


 本文详细介绍了如何从零开始部署Elasticsearch集群,包括配置环境变量、下载并制作Parcel包和CSD文件、上传至HTTP服务、配置CDH以及部署和测试ik分词器的过程。
制作Elasticsearch的Parcel包和csd文件
制作Elasticsearch的Parcel包和csd文件
部分借鉴与:https://www.cnblogs.com/zhangrui153169/p/11447423.html
配置java,maven等环境变量
java:
export JAVA_HOME=/usr/local/java
export PATH=$JAVA_HOME/bin:$PATH
export CLASSPATH=$JAVA_HOME/lib/dt.jar:$JAVA_HOME/lib/tool.jar:$CLASSPATH
maven:
export MVN_HOME=/usr/local/maven
export PATH=$MVN_HOME/bin:$PATH
或者
yum install -y maven
下载 cm_ex t(parcel 编辑器)
下载地址:https://github.com/cloudera/cm_ext.git
mkdir -p /root/github/cloudera
cd /root/github/cloudera
nuzip cm_ext-cm5-5.2.zip
cd /root/github/cloudera/cm_ext
mvn clean package -Dmaven.test.skip=true
下载 elasticsearch安装包
下载地址:https://artifacts.elastic.co/downloads/elasticsearch/elasticsearch-7.0.1-linux-x86_64.tar.gz
mkdir /root/github/cloudera/elasticsearch
cd /root/github/cloudera/elasticsearch
下载制作Parcel包和CSD文件的脚本
下载地址: https://github.com/ibagomel/elasticsearch-parcel.git
制作 Elasticsearch 的Parcel包和CSD文件并校验
cd /root/github/cloudera/elasticsearch/elasticsearch-parcel-master
POINT_VERSION=5 VALIDATOR_DIR=/root/github/cloudera/cm_ext OS_VER=el7 PARCEL_NAME=ElasticSearch ./build-parcel.sh /root/github/cloudera/elasticsearch/elasticsearch-7.0.1-linux-x86_64.tar.gz
VALIDATOR_DIR=/root/github/cloudera/cm_ext CSD_NAME=ElasticSearch ./build-csd.sh
查看Parcel包和csd文件
tree /root/github/cloudera/elasticsearch/elasticsearch-parcel-master/build-parcel

ll /root/github/cloudera/elasticsearch/elasticsearch-parcel-master/build-parcel
上传parcel、CSD文件到ttpd服务中
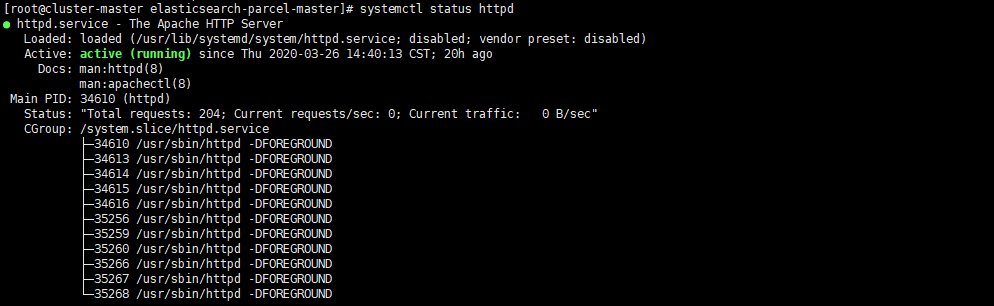
查看 httpd 状态
systemctl status httpd 	#查看httpd 状态
systemctl start httpd 	#启动 httpd
如果是没有安装 使用 yum 安装
yum install -y httpd
创建 elasticsearch 目录
mkdir -p /var/www/html/elasticsearch
cd /var/www/html/elasticsearch
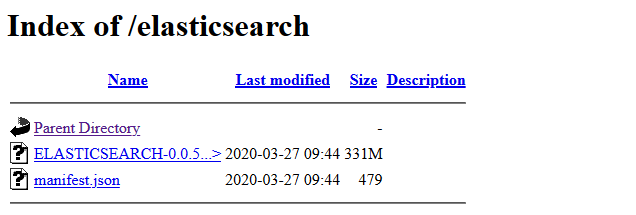
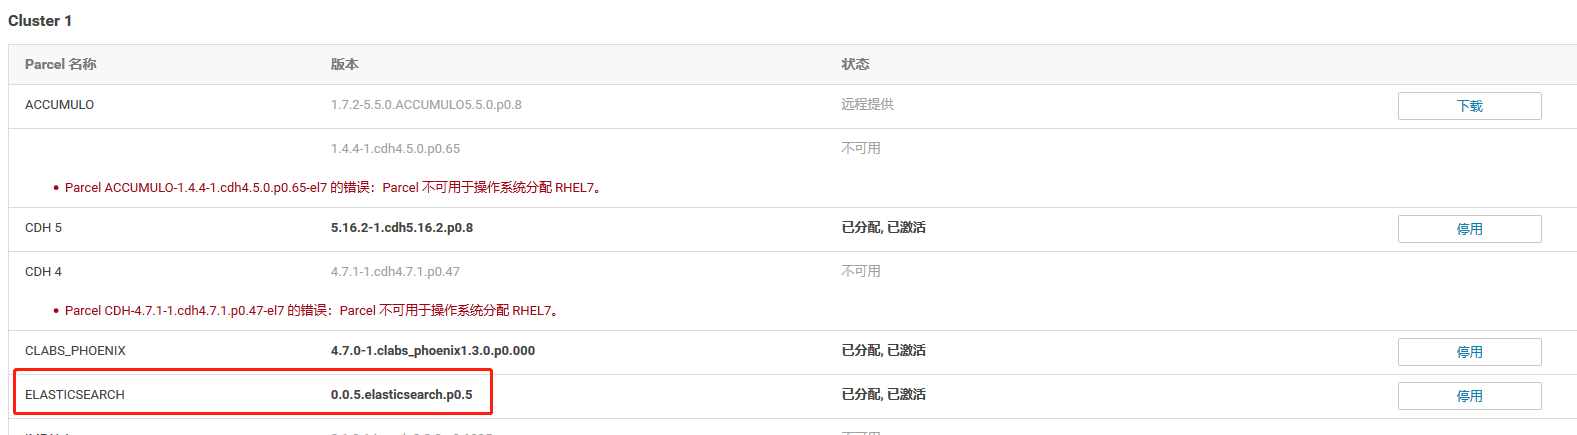
将 ELASTICSEARCH-0.0.5.elasticsearch.p0.5-el7.parcel、manifest.json 文件上传到/var/www/html/elasticsearch
验证
访问 http://cluster-master/elasticsearch/ #cluster-master等于主机IP
CDH配置
配置 远程 Parcel 存储库
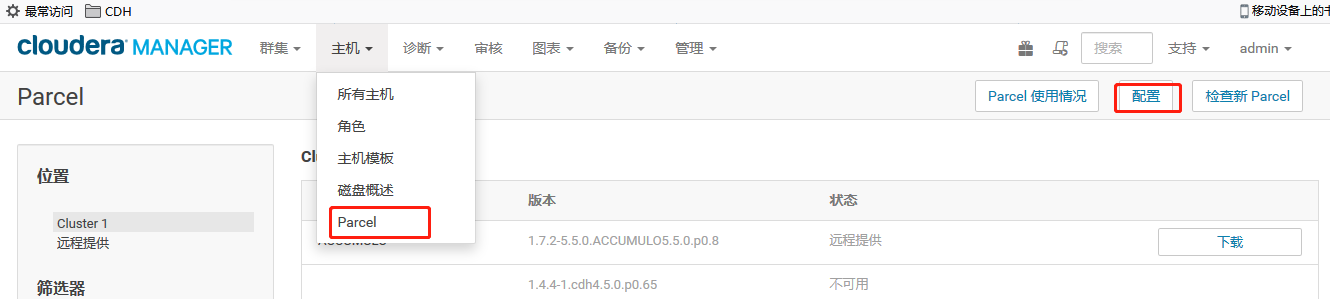
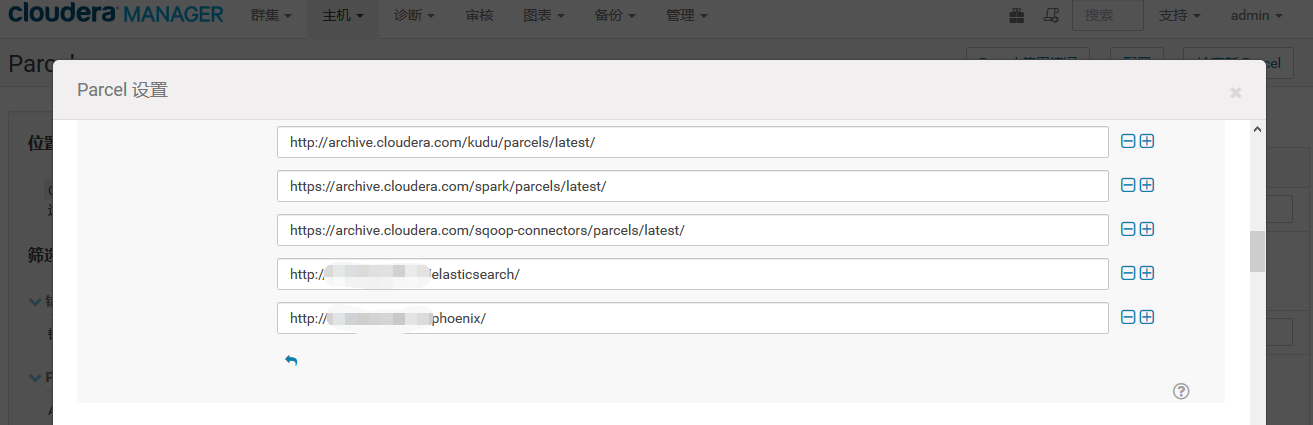
下载 分配 激活 即可
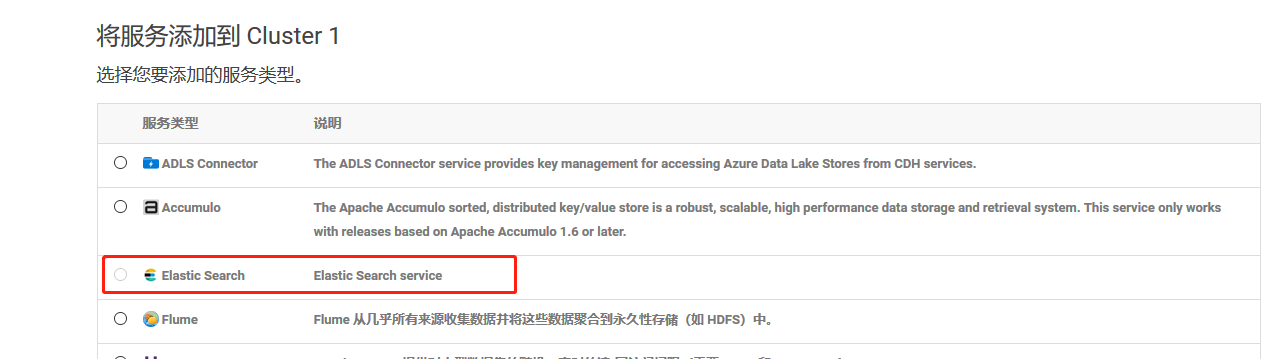
添加 elasticsearch 服务

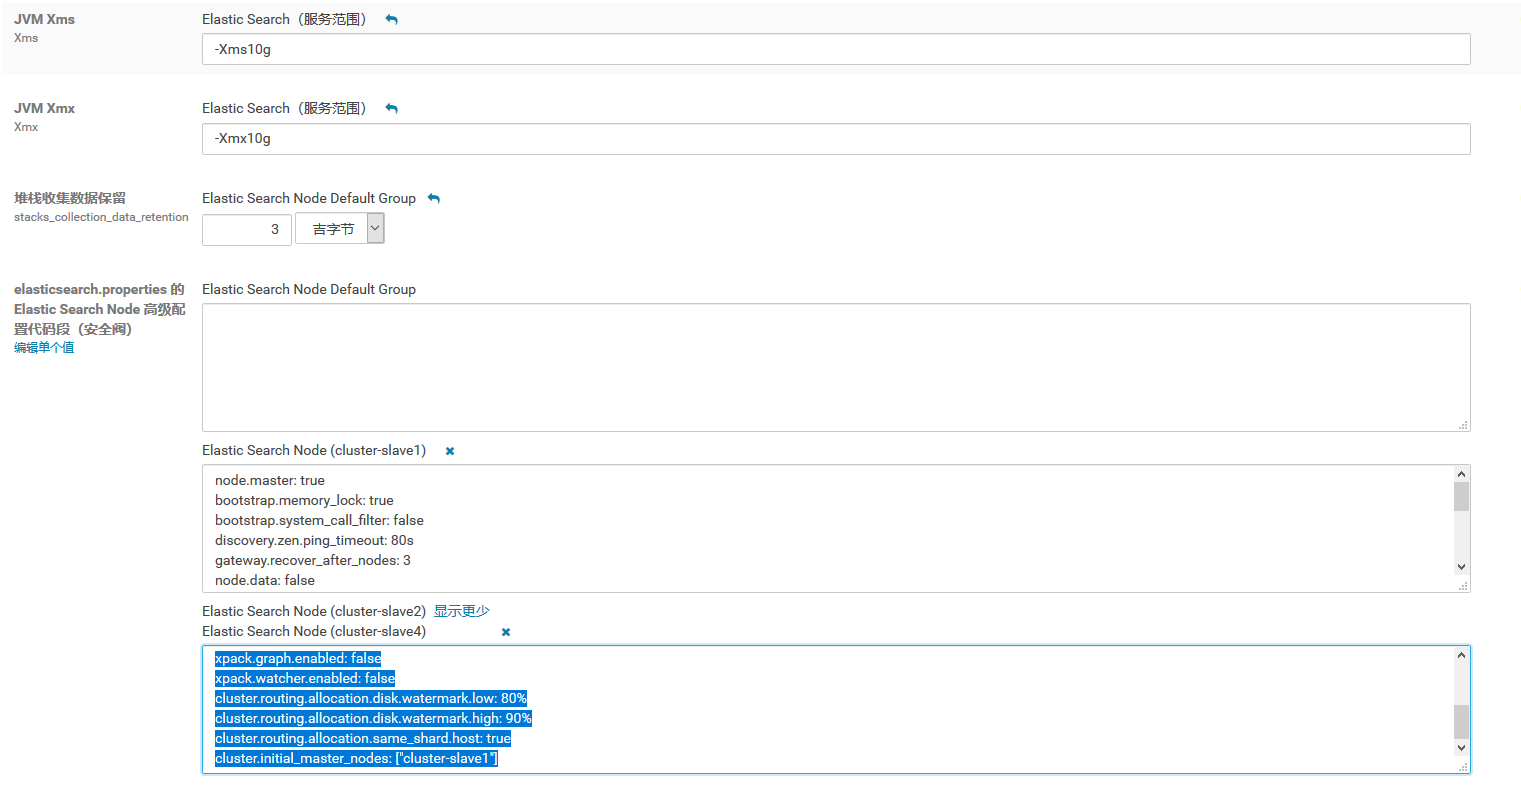
Elastic Search Node配置
主节点配置
node.master: true
bootstrap.memory_lock: true
bootstrap.system_call_filter: false
discovery.zen.ping_timeout: 80s
gateway.recover_after_nodes: 3
node.data: false #表示不是子节点
node.ingest: true
xpack.security.enabled: false
xpack.graph.enabled: false
xpack.watcher.enabled: false
cluster.routing.allocation.disk.watermark.low: 80%
cluster.routing.allocation.disk.watermark.high: 90%
cluster.routing.allocation.same_shard.host: true
cluster.initial_master_nodes: ["cluster-slave1"] #配置主节点
子节点配置
bootstrap.memory_lock: true
bootstrap.system_call_filter: false
node.master: false
node.ingest: true
node.data: true #表示是子节点
xpack.security.enabled: false
xpack.graph.enabled: false
xpack.watcher.enabled: false
cluster.routing.allocation.disk.watermark.low: 80%
cluster.routing.allocation.disk.watermark.high: 90%
cluster.routing.allocation.same_shard.host: true
cluster.initial_master_nodes: ["cluster-slave1"]
ik 分词器部署
下载地址
https://github.com/medcl/elasticsearch-analysis-ik/releases/download/v7.0.1/elasticsearch-analysis-ik-7.0.1.zip (建议用迅雷下载)
解压
unzip elasticsearch-analysis-ik-7.0.1.zip
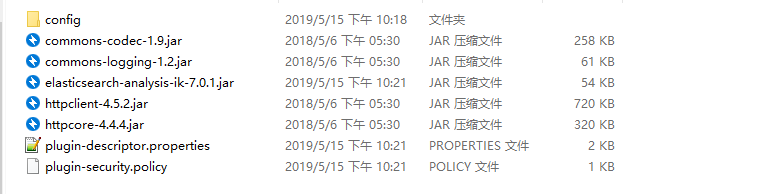
创建 ik 目录
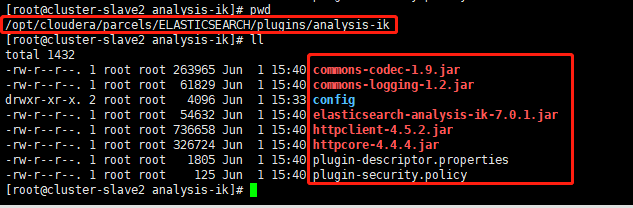
mkdir -p /opt/cloudera/parcels/ELASTICSEARCH/plugins/analysis-ik
将解压的文件cp 到 analysis-ik目录下
配置:plugin-descriptor.properties
#
# foo.zip <-- zip file for the plugin, with this structure:
#   <arbitrary name1>.jar <-- classes, resources, dependencies
#   <arbitrary nameN>.jar <-- any number of jars
#   plugin-descriptor.properties <-- example contents below:
#
# jvm=true
# classname=foo.bar.BazPlugin
# description=My cool plugin
# version=2.0.0-rc1
# elasticsearch.version=2.0
# java.version=1.7
#
### mandatory elements for all plugins:
#
# 'description': simple summary of the plugin
description=IK Analyzer for Elasticsearch
#
# 'version': plugin's version
version=7.0.1
#
# 'name': the plugin name
name=analysis-ik
#
# 'classname': the name of the class to load, fully-qualified.
classname=org.elasticsearch.plugin.analysis.ik.AnalysisIkPlugin
#
# 'java.version' version of java the code is built against
# use the system property java.specification.version
# version string must be a sequence of nonnegative decimal integers
# separated by "."'s and may have leading zeros
java.version=1.8
#
# 'elasticsearch.version' version of elasticsearch compiled against
# You will have to release a new version of the plugin for each new
# elasticsearch release. This version is checked when the plugin
# is loaded so Elasticsearch will refuse to start in the presence of
# plugins with the incorrect elasticsearch.version.
elasticsearch.version=7.0.1
然后重启应该就ok了
测试效果
建表
PUT /ems
{
  "mappings": {
    "properties": {
      "content": {
        "type": "text",
        "analyzer": "ik_max_word"
      },
      "firstCode": {
        "type": "keyword"
      },
      "id": {
        "type": "long"
      },
      "secordCode": {
        "type": "keyword"
      },
      "type": {
        "type": "integer"
      }
    }
  }
}
测试语句
GET  /ems/_analyze
{"text":"我是最棒的中国人 yes",
 "analyzer": "ik_max_word"
}
测试结果
{
  "tokens" : [
    {
      "token" : "我",
      "start_offset" : 0,
      "end_offset" : 1,
      "type" : "CN_CHAR",
      "position" : 0
    },
    {
      "token" : "是",
      "start_offset" : 1,
      "end_offset" : 2,
      "type" : "CN_CHAR",
      "position" : 1
    },
    {
      "token" : "最",
      "start_offset" : 2,
      "end_offset" : 3,
      "type" : "CN_CHAR",
      "position" : 2
    },
    {
      "token" : "棒",
      "start_offset" : 3,
      "end_offset" : 4,
      "type" : "CN_CHAR",
      "position" : 3
    },
    {
      "token" : "的",
      "start_offset" : 4,
      "end_offset" : 5,
      "type" : "CN_CHAR",
      "position" : 4
    },
    {
      "token" : "中国人",
      "start_offset" : 5,
      "end_offset" : 8,
      "type" : "CN_WORD",
      "position" : 5
    },
    {
      "token" : "中国",
      "start_offset" : 5,
      "end_offset" : 7,
      "type" : "CN_WORD",
      "position" : 6
    },
    {
      "token" : "国人",
      "start_offset" : 6,
      "end_offset" : 8,
      "type" : "CN_WORD",
      "position" : 7
    },
    {
      "token" : "yes",
      "start_offset" : 9,
      "end_offset" : 12,
      "type" : "ENGLISH",
      "position" : 8
    }
  ]
}


 677
677

 被折叠的 条评论
为什么被折叠?
被折叠的 条评论
为什么被折叠?
 到【灌水乐园】发言


