AI_综述:3D目标检测于RGB-D(Object detection in RGB-D images)

本文按时间顺序回顾了2014年至2017年间基于RGB-D图像的3D目标检测方法,重点介绍了DepthR-CNN、3D Faster-RCNN等模型。这些模型旨在通过融合深度信息提升目标检测的准确性。

摘要生成于 C知道 ,由 DeepSeek-R1 满血版支持, 前往体验 >

转载自:https://zhuanlan.zhihu.com/p/34887948

基于深度学习的图像目标检测(上)

基于深度学习的图像目标检测(下)

大牛讲堂 | 基于DenesBox的目标检测在自动驾驶中的应用

前言

CNN(convolutional neural network)在目标检测中大放异彩,R-CNN系列,YOLO,SSD各类优秀的方法层出不穷。在2D图像的目标检测上,不少学术界提出的框架已经投入商用。但是,具体落实到自动驾驶、机器人这类应用场景上时,2D场景下的目标检测对于3D真实世界的场景描述依然不够。

目标检测问题实际上包含了两个任务:定位和分类。3D目标检测在定位这一任务上的目标是返回3D bounding boxes,而其需要的信息除了2D的RGB图像以外,还包含了与之对应的深度信息Depth Map:

RGB-D = 普通的RGB三通道彩色图像 + Depth Map

在3D计算机图形中,Depth Map(深度图)是包含与视点的场景对象的表面的距离有关的信息的图像或图像通道。其中,Depth Map 类似于灰度图像,只是它的每个像素值是传感器距离物体的实际距离。通常RGB图像和Depth图像是配准的,因而像素点之间具有一对一的对应关系。

本文以时间为主轴,带你速览自2014年以来的,在RGB-D图像上进行目标检测的典型论文。

论文

2014年:Learning Rich Features from RGB-D Images for Object Detection and Segmentation(ECCV'14)

本文是rbg大神在berkeley时的作品。”基于CNN已经在图像分类、对象检测、语义分割、细粒度分类上表现出了相当的优势,不少工作已经将CNN引入在RGB-D图像上的视觉任务上。这些工作中一部分直接采用4-channel的图像来进行语义分割任务(not object detetction),一部分只是在非常理想的环境下对小物体进行目标检测。“

作者的方法是在2D目标检测框架R-CNN的基础上,增加对Depth Map进行利用的module,总体结构如下:

(1)基于RGB图像和Depth Map,检测图像中的轮廓,并生成2.5D的proposals(从overview上可以看到,所谓的2.5D实则包括目标每个像素的视差、高度、倾斜角)

(2)利用CNN进行特征提取,这里的网络包括两个:Depth CNN学习深度图上的特征,RGB CNN学习2D图像上的特征,最后利用SVM进行分类。

在对Depth Map的利用上,论文所述方法并没有直接利用CNN对其进行学习,而是encode the depth image with three channels at each pixel: horizontal disparity(水平视差), height above ground(高度), and the angle the pixel’s local surface normal makes with the inferred gravity direction(相对于重力的倾斜角).

2015年:3D Object Proposals for Accurate Object Class Detection(NIPS'15)

来自Tsing Hua陈晓智大神的作品(大神在同时也是CVPR17: Multi-View 3D Object Detection Network for Autonomous Driving的一作,给跪了)。

作者首先指出,目前最先进的RCNN方法在自动驾驶数据集KITTI上表现不好,原因之一在于KITTI上的测试图像中,包含许多小型物体、遮挡、阴影,使得实际包含了object的proposals被认为是不包含的。此外,KITTI对区域的精细程度要求很高(overlap),而目前的大多数区域推荐都基于强度和纹理的grouping super pixels,它们无法获得高质量的proposals。

文章面向自动驾驶场景,提出了一种新的object proposal方法。对于每一个3D bounding box(记为y),将其用一个元组来表示(x, y, z, θ, c, t),(x, y, z) 表示 3D box的中心,θ 表示其方位角,c代表object是哪一类,t代表相应的3d box模板集合。

以x代表点云,y代表proposal,作者认为y应该有以下特性:

  • 包含点云的高密度区域
  • 不能与free space重叠
  • 点云不应该垂直延伸在3d box之外
  • box附近的点云高度应该比之低

基于这些特性,作者列出了能量方程,目标为最小化E(x,y),采用ICML2004上一篇文章中所述的structured SVM进行训练。

文章中所述方法的效果、代码、数据:3D Object Proposals for Accurate Object Class Detection

2016年:Deep Sliding Shapes for Amodal 3D Object Detection in RGB-D Images(CVPR'16)

文章来自普林斯顿大学,提出的方法为Faster R-CNN的3D版本,侧重于indoor scene下的object detection。

目前关于3D目标检测任务的方法,有采用2D方法来结合深度图的,也有在3D空间内进行检测的。这不禁让作者发问:which representation is better for 3D amodal object detection, 2D or 3D?接着他指出,目前2D方法表现更优异的原因,可能是因为其CNN模型更为powerful(well-designed&pre-trained with ImageNet),而不是由于其2D表达。

作者的方法是设计名为Deep Sliding Shapes的3D CNN,输入3D的立体场景,输出3D bounding boxes,由此提出了Multi-scale 3D RPN(Region Proposal Network):

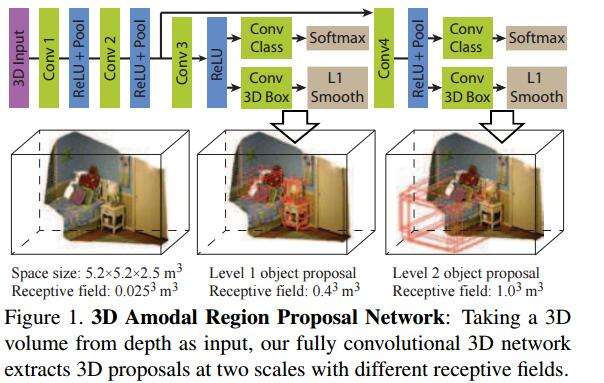
类似于Faster R-CNN中的RPN网络,对于每一个滑动窗口,作者定义N=19种anchor boxes:

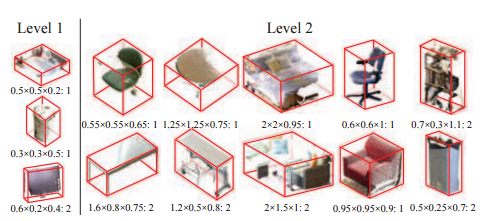
而后,为了检测大小不一的目标,作者增加了多尺度的检测手段。具体来说,在不同的卷积层上进行滑窗。这里的滑窗是3D sliding window,因为整个网络结构就是接收3Dinput的。为了精修区域,作者改进了bbox regression,提出3D box regression:一个3D box可以由中心坐标[cx, cy, cz],长宽高[s1, s2, s3]来表示,最后要得到的是6个偏移量:

而后采用与2D box regression同样的smooth L1 loss即可。

补充:如何从Depth Map得到3D Input?

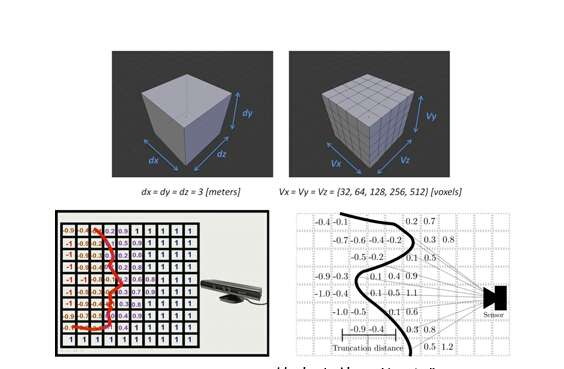
Encoding 3D Representation:不同于Depth RCNN的disparity+height+angle 表达,作者在这里采用了TSDF方法,可以看如下的引用:

KinectFusion在世界坐标系中定义了一个立方体,并把该立方体按照一定的分辨率切割成小立方体(voxel)。以图8上为例所示,图中定义了一个3x3x3米的立方体,并把立方体分为不同分辨率的小立方体网格。也就是说,这个大立方体限制了经过扫描重建的模型的体积。然后,KinectFusion使用了一种称为“截断有符号距离函数”(truncated signed distance function,简称TSDF)的方法来更新每个小网格中的一个数值,该数值代表了该网格到模型表面的最近距离,也称为TSDF值(图8下)。对于每个网格,在每一帧都会更新并记录TSDF的值,然后再通过TSDF值还原出重建模型。例如,通过图8下两幅图中的网格的TSDF数值分布,我们可以很快还原出模型表面的形状和位置。这种方法通常被称为基于体数据的方法(Volumetric-based method)。该方法的核心思想是,通过不断更新并“融合”(fusion)TSDF这种类型的测量值,我们能够 越来越接近所需要的真实值。

2017:Learning Cross-Modal Deep Representations for Robust Pedestrian Detection(CVPR'17)

这篇文章虽然是针对于专门的pedestrians detection任务,但是其做法是很具有启发性的,所以也贴在这里。

作者指出,“行人检测任务在深度学习的帮助下已经取得重大突破,同时新型传感器(如thermal and depth cameras)也为解决不利照明和遮挡提供了新的机会。但是,现有监控系统绝大多数仍然采用传统的RGB传感器,因此在illumination variation, shadows, and low
external light仍然十分具有挑战。”

在针对于照明条件不利环境下的行人检测任务,文章描述了一种依赖于cross-modality learning framework的学习框架,由两个网络组成:


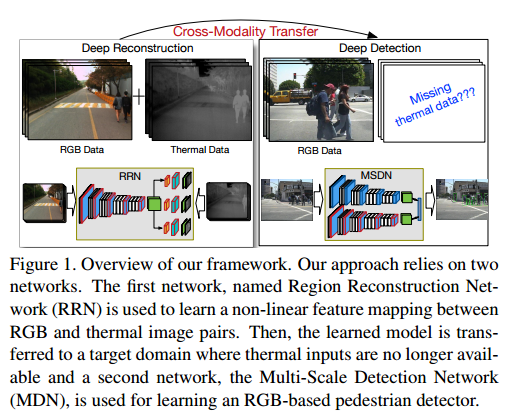
(1)Region Reconstruction Network (RRN)

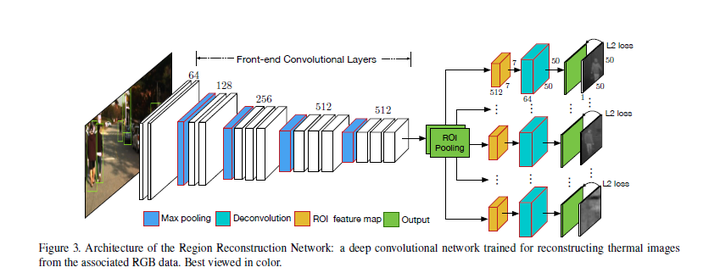
RRN用于学习在RGB图像和thermal image间的映射,而后学习得到的模型就可以用于依据RGB生成thermal image。RRN接收RGB+行人proposals,在ROI Pooling后加了重建网络(全卷积)。这里的重建网络不重建整幅图像的thermal image,而是只对行人区域进行重建。

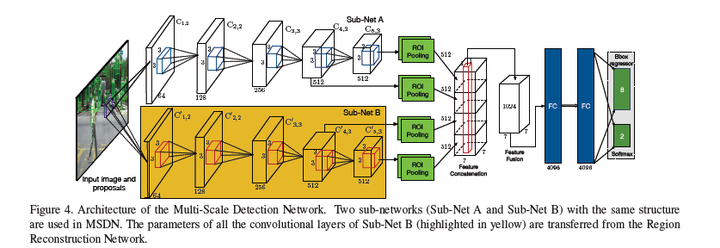
(2)Multi-Scale Detection Network (MSDN)

MSDN利用RRN学习的cross-modal representations来进行检测。其包含两个子网(Sub-Net A和Sub-Net B),其中Sub-Net B中的参数从RRN中迁移而来,最后的fc分别做multi-task:bbox regression和softmax。

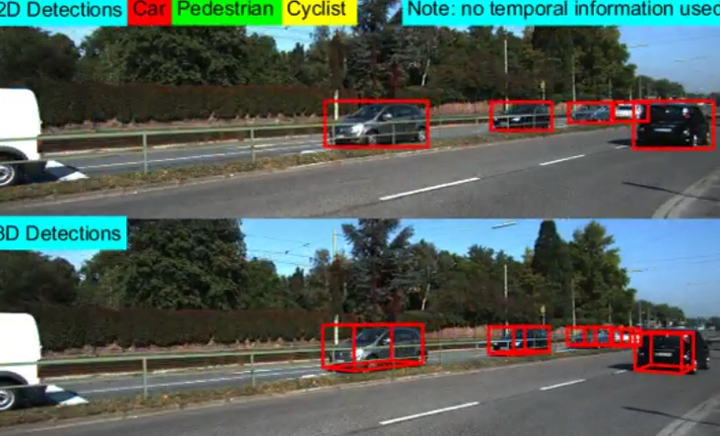
2017:Amodal Detection of 3D Objects: Inferring 3D Bounding Boxes from 2D Ones in RGB-Depth Images(CVPR'17)

来自坦普尔大学的文章。作者在这里与2016的Deep Sliding Shapes思路不同,重新回到2.5D方法来进行3D目标检测。所谓2.5D方法,实则就是从RGB-D上提取出合适的表达,而后building models to convert 2D results to 3D space。“虽然利用三维几何特征检测前景光明,但在实践中,重建的三维形状往往不完整,由于遮挡、反射等原因而含有各种噪声。”

整个系统的overview如下,其基于Fast R-CNN实现:

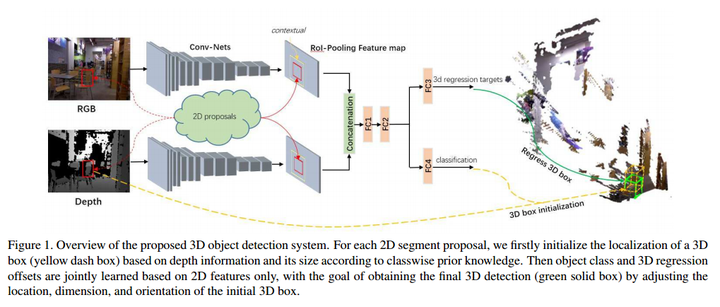
对于每一个2D的proposal(这里关于2D proposals的方法就是用的Depth R-CNN中的方法),由分类结果和depth information来初始化一个3D bounding box(图中黄色的虚线框),而后也是用一个3d box regression来进行区域精修。重点关注3D box proposal and regression:

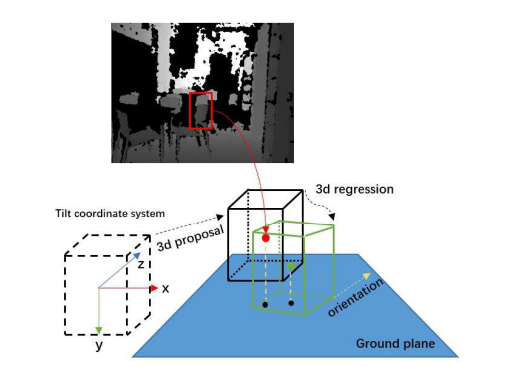
图中是3D box proposal的一个实例。每一个3d box由向量[xcam, ycam, zcam, l, w, h, θ].来表达,[xcam, ycam, zcam]表中心位置,[l, w, h]表尺寸,θ∈ [−π/2, π/2]表示方位角,即图中黄色的箭头与z轴形成的夹角。在初始化的时候,关于尺寸是由某一类物体的类别来进行确定的。最后输出7个调整量[δx, δy, δz, δl, δw, δh, δθ],利用Smooth L1 Loss作为损失函数。

结语

3D目标检测对于自动驾驶与机器人等领域意义重大。本文以时间为序,重点关注和分析了基于RGB-D上的3D Object Detection方法。从Depth R-CNN到3D Faster-RCNN,似乎始终基于2D的目标检测框架在跟循改进。期待在未来,将会有更为优美的方法出现。

感谢您的阅读,文中的遗漏与错误,恳请批评指正。

参考文献

[1] Gupta S, Girshick R, Arbeláez P, et al. Learning Rich Features from RGB-D Images for Object Detection and Segmentation[C]// European Conference on Computer Vision. Springer, Cham, 2014:345-360.

[2] Chen X, Kundu K, Zhu Y, et al. 3D object proposals for accurate object class detection[C]// International Conference on Neural Information Processing Systems. MIT Press, 2015:424-432.

[3] Song S, Xiao J. Deep Sliding Shapes for Amodal 3D Object Detection in RGB-D Images[J]. 2015, 139(2):808-816.

[4] Deng Z, Latecki L J. Amodal Detection of 3D Objects: Inferring 3D Bounding Boxes from 2D Ones in RGB-Depth Images[C]// IEEE Conference on Computer Vision and Pattern Recognition. IEEE Computer Society, 2017:398-406.

[5] Xu D, Ouyang W, Ricci E, et al. Learning Cross-Modal Deep Representations for Robust Pedestrian Detection[J]. 2017.

+--------------------------------------------------------------------------------------------------------+ | npu-smi 25.0.rc1.1 Version: 25.0.rc1.1 | +-------------------------------+-----------------+------------------------------------------------------+ | NPU Name | Health | Power(W) Temp(C) Hugepages-Usage(page) | | Chip Device | Bus-Id | AICore(%) Memory-Usage(MB) | +===============================+=================+======================================================+ | 2 310P3 | OK | NA 49 24 / 24 | | 0 0 | 0000:01:00.0 | 0 1706 / 44216 | +-------------------------------+-----------------+------------------------------------------------------+ | 2 310P3 | OK | NA 47 0 / 0 | | 1 1 | 0000:01:00.0 | 0 1367 / 43757 | +===============================+=================+======================================================+ | 3 310P3 | OK | NA 52 0 / 0 | | 0 2 | 0000:03:00.0 | 0 1484 / 44216 | +-------------------------------+-----------------+------------------------------------------------------+ | 3 310P3 | OK | NA 49 0 / 0 | | 1 3 | 0000:03:00.0 | 0 1456 / 43757 | +===============================+=================+======================================================+ | 5 310P3 | OK | NA 49 0 / 0 | | 0 4 | 0000:81:00.0 | 0 1599 / 44216 | +-------------------------------+-----------------+------------------------------------------------------+ | 5 310P3 | OK | NA 47 0 / 0 | | 1 5 | 0000:81:00.0 | 0 1341 / 43757 | +===============================+=================+======================================================+ | 6 310P3 | OK | NA 51 0 / 0 | | 0 6 | 0000:83:00.0 | 0 1505 / 44216 | +-------------------------------+-----------------+------------------------------------------------------+ | 6 310P3 | OK | NA 50 0 / 0 | | 1 7 | 0000:83:00.0 | 0 1433 / 43757 | +===============================+=================+======================================================+ +-------------------------------+-----------------+------------------------------------------------------+ | NPU Chip | Process id | Process name | Process memory(MB) | +===============================+=================+======================================================+ | 2 0 | 2450404 | python | 98 | | 2 0 | 2526327 | python | 99 | | 2 0 | 2522713 | python | 98 | +===============================+=================+======================================================+ | No running processes found in NPU 3 | +===============================+=================+======================================================+ | No running processes found in NPU 5 | +===============================+=================+======================================================+ | No running processes found in NPU 6 | +===============================+=================+======================================================+ 这是当前npu的使用状态,现在需要怎么办,代码中有错误吗,还是代码衔接问题 import os import io import cv2 import time import logging import numpy as np from PIL import Image from fastapi import FastAPI, File, UploadFile, Request from fastapi.responses import JSONResponse from fastapi.staticfiles import StaticFiles from pydantic import BaseModel from typing import Optional, List, Dict, Any from datetime import datetime # 华为昇腾推理API import acl # 配置日志 logging.basicConfig(level=logging.INFO, format='%(asctime)s - %(name)s - %(levelname)s - %(message)s') logger = logging.getLogger(__name__) app = FastAPI(title="Ascend-OM Object Detection API") RESULT_DIR = 'results' os.makedirs(RESULT_DIR, exist_ok=True) app.mount("/gqj_check/img", StaticFiles(directory=RESULT_DIR), name="results") CUSTOM_NAMES = { "A_安全帽": "安全帽", "B_安全带": "安全带", "C_绝缘靴": "绝缘靴", "D_绝缘手套": "绝缘手套", "E_验电器": "验电器", "F_工具包": "工具包", "G_钳子": "钳子", "H_力矩扳手": "力矩扳手", "I_钢丝刷": "钢丝刷", "J_头灯": "头灯", "K_力矩头": "力矩头", "L_防护旗": "防护旗", "M_扳手": "扳手", "N_螺丝刀": "螺丝刀", "O_脚扣": "脚扣", "P_水平尺": "水平尺", "Q_手锤子": "手锤子" } class ImageUrl(BaseModel): image_url: str class DetectionItem(BaseModel): class_name: str count: int confidence: float class ApiResponse(BaseModel): code: int msg: str request_time: str end_time: str total_time: str status: Optional[str] data: List[DetectionItem] inference_time: Optional[str] image_url: Optional[str] source_url: Optional[str] # --------- 昇腾 NPU 推理相关 --------- class AscendModel: def __init__(self, om_path): logger.info("初始化ACL环境...") self.acl_init() self.context, self.stream = None, None self.model_id, self.model_desc = None, None self.input_size = (960, 960) # 需与模型输入一致 self.input_data = None self.output_data = None logger.info("加载模型...") self.load_model(om_path) logger.info("模型加载完成") def acl_init(self): """初始化ACL环境""" ret = acl.init() if ret != 0: raise Exception(f"ACL初始化失败,错误码: {ret}") def load_model(self, om_path): """加载OM模型并准备输入输出缓冲区""" if not os.path.exists(om_path): raise FileNotFoundError(f"模型文件不存在: {om_path}") # 创建上下文和流 self.context = acl.rt.create_context(0) self.stream = acl.rt.create_stream() # 加载模型 self.model_id = acl.mdl.load_from_file(om_path) self.model_desc = acl.mdl.create_desc(self.model_id) # 准备输入输出缓冲区 self._prepare_buffers() def _prepare_buffers(self): """准备模型输入输出缓冲区""" # 获取输入描述 input_num = acl.mdl.get_num_inputs(self.model_desc) input_desc = acl.mdl.get_input_desc(self.model_desc, 0) input_size = acl.mdl.get_desc_size(input_desc) self.input_data = acl.rt.malloc(input_size, acl.rt.mem_type_device) # 获取输出描述 output_num = acl.mdl.get_num_outputs(self.model_desc) self.output_data = [] for i in range(output_num): output_desc = acl.mdl.get_output_desc(self.model_desc, i) output_size = acl.mdl.get_desc_size(output_desc) output_buf = acl.rt.malloc(output_size, acl.rt.mem_type_device) self.output_data.append(output_buf) def preprocess(self, image: Image.Image): """图像预处理""" img = image.resize(self.input_size) img = np.array(img) if img.shape[2] == 4: img = img[:, :, :3] # 去除alpha通道 img = cv2.cvtColor(img, cv2.COLOR_RGB2BGR) img = img.astype(np.float32) / 255.0 img = np.transpose(img, (2, 0, 1)) img = np.expand_dims(img, 0) return img def infer(self, img_np: np.ndarray): """执行模型推理""" logger.info("开始推理...") start_time = time.time() # 将数据拷贝到设备 img_flat = img_np.flatten() acl.rt.memcpy(self.input_data, img_flat.nbytes, acl.util.numpy_to_ptr(img_flat), img_flat.nbytes, acl.rt.memcpy_host_to_device) # 执行推理 inputs = [self.input_data] outputs = self.output_data ret = acl.mdl.execute(self.model_id, inputs, outputs) if ret != 0: raise Exception(f"推理执行失败,错误码: {ret}") # 处理输出(根据实际模型输出格式调整) # 这里假设输出是检测框数组 [class_id, conf, x1, y1, x2, y2] output_buffer = outputs[0] output_size = acl.mdl.get_desc_size(acl.mdl.get_output_desc(self.model_desc, 0)) host_output = np.zeros(output_size // 4, dtype=np.float32) # 假设是float32类型 acl.rt.memcpy(acl.util.numpy_to_ptr(host_output), output_size, output_buffer, output_size, acl.rt.memcpy_device_to_host) # 解析输出为检测框格式 dets = [] num_dets = int(host_output[0]) # 假设第一个元素是检测框数量 for i in range(num_dets): base_idx = 1 + i * 6 if base_idx + 5 >= len(host_output): break class_id = int(host_output[base_idx]) conf = host_output[base_idx + 1] x1, y1, x2, y2 = host_output[base_idx+2:base_idx+6] dets.append([class_id, conf, x1, y1, x2, y2]) inference_time = time.time() - start_time logger.info(f"推理完成,耗时: {inference_time:.3f}秒") return dets def __del__(self): """资源释放""" logger.info("释放资源...") if hasattr(self, 'model_id') and self.model_id: acl.mdl.unload(self.model_id) if hasattr(self, 'model_desc') and self.model_desc: acl.mdl.destroy_desc(self.model_desc) if hasattr(self, 'input_data') and self.input_data: acl.rt.free(self.input_data) if hasattr(self, 'output_data') and self.output_data: for buf in self.output_data: acl.rt.free(buf) if hasattr(self, 'stream') and self.stream: acl.rt.destroy_stream(self.stream) if hasattr(self, 'context') and self.context: acl.rt.destroy_context(self.context) acl.finalize() # --------- FastAPI 业务逻辑 --------- model = None # 延迟初始化,通过命令行参数加载 def process_image(image: Image.Image, request_time: datetime, original_filename: Optional[str] = None): """处理图像并返回检测结果""" timestamp = request_time.strftime("%Y%m%d_%H%M%S_%f") # 生成文件名 if original_filename: base_name = os.path.basename(original_filename) name, ext = os.path.splitext(base_name) original_filename = f"{name}_{timestamp}{ext}" else: original_filename = f"original_{timestamp}.jpg" original_path = os.path.join(RESULT_DIR, original_filename) result_filename = f"detection_{timestamp}.jpg" result_path = os.path.join(RESULT_DIR, result_filename) # 保存原图 image.save(original_path) logger.info(f"原图保存至: {original_path}") # 推理过程 logger.info("开始预处理和推理...") start_inference_time = time.time() img_np = model.preprocess(image) results = model.infer(img_np) end_inference_time = time.time() inference_time = end_inference_time - start_inference_time logger.info(f"推理耗时: {inference_time:.3f} 秒") # 解析推理结果 class_counts = {} detected_objects = [] opencv_image = cv2.cvtColor(np.array(image), cv2.COLOR_RGB2BGR) height, width = opencv_image.shape[:2] for det in results: class_id, conf, x1, y1, x2, y2 = det # 过滤低置信度结果 if conf < 0.5: continue # 检查类别ID有效性 if 0 <= class_id < len(CUSTOM_NAMES): class_name = list(CUSTOM_NAMES.values())[int(class_id)] else: class_name = f"未知类别({class_id})" logger.warning(f"检测到未知类别ID: {class_id}") # 更新计数 class_counts[class_name] = class_counts.get(class_name, 0) + 1 detected_objects.append({"class_name": class_name, "confidence": conf}) # 绘制检测框(确保坐标在有效范围内) x1 = max(0, min(int(x1), width)) y1 = max(0, min(int(y1), height)) x2 = max(0, min(int(x2), width)) y2 = max(0, min(int(y2), height)) cv2.rectangle(opencv_image, (x1, y1), (x2, y2), (0,255,0), 2) cv2.putText(opencv_image, f"{class_name}:{conf:.2f}", (x1, max(10, y1-10)), cv2.FONT_HERSHEY_SIMPLEX, 0.7, (0,255,0), 2) # 保存结果图 cv2.imwrite(result_path, opencv_image) logger.info(f"结果图保存至: {result_path}") # 构建返回结果 detection_result = [] for class_name, count in class_counts.items(): class_detections = [d for d in detected_objects if d["class_name"] == class_name] max_confidence = max([d["confidence"] for d in class_detections]) if class_detections else 0 detection_result.append({ "class_name": class_name, # 与DetectionItem保持一致 "count": count, "confidence": round(max_confidence, 4) }) return { "detection_result": detection_result, "inference_time": inference_time, "original_path": original_path, "result_path": result_path } @app.post("/gqj_check/localfile") async def detect_objects(request: Request, file: UploadFile = File(...)): request_time = datetime.now() if model is None: end_time = datetime.now() return JSONResponse( content={"code": 500, "msg": "模型未加载", "request_time": str(request_time), "end_time": str(end_time), "total_time": "0", "data": []}, status_code=500 ) try: contents = await file.read() image = Image.open(io.BytesIO(contents)) result = process_image(image, request_time, file.filename) end_time = datetime.now() base_url = str(request.base_url) result_filename = os.path.basename(result["result_path"]) debug_image_url = f"{base_url}gqj_check/img/{result_filename}" response_data = { "code": 200, "msg": "成功", "request_time": str(request_time), "end_time": str(end_time), "total_time": f"{(end_time-request_time).total_seconds():.3f}秒", "status": "success", "data": result["detection_result"], "inference_time": f"{result['inference_time']:.3f}", # 与模型保持一致 "debug_image_url": debug_image_url } logger.info("检测完成,返回结果") return JSONResponse(content=response_data) except Exception as e: end_time = datetime.now() logger.error(f"检测异常: {str(e)}", exc_info=True) return JSONResponse( content={"code": 500, "msg": str(e), "request_time": str(request_time), "end_time": str(end_time), "total_time": "0", "data": []}, status_code=500 ) if __name__ == "__main__": import argparse import uvicorn parser = argparse.ArgumentParser() parser.add_argument('--model_path', type=str, required=True, help='OM模型路径') parser.add_argument('--port', type=int, default=8000) parser.add_argument('--input_size', type=int, nargs=2, default=(960, 960), help='模型输入尺寸') args = parser.parse_args() logger.info(f"正在加载模型: {args.model_path},服务端口: {args.port}") model = AscendModel(args.model_path) model.input_size = tuple(args.input_size) # 设置输入尺寸 logger.info(f"模型加载完成,输入尺寸: {model.input_size},服务启动中...") uvicorn.run(app, host="0.0.0.0", port=args.port)
最新发布
07-31
评论 1
添加红包

请填写红包祝福语或标题

红包个数最小为10个

红包金额最低5元

当前余额3.43前往充值 >
需支付:10.00
成就一亿技术人!
领取后你会自动成为博主和红包主的粉丝 规则
hope_wisdom
发出的红包
实付
使用余额支付
点击重新获取
扫码支付
钱包余额 0

抵扣说明:

1.余额是钱包充值的虚拟货币,按照1:1的比例进行支付金额的抵扣。
2.余额无法直接购买下载,可以购买VIP、付费专栏及课程。

余额充值