OkHttp是一个精巧的网络请求库,有以下优点:
- 支持http2,对一台机器的所有请求共享同一个socket
- 内置连接池,支持连接复用,减少延迟
- 支持透明的gzip压缩响应体
- 通过缓存避免重复的请求
- 请求失败时自动重试主机的其他ip,自动重定向
而在设计方面也有很多值得学习的地方,如拦截器等。下面通过分析源码,理解OkHttp的设计原理。
从OkHttp发起一个请求开始:
// 同步
OkHttpClient.newCall(request).execute()
// 异步
OkHttpClient.newCall(request).enqueue(Callback responseCallback)
其实OkHttpClient.newCall(request)返回一个RealCall对象:
// OkHttpClient
@Override
public Call newCall(Request request) {
	return RealCall.newRealCall(this, request, false /* for web socket */);
}
所以execute和enqueue是RealCall的方法,我们看看这两个方法:
// RealCall类
// 同步方法
@Override
public Response execute() throws IOException {
	synchronized (this) {
	  if (executed) throw new IllegalStateException("Already Executed");
	  // 设置标志
	  executed = true;
	}
	captureCallStackTrace();
	try {
		// 添加到队列runningSyncCalls队列
		client.dispatcher().executed(this);
		// 执行Http请求,并获取结果
		Response result = getResponseWithInterceptorChain();
		if (result == null) throw new IOException("Canceled");
		return result;
	} finally {
		// 移出runningSyncCalls队列
		client.dispatcher().finished(this);
	}
}
// 异步方法
@Override public void enqueue(Callback responseCallback) {
  synchronized (this) {
      if (executed) throw new IllegalStateException("Already Executed");
      // 设置标志
      executed = true;
  }
  captureCallStackTrace();
  // 2中情况:
  // 如果当前并发数达到maxRequests(64),加入到readyAsyncCalls队列,等待执行
  // 否则,加入runningSyncCalls队列,在线程池中执行
  client.dispatcher().enqueue(new AsyncCall(responseCallback));
}
client.dispatcher()返回Dispatcher对象,Dispatcher实质是请求的管理器,起任务调度的作用。控制最大请求并发数和单个主机的最大并发数,并持有一个线程池负责执行异步请求。
// Dispatcher类
/** 最大并发请求数 */
private int maxRequests = 64;
/** 每个主机最大请求数 */
private int maxRequestsPerHost = 5;
/** 消费者线程池 */
private ExecutorService executorService;
/** 将要运行的异步请求队列 */
private final Deque<AsyncCall> readyAsyncCalls = new ArrayDeque<>();
/** 正在运行的异步请求队列 */
private final Deque<AsyncCall> runningAsyncCalls = new ArrayDeque<>();
/** 正在运行的同步请求队列 */
private final Deque<RealCall> runningSyncCalls = new ArrayDeque<>();
线程池初始化:
// Dispatcher类
public synchronized ExecutorService executorService() {
    if (executorService == null) {
      executorService = new ThreadPoolExecutor(0, Integer.MAX_VALUE, 60, TimeUnit.SECONDS, new SynchronousQueue<Runnable>(), Util.threadFactory("OkHttp Dispatcher", false));
    }
    return executorService;
}
我们看看管理同步请求的代码:
// Dispatcher类
synchronized void executed(RealCall call) {
    runningSyncCalls.add(call);
}
只是加入到队列中,没做任何处理,我们重点看一下管理异步请求:
// Dispatcher类
synchronized void enqueue(AsyncCall call) {
	if (runningAsyncCalls.size() < maxRequests && runningCallsForHost(call) < maxRequestsPerHost) {
		// 当前并发数小于最大并发请求数,而且当前单机请求数小于每个主机最大请求数
	    runningAsyncCalls.add(call);
	    // 直接执行
	    executorService().execute(call);
	} else {
		// 等待执行
	    readyAsyncCalls.add(call);
	}
}
那么等待的请求什么时候会执行呢,因为等待的请求都是异步请求,所以我们需要了解一下AsyncCall类。它是RealCall的内部类,继承了NamedRunnable:
// NamedRunnable
public abstract class NamedRunnable implements Runnable {
  protected final String name;
  public NamedRunnable(String format, Object... args) {
    this.name = Util.format(format, args);
  }
  @Override public final void run() {
    String oldName = Thread.currentThread().getName();
    Thread.currentThread().setName(name);
    try {
      execute();
    } finally {
      Thread.currentThread().setName(oldName);
    }
  }
  protected abstract void execute();
}
run方法执行了子类重写的execute方法,所以异步请求执行时,AsyncCall的execute方法机会执行:
// RealCall类,因为AsyncCall是RealCall的内部类
class AsyncCall extends NamedRunnable {
	...
	@Override
	protected void execute() {
        boolean signalledCallback = false;
        try {
	        // 执行Http请求,并获取结果
            Response response = getResponseWithInterceptorChain();
            ...
        } finally {
	        // 关键 : finished方法
            client.dispatcher().finished(this);
        }
    }
	...
}
我们现在可以看看这个finished方法做了什么呢:
void finished(AsyncCall call) {
  finished(runningAsyncCalls, call, true);
}
private <T> void finished(Deque<T> calls, T call, boolean promoteCalls) {
    int runningCallsCount;
    Runnable idleCallback;
    synchronized (this) {
        if (!calls.remove(call)) throw new AssertionError("Call wasn't in-flight!");
        if (promoteCalls) promoteCalls();
        runningCallsCount = runningCallsCount();
        idleCallback = this.idleCallback;
    }
    if (runningCallsCount == 0 && idleCallback != null) {
        idleCallback.run();
    }
}
调用了promoteCalls方法:
private void promoteCalls() {
    if (runningAsyncCalls.size() >= maxRequests) return; // Already running max capacity.
    if (readyAsyncCalls.isEmpty()) return; // No ready calls to promote.

    for (Iterator<AsyncCall> i = readyAsyncCalls.iterator(); i.hasNext(); ) {
        AsyncCall call = i.next();

        if (runningCallsForHost(call) < maxRequestsPerHost) {
	        // 移出readyAsyncCalls
            i.remove();
            // 加入到runningAsyncCalls
            runningAsyncCalls.add(call);
            // 执行请求
            executorService().execute(call);
        }

        if (runningAsyncCalls.size() >= maxRequests) return; // Reached max capacity.
    }
}
这样就达到任务调度。接下来,是OkHttp的核心,拦截器。同步请求还是异步请求,都是调用了RealCall的getResponseWithInterceptorChain方法进行请求,并获取结果,我们来看看这个方法:
// RealCall类
Response getResponseWithInterceptorChain() throws IOException {
    // Build a full stack of interceptors.
    // 一堆拦截器
    List<Interceptor> interceptors = new ArrayList<>();
    interceptors.addAll(client.interceptors());
    interceptors.add(retryAndFollowUpInterceptor);
    interceptors.add(new BridgeInterceptor(client.cookieJar()));
    interceptors.add(new CacheInterceptor(client.internalCache()));
    interceptors.add(new ConnectInterceptor(client));
    if (!forWebSocket) {
      interceptors.addAll(client.networkInterceptors());
    }
    interceptors.add(new CallServerInterceptor(forWebSocket));
    // 生成拦截器链
    Interceptor.Chain chain = new RealInterceptorChain(interceptors, null, null, null, 0,
        originalRequest, this, eventListener, client.connectTimeoutMillis(),
        client.readTimeoutMillis(), client.writeTimeoutMillis());
	// 执行
    return chain.proceed(originalRequest);
}
这里调用了RealInterceptorChain的proceed方法:
// RealInterceptorChain类
public Response proceed(Request request, StreamAllocation streamAllocation, HttpCodec httpCodec,
      RealConnection connection) throws IOException {
    if (index >= interceptors.size()) throw new AssertionError();
    calls++;
    // If we already have a stream, confirm that the incoming request will use it.
    if (this.httpCodec != null && !this.connection.supportsUrl(request.url())) {
        throw new IllegalStateException("network interceptor " + interceptors.get(index - 1)
          + " must retain the same host and port");
    }

    // If we already have a stream, confirm that this is the only call to chain.proceed().
    if (this.httpCodec != null && calls > 1) {
        throw new IllegalStateException("network interceptor " + interceptors.get(index - 1)
          + " must call proceed() exactly once");
    }

    // Call the next interceptor in the chain.
    RealInterceptorChain next = new RealInterceptorChain(interceptors, streamAllocation, httpCodec,
        connection, index + 1, request, call, eventListener, connectTimeout, readTimeout,
        writeTimeout);
    // 调用了Interceptor的intercept方法
    Interceptor interceptor = interceptors.get(index);
    Response response = interceptor.intercept(next);

    // Confirm that the next interceptor made its required call to chain.proceed().
    if (httpCodec != null && index + 1 < interceptors.size() && next.calls != 1) {
        throw new IllegalStateException("network interceptor " + interceptor
          + " must call proceed() exactly once");
    }

    // Confirm that the intercepted response isn't null.
    if (response == null) {
        throw new NullPointerException("interceptor " + interceptor + " returned null");
    }

    if (response.body() == null) {
        throw new IllegalStateException(
          "interceptor " + interceptor + " returned a response with no body");
    }

    return response;
}
这里主要调用了Interceptor的intercept方法,我们挑一个Interceptor来看,intercept方法是这么执行的,(以CacheInterceptor为例):
// CacheInterceptor类
public final class CacheInterceptor implements Interceptor {
	@Override
	public Response intercept(Chain chain) throws IOException {
		...
		// 如果有缓存,直接返回
	    if (networkRequest == null && cacheResponse == null) {
	      return new Response.Builder()
	          .request(chain.request())
	          .protocol(Protocol.HTTP_1_1)
	          .code(504)
	          .message("Unsatisfiable Request (only-if-cached)")
	          .body(Util.EMPTY_RESPONSE)
	          .sentRequestAtMillis(-1L)
	          .receivedResponseAtMillis(System.currentTimeMillis())
	          .build();
	    }
	    // 如果没有缓存,或者强制从网络获取,
	    Response networkResponse = null;
	    try {
		    // 继续调用链的下一个拦截器,又回到RealInterceptorChain的proceed方法
	        networkResponse = chain.proceed(networkRequest);
	    } finally {
	        // If we're crashing on I/O or otherwise, don't leak the cache body.
	        if (networkResponse == null && cacheCandidate != null) {
	            closeQuietly(cacheCandidate.body());
	        }
	    }
	    ...
        return response;
    }
}
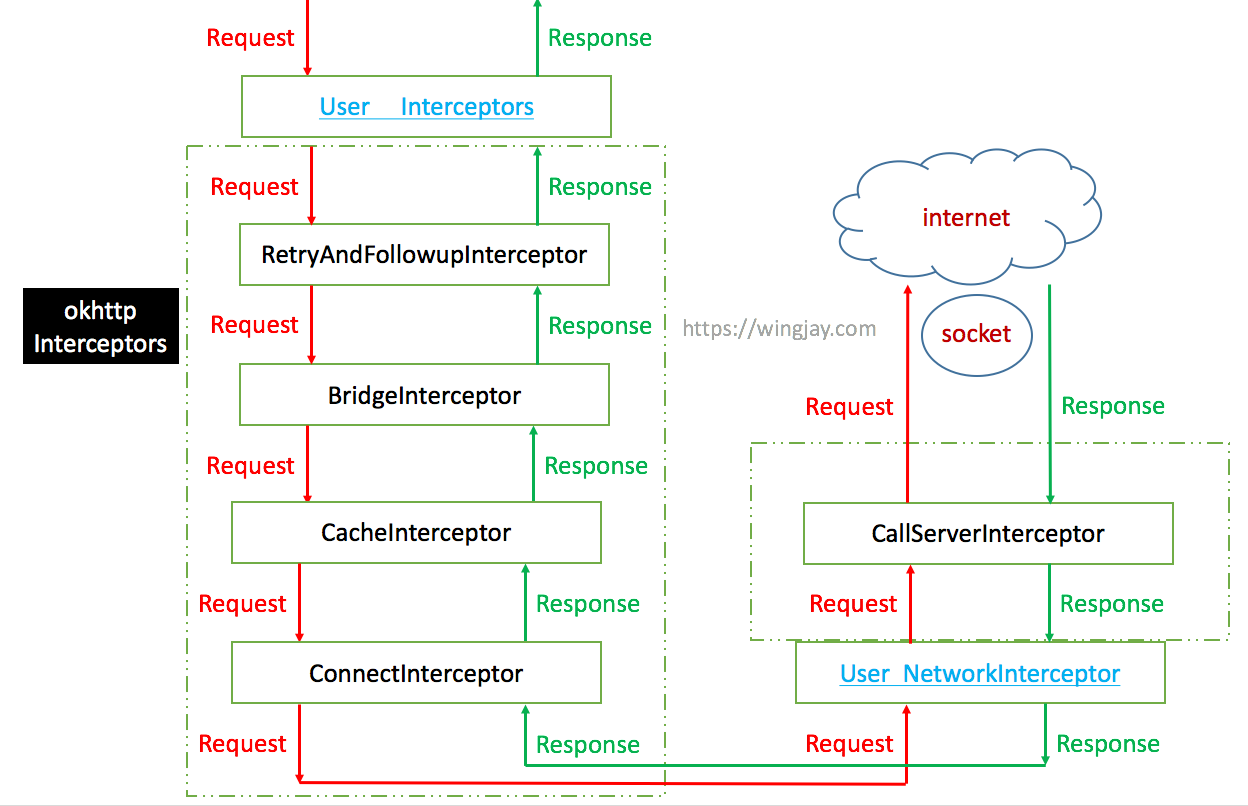
从代码可以看出,Chain与Interceptor会互相递归调用,这是典型的职责链模式,这样清楚地切开了不同的逻辑,每个拦截器完成自己的职责,从而完成用户的网络请求。
大概流程是:
- 先经过用户拦截器
- RetryAndFollowUpInterceptor负责自动重试和进行必要的重定向
- BridgeIntercetor负责将用户Request转换成一个实际的网络请求的Request,再调用下层的拦截器获取Response,最后再将网络Response转换成用户的Reponse
- CacheInterceptor负责控制缓存
- ConnectInterceptor负责进行连接主机
- 网络拦截器进行拦截
- CallServerInterceptor是真正和服务器通信,完成http请求
(图片来自带你学开源项目:OkHttp-- 自己动手实现 okhttp)

这里涉及到两个用户定义的拦截器:
- Interceptors:这里的拦截器是拦截用户最原始的 request。
- NetworkInterceptor:这是最底层的 request 拦截器。
如何区分这两个呢?举个例子,我创建两个 LoggingInterceptor,分别放在interceptors 层和 NetworkInterceptor 层,然后访问一个会重定向的 URL_1,当访问完URL_1 后会再去访问重定向后的新地址 URL_2。对于这个过程,interceptors 层的拦截器只会拦截到 URL_1 的 request,而在 NetworkInterceptor 层的拦截器则会同时拦截到 URL_1 和URL_2两个 request。
我们最后来看看拦截器的最后一节,CallServerInterceptor,主要作用访问服务器,提交Http请求,并获取结果。进入CallServerInterceptor的intercept方法看看:
// CallServerInterceptor类
@Override
public Response intercept(Chain chain) throws IOException {
    RealInterceptorChain realChain = (RealInterceptorChain) chain;
    HttpCodec httpCodec = realChain.httpStream();
    StreamAllocation streamAllocation = realChain.streamAllocation();
    RealConnection connection = (RealConnection) realChain.connection();
    Request request = realChain.request();
	...
	// HttpCodec处理request
    ...
    Response response = responseBuilder
        .request(request)
        .handshake(streamAllocation.connection().handshake())
        .sentRequestAtMillis(sentRequestMillis)
        .receivedResponseAtMillis(System.currentTimeMillis())
        .build();
	...
    return response;
}
因为OkHttp访问服务器用的是Socket,如果每次访问(connect)都要3次握手4次挥手的话,显然大量的连接会有点浪费时间,所以OkHttp对Socket进行池化。OkHttp使用类似于引用计数法方式跟踪Socket,这里的计数对象是StreamAllocation,它被反复执行aquire与release操作,改变计数对象。详细请看OkHttp3源码分析[复用连接池]。
由于篇幅问题,关于Okhttp网络接连于通信这块,打算另开一篇记录。
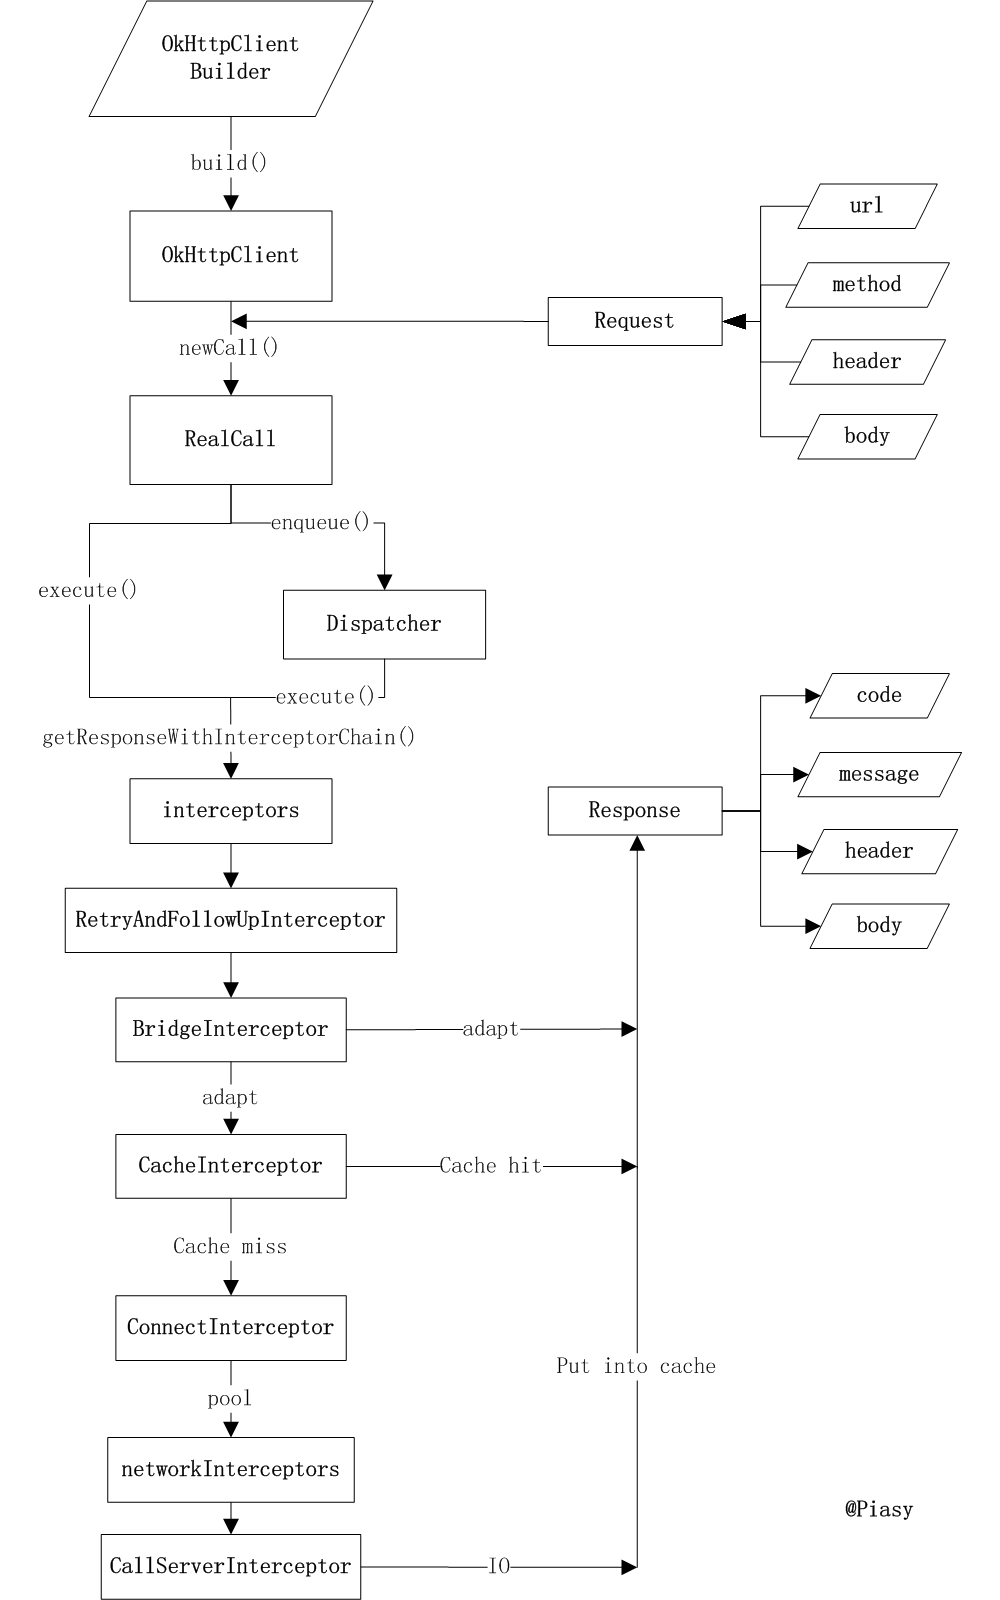
最后,提供OkHttp整体的流程图:

参考资料
OkHttp3源码详解(二整体流程)
深入解析OkHttp3
OkHttp3源码分析[复用连接池]
带你学开源项目:OkHttp-- 自己动手实现 okhttp


 本文深入分析OkHttp网络请求库的设计原理及核心组件,包括请求管理、任务调度、连接池复用及拦截器机制等,揭示其高效稳定的秘密。


 940
940

 被折叠的 条评论
为什么被折叠?


