


 本文详细介绍了Elasticsearch作为分布式搜索引擎的功能、应用场景、特点和核心概念,包括全文检索、数据分析、近实时处理。讨论了其在日志收集、商品搜索、BI系统等多个领域的应用,并提供了安装、配置、使用ES的步骤,以及如何通过curl命令进行数据操作。文章还探讨了集群部署、分片和副本的概念,强调了数据完整性和副本的重要性,以及集群状态的颜色含义。
Elasticsearch介绍:
1、Elasticsearch的功能
(1)分布式搜索和分析引擎
(2)全文检索,结构化检索,数据分析
(3)对海量数据进行近实时的处理
(4)日志收集展示分析(对于运维主要使用)
分布式:ES自动可以将海量数据分散到多台服务器上存储和检索
海量数据的处理:分布式以后,就可以采用大量的服务器去存储和检索数据,自然而然就可以实现海量数据的处理了。跟分布式/海量数据相反的,lucene,单机应用,只能在单台服务器上使用,最多只能处理单台服务器可以处理的数据量。
近实时:在秒级别对数据进行搜索和分析
2、 Elasticsearcg的适用场景
(1)维基百科,全文检索,关键词高亮,搜索推荐 1.3 Elasticsearcg的适用场景
(2)新闻网站,用户日志+社交网络数据,分析
(3) Stack Ovelow (国外的程序异常讨论论坛),全文检索,搜索相关问题和答案
(4) GitHub(开源代码管理),搜索上亿行代码
(5) 电商网站,检索商品
(6) 日志数据分析,logstash,采集日志,ES进行复杂的数据分析
(7)商品价格监控网站,用户设定某商品的价格阈值,当低于该阈值的时候,发视消息给用户( 8)BI系统,ES执行数据分析和挖掘,Kibana进行数据可视化
(9)国内,站内搜索(电商,招聘,门户)
( 10)BI系统,商业智能,分析用户消费趋势和用户群体的组成构成。
3、Elasticsearch,的特点
(1) 可以作为一个大型分布式集群(数百台服务器)技术,处理PB 级数据,服务大公司,也可以运行在单机上,服务小公司
(2) Elasticsearch.,不是什么新技术,主要是将全文检索,数据分析以及分布式技术,合并在一起,才形成了独一无二的 ES,lucene(全文检索)
(3)对用户而言,是开箱即用的,非常简单,作为中小型的应用,直接3分钟部署一下 ES,就可以作为生产环境的系统来使用了,数据量不大,操作不是太复杂
(4)数据库的功能面对很多领域是不够的,优势:事务,各种联机事务型的操作,特殊的功能,比如全文检索,同义词处理,相关度排名,复杂数据分析,海量数据的近实时处理,Elasticsearch,作为传统数据库的一个补充,提供了数据库所不能提供的很多功能。
4、 Elasticsearcg的核心概念
(1) Near Realtime(NRT):近实时,两个意思,从写入数据到可以被搜索有一个小延迟(大概1秒);
(2) Cluster:集群,包含多个节点,每个节点属于哪个集群是通过一个配置(集群名称:默认是elasticsearch)来决定的,对于中小型应用来说,刚开始一个集群就一个节点很正常
(3) Node:节点,集群中的一个节点,节点也有一个名称(默认是随机分配的),节点名称很重要(在执行运维管理操作的时候),默认节点会去加入一个名称为‘elasticsearch.'..的集群,如果直接启动一堆节点,那么他们会自动组成一个elasticsearch.集群,当然一个节点也可以组成一个elastic.saerch集群
(4) Document:文档,ES中最小数据单元,一个document可以是一条客户数据,一条商品分类数据,一条订单数据,通常是JSON数据结构表示,每个index 下的 type中,都可以去存储多个document,一个 document里面有多个feld,每个field就是一个数据字段。
(5)Index:索引包含一堆有相似结构的文档数据,比如可以有一个客户索引,商品分类索引,订单索引,索引有一个名称,一个index包含很多document。一个index就代表了一类类似的或者相同的document。比如说建立一个product index,商品索引,里面可能存放了所有的商品数据,所有的商品document.
(6) Type:类型,每个索引里都可以有一个或多个type,type是index 中的一个逻辑数据分类,一个type下的document,都有相同的 field,比如博客系统,有一个索引,可以定义用户数据type,博客数据type,评论数据type。
商品index,里面存放了所有的商品数据,商品document。但是商品分很多种类,每个种类的document 的 field可能不太一样,比如说电器商品,可能还包含一些诸如售后时间范围这样的特殊feld:生鲜商品,还包含一些诸如生鲜保质期之类的field
(7) shard:单台机器无法存储大量数据,es可以将一个索引中的数据切分为多个shar d,分布在多台服务器上存储,有了shard就可以横向扩展,存储更多数据,让搜索和分析等操作分不到多台服务器上去执行,提升吞吐量和性能,每个shar d都是一个lucene index
(8) replica:任何一个服务器随时可能故障或宕机,此时 shard可能就会丢失,因此可以为每个shar d创建多个replica副本,replica可以在 shard 故障时提供备用服务,保证数据不丢失,多个replica还可以提升搜索操作的吞吐量和性能。primary shar d(建立索引时一次设置,不能修改,默认5个), replicashard(随时修改数量,默认1个)﹐默认每个索引10个shard,5个primary shar d,5个replica shard,最小的高可用配置,是2台服务器
5、Elasticsearch 核心概念 VS 数据库核心概念
Elasticsearch mysql 数据库
=================================================
Document(文档) 行 mysql 的一行,在ES中叫文档
Type(类型) 表 mysql 的一个表,在ES中叫类型
Index(索引) 库 mysql 的一个库,在ES中叫索引
filed 字段 mysql 的一个字段,在ES中叫类型
6、安装方式
| 安装方式 | 优点 | 缺点 |
| dcocker | 1.部署方便 2.开箱即用 3.启动迅速 | 1.需要有docker的知识 2.修改配置麻烦,需要重新生成镜像 3.数据存储需要挂载目录 |
| tar | 1.部署灵活 ⒉.对系统的侵占性小 | 1.需要自己写启动管理文件 2.目录提前需要规划好 |
| Rpm | deb (Ubuntu的rpm) | 1.部署方便 2.启动脚本安装即用 3.存放目录标准化 | 1.软件各个组件分散在不同的目录 2.卸裁可能不干净 3.默认配置需要修改 |
| ansible | 1.极其的灵活 2.你想要的功能都有 3.批量部署速度快 | 1.需要学习ansible语法和规则 2.需要提前规划好所有的标准 3.需要专人维护 |
一、单节点使用ES(6.x)
准备一台机器:192.168.75.125
1、rpm安装ES
[root@75-125 ~]#  yum install -y java-1.8.0-openjdk.x86_64
[root@75-125 ~]#  mkdir -p /opt/installpag;cd /opt/installpag
[root@75-125 installpag ]#  wget https://artifacts.elastic.co/downloads/elasticsearch/elasticsearch-6.6.0.rpm
[root@75-125 installpag]# ll
-rw-r--r--. 1 root root 114059630 1月  29 2019 elasticsearch-6.6.0.rpm

[root@75-125 installpag]# rpm -ivh elasticsearch-6.6.0.rpm

安装后提示如下
### NOT starting on installation, please execute the following statements to configure elasticsearch service to start automatically using systemd
 sudo systemctl daemon-reload
 sudo systemctl enable elasticsearch.service
### You can start elasticsearch service by executing
 sudo systemctl start elasticsearch.service
Created elasticsearch keystore in /etc/elasticsearch
翻译:
###安装时未启动,请执行以下语句以配置elasticsearch服务以使用systemd自动启动
sudo systemctl守护程序重新加载
sudo systemctl启用弹性搜索服务
###您可以通过执行
sudo systemctl启动弹性搜索服务
在/etc/elasticsearch中创建了elasticsearch密钥库
1.2、启动查看状态
[root@75-125 installpag]# systemctl daemon-reload
[root@75-125 installpag]# systemctl enable elasticsearch.service
Created symlink from /etc/systemd/system/multi-user.target.wants/elasticsearch.service to /usr/lib/systemd/system/elasticsearch.service.

[root@75-125 installpag]# systemctl start elasticsearch.service

验证启动成功--方式一:
[root@75-125 installpag]# netstat -tulpn |grep 9200   注意:elasticsearch.启动比较慢,查看端口9200未启动,需要查看日志
[root@75-125 installpag]# tail -f /var/log/elasticsearch/elasticsearch.log    日志中没有报错
[2021-02-20T10:32:18,475][INFO ][o.e.g.GatewayService     ] [rSX_fym] recovered [0] indices into cluster_state
[2021-02-20T10:32:18,975][INFO ][o.e.c.m.MetaDataIndexTemplateService] [rSX_fym] adding template [.triggered_watches] for index patterns [.triggered_watches*]
[2021-02-20T10:32:19,135][INFO ][o.e.c.m.MetaDataIndexTemplateService] [rSX_fym] adding template [.watch-history-9] for index patterns [.watcher-history-9*]
[2021-02-20T10:32:19,194][INFO ][o.e.c.m.MetaDataIndexTemplateService] [rSX_fym] adding template [.watches] for index patterns [.watches*]
[2021-02-20T10:32:19,288][INFO ][o.e.c.m.MetaDataIndexTemplateService] [rSX_fym] adding template [.monitoring-logstash] for index patterns [.monitoring-logstash-6-*]
[2021-02-20T10:32:19,359][INFO ][o.e.c.m.MetaDataIndexTemplateService] [rSX_fym] adding template [.monitoring-es] for index patterns [.monitoring-es-6-*]
[2021-02-20T10:32:19,429][INFO ][o.e.c.m.MetaDataIndexTemplateService] [rSX_fym] adding template [.monitoring-beats] for index patterns [.monitoring-beats-6-*]
[2021-02-20T10:32:19,477][INFO ][o.e.c.m.MetaDataIndexTemplateService] [rSX_fym] adding template [.monitoring-alerts] for index patterns [.monitoring-alerts-6]
[2021-02-20T10:32:19,524][INFO ][o.e.c.m.MetaDataIndexTemplateService] [rSX_fym] adding template [.monitoring-kibana] for index patterns [.monitoring-kibana-6-*]
[2021-02-20T10:32:19,741][INFO ][o.e.l.LicenseService     ] [rSX_fym] license [53c1c120-a2d9-4505-a081-a48f60c48fe3] mode [basic] - valid

[root@75-125 installpag]# netstat -tulpn |grep 9200   查看端口9200启动
tcp6       0      0 127.0.0.1:9200          :::*                    LISTEN      1569/java
tcp6       0      0 ::1:9200                :::*                    LISTEN      1569/java

验证启动成功--方式二:
[root@75-125 installpag]# curl 127.0.0.1:9200
{
  "name" : "rSX_fym",
  "cluster_name" : "elasticsearch",
  "cluster_uuid" : "cxsIpPbWRPukZSTBpc1Wvg",
  "version" : {
    "number" : "6.6.0",
    "build_flavor" : "default",
    "build_type" : "rpm",
    "build_hash" : "a9861f4",
    "build_date" : "2019-01-24T11:27:09.439740Z",
    "build_snapshot" : false,
    "lucene_version" : "7.6.0",
    "minimum_wire_compatibility_version" : "5.6.0",
    "minimum_index_compatibility_version" : "5.0.0"
  },
  "tagline" : "You Know, for Search"
}
2、配置ES文件
2.1、修改配置文件
查看elasticsearch的配置文件。c是文件的意思
[root@75-125 installpag]# rpm -qc elasticsearch
/etc/elasticsearch/elasticsearch.yml    ES主配置文件
/etc/elasticsearch/jvm.options          jvm虚拟机配置,java之所以能在所有的平台运行代码,是因为把代码放在虚拟机中,java跨平台运行
/etc/init.d/elasticsearch               启动文件
/etc/sysconfig/elasticsearch            ES环境变量相关的参数配置文件
/usr/lib/sysctl.d/elasticsearch.conf    最大文件限制
/usr/lib/systemd/system/elasticsearch.service   systemd启动文件

[root@75-125 installpag]# rpm -ql elasticsearch |grep /var/
/var/lib/elasticsearch    数据目录
/var/log/elasticsearch    日志目录
/var/run/elasticsearch    pid目录


[root@75-125 installpag]# cat /usr/lib/sysctl.d/elasticsearch.conf
vm.max_map_count=262144
java相关的,最大文件限制一个进程可以拥有的VMA(虚拟内存区域)的数量

生成一个elasticsearch账户
[root@75-125 elasticsearch]# tail -1 /etc/passwd
elasticsearch:x:998:996:elasticsearch user:/nonexistent:/sbin/nologin
2.2、修改ES主配置文件
[root@75-125 installpag]# vi /etc/elasticsearch/elasticsearch.yml
:set nu
     17 #cluster.name: my-application    集群相关的
     23 node.name: node-1  设置节点名称,可以开可以不开,不打开默认node-1
     33 path.data: /data/elasticsearch    修改
     37 path.logs: /var/log/elasticsearch   不改
     43 bootstrap.memory_lock: true     打开内存锁定。对于java来说如果不进行内存锁定,会一直吃内存,这个配合/etc/elasticsearch/jvm.options。启动后直接锁死内存,直接占用多大内存,如果超过立马杀死
     55 network.host: 192.168.0.1   绑定IP,如果不开启,默认是127.0.0.1。导致其他设备不能访问
     59 http.port: 9200   端口可以开可以不开 , 不打开默认9200

[root@75-125 installpag]# cat /etc/elasticsearch/elasticsearch.yml |egrep -v ^#
node.name: node-1
path.data: /data/elasticsearch
path.logs: /var/log/elasticsearch
bootstrap.memory_lock: true
network.host: 192.168.75.125,127.0.0.1
http.port: 9200

[root@75-125 elasticsearch]# mkdir -p /data/elasticsearch
[root@75-125 elasticsearch]# chown -R elasticsearch:elasticsearch /data/elasticsearch/2.3、配置jvm虚拟机
[root@75-125 ~]# vi /etc/elasticsearch/jvm.options    根据你的系统修改对应的Xms512m、Xmx512m
# Xms represents the initial size of total heap space
# Xmx represents the maximum size of total heap space

-Xms512m
-Xmx512m

[root@75-125 ~]# systemctl restart elasticsearch
[root@75-125 ~]# systemctl status elasticsearch  查看后启动失败
● elasticsearch.service - Elasticsearch
   Loaded: loaded (/usr/lib/systemd/system/elasticsearch.service; enabled; vendor preset: disabled)
   Active: failed (Result: exit-code) since 六 2021-02-20 11:43:30 CST; 3min 29s ago

解决方案:
[root@75-125 ~]# systemctl edit elasticsearch    填写下面内容后:wq 保存
[Service]
LimitMEMLOCK=infinity

[root@75-125 ~]# systemctl daemon-reload
[root@75-125 ~]# systemctl restart elasticsearch
[root@75-125 ~]# systemctl status elasticsearch  查看正常


理解:systemctl edit elasticsearch,这个命令就是给你生成一个/etc/systemd/system/elasticsearch.service.d/override.conf 文件,里面是
[Service]
LimitMEMLOCK=infinity
解释:
[root@75-125 ~]# vi /etc/elasticsearch/jvm.options
# Xms represents the initial size of total heap space    最小占用内存
# Xmx represents the maximum size of total heap space    最大占用内存

-Xms1g
-Xmx1g

注意:
1、-Xms1g=-Xmx1g   说明启动后固定就占用1g。
2、为什么:假如设备一共2g,其他服务已经占用1.3g,如果最小-Xms是512m,最大是1g,这个时候刚启动是没问题,但是如果java占用700m,700m+1.3g=2g,然后java还在涨直到1g后,出现了内存不够,导致其他服务也异常
3、Xmx不能超过32g,如果超了性能不升还下降
4、最大最小内存最好设置一样
5、最大给服务器物理内存的50%
检查状态:
[root@75-125 ~]# netstat -tulpn |grep 9200
tcp6       0      0 192.168.75.125:9200     :::*                    LISTEN      1603/java
[root@75-125 ~]# curl 192.168.75.125:9200
{
  "name" : "node-1",
  "cluster_name" : "elasticsearch",
  "cluster_uuid" : "QptcbgQhSJWB8y8_yob84g",
  "version" : {
    "number" : "6.6.0",
    "build_flavor" : "default",
    "build_type" : "rpm",
    "build_hash" : "a9861f4",
    "build_date" : "2019-01-24T11:27:09.439740Z",
    "build_snapshot" : false,
    "lucene_version" : "7.6.0",
    "minimum_wire_compatibility_version" : "5.6.0",
    "minimum_index_compatibility_version" : "5.0.0"
  },
  "tagline" : "You Know, for Search"
}
[root@75-125 ~]#
3、ES-head插件安装
3.1、Elasticsearch交互-交互方式概念
RESTful API是一种类似于协议接口,通过这种接口传递参数。所有其他语言可以使用RESTfulAPl通过端口9200和Elasticsearch进行通信,可以用web客户端访问Elasticsearch,或者甚至可以使用curl命令和Elasticsearch交互。
—个Elasticsearch请求和任何HTTP请求一样由若干相同的部件组成:curl -X<VERB> '<PROTOCOL>://<HOST>:<PORT>/<PATH>?<QUERY_STRING>'-d '<BODY>
VERB:适当的HTTP方法或谓词:GET'、“POST'、“PUT'、HEAD或者`DELETE。PROTOCOL http或者https`(如果你在Elasticsearch前面有一个`https代理)
HOST: Elasticsearch集群中任意节点的主机名,或者用localhost代表本地机器上的节点。
PORT:运行Elasticsearch HTTP服务的端口号,默认是9200。
PATH: API的终端路径(例如_count将返回集群中文档数量)。Path可能包含多个组件,例如:_cluster/stats和_nodes/stats/jvm.
QUERY_STRING:任意可选的查询字符串参数(例如 ?pretty将格式化地输出JSON 返回值,使其更容易阅读)BODY:一个JSON格式的请求体(如果请求需要的话)
3.2、Elasticsearch交互方式种类
1、curl命令:最繁琐、最复杂、最容易出错、不需要安装任何软件,只需要有curl命令
[root@75-125 ~]# curl 192.168.75.125:9200/_cat/nodes
192.168.75.125 23 93 1 0.00 0.01 0.05 mdi * node-1
2、es-head插件:查看数据方便、操作相对容易、需要node环境
3、kibana:(ELK中的k)查看数据以及报表格式丰富、操作很简单、需要java环境和安装配置kibana
3.3、安装ES-head
ES-head 插件在5.0以前是官方的插件,5.0以后安装方式改变,需要nodejs环境支持,或者直接使用别人封装好的docker镜像


这个时候填写对应的信息后,连接就能显示

4、使用ES API---curl命令
4.1、创建Index索引( mysql 库)
在http中会使用get、 put、 post、等。所以xput 提交的意思。vipinfo 数据库的名字叫vipinfo。所以总体的意思是:当于mysql创建一个数据库,数据库的名字叫vipinfo
[root@75-125 installpag]# curl -XPUT 192.168.75.125:9200/vipinfo
{"acknowledged":true,"shards_acknowledged":true,"index":"vipinfo"}[root@75-125 installpag]#

注意:执行后返回的是json的形式,可以在json中显示
创建数据库test,不以json显示,?pretty以友好的人类可读性是显示
[root@75-125 installpag]# curl -XPUT 192.168.75.125:9200/test?pretty
{
  "acknowledged" : true,
  "shards_acknowledged" : true,
  "index" : "test"
}
查看es-head:
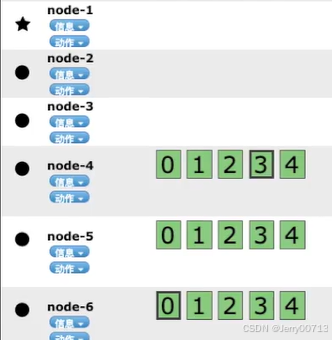
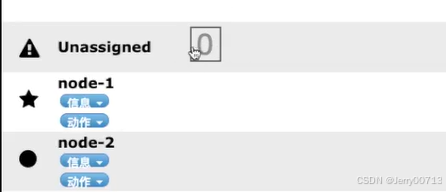
ES默认配置是:5分片1副本。
1、其中node-1后面的是数据分片。什么是数据分片:一个数据分成了(0~4)5个,打散分别存放在不同地方
2、Unassigned后面的是副本分片。什么是副本分片:ES诞生就是为了集群做备份。而备份不能在自己身上,目前没有其他机器。所以不满足默认配置5分片1副本。所以yellow:默认配置不满足,但是数据还在,只不过数据没有备份

存放数据:/data/elasticsearch/nodes/0/indices/中有4XhyGNeqQMOYiaR2TTrfew 中有0 1 2 3 4 _state
4.2、curl命令行形式添加数据
目前没有任何数据

user:新建一个表,使用这个表
1?:相当于mysql中索引。插入第一行数据1?,在插入第二行2?。数字不可以省
-d :后面接的是要插入的信息
[root@75-125 installpag]# curl -XPUT '192.168.75.125:9200/vipinfo/user/1?pretty' -H 'Content-Type: application/json' -d'
{
      "first_name" : "John",
      "last_name": "Smith",
      "age" : 25,
      "about" : "I love to go rock climbing", "interests": [ "sports", "music" ]
}
'

[root@75-125 installpag]# curl -XPUT 'localhost:9200/vipinfo/user/2?pretty' -H 'Content-Type: application/json' -d'
{
      "first_name" : "tece",
      "last_name": "Fir",
      "age" : 35,
      "about" : "I love to go rock sports", "interests": [ "forestry" ]
}
'

注:即使没有数据库也可以插入数据,
[root@75-125 installpag]# curl -XPUT 'localhost:9200/linux/teacher/?pretty' -H 'Content-Type: application/json' -d'
{
      "teacher" : "old456",
      "num" : 21,
      "age" : 35
}
'


结果
{
  "_index" : "vipinfo",
  "_type" : "user",
  "_id" : "1",
  "_version" : 1,
  "result" : "created",
  "_shards" : {
    "total" : 2,
    "successful" : 1,
    "failed" : 0
  },
  "_seq_no" : 0,
  "_primary_term" : 1
}

age 输入25,就会显示25

随机生成id: 使用 curl -XPOST
[root@75-125 ~]# curl -XPOST 'localhost:9200/linux/teacher/?pretty' -H 'Content-Type: application/json' -d'
{
      "teacher" : "oldzhang",
      "num" : 35,
      "age" : 35
}
'

{
  "_index" : "linux",
  "_type" : "teacher",
  "_id" : "Q8ffvncBwkahPw2N-6tM",
  "_version" : 1,
  "result" : "created",
  "_shards" : {
    "total" : 2,
    "successful" : 1,
    "failed" : 0
  },
  "_seq_no" : 0,
  "_primary_term" : 1
}
[root@75-125 ~]#
随机的id、不随机id:
如果不使用随机ID:需要记录每次的id号,而且插入的时候每次都的判断到底有没有这个id,性能损耗
如果使用随机ID:不需要记录每次的id号,但是需要查询数据改怎么查,除了id不同,其他的数据(比如年龄1w个19怎么查看)
解决方案:增加一个sid,这样解决随机id,每次插入的时候sid都改变,就算是相同了,只有几个相同的。
[root@75-125 ~]# curl -XPOST 'localhost:9200/usertest/utest/?pretty' -H 'Content-Type: application/json' -d'
{
      "sid" : 10,
      "teacher" : "oldzhang",
      "num" : 35,
      "age" : 35
}
'

[root@75-125 ~]#  curl -XPOST 'localhost:9200/usertest/utest/?pretty' -H 'Content-Type: application/json' -d'
{
      "sid" : 10,
      "teacher" : "oldssszhang",
      "num" : 25,
      "age" : 35
}
'

{
  "_index" : "usertest",
  "_type" : "utest",
  "_id" : "RMf0vncBwkahPw2NxKtL",
  "_version" : 1,
  "result" : "created",
  "_shards" : {
    "total" : 2,
    "successful" : 1,
    "failed" : 0
  },
  "_seq_no" : 0,
  "_primary_term" : 1
}
4.3、查询数据
查询vipinfo下的所有表
[root@75-125 ~]# curl -XGET localhost:9200/vipinfo/_search?pretty
{
  "took" : 63,
  "timed_out" : false,
  "_shards" : {
    "total" : 5,
    "successful" : 5,
    "skipped" : 0,
    "failed" : 0
  },
  "hits" : {
    "total" : 2,
    "max_score" : 1.0,
    "hits" : [
      {
        "_index" : "vipinfo",
        "_type" : "user",
        "_id" : "2",
        "_score" : 1.0,
        "_source" : {
          "first_name" : "tece",
          "last_name" : "Fir",
          "age" : 35,
          "about" : "I love to go rock sports",
          "interests" : [
            "forestry"
          ]
        }
      },
      {
        "_index" : "vipinfo",
        "_type" : "user",
        "_id" : "1",
        "_score" : 1.0,
        "_source" : {
          "first_name" : "John",
          "last_name" : "Smith",
          "age" : 25,
          "about" : "I love to go rock climbing",
          "interests" : [
            "sports",
            "music"
          ]
        }
      }
    ]
  }
}
查询vipinfo下的user中id=1
[root@75-125 ~]# curl -XGET localhost:9200/vipinfo/user/1?pretty
{
  "_index" : "vipinfo",
  "_type" : "user",
  "_id" : "1",
  "_version" : 1,
  "_seq_no" : 0,
  "_primary_term" : 1,
  "found" : true,
  "_source" : {
    "first_name" : "John",
    "last_name" : "Smith",
    "age" : 25,
    "about" : "I love to go rock climbing",
    "interests" : [
      "sports",
      "music"
    ]
  }
}
按条件查询,不按照id。其中_serarch?q 就等同于where
[root@75-125 ~]# curl -XGET 'localhost:9200/vipinfo/user/_search?q=last_name:Smith&pretty'
{
  "took" : 401,
  "timed_out" : false,
  "_shards" : {
    "total" : 5,
    "successful" : 5,
    "skipped" : 0,
    "failed" : 0
  },
  "hits" : {
    "total" : 1,
    "max_score" : 0.2876821,
    "hits" : [
      {
        "_index" : "vipinfo",
        "_type" : "user",
        "_id" : "1",
        "_score" : 0.2876821,
        "_source" : {
          "first_name" : "John",
          "last_name" : "Smith",
          "age" : 25,
          "about" : "I love to go rock climbing",
          "interests" : [
            "sports",
            "music"
          ]
        }
      }
    ]
  }
}
另一种写法,不能过滤多种
[root@75-125 ~]# curl -XGET 'localhost:9200/vipinfo/user/_search?pretty' -H 'Content-Type: application/json' -d'
{
   "query" : {
       "match" : {
              "last_name" : "Smith"
        }
    }
}
'
过滤多种
[root@75-125 ~]# curl -XGET 'localhost:9200/vipinfo/user/_search?pretty' -H 'Content-Type: application/json' -d'
{
   "query" : {
       "match" : {
              "last_name" : "Smith"
        }
    },
    "filter" : {
        "range" : {"age" : { "gt" : 30 }
     }
   }
}
'
工具查询数据。+是多个条件

4.4、更新数据
如果使用PUT模式,必须要填写完整的信息,注意:只能修改其中一条
[root@75-125 ~]# curl -XPUT 'localhost:9200/vipinfo/user/1?pretty' -H 'Content-Type: application/json' -d'
{
      "first_name" : "John",
      "last_name": "Smith",
      "age" : 29,
      "about" : "I love to go rock climbing", "interests": [ "sports", "music" ]
}
'

如果使用POST模式,只需要填写修改的信息注意,随便改,注意:没写的那条数据就会比变成空
[root@75-125 ~]# curl -XPOST 'localhost:9200/vipinfo/user/1?pretty' -H 'Content-Type: application/json' -d'
{
      "first_name" : "Johna",
      "age" : 22
}
'
使用工具

4.5、删除数据
[root@75-125 ~]# curl -XDELETE 'localhost:9200/vipinfo/user/1?pretty' -H 'Content-Type: application/json' -d' {}'
{
  "_index" : "vipinfo",
  "_type" : "user",
  "_id" : "1",
  "_version" : 8,
  "result" : "deleted",
  "_shards" : {
    "total" : 2,
    "successful" : 1,
    "failed" : 0
  },
  "_seq_no" : 7,
  "_primary_term" : 3
}
或者在工具删除,动作→删除→输入删除→确定


4.6、关闭数据

二、ES集群(6.x)
1、介绍
Elasticsearch 可以横向扩展至数百(甚至数千)的服务器节点,同时可以处理PB级数据
Elasticsearch 天生就是分布式的,并且在设计时屏蔽了分布式的复杂性。
Elasticsearch 尽可能地屏蔽了分布式系统的复杂性。
2、安装部署介绍
准备三台机器:10.4.7.2、10.4.7.3、10.4.7.4
部署跟跟单节点一样,区别是修改单节点的/etc/elasticsearch/elasticsearch.yml
#cluster.name: my-application 集群名称:同一个集群内的所有成员节点的集群名称要相同
#node.name: node-1 节点名称:同一个集群内的所有成员节点的节点名称要不相同
#network.host: 10.4.7.2,127.0.0.1 自己的网络
#discovery.zen.ping.unicast.hosts: ["host1", "host2"] 把集群中的所有节点都写入
#discovery.zen.minimum_master_nodes: master候选节点候选节点
2.1、先部署10.4.7.2:
[root@7-2 ]# yum install -y java-1.8.0-openjdk.x86_64
[root@7-2 ]# mkdir -p /opt/installpag;cd /opt/installpag
[root@7-2 installpag ]# rz elasticsearch-6.6.0.rpm
[root@7-2 installpag ]# rpm -ivh elasticsearch-6.6.0.rpm
[root@7-2 ]# systemctl daemon-reload;systemctl enable elasticsearch.service;systemctl start elasticsearch.service
[root@7-2 ]# vi /etc/elasticsearch/elasticsearch.yml
[root@7-2 installpag]# grep "^[a-Z]" /etc/elasticsearch/elasticsearch.yml
cluster.name: Linux
node.name: node-1
path.data: /data/elasticsearch
path.logs: /var/log/elasticsearch
bootstrap.memory_lock: true
network.host: 10.4.7.2,127.0.0.1
http.port: 9200
discovery.zen.ping.unicast.hosts: ["10.4.7.2", "10.4.7.3", "10.4.7.4"]
discovery.zen.minimum_master_nodes: 2


[root@7-2 ]# mkdir -p /data/elasticsearch;chown -R elasticsearch:elasticsearch /data/elasticsearch/
[root@7-2 ~]# vi /etc/elasticsearch/jvm.options
-Xms512m
-Xmx512m

[root@7-2 ]# systemctl restart elasticsearch;systemctl edit elasticsearch
[Service]
LimitMEMLOCK=infinity

[root@7-2 ]# systemctl daemon-reload;systemctl restart elasticsearch;systemctl status elasticsearch

[root@7-2 ]# netstat -tulpn |grep 9200
tcp6       0      0 10.4.7.2:9200           :::*                    LISTEN      3404/java
tcp6       0      0 127.0.0.1:9200          :::*                    LISTEN      3404/java
注意:在做单节点的时候,我们查看的日志是:/var/log/elasticsearch/elasticsearch.log。这里由于我们做了集群,集群名字叫Linux,所以日志就是/var/log/elasticsearch/Linux.log
[root@7-2 elasticsearch]# tail -f /var/log/elasticsearch/Linux.log

如果遇到此报错:就说明/date/elasticsearch权限不对
Caused by: java.nio.file.AccessDeniedException: /date/elasticsearch

如果遇到此报错:就说明目前没有检测到"10.4.7.3", "10.4.7.4"。注意:是按照9200端口检测
[2021-02-21T13:50:31,871][WARN ][o.e.d.z.ZenDiscovery     ] [node-1] not enough master nodes discovered during pinging (found [[Candidate{node={node-1}{uZ_U4U9BTfiW6Lyy9KIydg}{8rYhiQaTTQmHbC1dXfO3cQ}{10.4.7.2}{10.4.7.2:9300}{ml.machine_memory=1907724288, xpack.installed=true, ml.max_open_jobs=20, ml.enabled=true}, clusterStateVersion=-1}]], but needed [2]), pinging again
2.2、部署10.4.7.3:
[root@7-3 ]# yum install -y java-1.8.0-openjdk.x86_64
[root@7-3 ]# mkdir -p /opt/installpag;cd /opt/installpag
[root@7-3 installpag ]# rz elasticsearch-6.6.0.rpm
[root@7-3 installpag ]# rpm -ivh elasticsearch-6.6.0.rpm
[root@7-3 ]# systemctl daemon-reload;systemctl enable elasticsearch.service;systemctl start elasticsearch.service
[root@7-3 ]# vi /etc/elasticsearch/elasticsearch.yml
[root@7-3 installpag]# grep "^[a-Z]" /etc/elasticsearch/elasticsearch.yml
cluster.name: Linux
node.name: node-2
path.data: /data/elasticsearch
path.logs: /var/log/elasticsearch
bootstrap.memory_lock: true
network.host: 10.4.7.3,127.0.0.1
http.port: 9200
discovery.zen.ping.unicast.hosts: ["10.4.7.2", "10.4.7.3", "10.4.7.4"]
discovery.zen.minimum_master_nodes: 2


[root@7-3 ]# mkdir -p /data/elasticsearch;chown -R elasticsearch:elasticsearch /data/elasticsearch/
[root@7-3  ~]# vi /etc/elasticsearch/jvm.options
-Xms512m
-Xmx512m

[root@7-3 ]# systemctl restart elasticsearch;systemctl edit elasticsearch
[Service]
LimitMEMLOCK=infinity

[root@7-3 ]# systemctl daemon-reload;systemctl restart elasticsearch;systemctl status elasticsearch

[root@7-3 ]# netstat -tulpn |grep 9200
tcp6       0      0 10.4.7.2:9200           :::*                    LISTEN      3404/java
tcp6       0      0 127.0.0.1:9200          :::*                    LISTEN      3404/java
2.3、部署10.4.7.4:
[root@7-4 ]# yum install -y java-1.8.0-openjdk.x86_64
[root@7-4 ]# mkdir -p /opt/installpag;cd /opt/installpag
[root@7-4 installpag ]# rz elasticsearch-6.6.0.rpm
[root@7-4 installpag ]# rpm -ivh elasticsearch-6.6.0.rpm
[root@7-4 ]# systemctl daemon-reload;systemctl enable elasticsearch.service;systemctl start elasticsearch.service
[root@7-4 ]# vi /etc/elasticsearch/elasticsearch.yml
[root@7-4 installpag]# grep "^[a-Z]" /etc/elasticsearch/elasticsearch.yml
cluster.name: Linux
node.name: node-3
path.data: /data/elasticsearch
path.logs: /var/log/elasticsearch
bootstrap.memory_lock: true
network.host: 10.4.7.4,127.0.0.1
http.port: 9200
discovery.zen.ping.unicast.hosts: ["10.4.7.2", "10.4.7.3", "10.4.7.4"]
discovery.zen.minimum_master_nodes: 2


[root@7-4 ]# mkdir -p /data/elasticsearch;chown -R elasticsearch:elasticsearch /data/elasticsearch/
[root@7-4  ~]# vi /etc/elasticsearch/jvm.options
-Xms512m
-Xmx512m

[root@7-4 ]# systemctl restart elasticsearch;systemctl edit elasticsearch
[Service]
LimitMEMLOCK=infinity

[root@7-4 ]# systemctl daemon-reload;systemctl restart elasticsearch;systemctl status elasticsearch

[root@7-4 ]# netstat -tulpn |grep 9200
tcp6       0      0 10.4.7.2:9200           :::*                    LISTEN      3404/java
tcp6       0      0 127.0.0.1:9200          :::*                    LISTEN      3404/java
排错:
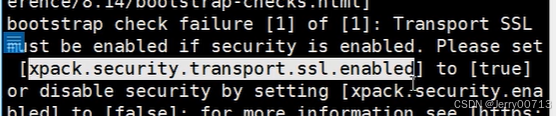
[1] bootstrap checks failed
[1]: memory locking requested for elasticsearch process but memory is not locked
[2021-02-21T14:20:19,030][INFO ][o.e.n.Node               ] [node-3] stopping ...
[2021-02-21T14:20:19,149][INFO ][o.e.n.Node               ] [node-3] stopped
[2021-02-21T14:20:19,149][INFO ][o.e.n.Node               ] [node-3] closing ...
[2021-02-21T14:20:19,247][INFO ][o.e.n.Node               ] [node-3] closed
[2021-02-21T14:20:19,258][INFO ][o.e.x.m.p.NativeController] [node-3] Native controller process has stopped - no new native processes can be started
解决方案:
解决方法一(关闭bootstrap.memory_lock:,会影响性能):
# vim /etc/elasticsearch/elasticsearch.yml          // 设置成false就正常运行了。
bootstrap.memory_lock: false

解决方法二(开启bootstrap.memory_lock:):
1. 修改文件/etc/elasticsearch/elasticsearch.yml,上面那个报错就是开启后产生的,如果开启还要修改其它系统配置文件
bootstrap.memory_lock: true
2. 修改文件/etc/security/limits.conf,最后添加以下内容。
*		 soft	 nofile		 65536
*		 hard	 nofile		 65536
*		 soft	 nproc		 32000
*		 hard	 nproc		 32000
*		 hard	 momlock	                 unlimited
*		 soft	 momlock	                 unlimited

3. 修改文件/etc/sysctl.conf
vm.max_map_count = 655360

4. 修改文件 /etc/systemd/system.conf ,分别修改以下内容。
DefaultLimitNOFILE=65536
DefaultLimitNPROC=32000
DefaultLimitMEMLOCK=infinity

5。对于上面的内容让其生效或者重启下系统
[root@localhost security]# sysctl -p
vm.max_map_count = 655360
查看集群状态:

插入一个索引。显示集群默认分配数据(5分片1副本。也就是5个主分片跟1套副本。一套副本就是5个主分片内容)

如果有密码
curl -ks -u elastic:123456 -XGET "https://localhost:9200/_cluster/health/pretty"
查看集群的健康状态:-XGET _cluster/health?pretty
查看集群的健康状态详细:-XGET _cluster/state?human&pretty
查看集群设置:-XGET _cluster/settings?include_defaults=true&human&pretty
curl -XGET 'http://localhost:9200/_nodes/procese?human&pretty' 反回集群名称
curl -XGET 'http://localhost:9200/_nodes/_all/info/jvm,process?human&pretty' 所有的信息、IP地址、内存、版本
curl -XGET 'http://localhost:9200/_cat/nodes?human&pretty' 重要,当前所有节点打印出来
curl -XGET 'http://localhost:9200/_cluster/health?pretty'
curl -XGET 'localhost:9200/_cat/indices?pretty' 查看有几个索引
get _cat/health?v
![]()
epoch      timestamp cluster    status node.total node.data shards pri relo init unassign pending_tasks max_task_wait_time active_shards_percent
1736139581 04:59:41  es-cluster green           3         3    123  56    0    0        0             0                  -                100.0%
epoch es集群一共运行了多少s
timestamp 当前时间 (格林尼治,北京时间+8h)
cluster 集群名字
node.tatal 集群可用节点个数
node.data 数据节点
shards 多少个分片(包含主分片、副本分片)
pri 主分片多少个
relo 迁移中的分片数量
init 初始化的分片数量
unassign 未分配的分片数量
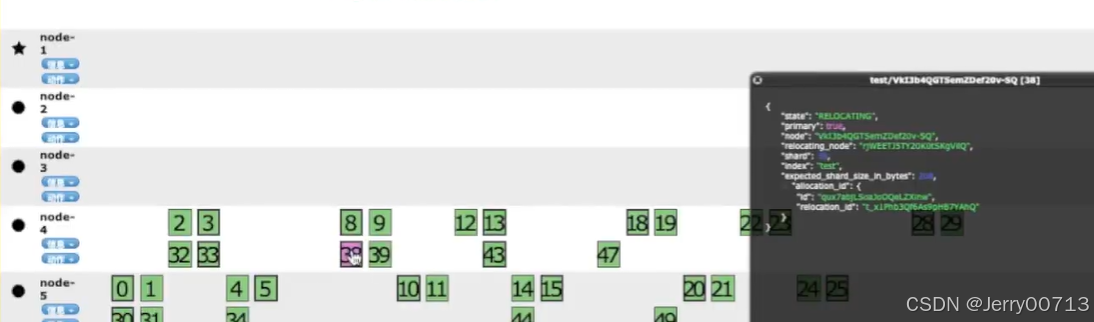
pending_tasks 准备执行任务中的数量(如下图,node1是master节点,node2、node3是候选节点。他们都不是数据节点,node1 是master负责调度,而候选节点啥也不用干,就监听。这里显示的是master干的活,比如创建索引给那个数据节点上,是需要master干的活,此时创建的任务,准备执行任务中的数量为1)
max_task_wait_time 最大任务等待时间
active_shards_percent 集群分片激活程度

{
"cluster_name": "Linux",
"status": "green",   状态
"timed_out": false,
"number_of_nodes": 3,            有多少个节点
"number_of_data_nodes": 3,       有多少个数据节点
"active_primary_shards": 5,      一共有多少个主分片
"active_shards": 10,             活动的分片一共有多少个(主分片+副本分片)
"relocating_shards": 0,          迁移中的分片数量
"initializing_shards": 0,        初始化的分片数量
"unassigned_shards": 0,          未分配的分片数量
"delayed_unassigned_shards": 0,
"number_of_pending_tasks": 0,
"number_of_in_flight_fetch": 0,
"task_max_waiting_in_queue_millis": 0,
"active_shards_percent_as_number": 100
}
未分配的分片数量 :节点没有使用的
初始化索引的分片数量:新建一个分片数大的,立刻查看,发现黄色的就是初始化索引
迁移中的分片数量:索引在迁移过程中,比如一个es node节点宕机,索引就会迁移,如下粉色

节点角色:
主节点:负责调度数据反回数据
工作节点:负责处理数据默认情况下:
1、所有节点都是工作节点
2、主节点及负责调度有负责处理数据
3、主节点跟谁先启动有关
3、脑裂后合并
准备二台机器:10.4.7.2、10.4.7.3。关闭10.4.7.4的ES,让10.4.7.2、10.4.7.3成为集群
思路:
1、注释10.4.7.2、10.4.7.3的discovery.zen.minimum_master_nodes: 2,修改discovery.zen.ping.unicast.hosts: ["10.4.7.2", "10.4.7.3"]。关闭10.4.7.4的ES。使得让10.4.7.2、10.4.7.3成为集群,并且集群在一个节点的时候也能启动
2、关闭10.4.7.2、10.4.7.3的ES,清空10.4.7.3数据:rm -rf /data/elasticsearch/*,启动10.4.7.3,在10.4.7.3插入数据。同样的手法,关闭10.4.7.2、10.4.7.3,清空10.4.7.2,启动10.4.7.2,10.4.7.2插入数据。最后重启10.4.7.2、10.4.7.3然后由于配置集群,然后就会成为集群。集群中还是green无问题
3、这个时候问题就来了,这两个数据应该怎么办,是合并还是吞并。
答:如果10.4.7.2中有的数据,10.4.7.3没有,就会合并这些数据。如果数据有冲突,比如10.4.7.2中有A库B表id=1的一行数据,10.4.7.3中有A库B表id=1的一行数据。全部都一样,这就导致你刷新一次显示10.4.7.2的数据,在刷新一次显示10.4.7.3数据
总结:如果出现这种情况,解决办法:
两个master,需要清空一个节点的数据,以一台为准。
操作:把一个节点的数据清空:rm -rf /data/elasticsearch/*。然后重启启动此节点,这样由于此节点数据是空,集群后,就会同步另一个master数据
4、ES分片与副本讲解
1、默认分配数据(5分片1副本。也就是5个主分片跟1套副本。一套副本就是5个主分片内容)
2、ES分散数据:比如3节点,如果其中一台节点损坏后,数据不会丢(0~4依旧在其他节点存在)


3、比如3节点,如果其中一台节点损坏后,剩下两个节点会立即同步各自的数据。这样的好处是,如果其中一台节点有坏了,数据不会丢(0~4依旧在其他节点存在)
注意:如果是3节点,两个节点同时丢失(这里指两个节点的/data/elasticsearch/*数据全部丢失,就会导致部分的数据丢失。如果是停止,启动后会立同步)

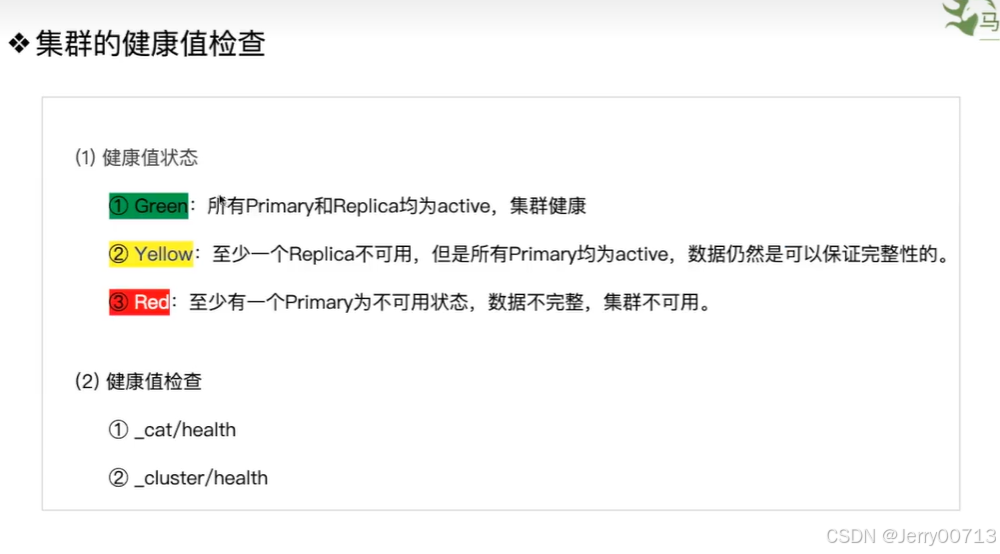
4、集群状态颜色:
绿色:所有条件都满足,数据完整,副本满足
黄色:数据完整,副本不满足
红色:有索引数据出现不完整了(集群中有3个节点,2个节点同时宕机导致的数据丢失后,红色)。注意:一旦是红色,那些缺少分片的节点不能插入数据,但是不缺少分片的能插入数据
紫色:有分片正在同步中(集群中有3个节点,2个节点依次宕机数据未丢失后,启动节点,这时候就会选举主分片在哪个节点。选举的时候主分片是紫色)
5、思考如何做集群监控:不能只监控green。这是因为你有3个节点,停止一个节点,剩下2个节点依旧能green。所以要监控有多少节点。报警怎么写(监控green、监控有多少节点):是or( 只要有一个满足就报警)
[root@7-3 ~]# curl -XGET 'http://localhost:9200/_cat/nodes?human&pretty'
10.4.7.2 21 95  5 0.05 0.06 0.13 mdi - node-1
10.4.7.3 27 93 92 6.33 4.59 4.26 mdi - node-2
10.4.7.4 24 93  0 0.00 0.01 0.05 mdi * node-3
[root@7-3 ~]# curl -XGET 'http://localhost:9200/_cat/nodes?human&pretty' |wc -l
  % Total    % Received % Xferd  Average Speed   Time    Time     Time  Current
                                 Dload  Upload   Total   Spent    Left  Speed
  0     0    0     0    0     0      0      0 --:--:--  0:00:03 --:--:--     0
100   138  100   138    0     0     29      0  0:00:04  0:00:04 --:--:--    29
3
[root@7-3 ~]#
[root@7-3 ~]# curl -s -XGET 'http://localhost:9200/_cat/nodes?human&pretty' |wc -l
3

解释:
执行curl命令时,会返回这样的% Total % Received % 统计信息
curl -s 不输出统计信息
6、默认是5分片1副本,如何修改
默认分片数据:
[root@7-3 ~]# curl -XPUT 'localhost:9200/index1?pretty'
{
  "acknowledged" : true,
  "shards_acknowledged" : true,
  "index" : "index1"
}
创建索引的时候指定分片和副本:
[root@7-3 ~]# curl -XPUT 'localhost:9200/index2?pretty' -H 'Content-Type: application/json' -d'
{
   "settings" : {
   "number_of_shards" : 3,     指定分片
   "number_of_replicas" : 1      指定副本
  }
}'
已经创建的索引修改:
首先声明,已经创建的索引,分片是不可以改,但是可以改副本。理由:分片是主节点,副本是复制主节点
[root@7-3 ~]# curl -XPUT 'localhost:9200/index2/_settings?pretty' -H 'Content-Type: application/json' -d'
{
   "settings" : {
   "number_of_replicas" : 2      指定副本
  }
}'
思考:目前集群中3个节点,索引分别是5节点1副本、3节点2副本。如果停止一个节点,是green? 答:是yellow,因为3节点2副本,停止一个节点后,构建不成2副本,导致黄色:数据完整,副本不满足

三、ES单节点(8.x)
1、准备环境
1.系统优化
略

2.es依赖配置
#修改文件打开数量上线,修改后需要断开会话
cat >> /etc/security/limits.d/es7.conf <<EOF
*	soft	nofile	65535
*	hard	nofile	131070
*	hard	nproc	8192
EOF

[root@node01 ~]# ulimit -Sn
65535

[root@node01 ~]# ulimit -Hn
131070

#调大内核虚拟内存映射值
cat >> /etc/sysctl.d/es.conf <<EOF
vm.swappiness=1
vm.max_map_count=524288
EOF

sysctl -q vm.max_map_count
sysctl -f  /etc/sysctl.d/es.conf
sysctl -q vm.max_map_count
2、创建用户
useradd -u 2024 es8
3.下载解压安装包
3.1 下载es8
https://www.elastic.co/cn/downloads/past-releases#elasticsearchhttps://www.elastic.co/cn/downloads/past-releases#elasticsearch
https://www.elastic.co/cn/downloads/past-releases#elasticsearch
wget https://artifacts.elastic.co/downloads/elasticsearch/elasticsearch-8.10.4-linux-x86_64.tar.gz3.2 解压安装创、建目录
tar -xf elasticsearch-8.10.4-linux-x86_64.tar.gz -C /opt
cd /opt
ln -s elasticsearch-8.10.4 elasticsearch
[root@node1 opt]# cd /opt/elasticsearch
[root@node1 elasticsearch]# ll
总用量 2204
drwxr-xr-x  2 root root    4096 10月 12 2023 bin
drwxr-xr-x  3 root root     210 1月   5 09:57 config
drwxr-xr-x  8 root root      96 10月 12 2023 jdk
drwxr-xr-x  5 root root    4096 10月 12 2023 lib
-rw-r--r--  1 root root    3860 10月 12 2023 LICENSE.txt
drwxr-xr-x  2 root root       6 10月 12 2023 logs
drwxr-xr-x 76 root root    4096 10月 12 2023 modules
-rw-r--r--  1 root root 2231504 10月 12 2023 NOTICE.txt
drwxr-xr-x  2 root root       6 10月 12 2023 plugins
-rw-r--r--  1 root root    8157 10月 12 2023 README.asciidoc
root@node1 elasticsearch]# mkdir data

/opt/elasticsearch #安装目录
/opt/elasticsearch/data #数据目录
/opt/elasticsearch/logs #日志目录
3.3 授权目录
chown  -R  es8:es8  /opt/elasticsearch
chown -R es8:es8 /opt/elasticsearch-8.10.4/
4、配置环境变量
vim /etc/profile.d/ES_ENV.sh
#!/bin/bash

export ES_HOME=/opt/elasticsearch
export PATH=$PATH:$JAVA_HOME/bin:$ES_HOME/bin
source /etc/profile
5、修改配置文件
]# su es8
]$ cd /opt/elasticsearch/config
]$ cp elasticsearch.yml{,bak}
cat >elasticsearch.yml <<EOF
cluster.name: my-elk
node.name: node01
path.data: /opt/elasticsearch/data
path.logs: /opt/elasticsearch/logs
network.host: 0.0.0.0
http.port: 9200
EOF


# 集群名称
cluster.name: my-elk
# 节点名称,仅仅是描述名称,用于在日志中区分
node.name: node1
# 当前节点的IP地址
network.host: node1
http.port: 9200

#数据存放的位置
path.data: /opt/elasticsearch/data
#日志存放的位置
path.logs: /opt/elasticsearch/logs
# head 插件需要这打开这两个配置
http.cors.allow-origin: "*"
http.cors.enabled: true
http.max_content_length: 200mb
#es7.x之后新增的配置,初始化一个新的集群时需要配置来选举master
cluster.initial_master_nodes: ["node1"]
注意:关于ssI等其他的配置,会默认开启。
6、使用system启动es
cat >> /usr/lib/systemd/system/elasticsearch.service << EOF
# /usr/lib/systemd/system/elasticsearch.service
[Unit]
Description=elasticsearch2023
After=network.target

[Service]
Type=simple
ExecStart=/opt/elasticsearch/bin/elasticsearch
User=es8
LimitNOFILE=655350

[Install]
WantedBy=multi-user.target
EOF
查看日志
tail -1000f /opt/elasticsearch/logs/my-elk.log
7、访问验证
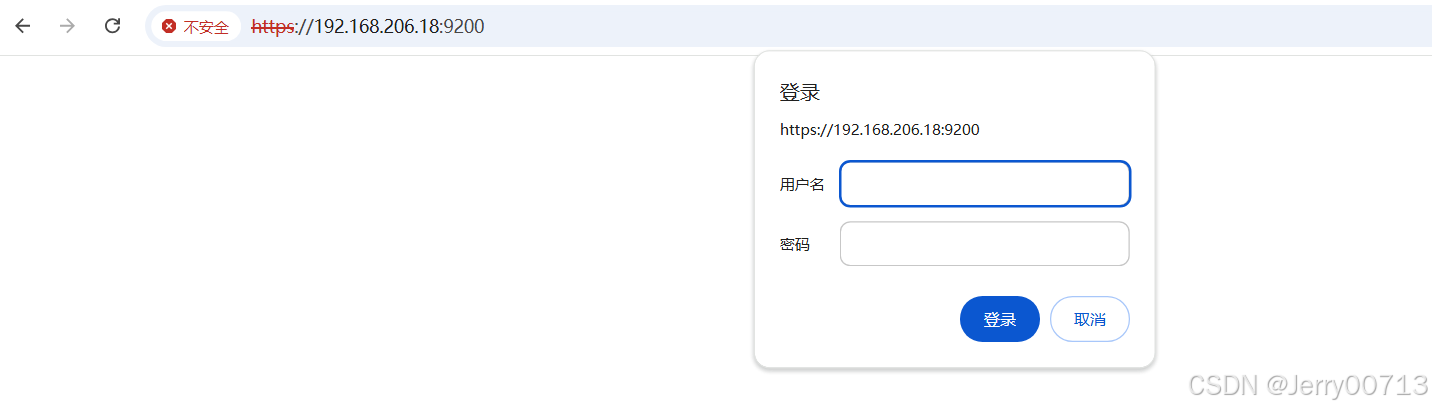
注意是 https:IP:9200
8、重置elastic密码
8.1 重置随机密码
cd /opt/elasticsearch/bin
./elasticsearch-reset-password -u elastic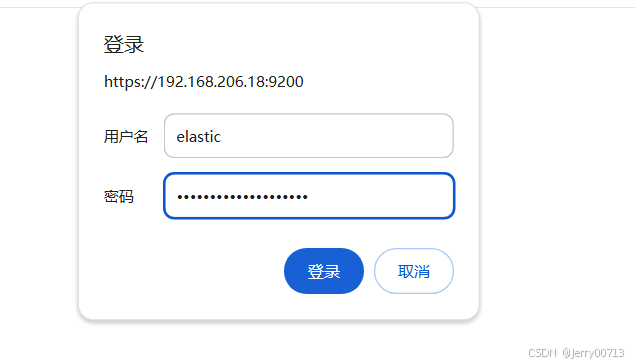
8.2 自定义密码
./elasticsearch-reset-password -u elastic -i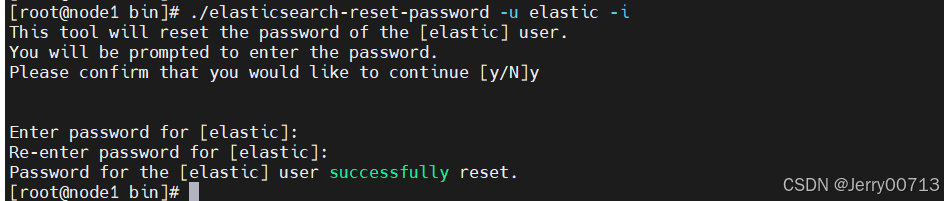
9、jvm内存调整
由于Elasticsearch是Java开发的,所以可以通过jvm.options配置文件来设定JVM的相关设定。如果没有特殊需求按默认即可。
不过其中还是有两项最重要的-Xmx1g与-Xms1gJVM的最大最小内存。如果太小会导致Elasticsearch刚刚启动就立刻停止。太大会拖慢系统本身。
根据实际情况调整
vim /opt/elasticsearch/config/jvm.options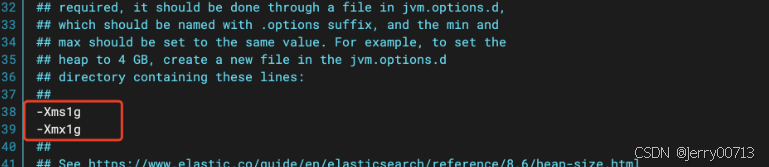
systemctl restart elasticsearch.service
ps -ef | grep elastic | grep 1g
10、es 引用其他 jdk
es 默认自带jdk,如果想引用其他的版本jdk,,比如jdk-8u421安装
]# rz jdk-8u421-linux-x64.tar.gz
]# tar -zxvf jdk-8u421-linux-x64.tar.gz -C /usr/local/
]# cd /usr/local/
]# ln -s jdk1.8.0_421/ jdk

]# cat >>/etc/profile <<EOF

export JAVA_HOME=/usr/local/jdk
export JRE_HOME=${JAVA_HOME}/jre
export CLASSPATH=.:${JAVA_HOME}/lib:${JRE_HOME}/lib
export PATH=\${JAVA_HOME}/bin:\$PATH
EOF

]# source /etc/profile
然后在systemctl 中加入引用
cat >> /usr/lib/systemd/system/elasticsearch.service << EOF
# /usr/lib/systemd/system/elasticsearch.service
[Unit]
Description=elasticsearch2023
After=network.target

[Service]
Type=simple
Environment=JAVA_HOME=/usr/local/jdk
ExecStart=/opt/elasticsearch/bin/elasticsearch
User=es8
LimitNOFILE=655350

[Install]
WantedBy=multi-user.target
EOF
四、ES集群(8.x)(非认证方式)
1、环境准备
采用三台CentOS7.6部署Elasticsearch集群,部署Elasticsearch集群就不得不提索引分片,以下是索引分片的简单介绍。
| 系统 | 节点名称 | IP地址 |
| centos stream 8 | node1 | 192.168.206.18 |
| centos stream 8 | node2 | 192.168.206.19 |
| centos stream 8 | node3 | 192.168.206.20 |
配置hostname
hostnamectl set-hostname node1
hostnamectl set-hostname node1
hostnamectl set-hostname node1
在node1、node2、node3上都要执行一下操作:
echo "192.168.206.18 node1" >>/etc/hosts
echo "192.168.206.19 node2" >>/etc/hosts
echo "192.168.206.20 node3" >>/etc/hosts
所有节点执行
1.系统优化
略

2.es依赖配置
#修改文件打开数量上线,修改后需要断开会话
cat >> /etc/security/limits.d/es7.conf <<EOF
*	soft	nofile	65535
*	hard	nofile	131070
*	hard	nproc	8192
EOF

ulimit -Sn
ulimit -Hn


#调大内核虚拟内存映射值
cat >> /etc/sysctl.d/es.conf <<EOF
vm.swappiness=1
vm.max_map_count=524288
EOF

sysctl -q vm.max_map_count
sysctl -f  /etc/sysctl.d/es.conf
sysctl -q vm.max_map_count
2、创建用户
useradd -u 2024 es8
3.下载解压安装包
3.1 下载es8
https://www.elastic.co/cn/downloads/past-releases#elasticsearchhttps://www.elastic.co/cn/downloads/past-releases#elasticsearch
https://www.elastic.co/cn/downloads/past-releases#elasticsearch
wget https://artifacts.elastic.co/downloads/elasticsearch/elasticsearch-8.10.4-linux-x86_64.tar.gz3.2 解压安装创、建目录
tar -xf elasticsearch-8.10.4-linux-x86_64.tar.gz -C /opt
cd /opt
ln -s elasticsearch-8.10.4 elasticsearch
[root@node1 opt]# cd /opt/elasticsearch
[root@node1 elasticsearch]# ll
总用量 2204
drwxr-xr-x  2 root root    4096 10月 12 2023 bin
drwxr-xr-x  3 root root     210 1月   5 09:57 config
drwxr-xr-x  8 root root      96 10月 12 2023 jdk
drwxr-xr-x  5 root root    4096 10月 12 2023 lib
-rw-r--r--  1 root root    3860 10月 12 2023 LICENSE.txt
drwxr-xr-x  2 root root       6 10月 12 2023 logs
drwxr-xr-x 76 root root    4096 10月 12 2023 modules
-rw-r--r--  1 root root 2231504 10月 12 2023 NOTICE.txt
drwxr-xr-x  2 root root       6 10月 12 2023 plugins
-rw-r--r--  1 root root    8157 10月 12 2023 README.asciidoc
root@node1 elasticsearch]# mkdir data

/opt/elasticsearch #安装目录
/opt/elasticsearch/data #数据目录
/opt/elasticsearch/logs #日志目录
3.3 授权目录
chown  -R  es8:es8  /opt/elasticsearch
chown -R es8:es8 /opt/elasticsearch-8.10.4/
4、配置环境变量
vim /etc/profile.d/ES_ENV.sh
#!/bin/bash

export ES_HOME=/opt/elasticsearch
export PATH=$PATH:$JAVA_HOME/bin:$ES_HOME/bin
source /etc/profile.d/ES_ENV.sh
5、集群配置文件
此处由于添加xpack.security.enabled: false是非认证方式,如果想要添加认证方法,直接跳到第六步
注意各节点的node.name和network.host不同,node2和node3节点无需配置discovery.seed hosts和cluster.initial master nodes。 network.host也可以填写0.0.0.0
node1:
]# su es8
]$ cd /opt/elasticsearch/config
]$ cp elasticsearch.yml{,bak}

]$ grep -v "^#\|^$" elasticsearch.yml
cluster.name: es-cluster
node.name: node1
network.host: 0.0.0.0
http.port: 9200
discovery.seed_hosts: ["node1", "node2", "node3"]
cluster.initial_master_nodes: ["node1", "node2", "node3"]
http.cors.enabled: true
http.cors.allow-origin: "*"
xpack.security.enabled: false


#指定集群名称3个节点必须一致
cluster.name:es-cluster
#指定节点名称,每个节点名字唯一,仅仅是描述名称,用于在日志中区分
node.name:node-1
#绑定ip,开启远程访问,可以配置0.0.0.0
network.host:0.0.0.0
#担任角色,master 和 数据
node.roles: [master, data]
#指定web端口,对外提供服务的端口
http.port:9200
#指定tcp端囗,9300为集群服务的端口
transport.tcp.port:9308
#用于节点发现,一般配置集群的候选主节点
discovery.seed hosts:['es-node1","es-node2","es-node3"]
#7.0新引入的配置项,集群引导节点。指定集群初次选举中用到的具有主节点资格的节点称为集群引导节点,只在第一次形成集群时需要
#该选项配置为node.name的值,指定可以初始化集群节点的名称,可以一个节点,可以任意个节点
cluster.initial master nodes:["node-1","node-2","node-3"]
#解决跨域问题
http.cors.enabled:true
http.cors.allow-origin:"*"
#新启动建议关闭security安全认证,启动无问题在开启
xpack.security.enabled:false
transport.compress: true#集群内同时启动的数据任务个数,默认是2个
cluster.routing.allocation.cluster_concurrent_rebalance: 16
#初始化数据恢复时,兵法恢复线程的个数,默认4个
cluster.routing.allocation.node_initial_primaries_recoveries: 16

设置config/elasticsearch.yml属性action.destructive_requires_name为true,禁止使用通配符或者_all标识索引。
6、安装ik分词器
所有节点
[es8@node1 bin]$ ./elasticsearch-plugin install https://release.infinilabs.com/analysis-ik/stable/elasticsearch-analysis-ik-8.10.4.zip
-> Installing https://release.infinilabs.com/analysis-ik/stable/elasticsearch-analysis-ik-8.10.4.zip
-> Downloading https://release.infinilabs.com/analysis-ik/stable/elasticsearch-analysis-ik-8.10.4.zip
@@@@@@@@@@@@@@@@@@@@@@@@@@@@@@@@@@@@@@@@@@@@@@@@@@@@@@@@@@@
@     WARNING: plugin requires additional permissions     @
@@@@@@@@@@@@@@@@@@@@@@@@@@@@@@@@@@@@@@@@@@@@@@@@@@@@@@@@@@@
* java.net.SocketPermission * connect,resolve
See https://docs.oracle.com/javase/8/docs/technotes/guides/security/permissions.html
for descriptions of what these permissions allow and the associated risks.

Continue with installation? [y/N]y
-> Installed analysis-ik
-> Please restart Elasticsearch to activate any plugins installed
[es8@node1 bin]$
7、启动每个节点的ES服务
#注意: 如果运行过单节点模式,需要删除data目录,否则会导致无法加入集群 rm -rf data
所有节点启动ES
[es8@node1 elasticsearch]$ pwd
/opt/elasticsearch
[es8@node1 elasticsearch]$ bin/elasticsearch -d
验证集群任意访问一个node节点的地址
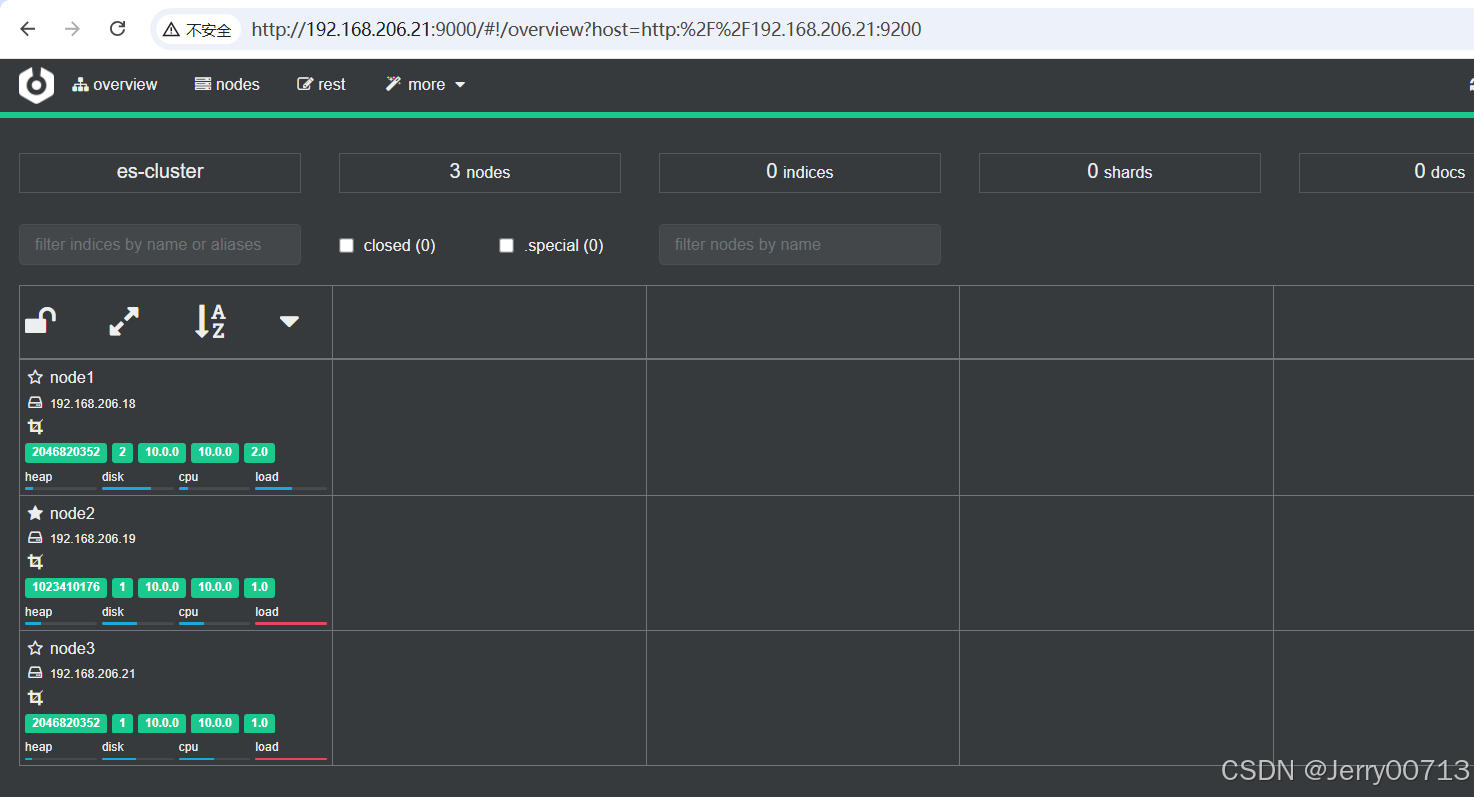
http://192.168.206.18:9200/_cat/nodes?pretty

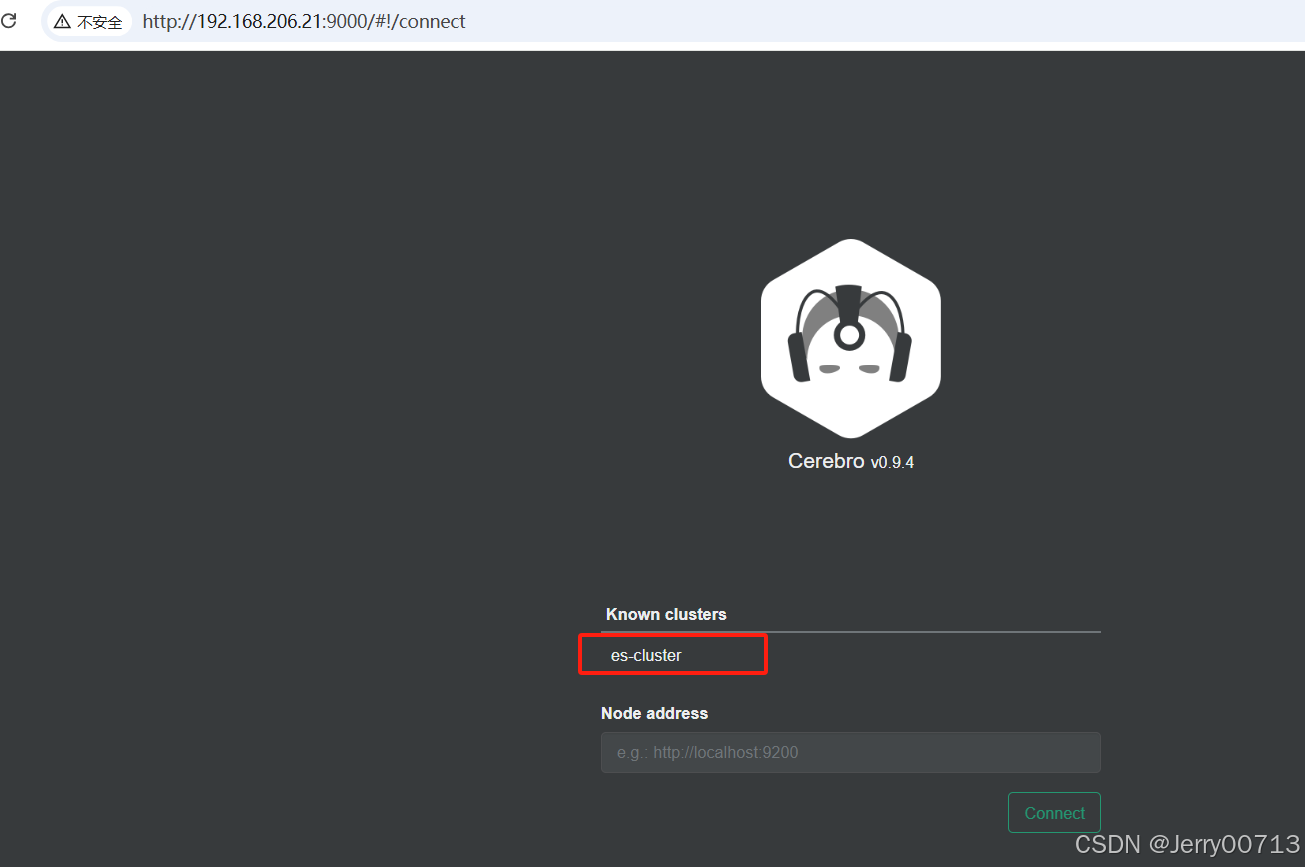
五、部署可视工具Cerebro客户端
5.1、Cerebro介绍
Cerebro 可以查看分片分配和通过图形界面执行常见的索引操作。 完全开源,并且它允许添加用户,密码或 LDAP 身份验证问网络界面。Cerebro 基于 Scala 的Play 框架编写,用于后端 REST和 Elasticsearch 通信。它使用通过 Angulars 编写的单页应用程序(SPA)前端。
顶目网址:https://github.com/lmenezes/cerebro
5.2、安装 Cerebro
下载地址:
wget https://github.com/lmenezes/cerebro/releases/download/v0.9.4/cerebro-0.9.4.tgz
下载cerebro
wget https://github.com/lmenezes/cerebro/releases/download/v0.9.4/cerebro-0.9.4.tgz
解压
tar xf cerebro-0.9.4.tgz -C /opt/elasticsearch
chown -R es8:es8 /opt/elasticsearch
部署jdk (系统有不用部署)
]# rz jdk-8u421-linux-x64.tar.gz
]# tar -zxvf jdk-8u421-linux-x64.tar.gz -C /usr/local/
]# cd /usr/local/
]# ln -s jdk1.8.0_421/ jdk

]# cat >>/etc/profile <<EOF

export JAVA_HOME=/usr/local/jdk
export JRE_HOME=${JAVA_HOME}/jre
export CLASSPATH=.:${JAVA_HOME}/lib:${JRE_HOME}/lib
export PATH=\${JAVA_HOME}/bin:\$PATH
EOF

]# source /etc/profile
将集群信息写入配置文件(写入后相当于访问直接能跳转进去,如果不写,每次登录都会手动输入连接的es)
#可以在浏览器页面手动输入es集群信息
#将集群信息写入配置文件后,即可在web页面选择集群vi /opt/elasticsearch/cerebro-0.9.4/conf/application.conf
... ...
auth={
    type: basic
    settings: {
        username="admin"					# 访问cerebro的用户名
        password="Admin_2018"				# 访问cerebro的密码
    }
}
hosts = [
  {
    host = "http://es1.dev.1datatm.info:9200"		# 集群连接地址
    name = "es-cluster"							    # 集群标识
    auth = {                                        # 配置es的用户名跟密码
      username = "username"
      password = "secret-password"
    }

  }
... ...
加入systemctl管理
chown -R es8:es8 /opt/elasticsearch
vim /lib/systemd/system/cerebro.service
[Unit]
Description=Cerebro
After=network.target

[Service]
Type=folking
LimitNOFILE=65535
Environment=JAVA_HOME=/usr/local/jdk    # 写的是可用的jdk
ExecStart=/opt/elasticsearch/cerebro-0.9.4/bin/cerebro -Dconfig.file=/opt/elasticsearch/cerebro-0.9.4/conf/application.conf
Restart=on-failure
WorkingDirectory=/opt/elasticsearch/cerebro-0.9.4

[Install]
WantedBy=multi-user.target
启动后默认
默认监听地址为0.0.0.0
默认端口为9000
访问 IP:9000
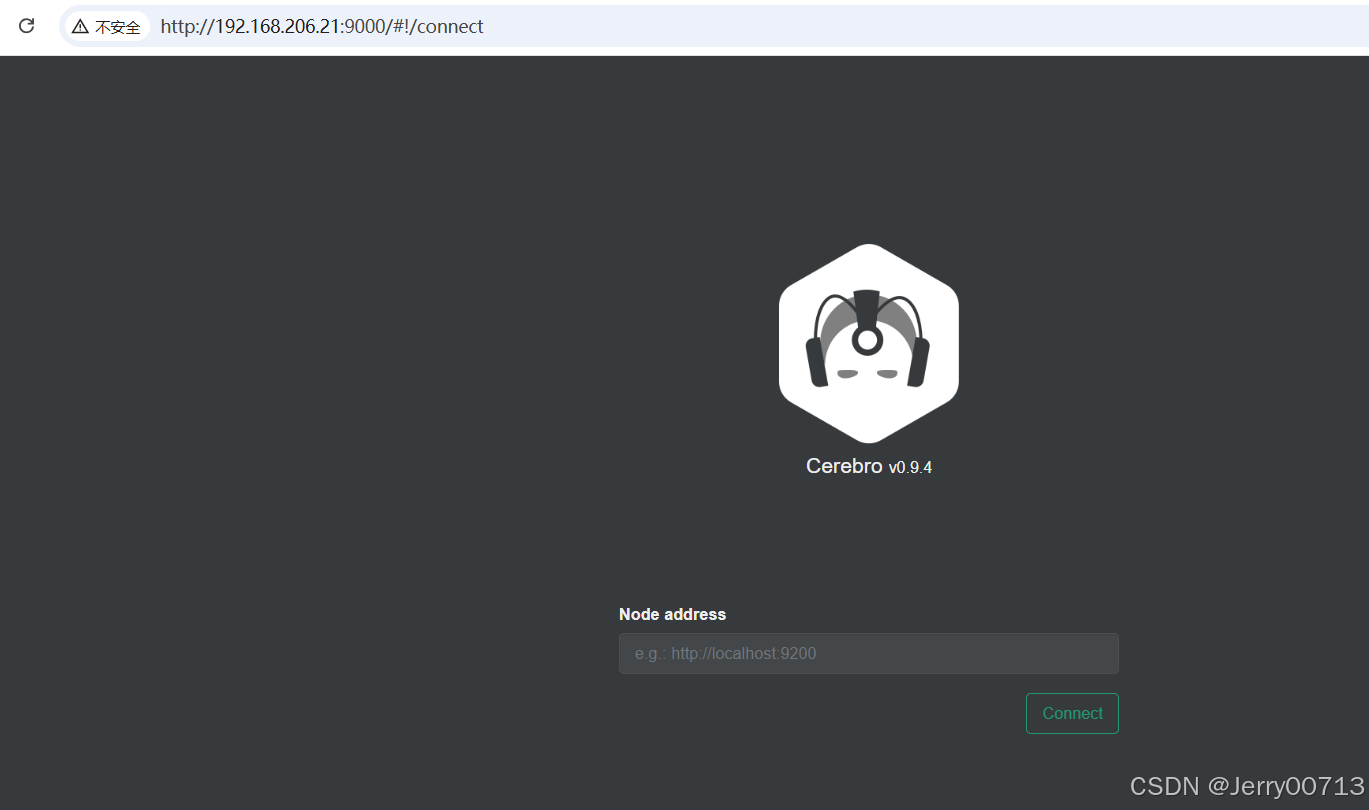
Node address 地址写任意一台es,比如 http://192.168.206.21:9200/
六、ES集群安全认证
ES敏感信息泄露的原因

基于Security的安全认证
ES8默认启动了Security,由于配置xpack.security.enabled: false导致不开启。ES8.x第一次启动之后会输出以下信息,此时服务已经启动成功了。
比如windows下第一次启动ES,会输出如下信息:
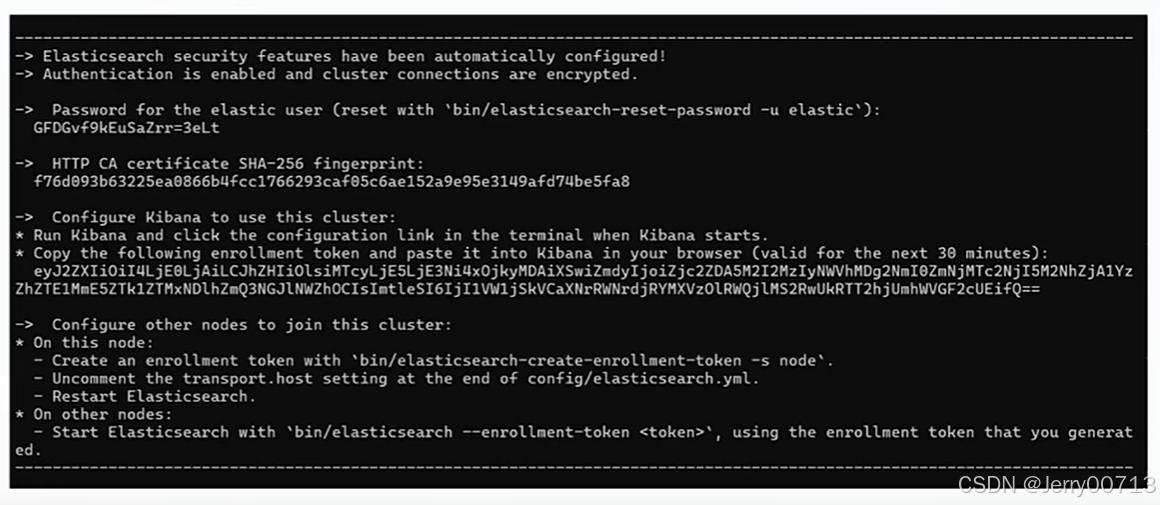
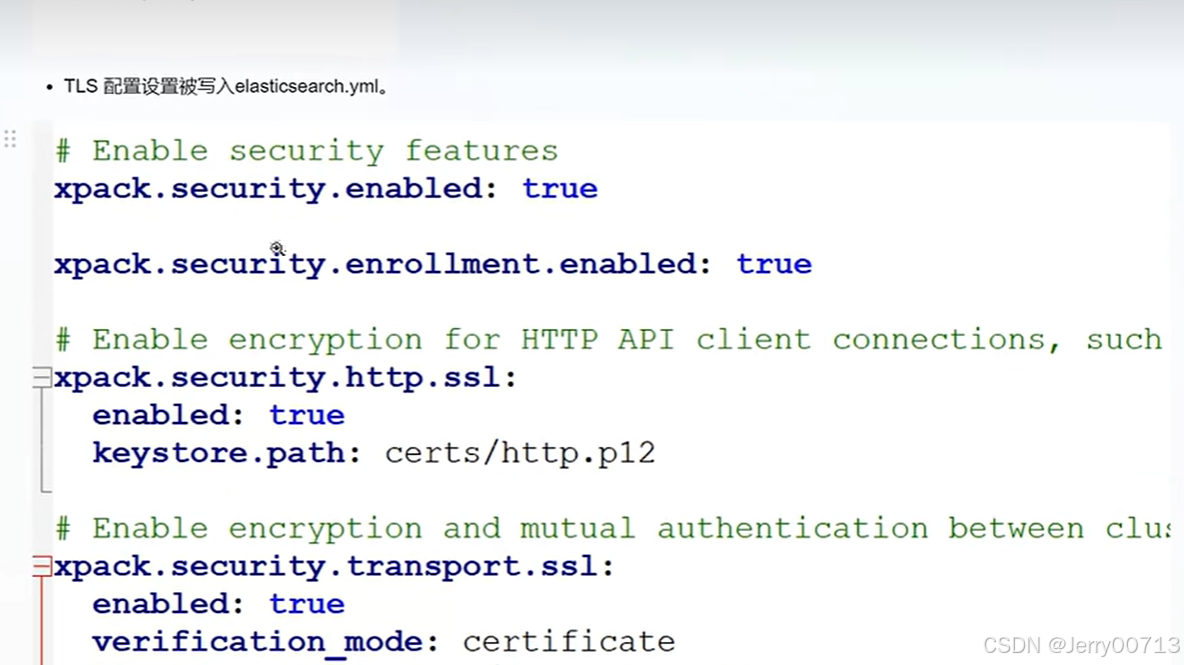
启动后生成证书信息
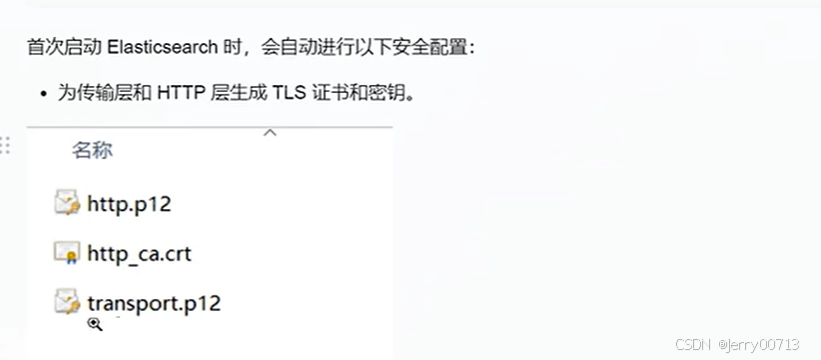
自动改文件
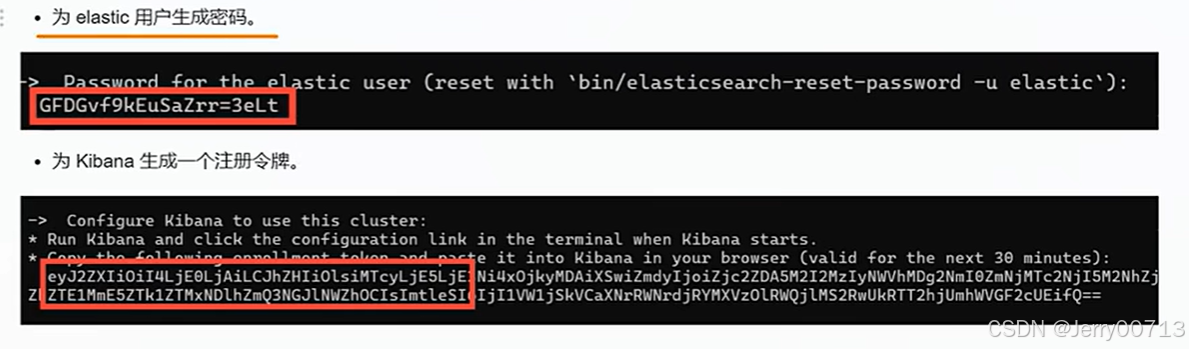
随后查看启动日志,生成密码
三节点ES集群增加安全认证
es8之后,认证集群方式:选一个节点做引导节点,然后其他节点加进来
6.1、node1 增加安全认证(做引导节点)
1) 停止所有已经启动的集群所有节点,建议并删除data目录,怕有数据问题
2) 以node-1为例,修改config/elasticsearch.yml配置文件
cluster.initial_master_nodes: ["node1"] # 改成只有自己
# xpack.security.enabled: false # 注释认证是flase
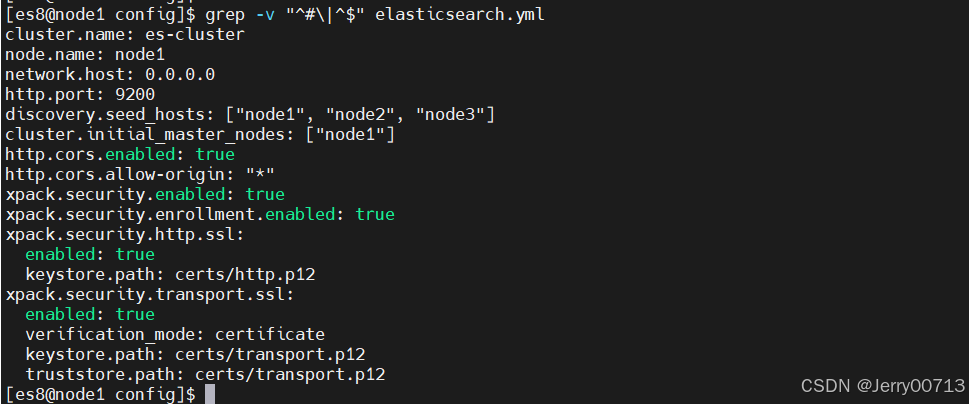
[es8@node1 config]$ grep -v "^#\|^$" elasticsearch.yml
cluster.name: es-cluster
node.name: node1
network.host: 0.0.0.0
http.port: 9200
discovery.seed_hosts: ["node1", "node2", "node3"]
cluster.initial_master_nodes: ["node1"]
http.cors.enabled: true
http.cors.allow-origin: "*"
启动es
[es8@node1 bin]$ pwd
/opt/elasticsearch/bin
[es8@node1 bin]$ ./elasticsearch -d
问题1:没有自动生成配置,又可能是你上述配置了cluster.initial_master_nodes: ["node1"] ,这个node1进行引导,可是你这个机器不是node1
查看配置文件自动修改了
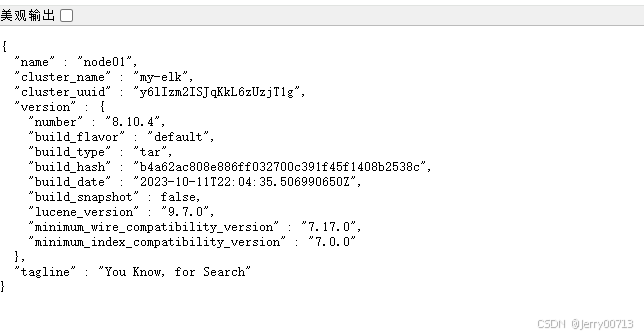
修改用户elastic的密码
./elasticsearch-reset-password -u elastic -i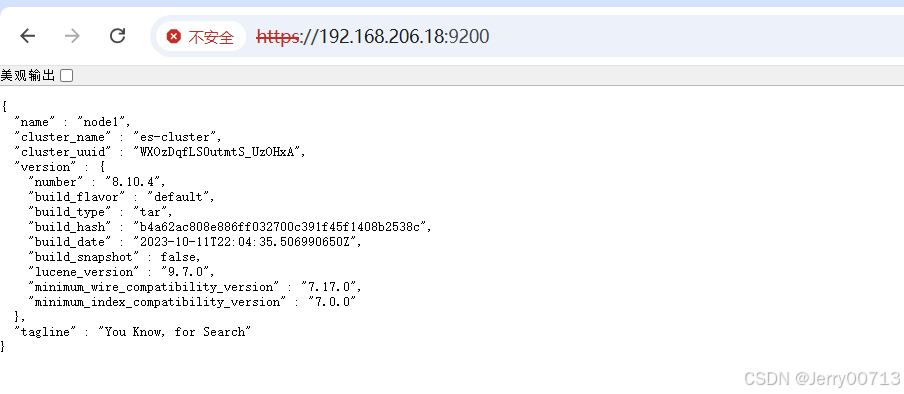
6.2、node-2和node-3加入集群
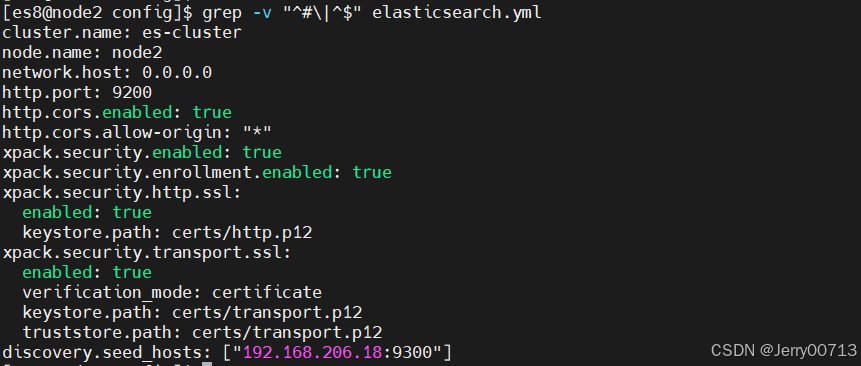
1) 修改node-2和node-3的 elasticsearch.yml配置文件
#discovery.seed_hosts: ["node1", "node2", "node3"] # 注释
#cluster.initial_master_nodes: ["node1", "node2", "node3"] # 注释
#xpack.security.enabled: false # 注释
[es8@node2 config]$ grep -v "^#\|^$" elasticsearch.yml
cluster.name: es-cluster
node.name: node2
network.host: 0.0.0.0
http.port: 9200
http.cors.enabled: true
http.cors.allow-origin: "*"
[es8@node2 config]$
2) node-2和node-3向node1引导的集群中加入
默认情况下,要向集群中添加新节点,需要通过令牌来完成节点之间的通信,在node-1中执行下面的命令为新节点生成注册令牌,其中 -s node 生成es node节点令牌,-s kibana 生成kibana 节点令牌
[es8@node1 bin]$ pwd
/opt/elasticsearch/bin
[es8@node1 bin]$ ./elasticsearch-create-enrollment-token -s node
eyJ2ZXIiOiI4LjEwLjQiLCJhZHIiOlsiMTkyLjE2OC4yMDYuMTg6OTIwMCJdLCJmZ3IiOiJjMTU3NjA4MDBhZWEyOWVmYTZjNGQ2NWE4ODk3ZjM2OGQ4ZWNmMzZhOWIxOGYzNzU2ZjM0YTY1N2Q4OTI2M2RhIiwia2V5IjoibjZfZ05aUUJ0cm9Yd2YzdTJBRko6Y194NW9EZThUbmU4WURiNGRRMF9fUSJ9
[es8@node1 bin]$
node-2和node-3 加入命令
./elasticsearch --enrollment-token 令牌 -d
./elasticsearch --enrollment-token eyJ2ZXIiOiI4LjEwLjQiLCJhZHIiOlsiMTkyLjE2OC4yMDYuMTg6OTIwMCJdLCJmZ3IiOiJjMTU3NjA4MDBhZWEyOWVmYTZjNGQ2NWE4ODk3ZjM2OGQ4ZWNmMzZhOWIxOGYzNzU2ZjM0YTY1N2Q4OTI2M2RhIiwia2V5Ijoib2Ffb05aUUJ0cm9Yd2YzdWFBR0o6Vi1MUG42VjhTX09CcUhaaXBwZ1RCZyJ9 -d
自动修改配置文件
注意:令牌有时间的,如果这样就是过期了,需要重新生成
![]()
注意:只有第一次这样后续就不用加令牌了

6.3、部署Kibana,将 kibana显示 es 集群
部署Kibana
]# cd /opt/elasticsearch
]# wget https://artifacts.elastic.co/downloads/kibana/kibana-8.10.4-linux-x86_64.tar.gz
]# tar -zxvf kibana-8.10.4-linux-x86_64.tar.gz
]# ln -s kibana-8.10.4 kibana
]# chown -R es8:es8 /opt/elasticsearch-8.10.4/
]# su es8
]$ cd /opt/elasticsearch/kibana/config

]$ grep -v "^#\|^$" kibana.yml    #
server.host: "192.168.206.19"   # 修改为自己的服务器IP
i18n.locale: "zh-CN"            # 修改kinana为中文

启动kibana
]$ cd /opt/elasticsearch/kibana/bin
]$ nohup ./kibana &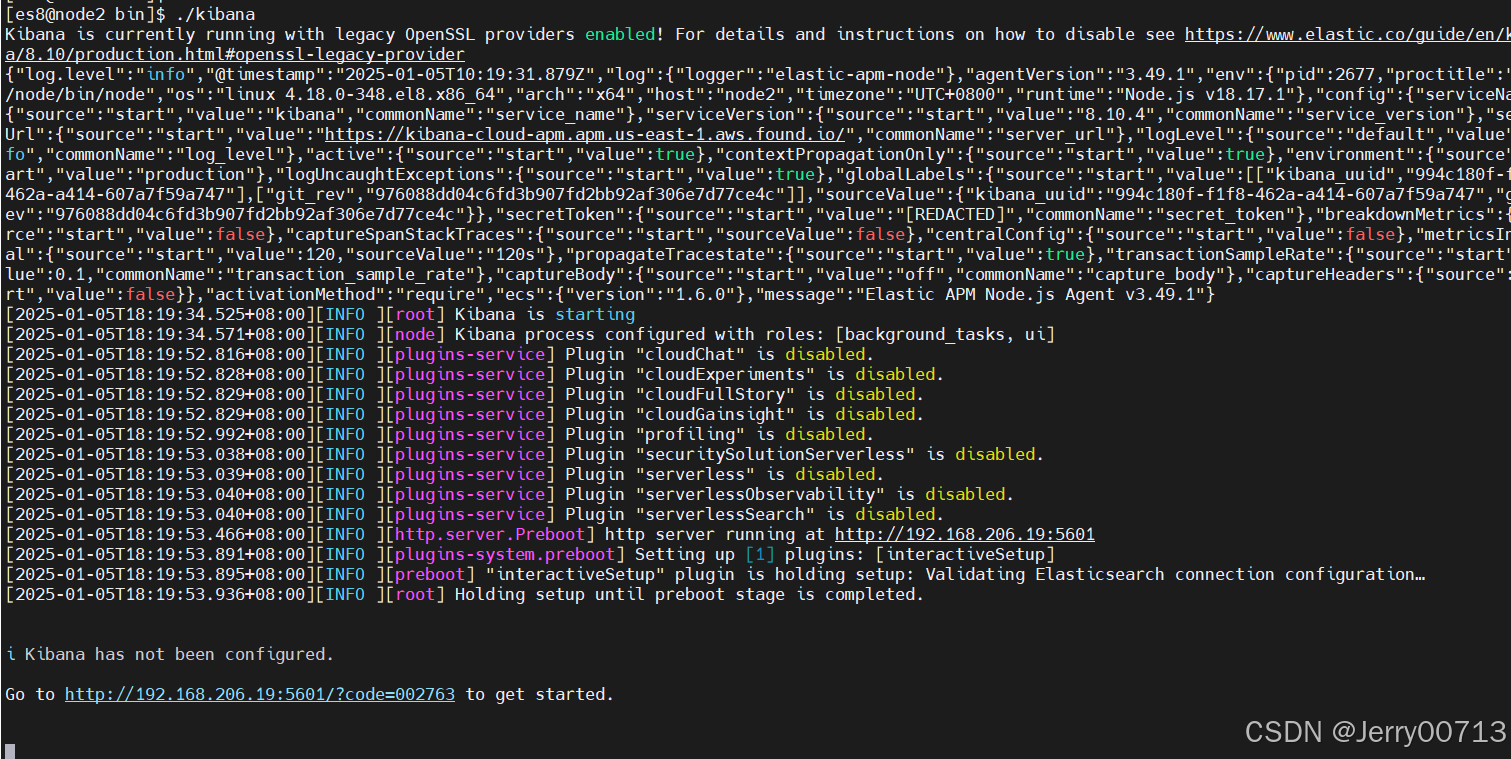
1) 进入 node1的 ES bin目录,生成kibana的注册令牌
[es8@node1 bin]$ pwd
/opt/elasticsearch/bin
[es8@node1 bin]$ ./elasticsearch-create-enrollment-token -s kibana
eyJ2ZXIiOiI4LjEwLjQiLCJhZHIiOlsiMTkyLjE2OC4yMDYuMTg6OTIwMCJdLCJmZ3IiOiJjMTU3NjA4MDBhZWEyOWVmYTZjNGQ2NWE4ODk3ZjM2OGQ4ZWNmMzZhOWIxOGYzNzU2ZjM0YTY1N2Q4OTI2M2RhIiwia2V5IjoibzY4Q05wUUJ0cm9Yd2YzdTFnRW86NU9VcEFLR3NUNy0zUGZFLXpOWE41USJ9
[es8@node1 bin]$
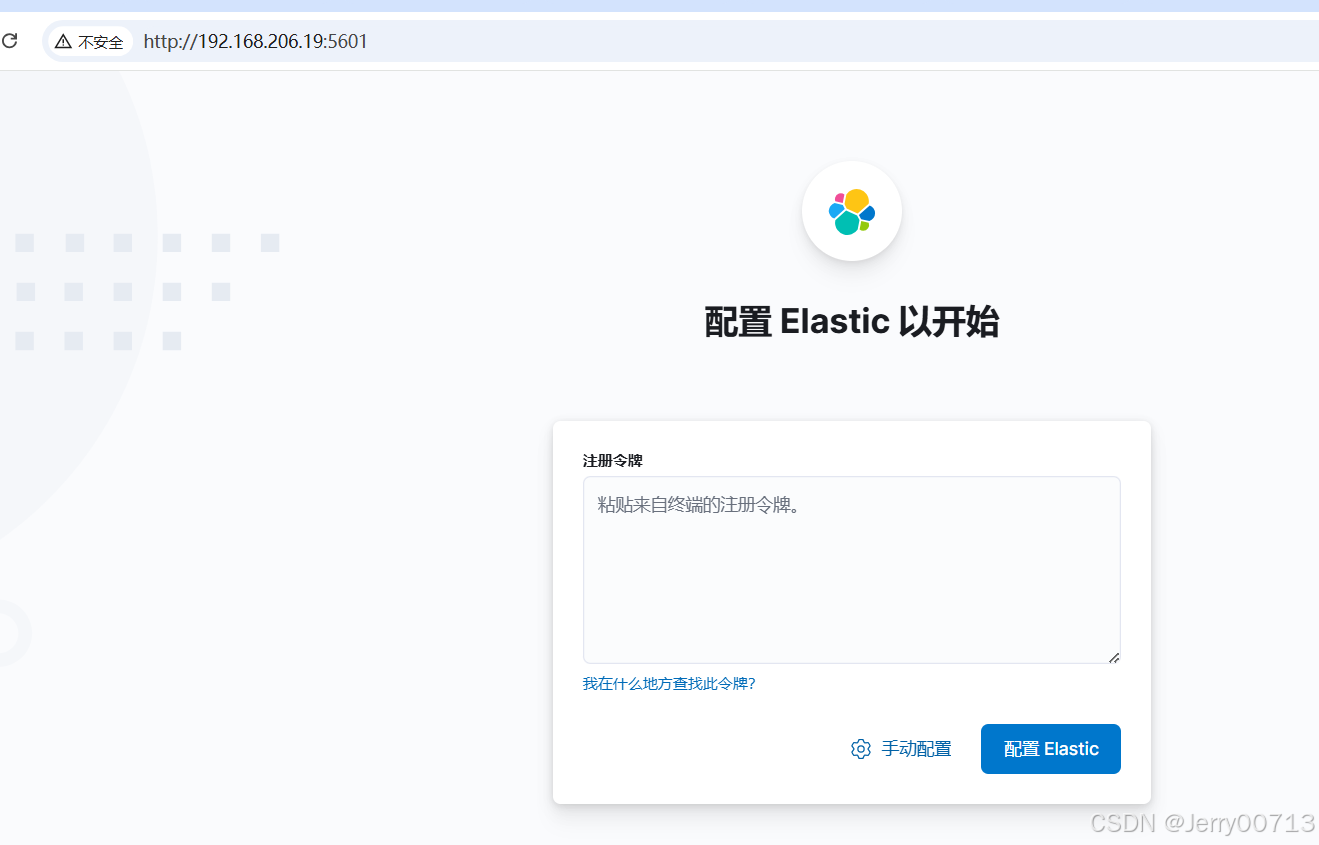
2) kibana 注入,进入 kibana 的 bin目录
![]()
[es8@node2 bin]$ pwd
/opt/elasticsearch/kibana/bin
[es8@node2 bin]$ ll
总用量 36
-rwxr-xr-x. 1 es8 es8  837 10月 12 2023 kibana
-rwxr-xr-x. 1 es8 es8  803 10月 12 2023 kibana-encryption-keys
-rwxr-xr-x. 1 es8 es8  807 10月 12 2023 kibana-health-gateway
-rwxr-xr-x. 1 es8 es8  796 10月 12 2023 kibana-keystore
-rwxr-xr-x. 1 es8 es8  813 10月 12 2023 kibana-plugin
-rwxr-xr-x. 1 es8 es8  793 10月 12 2023 kibana-setup
-rwxr-xr-x. 1 es8 es8  805 10月 12 2023 kibana-verification-code
-rw-------. 1 es8 es8 5718 1月   5 18:19 nohup.out
[es8@node2 bin]$ ./kibana-setup --enrollment-token eyJ2ZXIiOiI4LjEwLjQiLCJhZHIiOlsiMTkyLjE2OC4yMDYuMTg6OTIwMCJdLCJmZ3IiOiJjMTU3NjA4MDBhZWEyOWVmYTZjNGQ2NWE4ODk3ZjM2OGQ4ZWNmMzZhOWIxOGYzNzU2ZjM0YTY1N2Q4OTI2M2RhIiwia2V5IjoibzY4Q05wUUJ0cm9Yd2YzdTFnRW86NU9VcEFLR3NUNy0zUGZFLXpOWE41USJ9

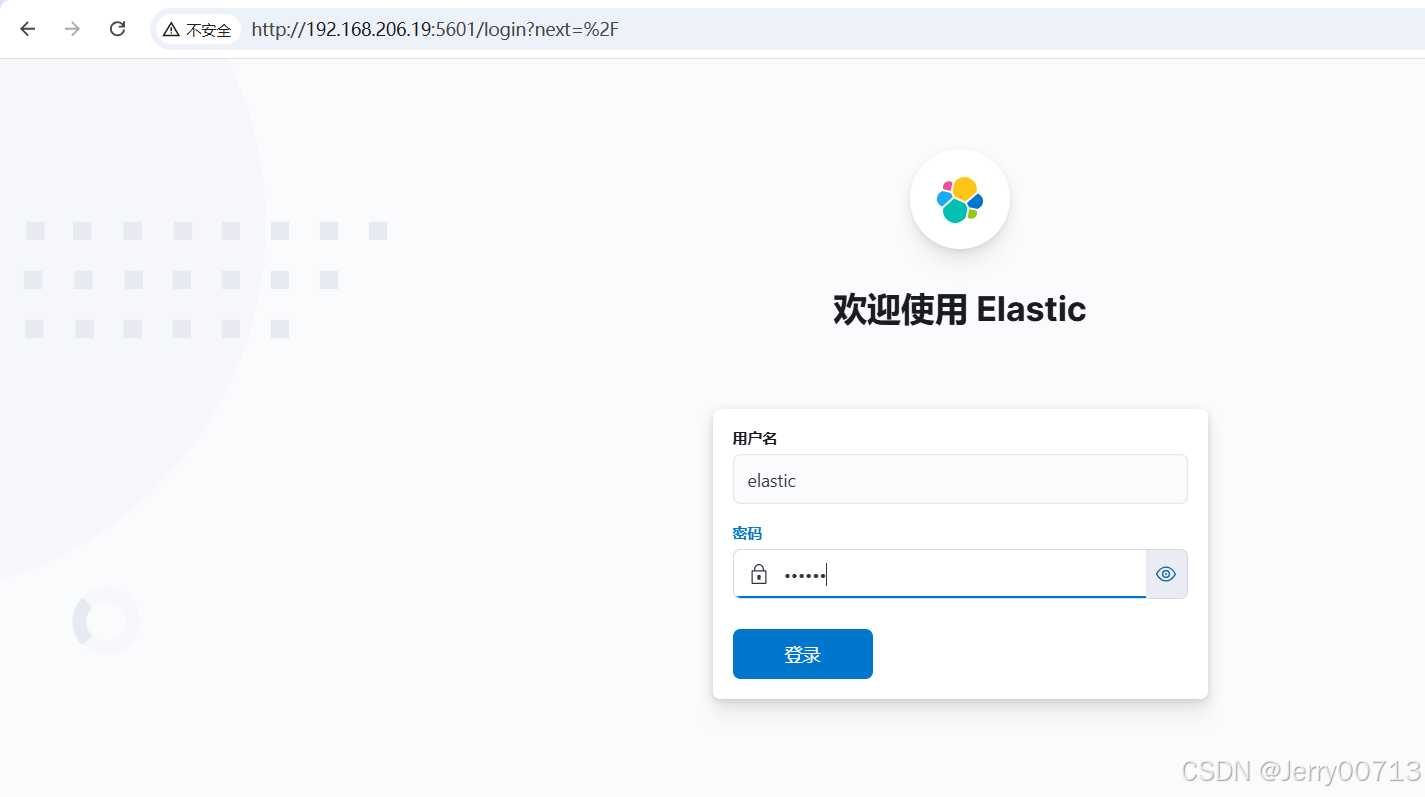
3)重启kibana 后
输入 es 的用户密码
6.4、部署cerebor,将 cerebor 显示 es 集群
1) 修改配置文件
[es8@node3 conf]$ pwd
/opt/elasticsearch/cerebro-0.9.4/conf
[es8@node3 conf]$ vi application.conf # 修改如下
hosts = [
    {
     host = "https://192.168.206.18:9200"
     name = "es-cluster"
     auth = {
       username = "elastic"
       password = "123456"
    }
 }
]


注意:host 里面只能是一个IP
2)启动cerebro服务
nohup bin/cerebro -Dplay.ws.ssl.loose.acceptAnyCertificate=true &或者
[root@node3 ~]# cat /usr/lib/systemd/system/cerebro.service
[Unit]
Description=Cerebro
After=network.target

[Service]
Type=folking
LimitNOFILE=655350
#Environment=JAVA_HOME=/opt/elasticsearch/jdk
Environment=JAVA_HOME=/usr/local/jdk
#ExecStart=/opt/elasticsearch/cerebro-0.9.4/bin/cerebro -Dconfig.file=/opt/elasticsearch/cerebro-0.9.4/conf/application.conf
ExecStart=/opt/elasticsearch/cerebro-0.9.4/bin/cerebro -Dplay.ws.ssl.loose.acceptAnyCertificate=true -Dconfig.file=/opt/elasticsearch/cerebro-0.9.4/conf/application.conf
Restart=on-failure
WorkingDirectory=/opt/elasticsearch/cerebro-0.9.4

[Install]
WantedBy=multi-user.target
七、Elasticsearch核心概念
7.1、什么是搜索引擎
全文搜索引擎
包含自然语言处理(NLP)、爬虫、网页处理、大数据处理如谷歌、百度、搜狗、必应等等
比如百度中搜索的是卡罗拉,在数据库中之过滤搜索到title=卡罗拉,其中卡罗拉可能是车,可能是音乐,百度都会显示
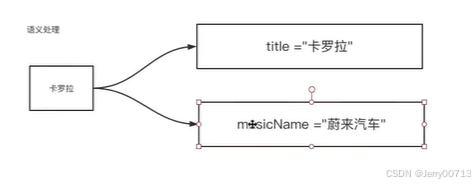
垂直搜索引擎(条件)
有明确搜索目的的搜索行为,比如各大电商网站、OA、站内搜索、视频网站等。比较明确的指定搜索条件。比如直接去汽车直接搜索卡罗拉,查到的信心就是卡罗卡小汽车
ES ≠ 搜索引擎,ES 除了搜索功能还有聚合分析、大数据存储。而搜索引擎还有自然语言处理(NLP)、爬虫、网页处理、大数据处理如谷歌、百度、搜狗、必应等等。只能说ES是搜索引擎的核心。
搜索引擎应该具备哪些要求?
查询速度快:高效的压缩算法 快速的编码和解码速度
结果准确:BM25(7.0x 版本之后)TF-IDF
检索结果丰富:召回率
面向海量数据,如何达到“搜索引擎”级别的查询效率?
索引,帮助快速检索,以数据结构为载体,以文件的形式落地
索引对应的存储位置 indices 目录下

查看索引的UUID
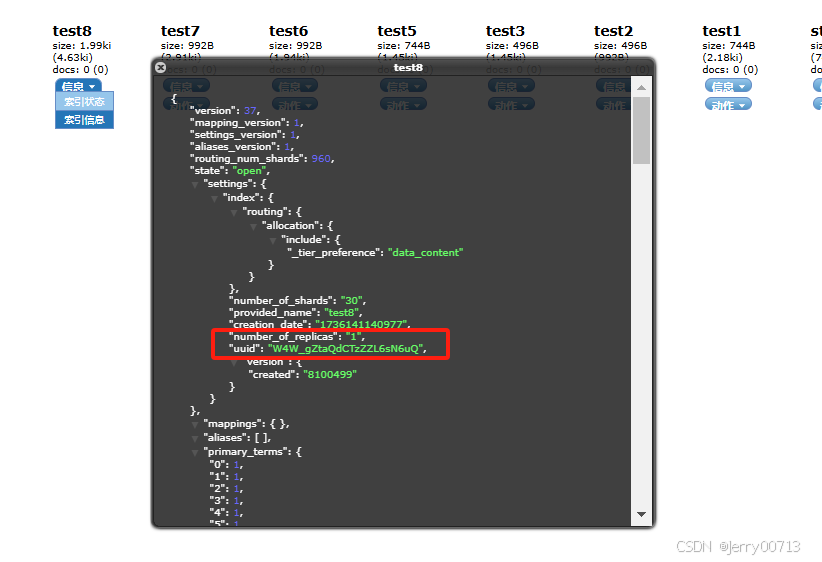

倒排索引深入解读


 1692
1692


 到【灌水乐园】发言


