


在过往的后台开发中,我们往往使用java自带的线程或线程池,来进行异步的调用。这对于效果来说没什么,甚至可以让开发人员对底层的状况更清晰,但是对于代码的易读性和可维护性却非常的差。
开发人员在实际使用过程中,应该更多的将精力放置在业务代码的书写过程中,而不是系统代码的维护中。你需要懂,但是不需要你直接维护去写,这才是编程语言的风向标。(这也是为什么spring在目前的java开发中,占用比重如此之大的原因之一)
下面来看使用Springboot 来实现异步调用的集中场景
一、简易注解,无需额外配置
1、添加@EnableAsync 到启动类(或者线程池配置类中)
2、添加@Async到需要异步执行的方法中
代码如下:
启动类
<pre class="prettyprint hljs java" style="padding: 0.5em; font-family: Menlo, Monaco, Consolas, "Courier New", monospace; color: rgb(68, 68, 68); border-radius: 4px; display: block; margin: 0px 0px 1.5em; font-size: 14px; line-height: 1.5em; word-break: break-all; overflow-wrap: break-word; white-space: pre; background-color: rgb(246, 246, 246); border: none; overflow-x: auto;">1 @EnableAsync
2 @SpringBootApplication
3 public class DemoLearnSpringbootApplication {
4
5 public static void main(String[] args) {
6 SpringApplication.run(DemoLearnSpringbootApplication.class, args);
7 }
8 }
调用类
<pre class="prettyprint hljs less" style="padding: 0.5em; font-family: Menlo, Monaco, Consolas, "Courier New", monospace; color: rgb(68, 68, 68); border-radius: 4px; display: block; margin: 0px 0px 1.5em; font-size: 14px; line-height: 1.5em; word-break: break-all; overflow-wrap: break-word; white-space: pre; background-color: rgb(246, 246, 246); border: none; overflow-x: auto;"> 1 @Component
2 public class SimpleAsyncDemo {
3 @Autowired
4 private SimpleTaskHandler simpleTaskHandler;
5
6
7 @PostConstruct
8 public void execTaskHandler1() {
9 try {
10 simpleTaskHandler.handle1(2);
11 simpleTaskHandler.handle2(2);
12 simpleTaskHandler.handle3(2);
13 simpleTaskHandler.handle1(2);
14 simpleTaskHandler.handle2(2);
15 simpleTaskHandler.handle3(2);
16 simpleTaskHandler.handle1(2);
17 simpleTaskHandler.handle2(2);
18 simpleTaskHandler.handle3(2);
19 } catch (InterruptedException e) {
20 e.printStackTrace();
21 }
22 }
23
24 }
被异步调用的类
<pre class="prettyprint hljs java" style="padding: 0.5em; font-family: Menlo, Monaco, Consolas, "Courier New", monospace; color: rgb(68, 68, 68); border-radius: 4px; display: block; margin: 0px 0px 1.5em; font-size: 14px; line-height: 1.5em; word-break: break-all; overflow-wrap: break-word; white-space: pre; background-color: rgb(246, 246, 246); border: none; overflow-x: auto;"> 1 @Component
2 public class SimpleTaskHandler {
3
4 public void printCurrentTime(String key) {
5 SimpleDateFormat format = new SimpleDateFormat("yyyy-MM-dd HH:mm:ss");
6 System.out.println(format.format(new Date()) + "***" + key + "****" + Thread.currentThread().getName());
7 }
8
9 @Async
10 public void handle1(int time) throws InterruptedException {
11 TimeUnit.SECONDS.sleep(time);
12 printCurrentTime("handle1");
13 }
14
15 @Async
16 public void handle2(int time) throws InterruptedException {
17 TimeUnit.SECONDS.sleep(time);
18 printCurrentTime("handle2");
19 }
20
21 @Async
22 public void handle3(int time) throws InterruptedException {
23 TimeUnit.SECONDS.sleep(time);
24 printCurrentTime("handle3");
25 }
26
27
28 }
执行结果
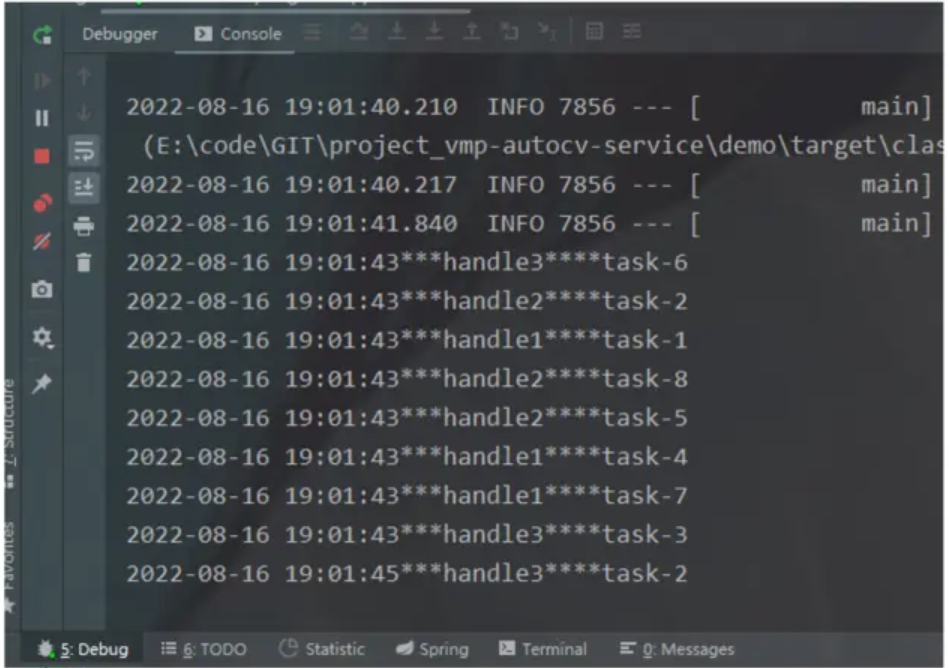
handle1、handle2、handle3的执行结果为乱序,不可预估。这样最简易的通过2个注解即完成异步线程的调用了。
细心的同学已经发现了,连续调用9次异步线程后,最后一次的线程名称就会与之前的重复。这是由于默认的线程池配置的结果。
默认配置如下
<pre class="prettyprint hljs gradle" style="padding: 0.5em; font-family: Menlo, Monaco, Consolas, "Courier New", monospace; color: rgb(68, 68, 68); border-radius: 4px; display: block; margin: 0px 0px 1.5em; font-size: 14px; line-height: 1.5em; word-break: break-all; overflow-wrap: break-word; white-space: pre; background-color: rgb(246, 246, 246); border: none; overflow-x: auto;"># 核心线程数
spring.task.execution.pool.core-size=8
# 最大线程数
spring.task.execution.pool.max-size=16
# 空闲线程存活时间
spring.task.execution.pool.keep-alive=60s
# 是否允许核心线程超时
spring.task.execution.pool.allow-core-thread-timeout=true
# 线程队列数量
spring.task.execution.pool.queue-capacity=100
# 线程关闭等待
spring.task.execution.shutdown.await-termination=false
spring.task.execution.shutdown.await-termination-period=
# 线程名称前缀
spring.task.execution.thread-name-prefix=task-
二、自定义线程池
只通过注解来完成异步线程调用,简单明了,对应的异步线程来自springboot 默认生成的异步线程池。但是有些场景却并不满足。所以我们需要针对业务需要定义自己的线程池配置文件
1、在application.properties中定义我们自己的线程池配置
2、在springboot项目中,添加对应的线程池bean对象
3、添加@EnableAsync 到启动类(或者线程池配置类中)
4、添加@Async到需要异步执行的方法中
代码如下:
application.properties配置文件
<pre class="prettyprint hljs verilog" style="padding: 0.5em; font-family: Menlo, Monaco, Consolas, "Courier New", monospace; color: rgb(68, 68, 68); border-radius: 4px; display: block; margin: 0px 0px 1.5em; font-size: 14px; line-height: 1.5em; word-break: break-all; overflow-wrap: break-word; white-space: pre; background-color: rgb(246, 246, 246); border: none; overflow-x: auto;">task.pool.demo.corePoolSize= 5
task.pool.demo.maxPoolSize= 10
task.pool.demo.keepAliveSeconds= 300
task.pool.demo.queueCapacity= 50
调用类
<pre class="prettyprint hljs less" style="padding: 0.5em; font-family: Menlo, Monaco, Consolas, "Courier New", monospace; color: rgb(68, 68, 68); border-radius: 4px; display: block; margin: 0px 0px 1.5em; font-size: 14px; line-height: 1.5em; word-break: break-all; overflow-wrap: break-word; white-space: pre; background-color: rgb(246, 246, 246); border: none; overflow-x: auto;"> 1 @Component
2 public class SimpleAsyncDemo {
3
4 @Autowired
5 private PoolTaskHandler poolTaskHandler;
6
7
8 @PostConstruct
9 public void execTaskHandler2() {
10 try {
11 poolTaskHandler.handle1(2);
12 poolTaskHandler.handle2(2);
13 poolTaskHandler.handle3(2);
14 poolTaskHandler.handle1(2);
15 poolTaskHandler.handle2(2);
16 poolTaskHandler.handle3(2);
17 poolTaskHandler.handle1(2);
18 poolTaskHandler.handle2(2);
19 poolTaskHandler.handle3(2);
20 } catch (InterruptedException e) {
21 e.printStackTrace();
22 }
23 }
24
25 }
异步线程池的配置类
<pre class="prettyprint hljs kotlin" style="padding: 0.5em; font-family: Menlo, Monaco, Consolas, "Courier New", monospace; color: rgb(68, 68, 68); border-radius: 4px; display: block; margin: 0px 0px 1.5em; font-size: 14px; line-height: 1.5em; word-break: break-all; overflow-wrap: break-word; white-space: pre; background-color: rgb(246, 246, 246); border: none; overflow-x: auto;"> 1 @Configuration
2 public class ThreadPoolConfig {
3
4 @Value("${task.pool.demo.corePoolSize}")
5 private int corePoolSize;
6 @Value("${task.pool.demo.maxPoolSize}")
7 private int maxPoolSize;
8 @Value("${task.pool.demo.queueCapacity}")
9 private int queueCapacity;
10 @Value("${task.pool.demo.keepAliveSeconds}")
11 private int keepAliveSeconds;
12
13
14 @Bean("handleAsync")
15 public TaskExecutor taskExecutor() {
16 ThreadPoolTaskExecutor executor = new ThreadPoolTaskExecutor();
17 // 设置核心线程数
18 executor.setCorePoolSize(corePoolSize);
19 // 设置最大线程数
20 executor.setMaxPoolSize(maxPoolSize);
21 // 设置队列容量
22 executor.setQueueCapacity(queueCapacity);
23 // 设置线程活跃时间(秒)
24 executor.setKeepAliveSeconds(keepAliveSeconds);
25 // 设置默认线程名称前缀
26 executor.setThreadNamePrefix("Thread-ABC-");
27 // 设置拒绝策略
28 executor.setRejectedExecutionHandler(new ThreadPoolExecutor.CallerRunsPolicy());
29 // 等待所有任务结束后再关闭线程池
30 executor.setWaitForTasksToCompleteOnShutdown(true);
31 return executor;
32 }
33 }
被异步调用的类
<pre class="prettyprint hljs java" style="padding: 0.5em; font-family: Menlo, Monaco, Consolas, "Courier New", monospace; color: rgb(68, 68, 68); border-radius: 4px; display: block; margin: 0px 0px 1.5em; font-size: 14px; line-height: 1.5em; word-break: break-all; overflow-wrap: break-word; white-space: pre; background-color: rgb(246, 246, 246); border: none; overflow-x: auto;"> 1 @Component
2 public class PoolTaskHandler {
3
4 public void printCurrentTime(String key) {
5 SimpleDateFormat format = new SimpleDateFormat("yyyy-MM-dd HH:mm:ss");
6 System.out.println(format.format(new Date()) + "***" + key + "****" + Thread.currentThread().getName());
7 }
8
9 @Async("handleAsync")
10 public void handle1(int time) throws InterruptedException {
11 TimeUnit.SECONDS.sleep(time);
12 printCurrentTime("handle-1");
13 }
14
15 @Async("handleAsync")
16 public void handle2(int time) throws InterruptedException {
17 TimeUnit.SECONDS.sleep(time);
18 printCurrentTime("handle-2");
19 }
20
21 @Async("handleAsync")
22 public void handle3(int time) throws InterruptedException {
23 TimeUnit.SECONDS.sleep(time);
24 printCurrentTime("handle-3");
25 }
26
27
28 }
执行结果如下
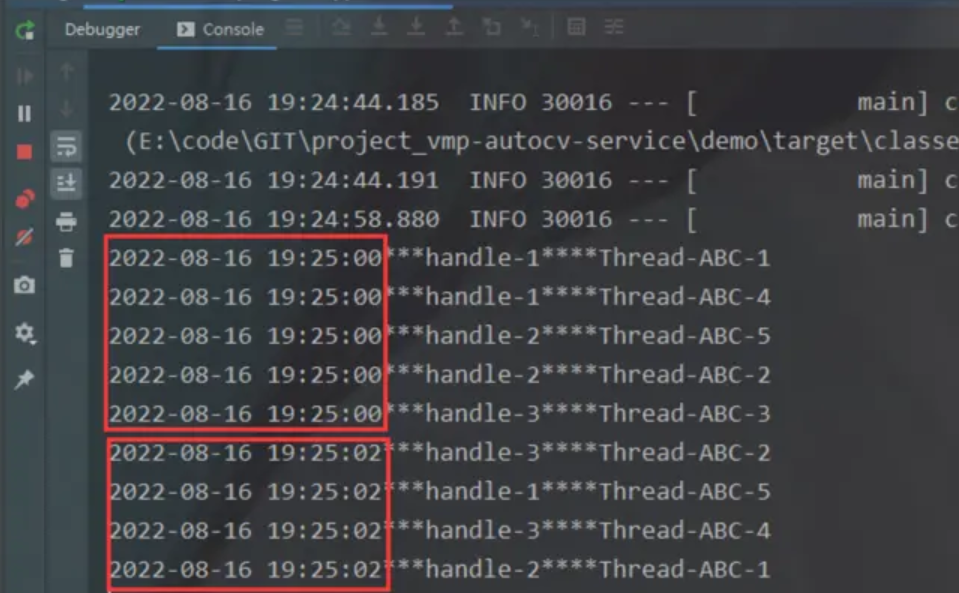
与上例类似,我们发现请求线程变成了每5个一批,这与我们在配置文件中的配置互相印证
调用类
<pre class="prettyprint hljs dart" style="padding: 0.5em; font-family: Menlo, Monaco, Consolas, "Courier New", monospace; color: rgb(68, 68, 68); border-radius: 4px; display: block; margin: 0px 0px 1.5em; font-size: 14px; line-height: 1.5em; word-break: break-all; overflow-wrap: break-word; white-space: pre; background-color: rgb(246, 246, 246); border: none; overflow-x: auto;"> 1 @Component
2 public class SimpleAsyncDemo {
3
4 @Autowired
5 private ReturnTaskHandler returnTaskHandler;
6
7 @PostConstruct
8 public void execTaskHandler3() {
9 try {
10 String a1 = returnTaskHandler.handle1(2);
11 String a2 = returnTaskHandler.handle2(2);
12 String a3 = returnTaskHandler.handle3(2);
13 String a4 = returnTaskHandler.handle1(2);
14 String a5 = returnTaskHandler.handle2(2);
15 String a6 = returnTaskHandler.handle3(2);
16 String a7 = returnTaskHandler.handle1(2);
17 String a8 = returnTaskHandler.handle2(2);
18 String a9 = returnTaskHandler.handle3(2);
19 int c = 1;
20 } catch (InterruptedException e) {
21 e.printStackTrace();
22 }
23 }
24
25 }
被调用类
<pre class="prettyprint hljs java" style="padding: 0.5em; font-family: Menlo, Monaco, Consolas, "Courier New", monospace; color: rgb(68, 68, 68); border-radius: 4px; display: block; margin: 0px 0px 1.5em; font-size: 14px; line-height: 1.5em; word-break: break-all; overflow-wrap: break-word; white-space: pre; background-color: rgb(246, 246, 246); border: none; overflow-x: auto;"> 1 @Component
2 public class ReturnTaskHandler {
3
4 public void printCurrentTime(String key) {
5 SimpleDateFormat format = new SimpleDateFormat("yyyy-MM-dd HH:mm:ss");
6 System.out.println(format.format(new Date()) + "***" + key + "****" + Thread.currentThread().getName());
7 }
8
9 @Async("handleAsync")
10 public String handle1(int time) throws InterruptedException {
11 TimeUnit.SECONDS.sleep(time);
12 printCurrentTime("handle-1");
13 return "result1";
14 }
15
16 @Async("handleAsync")
17 public String handle2(int time) throws InterruptedException {
18 TimeUnit.SECONDS.sleep(time);
19 printCurrentTime("handle-2");
20 return "result2";
21 }
22
23 @Async("handleAsync")
24 public String handle3(int time) throws InterruptedException {
25 TimeUnit.SECONDS.sleep(time);
26 printCurrentTime("handle-3");
27 return "result3";
28 }
29
30 }
其余代码继续我们使用上文中的其他代码
结果如下
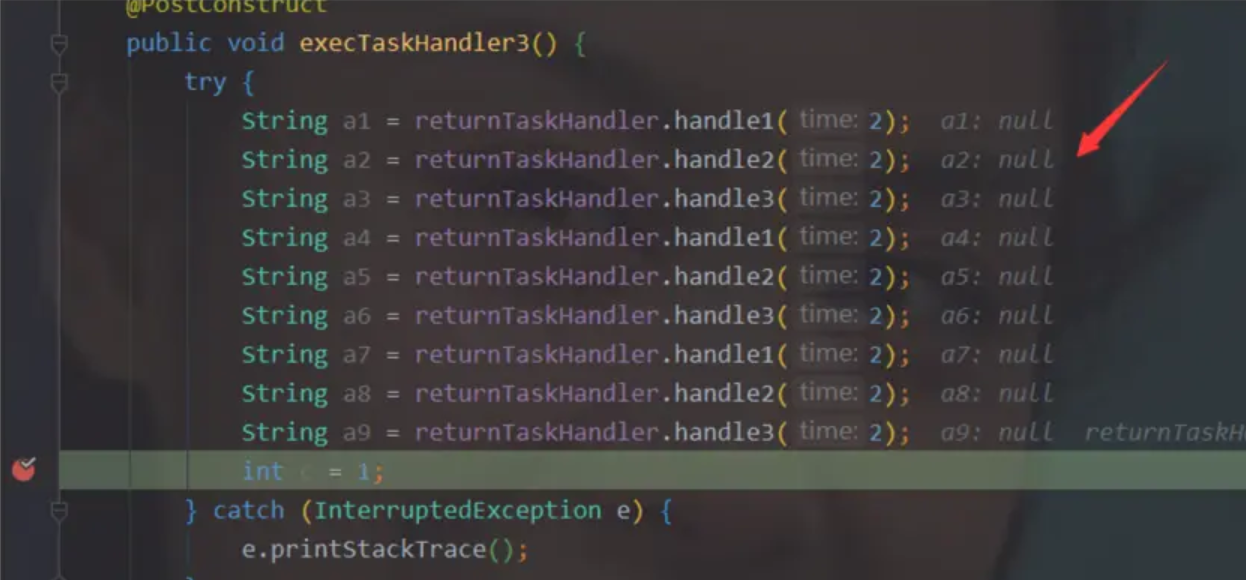
所有结果返回都是null值。
如果想要拿到正确的执行结果,我们需要使用future接口类看来帮忙接住异步线程的返回结果(关于future等接口类的内容我会在后边的文章中讲解)
其余代码继续我们使用上文中的其他代码,改动的代码如下:
被调用类
<pre class="prettyprint hljs java" style="padding: 0.5em; font-family: Menlo, Monaco, Consolas, "Courier New", monospace; color: rgb(68, 68, 68); border-radius: 4px; display: block; margin: 0px 0px 1.5em; font-size: 14px; line-height: 1.5em; word-break: break-all; overflow-wrap: break-word; white-space: pre; background-color: rgb(246, 246, 246); border: none; overflow-x: auto;"> 1 @Component
2 public class ReturnSuccTaskHandler {
3
4 public void printCurrentTime(String key) {
5 SimpleDateFormat format = new SimpleDateFormat("yyyy-MM-dd HH:mm:ss");
6 System.out.println(format.format(new Date()) + "***" + key + "****" + Thread.currentThread().getName());
7 }
8
9 @Async("handleAsync")
10 public Future<String> handle1(int time) throws InterruptedException {
11 TimeUnit.SECONDS.sleep(time);
12 printCurrentTime("handle-1");
13 return new AsyncResult<>("result1");
14 }
15
16 @Async("handleAsync")
17 public Future<String> handle2(int time) throws InterruptedException {
18 TimeUnit.SECONDS.sleep(time);
19 printCurrentTime("handle-2");
20 return new AsyncResult<>("result2");
21 }
22
23 @Async("handleAsync")
24 public Future<String> handle3(int time) throws InterruptedException {
25 TimeUnit.SECONDS.sleep(time);
26 printCurrentTime("handle-3");
27 return new AsyncResult<>("result3");
28 }
29
30
31 }
调用类
<pre class="prettyprint hljs kotlin" style="padding: 0.5em; font-family: Menlo, Monaco, Consolas, "Courier New", monospace; color: rgb(68, 68, 68); border-radius: 4px; display: block; margin: 0px 0px 1.5em; font-size: 14px; line-height: 1.5em; word-break: break-all; overflow-wrap: break-word; white-space: pre; background-color: rgb(246, 246, 246); border: none; overflow-x: auto;"> 1 @Component
2 public class SimpleAsyncDemo {
3
4
5 @Autowired
6 private ReturnSuccTaskHandler returnSuccTaskHandler;
7
8
9
10 @PostConstruct
11 public void execTaskHandler4() {
12 try {
13 Future<String> a1 = returnSuccTaskHandler.handle1(2);
14 Future<String> a2 = returnSuccTaskHandler.handle2(2);
15 Future<String> a3 = returnSuccTaskHandler.handle3(2);
16 Future<String> a4 = returnSuccTaskHandler.handle1(2);
17 Future<String> a5 = returnSuccTaskHandler.handle2(2);
18 Future<String> a6 = returnSuccTaskHandler.handle3(2);
19 Future<String> a7 = returnSuccTaskHandler.handle1(2);
20 Future<String> a8 = returnSuccTaskHandler.handle2(2);
21 Future<String> a9 = returnSuccTaskHandler.handle3(2);
22 while (true){
23 // 如果任务都做完就执行如下逻辑
24 if (a1.isDone() &&
25 a2.isDone()&&
26 a3.isDone()&&
27 a4.isDone()&&
28 a5.isDone()&&
29 a6.isDone()&&
30 a7.isDone()&&
31 a8.isDone()&&
32 a9.isDone()){
33 SimpleDateFormat format = new SimpleDateFormat("yyyy-MM-dd HH:mm:ss");
34 System.out.println(format.format(new Date()) + "async task end.");
35 System.out.println("async result:"+a1.get());
36 System.out.println("async result:"+a2.get());
37 System.out.println("async result:"+a3.get());
38 System.out.println("async result:"+a3.get());
39 System.out.println("async result:"+a4.get());
40 System.out.println("async result:"+a5.get());
41 System.out.println("async result:"+a6.get());
42 System.out.println("async result:"+a7.get());
43 System.out.println("async result:"+a8.get());
44 System.out.println("async result:"+a9.get());
45 break;
46 }
47 }
48 } catch (InterruptedException | ExecutionException e) {
49 e.printStackTrace();
50 }
51 }
52
53
54 }
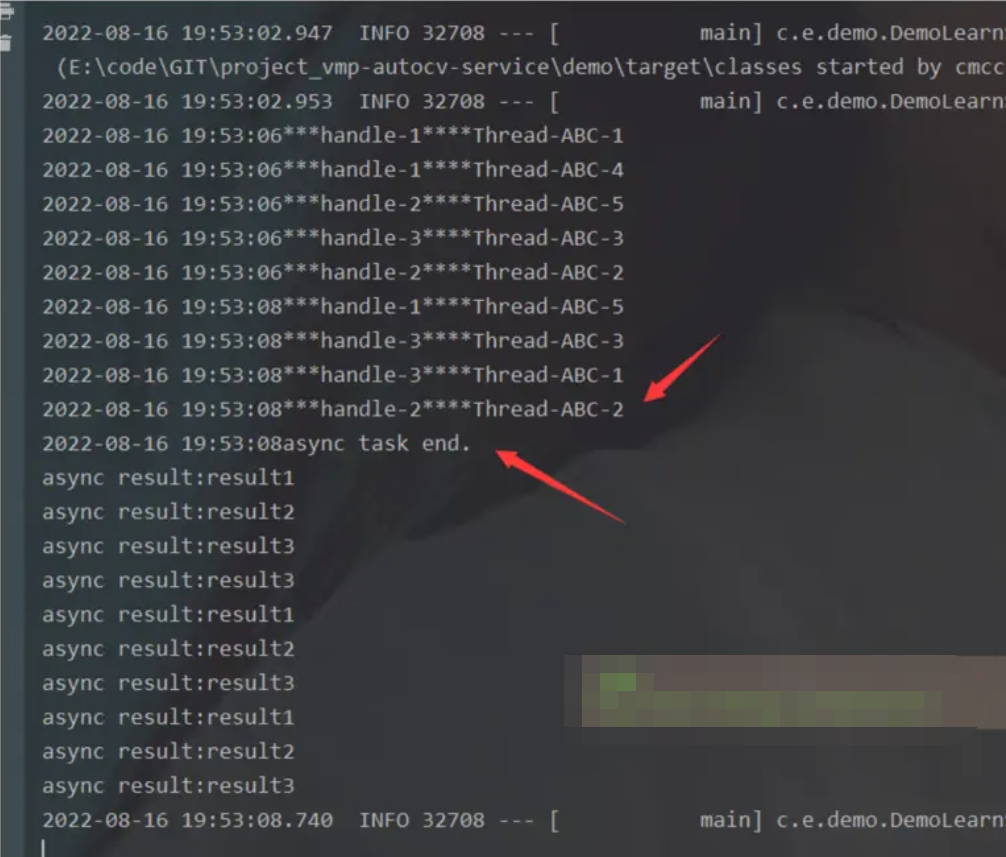
输出结果如下,我们可以发现 ,1、可以拿到返回结果,2、在最后一个子任务执行完成后,即立刻拿到结果。
 1349


 扫一扫


 被折叠的 条评论
为什么被折叠?
 到【灌水乐园】发言


