


一、Docker 网络模式说明
-
Docker 容器自身的原生网络模式,主要有以下的四种类型:桥接模式 (Bridge) 、主机模式 (Host) 、无网络模式 (None) 、容器模式 (Container) 。
-
关于其它的如 Overlay、Macvlan 及自定义的网络模式,是通过 Docker 网络功能扩展实现的自定义配置,不属于Docker原生的网络模式的范畴。
-
Bridge 模式创建虚拟网桥让容器与主机通信,Host模式下容器直接使用宿主机IP和端口,None模式则无网络连接,Container模式共享IP和端口。
二、Docker 网络模式特点
| 网络模式 | 类型特点 | 类型说明 |
|---|---|---|
| bridge | 容器拥有网卡、IP地址,连接到Docker0虚拟网桥,通过网桥以及Iptables配置与宿主机通信 | 默认的模式 |
| host | 容器不会拥有任何独立的网络资源, 而是使用宿主机的IP和端口 | 同一端口只能绑定一个容器服务 |
| none | 该模式关闭了容器的一切网络功能,与宿主机、其他容器无法连通 | 只适用于需隔离网络环境的场景 |
| container | 首个容器以Bridge模式启动,后续容器共享首个容器的网络资源,保持其他资源隔离 | 首容器停止,其他容器失去连接 |
三、关于 Docker0 网卡
当我们在Linux宿主机里面安装了Docker容器:
- 宿主机上会配置一个 “docker0” 的网卡,“docker0” 对于容器来说就相当于网关
- 容器就通过 “docker0” 连在一个二层网络中,再通过 “docker0” 和物理网卡交互
- “docker0” 默认使用的是 Liunx 的桥接模式,使用的技术是 Veth-Pair 的技术
- 每启动一个 Docker 容器,Docker 就为该容器会分配一个IP地址、一对虚拟网卡
- 容器分配的 IP 地址默认是 “172.17.0.0/16” 形式的,也可以自定义 (不推荐修改)
[root@localhost ~]# ifconfig
docker0: flags=4099<UP,BROADCAST,MULTICAST>  mtu 1500                               ## 虚拟网卡 docker0
        inet 172.17.0.1  netmask 255.255.0.0  broadcast 172.17.255.255
        ether 02:42:24:a9:0b:47  txqueuelen 0  (Ethernet)
        RX packets 0  bytes 0 (0.0 B)
        RX errors 0  dropped 0  overruns 0  frame 0
        TX packets 0  bytes 0 (0.0 B)
        TX errors 0  dropped 0 overruns 0  carrier 0  collisions 0

ens33: flags=4163<UP,BROADCAST,RUNNING,MULTICAST>  mtu 1500                          ## 物理网卡 ens33
        inet 192.168.10.220  netmask 255.255.255.0  broadcast 192.168.10.255
        inet6 fe80::cae4:54c5:b8e9:a630  prefixlen 64  scopeid 0x20<link>
        ether 00:0c:29:d1:ef:94  txqueuelen 1000  (Ethernet)
        RX packets 1506  bytes 157907 (154.2 KiB)
        RX errors 0  dropped 0  overruns 0  frame 0
        TX packets 710  bytes 69706 (68.0 KiB)
        TX errors 0  dropped 0 overruns 0  carrier 0  collisions 0

lo: flags=73<UP,LOOPBACK,RUNNING>  mtu 65536
        inet 127.0.0.1  netmask 255.0.0.0
        inet6 ::1  prefixlen 128  scopeid 0x10<host>
        loop  txqueuelen 1000  (Local Loopback)
        RX packets 12  bytes 1020 (1020.0 B)
        RX errors 0  dropped 0  overruns 0  frame 0
        TX packets 12  bytes 1020 (1020.0 B)
        TX errors 0  dropped 0 overruns 0  carrier 0  collisions 0
- 1.
- 2.
- 3.
- 4.
- 5.
- 6.
- 7.
- 8.
- 9.
- 10.
- 11.
- 12.
- 13.
- 14.
- 15.
- 16.
- 17.
- 18.
- 19.
- 20.
- 21.
- 22.
- 23.
- 24.
- 25.
- 26.
- 27.
- 28.
四、Docker 默认网络类型
- 在启动 Docker 容器的时候,可以用 “–net” 选项指定容器的网络模式,下面三种是 Docker 默认的网络类型,除此之外还一种 container 的网络模式。
- 当安装 Docker 时,它会自动创建三种网络模式(bridge、host、none)。可以使用以下 “docker network ls/list ” 查看
五、Docker 网络模式详解
5.1、Bridge模式
当创建⼀个 Docker 容器的时候,同时会创建了⼀对 veth pair 接⼝。这对接⼝⼀端在容器内即 eth0;另⼀端 在本地并被挂载到 docker0 ⽹桥,名称以 veth 开头。通过这种⽅ 式,主机可以跟容器通信,容器之间也可以相互通信。Docker 就创建了在主机和所有容器之 间⼀个虚拟共享⽹络。Docker⽹桥是宿主机虚拟出来的,并不是真实存在的⽹络设备,外部⽹络是⽆法寻址到的, 这也意味着外部⽹络⽆法通过直接容器IP访问到容器,如果容器希望外部访问能够访问到, 可以通过映射容器端⼝到宿主机。
使⽤场景: 当您需要多个容器在同⼀个 Docker 宿主机上进⾏通信时,使⽤⾃定义的桥接⽹络模式(bridge)是最佳选择,此模式也是默认的网络模式
桥接网络模式 docker0 虚拟网卡的详细信息
[root@localhost ~]# docker inspect bridge
[
    {
        "Name": "bridge",
        "Id": "61bff7cf47687d192fbcb8ece5a6fbfa72302104dba99fa51283dc4d12e68a0e",
        "Created": "2025-07-08T10:15:15.281790728+08:00",
        "Scope": "local",
        "Driver": "bridge",
        "EnableIPv6": false,
        "IPAM": {
            "Driver": "default",
            "Options": null,
            "Config": [
                {
                    "Subnet": "172.17.0.0/16",      ##  默认网段
                    "Gateway": "172.17.0.1"         ##  默认网关
                }
            ]
        },
        "Internal": false,
        "Attachable": false,
        "Ingress": false,
        "ConfigFrom": {
            "Network": ""
        },
        "ConfigOnly": false,
        "Containers": {},
        "Options": {
            "com.docker.network.bridge.default_bridge": "true",        ##  默认的网络模式
            "com.docker.network.bridge.enable_icc": "true",
            "com.docker.network.bridge.enable_ip_masquerade": "true",
            "com.docker.network.bridge.host_binding_ipv4": "0.0.0.0",
            "com.docker.network.bridge.name": "docker0",               ##  关联的网卡名字
            "com.docker.network.driver.mtu": "1500"
        },
        "Labels": {}
    }
]
- 1.
- 2.
- 3.
- 4.
- 5.
- 6.
- 7.
- 8.
- 9.
- 10.
- 11.
- 12.
- 13.
- 14.
- 15.
- 16.
- 17.
- 18.
- 19.
- 20.
- 21.
- 22.
- 23.
- 24.
- 25.
- 26.
- 27.
- 28.
- 29.
- 30.
- 31.
- 32.
- 33.
- 34.
- 35.
- 36.
- 37.
- 38.
- 39.
- 40.
下面创建以 bridge 网络模式运行的容器 ” nginxbridge “
[root@localhost ~]# docker run -itd --net=bridge -p 8000:80 --name=nginxbridge nginx:latest
73ec12a0a70248f24318e455e1ab436a110860efe4dda66a691304fc7f24f5eb

[root@localhost ~]# docker ps | grep nginx
73ec12a0a702    nginx:latest  "/docker-entrypoint.…"   24 seconds ago   Up 24 seconds    0.0.0.0:8000->80/tcp    nginxbridge

[root@localhost ~]# ifconfig
docker0: flags=4163<UP,BROADCAST,RUNNING,MULTICAST>  mtu 1500
        inet 172.17.0.1  netmask 255.255.0.0  broadcast 172.17.255.255
        inet6 fe80::42:24ff:fea9:b47  prefixlen 64  scopeid 0x20<link>
        ether 02:42:24:a9:0b:47  txqueuelen 0  (Ethernet)
        RX packets 0  bytes 0 (0.0 B)
        RX errors 0  dropped 0  overruns 0  frame 0
        TX packets 14  bytes 1236 (1.2 KiB)
        TX errors 0  dropped 0 overruns 0  carrier 0  collisions 0

ens33: flags=4163<UP,BROADCAST,RUNNING,MULTICAST>  mtu 1500
        inet 192.168.10.220  netmask 255.255.255.0  broadcast 192.168.10.255
        inet6 fe80::cae4:54c5:b8e9:a630  prefixlen 64  scopeid 0x20<link>
        ether 00:0c:29:d1:ef:94  txqueuelen 1000  (Ethernet)
        RX packets 140023  bytes 204553925 (195.0 MiB)
        RX errors 0  dropped 0  overruns 0  frame 0
        TX packets 19069  bytes 1267613 (1.2 MiB)
        TX errors 0  dropped 0 overruns 0  carrier 0  collisions 0

lo: flags=73<UP,LOOPBACK,RUNNING>  mtu 65536
        inet 127.0.0.1  netmask 255.0.0.0
        inet6 ::1  prefixlen 128  scopeid 0x10<host>
        loop  txqueuelen 1000  (Local Loopback)
        RX packets 12  bytes 1020 (1020.0 B)
        RX errors 0  dropped 0  overruns 0  frame 0
        TX packets 12  bytes 1020 (1020.0 B)
        TX errors 0  dropped 0 overruns 0  carrier 0  collisions 0

vethf60bfd8: flags=4163<UP,BROADCAST,RUNNING,MULTICAST>  mtu 1500                  ##  veth 网卡
        inet6 fe80::4874:49ff:fe91:ea5e  prefixlen 64  scopeid 0x20<link>
        ether 4a:74:49:91:ea:5e  txqueuelen 0  (Ethernet)
        RX packets 0  bytes 0 (0.0 B)
        RX errors 0  dropped 0  overruns 0  frame 0
        TX packets 11  bytes 946 (946.0 B)
        TX errors 0  dropped 0 overruns 0  carrier 0  collisions 0


[root@localhost ~]# docker inspect nginxbridge | tail -n 20
            "Networks": {
                "bridge": {
                    "IPAMConfig": null,
                    "Links": null,
                    "Aliases": null,
                    "NetworkID": "61bff7cf47687d192fbcb8ece5a6fbfa72302104dba99fa51283dc4d12e68a0e",
                    "EndpointID": "be1c52cb899506061938f681466892c86c95057bfdb6929ecb231dafb51607be",
                    "Gateway": "172.17.0.1",
                    "IPAddress": "172.17.0.2",                                  ## 容器的 IP 地址
                    "IPPrefixLen": 16,
                    "IPv6Gateway": "",
                    "GlobalIPv6Address": "",
                    "GlobalIPv6PrefixLen": 0,
                    "MacAddress": "02:42:ac:11:00:02",
                    "DriverOpts": null
                }
            }
        }
    }
]

[root@localhost ~]# docker exec -it nginxbridge /bin/bash
root@73ec12a0a702:/#
root@73ec12a0a702:/# cat /etc/hosts
127.0.0.1       localhost
::1     localhost ip6-localhost ip6-loopback
fe00::0 ip6-localnet
ff00::0 ip6-mcastprefix
ff02::1 ip6-allnodes
ff02::2 ip6-allrouters
172.17.0.2      73ec12a0a702               ##  Host 记录的 IP地址对应的容器的ID前12位

root@73ec12a0a702:/# apt-get update
root@73ec12a0a702:/# apt-get install net-tools
root@73ec12a0a702:/# ifconfig
eth0: flags=4163<UP,BROADCAST,RUNNING,MULTICAST>  mtu 1500
        inet 172.17.0.2  netmask 255.255.0.0  broadcast 172.17.255.255        ## 容器内部查看 IP 地址
        ether 02:42:ac:11:00:02  txqueuelen 0  (Ethernet)
        RX packets 3402  bytes 9481916 (9.0 MiB)
        RX errors 0  dropped 0  overruns 0  frame 0
        TX packets 3210  bytes 175177 (171.0 KiB)
        TX errors 0  dropped 0 overruns 0  carrier 0  collisions 0
- 1.
- 2.
- 3.
- 4.
- 5.
- 6.
- 7.
- 8.
- 9.
- 10.
- 11.
- 12.
- 13.
- 14.
- 15.
- 16.
- 17.
- 18.
- 19.
- 20.
- 21.
- 22.
- 23.
- 24.
- 25.
- 26.
- 27.
- 28.
- 29.
- 30.
- 31.
- 32.
- 33.
- 34.
- 35.
- 36.
- 37.
- 38.
- 39.
- 40.
- 41.
- 42.
- 43.
- 44.
- 45.
- 46.
- 47.
- 48.
- 49.
- 50.
- 51.
- 52.
- 53.
- 54.
- 55.
- 56.
- 57.
- 58.
- 59.
- 60.
- 61.
- 62.
- 63.
- 64.
- 65.
- 66.
- 67.
- 68.
- 69.
- 70.
- 71.
- 72.
- 73.
- 74.
- 75.
- 76.
- 77.
- 78.
- 79.
- 80.
- 81.
- 82.
- 83.
- 84.
- 85.
- 86.
- 87.
- 88.
创建以 bridge 网络模式运行的容器二 ” nginxbridge02 “
[root@localhost ~]# docker run -itd -p 8001:80 --name=nginxbridge02 nginx:latest
d711465273ae27dad49555cbbf6670361248187b53c5fc62d9bbc5298675a1aa

[root@localhost ~]# ifconfig
docker0: flags=4163<UP,BROADCAST,RUNNING,MULTICAST>  mtu 1500
        inet 172.17.0.1  netmask 255.255.0.0  broadcast 172.17.255.255
        inet6 fe80::42:24ff:fea9:b47  prefixlen 64  scopeid 0x20<link>
        ether 02:42:24:a9:0b:47  txqueuelen 0  (Ethernet)
        RX packets 3210  bytes 130237 (127.1 KiB)
        RX errors 0  dropped 0  overruns 0  frame 0
        TX packets 3400  bytes 9481856 (9.0 MiB)
        TX errors 0  dropped 0 overruns 0  carrier 0  collisions 0

ens33: flags=4163<UP,BROADCAST,RUNNING,MULTICAST>  mtu 1500
        inet 192.168.10.220  netmask 255.255.255.0  broadcast 192.168.10.255
        inet6 fe80::cae4:54c5:b8e9:a630  prefixlen 64  scopeid 0x20<link>
        ether 00:0c:29:d1:ef:94  txqueuelen 1000  (Ethernet)
        RX packets 148106  bytes 214316066 (204.3 MiB)
        RX errors 0  dropped 0  overruns 0  frame 0
        TX packets 23574  bytes 1586118 (1.5 MiB)
        TX errors 0  dropped 0 overruns 0  carrier 0  collisions 0

lo: flags=73<UP,LOOPBACK,RUNNING>  mtu 65536
        inet 127.0.0.1  netmask 255.0.0.0
        inet6 ::1  prefixlen 128  scopeid 0x10<host>
        loop  txqueuelen 1000  (Local Loopback)
        RX packets 12  bytes 1020 (1020.0 B)
        RX errors 0  dropped 0  overruns 0  frame 0
        TX packets 12  bytes 1020 (1020.0 B)
        TX errors 0  dropped 0 overruns 0  carrier 0  collisions 0

vethc4cd263: flags=4163<UP,BROADCAST,RUNNING,MULTICAST>  mtu 1500                   ## 第二个容器的 veth 网卡
        inet6 fe80::c854:9bff:fe87:d78  prefixlen 64  scopeid 0x20<link>
        ether ca:54:9b:87:0d:78  txqueuelen 0  (Ethernet)
        RX packets 0  bytes 0 (0.0 B)
        RX errors 0  dropped 0  overruns 0  frame 0
        TX packets 7  bytes 586 (586.0 B)
        TX errors 0  dropped 0 overruns 0  carrier 0  collisions 0

vethf60bfd8: flags=4163<UP,BROADCAST,RUNNING,MULTICAST>  mtu 1500                  ## 第一个容器的 veth 网卡
        inet6 fe80::4874:49ff:fe91:ea5e  prefixlen 64  scopeid 0x20<link>
        ether 4a:74:49:91:ea:5e  txqueuelen 0  (Ethernet)
        RX packets 3210  bytes 175177 (171.0 KiB)
        RX errors 0  dropped 0  overruns 0  frame 0
        TX packets 3402  bytes 9481916 (9.0 MiB)
        TX errors 0  dropped 0 overruns 0  carrier 0  collisions 0

[root@localhost ~]# docker inspect nginxbridge02 | tail -n 20
            "Networks": {
                "bridge": {
                    "IPAMConfig": null,
                    "Links": null,
                    "Aliases": null,
                    "NetworkID": "61bff7cf47687d192fbcb8ece5a6fbfa72302104dba99fa51283dc4d12e68a0e",
                    "EndpointID": "109620c464b49535988266e2702340649d11ed15685898b4f1440e6effbe4c08",
                    "Gateway": "172.17.0.1",
                    "IPAddress": "172.17.0.3",                                    ## 容器的 IP 地址
                    "IPPrefixLen": 16,
                    "IPv6Gateway": "",
                    "GlobalIPv6Address": "",
                    "GlobalIPv6PrefixLen": 0,
                    "MacAddress": "02:42:ac:11:00:03",
                    "DriverOpts": null
                }
            }
        }
    }
]

[root@localhost ~]# docker inspect --format='{{.NetworkSettings.IPAddress}}' nginxbridge02     ## 容器的 IP 地址
172.17.0.3

[root@localhost ~]# docker exec -it nginxbridge02 cat /etc/hosts
127.0.0.1       localhost
::1     localhost ip6-localhost ip6-loopback
fe00::0 ip6-localnet
ff00::0 ip6-mcastprefix
ff02::1 ip6-allnodes
ff02::2 ip6-allrouters
172.17.0.3      d711465273ae            ##  Hosts 记录的 IP地址对应的容器的ID前12位


[root@localhost ~]# docker exec -it nginxbridge02  apt-get update
[root@localhost ~]# docker exec -it nginxbridge02  apt-get install net-tools

[root@localhost ~]# docker exec -it nginxbridge02 ifconfig                 ## 容器外部查看容器的 IP 地址
eth0: flags=4163<UP,BROADCAST,RUNNING,MULTICAST>  mtu 1500
        inet 172.17.0.3  netmask 255.255.0.0  broadcast 172.17.255.255
        ether 02:42:ac:11:00:03  txqueuelen 0  (Ethernet)
        RX packets 3588  bytes 9501022 (9.0 MiB)
        RX errors 0  dropped 0  overruns 0  frame 0
        TX packets 3581  bytes 194916 (190.3 KiB)
        TX errors 0  dropped 0 overruns 0  carrier 0  collisions 0

lo: flags=73<UP,LOOPBACK,RUNNING>  mtu 65536
        inet 127.0.0.1  netmask 255.0.0.0
        loop  txqueuelen 1000  (Local Loopback)
        RX packets 0  bytes 0 (0.0 B)
        RX errors 0  dropped 0  overruns 0  frame 0
        TX packets 0  bytes 0 (0.0 B)
        TX errors 0  dropped 0 overruns 0  carrier 0  collisions 0
- 1.
- 2.
- 3.
- 4.
- 5.
- 6.
- 7.
- 8.
- 9.
- 10.
- 11.
- 12.
- 13.
- 14.
- 15.
- 16.
- 17.
- 18.
- 19.
- 20.
- 21.
- 22.
- 23.
- 24.
- 25.
- 26.
- 27.
- 28.
- 29.
- 30.
- 31.
- 32.
- 33.
- 34.
- 35.
- 36.
- 37.
- 38.
- 39.
- 40.
- 41.
- 42.
- 43.
- 44.
- 45.
- 46.
- 47.
- 48.
- 49.
- 50.
- 51.
- 52.
- 53.
- 54.
- 55.
- 56.
- 57.
- 58.
- 59.
- 60.
- 61.
- 62.
- 63.
- 64.
- 65.
- 66.
- 67.
- 68.
- 69.
- 70.
- 71.
- 72.
- 73.
- 74.
- 75.
- 76.
- 77.
- 78.
- 79.
- 80.
- 81.
- 82.
- 83.
- 84.
- 85.
- 86.
- 87.
- 88.
- 89.
- 90.
- 91.
- 92.
- 93.
- 94.
- 95.
- 96.
- 97.
- 98.
- 99.
- 100.
- 101.
- 102.
- 103.
两个容器的互通性测试
[root@localhost ~]# docker exec -it nginxbridge02 apt install iputils-ping
[root@localhost ~]# docker exec -it nginxbridge02 ping 172.17.0.2               ## 同一个网络模式下默认都是互通的
PING 172.17.0.2 (172.17.0.2) 56(84) bytes of data.
64 bytes from 172.17.0.2: icmp_seq=1 ttl=64 time=0.102 ms
64 bytes from 172.17.0.2: icmp_seq=2 ttl=64 time=0.052 ms
64 bytes from 172.17.0.2: icmp_seq=3 ttl=64 time=0.046 ms
64 bytes from 172.17.0.2: icmp_seq=4 ttl=64 time=0.045 ms
- 1.
- 2.
- 3.
- 4.
- 5.
- 6.
- 7.
- 8.
- 9.
5.2、Host 模式
在 Host 类型的⽹络中,容器不会虚拟出⾃⼰的⽹卡,它将容器直接融入到主机的网络栈中,使得容器直接使用主机的网络接口和IP地址。在这种模式下,容器内部的服务可以使用宿主机的网络地址和端口,无需进行NAT转换,网络性能较好。
使⽤场景: 当容器⽹络堆栈不应与Docker主机隔离但⼜希望隔离容器的其他⽅⾯时,使⽤主机⽹络模式(host)是最佳选择。
下面创建以 host 网络模式运行的容器 ” nginxhost “
[root@localhost ~]# docker run -itd --net=host --name=nginxhost nginx:latest
4282a6ee7d1a6fb776eeca20eaa92635e4a984c2703142f7ae5e3c88183dcbd7

[root@localhost ~]# docker inspect nginxhost | tail -n 20
            "Networks": {
                "host": {
                    "IPAMConfig": null,
                    "Links": null,
                    "Aliases": null,
                    "NetworkID": "4af4d7131c322adab09cf5e6c266efbb8e0474664801c77341f90d0e06a5a00f",
                    "EndpointID": "008178dbfb0dd11adf3ea4b4816876853e8ffbaf2a520f93526be079be0d89fe",
                    "Gateway": "",
                    "IPAddress": "",                    ## 查看发现,容器是没有 IP 地址的
                    "IPPrefixLen": 0,
                    "IPv6Gateway": "",
                    "GlobalIPv6Address": "",
                    "GlobalIPv6PrefixLen": 0,
                    "MacAddress": "",
                    "DriverOpts": null
                }
            }
        }
    }
]

[root@localhost ~]# docker exec -it nginxhost cat /etc/hosts            ##  Hosts 记录的里面什么信息都没有
127.0.0.1   localhost localhost.localdomain localhost4 localhost4.localdomain4
::1         localhost localhost.localdomain localhost6 localhost6.localdomain6
- 1.
- 2.
- 3.
- 4.
- 5.
- 6.
- 7.
- 8.
- 9.
- 10.
- 11.
- 12.
- 13.
- 14.
- 15.
- 16.
- 17.
- 18.
- 19.
- 20.
- 21.
- 22.
- 23.
- 24.
- 25.
- 26.
- 27.
- 28.
- 29.
- 30.
Docker 不能够在 host 模式下运行多个容器
[root@localhost ~]# docker ps
CONTAINER ID     IMAGE         COMMAND                  CREATED          STATUS         PORTS                  NAMES
4282a6ee7d1a    nginx:latest   "/docker-entrypoint.…"   2 minutes ago    Up 2 minutes                          nginxhost
d711465273ae    nginx:latest   "/docker-entrypoint.…"   5 minutes ago    Up 5 minutes   0.0.0.0:8001->80/tcp   nginxbridge02
73ec12a0a702    nginx:latest   "/docker-entrypoint.…"   7 minutes ago    Up 7 minutes   0.0.0.0:8000->80/tcp   nginxbridge

[root@localhost ~]# docker run -itd --net=host --name=nginxhost3 nginx:latest
22d832ebd1479fb96b9d234888cc2aad940f4cb67787c4f2217d091cb29c3fcb

[root@localhost ~]# docker ps
CONTAINER ID     IMAGE         COMMAND                  CREATED          STATUS         PORTS                  NAMES
4282a6ee7d1a    nginx:latest   "/docker-entrypoint.…"   2 minutes ago    Up 2 minutes                          nginxhost
d711465273ae    nginx:latest   "/docker-entrypoint.…"   5 minutes ago    Up 5 minutes   0.0.0.0:8001->80/tcp   nginxbridge02
73ec12a0a702    nginx:latest   "/docker-entrypoint.…"   7 minutes ago    Up 7 minutes   0.0.0.0:8000->80/tcp   nginxbridge

## 发现创建容器 " nginxhost3 " 虽然没有报错,但是在查看运行的容器时,是没有 " nginxhost3 " 这个容器存在的
- 1.
- 2.
- 3.
- 4.
- 5.
- 6.
- 7.
- 8.
- 9.
- 10.
- 11.
- 12.
- 13.
- 14.
- 15.
- 16.
- 17.
- 18.
5.3、None 模式
None 网络模式是 Docker 提供的一种特殊网络模式,它将容器与宿主机隔离开来,不提供任何网络能力。在这种模式下,意味着容器不能访问外部网络,也不能被外部网络访问。
下面创建以 nose 网络模式运行的容器 ” nginxnone “
[root@localhost ~]# docker run -itd --net=none --name=nginxnone nginx:latest
40412eb2cd7e6fb0fa8ace9294c093f945de14387311b311541eb2946e08e0e7

[root@test220 ~]# docker exec -it nginxhost cat /etc/hosts           ##  Hosts 记录的里面什么信息都没有
127.0.0.1   localhost localhost.localdomain localhost4 localhost4.localdomain4
::1         localhost localhost.localdomain localhost6 localhost6.localdomain6


[root@localhost ~]# docker inspect nginxnone | tail -n 20
            "Networks": {
                "none": {
                    "IPAMConfig": null,
                    "Links": null,
                    "Aliases": null,
                    "NetworkID": "c279a40eea89e70857bfac68fa7123481b5f953764ad6834950155f6eb614c32",
                    "EndpointID": "a8abcb580b8fb3aa376b0815513f7bb216826aea508046c713bf3bb97047c5b0",
                    "Gateway": "",
                    "IPAddress": "",                      ## 查看发现,容器是没有 IP 地址的
                    "IPPrefixLen": 0,
                    "IPv6Gateway": "",
                    "GlobalIPv6Address": "",
                    "GlobalIPv6PrefixLen": 0,
                    "MacAddress": "",
                    "DriverOpts": null
                }
            }
        }
    }
]
- 1.
- 2.
- 3.
- 4.
- 5.
- 6.
- 7.
- 8.
- 9.
- 10.
- 11.
- 12.
- 13.
- 14.
- 15.
- 16.
- 17.
- 18.
- 19.
- 20.
- 21.
- 22.
- 23.
- 24.
- 25.
- 26.
- 27.
- 28.
- 29.
- 30.
- 31.
- 32.
5.4、Container 模式
这个模式指定新创建的容器和已经存在的⼀个容器共享⼀个⽹络,⽽不是和宿主机共享。新创建的容器不会创建⾃⼰的⽹卡,配置⾃⼰的 IP,⽽是和⼀个指定的容器共享 IP、端⼝范 围等。同样,两个容器除了⽹络⽅⾯,其他的如⽂件系统、进程列表等还是隔离的。两个容器的进 程可以通过 lo(回环) ⽹卡设备通信。
1、 下面创建以 container 网络模式运行的容器 ” nginxcontainer00 “ ,指定一个共享网络的容器

[root@localhost ~]# docker ps | grep nginxbridge
73ec12a0a702        nginx:latest        "/docker-entrypoint.…"   16 hours ago        Up About an hour    0.0.0.0:8000->80/tcp   nginxbridge

[root@localhost ~]# docker run -itd --net=container:nginxbridge --name=nginxcontainer00 nginx:latest /bin/bash
0d5a61191f1ed41f94e96c32918d4960d6518616947e2c78014825a629fdfc3e


2、安装相关工具查下 IP 地址信息

[root@localhost ~]# docker exec -it nginxcontainer00 apt-get update
[root@localhost ~]# docker exec -it nginxcontainer00 apt-get install net-tools

[root@localhost ~]# docker exec -it nginxbridge ifconfig eth0
eth0: flags=4163<UP,BROADCAST,RUNNING,MULTICAST>  mtu 1500
        inet 172.17.0.2  netmask 255.255.0.0  broadcast 172.17.255.255           ## 容器 nginxbridge 的 IP 地址
        ether 02:42:ac:11:00:02  txqueuelen 0  (Ethernet)
        RX packets 3671  bytes 9521819 (9.0 MiB)
        RX errors 0  dropped 0  overruns 0  frame 0
        TX packets 3643  bytes 198805 (194.1 KiB)
        TX errors 0  dropped 0 overruns 0  carrier 0  collisions 0

[root@localhost ~]# docker exec -it nginxcontainer00 ifconfig eth0
eth0: flags=4163<UP,BROADCAST,RUNNING,MULTICAST>  mtu 1500
        inet 172.17.0.2  netmask 255.255.0.0  broadcast 172.17.255.255          ## 容器 nginxcontainer00 的 IP 地址
        ether 02:42:ac:11:00:02  txqueuelen 0  (Ethernet)
        RX packets 3671  bytes 9521819 (9.0 MiB)
        RX errors 0  dropped 0  overruns 0  frame 0
        TX packets 3643  bytes 198805 (194.1 KiB)
        TX errors 0  dropped 0 overruns 0  carrier 0  collisions 0
- 1.
- 2.
- 3.
- 4.
- 5.
- 6.
- 7.
- 8.
- 9.
- 10.
- 11.
- 12.
- 13.
- 14.
- 15.
- 16.
- 17.
- 18.
- 19.
- 20.
- 21.
- 22.
- 23.
- 24.
- 25.
- 26.
- 27.
- 28.
- 29.
- 30.
- 31.
- 32.
- 33.
六、关于自定义网络模式
6.1、常见自定义网络模式
Docker 除了上述四种原生的网络模式外, Docker 还能够扩展支持自定义网络模式。自定义的网络模式是对 Docker 默认 Bridge 网络的增强,提供了更佳的功能性和灵活性。自定义的网络模式能够用户根据需求,创建的虚拟网络环境,用于更精细地控制容器间的通信方式和网络配置。以下是部分常见的自定义网络模式的类型和自身特点:
-
Bridge 模式 : 注意别于默认的桥接模式,使用的网络驱动仍是桥接,底层依然利用 Linux Bridge 、Veth Pair 技术,但功能比默认 Docker0 强大得多。
-
Overlay 默认 : 覆盖网络,基于 VXLAN 隧道技术实现的跨主机的容器通信技术,在 Docker Swarm 及 Kubernetes 等容器编排平台中发挥着重要作用。
-
Macvlan 模式 : MAC 地址虚拟局域网,为容器分配一个独立的 MAC 地址,容器可以直接连接到物理网络或 VLAN 上,允许容器直接与外部网络通信。
-
IPvlan 模式: IP虚拟局域网,为容器独立分配 IP 地址并支持更精细的 VLAN 标记和路由控制,适合复杂网络策略场景中实现精细的网络隔离和流量控制。
6.2、自定义网络模式说明
在自定义的网络模式中,Bridge 是最常见的一种,也是使用最多的一种,因此这里只介绍这种网络模式。
使用之前,先关了解自定义网络模式的以下特点:
- 严格的讲,自定义的网络模式依然是属于 Docker 默认网络模式中的 Bridge 模式,是特殊的桥接模式
- 自定义的网络模式创建后,在宿主机会创建一个新的、以 " br + 12位的随机字符串 " 为名字虚拟网卡
- 初次创建新自定义网络模式,此模式下的 IP 网段为 " 172.18.0.0/16 " , 再次常见则为 " 172.19.0.0/16 " ,依次类推
- 使用基于创建的自定义的网络模式而运行起来的容器,默认情况下各自都是相互网络隔离的,彼此不能够进行相互通讯
- 使用命令 ” docker network connect 自定义网络名称 容器ID或者容器名称 “ 可以将自定义网络的容器关联到要其它网络模式下的容器
使用相关说明演示
1、 创建两个自定义的网络

[root@localhost ~]# docker network create test_network
a82e098040aa7b71dad471074bff4145d12ed85d2173d308d7fc6212e03374a4
[root@localhost ~]# docker network create --driver bridge testnetwork
b215c6b7d0e33927c53b79a70bd2731eaa3b478961e01de2f4545b6de86487e3

# 带不带上参数 ” --driver bridge “ 都可以,自定义的网络模式就是基于桥接技术的,可以说是一种特殊的桥接模式


2、查看验证刚创建的自定义网络

[root@localhost ~]# docker network ls
NETWORK ID          NAME                DRIVER              SCOPE
61bff7cf4768        bridge              bridge              local
4af4d7131c32        host                host                local
c279a40eea89        none                null                local
a82e098040aa        test_network        bridge              local              #  创建的第一个自定义网络
b215c6b7d0e3        testnetwork         bridge              local              #  创建的第二个自定义网络


[root@localhost ~]# ifconfig
br-a82e098040aa: flags=4099<UP,BROADCAST,MULTICAST>  mtu 1500                  # 第一个创建的网段为 172.18.0.0
        inet 172.18.0.1  netmask 255.255.0.0  broadcast 172.18.255.255
        ether 02:42:d9:fe:22:2b  txqueuelen 0  (Ethernet)
        RX packets 172389  bytes 234586844 (223.7 MiB)
        RX errors 0  dropped 0  overruns 0  frame 0
        TX packets 40314  bytes 2918819 (2.7 MiB)
        TX errors 0  dropped 0 overruns 0  carrier 0  collisions 0

br-b215c6b7d0e3: flags=4099<UP,BROADCAST,MULTICAST>  mtu 1500
        inet 172.19.0.1  netmask 255.255.0.0  broadcast 172.19.255.255         # 第二个创建的网段为 172.19.0.0
        ether 02:42:88:48:f1:b2  txqueuelen 0  (Ethernet)
        RX packets 172389  bytes 234586844 (223.7 MiB)
        RX errors 0  dropped 0  overruns 0  frame 0
        TX packets 40314  bytes 2918819 (2.7 MiB)
        TX errors 0  dropped 0 overruns 0  carrier 0  collisions 0

[root@localhost ~]# docker inspect testnetwork
[
    {
        "Name": "testnetwork",
        "Id": "b215c6b7d0e33927c53b79a70bd2731eaa3b478961e01de2f4545b6de86487e3",
        "Created": "2025-07-09T14:09:22.854064231+08:00",
        "Scope": "local",
        "Driver": "bridge",
        "EnableIPv6": false,
        "IPAM": {
            "Driver": "default",
            "Options": {},
            "Config": [
                {
                    "Subnet": "172.19.0.0/16",                             # 查看第二个创建的自定义网络的信息
                    "Gateway": "172.19.0.1"
                }
            ]
        },
        "Internal": false,
        "Attachable": false,
        "Ingress": false,
        "ConfigFrom": {
            "Network": ""
        },
        "ConfigOnly": false,
        "Containers": {},
        "Options": {},
        "Labels": {}
    }
]
- 1.
- 2.
- 3.
- 4.
- 5.
- 6.
- 7.
- 8.
- 9.
- 10.
- 11.
- 12.
- 13.
- 14.
- 15.
- 16.
- 17.
- 18.
- 19.
- 20.
- 21.
- 22.
- 23.
- 24.
- 25.
- 26.
- 27.
- 28.
- 29.
- 30.
- 31.
- 32.
- 33.
- 34.
- 35.
- 36.
- 37.
- 38.
- 39.
- 40.
- 41.
- 42.
- 43.
- 44.
- 45.
- 46.
- 47.
- 48.
- 49.
- 50.
- 51.
- 52.
- 53.
- 54.
- 55.
- 56.
- 57.
- 58.
- 59.
- 60.
- 61.
- 62.
- 63.
- 64.
- 65.
- 66.
- 67.
- 68.
- 69.
- 70.
- 71.
1、 运行一个容器使用第二个自定义的网络

[root@localhost ~]# docker run -itd --net=testnetwork -p 8008:80 --name=nginx_network nginx:latest
4c4b65e01d82e6b6670bdd64c74616f1a6818dffdfdb50729f71d45f32c2bc26

[root@localhost ~]# docker ps | grep network
4c4b65e01d82        nginx:latest        "/docker-entrypoint.…"   About a minute ago   Up About a minute   0.0.0.0:8008->80/tcp   nginx_network


2、 容器相关信息查看

[root@localhost ~]# docker exec -it nginx_network apt-get update
[root@localhost ~]# docker exec -it nginx_network apt-get install net-tools
[root@localhost ~]# docker exec -it nginx_network apt install iputils-ping

[root@localhost ~]# docker exec -it nginx_network ifconfig
eth0: flags=4163<UP,BROADCAST,RUNNING,MULTICAST>  mtu 1500
        inet 172.19.0.2  netmask 255.255.0.0  broadcast 172.19.255.255            # IP 地址为 172.19.0.2
        ether 02:42:ac:13:00:02  txqueuelen 0  (Ethernet)
        RX packets 3348  bytes 9586681 (9.1 MiB)
        RX errors 0  dropped 0  overruns 0  frame 0
        TX packets 3239  bytes 176367 (172.2 KiB)
        TX errors 0  dropped 0 overruns 0  carrier 0  collisions 0


3、 进行相关连通性测试

[root@localhost ~]# docker inspect nginxbridge | tail -n 22
            "IPv6Gateway": "",
            "MacAddress": "02:42:ac:11:00:02",
            "Networks": {
                "bridge": {
                    "IPAMConfig": null,
                    "Links": null,
                    "Aliases": null,
                    "NetworkID": "61bff7cf47687d192fbcb8ece5a6fbfa72302104dba99fa51283dc4d12e68a0e",
                    "EndpointID": "f970723ebcd226fdc0fd5ae3f681f7c5694e26372393ec708b7c8eadd75040e5",
                    "Gateway": "172.17.0.1",
                    "IPAddress": "172.17.0.2",
                    "IPPrefixLen": 16,
                    "IPv6Gateway": "",
                    "GlobalIPv6Address": "",
                    "GlobalIPv6PrefixLen": 0,
                    "MacAddress": "02:42:ac:11:00:02",
                    "DriverOpts": null
                }
            }
        }
    }
]

[root@localhost ~]# docker exec -it nginxbridge ping 172.19.0.2           # 默认的桥接网络模式下的容器无法访问自定义网络的容器
PING 172.19.0.2 (172.19.0.2) 56(84) bytes of data.
^C
--- 172.19.0.2 ping statistics ---
63 packets transmitted, 0 received, 100% packet loss, time 62173ms

[root@localhost ~]# ping 172.19.0.2                                       # 宿主机可以访问自定义网络的容器
PING 172.19.0.2 (172.19.0.2) 56(84) bytes of data.
64 bytes from 172.19.0.2: icmp_seq=2 ttl=64 time=0.040 ms
64 bytes from 172.19.0.2: icmp_seq=3 ttl=64 time=0.041 ms
64 bytes from 172.19.0.2: icmp_seq=4 ttl=64 time=0.043 ms
64 bytes from 172.19.0.2: icmp_seq=5 ttl=64 time=0.040 ms


4、 使用命令将处于两个网络模式下的容器进行连接( 连通是单向的 )

[root@localhost ~]# docker network connect testnetwork nginxbridge

[root@localhost ~]# docker inspect nginxbridge | tail -n 37        ##  在容器 nginxbridge 中多出一个网卡,地址为 "172.19.0.3"
            "Networks": {
                "bridge": {
                    "IPAMConfig": null,
                    "Links": null,
                    "Aliases": null,
                    "NetworkID": "61bff7cf47687d192fbcb8ece5a6fbfa72302104dba99fa51283dc4d12e68a0e",
                    "EndpointID": "f970723ebcd226fdc0fd5ae3f681f7c5694e26372393ec708b7c8eadd75040e5",
                    "Gateway": "172.17.0.1",
                    "IPAddress": "172.17.0.2",
                    "IPPrefixLen": 16,
                    "IPv6Gateway": "",
                    "GlobalIPv6Address": "",
                    "GlobalIPv6PrefixLen": 0,
                    "MacAddress": "02:42:ac:11:00:02",
                    "DriverOpts": null
                },
                "testnetwork": {
                    "IPAMConfig": {},
                    "Links": null,
                    "Aliases": [
                        "73ec12a0a702"
                    ],
                    "NetworkID": "b215c6b7d0e33927c53b79a70bd2731eaa3b478961e01de2f4545b6de86487e3",
                    "EndpointID": "c731ccd77122a72d4c93b93843310f6e5f794b89482d0f8feb59e5d1b7a15580",
                    "Gateway": "172.19.0.1",
                    "IPAddress": "172.19.0.3",
                    "IPPrefixLen": 16,
                    "IPv6Gateway": "",
                    "GlobalIPv6Address": "",
                    "GlobalIPv6PrefixLen": 0,
                    "MacAddress": "02:42:ac:13:00:03",
                    "DriverOpts": {}
                }
            }
        }
    }
]


#   在进行访问,发现容器 nginxbridge 是可以PING通 nginx_network 的

[root@localhost ~]# docker exec -it nginxbridge ping 172.19.0.2
PING 172.19.0.2 (172.19.0.2) 56(84) bytes of data.
64 bytes from 172.19.0.2: icmp_seq=1 ttl=64 time=0.063 ms
64 bytes from 172.19.0.2: icmp_seq=2 ttl=64 time=0.044 ms
64 bytes from 172.19.0.2: icmp_seq=3 ttl=64 time=0.065 ms
64 bytes from 172.19.0.2: icmp_seq=4 ttl=64 time=0.050 ms
- 1.
- 2.
- 3.
- 4.
- 5.
- 6.
- 7.
- 8.
- 9.
- 10.
- 11.
- 12.
- 13.
- 14.
- 15.
- 16.
- 17.
- 18.
- 19.
- 20.
- 21.
- 22.
- 23.
- 24.
- 25.
- 26.
- 27.
- 28.
- 29.
- 30.
- 31.
- 32.
- 33.
- 34.
- 35.
- 36.
- 37.
- 38.
- 39.
- 40.
- 41.
- 42.
- 43.
- 44.
- 45.
- 46.
- 47.
- 48.
- 49.
- 50.
- 51.
- 52.
- 53.
- 54.
- 55.
- 56.
- 57.
- 58.
- 59.
- 60.
- 61.
- 62.
- 63.
- 64.
- 65.
- 66.
- 67.
- 68.
- 69.
- 70.
- 71.
- 72.
- 73.
- 74.
- 75.
- 76.
- 77.
- 78.
- 79.
- 80.
- 81.
- 82.
- 83.
- 84.
- 85.
- 86.
- 87.
- 88.
- 89.
- 90.
- 91.
- 92.
- 93.
- 94.
- 95.
- 96.
- 97.
- 98.
- 99.
- 100.
- 101.
- 102.
- 103.
- 104.
- 105.
- 106.
- 107.
- 108.
- 109.
- 110.
- 111.
- 112.
- 113.
- 114.
- 115.
- 116.
- 117.
- 118.
- 119.
- 120.
七、Docker 网络通信的实现
7.1、容器网络访问的应用
Docker 容器可以访问到容器外部应用
## 提示,默认情况下,容器的网络模式是 桥接模式

[root@test220 ~]# docker ps | grep bridge
d711465273ae    nginx:latest   "/docker-entrypoint.…"   5 minutes ago    Up 5 minutes   0.0.0.0:8001->80/tcp   nginxbridge02
73ec12a0a702    nginx:latest   "/docker-entrypoint.…"   7 minutes ago    Up 7 minutes   0.0.0.0:8000->80/tcp   nginxbridge

[root@test220 ~]# docker exec -it nginxbridge02 apt-get update
[root@test220 ~]# docker exec -it nginxbridge02 apt install iputils-ping

[root@test220 ~]# docker exec -it nginxbridge02 ping www.163.com
PING www.163.com.w.kunluncan.com (61.170.81.227) 56(84) bytes of data.
64 bytes from 61.170.81.227 (61.170.81.227): icmp_seq=1 ttl=127 time=15.4 ms
64 bytes from 61.170.81.227 (61.170.81.227): icmp_seq=2 ttl=127 time=16.5 ms
64 bytes from 61.170.81.227 (61.170.81.227): icmp_seq=3 ttl=127 time=16.1 ms
64 bytes from 61.170.81.227 (61.170.81.227): icmp_seq=4 ttl=127 time=23.4 ms
- 1.
- 2.
- 3.
- 4.
- 5.
- 6.
- 7.
- 8.
- 9.
- 10.
- 11.
- 12.
- 13.
- 14.
- 15.
- 16.
- 17.
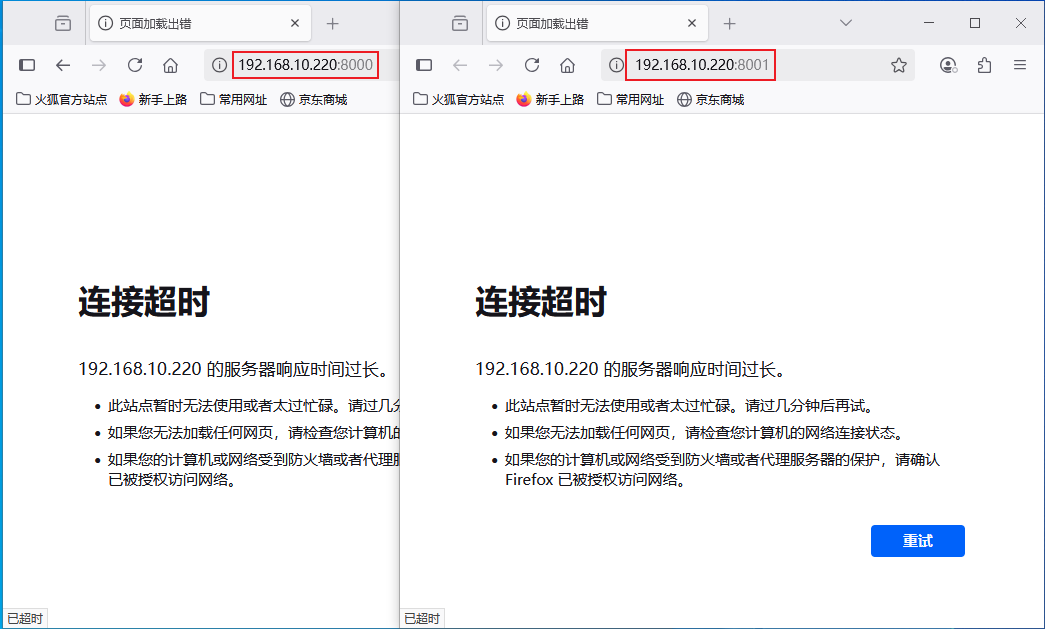
Docker 容器外部可以访问到容器应用 ( 如下图 )
7.2、容器网络访问的分析
分析:上述两个方向访问的实现,貌似说明容器与外部网络访问是自然的,本身就是允许的,其实不然。
容器实现与外部网络的访问,依赖于下面两个前提:
- 宿主机系统上自带的 IP 数据包转发功能的开启
- Docker 运行所依赖并调用的系统 Iptables 模块
查看 IP 数据包的转发功能开启情况
1、 查看 IP 数据包的转发功能开启情况
[root@test220 ~]# sysctl net.ipv4.ip_forward
net.ipv4.ip_forward = 1

2、查看 Iptables 模块加载情况
[root@test220 ~]# lsmod|egrep 'filter|nat|iptable'
xt_nat                 16384  2
iptable_filter         16384  1
iptable_nat            16384  1
nf_nat                 45056  3 xt_nat,iptable_nat,xt_MASQUERADE
nf_conntrack          147456  5 xt_conntrack,nf_nat,xt_nat,nf_conntrack_netlink,xt_MASQUERADE
br_netfilter           28672  0
ip_tables              28672  2 iptable_filter,iptable_nat
libcrc32c              16384  3 nf_conntrack,nf_nat,xfs

说明:1、安装 "iptables-services" 服务后会开启上面的模块功能,这里不需要安装而是直接查看相关模块有没有加载上
     2、Docker 是直接去调用上述的内核模块,而去调用和实现等同于安装 "Iptables" 后的各种表链及NAT的各种需求
- 1.
- 2.
- 3.
- 4.
- 5.
- 6.
- 7.
- 8.
- 9.
- 10.
- 11.
- 12.
- 13.
- 14.
- 15.
- 16.
- 17.
- 18.
- 19.
- 20.
由上不难发现,上述两种访问能够实现的前提之一,是得益于 “ ip_forward ” 的打开。下面我们暂时关闭数据包的转发功能,再测试下访问的情况。
再访问进行测试看看情况
##  我们再次打开数据包的转发功能,再测试下访问的情况。

[root@test220 ~]# echo 1 >  /proc/sys/net/ipv4/ip_forward

[root@test220 ~]# docker exec -it nginxbridge02 ping www.163.com
PING www.163.com.w.kunluncan.com (101.226.27.75) 56(84) bytes of data.
64 bytes from 101.226.27.75 (101.226.27.75): icmp_seq=1 ttl=127 time=11.8 ms
64 bytes from 101.226.27.75 (101.226.27.75): icmp_seq=2 ttl=127 time=13.0 ms
64 bytes from 101.226.27.75 (101.226.27.75): icmp_seq=3 ttl=127 time=12.1 ms
64 bytes from 101.226.27.75 (101.226.27.75): icmp_seq=4 ttl=127 time=11.6 ms

# 不难发现,上面又可以PING通外面的地址了,容器外部访问到容器的应用也正常了
- 1.
- 2.
- 3.
- 4.
- 5.
- 6.
- 7.
- 8.
- 9.
- 10.
- 11.
- 12.
- 13.
- 14.
同样的道理,如果我们卸载了相关的模块,容器的访问也是无法实现的。
关于卸载模块的说明:
- 卸载相关模块,不只是容器访问受影响,可能还有其它服务或组件因为缺少此模块而受到影响,导致无法正常使用 。
- 卸载模块的命令是 ” rmmod 模块名 “ 或者 ” modprobe -r 模块名 “ ,卸载后使用命令 " lsmod " 查看卸载成功与否。
- 卸载内核模块,是一个比较危险的操作,非特殊情况不建议进行相关的操作!!!必须确保没有进程或者组件正在使用该模块。
7.3、容器网络访问的原理
上面是容器网络访问的实现,那么容器具体是如何实现和外部的访问的呢???
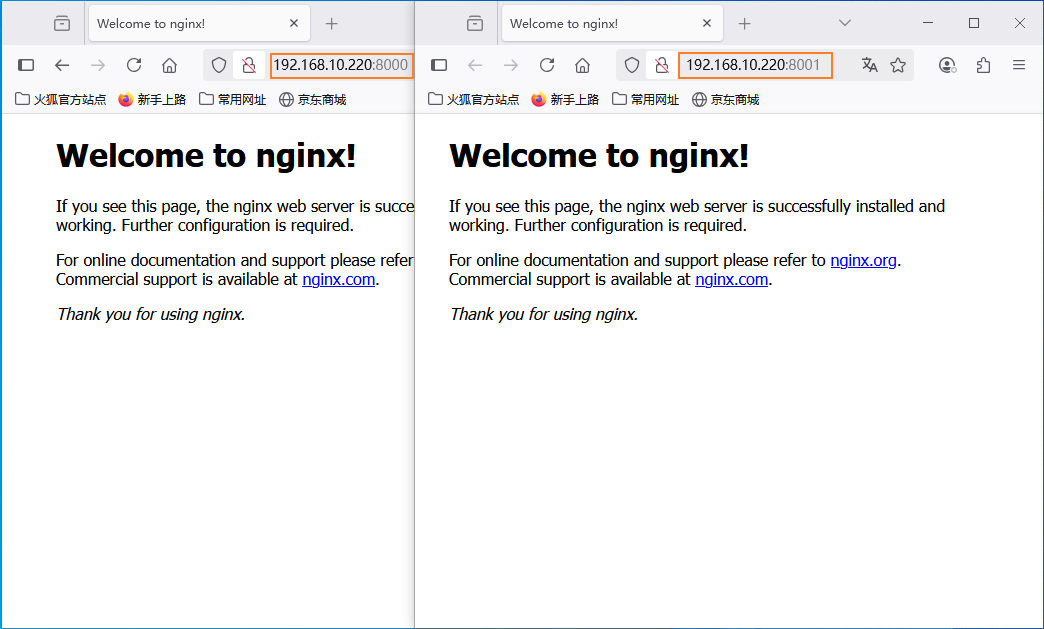
容器访问外部网络时,Docker 通过 IPtables 的 SNAT(源网络地址转换)规则将容器的源地址转换为宿主机的IP。
以下是大概的流程:
- 容器发起请求: 容器通过其网络接接口 (eth0) 发起请求。
- 路由表匹配: 容器根据路由表将数据包通过 veth 接口发送到 docker0 网卡。
- 创建SNAT规则: 进行SNAT转换,将数据包的源地址从容器IP转换为宿主机IP。
- 数据包到外部网络: 宿主机通过其网络接口 (如ens33) 将数据包发送到外部网络。
1、 容器发起访问请求
[root@test220 ~]# docker exec -it nginxbridge02 ping www.163.com
PING www.163.com.w.kunluncan.com (101.226.27.73) 56(84) bytes of data.
64 bytes from 101.226.27.73 (101.226.27.73): icmp_seq=1 ttl=127 time=11.4 ms
64 bytes from 101.226.27.73 (101.226.27.73): icmp_seq=2 ttl=127 time=10.6 ms
64 bytes from 101.226.27.73 (101.226.27.73): icmp_seq=3 ttl=127 time=12.0 ms
64 bytes from 101.226.27.73 (101.226.27.73): icmp_seq=4 ttl=127 time=10.6 ms

2、 源地址容器发送请求
[root@test220 ~]# tcpdump -i docker0 -n icmp
tcpdump: verbose output suppressed, use -v or -vv for full protocol decode
listening on docker0, link-type EN10MB (Ethernet), capture size 262144 bytes
06:58:52.662026 IP 172.17.0.3 > 101.226.27.75: ICMP echo request, id 360, seq 1, length 64
06:58:52.680508 IP 101.226.27.75 > 172.17.0.3: ICMP echo reply, id 360, seq 1, length 64
06:58:53.744256 IP 172.17.0.3 > 101.226.27.75: ICMP echo request, id 360, seq 2, length 64
06:58:53.756282 IP 101.226.27.75 > 172.17.0.3: ICMP echo reply, id 360, seq 2, length 64

3、 系统的路由表信息
[root@test220 ~]# route -n
Kernel IP routing table
Destination     Gateway         Genmask         Flags Metric Ref    Use Iface
0.0.0.0         192.168.10.2    0.0.0.0         UG    100    0        0 ens33
172.17.0.0      0.0.0.0         255.255.0.0     U     0      0        0 docker0
192.168.10.0    0.0.0.0         255.255.255.0   U     100    0        0 ens33

4、 查看 SNAT 规则
[root@test220 ~]# iptables -t nat -L POSTROUTING -n -v
Chain POSTROUTING (policy ACCEPT 547 packets, 40605 bytes)
pkts bytes target     prot opt in      out       source               destination
  67  4447 MASQUERADE  all  --  *      !docker0  172.17.0.0/16        0.0.0.0/0
  0   0    MASQUERADE  tcp  --  *      *         172.17.0.2           172.17.0.2           tcp dpt:80
  0   0    MASQUERADE  tcp  --  *      *         172.17.0.3           172.17.0.3           tcp dpt:80

5、 docker0 的请求交给宿主机网卡进行请求处理
[root@test220 ~]# tcpdump -i ens33 -n icmp
tcpdump: verbose output suppressed, use -v or -vv for full protocol decode
listening on ens33, link-type EN10MB (Ethernet), capture size 262144 bytes
06:59:10.679923 IP 192.168.10.220 > 101.226.27.75: ICMP echo request, id 360, seq 14, length 64
06:59:10.690642 IP 101.226.27.75 > 192.168.10.220: ICMP echo reply, id 360, seq 14, length 64
06:59:11.762213 IP 192.168.10.220 > 101.226.27.75: ICMP echo request, id 360, seq 15, length 64
06:59:11.778795 IP 101.226.27.75 > 192.168.10.220: ICMP echo reply, id 360, seq 15, length 64
- 1.
- 2.
- 3.
- 4.
- 5.
- 6.
- 7.
- 8.
- 9.
- 10.
- 11.
- 12.
- 13.
- 14.
- 15.
- 16.
- 17.
- 18.
- 19.
- 20.
- 21.
- 22.
- 23.
- 24.
- 25.
- 26.
- 27.
- 28.
- 29.
- 30.
- 31.
- 32.
- 33.
- 34.
- 35.
- 36.
- 37.
- 38.
- 39.
- 40.
- 41.
- 42.
- 43.
外部访问容器网络时,Docker 通过 IPtables 的 DNAT(目的网络地址转换)规则将请求转发到目标容器 。
以下是大概的流程:
- 请求到达宿主机: 外部网络通过宿主机的IP和端口发起请求。
- 创建DNAT规则: 根据DNAT转换,将请求的目标地址从宿主机IP转换为容器的IP。
- 路由表匹配: 根据宿主机系统的路由表,将数据包转发到对应容器的网络接口。
- 数据包到容器: docker0 通过广播找到容器并将数据包通过网络接口送入容器。
[root@test220 ~]# iptables -t nat -L DOCKER -n -v
Chain DOCKER (2 references)
pkts bytes  target     prot opt  in      out     source               destination
  0   0     RETURN     all  --  docker0  *       0.0.0.0/0            0.0.0.0/0
  2   104   DNAT       tcp  --  !docker0 *       0.0.0.0/0            0.0.0.0/0            tcp dpt:8000 to:172.17.0.2:80
  98  5096  DNAT       tcp  --  !docker0 *       0.0.0.0/0            0.0.0.0/0            tcp dpt:8001 to:172.17.0.3:80


# 其实通过具体进程,也能够看到系统上的 DNAT 规则
[root@test220 ~]# ps -aux | grep docker-proxy
root      13292  0.0  0.0 364512  7708 ?        Sl   Jul16   0:00 /usr/bin/docker-proxy -proto tcp -host-ip 0.0.0.0 -host-port 8000 -con             tainer-ip 172.17.0.2 -container-port 80
root      13392  0.0  0.0 217048  7748 ?        Sl   Jul16   0:00 /usr/bin/docker-proxy -proto tcp -host-ip 0.0.0.0 -host-port 8001 -con             tainer-ip 172.17.0.3 -container-port 80
- 1.
- 2.
- 3.
- 4.
- 5.
- 6.
- 7.
- 8.
- 9.
- 10.
- 11.
- 12.
- 13.
- 14.
结合上面网络访问的具体分析和说明,特画一个简易的网络访问流程图,以方便大家的理解,如下:


 1846
1846

 被折叠的 条评论
为什么被折叠?
被折叠的 条评论
为什么被折叠?
 到【灌水乐园】发言


