


创建一个vue实例
创建一个hello实例
<!DOCTYPE html>
<html lang="en">
<head>
<meta charset="UTF-8">
<meta name="viewport" content="width=device-width, initial-scale=1.0">
<title>Document</title>
</head>
<body>
<!--
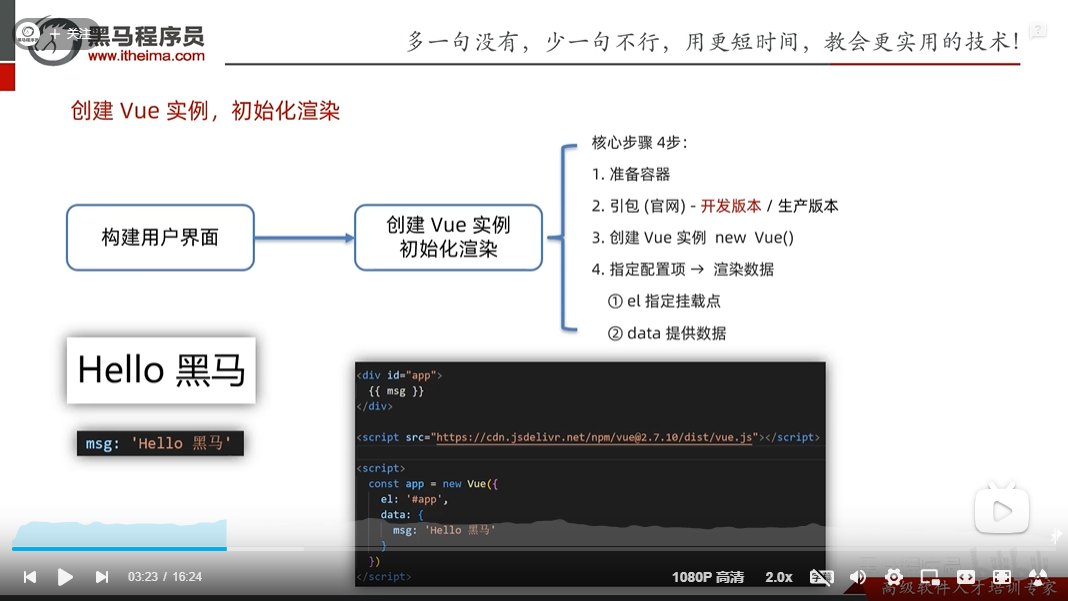
创建vue实例,初始化渲染
1.准备容器(vue所管理的界面)
2.引包(开发版本包 生产版本包)到官网查看
3.创建实列
4.添加配置项--完成渲染
-->
<!-- 盒子 -->
<div id="app">
<!-- 这里编写用于渲染的代码 -->
{{ message }}
</div>
<!-- 引入包 引入开发版本的包会包含完整的注释和警告 -->
<script src="https://cdn.jsdelivr.net/npm/vue@2.7.16/dist/vue.js"></script>
<script>
//创建实例
const app = new Vue({
// 通过el 配置选择器 指定vue 管理的盒子
el: '#app',
data: {
message:'hello 你好'
}
})
</script>
</body>
</html>
插值表达式

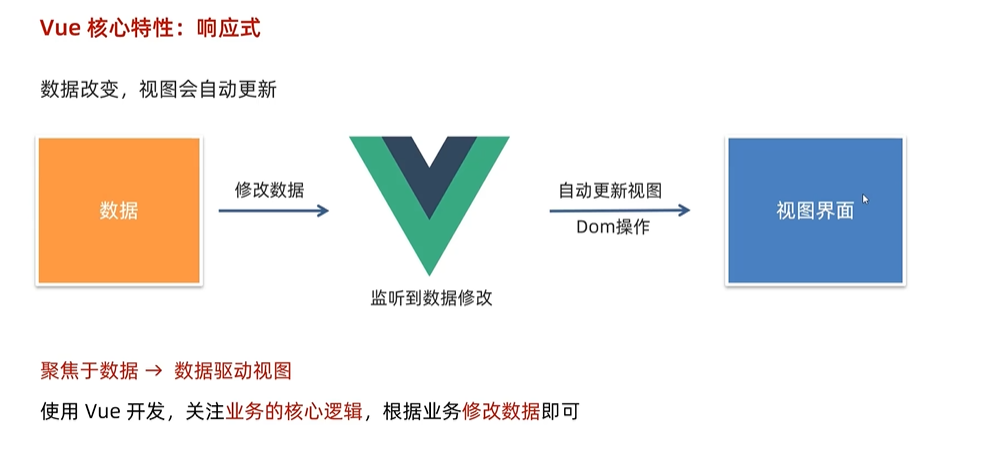
vue核心特性-响应式
总结
- 什么是响应式?
数据改变,视图自动更新 使用vue开发更专注于业务逻辑 - 如何访问或修改数据呢?
data中的数据,最终会被添加到实例上
访问数据:”实例.属性名“
修改数据:“实例.属性名” = “值”
v指令
v-html
v-html=“表达式”–》动态解析元素(标签)想当于innerHTML
<!DOCTYPE html>
<html lang="en">
<head>
    <meta charset="UTF-8">
    <meta name="viewport" content="width=device-width, initial-scale=1.0">
    <title>Document</title>
</head>
<body>
    <!--
        创建vue实例,初始化渲染
        1.准备容器(vue所管理的界面)
        2.引包(开发版本包  生产版本包)到官网查看
        3.创建实列
        4.添加配置项--完成渲染
    -->

    <!-- 盒子 -->
    <div id="app">
        <!-- 这里编写用于渲染的代码 -->
         <!-- v-html:用于解析标签 -->
         <div v-html="message"></div>
    </div>

    <!-- 引入包  引入开发版本的包会包含完整的注释和警告 -->
     <script src="https://cdn.jsdelivr.net/npm/vue@2.7.16/dist/vue.js"></script>

     <script>
        //创建实例
        const app = new Vue({
            // 通过el 配置选择器 指定vue 管理的盒子
            el: '#app',
            data: {
                message:`
                    <a href="https://www.baidu.com">
                        百度链接
                    </p>
                `
            }
        })
     </script>
</body>
</html>
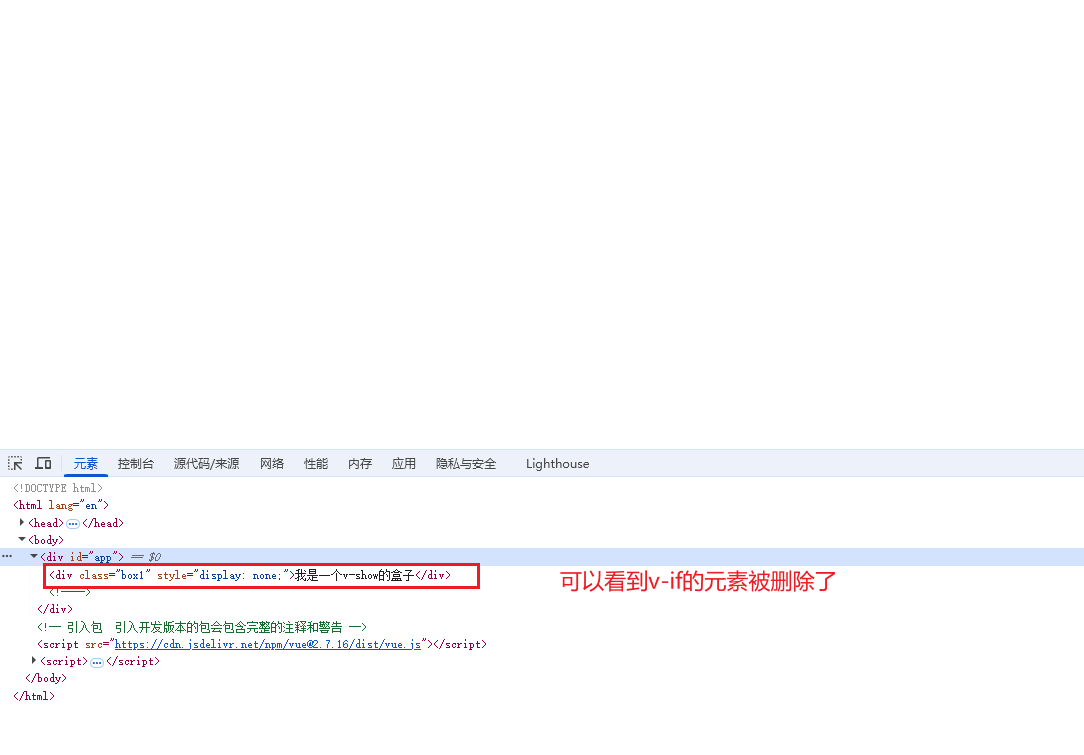
v-show 和v-if
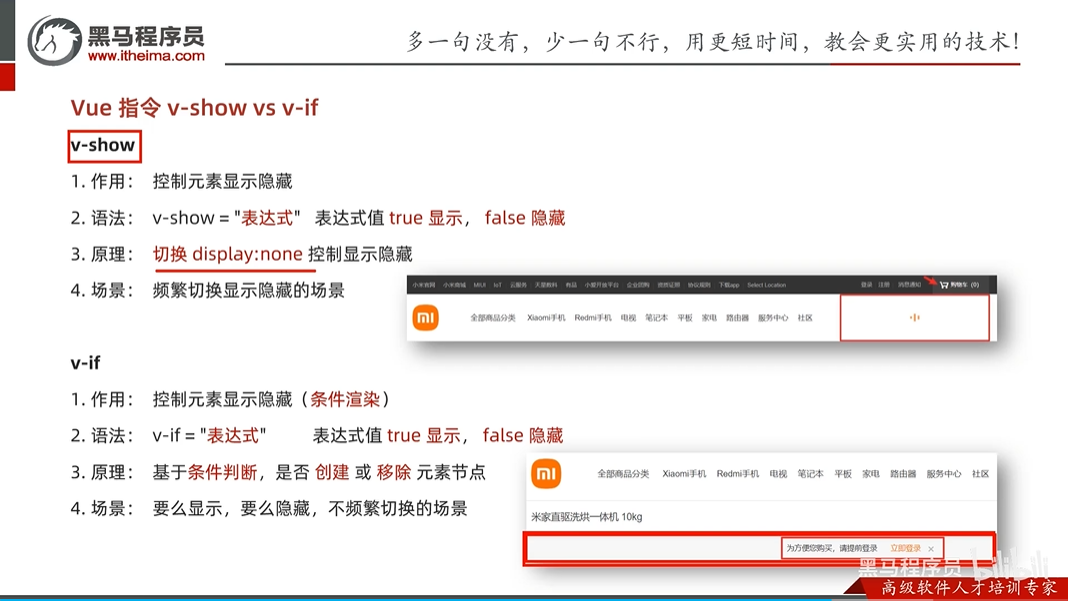
主要不同:v-show是控制css的display:none控制显示和隐藏,而v-if是直接控制元素的创建和删除
<!DOCTYPE html>
<html lang="en">
<head>
<meta charset="UTF-8">
<meta name="viewport" content="width=device-width, initial-scale=1.0">
<title>Document</title>
</head>
<body>
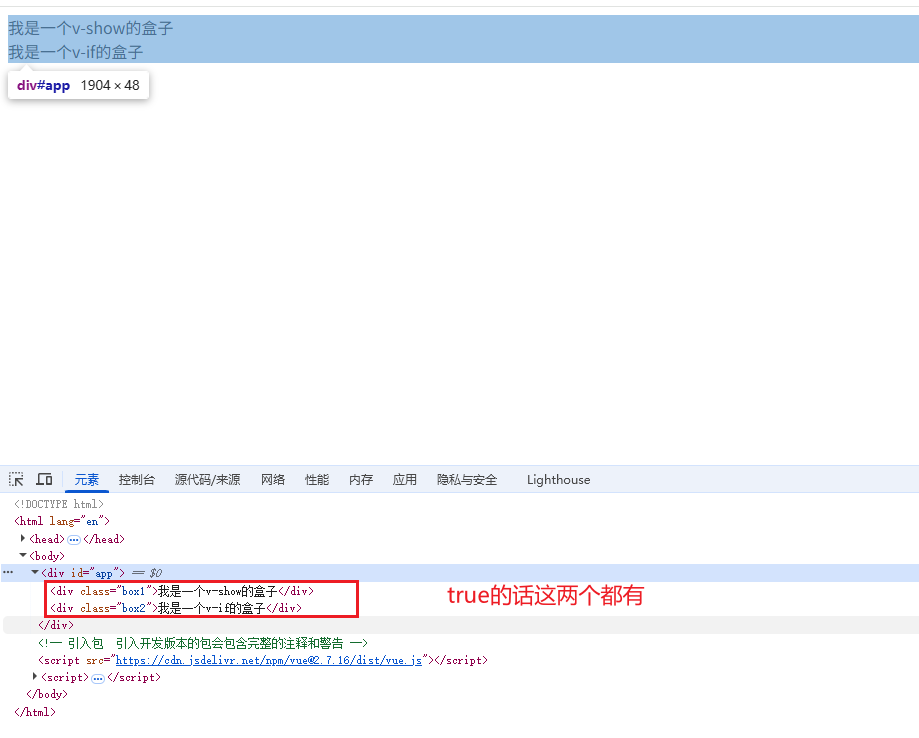
<div id= "app">
<div v-show="flag" class="box1">我是一个v-show的盒子</div>
<div v-if="flag" class="box2">我是一个v-if的盒子</div>
</div>
<!-- 引入包 引入开发版本的包会包含完整的注释和警告 -->
<script src="https://cdn.jsdelivr.net/npm/vue@2.7.16/dist/vue.js"></script>
<script>
const ap = new Vue({
el: '#app',
data:{
flag:true
}
})
</script>
</body>
</html>
当为true时:
<!DOCTYPE html>
<html lang="en">
<head>
    <meta charset="UTF-8">
    <meta name="viewport" content="width=device-width, initial-scale=1.0">
    <title>Document</title>
</head>
<body>
    <div id= "app">
        <div v-show="flag" class="box1">我是一个v-show的盒子</div>
        <div v-if="flag" class="box2">我是一个v-if的盒子</div>
    </div>

     <!-- 引入包  引入开发版本的包会包含完整的注释和警告 -->
     <script src="https://cdn.jsdelivr.net/npm/vue@2.7.16/dist/vue.js"></script>

     <script>
        const ap = new Vue({
            el: '#app',
            data:{
                flag:false
            }
        })
     </script>
</body>
</html>
当为false时:
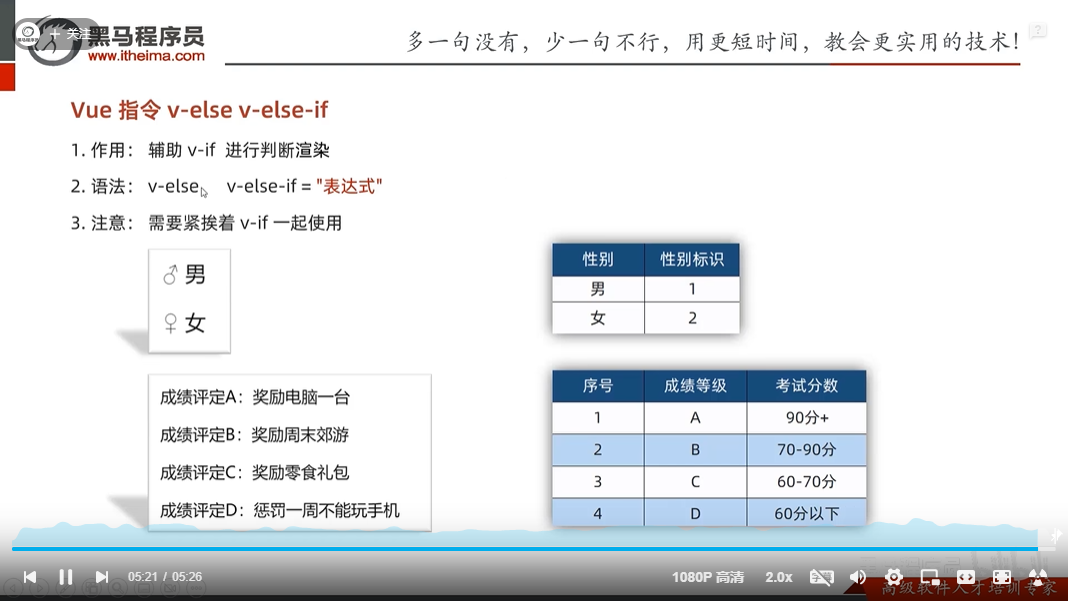
vi-else和v-else-if
<!DOCTYPE html>
<html lang="en">
<head>
    <meta charset="UTF-8">
    <meta name="viewport" content="width=device-width, initial-scale=1.0">
    <title>Document</title>
</head>
<body>
    <div id="app">
        <p v-if="gender === 2">性别:男</p>
        <p v-else>性别:女</p>
        <hr>
        <p v-if="score > 90">电脑一台</p>
        <p v-else-if="score > 80">手机一台</p>
        <p v-else-if="score > 60">旅游一次</p>
        <p v-else="score > 50">没礼品</p>
    </div>
     <!-- 引入包  引入开发版本的包会包含完整的注释和警告 -->
     <script src="https://cdn.jsdelivr.net/npm/vue@2.7.16/dist/vue.js"></script>

     <script>
        const app = new Vue({
            el:"#app",
            data:{
                gender:1,
                score:90
            }
        })
     </script>
</body>
</html>
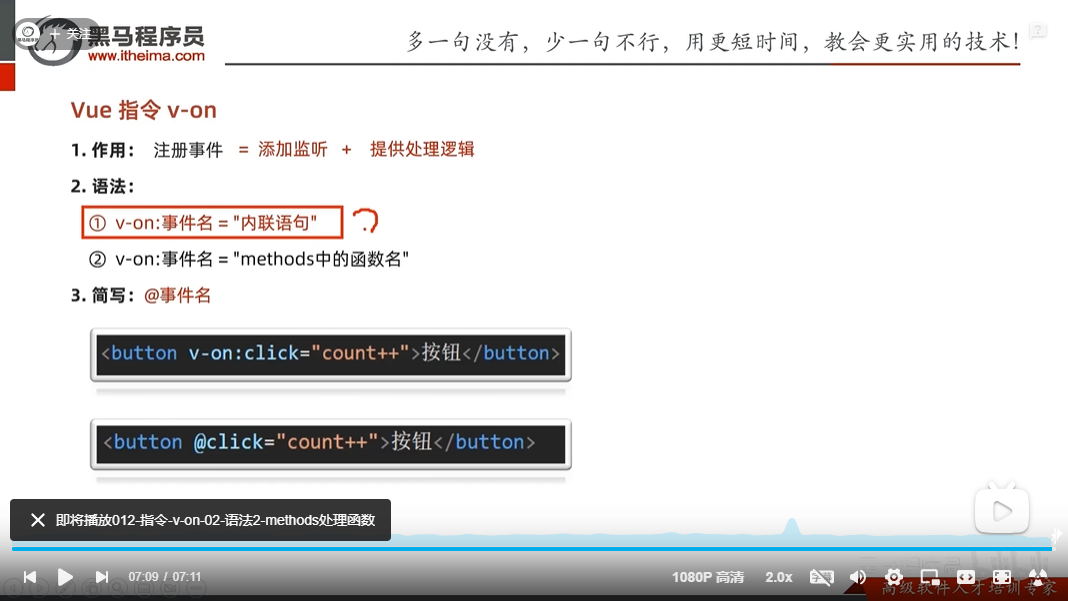
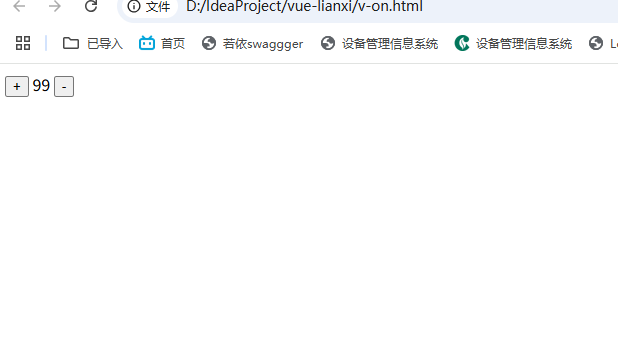
v-on:事件名="内联语句"用法
<!DOCTYPE html>
<html lang="en">
<head>
    <meta charset="UTF-8">
    <meta name="viewport" content="width=device-width, initial-scale=1.0">
    <title>Document</title>
</head>
<body>
    <div id="app">
        <button v-on:click="count++">+</button>
        <span>{{count}}</span>
        <button v-on:click="count--">-</button>
    </div>

         <!-- 引入包  引入开发版本的包会包含完整的注释和警告 -->
     <script src="https://cdn.jsdelivr.net/npm/vue@2.7.16/dist/vue.js"></script>

     <script>
        const a = new Vue({
            el:'#app',
            data:{
                count:100
            }
        })
     </script>
</body>
</html>
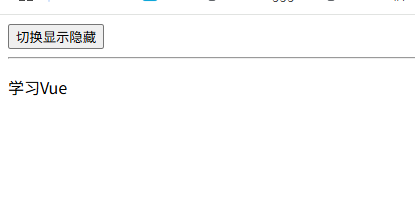
v-on:事件名=“methods内的函数名”

<!DOCTYPE html>
<html lang="en">
<head>
    <meta charset="UTF-8">
    <meta name="viewport" content="width=device-width, initial-scale=1.0">
    <title>Document</title>
</head>
<body>
    <div id="app">
        <button v-on:click="fn">切换显示隐藏</button>
        <hr>
        <p v-show="flag">学习Vue</p>
    </div>

         <!-- 引入包  引入开发版本的包会包含完整的注释和警告 -->
     <script src="https://cdn.jsdelivr.net/npm/vue@2.7.16/dist/vue.js"></script>

     <script>
        const a = new Vue({
            el:'#app',
            data:{
                count:100,
                flag:true
            },
            methods:{
                fn() {
                    a.flag = !a.flag
                }
            }
        })
     </script>
</body>
</html>
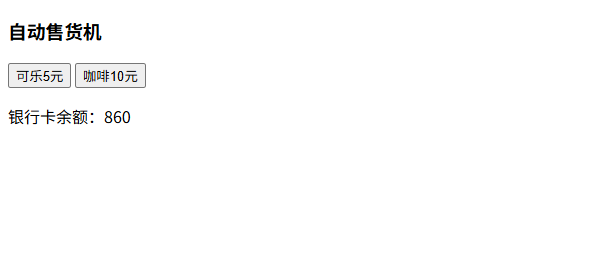
v-on:事件名="methods内的函数名,函数传参
<!DOCTYPE html>
<html lang="en">
<head>
    <meta charset="UTF-8">
    <meta name="viewport" content="width=device-width, initial-scale=1.0">
    <title>Document</title>
</head>
<body>
    <div id="app">
        <div class="box">
            <h3>自动售货机</h3>
            <button @click="fn(1,5) ">可乐5元</button>
            <button @click=" fn(2,10)">咖啡10元</button>
            <p>银行卡余额:{{moneny}}</p>
        </div>
    </div>

         <!-- 引入包  引入开发版本的包会包含完整的注释和警告 -->
     <script src="https://cdn.jsdelivr.net/npm/vue@2.7.16/dist/vue.js"></script>

     <script>
        const a = new Vue({
            el:'#app',
            data:{
                moneny:900
            },
            methods:{
                fn(type,c) {
                    if(type===1) {
                        a.moneny = a.moneny - c
                    }
                    if(type===2) {
                        a.moneny = a.moneny - c
                    }
                }
            }
        })
     </script>
</body>
</html>
v-bind动态绑定
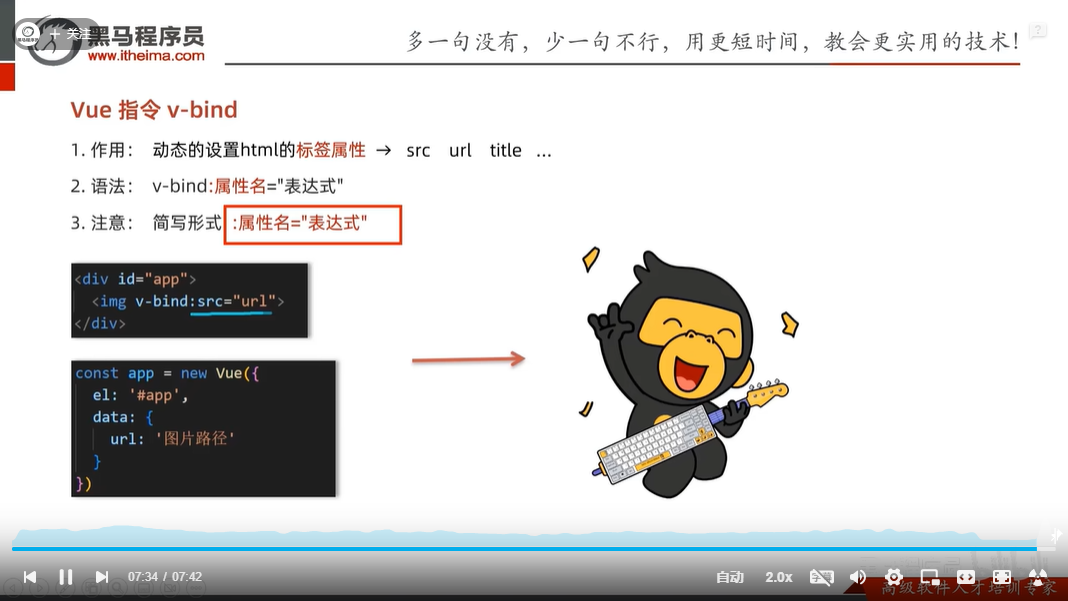
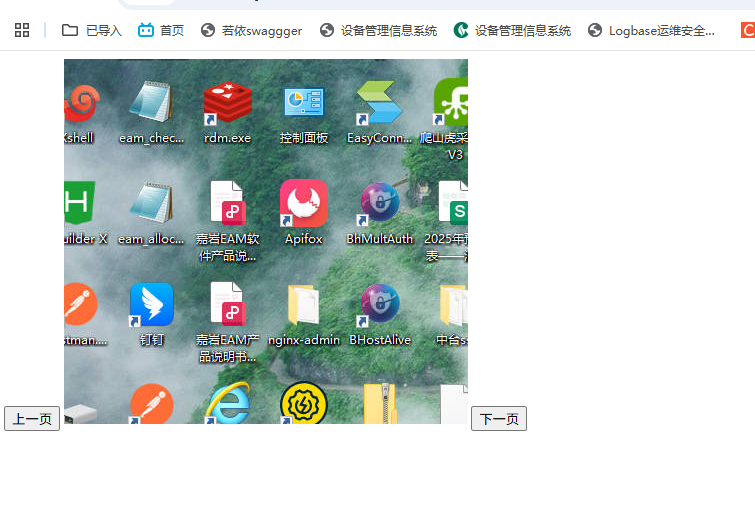
使用v-bind动态绑点图片实现图片切换
<!DOCTYPE html>
<html lang="en">
<head>
    <meta charset="UTF-8">
    <meta name="viewport" content="width=device-width, initial-scale=1.0">
    <title>Document</title>
</head>
<body>
    <div id="app">
        <!-- 数组下标当小于0时隐藏该元素 -->
        <button v-on:click="index--" v-show="index > 0">上一页</button>
        <img v-bind:src="tupian[index]">
        <!-- 当下一页超过了数组的大小就隐藏该元素 -->
        <button @click="index++" v-show="index < tupian.length - 1">下一页</button>
    </div>

      <!-- 引入包  引入开发版本的包会包含完整的注释和警告 -->
     <script src="https://cdn.jsdelivr.net/npm/vue@2.7.16/dist/vue.js"></script>

     <script>
        const app = new Vue({
            el:'#app',
            data:{
                tupian:[
                    "Snipaste_2025-07-23_17-00-38.jpg",
                    "Snipaste_2025-07-23_17-01-14.jpg",
                    "Snipaste_2025-07-23_17-01-44.jpg",
                    "Snipaste_2025-07-23_17-01-55.jpg",
                    "Snipaste_2025-07-23_17-02-03.jpg"
                ],
                index:0
            }
        })
     </script>
</body>
</html>
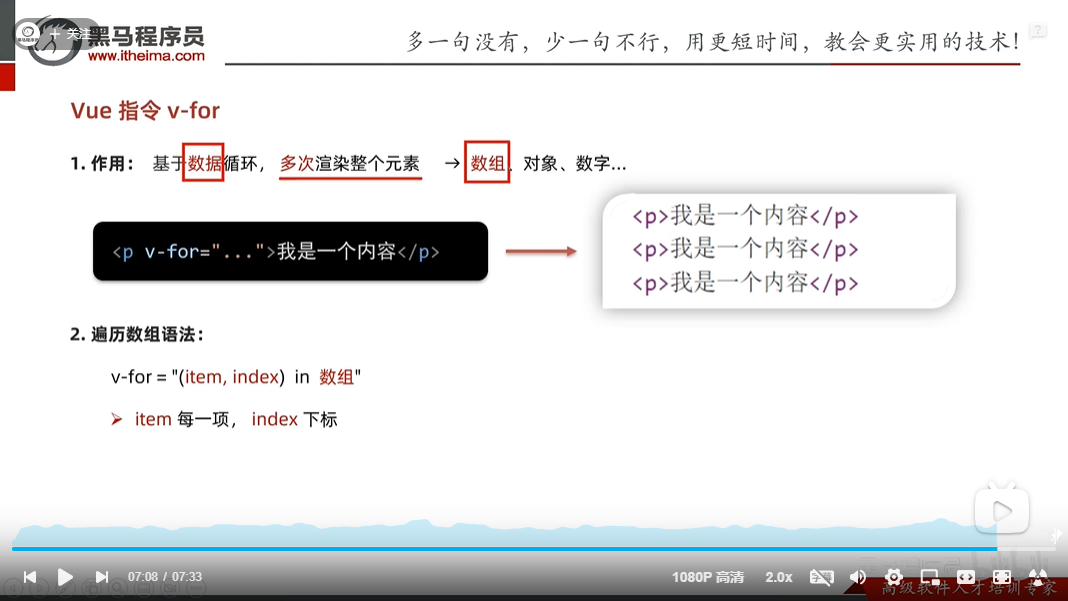
v-for
<!DOCTYPE html>
<html lang="en">
<head>
<meta charset="UTF-8">
<meta name="viewport" content="width=device-width, initial-scale=1.0">
<title>Document</title>
</head>
<body>
<div id="app">
<ur>
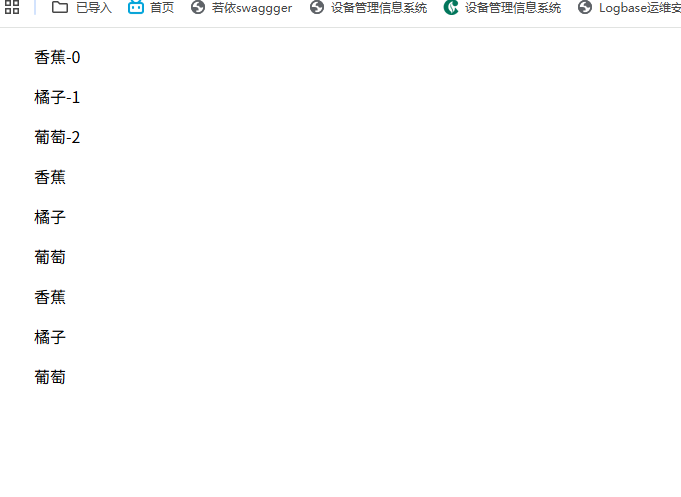
<ul v-for="(item,index) in list">{{item}}-{{index}}</ul>
<ul v-for="(item) in list">{{item}}</ul>
<!-- 简写 -->
<ul v-for="item in list">{{item}}</ul>
</ur>
</div>
<!-- 引入包 引入开发版本的包会包含完整的注释和警告 -->
<script src="https://cdn.jsdelivr.net/npm/vue@2.7.16/dist/vue.js"></script>
<script>
const app = new Vue({
el:"#app",
data:{
list:["香蕉","橘子","葡萄"]
}
})
</script>
</body>
</html>
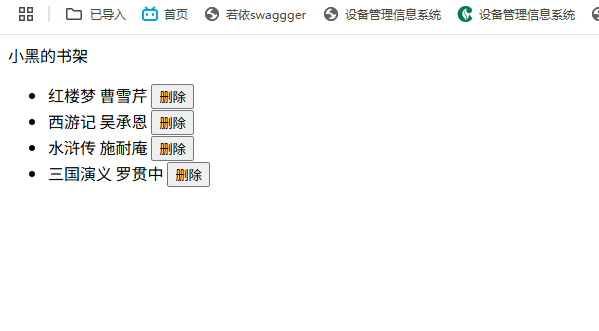
练习v-for
<!DOCTYPE html>
<html lang="en">
<head>
<meta charset="UTF-8">
<meta name="viewport" content="width=device-width, initial-scale=1.0">
<title>Document</title>
</head>
<body>
<div id="app">
<div> 小黑的书架</div>
<ul>
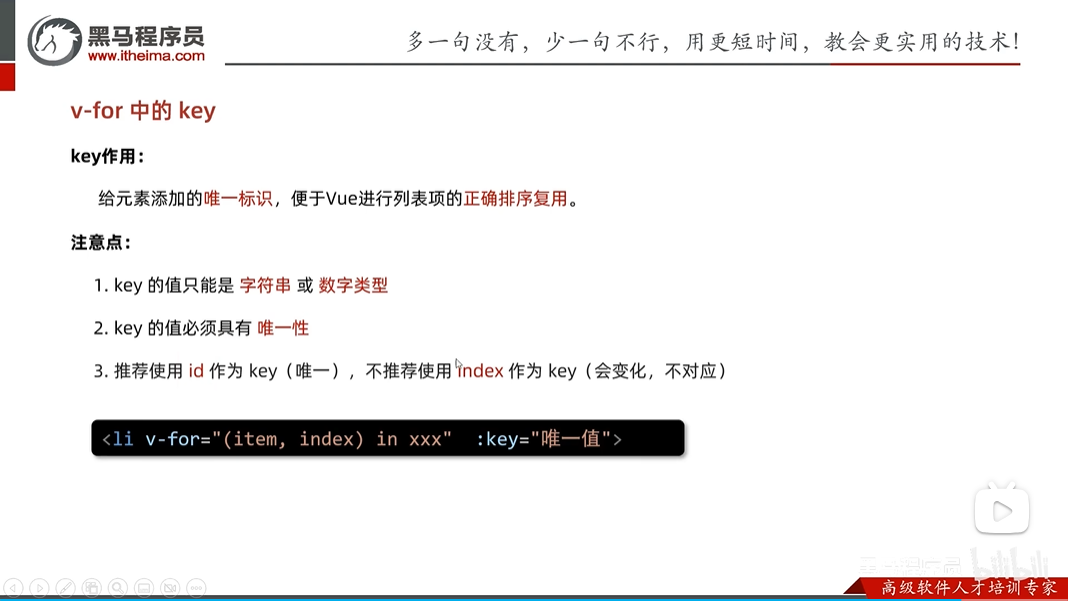
<!-- 加上:key="item.id"的作用是给这一列加上唯一标识,当删除时,那么这列都不会存在了,如果不加的话那么这列还是会存在的,只不过里面的内容会被下面的替换-->
<li v-for="(item,index ) in bookList" :key="item.id">
<span>{{item.name}}</span>
<span>{{item.zuozhe}}</span>
<button v-on:click="fn(item.index)">删除</button>
</li>
</ul>
</div>
<!-- 引入包 引入开发版本的包会包含完整的注释和警告 -->
<script src="https://cdn.jsdelivr.net/npm/vue@2.7.16/dist/vue.js"></script>
<script>
const app = new Vue({
el:"#app",
data:{
bookList:[{id:1,name:"红楼梦",zuozhe:"曹雪芹"},{id:2,name:"西游记",zuozhe:"吴承恩"},{id:3,name:"水浒传",zuozhe:"施耐庵"},{id:4,name:"三国演义",zuozhe:"罗贯中"}]
},
methods: {
fn(index) {
app.bookList.splice(index,1)
}
},
})
</script>
</body>
</html>
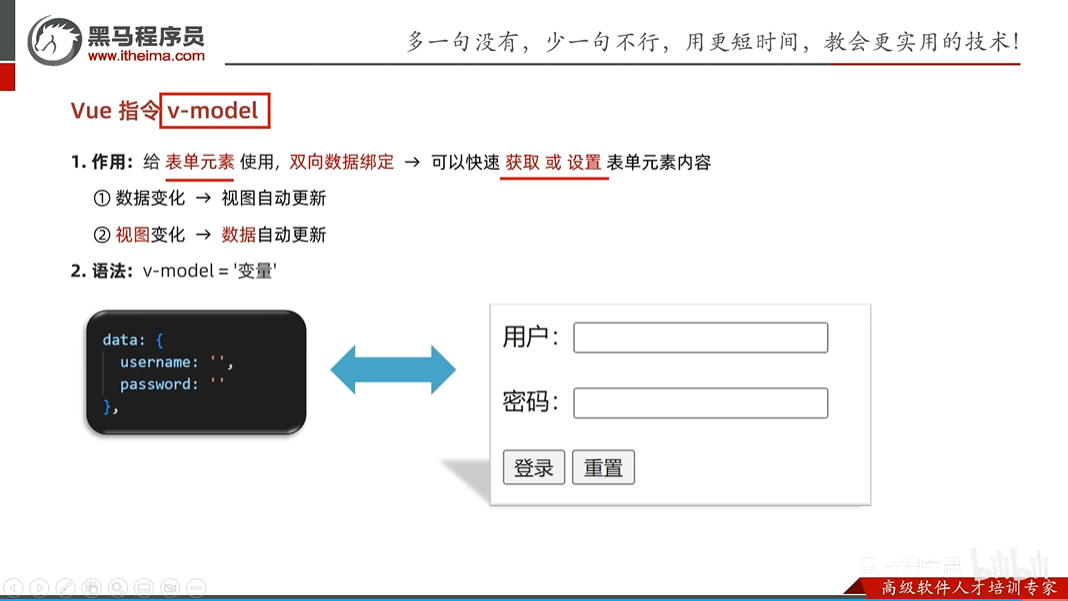
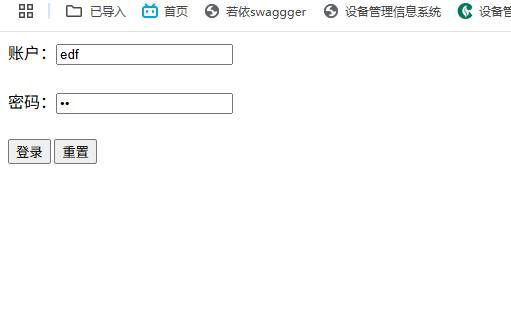
v-model双向数据绑定
<!DOCTYPE html>
<html lang="en">
<head>
    <meta charset="UTF-8">
    <meta name="viewport" content="width=device-width, initial-scale=1.0">
    <title>Document</title>
</head>
<body>
    <!--
        v-model 可以让数据和视图形成双向数据绑定
        数据变化,视图自动更新
        视图变化,数据自动更新
        可以快速的获取或者设置表单元素的内容
    -->

    <div id="app">
        账户:<input type="text" v-model="username"><br><br>
        密码:<input type="password" v-model="password"><br><br>
        <button @click="login">登录</button>
        <button @click="reset">重置</button>
    </div>

         <!-- 引入包  引入开发版本的包会包含完整的注释和警告 -->
     <script src="https://cdn.jsdelivr.net/npm/vue@2.7.16/dist/vue.js"></script>

     <script>
        const app = new Vue({
            el:"#app",
            data:{
                username:'',
                password:""
            },
            methods: {
                login() {
                    console.log(this.username,this.password)
                },
                reset() {
                    this.username="",
                    this.password=""
                }
            },
        })
     </script>
</body>
</html>
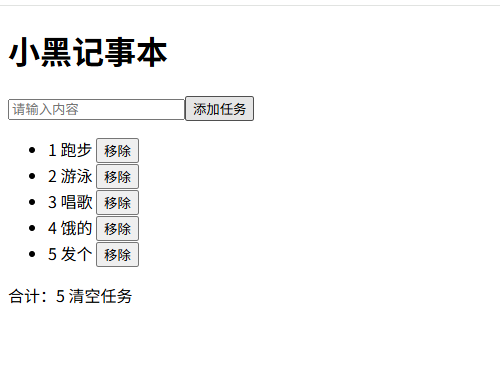
记事本练习
<!DOCTYPE html>
<html lang="en">
<head>
    <meta charset="UTF-8">
    <meta name="viewport" content="width=device-width, initial-scale=1.0">
    <title>Document</title>
</head>
<body>
    <div id="app">
    <header class="header">
        <h1>小黑记事本</h1>
        <input type="text" placeholder="请输入内容" v-model="content"><button @click="addTask(id++,content)">添加任务</button>
        <br>
    </header>

    <section class="main">
        <ul class="ul">
            <li class="list" v-for="(item,index) in list" :key="item.id">
                {{index+1}}  {{ item.content }}
                <button v-on:click="remove(item.id)">移除</button>
            </li>
        </ul>
        <span>合计:{{list.length}}
            <span v-on:click="clear">清空任务</span>
        </span>
    </section>
    </div>

         <!-- 引入包  引入开发版本的包会包含完整的注释和警告 -->
     <script src="https://cdn.jsdelivr.net/npm/vue@2.7.16/dist/vue.js"></script>

     <script>
        const app = new Vue({
            el:"#app",
            data:{
                list:[{id:1,content:"跑步"},{id:2,content:"游泳"},{id:3,content:"唱歌"}],
                content:"",
                id:4
            },
            methods: {
                addTask(id,content) {
                    if(content.trim() == "") {
                        alert("请输入内容")
                        return
                    }
                    this.list.push({id:id,content:content}),
                    console.log(this.list),
                    //清空文本
                    this.content=""
                },
                remove(id) {
                    console.log(id)
                    this.list = this.list.filter(item => item.id !== id)
                },
                clear() {
                    this.list=[]
                }
            },
        })
     </script>

</body>
</html>
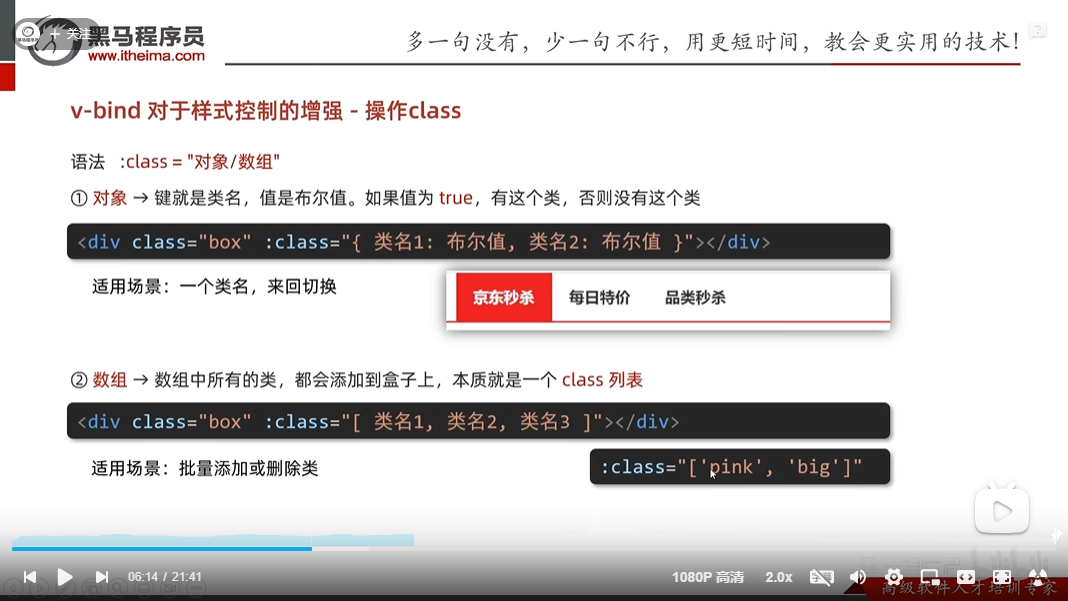
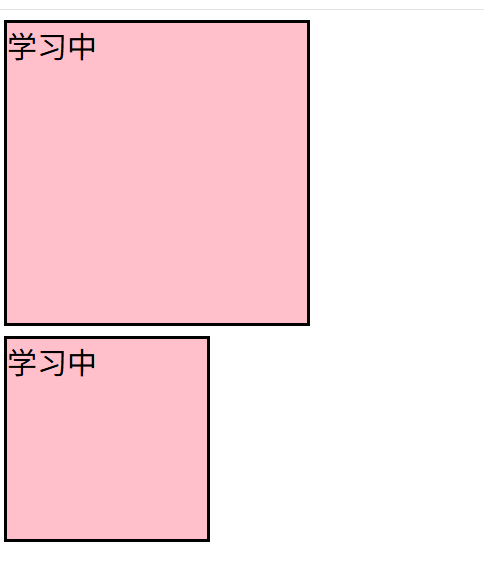
v-bind操作class
<!DOCTYPE html>
<html lang="en">
<head>
    <meta charset="UTF-8">
    <meta name="viewport" content="width=device-width, initial-scale=1.0">
    <title>Document</title>
    <style>
        .box {
            width: 200px;
            height: 200px;
            border: 3px solid #000;
            font-size: 30px;
            margin-top: 10px;
        }
        .pink {
            background-color: pink;
        }
        .big {
            width: 300px;
            height: 300px;
        }
    </style>
</head>
<body>


    <div id="app">
        <!-- 要么都存在,要么都不存在 -->
        <div   :class="['pink','big','box']" >学习中</div>
        <!-- 可以通过true和false来控制对象的有和无 -->
        <div   :class="{pink: true,box: true,big:false}">学习中</div>
    </div>


      <!-- 引入包  引入开发版本的包会包含完整的注释和警告 -->
     <script src="https://cdn.jsdelivr.net/npm/vue@2.7.16/dist/vue.js"></script>

     <script>
        const app = new Vue({
            el:"#app",
            data:{

            }
        })
     </script>
</body>
</html>
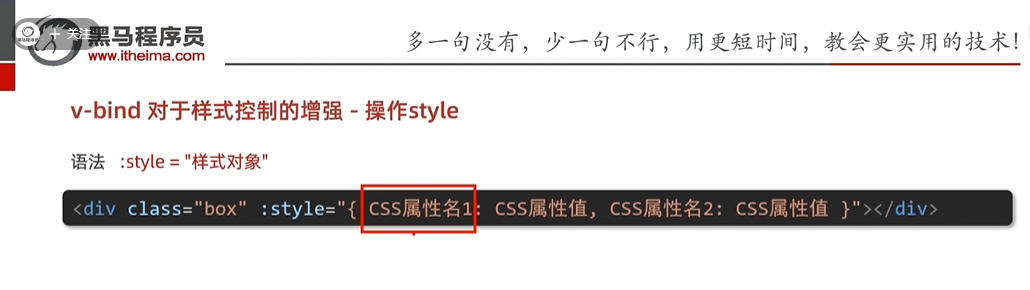
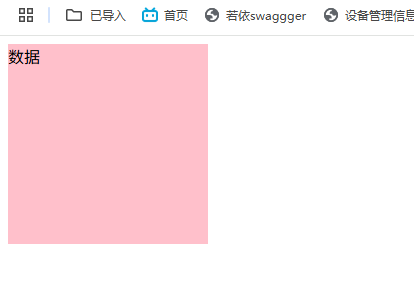
v-bind操作style
<!DOCTYPE html>
<html lang="en">
<head>
    <meta charset="UTF-8">
    <meta name="viewport" content="width=device-width, initial-scale=1.0">
    <title>Document</title>


</head>
<body>
    <div id="app">
        <div>
            <div :style="{width:'200px',height:'200px','background-color': 'pink'}">
                <span>数据</span>
            </div>
        </div>
    </div>
        <!-- 引入包  引入开发版本的包会包含完整的注释和警告 -->
     <script src="https://cdn.jsdelivr.net/npm/vue@2.7.16/dist/vue.js"></script>

     <script>
        const app = new Vue({
            el:"#app",
            data:{

            }
        })
     </script>
</body>
</html>
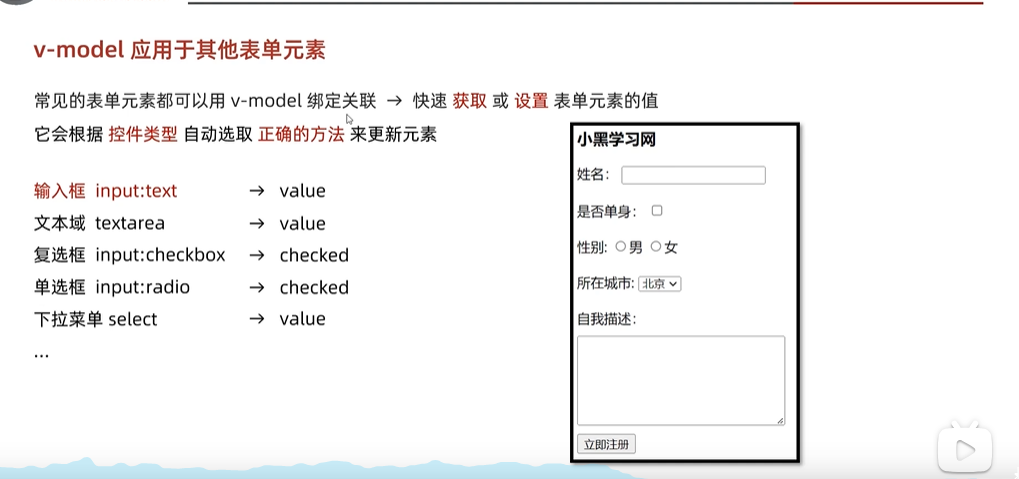
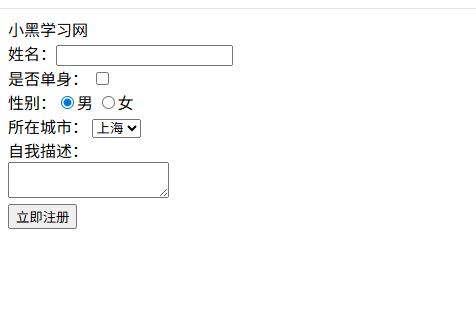
v-model应用于其它表单元素
<!DOCTYPE html>
<html lang="en">
<head>
    <meta charset="UTF-8">
    <meta name="viewport" content="width=device-width, initial-scale=1.0">
    <title>Document</title>
</head>
<body>
    <header>小黑学习网</header>
    <div id="app">
        姓名:<input type="text" v-model="username">
        <br>
        <!-- 复选框 -->
       是否单身: <input type="checkbox" v-model="isSingle">
       <br>
       <!-- 单选框 name:代表是一组,value代表是该单选框的值-->
       性别:<input type="radio" name="gen" value="1" v-model="genvalue">男   <input type="radio" name="gen" value="2" v-model="genvalue">女
       <br>
       <!-- 下拉菜单 -->
       所在城市:
       <select v-model="cycleId">
        <option value="101" >北京</option>
        <option value="102" >上海</option>
        <option value="103">江苏</option>
        <option value="104" >河南</option>
       </select>
       <br>
       <!-- 文本域 -->
       自我描述:
       <br>
       <textarea v-model="desc"></textarea>
       <br>
       <button>立即注册</button>
    </div>

          <!-- 引入包  引入开发版本的包会包含完整的注释和警告 -->
     <script src="https://cdn.jsdelivr.net/npm/vue@2.7.16/dist/vue.js"></script>

     <script>
        const app = new Vue({
            el:"#app",
            data:{
                username:"",
                isSingle:false,
                genvalue:"1",
                cycleId:102,
                desc:""
            }
        })
     </script>
</body>
</html>
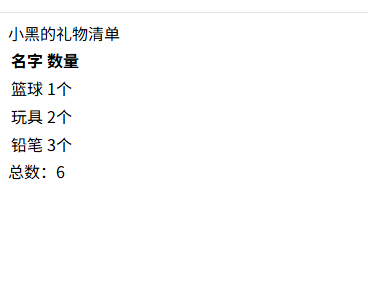
计算属性

<!DOCTYPE html>
<html lang="en">
<head>
    <meta charset="UTF-8">
    <meta name="viewport" content="width=device-width, initial-scale=1.0">
    <title>Document</title>
</head>
<body>
    <header>小黑的礼物清单</header>
    <div id="app">
       <table>
        <tr>
            <th>名字</th>
            <th>数量</th>
        </tr>
        <tr v-for="(item,index) in list" :key="item.id">
            <td>{{item.name}}</td>
            <td>{{item.num}}个</td>
        </tr>
       </table>
       <span>总数:{{totalNum}}</span>
    </div>
             <!-- 引入包  引入开发版本的包会包含完整的注释和警告 -->
     <script src="https://cdn.jsdelivr.net/npm/vue@2.7.16/dist/vue.js"></script>
     <script>
        const app = new Vue({
            el:"#app",
            data:{
                list:[{id:1,name:"篮球",num:1},{id:2,name:"玩具",num:2},{id:3,name:"铅笔",num:3}]
            },
            computed: {
                totalNum() {
                    // 基于现有数据编写求值逻辑,0是sum的初始值
                    let total = this.list.reduce((sum,item) => sum + item.num,0)
                    return total;
                }
            },
        })
     </script>
</body>
</html>
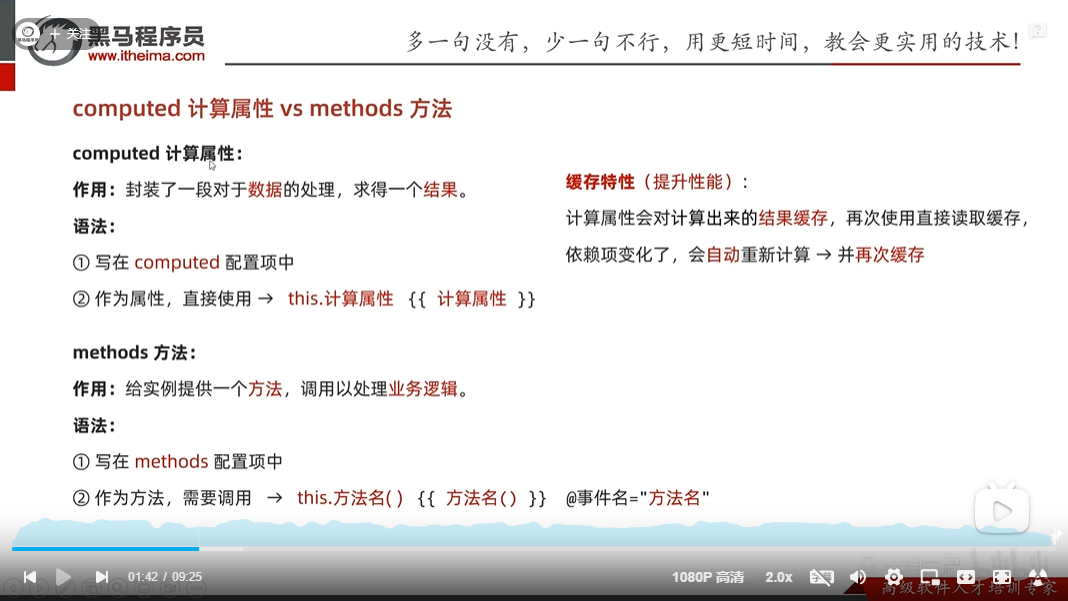
computed计算属性和methods方法比较
computed更注重计算,而methods里也可以计算方法但是它更注重于业务逻辑,最重要的一点是computed会把计算的结果放到缓存中,其它地方如果使用直接取缓存的就好了,效率很高,但是methods的计算,但凡其它地方用到都是要重新算一遍的,所以效率低
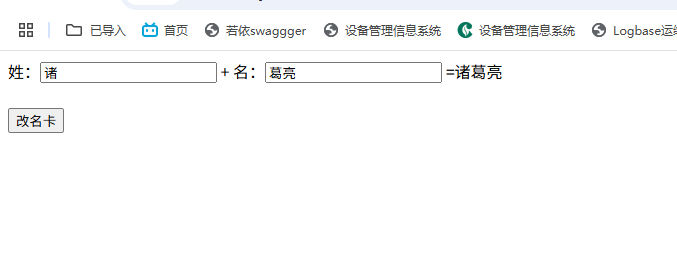
计算属性完整写法

<!DOCTYPE html>
<html lang="en">
<head>
    <meta charset="UTF-8">
    <meta name="viewport" content="width=device-width, initial-scale=1.0">
    <title>Document</title>
</head>
<body>
    <div id="app">
        <div>姓:<input type="text" v-model="firstname"> + 名:<input type="text" v-model="lastname"> =<span>{{fullname}}</span></div>
        <br>
        <button @click="changename">改名卡</button>
    </div>

           <!-- 引入包  引入开发版本的包会包含完整的注释和警告 -->
     <script src="https://cdn.jsdelivr.net/npm/vue@2.7.16/dist/vue.js"></script>

     <script>
        const app = new Vue({
            el:"#app",
            data:{
                name:"",
                firstname:"张",
                lastname:"飞"
            },
            methods: {
                changename() {
                    this.fullname = "诸葛亮"
                }
            },
            computed: {
                fullname:{
                    get() {
                        return this.firstname + this.lastname
                    },
                    // 这个set方法什么时候执行呢?当计算属性fullname被修改时,会执行这个方法,value就是fullname的值
                    set(value) {
                        console.log(value),
                        this.firstname = value.slice(0,1),
                        this.lastname = value.slice(1)
                    }
                }
            },
        })
     </script>
</body>
</html>
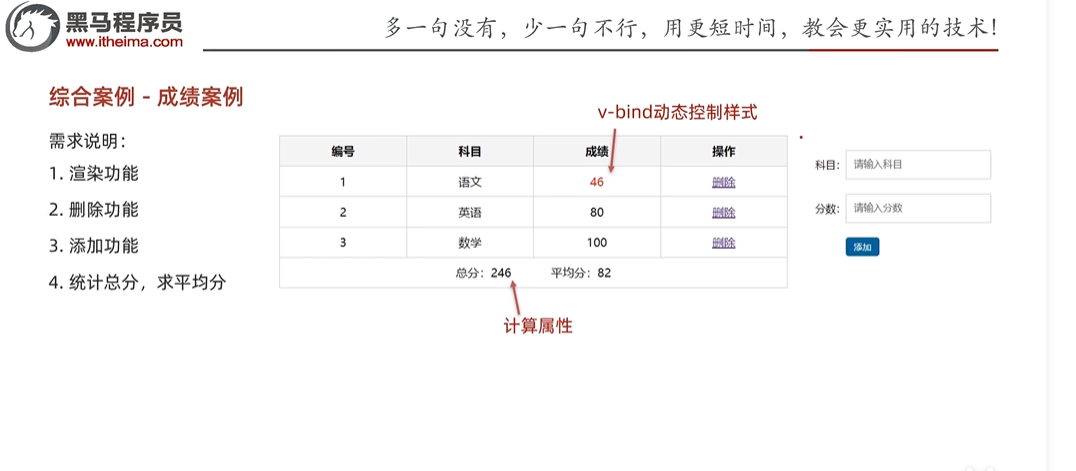
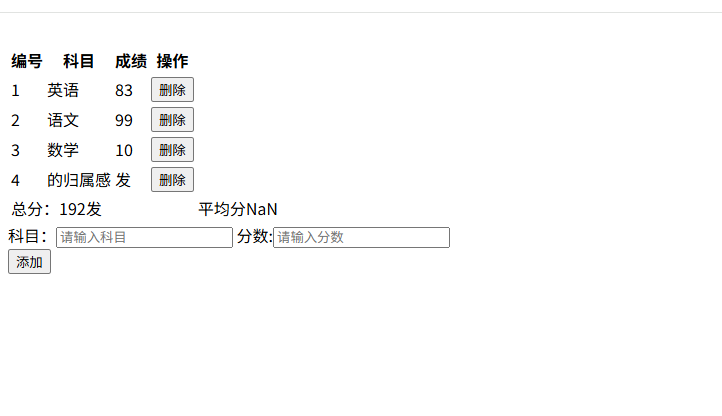
综合案例
<!DOCTYPE html>
<html lang="en">
<head>
<meta charset="UTF-8">
<meta name="viewport" content="width=device-width, initial-scale=1.0">
<title>Document</title>
<style>
.pink {
background-color: red;
}
.box {
width: 400px;
height: 200px;
border: 3px solid #000;
font-size: 30px;
margin-top: 10px;
}
.box1 {
width: 500px;
height: 200px;
border: 3px solid #000;
font-size: 30px;
margin-top: 10px;
}
</style>
</head>
<body>
<div id="app">
<div >
<table >
<thead>
<th>编号</th>
<th>科目</th>
<th>成绩</th>
<th>操作</th>
</thead>
<tbody v-if="list.length > 0">
<tr v-for="(item,index) in list" :key="item.id">
<td>{{index + 1}}</td>
<td>{{item.subject}}</td>
<td>{{item.score}}</td>
<td><button @click="del(item.id)">删除</button></td>
</tr>
</tbody>
<tbody v-if="list.length === 0">
<tr>
<td>暂无数据</td>
</tr>
</tbody>
<tfoot>
<tr>
<td colspan="5">
<span>总分:{{totalScore}}</span>
</td>
<td colspan="5">
<span>平均分{{avgScore}}</span>
</td>
</tr>
</tfoot>
</table>
</div>
<div >
科目:<input type="text" placeholder="请输入科目" v-model="subject1">
分数:<input type="text" placeholder="请输入分数" v-model="score1">
</div>
<div><button @click="add(++id,subject1,score1)">添加</button></div>
</div>
<!-- 引入包 引入开发版本的包会包含完整的注释和警告 -->
<script src="https://cdn.jsdelivr.net/npm/vue@2.7.16/dist/vue.js"></script>
<script>
const app = new Vue({
el:"#app",
data:{
list:[{id:1,subject:"英语",score:83},{id:2,subject:"语文",score:99},{id:3,subject:"数学",score:10}],
subject1:"",
score1:"",
id:3
},
methods: {
del(id) {
this.list = this.list.filter(item => item.id !== id)
},
add(id,subject1,score1) {
if(subject1.trim() == "" || score1.trim() == "") {
alert("科目/分数不能为空")
return
}
console.log("d")
this.list.push({id:id,subject:subject1,score:score1})
this.subject1 =""
this.score1 = ""
}
},
computed: {
totalScore() {
return this.list.reduce((sum,item) => sum + item.score,0)
},
avgScore() {
return this.totalScore / this.list.length
}
},
})
</script>
</body>
</html>
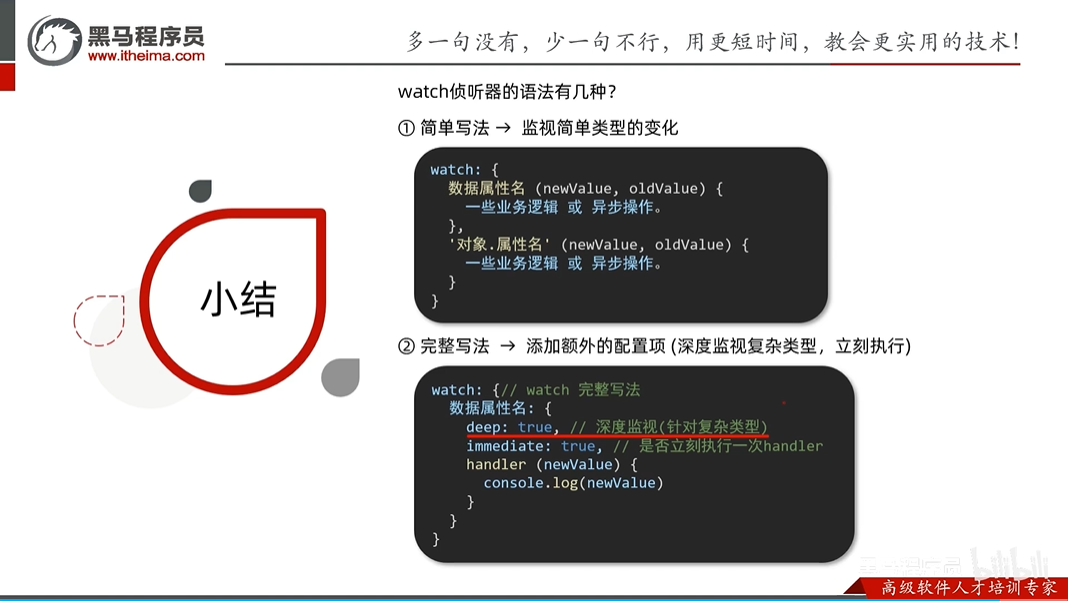
watch监视器
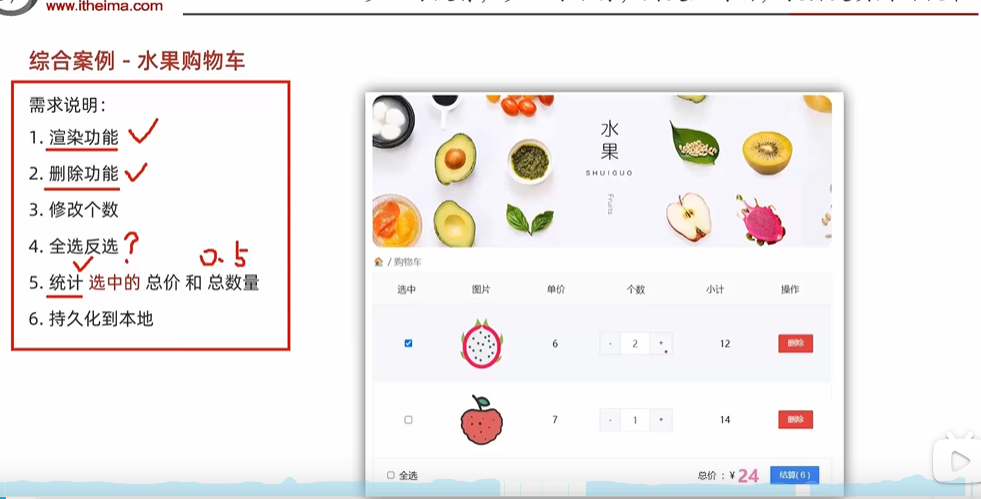
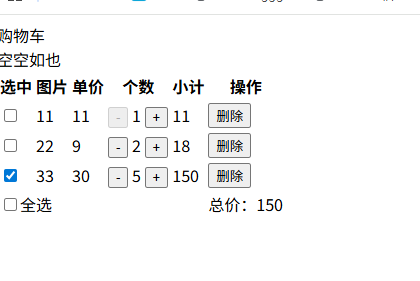
购物车案例

<!DOCTYPE html>
<html lang="en">
<head>
    <meta charset="UTF-8">
    <meta name="viewport" content="width=device-width, initial-scale=1.0">
    <title>Document</title>
</head>
<body>
    <header>购物车</header>
    <div id="app">
        <table>
                <thead>
                    <th>选中</th>
                     <th>图片</th>
                     <th>单价</th>
                     <th>个数</th>
                     <th>小计</th>
                     <th>操作</th>
                </thead>
                <tbody v-if="list.length > 0">
                    <tr v-for="(item,index) in list" :key="item.id">
                        <td><input type="checkbox" v-model="item.isChecked" @click="change(item.id)"></td>
                        <td>{{item.tupian}}</td>
                        <td>{{item.price}}</td>
                        <td>
                            <button @click="jian(item.id)" :disabled="item.count <= 1">-</button>
                            <span>{{item.count}}</span>
                            <button @click="add(item.id)">+</button>
                        </td>
                        <td>{{item.count*item.price}}</td>
                        <td><button v-on:click="del(item.id)">删除</button></td>
                    </tr>
                </tbody>

                <tbody  v-else><span>空空如也</span></tbody>

                <tfoot>
                    <tr>
                        <td colspan="5"><input type="checkbox" v-model="isAll">全选</td>
                        <td colspan="5">总价:{{totalPrice}}</td>
                    </tr>
                </tfoot>

        </table>
    </div>

               <!-- 引入包  引入开发版本的包会包含完整的注释和警告 -->
     <script src="https://cdn.jsdelivr.net/npm/vue@2.7.16/dist/vue.js"></script>
     <script>
        const defalutList = [{id:1,tupian:"11",price:11,count:1,isChecked:false},{id:2,tupian:"22",price:9,count:2,isChecked:false},{id:3,tupian:"33",price:30,count:3,isChecked:true}];

        const app = new Vue({
            el:"#app",
            data:{
                //localStorage返回为空就取defalutList
                list:  JSON.parse(localStorage.getItem("list")) || defalutList
            },
            methods: {
                del(id) {
                    this.list = this.list.filter(item => item.id !== id)
                },
                change(id) {
                    const c =this.list.find(item => item.id === id)
                    c.isChecked = true
                },
                add(id) {
                    const c = this.list.find(item => item.id === id)
                    c.count++
                },
                jian(id) {

                    const c = this.list.find(item => item.id === id)
                    c.count--

                }
            },
            computed: {
                isAll: {
                    get () {
                        //当所有的isChecked的值都为true则返回true
                        return this.list.every(item => item.isChecked === true)
                    },
                    set (value) {
                        console.log(value)
                        //当isAll这个计算属性改变时会调用set方法把每一个的isChecked改为对应的value值
                        this.list.forEach(item => item.isChecked = value)
                    }
                },
                totalPrice() {
                    return this.list.reduce((sum,item) => {
                        //被选中的计算值
                        if(item.isChecked) {
                            return sum + item.count * item.price
                        }else {
                            console.log(sum)
                            return sum
                        }
                    },0)
                }
            },
            watch: {
                list:{
                    deep: true,
                    handler (newValue) {
                        console.log(newValue)
                        //存到浏览器缓存
                        localStorage.setItem("list",JSON.stringify(newValue))
                    }
                }
            },


        })
     </script>
</body>
</html>
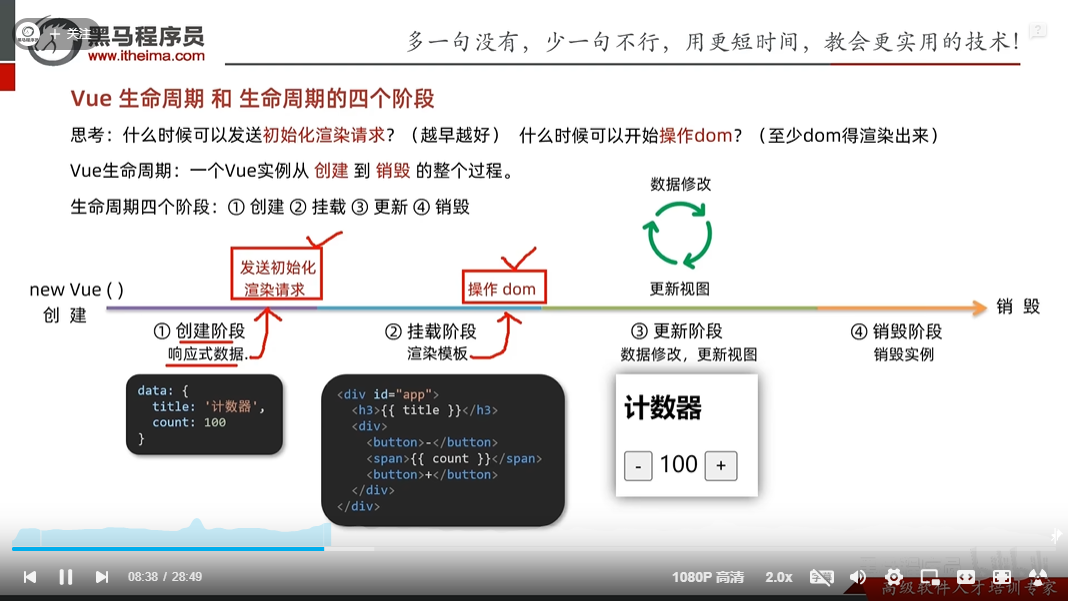
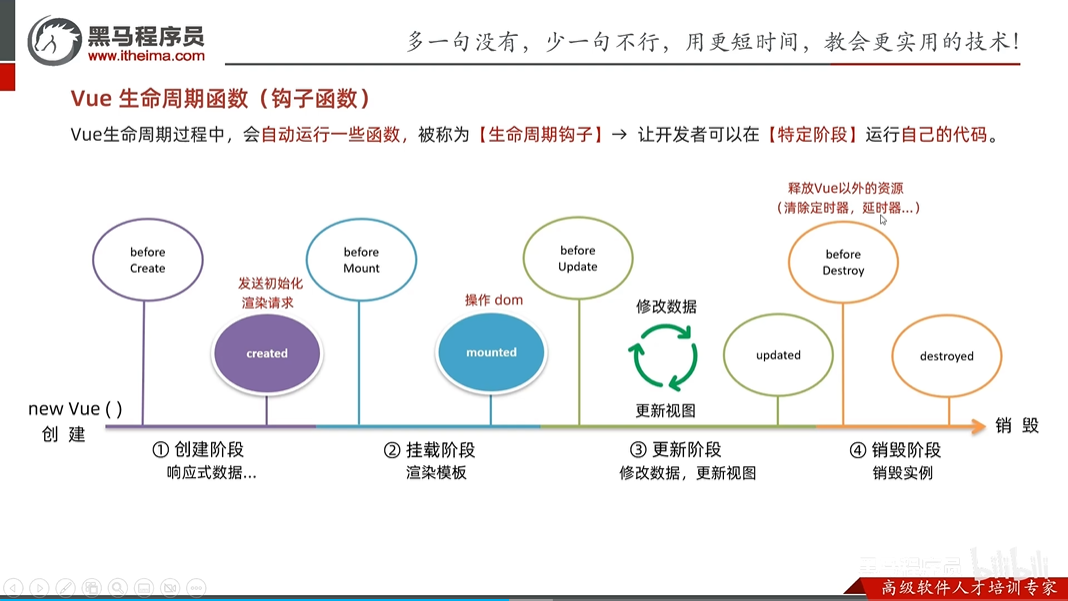
vue的生命周期以及8个钩子函数
- 生命周期四个阶段 创建,挂载,更新,销毁
- 钩子函数
<!DOCTYPE html>
<html lang="en">
<head>
<meta charset="UTF-8">
<meta name="viewport" content="width=device-width, initial-scale=1.0">
<title>Document</title>
</head>
<body>
<div id="app">
<h2>{{title}}</h2>
<div>
<button @click="count--" :disabled="count <= 0">-</button>
<span >{{count}}</span>
<button @click="count++">+</button>
</div>
</div>
<!-- 引入包 引入开发版本的包会包含完整的注释和警告 -->
<script src="https://cdn.jsdelivr.net/npm/vue@2.7.16/dist/vue.js"></script>
<script>
const ap = new Vue({
el:"#app",
data:{
count:10,
title:"计数器",
dd:"fd"
},
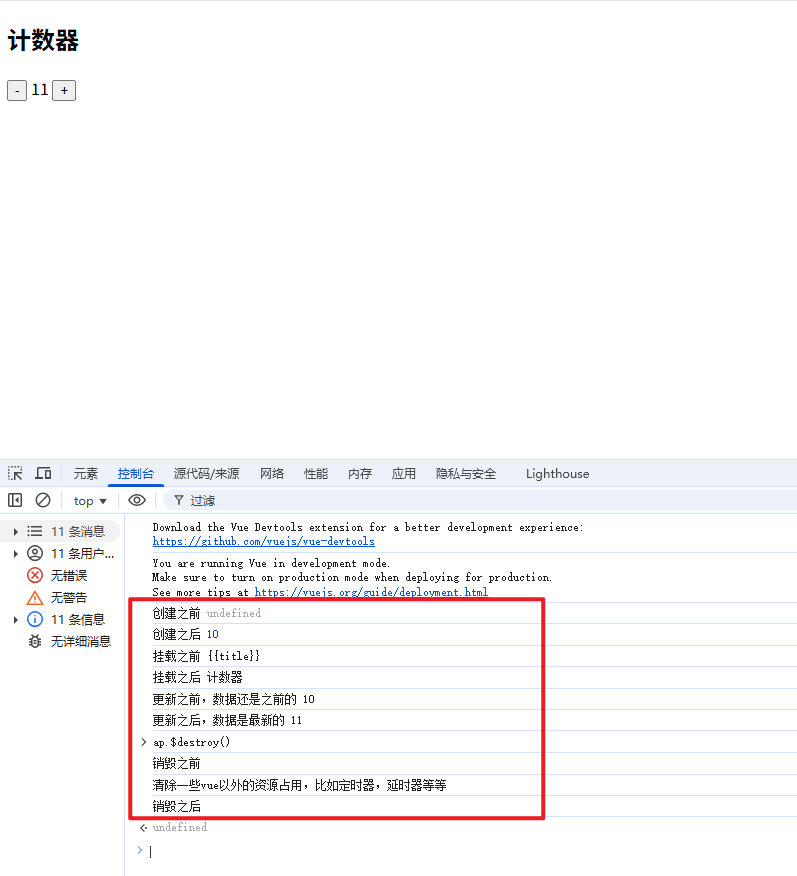
//创建阶段
beforeCreate() {
//this.count会出现未定义
console.log("创建之前",this.count)
},
created() {
console.log("创建之后",this.count)
},
//挂载(渲染)阶段
beforeMount() {
//document.querySelector('h2').innerHTML是取不到值的,因为它还没进行渲染
console.log("挂载之前",document.querySelector('h2').innerHTML)
},
mounted() {
console.log("挂载之后",document.querySelector('h2').innerHTML)
},
//更新阶段
beforeUpdate() {
console.log("更新之前,数据还是之前的",document.querySelector('span').innerHTML )
},
updated() {
console.log("更新之后,数据是最新的",document.querySelector('span').innerHTML)
},
//销毁阶段--一旦销毁,页面上的操作都会没反应
beforeDestroy() {
console.log("销毁之前")
console.log("清除一些vue以外的资源占用,比如定时器,延时器等等")
},
destroyed() {
console.log("销毁之后")
},
})
</script>
</body>
</html>
vue生命周期实例-初始化渲染
<!DOCTYPE html>
<html lang="en">
<head>
    <meta charset="UTF-8">
    <meta name="viewport" content="width=device-width, initial-scale=1.0">
    <title>Document</title>
</head>
<body>
    <div id="app">
        <div>新闻</div>
        <ul v-for="(item,index) in list" :key="item.id">
            <li>{{item.title}} <div><img :src="item.img"></img></div></li>
        </ul>

    </div>

                   <!-- 引入包  引入开发版本的包会包含完整的注释和警告 -->
     <script src="https://cdn.jsdelivr.net/npm/vue@2.7.16/dist/vue.js"></script>
         <!-- 引入最新版 -->

     <script src="https://unpkg.com/axios/dist/axios.min.js"></script>
     <script>
        const app = new Vue({
            el:"#app",
            data:{
                list:[]
            },
            //创建vue之后调用axios函数获取数据,在把数据赋值给对象的list属性
            async created() {
                const response = await axios.get('http://hmajax.itheima.net/api/news')
                console.log(response.data.data)
                this.list = response.data.data
            },

        })
     </script>
</body>
</html>

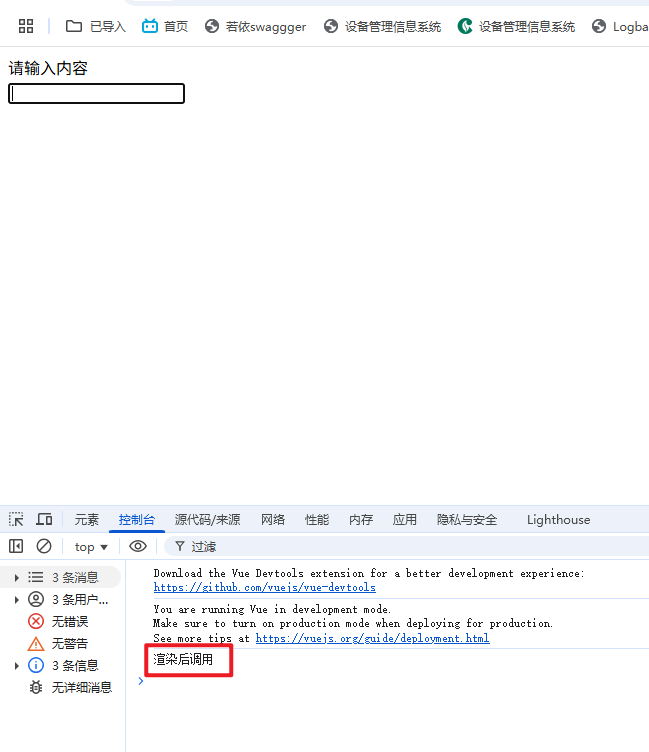
vue生命周期实例-获取焦点
<!DOCTYPE html>
<html lang="en">
<head>
    <meta charset="UTF-8">
    <meta name="viewport" content="width=device-width, initial-scale=1.0">
    <title>Document</title>
</head>
<body>
    <header>请输入内容</header>
    <div id="app">
        <input type="text" id="ff">
    </div>

                   <!-- 引入包  引入开发版本的包会包含完整的注释和警告 -->
     <script src="https://cdn.jsdelivr.net/npm/vue@2.7.16/dist/vue.js"></script>
     <script>
        const app = new Vue({
            el:"#app",
            data:{

            },
            //页面渲染之后
            mounted() {
                console.log('渲染后调用')
                document.querySelector("#ff").focus()
            }
        })
     </script>
</body>
</html>
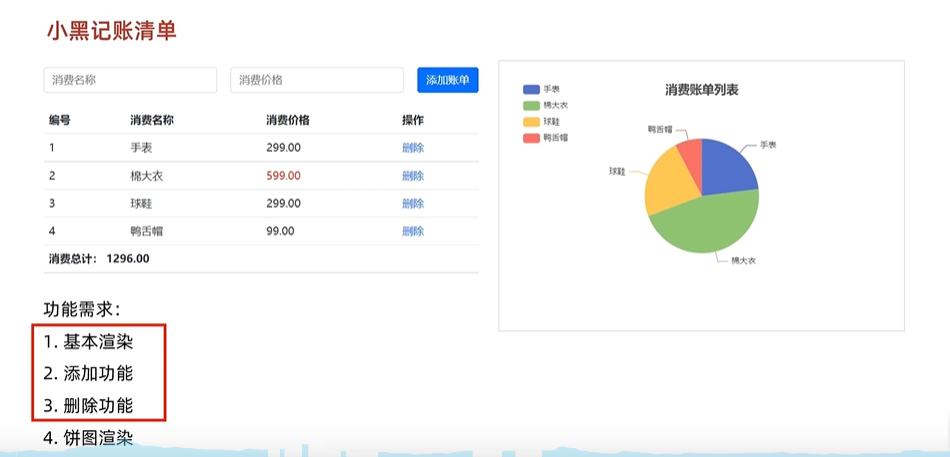
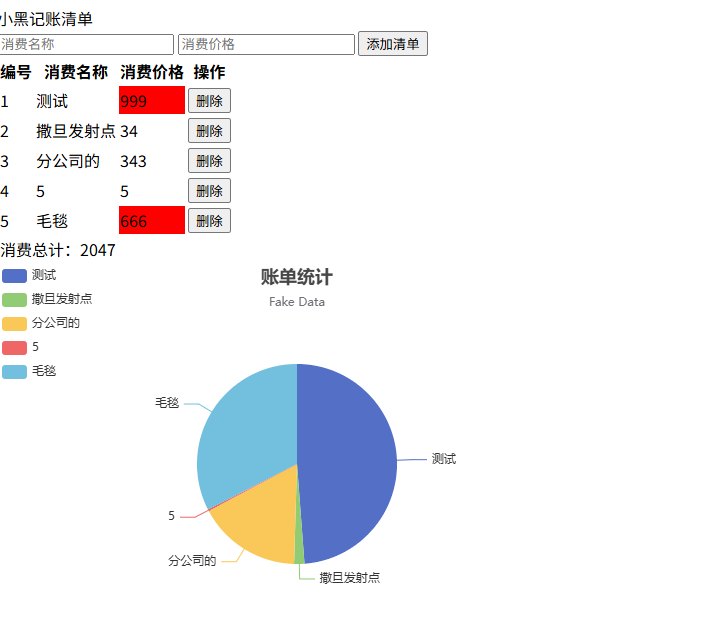
记账清单案例-表格渲染-饼图渲染
<!DOCTYPE html>
<html lang="en">

<head>
    <meta charset="UTF-8">
    <meta name="viewport" content="width=device-width, initial-scale=1.0">
    <title>Document</title>
    <style>
        .red {
            background-color: red;
        }
    </style>
</head>

<body>
    <header>小黑记账清单</header>
    <div id="app">

        <input type="text" placeholder="消费名称" v-model="name"> <input type="text" placeholder="消费价格"
            v-model.number="price"> <button @click="add(name,price)">添加清单</button>
        <div>
            <table>
                <thead>
                    <th>编号</th>
                    <th>消费名称</th>
                    <th>消费价格</th>
                    <th>操作</th>
                </thead>

                <tbody v-if="list.length > 0">
                    <tr v-for="(item,index) in list" :key="item.id">
                        <td>{{index+1}}</td>
                        <td>{{item.name}}</td>
                        <td :class="{red:item.price > 500}">{{item.price}}</td>
                        <td><button @click="del(item.id)">删除</button></td>
                    </tr>
                </tbody>

                <tfoot>
                    <tr>
                        <td colspan="5">消费总计:{{totalPrice}}</td>
                    </tr>
                </tfoot>
            </table>
        </div>
        <!-- 为 ECharts 准备一个定义了宽高的 DOM -->
        <div id="main" style="width: 600px;height:400px;"></div>

    </div>

    <!-- 引入包  引入开发版本的包会包含完整的注释和警告 -->
    <script src="https://cdn.jsdelivr.net/npm/vue@2.7.16/dist/vue.js"></script>
    <script src="https://unpkg.com/axios/dist/axios.min.js"></script>
    <script src="https://cdn.jsdelivr.net/npm/echarts@5.6.0/dist/echarts.min.js"></script>
    <script>

        const spp = new Vue({
            el: "#app",
            data: {
                list: [],
                name: '',
                price: ''
            },
            //创建vue之后的钩子
            async created() {

                this.getList()

            },
            mounted() {
                // 基于准备好的dom,初始化echarts实例
                this.myChart = echarts.init(document.getElementById('main'));
                this.myChart.setOption({
                    title: {
                        text: '账单统计',
                        subtext: 'Fake Data',
                        left: 'center'
                    },
                    tooltip: {
                        trigger: 'item'
                    },
                    legend: {
                        orient: 'vertical',
                        left: 'left'
                    },
                    series: [
                        {
                            name: 'Access From',
                            type: 'pie',
                            radius: '50%',
                            data: [
                                { value: 1048, name: 'Search Engine' },
                                { value: 735, name: 'Direct' },
                                { value: 580, name: 'Email' },
                                { value: 484, name: 'Union Ads' },
                                { value: 300, name: 'Video Ads' }
                            ],
                            emphasis: {
                                itemStyle: {
                                    shadowBlur: 10,
                                    shadowOffsetX: 0,
                                    shadowColor: 'rgba(0, 0, 0, 0.5)'
                                }
                            }
                        }
                    ]
                })
            },

            methods: {
                async getList() {
                    const response = await axios.get('https://applet-base-api-t.itheima.net/bill', {
                        params: {
                            creator: '小'
                        }
                    })
                    this.list = response.data.data,
                    console.log(this.list)

                     //更新图表
                    this.myChart.setOption({


                         series: [
                        {

                            data: this.list.map(item => ({value: item.price,name: item.name}))

                        }
                    ]
                    })
                },
                async del(id) {
                    console.log(id)
                    const response = await axios.delete(`https://applet-base-api-t.itheima.net/bill/${id}`)
                    console.log(response)
                    //重新渲染
                    this.getList()
                },
                async add(name, price) {
                    const response = await axios.post('https://applet-base-api-t.itheima.net/bill', {
                        creator: '小',
                        name: name,
                        price: price
                    })
                    //重新渲染
                    this.getList()
                }
            },
            computed: {
                totalPrice() {
                    return this.list.reduce((sum, item) => sum + item.price, 0)

                }
            }

        })
    </script>
</body>

</html>
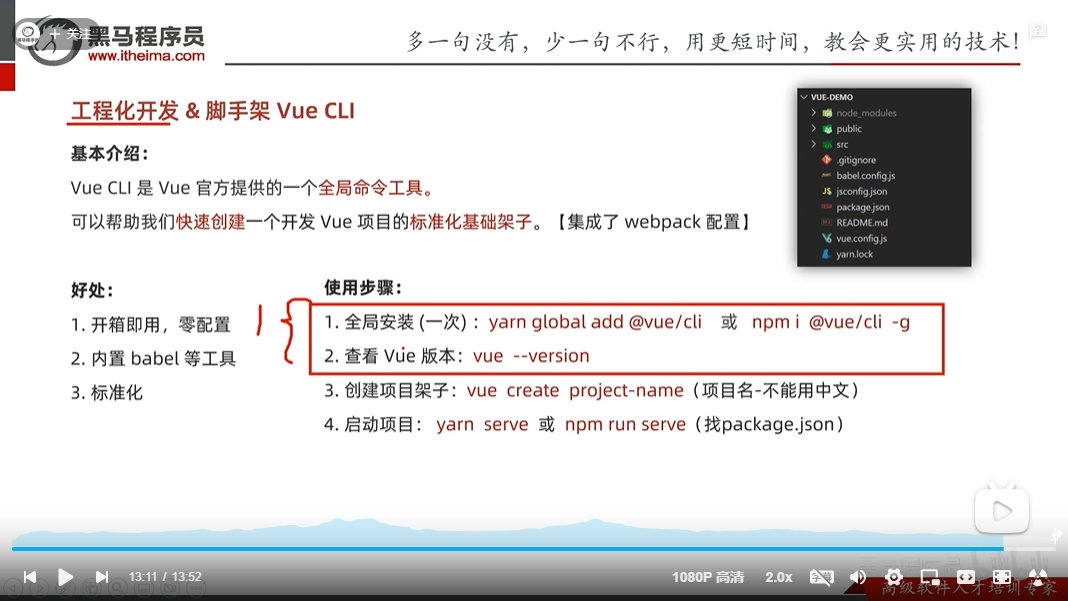
工程化开发,脚手架Vue CLI
项目目录介绍
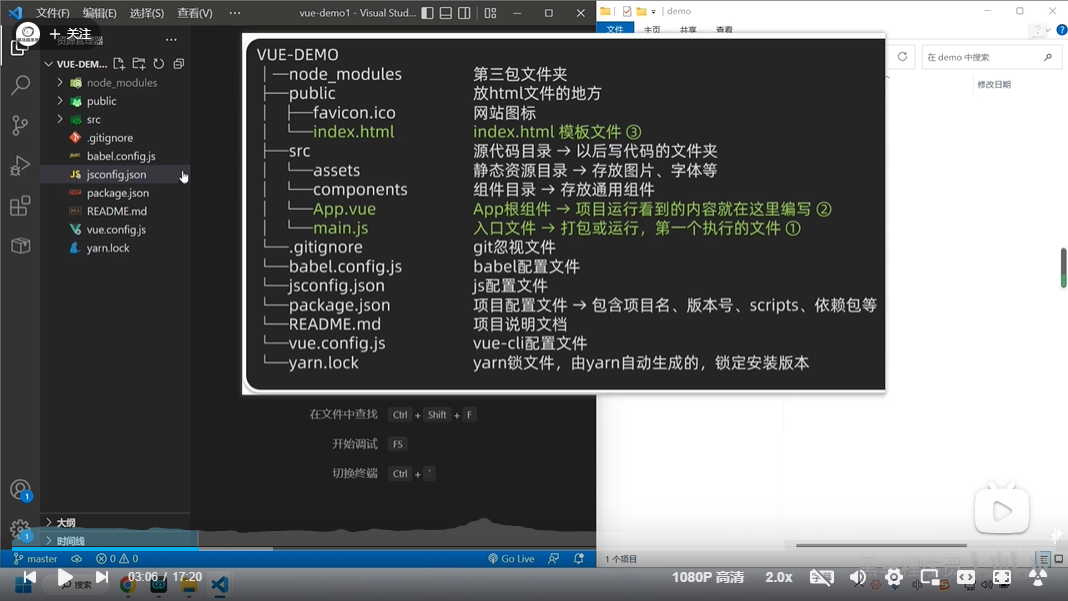
vue项目流程
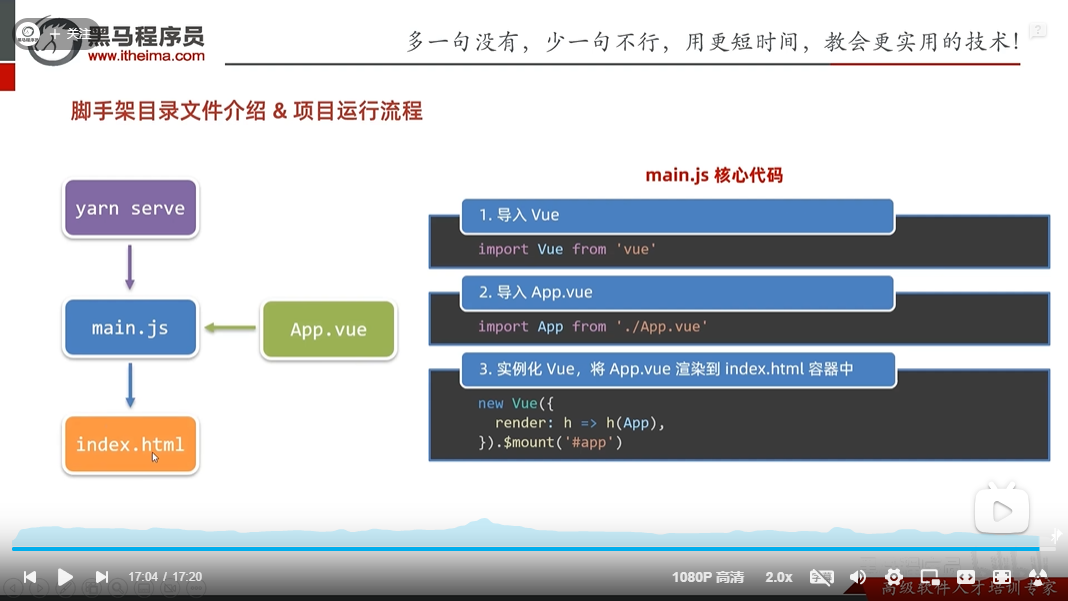
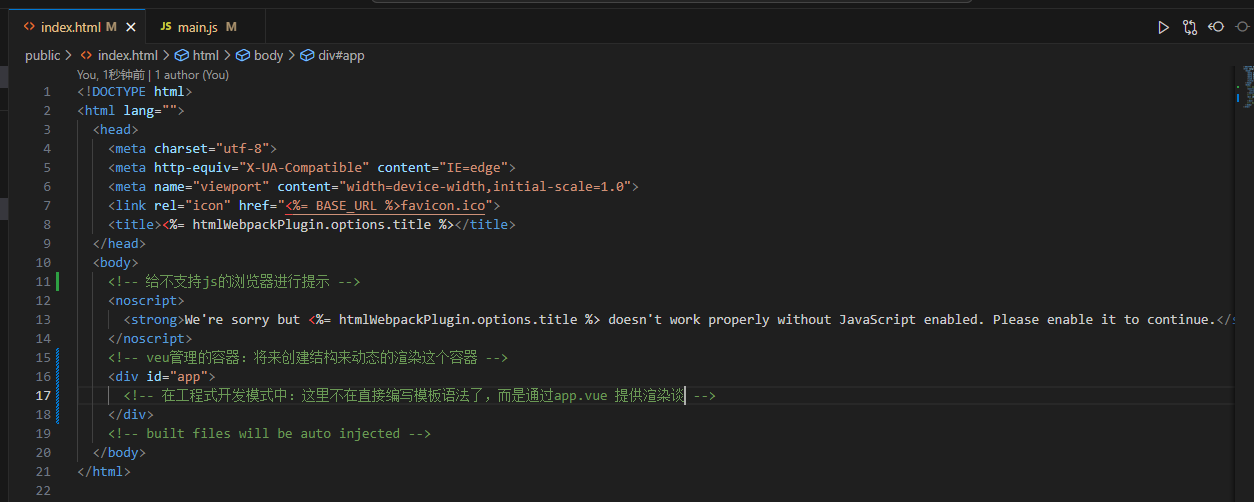
index.html文件介绍
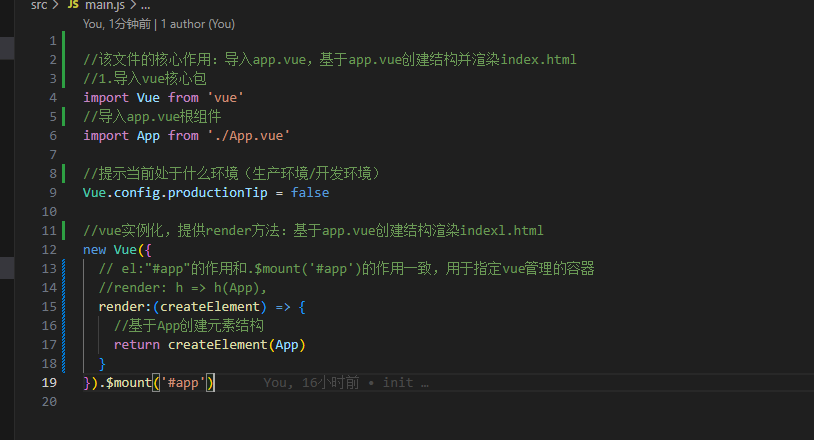
main.js文件介绍
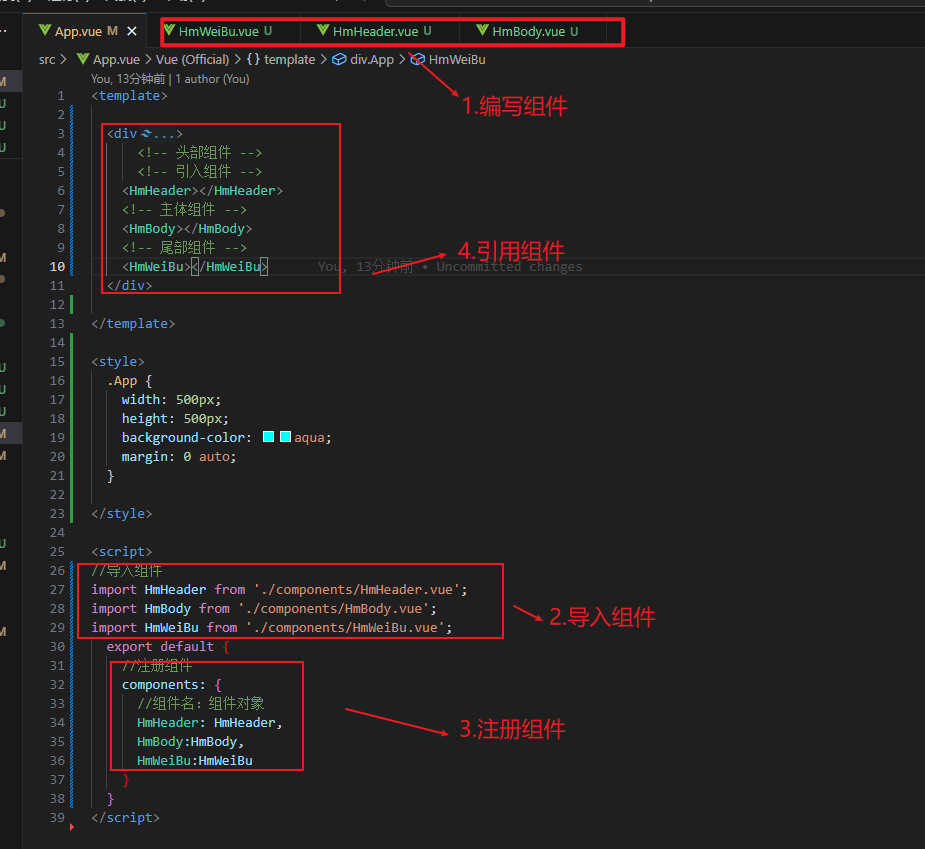
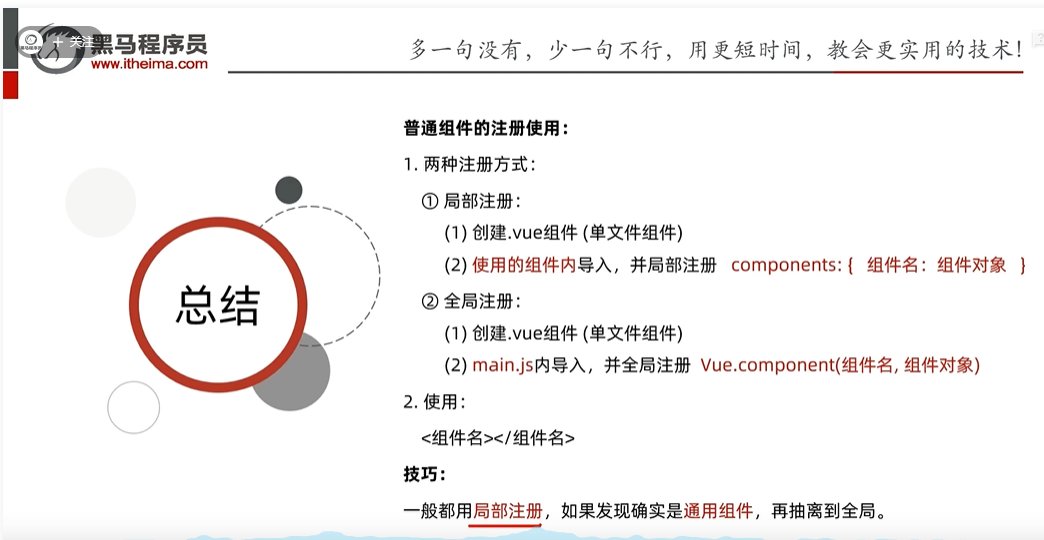
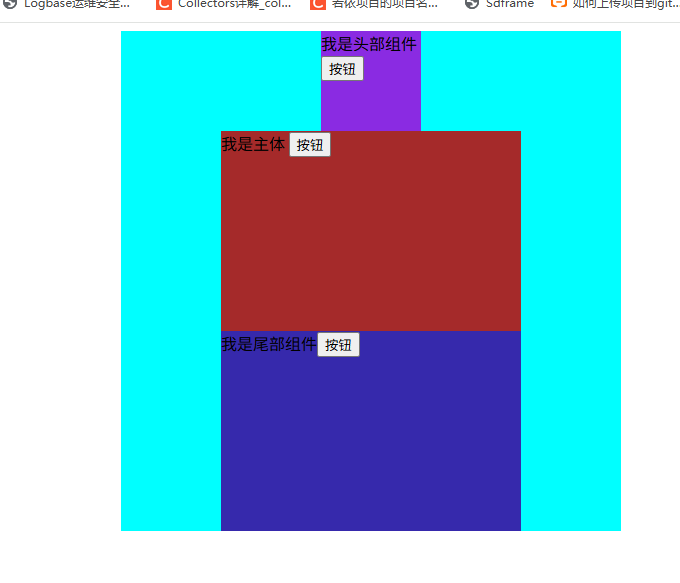
普通组件的注册-局部注册
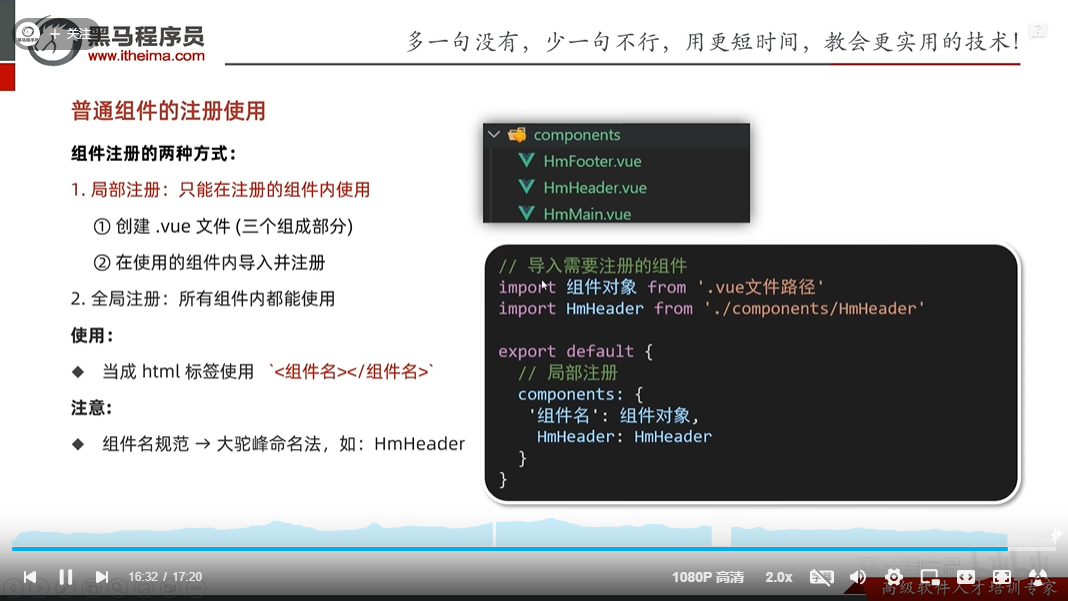
组件的注册-全局注册

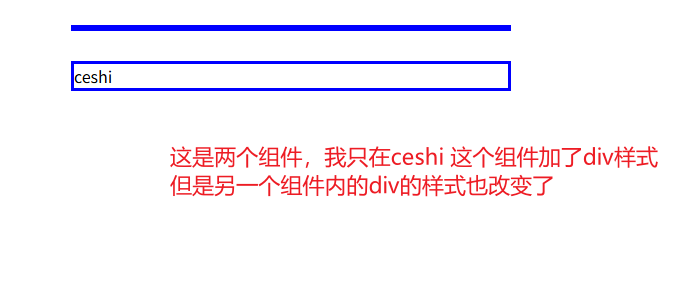
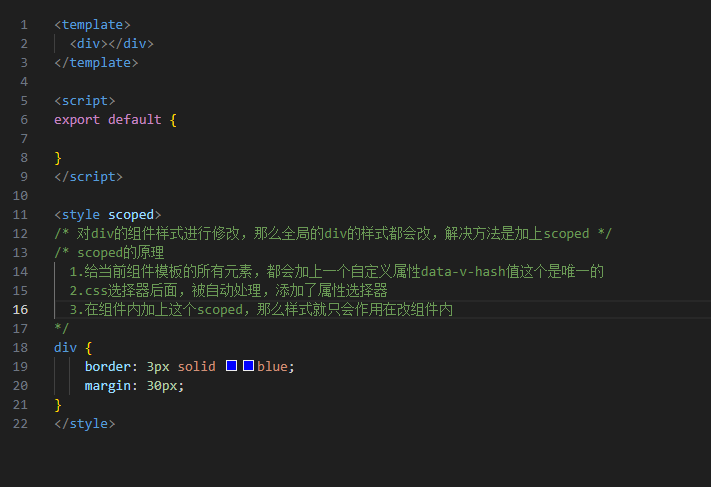
scoped解决样式冲突问题
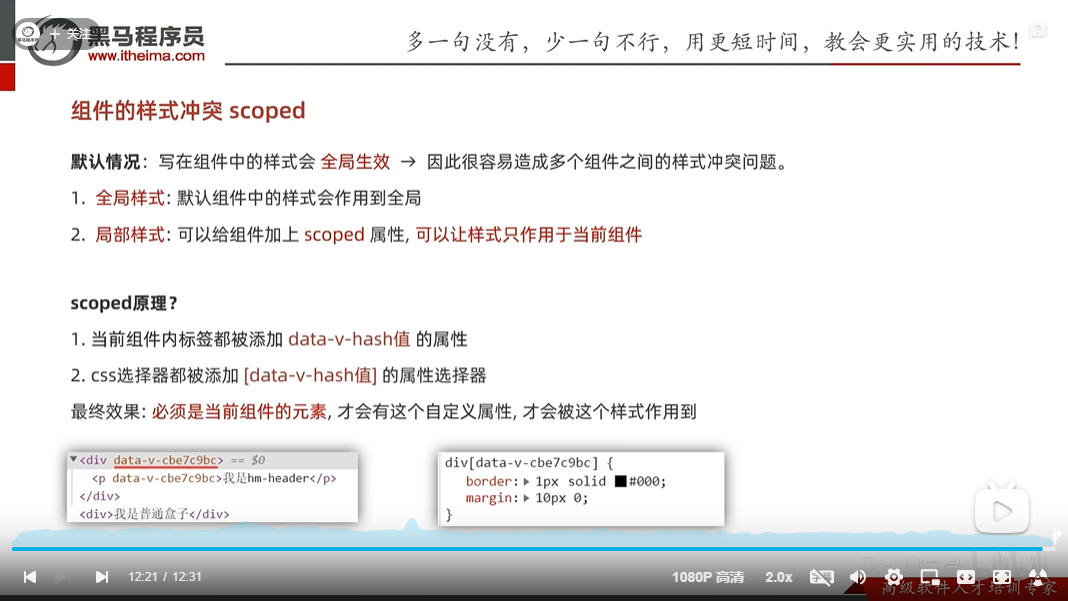
如果不加上scoped那么会出现全局的元素都是一样的,如图:
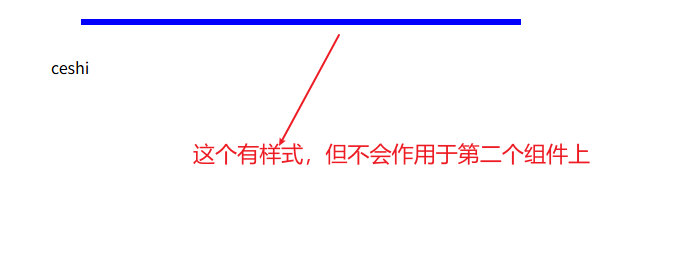
我在第一个组件内加上scpoed之后
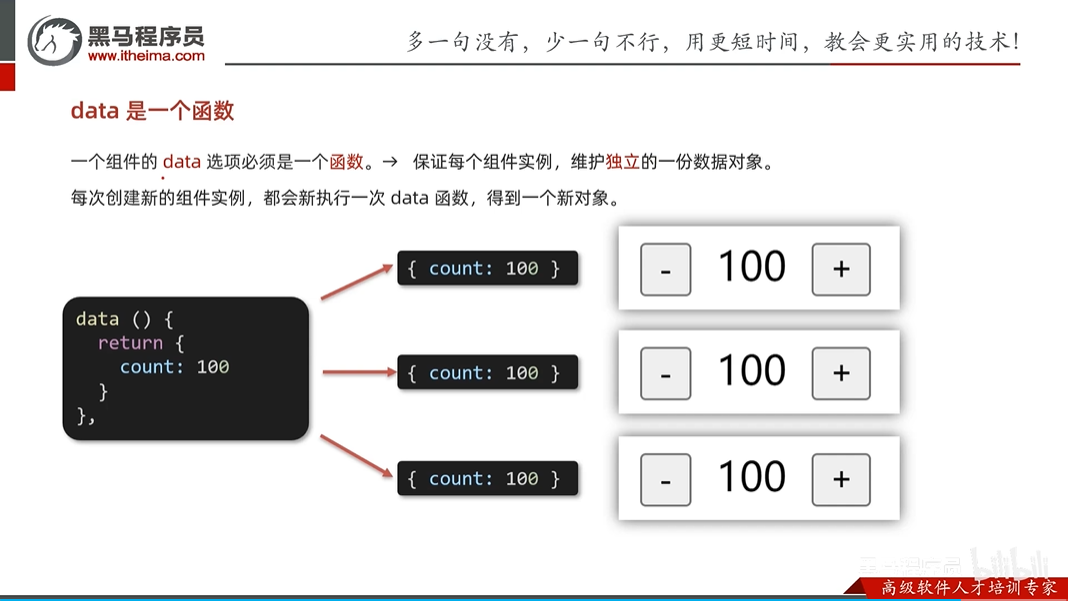
vue中data是一个函数
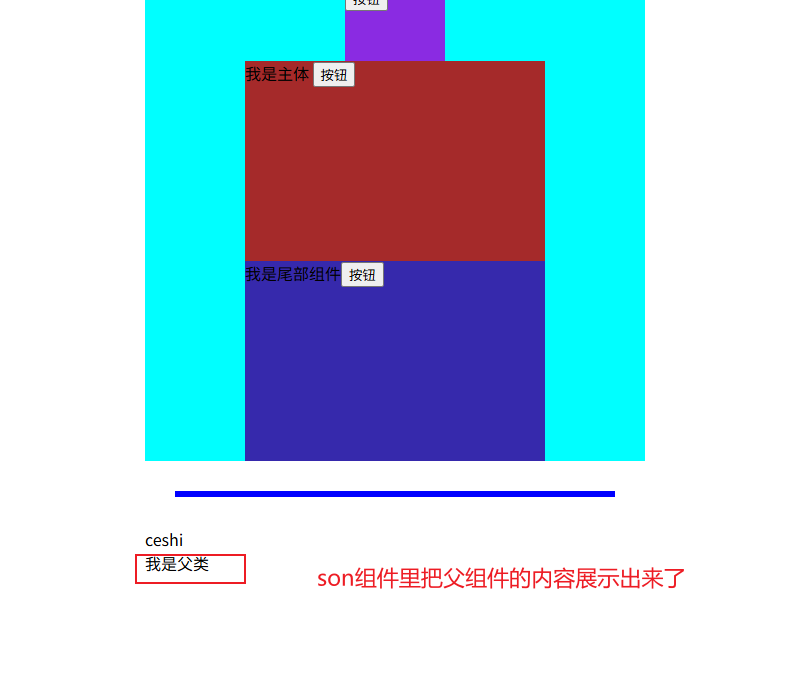
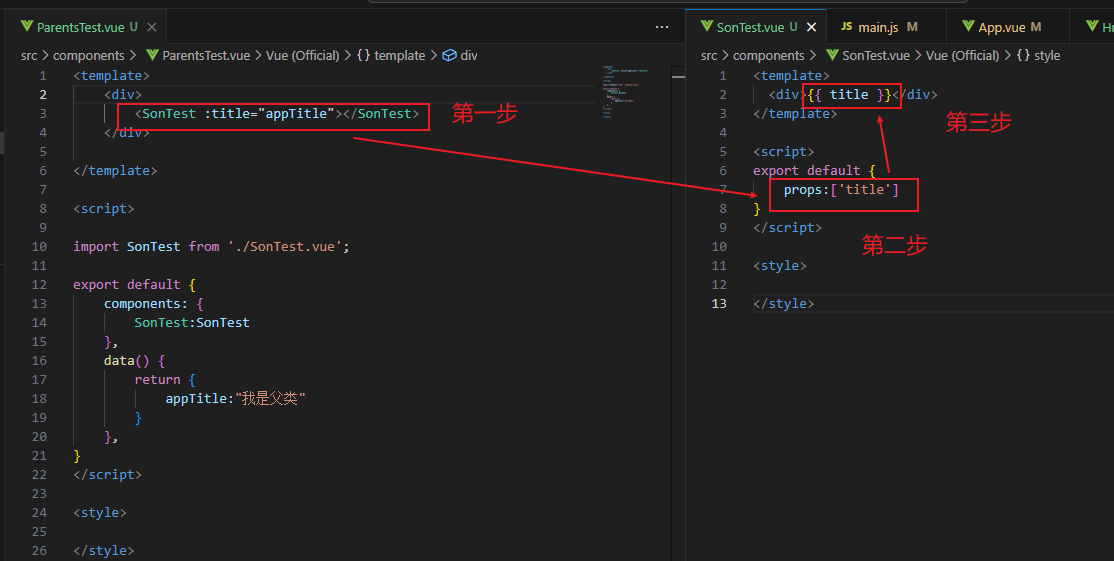
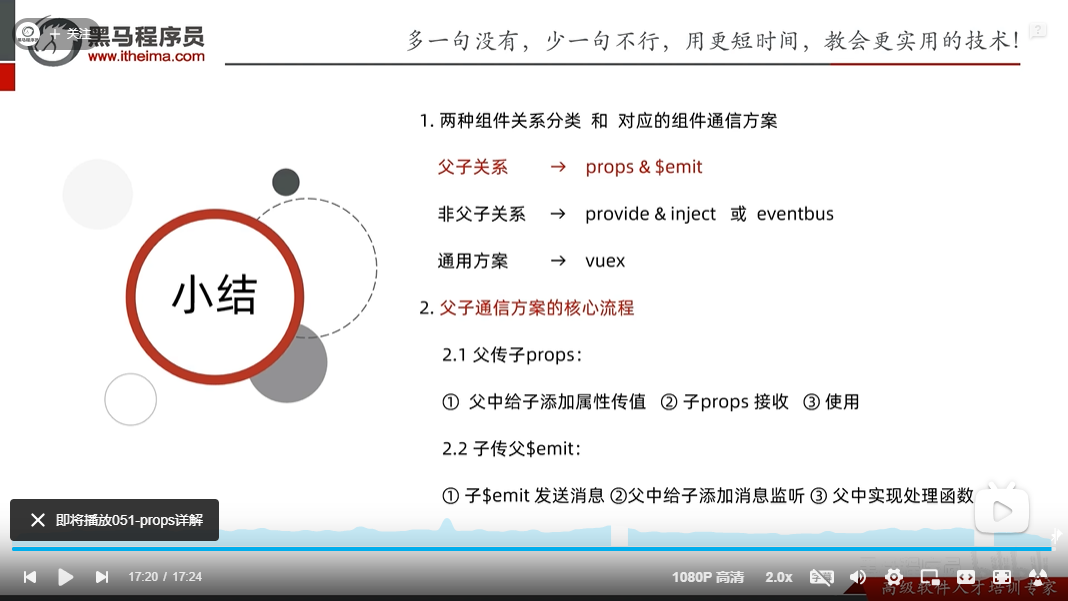
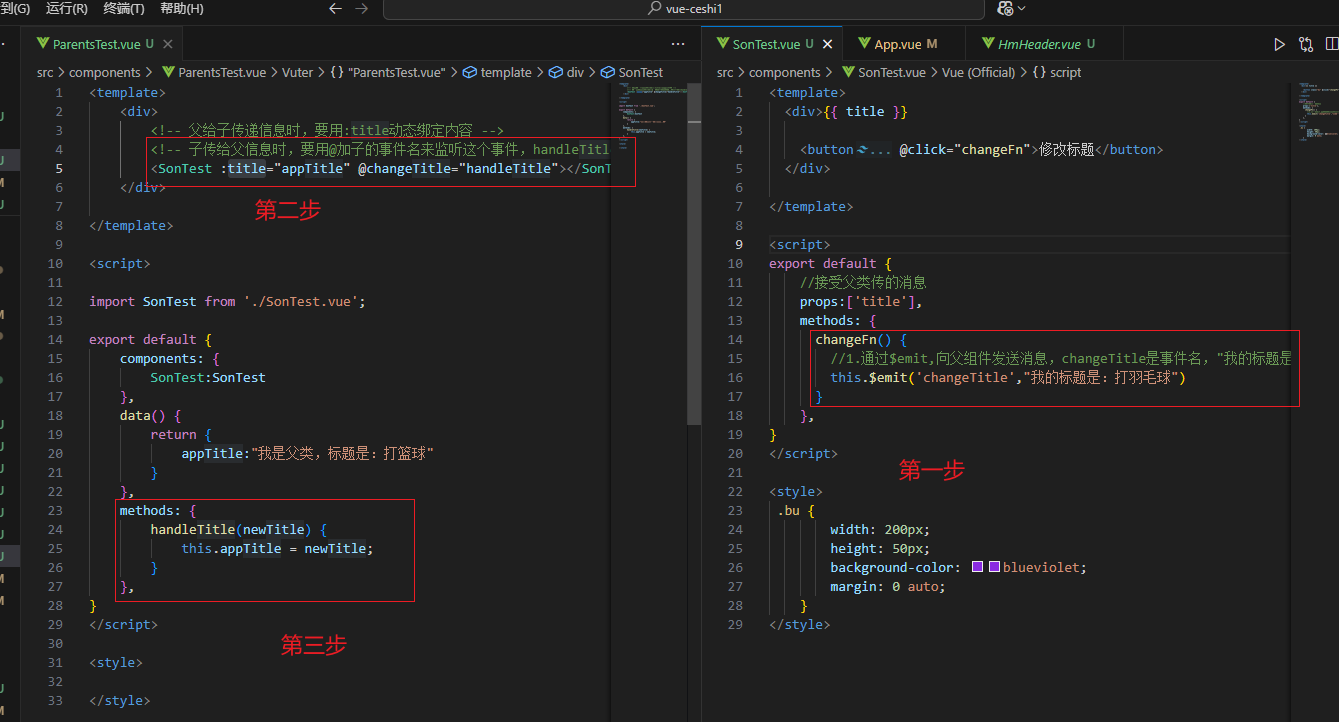
组件通信-父的内容传给子类
组件通信-子的内容传给父类
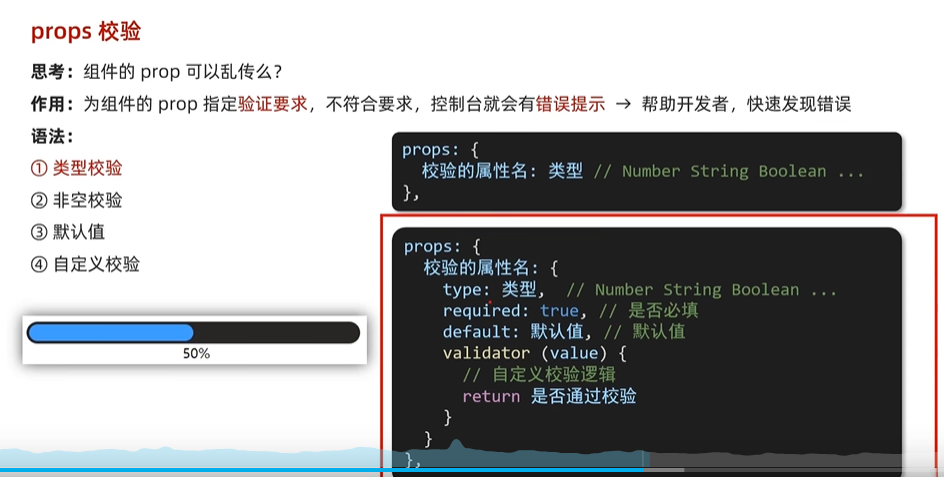
props的校验
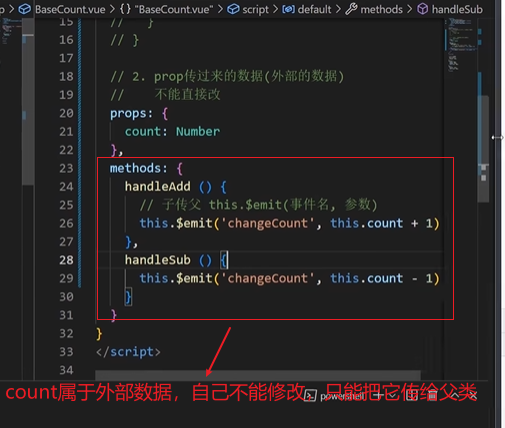
props,data,单向数据流
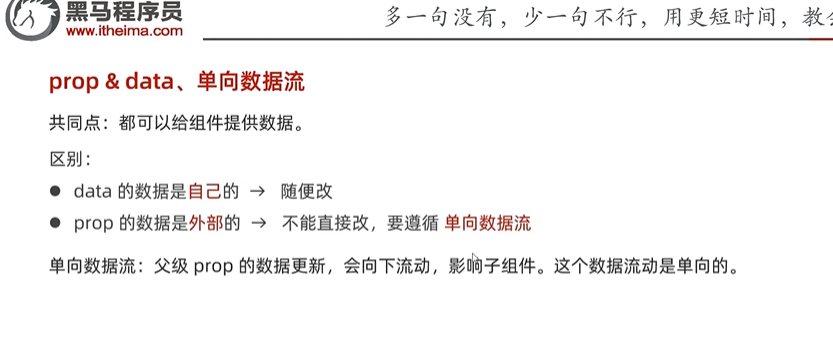
prop:虽然是外部的,自己不能改,但是可以传给上一层来实现修改
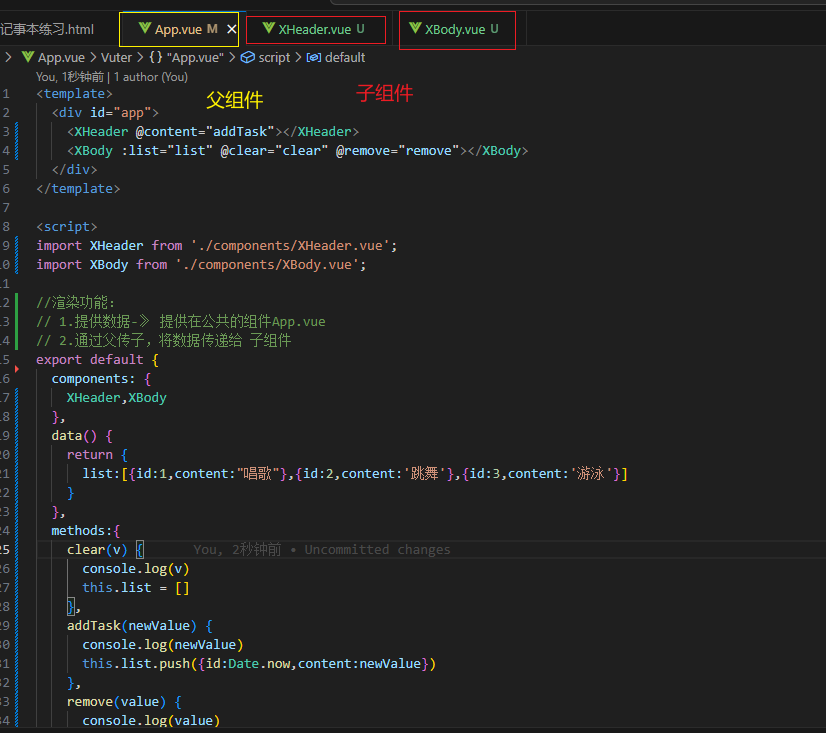
记事本改造-组件化
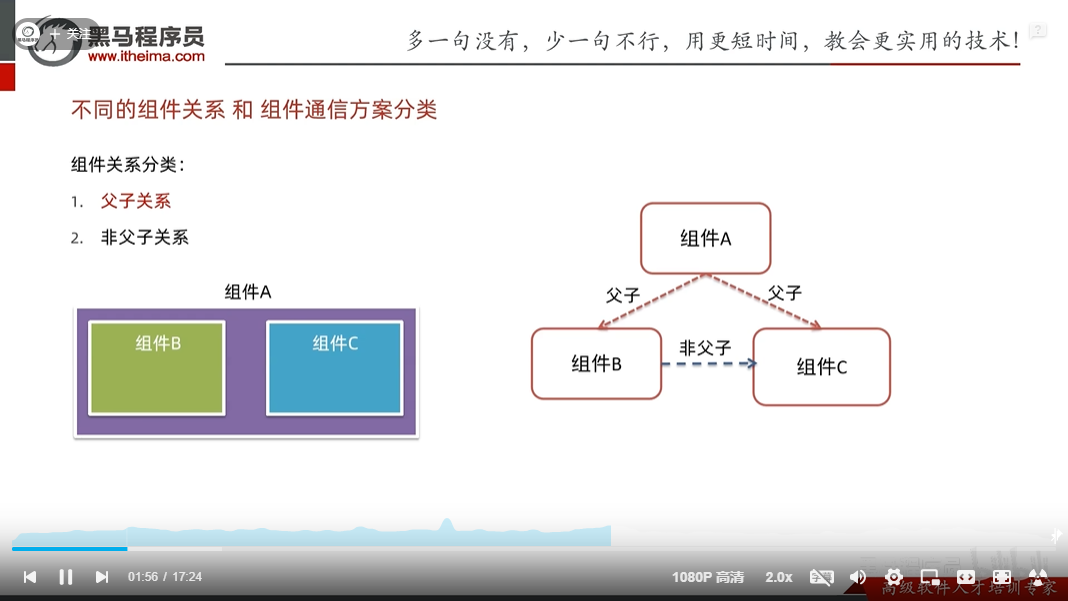
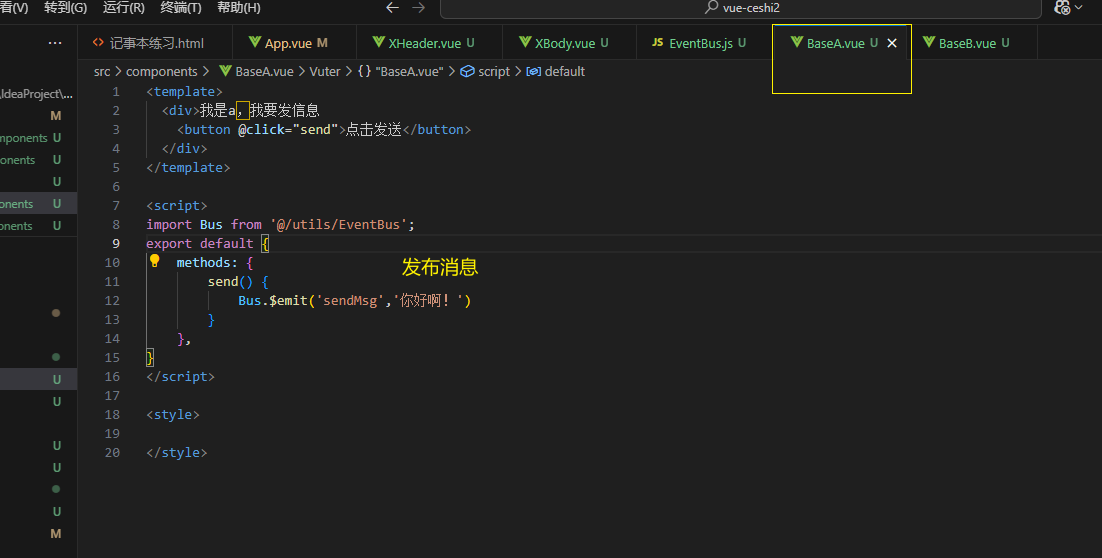
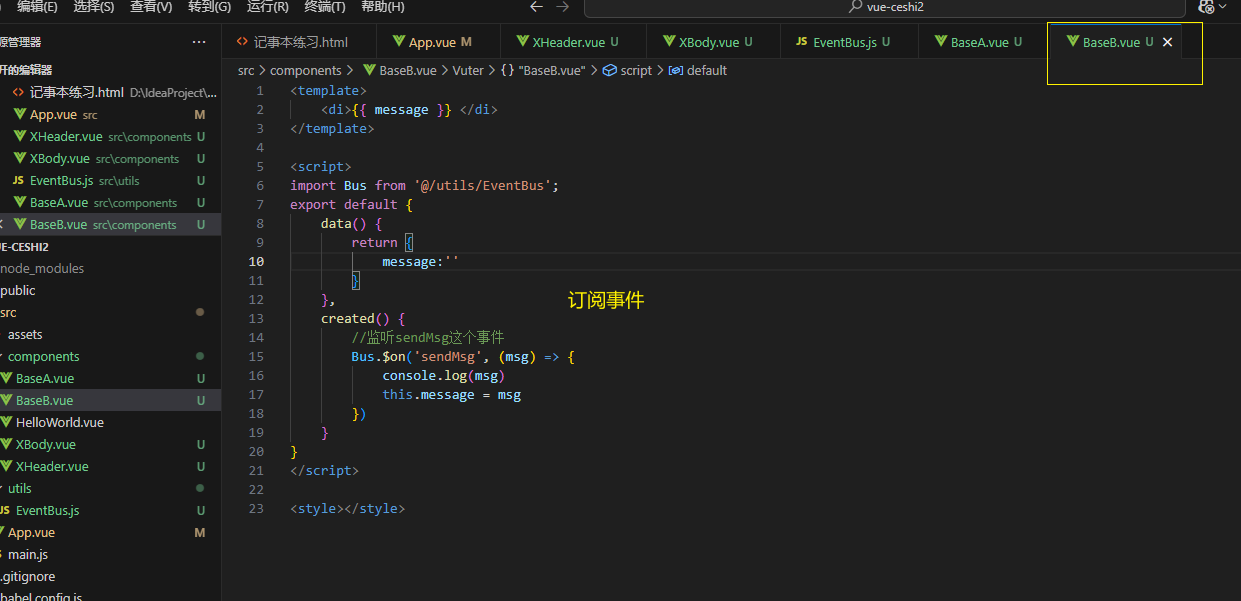
组件通信-非父子关系
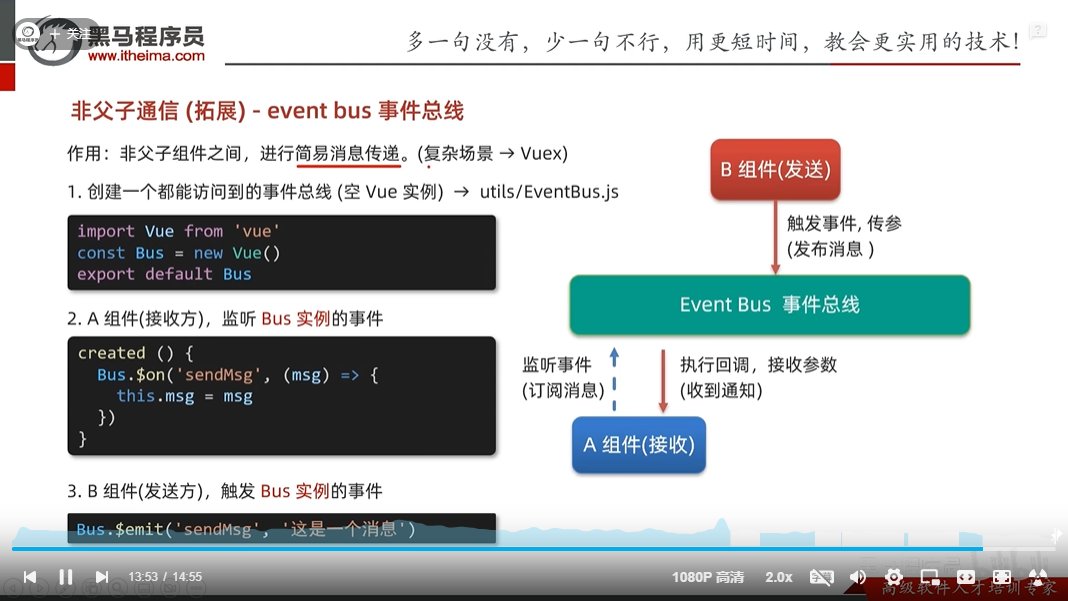
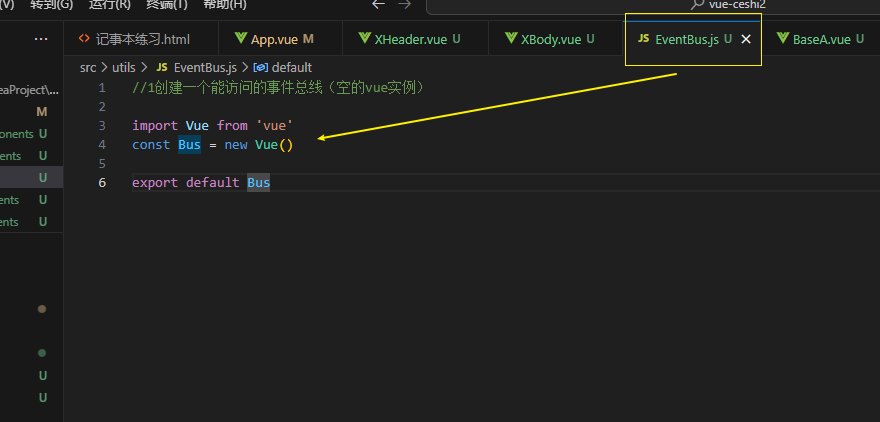
第一步先创建事件总线
第二步发布事件
第三步订阅事件
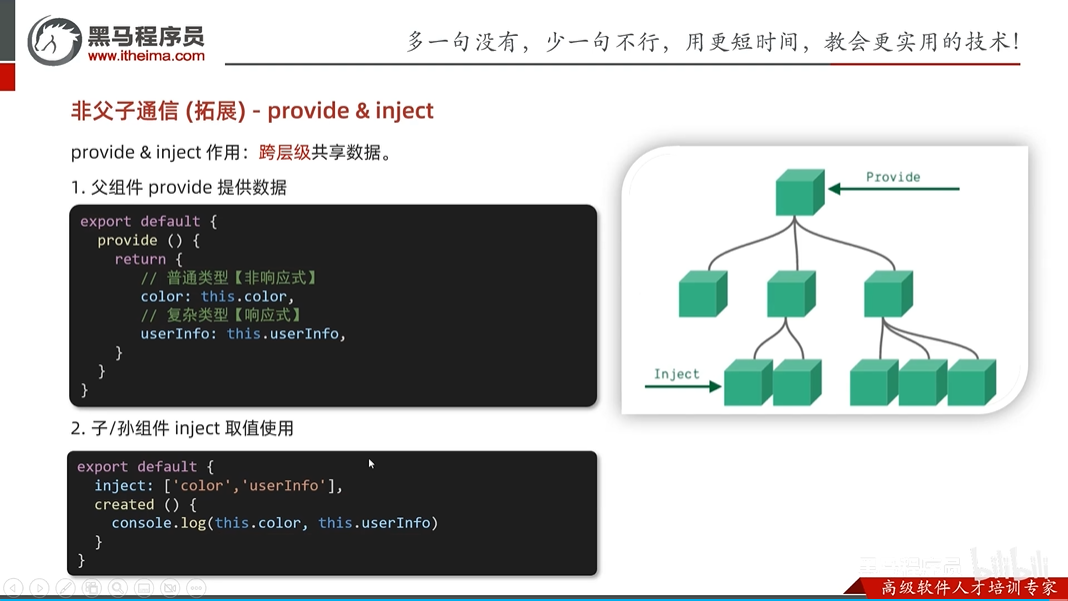
非父子通信拓展-provide & inject
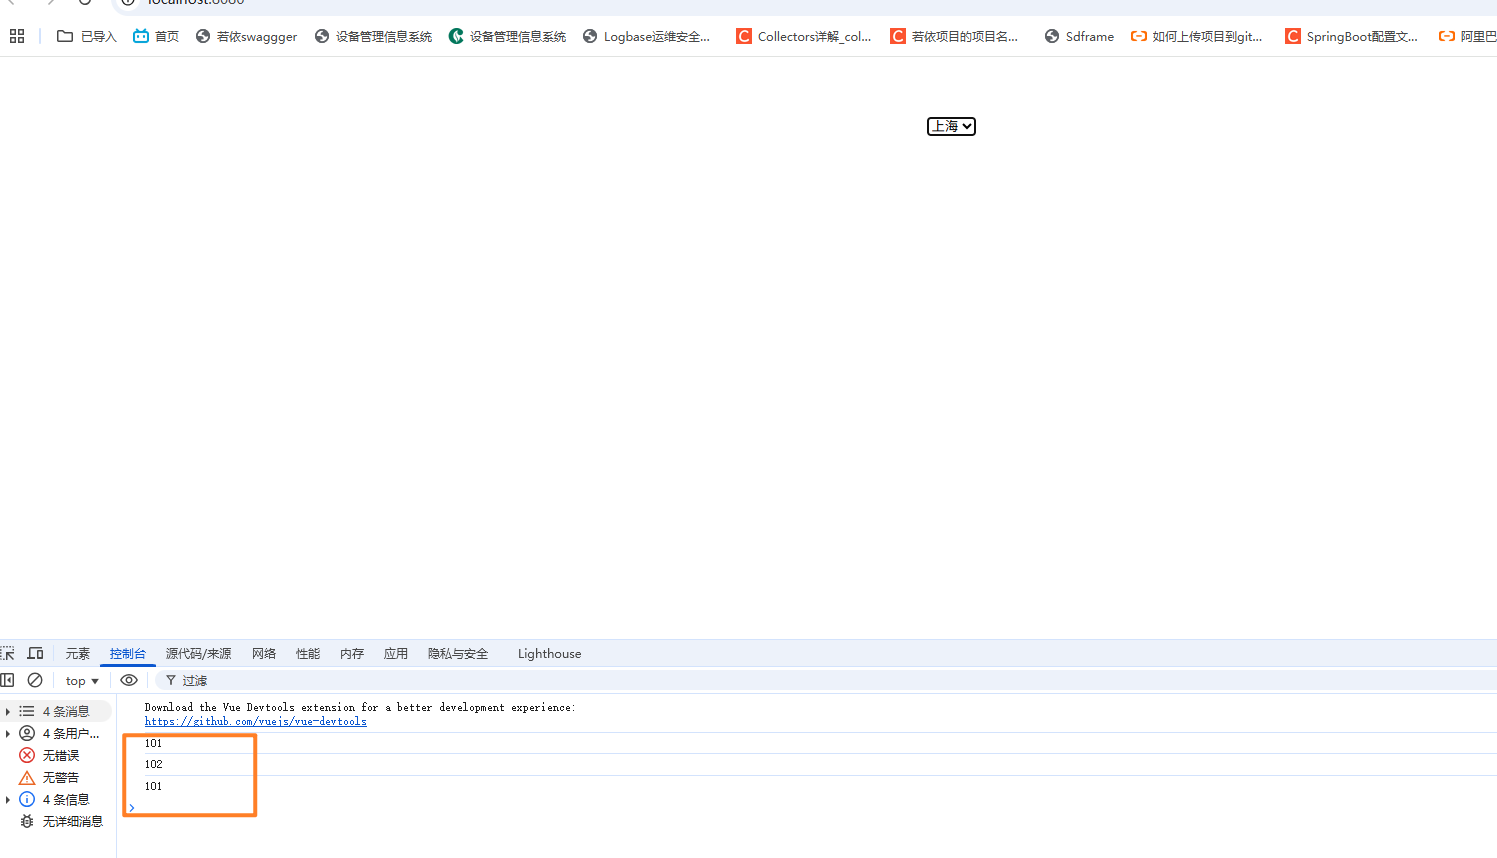
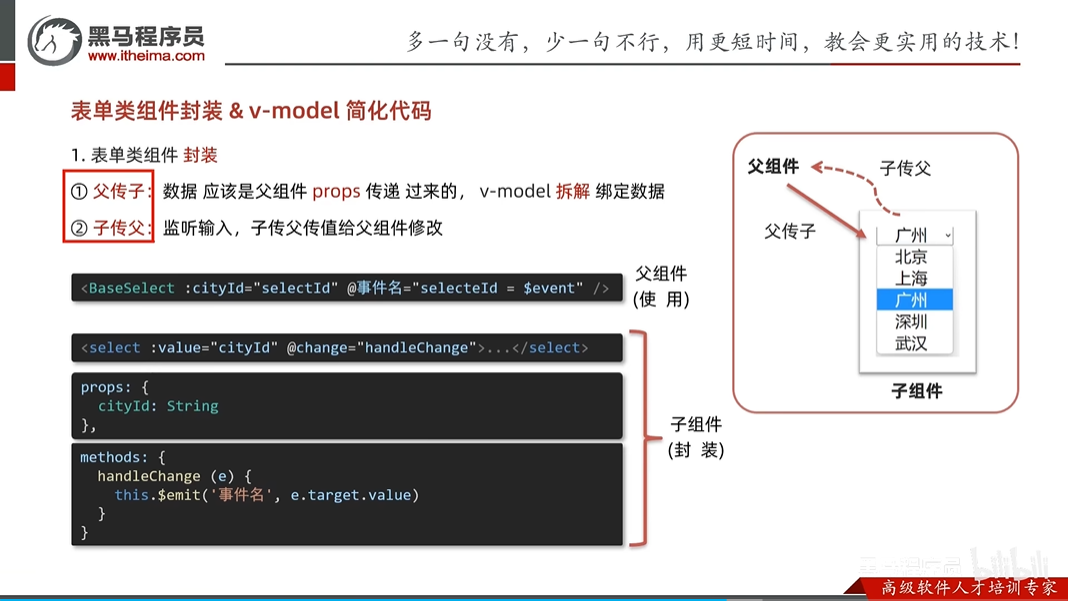
v-model详解
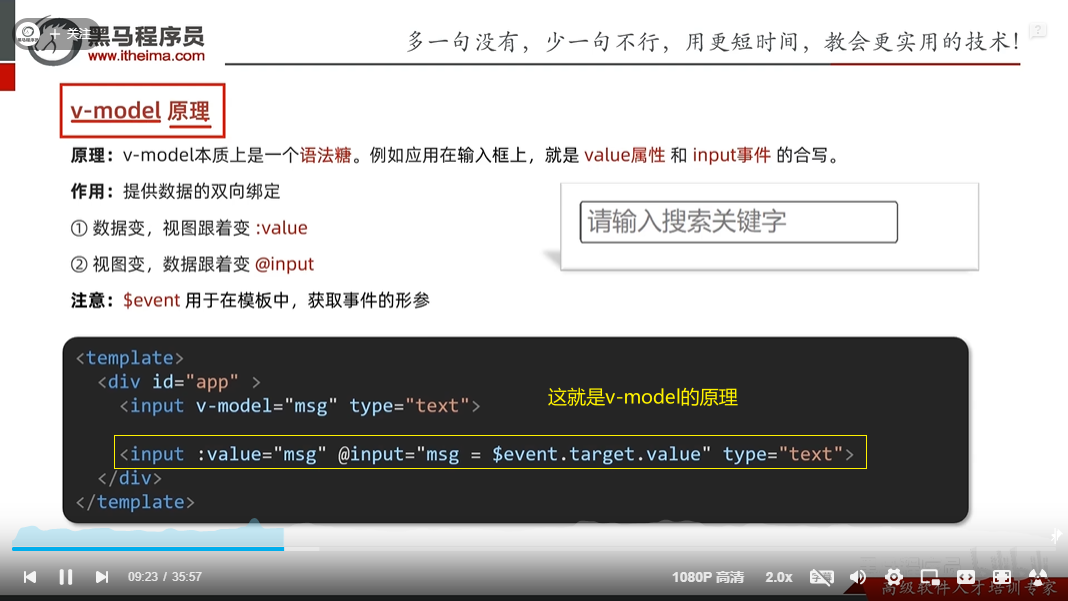
实现复选框,由于是父子组件,父要传给子默认是哪个值,当修改值的时候,子要把该值传给父类,以前没有父子组件的时候,直接用v-model,如在子组件中用v-model那一定会报错的,因为子组件不能修改外部的属性,所以要把v-model拆解,不同的标签有不同的拆解规则
1.文本框拆解
<input type="text" v-model="textValue">

<!-- 拆解 -->
<input
  type="text"
  :value="textValue"
  @input="textValue = $event.target.value">
2.复选框 (checkbox)
<input type="checkbox" v-model="checked">

<!-- 拆解 -->
<input
  type="checkbox"
  :checked="checked"
  @change="checked = $event.target.checked">
3. 单选按钮 (radio)
<input type="radio" v-model="picked" value="one">

<!-- 拆解 -->
<input
  type="radio"
  :checked="picked === 'one'"
  @change="picked = 'one'">
4. 下拉选择框 (select)
<select v-model="selected">
  <option value="a">A</option>
</select>

<!-- 拆解 -->
<select
  :value="selected"
  @change="selected = $event.target.value">
  <option value="a">A</option>
</select>
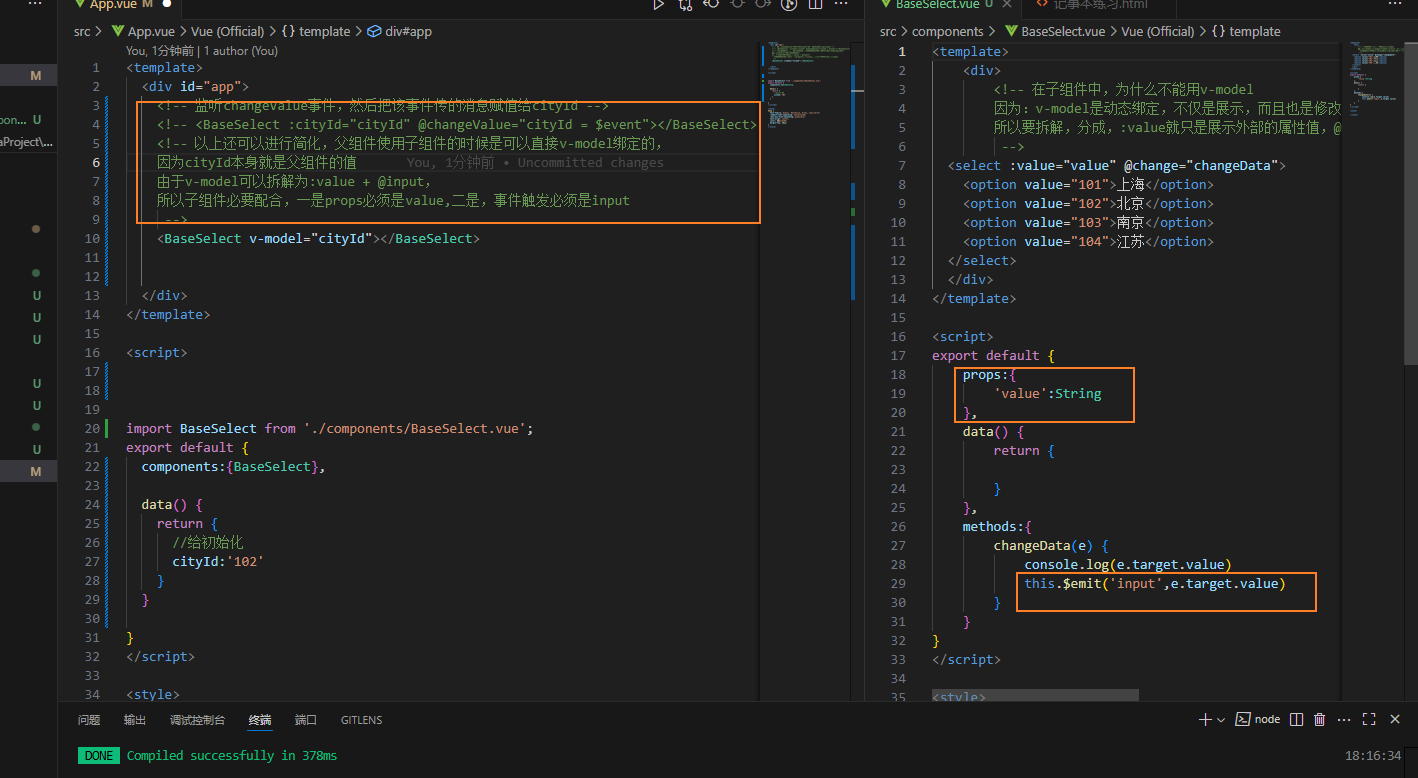
举例:下拉选择框
父组件
<template>
  <div id="app">
    <BaseSelect :cityId="cityId" @changeValue="ha"></BaseSelect>


  </div>
</template>

<script>


import BaseSelect from './components/BaseSelect.vue';
export default {
  components:{BaseSelect},

  data() {
    return {
      //给初始化
      cityId:'102'
    }
  },
  methods:{
    //处理子组件穿过来的值
    ha(newValue) {
      console.log(newValue)
      this.cityId = newValue;
    }

  }
}
</script>

<style>
#app {
  font-family: Avenir, Helvetica, Arial, sans-serif;
  -webkit-font-smoothing: antialiased;
  -moz-osx-font-smoothing: grayscale;
  text-align: center;
  color: #2c3e50;
  margin-top: 60px;
}
</style>
子组件
<template>
    <div>
        <!-- 在子组件中,为什么不能用v-model
        因为:v-model是动态绑定,不仅是展示,而且也是修改,而子组件不能修改外部的属性
        所以要拆解,分成,:value就只是展示外部的属性值,@change才是修改,修改的是该标签的值,然后传递给外部组件
         -->
  <select :value="cityId" @change="changeData">
    <option value="101">上海</option>
    <option value="102">北京</option>
    <option value="103">南京</option>
    <option value="104">江苏</option>
  </select>
  </div>
</template>

<script>
export default {
    props:{
        'cityId':String
    },
    data() {
        return {

        }
    },
    methods:{
        changeData(e) {
            this.$emit('changeValue',e.target.value)
        }
    }
}
</script>

<style>

</style>
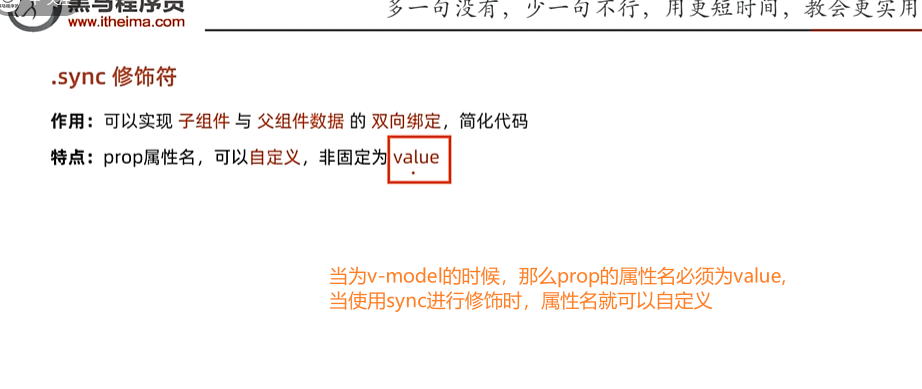
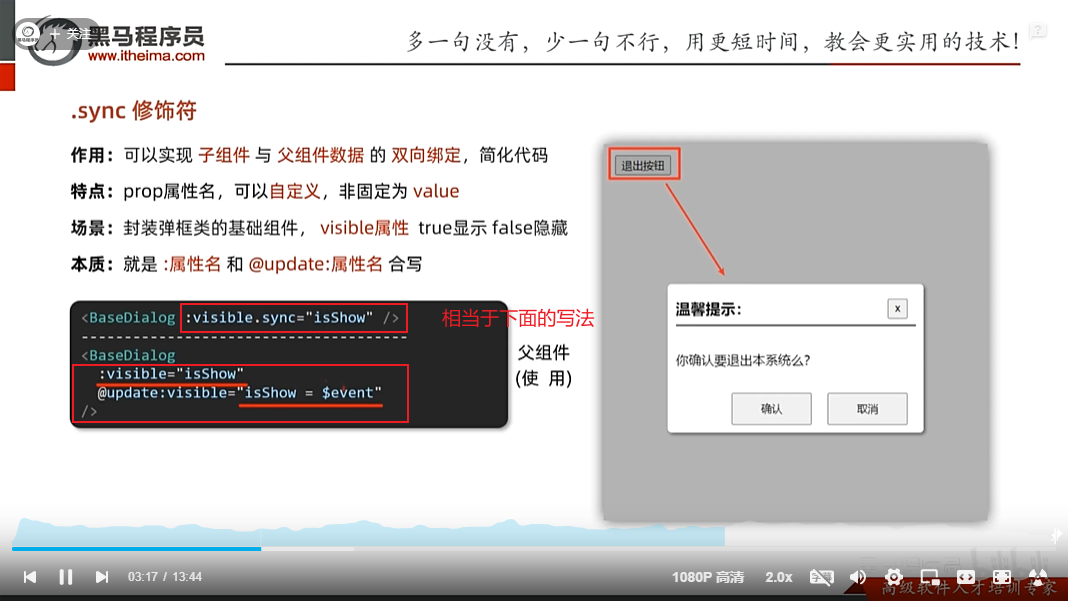
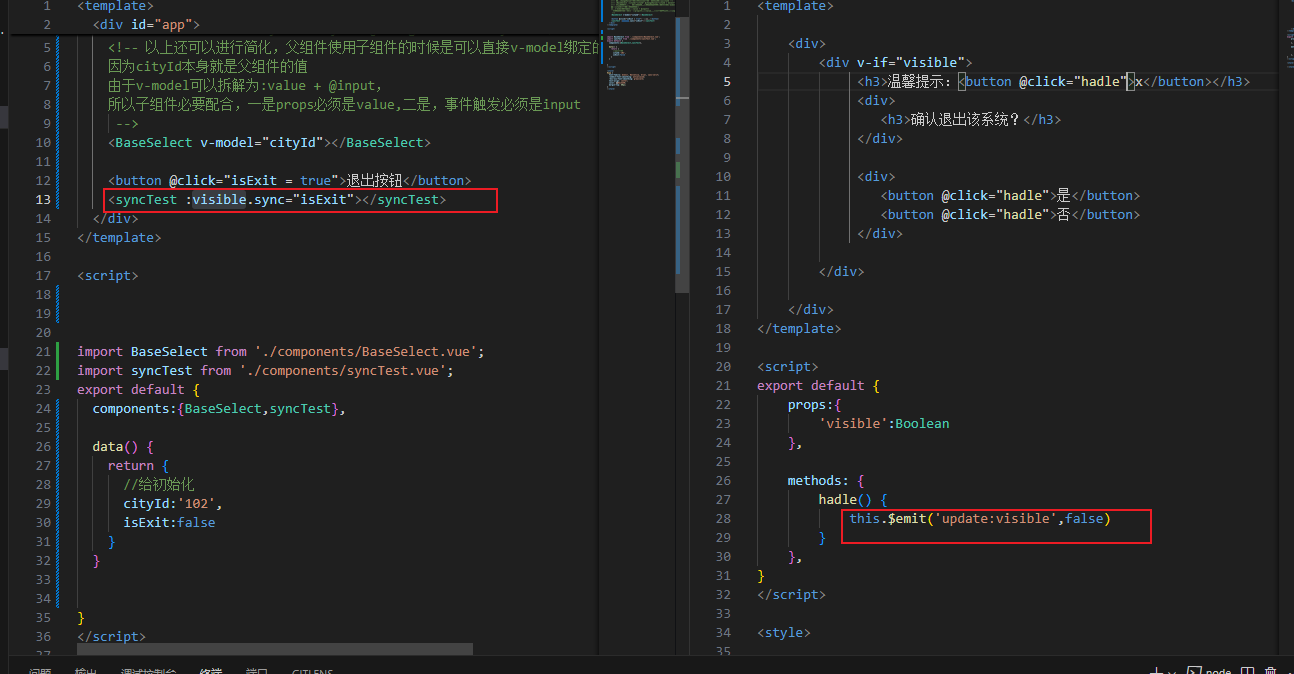
sync也可以进行父子组件双向绑定
v-model进行双向绑定时,prop属性名必须为value
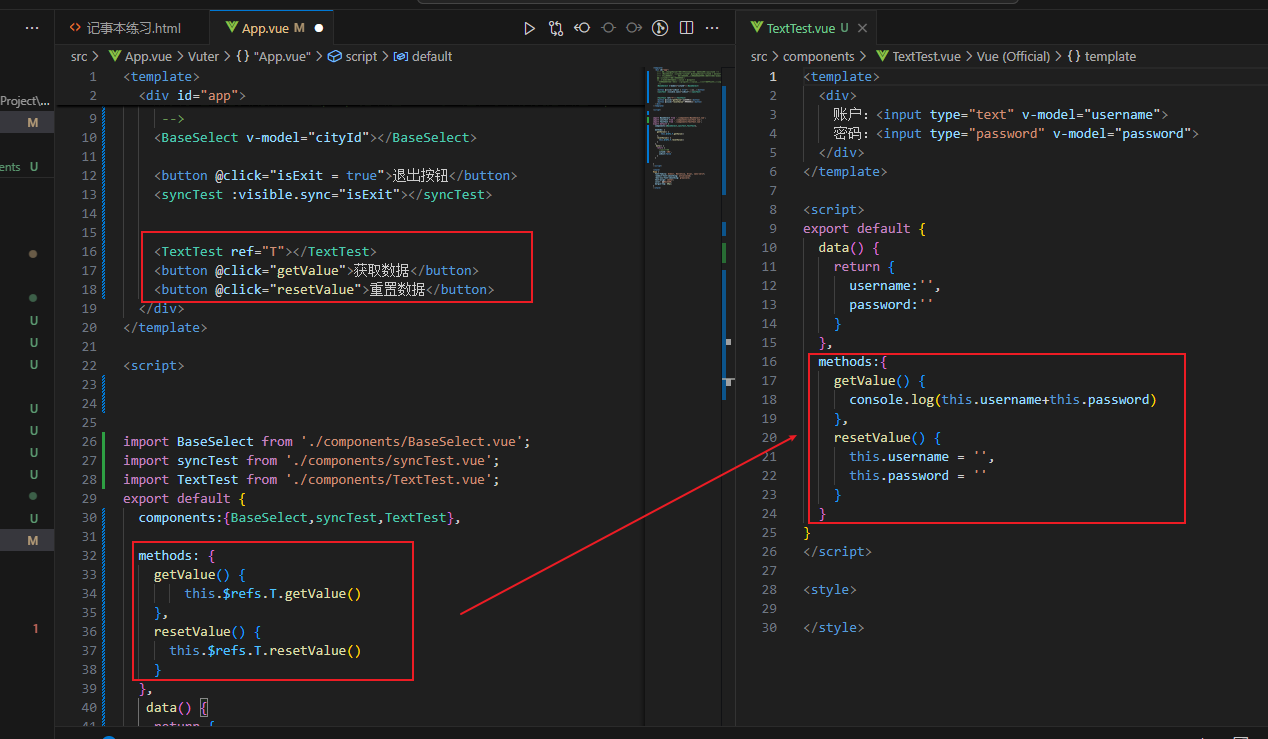
ref和$refs获取dom和组件
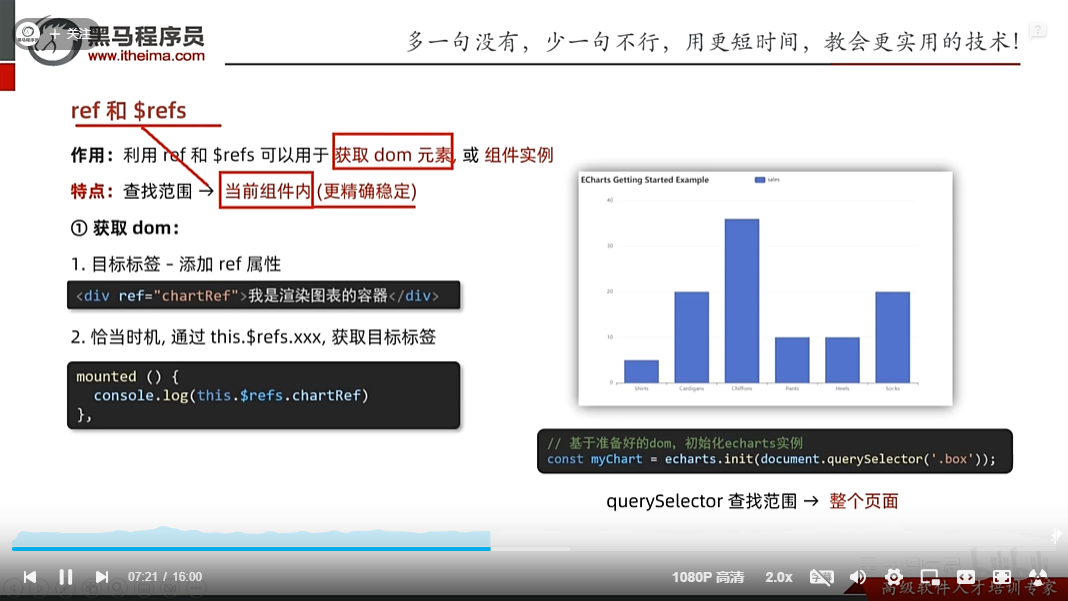
既然可以获取dom,那么就可以访问到该dom的任何数据
同理可以获取到组件,那么也可以访问到该组件内的任何数据,比如data里的数据以及methods里的方法
以下是获取组件的data
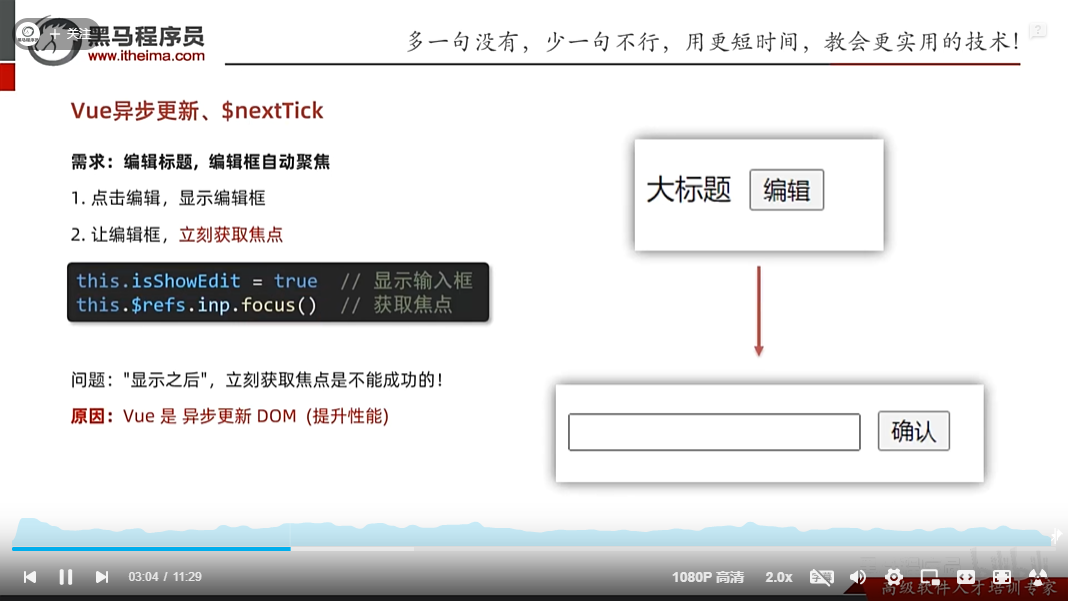
vue异步更新,$nextTick
由于是异步更新,所以需要加上$nextTick,它的作用是等异步更新后在进行操作,具体如下

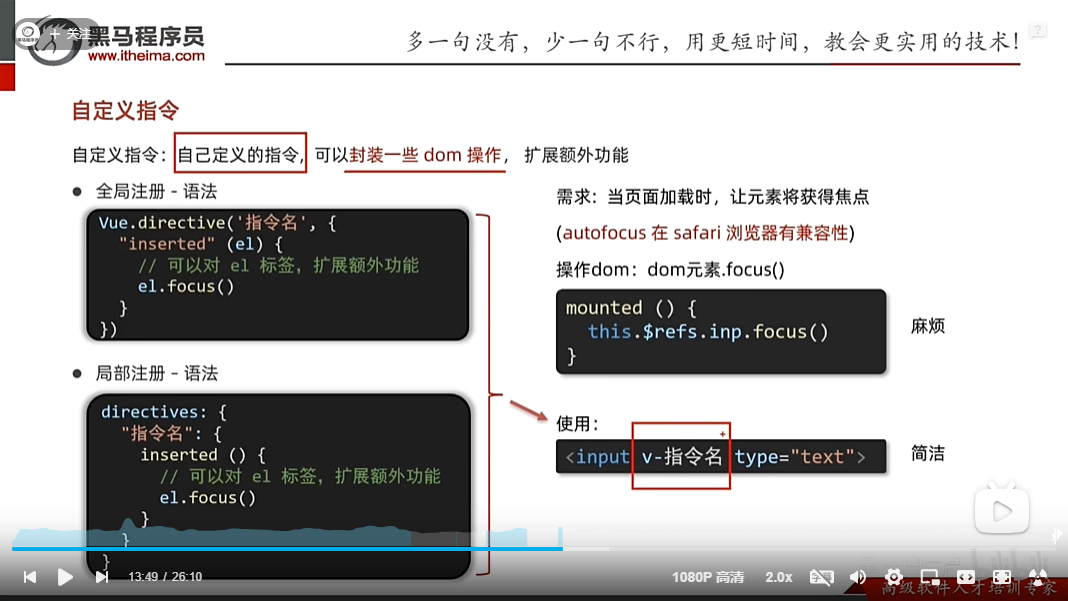
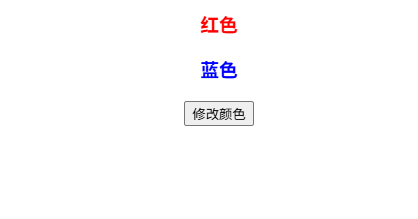
vue自定义指令
vue自定义指令传值以及修改

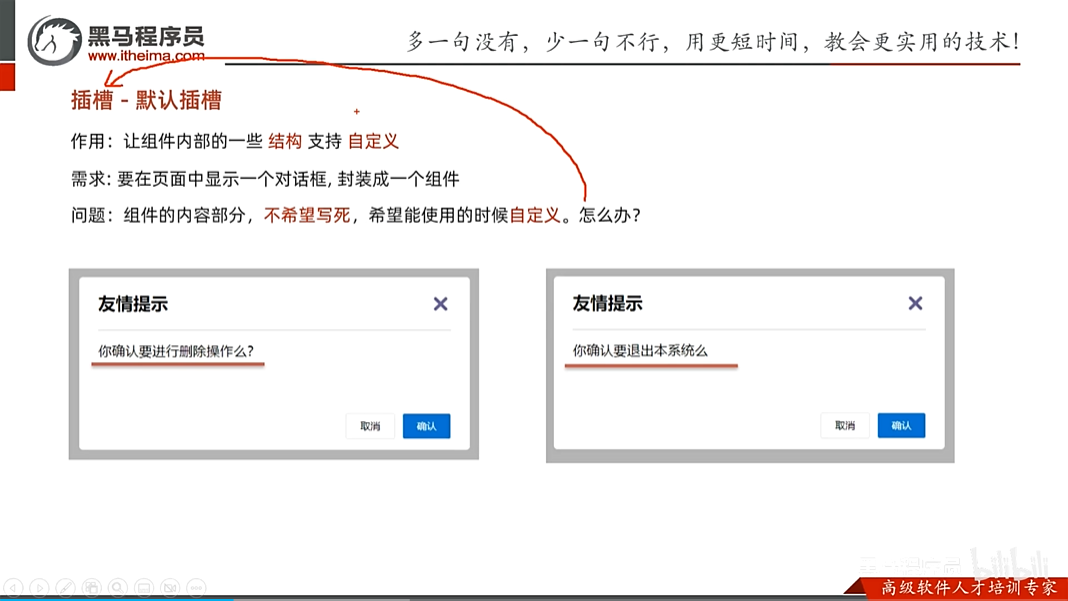
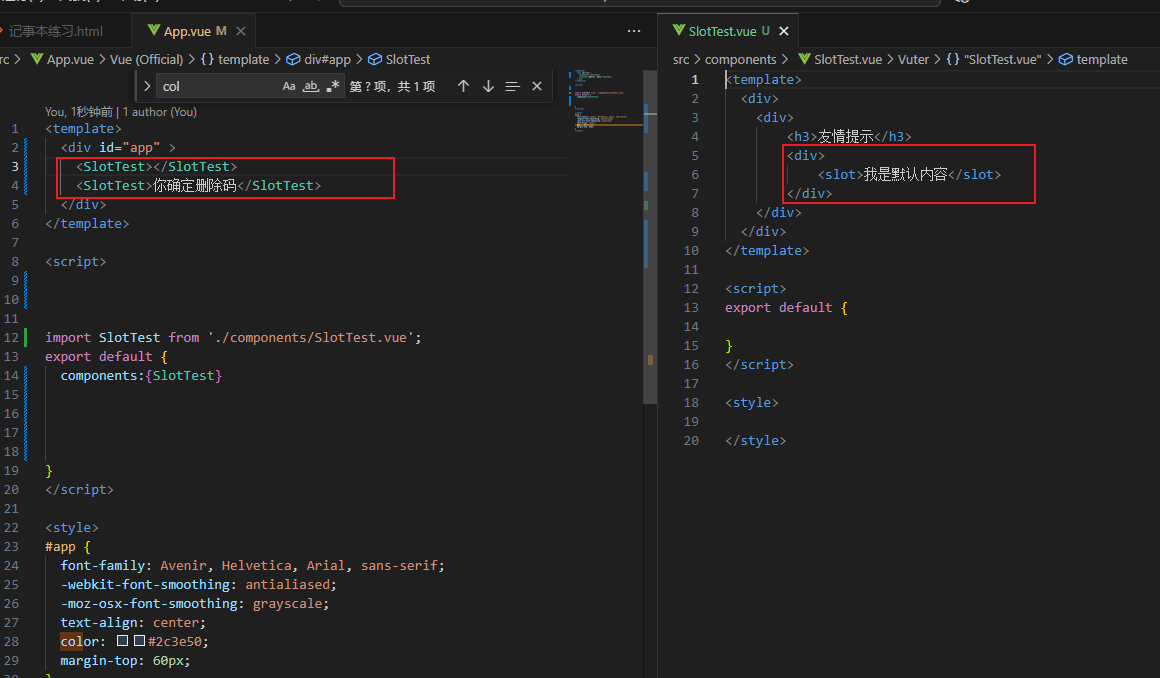
插槽-默认插槽
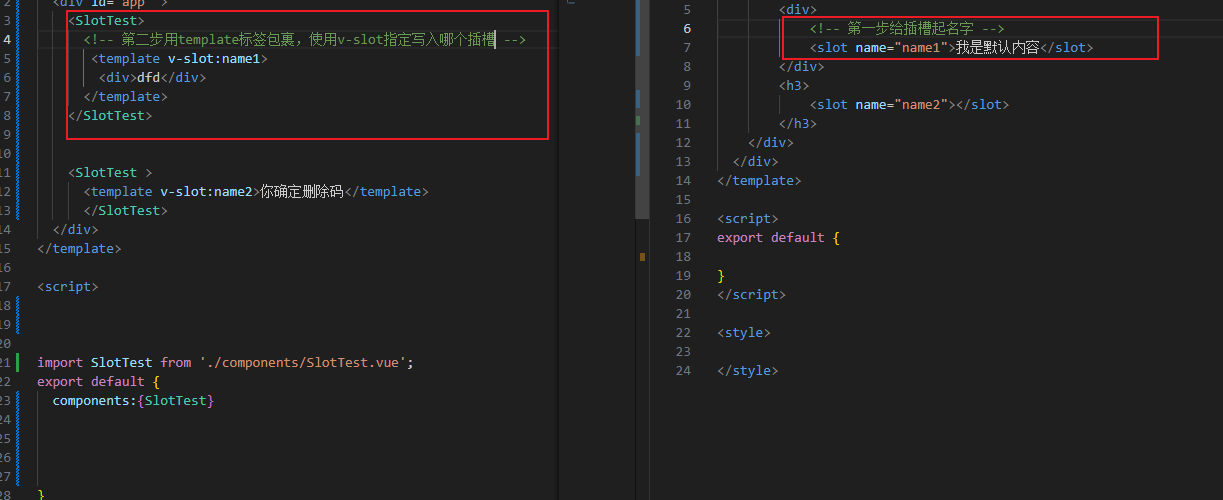
插槽-具名插槽就是给插槽取名字
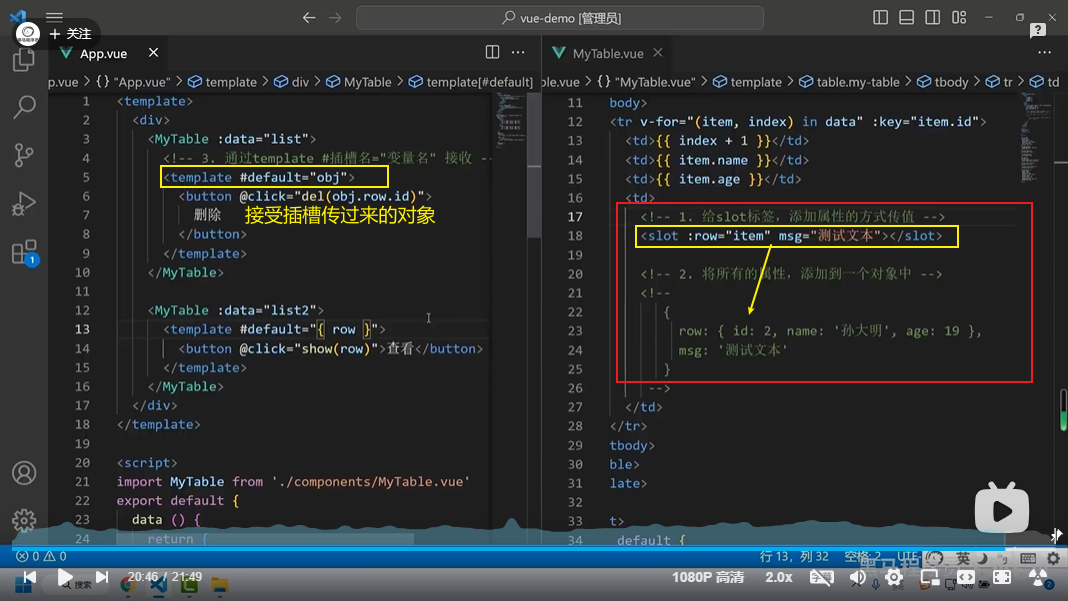
作用域插槽-传参

组件,插槽之间的使用案例
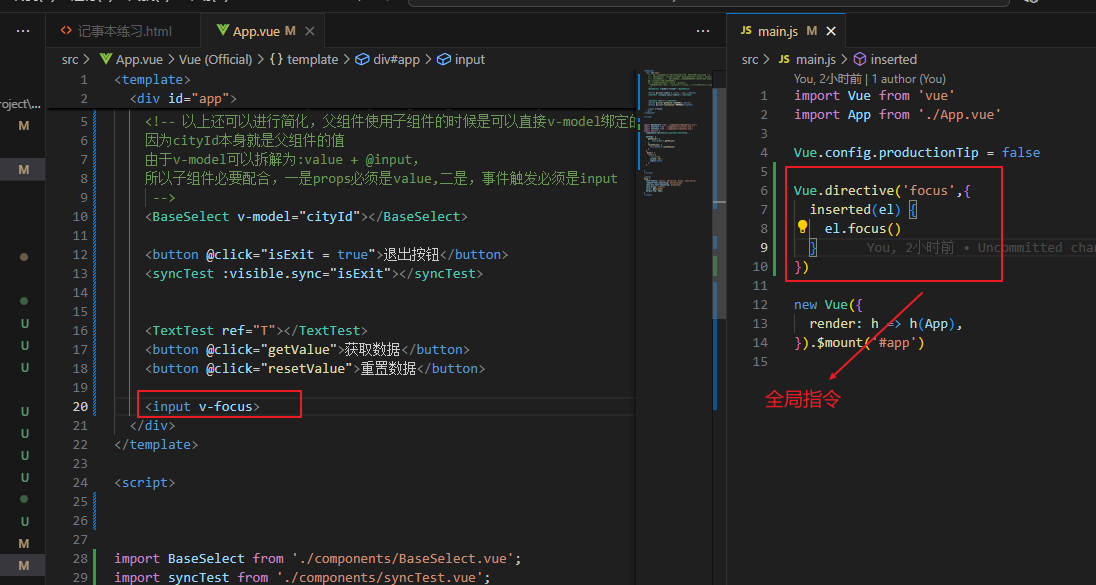
创建自定义标签
import Vue from 'vue'
import App from './App.vue'

Vue.config.productionTip = false
//自定义标签,使标签自动聚焦
Vue.directive('focus',{
  inserted(el) {
    el.focus()
  }
})

new Vue({
  render: h => h(App),
}).$mount('#app')
创建组件
<template>
  <div>
    <input type="text" v-if="isExit" :value="value" @input="ha" v-focus @blur="isExit = false" @keyup.enter="up" />
    <!-- @dblclick双击 -->
    <div v-else @dblclick="updateStatus">{{ value }}</div>
  </div>
</template>

<script>
export default {
    //使用v-model进行父传子,那么props的值必须为value
    props:['value'],
    data() {
        return {
            isExit:false
        }
    },
    methods:{
        updateStatus() {
            this.isExit = true;
        },
        ha(e) {
            //使用v-model进行子传父,那么emit的值必须为input
            this.$emit('input',e.target.value)
        },
        up() {
            this.isExit = false
        }
    }
}
</script>

<style>

</style>
创建表格组件
<template>
    <table>
      <thead>
        <th>
            <slot name="bianhao"></slot>
        </th>
        <th>
            <slot name="mingcheng"></slot>
        </th>
        <th>
            <slot name="biaoqian"></slot>
        </th>
      </thead>

      <tbody >
        <tr v-for="(item,index) in list" :key="item.id">
            <slot name="body" :item="item" :index="index"></slot>
        </tr>

      </tbody>

    </table>
</template>

<script>
export default {
    props:['list'],
    components:{

    }
}
</script>

<style>

</style>
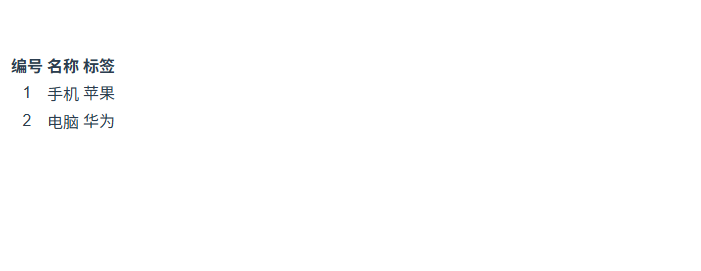
App.vue
<template>
  <div id="app">


    <MyTable :list="list">
      <template v-slot:bianhao>编号</template>
      <template v-slot:mingcheng>名称</template>
      <template v-slot:biaoqian>标签</template>

<!-- #body是v-slot='body'的简写 -->
      <template #body="{item,index}">
          <td>{{ index + 1 }}</td>
          <td>{{ item.name }}</td>
          <MyTag v-model="item.tag" >  </MyTag>
      </template>
    </MyTable>


  </div>
</template>

<script>
import MyTable from './components/MyTable.vue';
import MyTag from './components/MyTag.vue';
export default {
  name: 'App',
  components: {
    MyTable,MyTag
  },
  data() {
    return {
      list:[{id:1,name:'手机',tag:"苹果"},{id:2,name:'电脑',tag:'华为'}]
    }
  },
  methods: {

  },
}
</script>

<style>
#app {
  font-family: Avenir, Helvetica, Arial, sans-serif;
  -webkit-font-smoothing: antialiased;
  -moz-osx-font-smoothing: grayscale;
  text-align: center;
  color: #2c3e50;
  margin-top: 60px;
}
</style>
vue路由
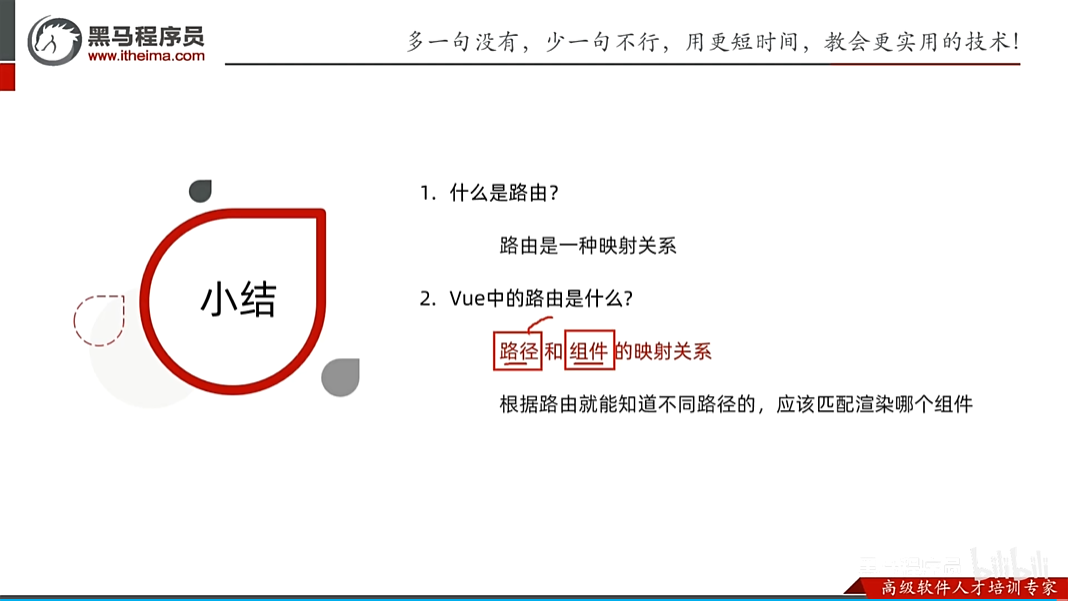
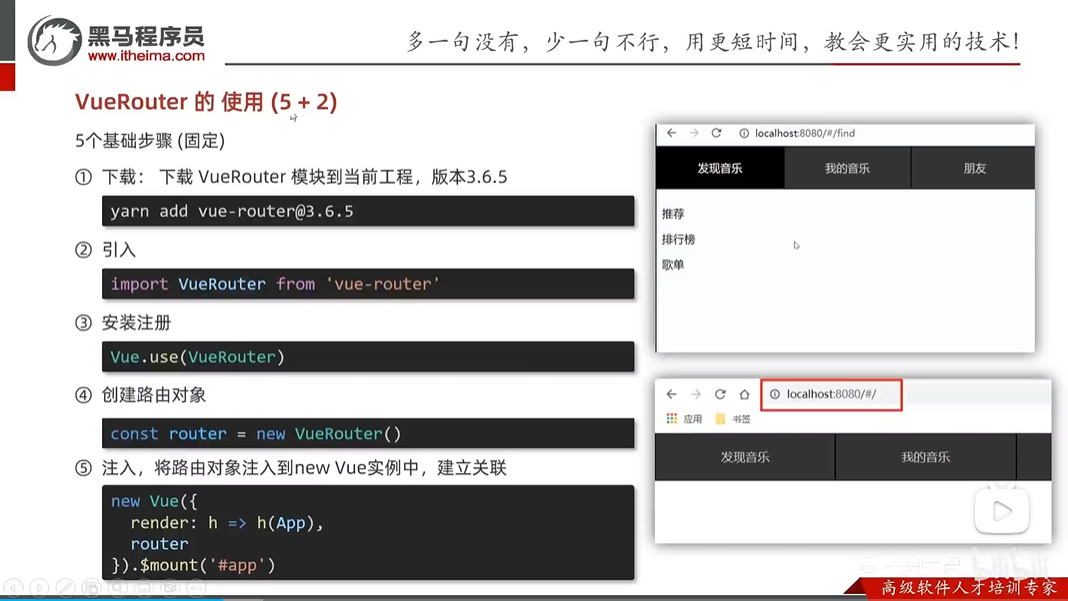
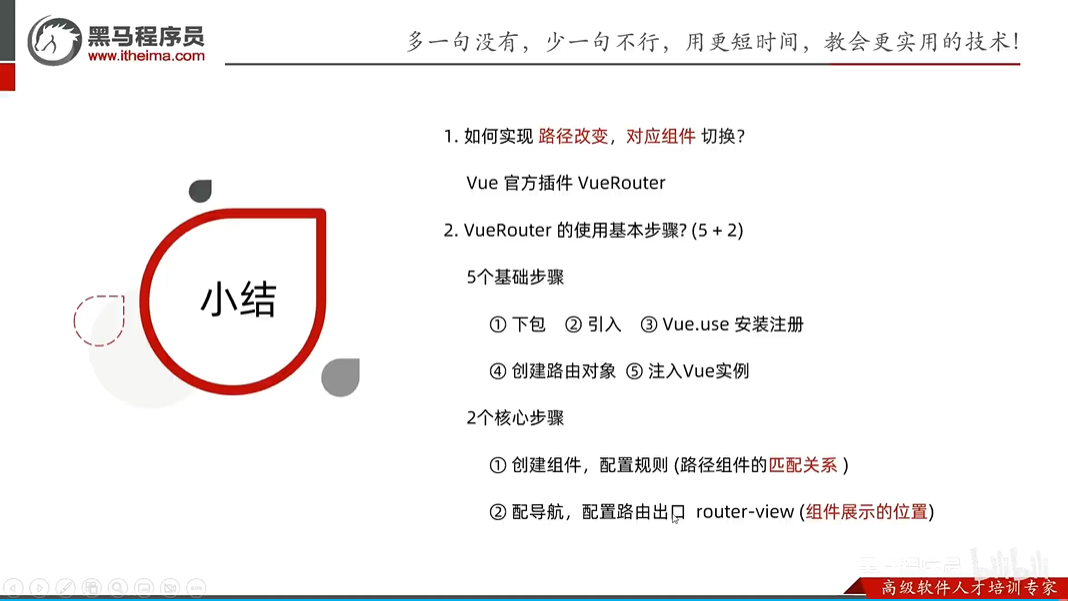
vue路由步骤
一旦挂载后,那么全局都是可以用的
// 在任何组件中可通过以下方式访问
this.$router // 路由实例
this.$route  // 当前路由对象
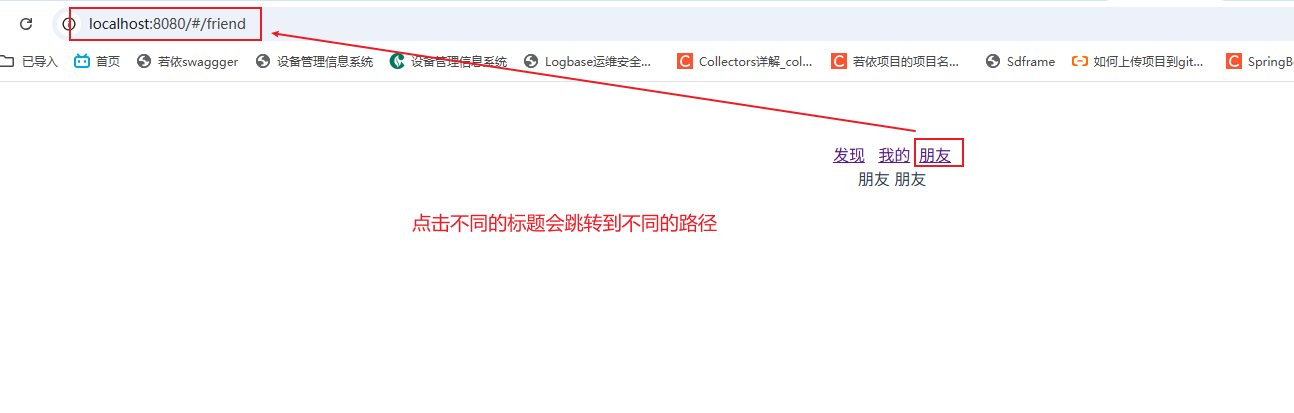
Vue路由演示
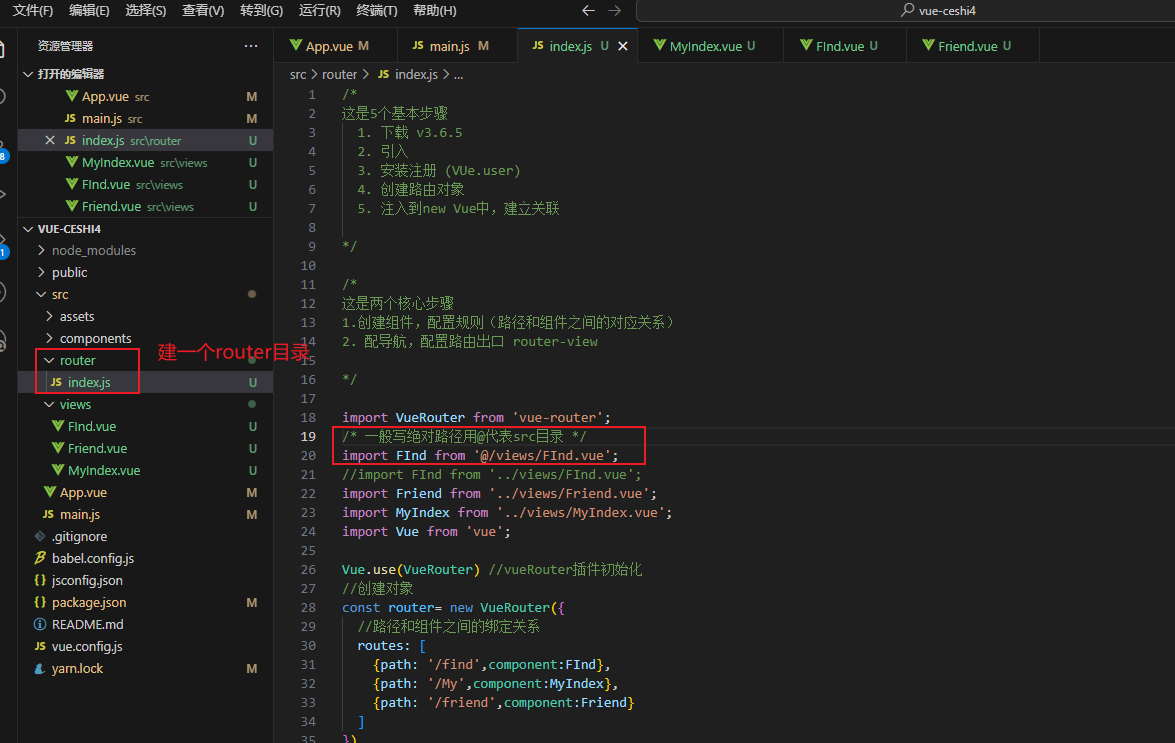
import Vue from 'vue'
import App from './App.vue'

/*
这是5个基本步骤
  1. 下载 v3.6.5
  2. 引入
  3. 安装注册 (VUe.user)
  4. 创建路由对象
  5. 注入到new Vue中,建立关联

*/

/*
这是两个核心步骤
1.创建组件,配置规则(路径和组件之间的对应关系)
2. 配导航,配置路由出口 router-view

*/

import VueRouter from 'vue-router';
import FInd from './views/FInd.vue';
import Friend from './views/Friend.vue';
import MyIndex from './views/MyIndex.vue';
Vue.config.productionTip = false
Vue.use(VueRouter) //vueRouter插件初始化
//创建对象
const router= new VueRouter({
  //路径和组件之间的绑定关系
  routes: [
    {path: '/find',component:FInd},
    {path: '/My',component:MyIndex},
    {path: '/friend',component:Friend}
  ]
})

new Vue({
  render: h => h(App),
  router
}).$mount('#app')
<template>
<div id="app">
<div>
<!-- 配置导航 -->
<a href="#/find">发现</a>
<a href="#/my">我的</a>
<a href="#/friend">朋友</a>
<div class="top">
<!-- 配置出口 -->
<router-view></router-view>
</div>
</div>
</div>
</template>
<script>
export default {
name: 'App',
components: {
}
}
</script>
<style>
#app {
font-family: Avenir, Helvetica, Arial, sans-serif;
-webkit-font-smoothing: antialiased;
-moz-osx-font-smoothing: grayscale;
text-align: center;
color: #2c3e50;
margin-top: 60px;
}
</style>
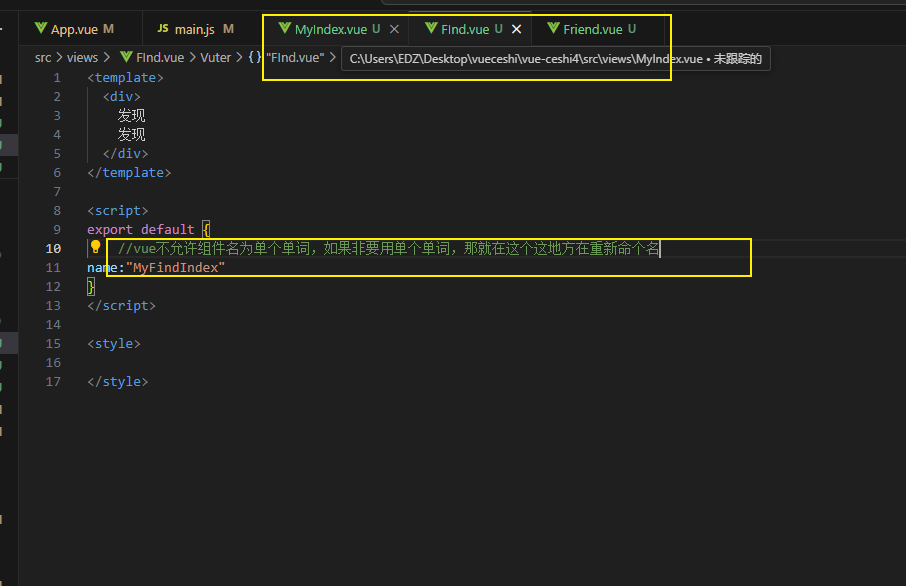
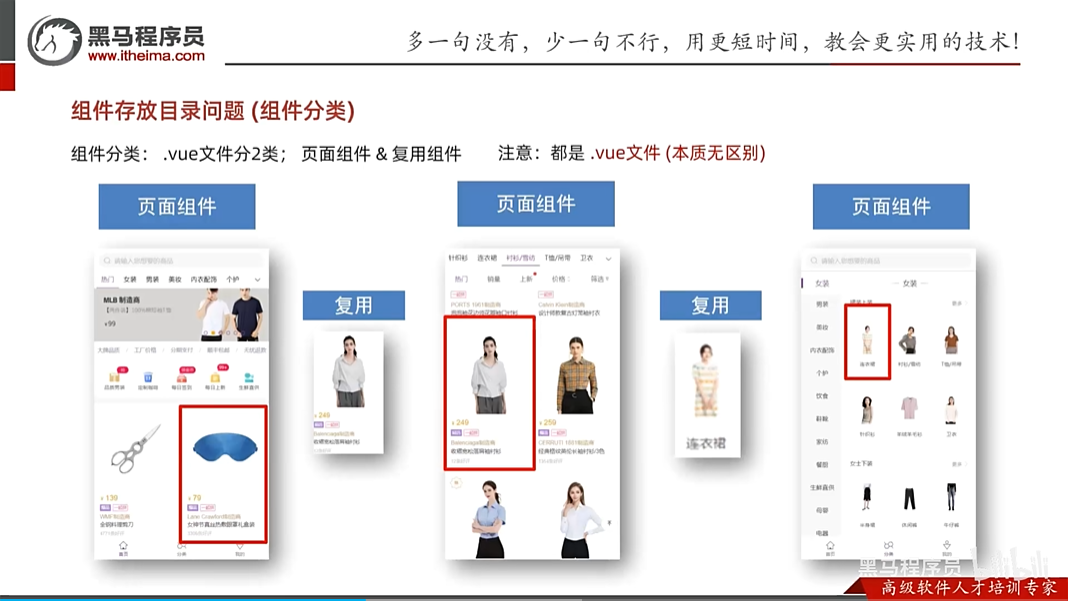
组件目录存放规范
路由模块化,不能全都放在main.js中
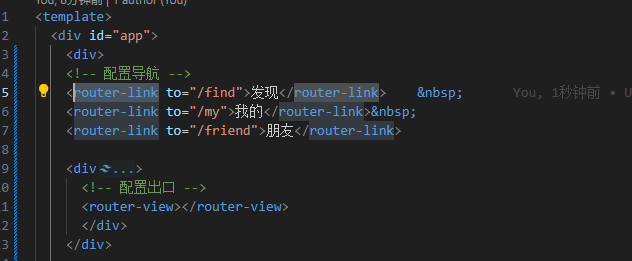
使用router-link代替标签并且快速高亮
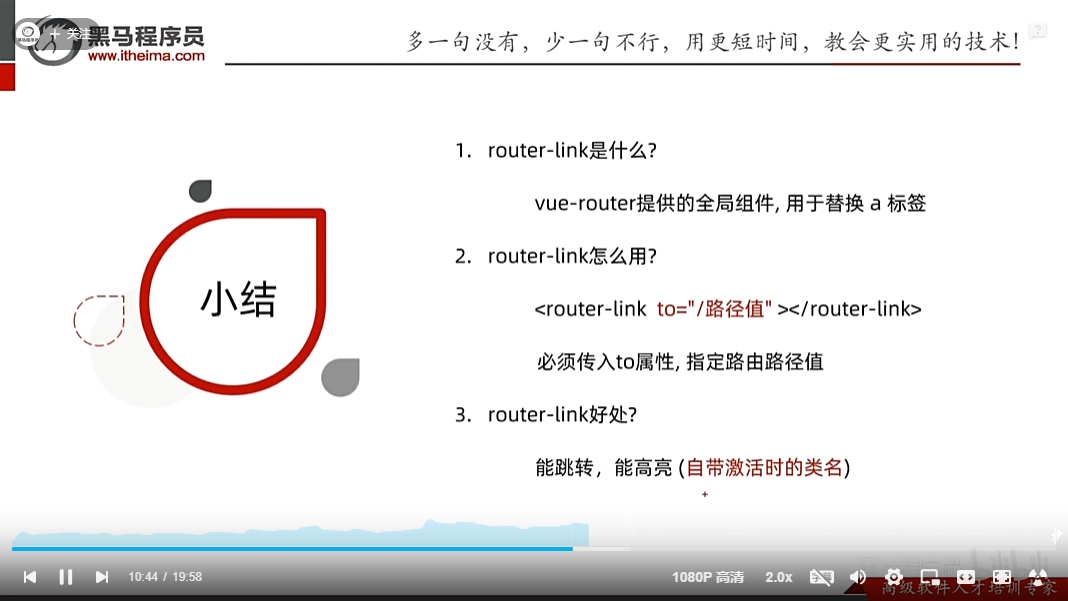
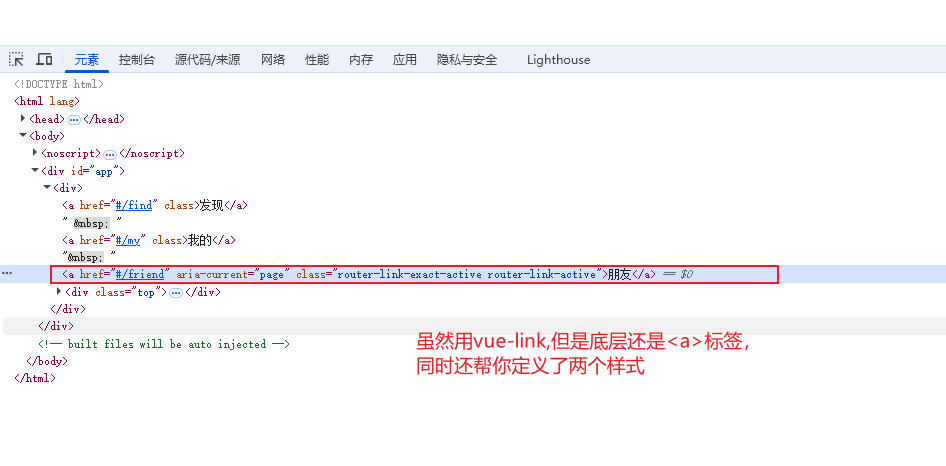
这个时候就可以针对于这个两个样式进行修改
//把样式添加背景色,这个是模糊匹配,就是当to后面跟的是/find,那么/find/one,/find/one/two都会高亮,且不会互相影响,即使你在页面的路径是/find/one,那么它是不会影响到/find的展示的
 .router-link-active  {
  background-color:aqua
 }
//精准匹配,只有find的才会高亮,其它的都不行
.router-link-exact-active {
background-color:aqua
自定义的类名
//创建VueRouter对象
const router= new VueRouter({
  //路径和组件之间的绑定关系
  routes: [
    {path: '/find',component:FInd},
    {path: '/My',component:MyIndex},
    {path: '/friend',component:Friend}
  ],
  //自定义route-link的类匹配名
  linkActiveClass:'active',
  linkExactActiveClass:'exact-active'
})
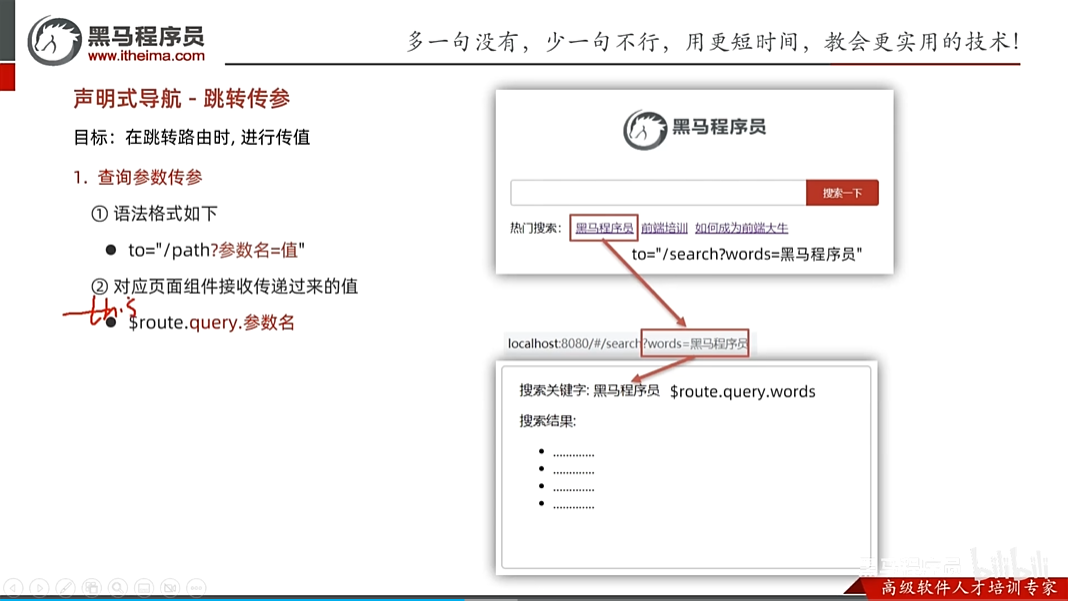
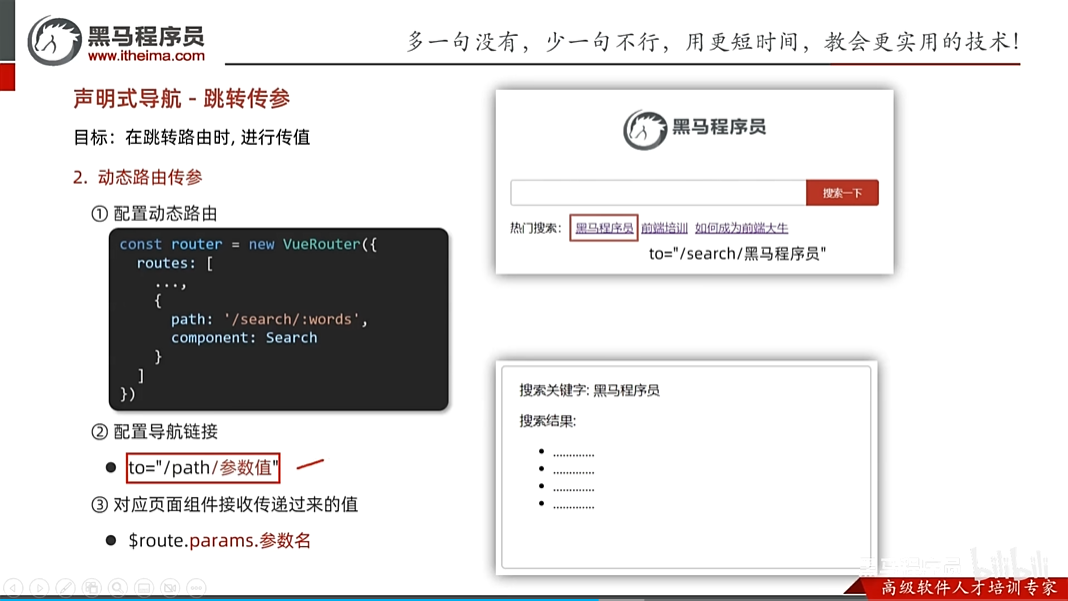
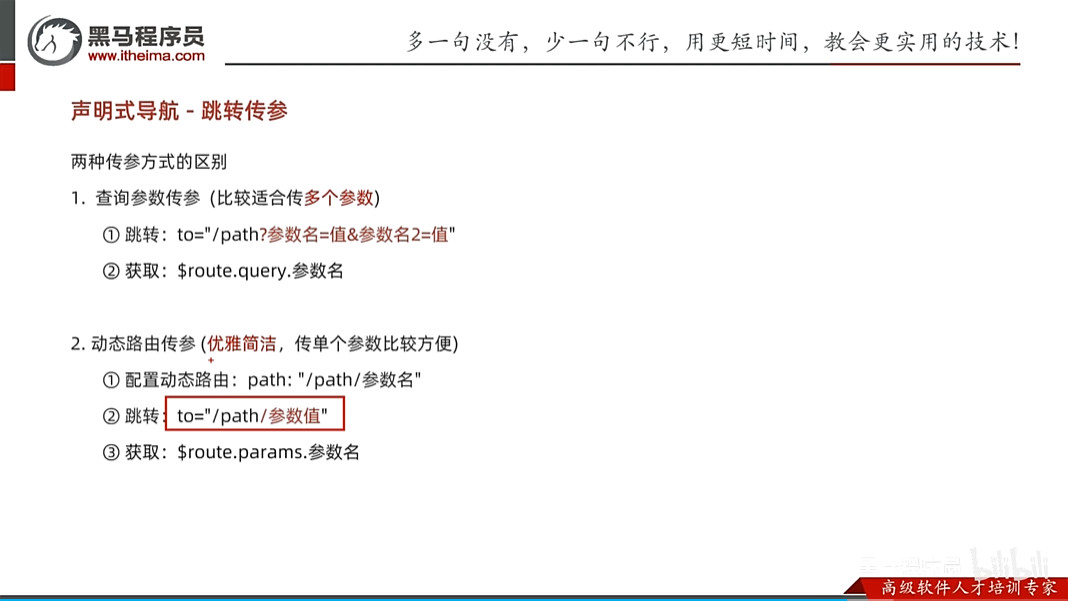
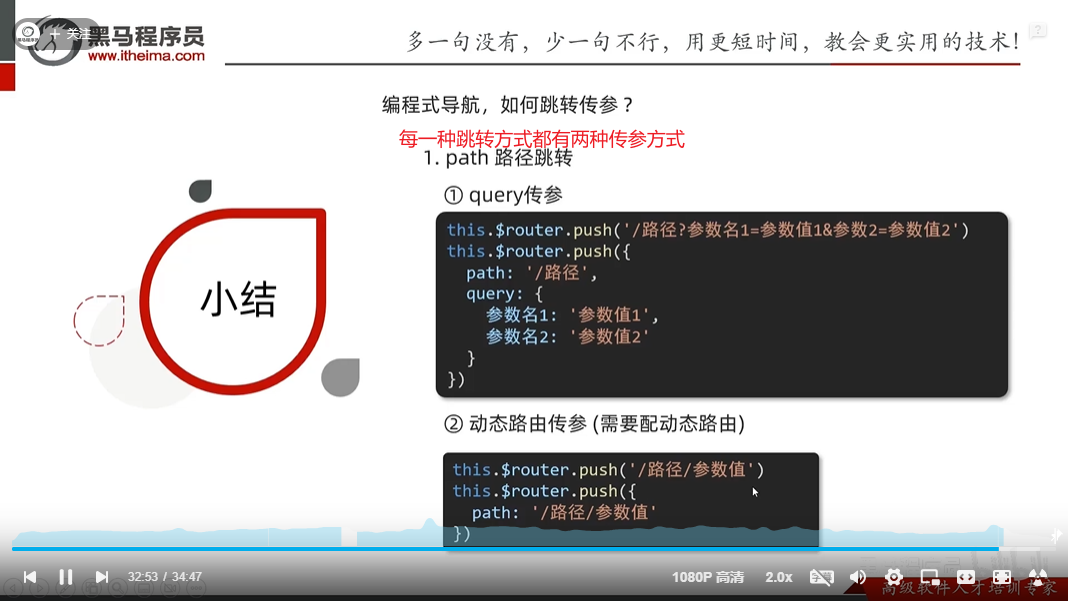
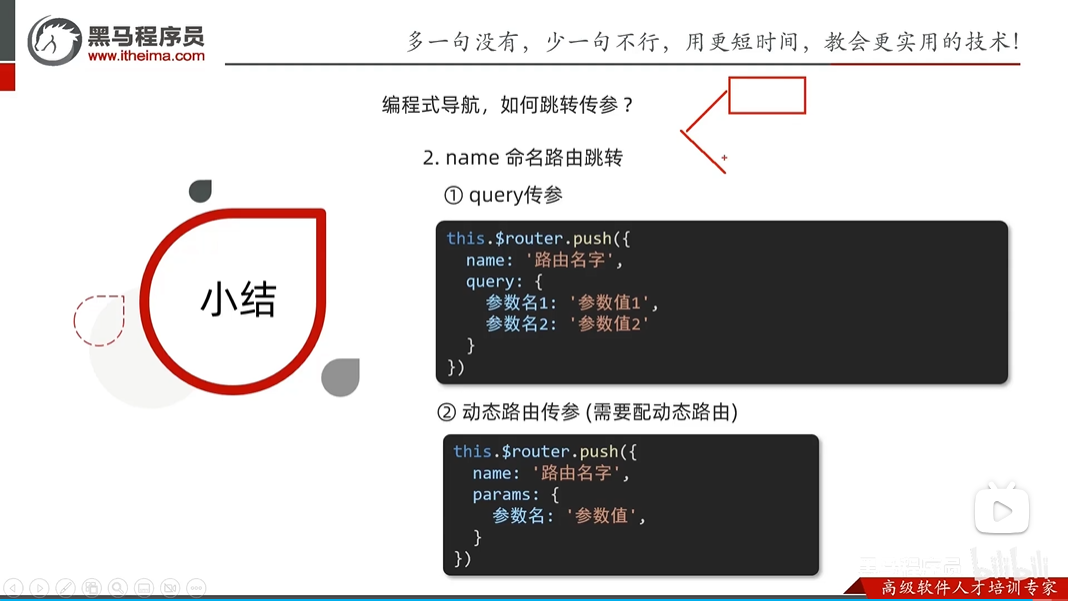
声明式导航-跳转传参
声明式导航-动态路由
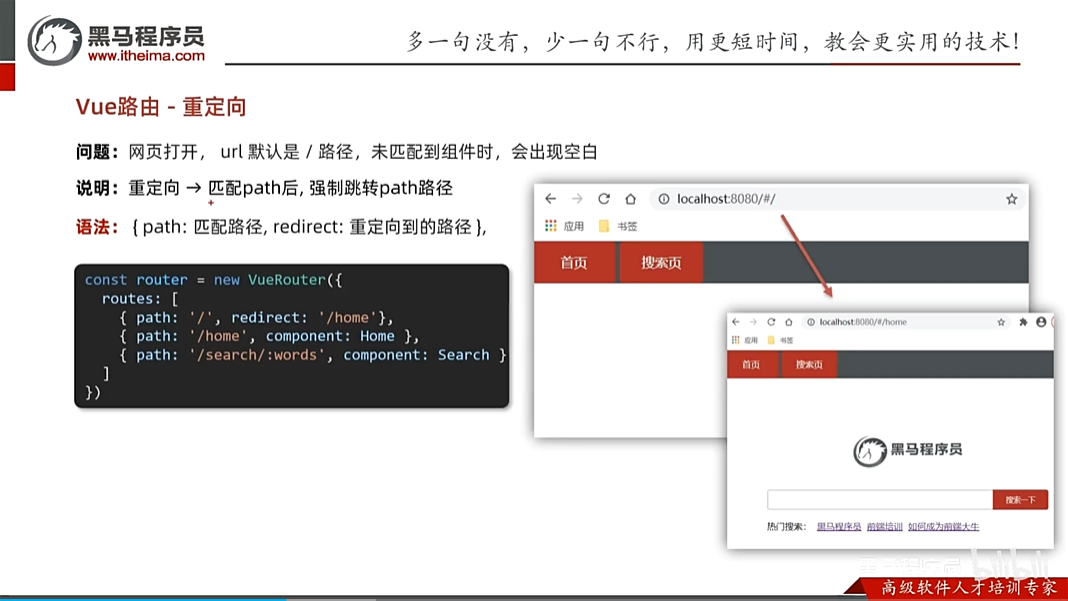
vue重定向
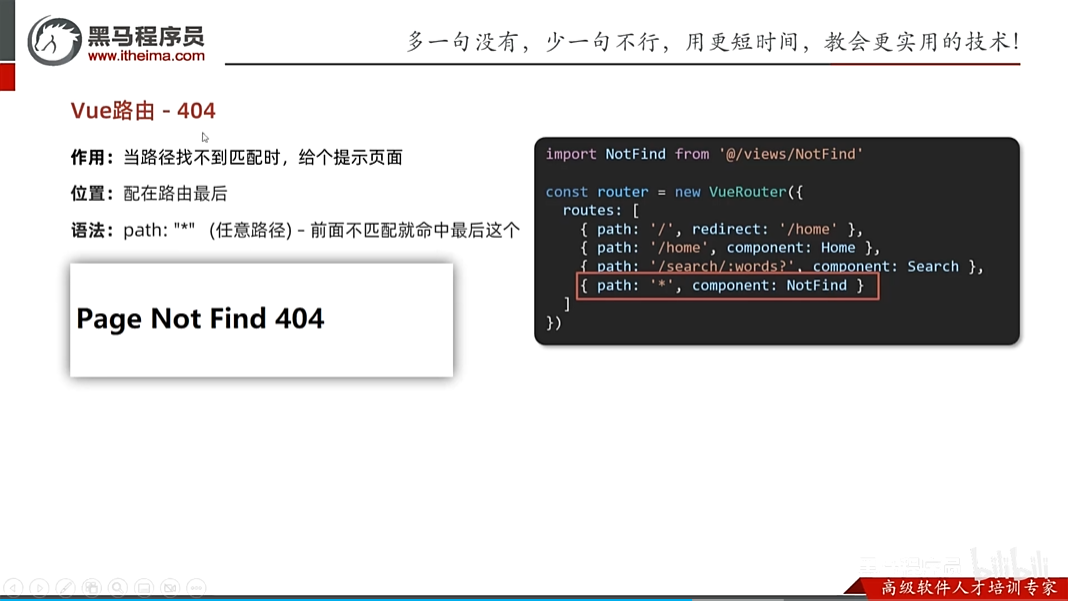
vue路由-404
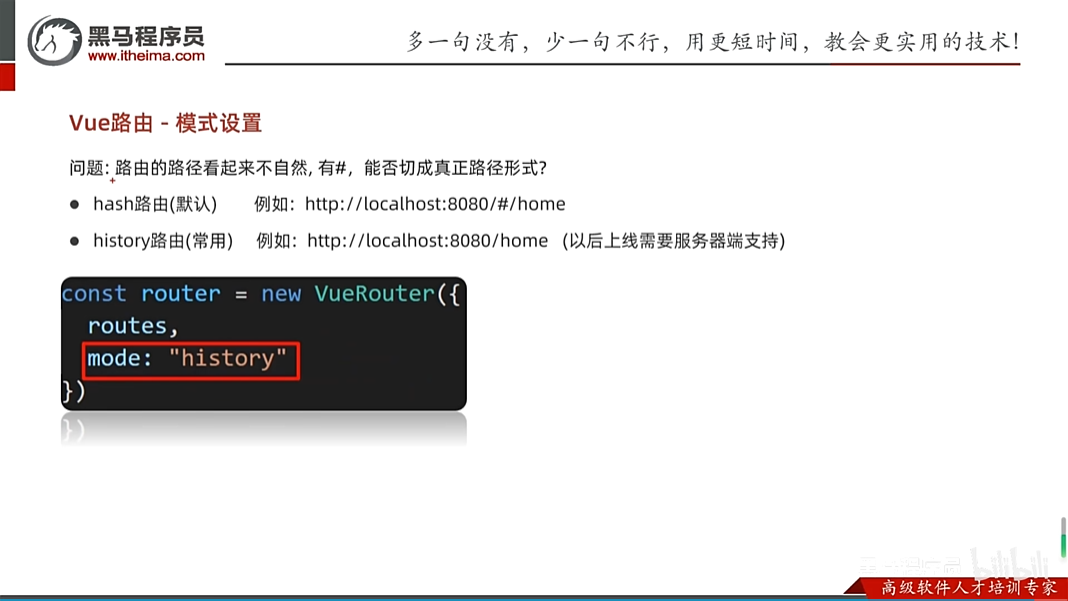
vue-路由模式的设置
vue编程式导航-两种模式
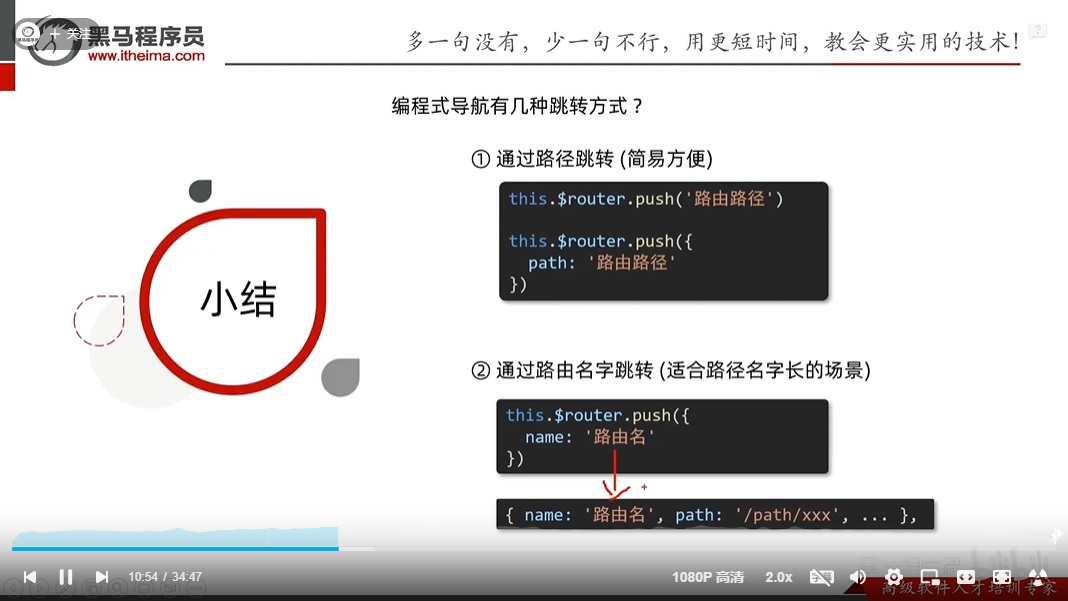
路径跳转
name跳转
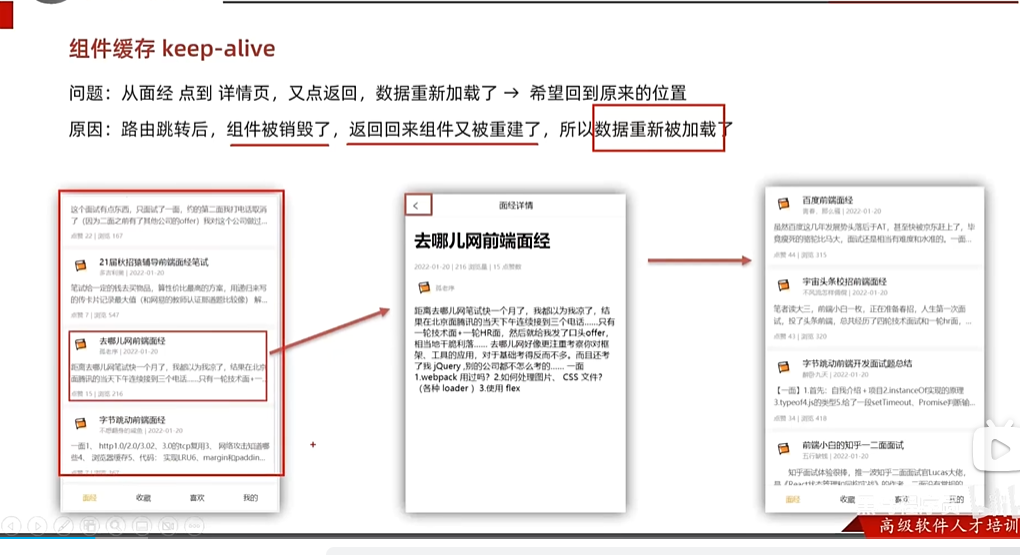
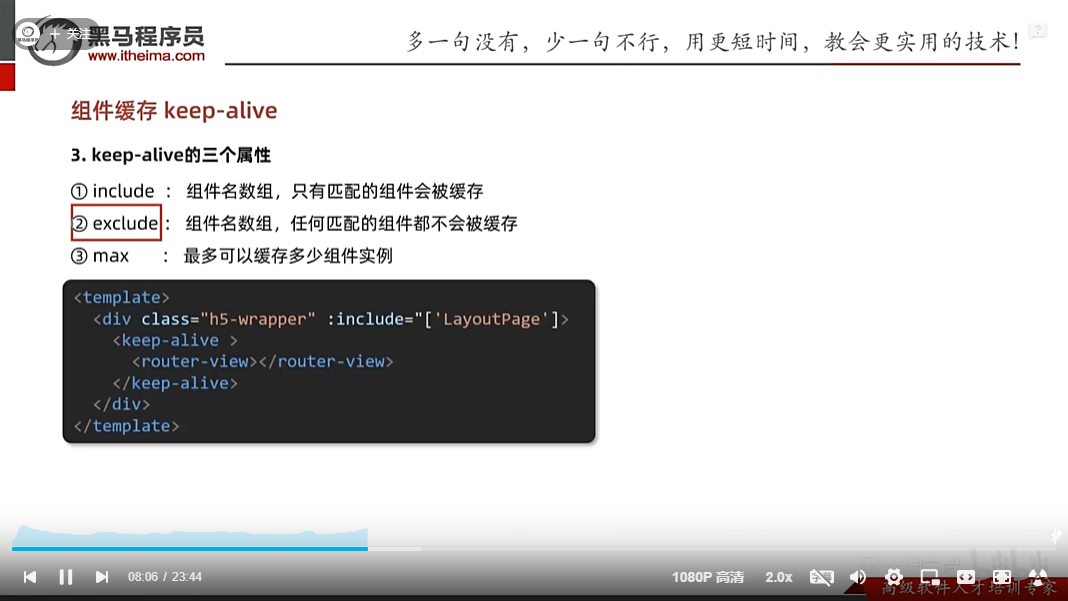
组件缓存
解决的问题是一个页面跳转到另一个页面,然后在跳转回来,这个时候涉及到组件的生命周期,该页面当跳转到另一个页面时,会销毁这个页面,当在跳转回来,那么会重新创建这个组件,那么它就不能记载之前的浏览位置了,所以用组件缓存
一旦组件被缓存,就不会执行组件的created,mounted,destroyed等钩子,但是实际场景中当返回跳转后希望加上欢迎回来内容,由于该组件被缓存了,所以不能用组件内的钩子了,只能用提供的activated:组件被激活时使用,deactivated:组件失活时使用

vue安装自动纠正代码格式错误
- 安装eslink插件
- 在vscode配置
{
    "vsicons.dontShowNewVersionMessage": true,
    "[html]": {
        "editor.defaultFormatter": "vscode.html-language-features"
    },
    "[vue]": {
        "editor.defaultFormatter": "Vue.volar"
    },
    "workbench.editor.empty.hint": "hidden",
    //当保存时,eslink自动帮我们修改错误
    "editor.codeActionsOnSave":{
        "source.fixAll": true
    },
    // 保存代码 ,不自动格式化
    "editor.formatOnSave": false
}
vuex讲解
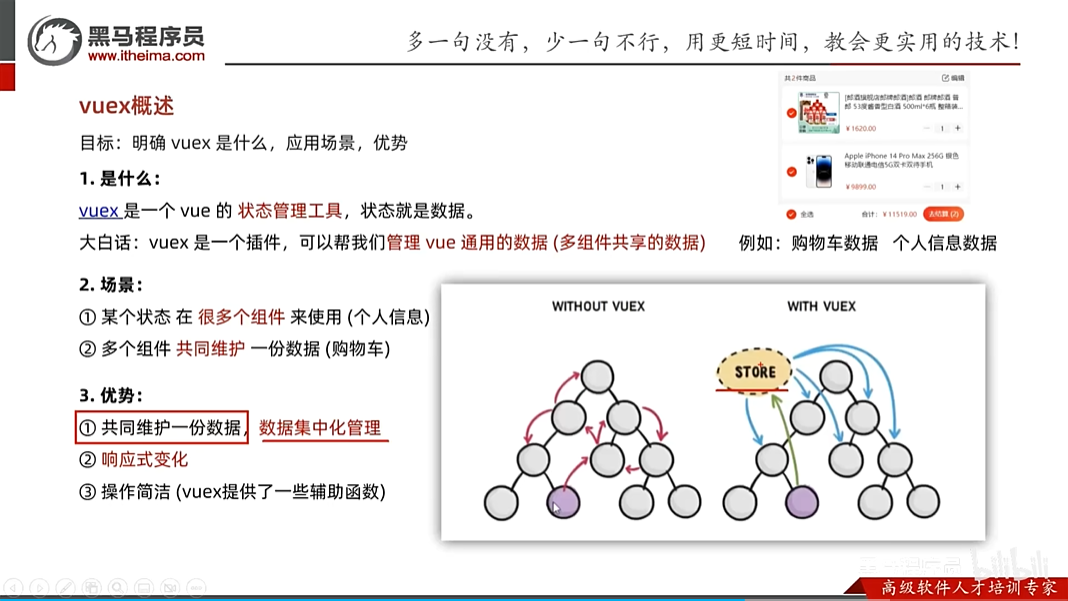
如果没有vuex那么多层的数据传递将会很麻烦,会一层一层的传递,但是如果有了vuex,它就会提供一个数据管理仓库,把数据放在这个仓库中,谁想用就去拿,而且当数据被修改时,会立刻响应到其它被使用的地方
vuex讲解-仓库
- 安装vuex — yarn add vuex@3
- 新建vuex模块文件–在src下创建一个store目录
- 创建仓库
- main.js中导入并挂载
第三步-创建仓库如下:
//这里存放的就是vuex相关的核心代码

import Vue from "vue";
import Vuex from 'vuex'


//插件安装
Vue.use(Vuex)


//创建仓库
const store = new Vuex.Store()


//导出给main.js使用
export default store
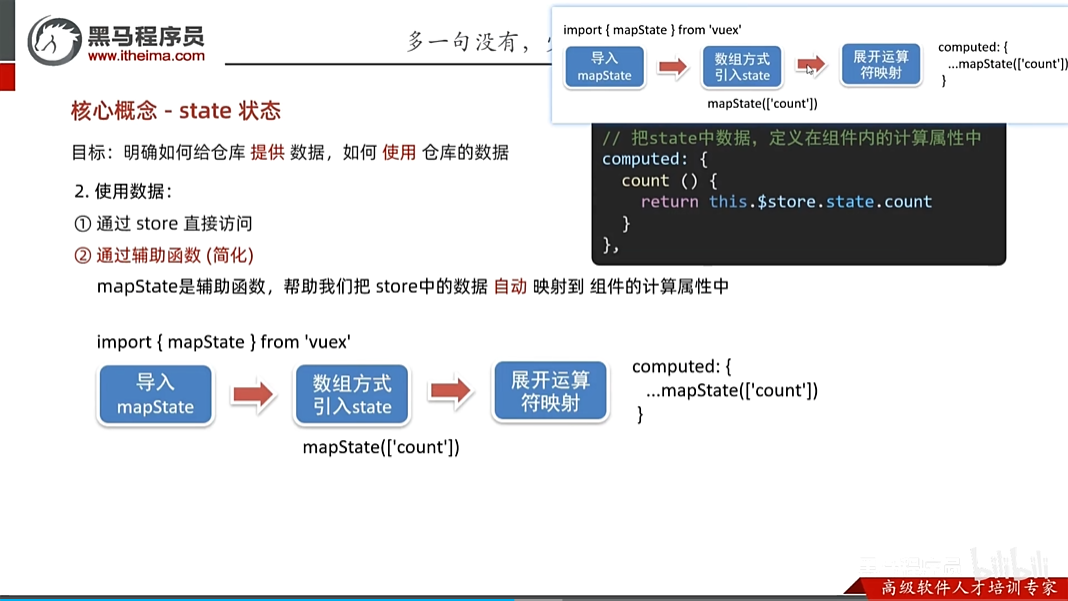
vuex仓库如何提高和获取仓库数据
提供数据用:state
访问数据用:$store.state
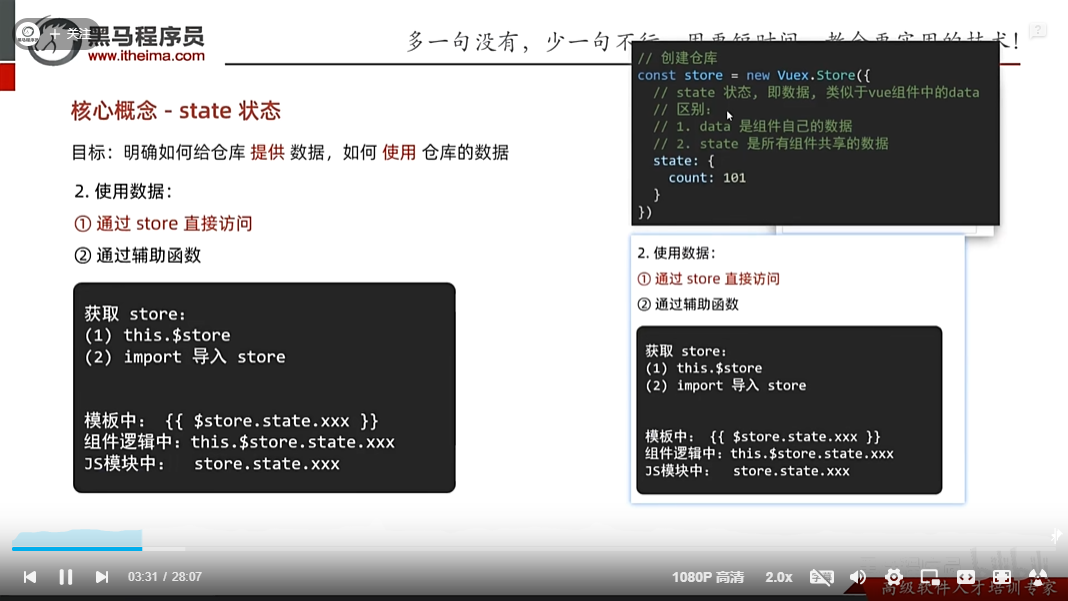
还可以用辅助函数mapState([‘count’]),它的原理是把$store.state封装到计算属性中,那么就意味着可以直接count去访问该数据
vuex修改仓库的数据
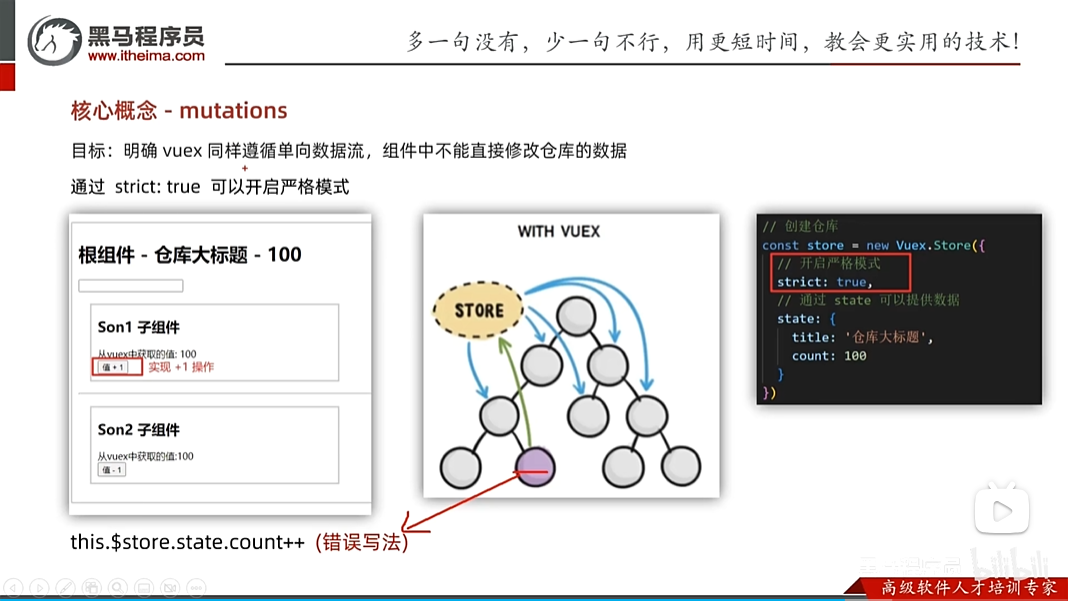
为什么不提供组件修改仓库的数据呢?
因为一旦组件可以修改,那么当运用的组件很多的时候,都去修改,那么就太乱了,所以这里只能仓库来修改。
虽然要求不能在组件里修改数据(this.$store.state.count++),但是这个语句不会报错,如果想让它报错,可以以下设置:
//创建仓库
const store = new Vuex.Store({
    //严格执行,上线后不要开启这个,因为这个会耗效率,一般适合初学者把这个设置为true
    strict: true,
    //通过state  可以提供数据 (所有组件都可以访问到这里的数据)
    state: {
        title: '仓库大标题',
        count:  100
    }
})
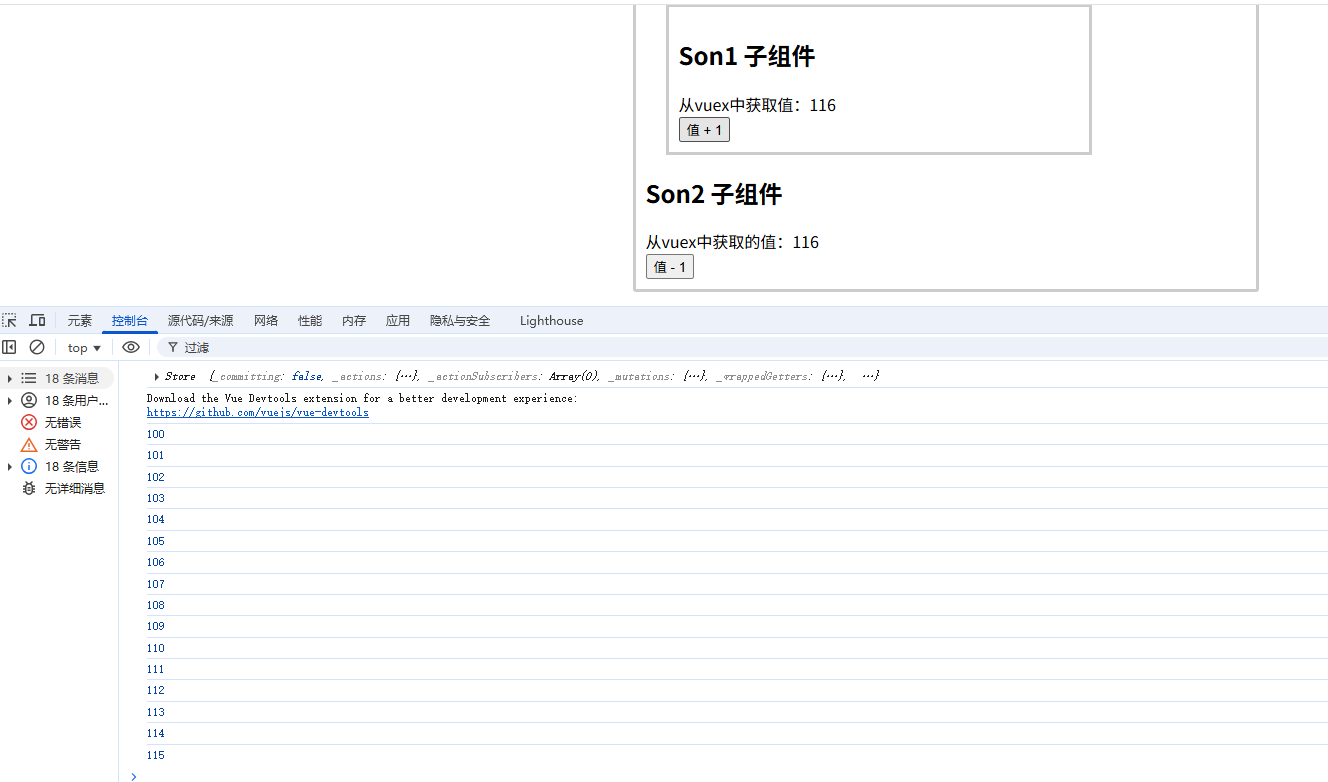
不开启严格模式如下
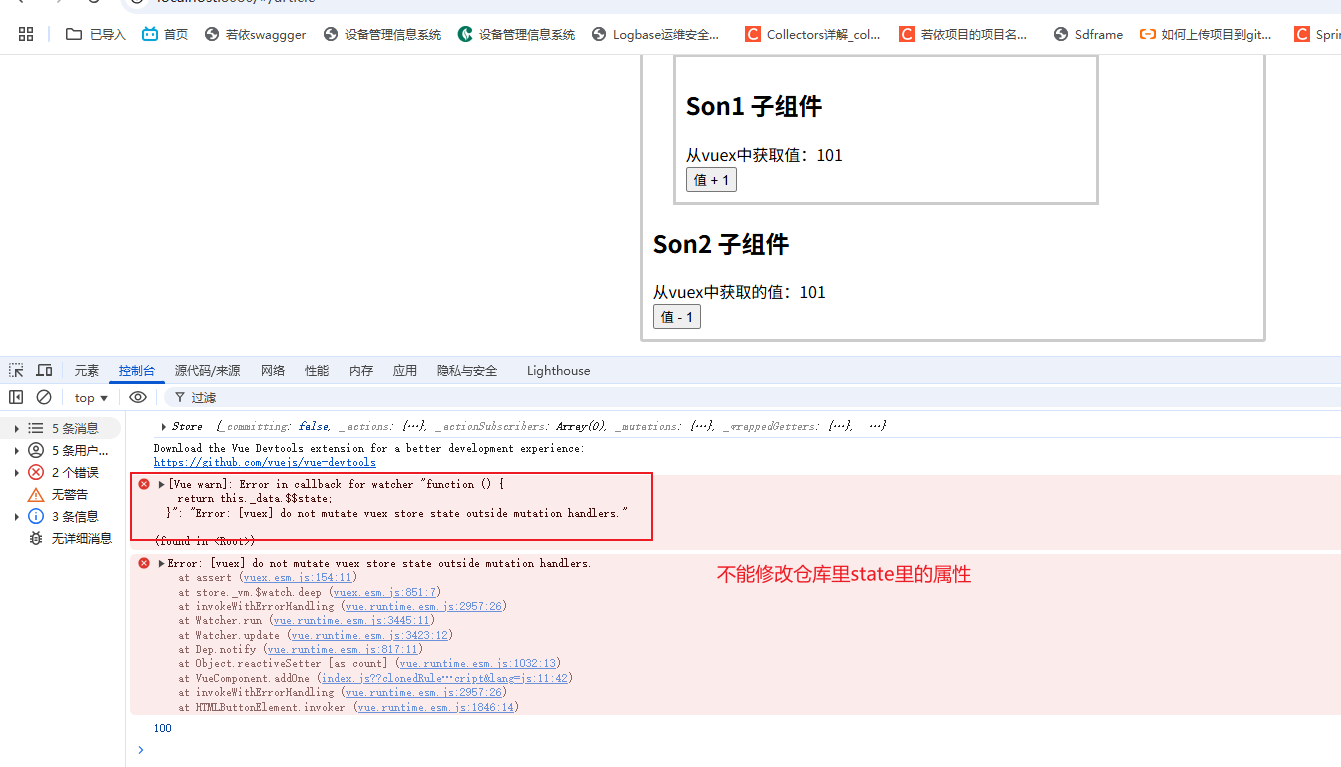
开启严格模式如下
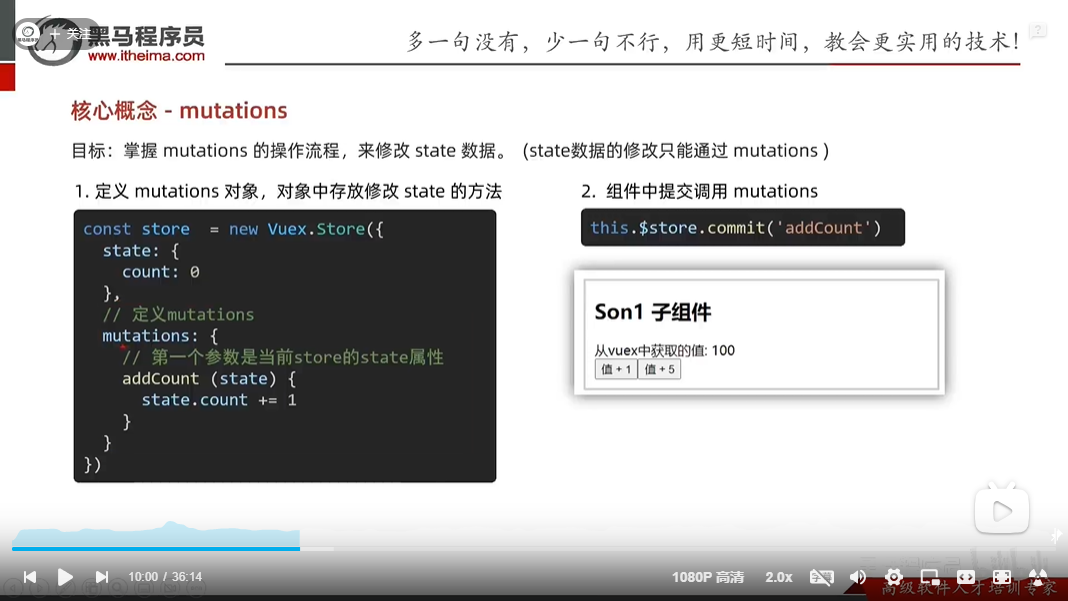
修改仓库里的数据–mutations
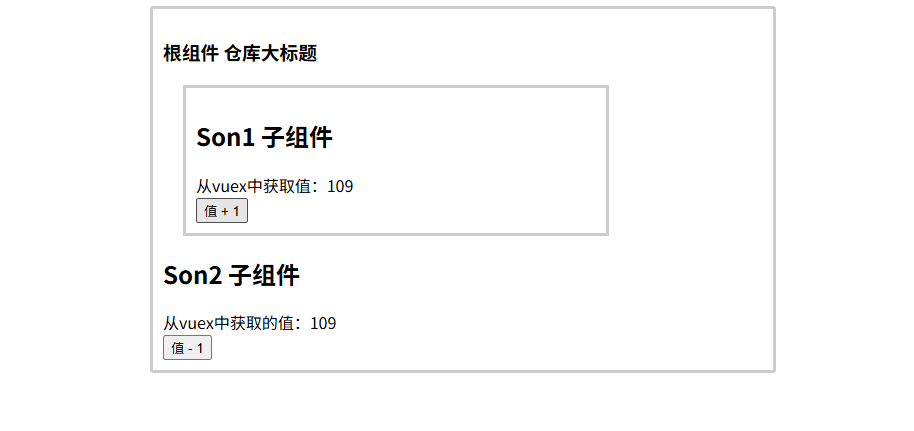
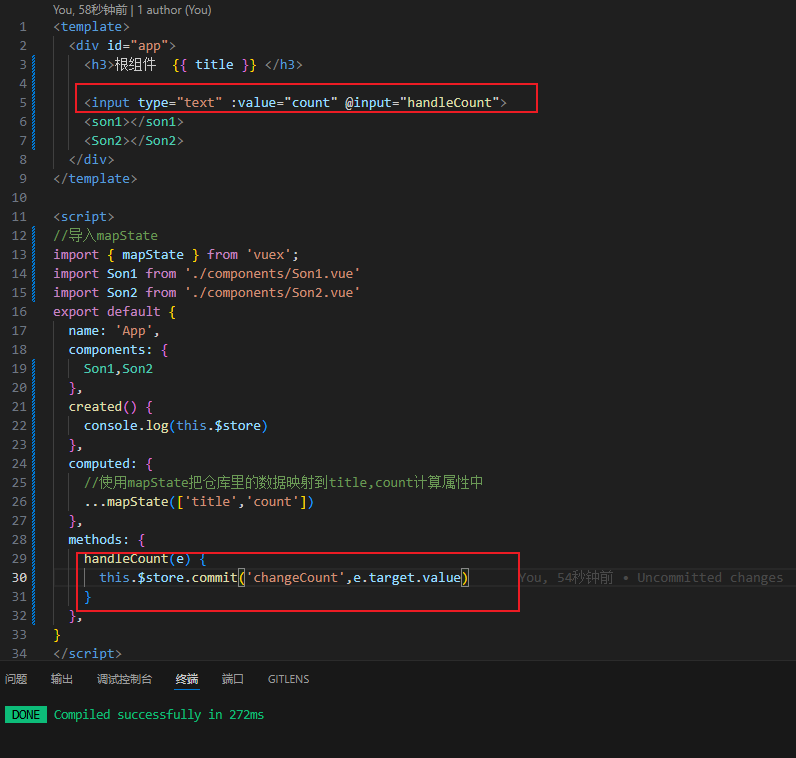
App.vue
<template>
  <div id="app">
    <h3>根组件  {{ title }} </h3>
    <son1></son1>
    <Son2></Son2>
  </div>
</template>

<script>
//导入mapState
import { mapState } from 'vuex';
import Son1 from './components/Son1.vue'
import Son2 from './components/Son2.vue'
export default {
  name: 'App',
  components: {
    Son1,Son2
  },
  created() {
    console.log(this.$store)
  },
  computed: {
    //使用mapState把仓库里的数据映射到title,count计算属性中
    ...mapState(['title','count'])
  }
}
</script>

<style>
#app {
  width: 600px;
  margin: 20px auto;
  border: 3px solid #ccc;
  border-radius: 3px;
  padding: 10px;
}

</style>
Son1.vue
<template>
<div class="box">
<h2>Son1 子组件</h2>
从vuex中获取值:<label>{{ count }}</label>
<br>
<button @click="addOne">值 + 1</button>
</div>
</template>
<script>
import { mapState } from 'vuex';
export default {
name: 'Son1Index',
computed: {
...mapState(['title','count'])
},
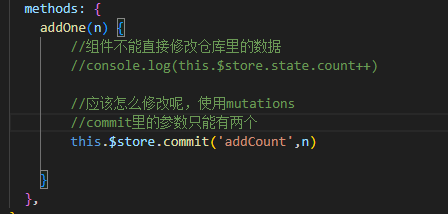
methods: {
addOne() {
//组件不能直接修改仓库里的数据
//console.log(this.$store.state.count++)
//应该怎么修改呢,使用mutations
this.$store.commit('addCount')
}
},
}
</script>
<style>
.box {
border: 3px solid #ccc;
width: 400px;
padding: 10px;
margin: 20px;
}
</style>
Son2.vue
<template>
  <div>
    <h2>Son2 子组件</h2>
    从vuex中获取的值:<label>{{ count }}</label>
    <br>
    <button @click="subtractCount">值 - 1</button>
  </div>
</template>

<script>
import { mapState } from 'vuex';
export default {
    name: "Son2Index",
    computed:{
        ...mapState(['title','count'])
    },
    methods:{
        subtractCount() {
            this.$store.commit('subtractCount')
        }
    }
}
</script>

<style>

</style>
mutations传参修改,只能有两个参数

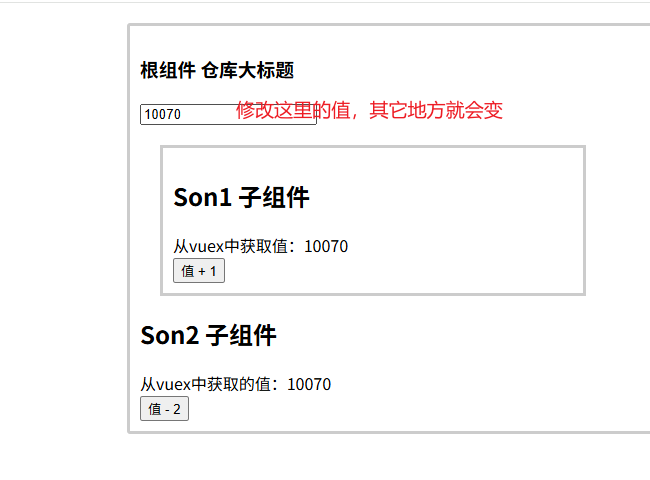
mutations实现双向绑定

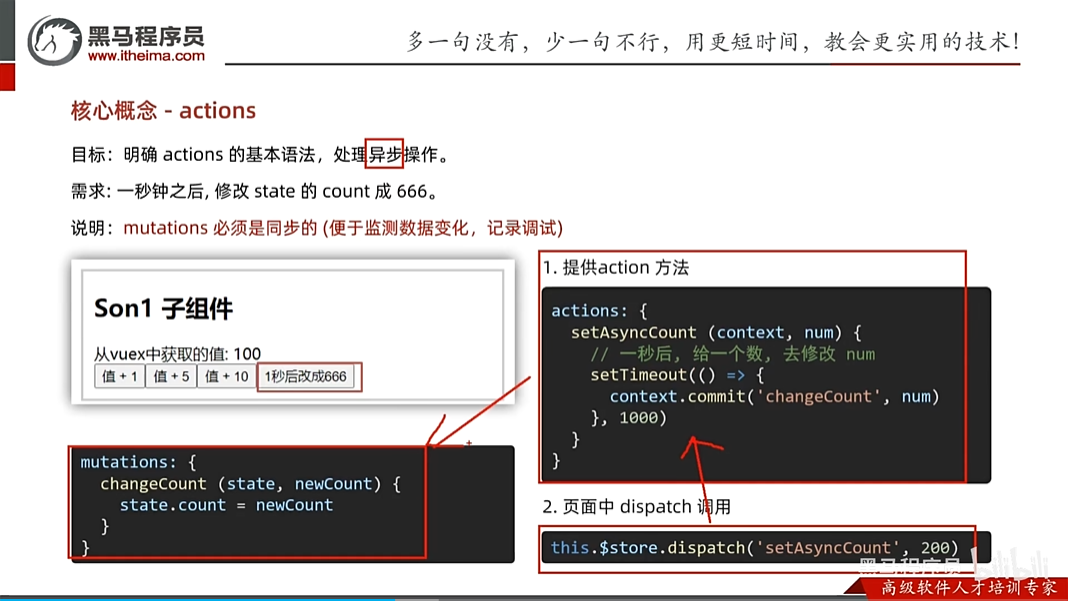
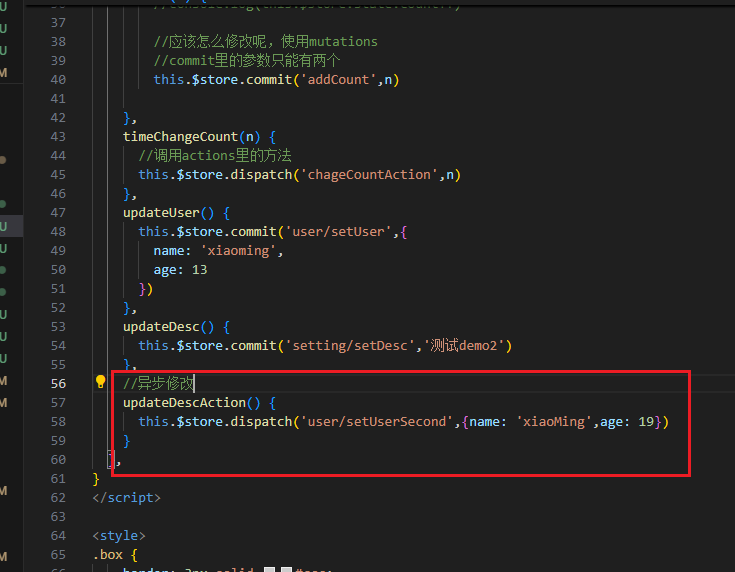
异步修改vuex里的数据-actions
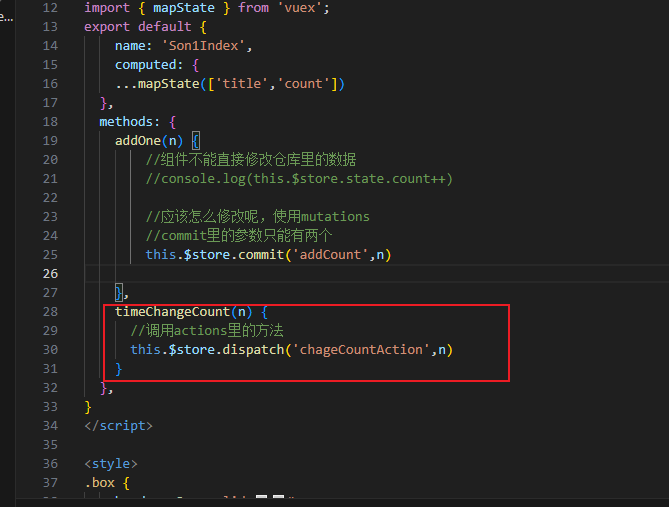
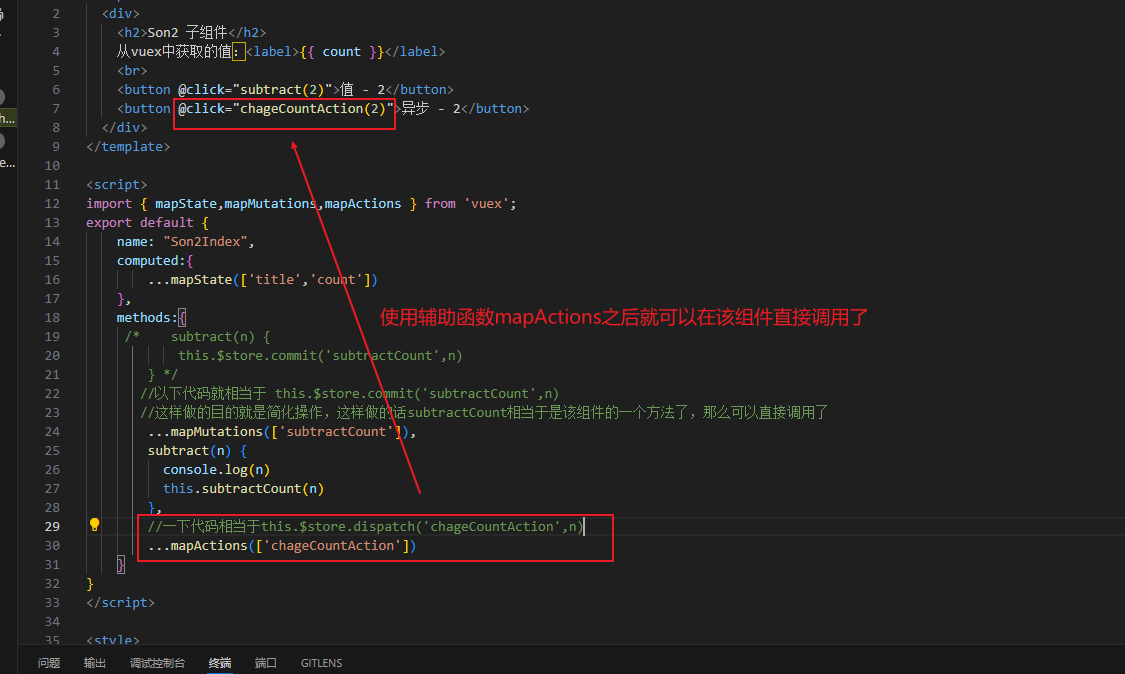
异步修改vuex里的数据-mapActions-辅助函数
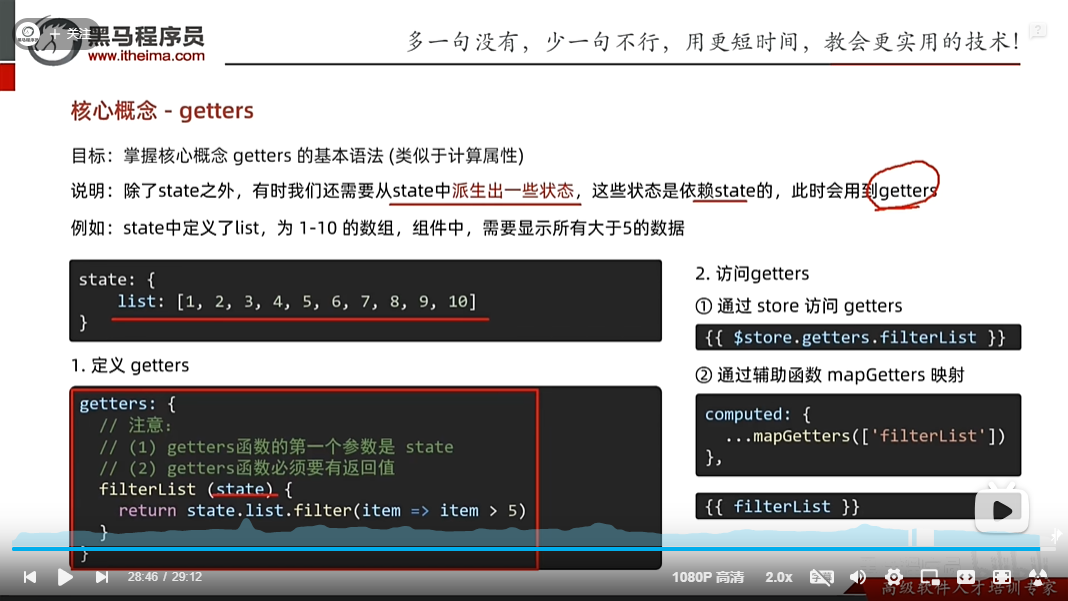
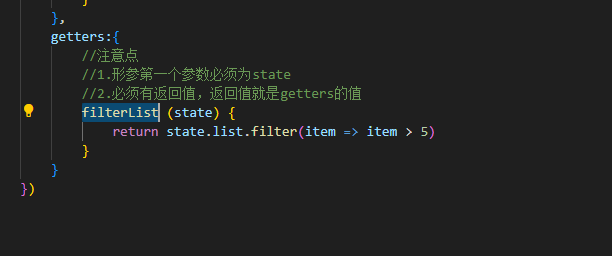
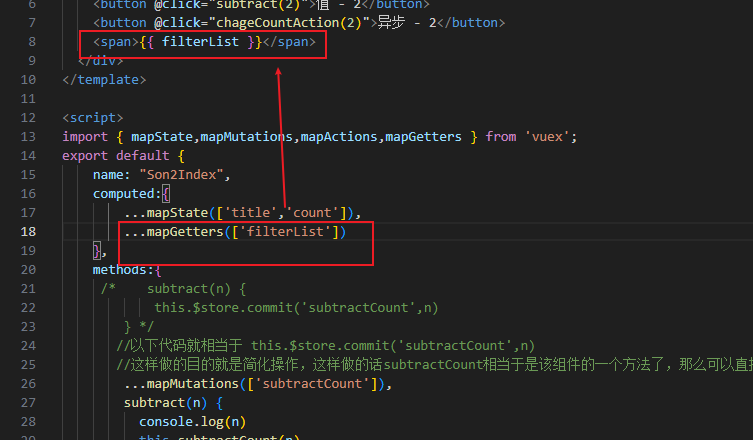
vuex中的getters以及辅助函数mapGetters
vuex分模块
为什么会分模块呢?因为如果不分的话,那么未来就是所有的仓库数据都是堆积到
new Vuex.Store({})中,容易乱,所以就用模块来解决这个问题,根据需要建立不同的js,然后在不同的js中声明仓库相关属性,最后在挂载到Vuex中就可以了
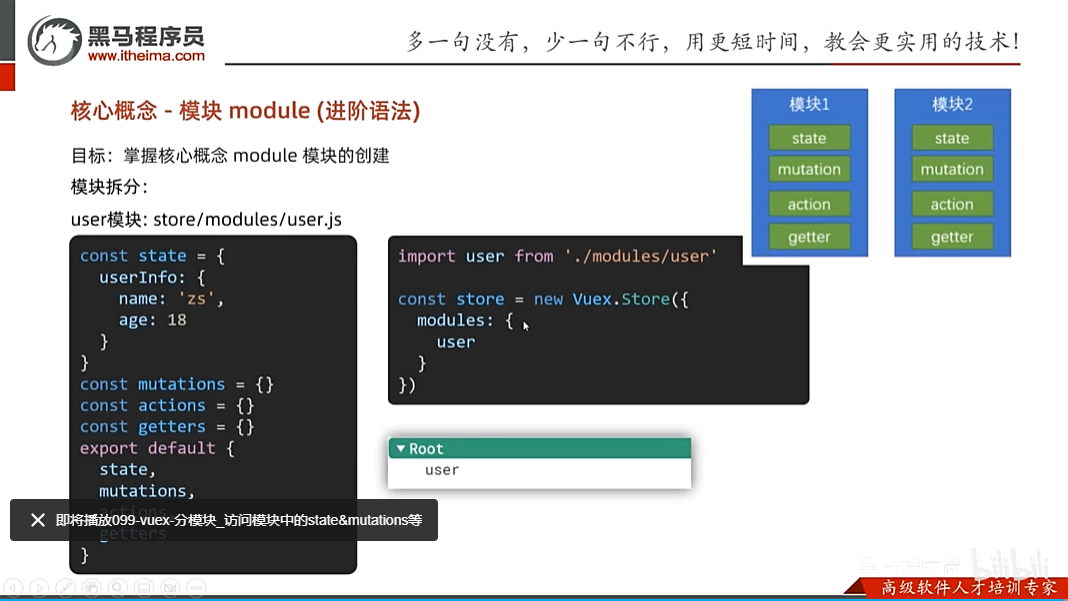
步骤一:
在store目录下创建一个modules目录
步骤二:
创建不同的js,里面写store的相关属性,如下
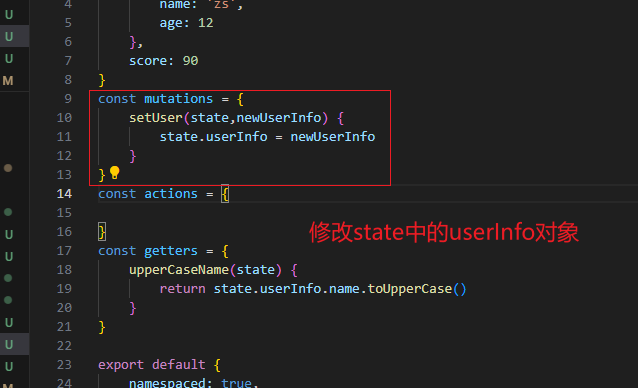
//user模块
const state = {
    userInfo:{
        name: '张三',
        age: 12
    },
    score: 90
}
const mutations = {

}
const actions = {

}
const getters = {

}

export default {
    state,
    mutations,
    actions,
    getters
}
步骤三:
将模块挂载到vuex的仓库中,如下
//这里存放的就是vuex相关的核心代码
import Vue from "vue";
import Vuex from 'vuex'
import setting from "./modules/setting";
import user from "./modules/user";
//插件安装
Vue.use(Vuex)
//创建仓库
const store = new Vuex.Store({
//严格执行,上线后不要开启这个,因为这个会耗效率,一般适合初学者把这个设置为true
strict: true,
//通过state 可以提供数据 (所有组件都可以访问到这里的数据)
state: {
title: '仓库大标题',
count: 100,
list: [0,1,2,3,4,5,6,7,8,9,10]
},
modules: {
user,setting
},
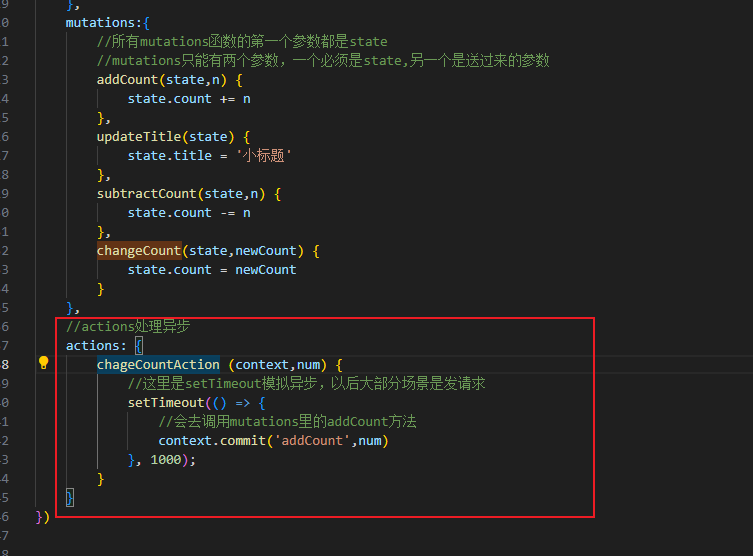
mutations:{
//所有mutations函数的第一个参数都是state
//mutations只能有两个参数,一个必须是state,另一个是送过来的参数
addCount(state,n) {
state.count += n
},
updateTitle(state) {
state.title = '小标题'
},
subtractCount(state,n) {
state.count -= n
},
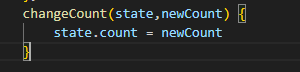
changeCount(state,newCount) {
state.count = newCount
}
},
//actions处理异步
actions: {
chageCountAction (context,num) {
//这里是setTimeout模拟异步,以后大部分场景是发请求
setTimeout(() => {
//会去调用mutations里的addCount方法
context.commit('addCount',num)
}, 1000);
}
},
getters:{
//注意点
//1.形参第一个参数必须为state
//2.必须有返回值,返回值就是getters的值
filterList (state) {
return state.list.filter(item => item > 5)
}
}
})
//导出给main.js使用
export default store
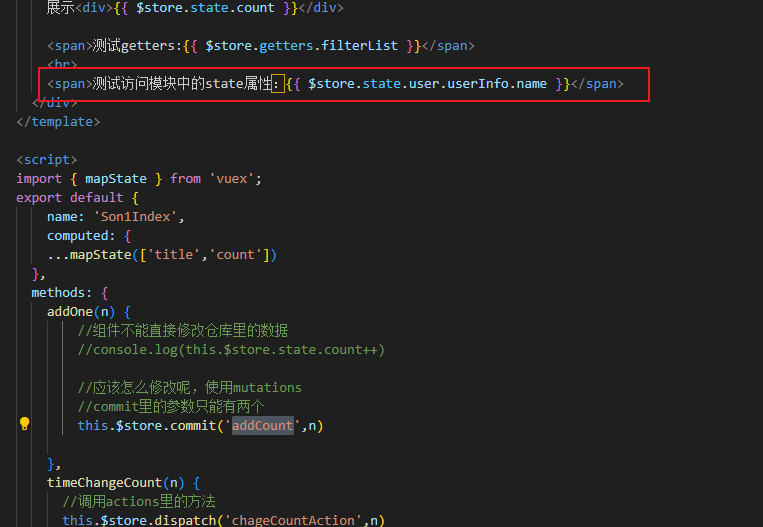
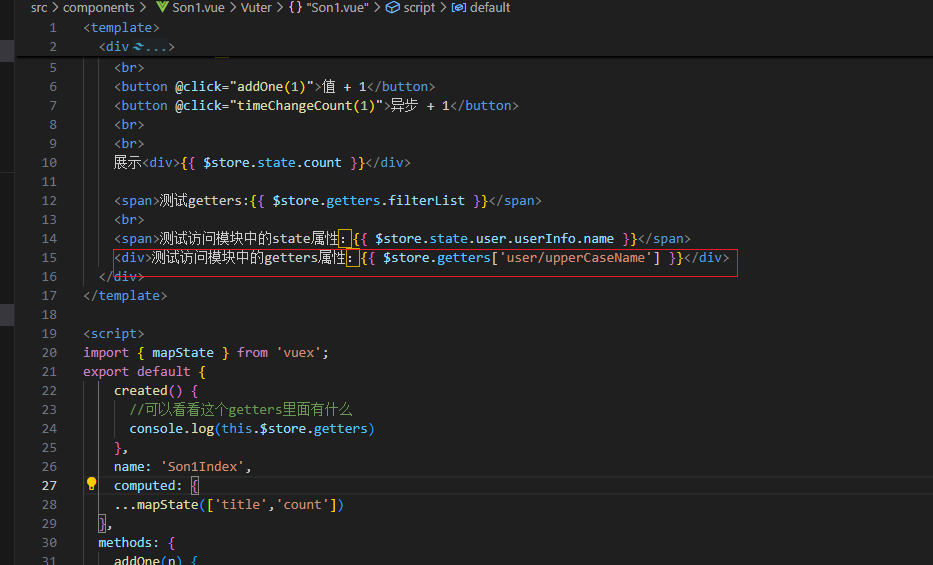
vuex如何访问模块中数据-state
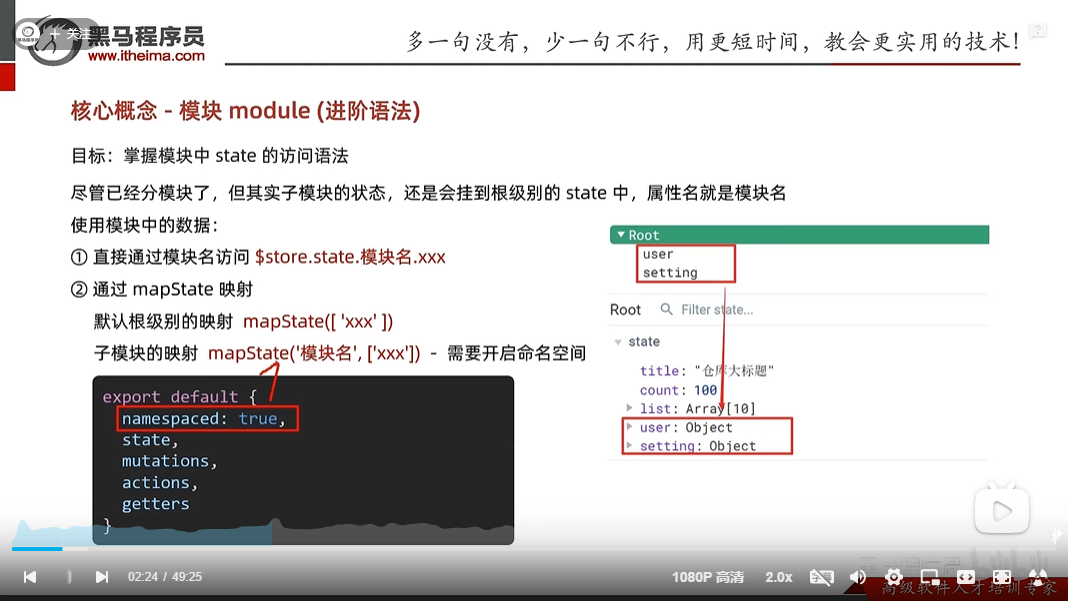
第一种直接通过模块名访问:
第二种通过mapState映射:
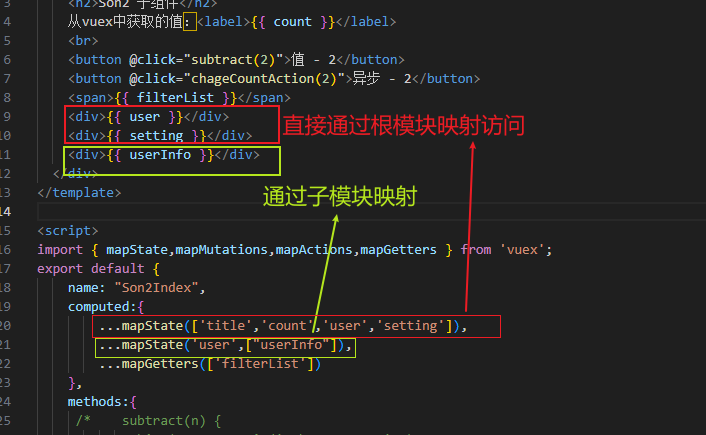
vuex如何访问模块中数据-getters


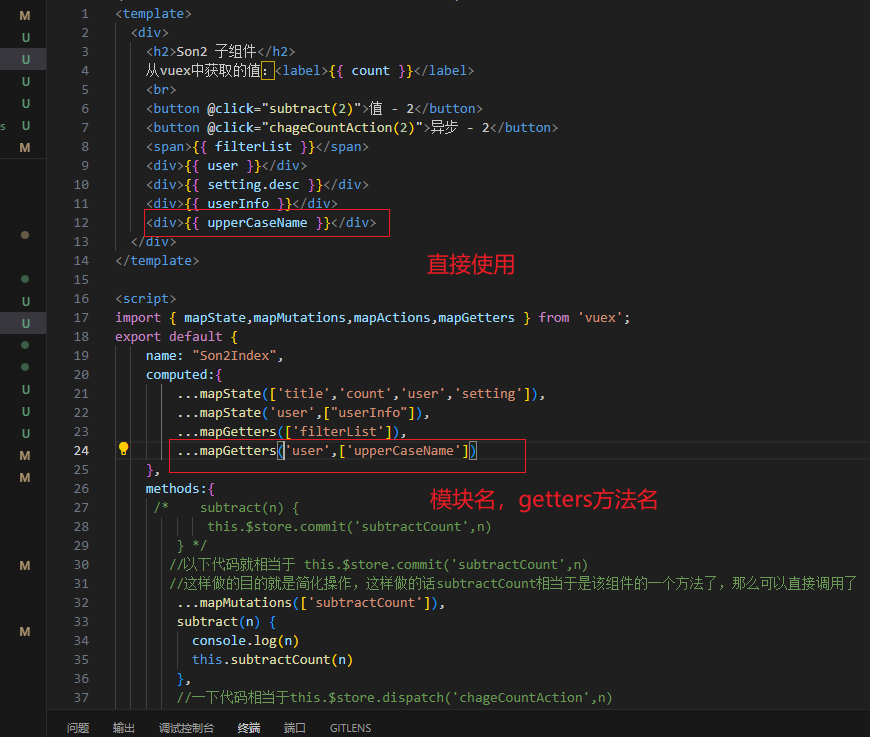
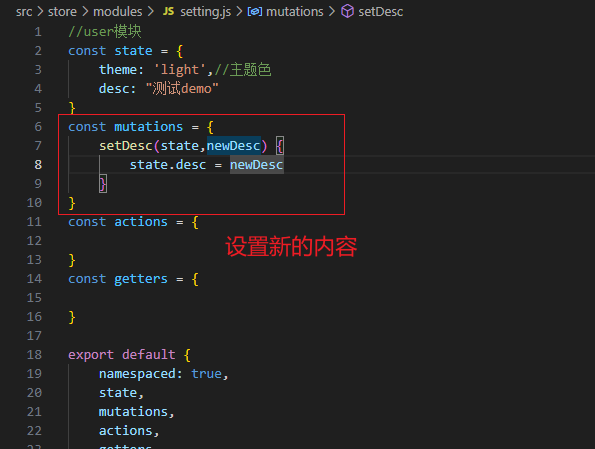
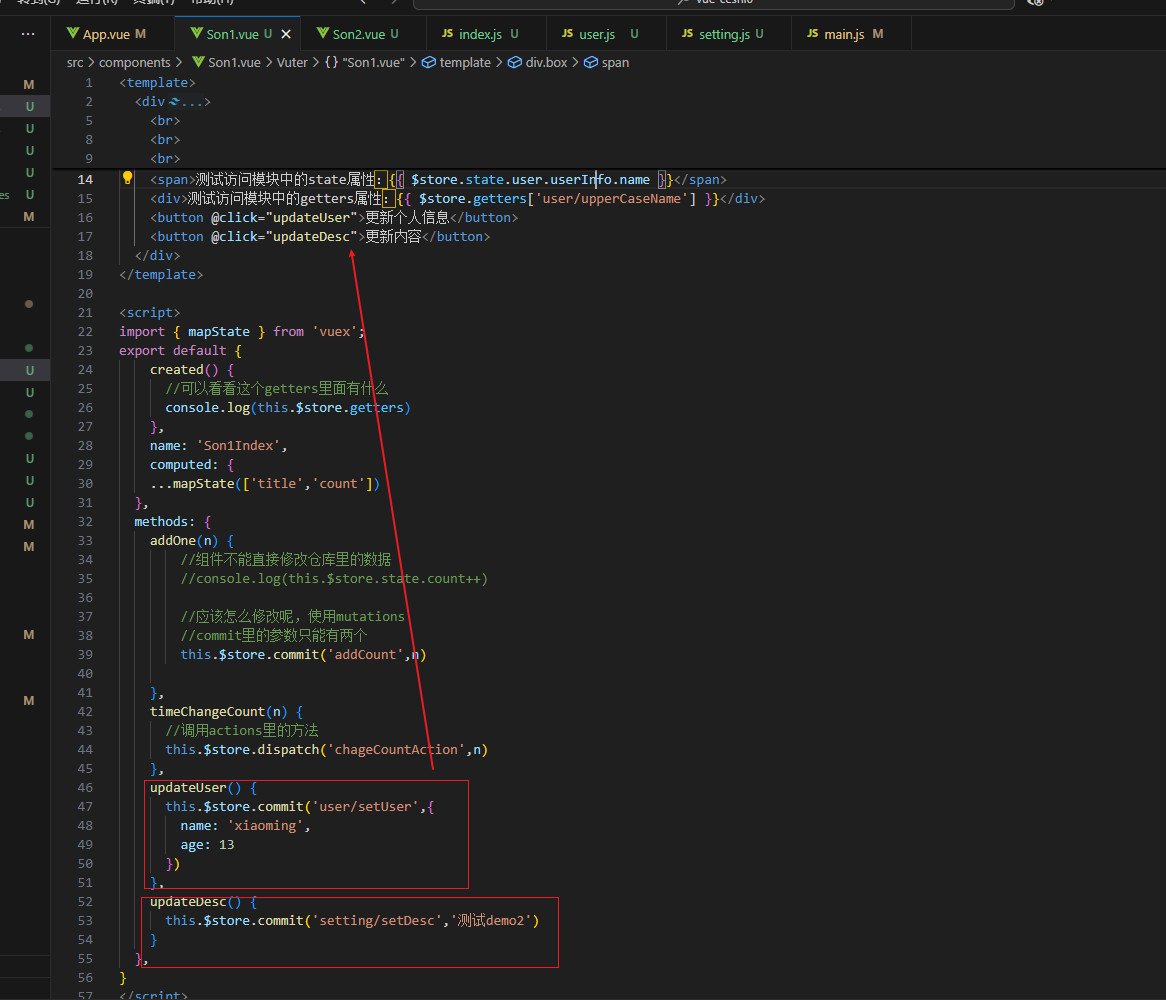
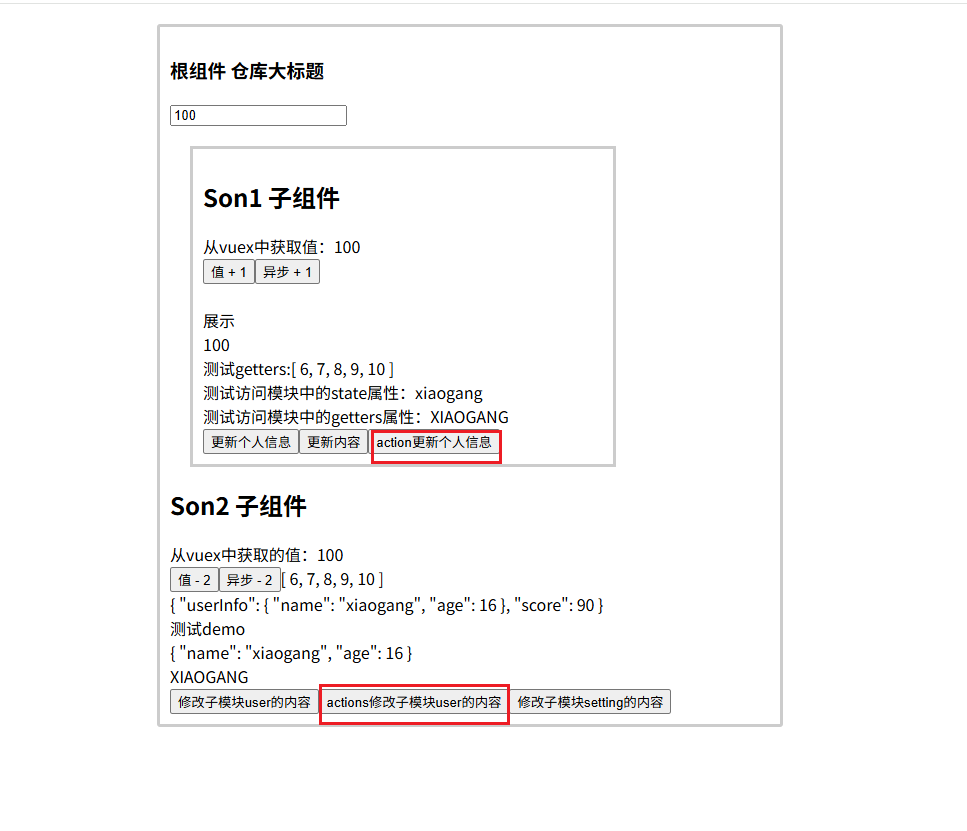
vuex修改模块中的数据-mutations,actions
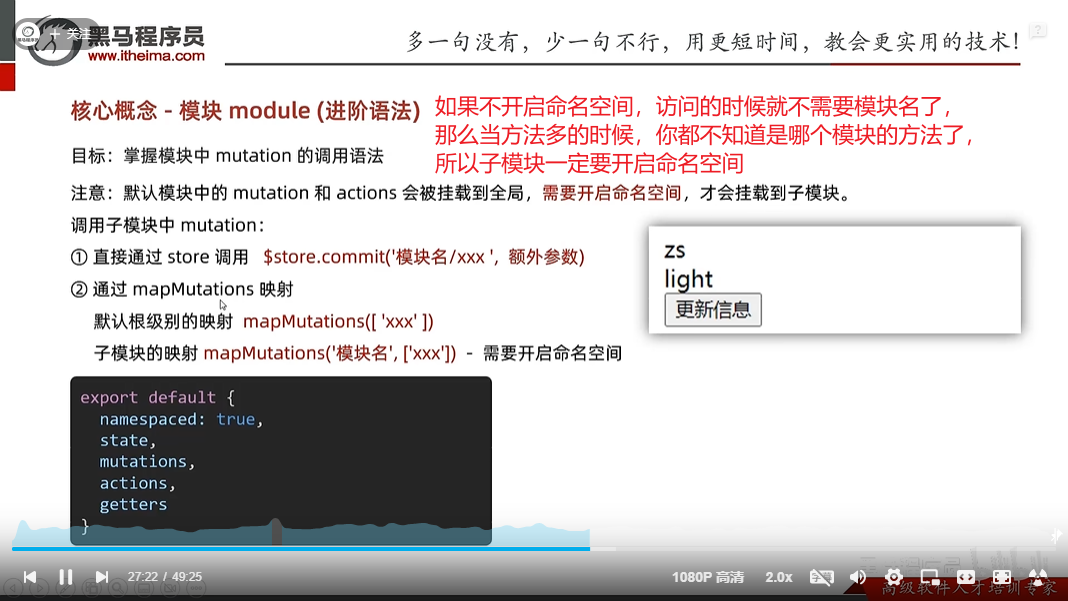
方式一:原生
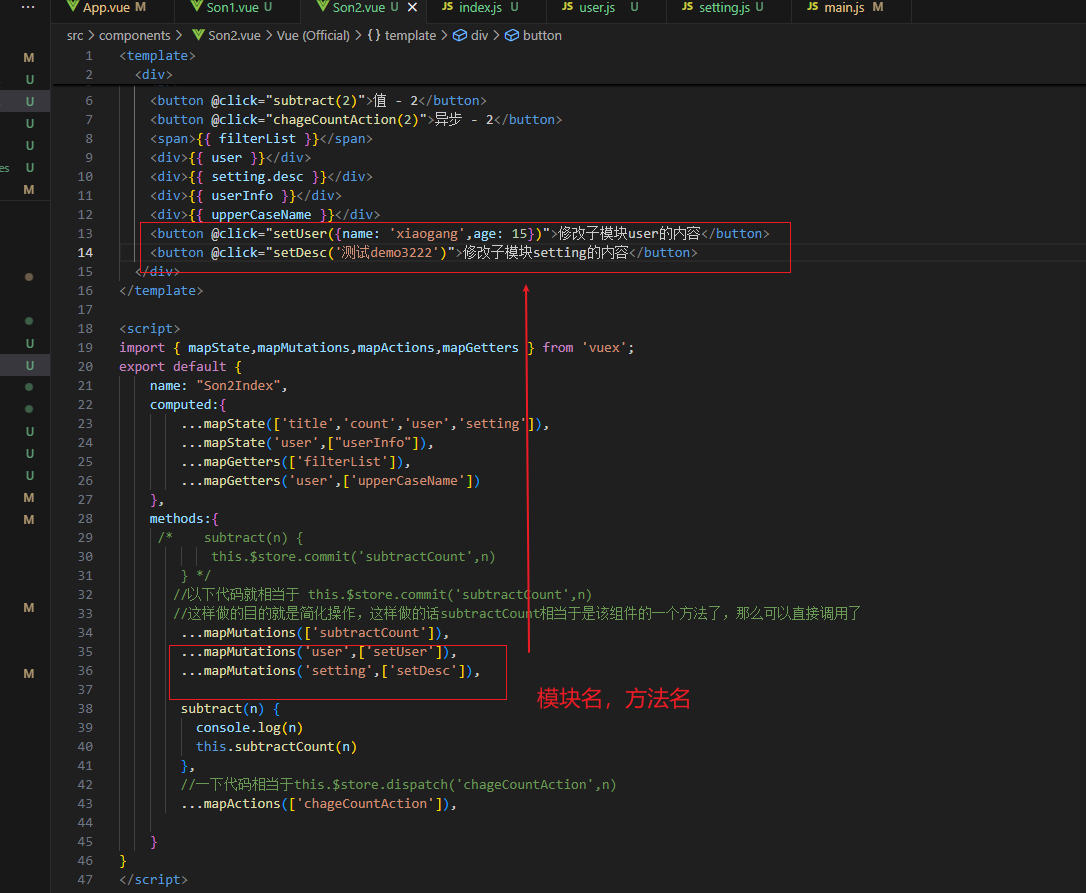
方式二:辅助函数
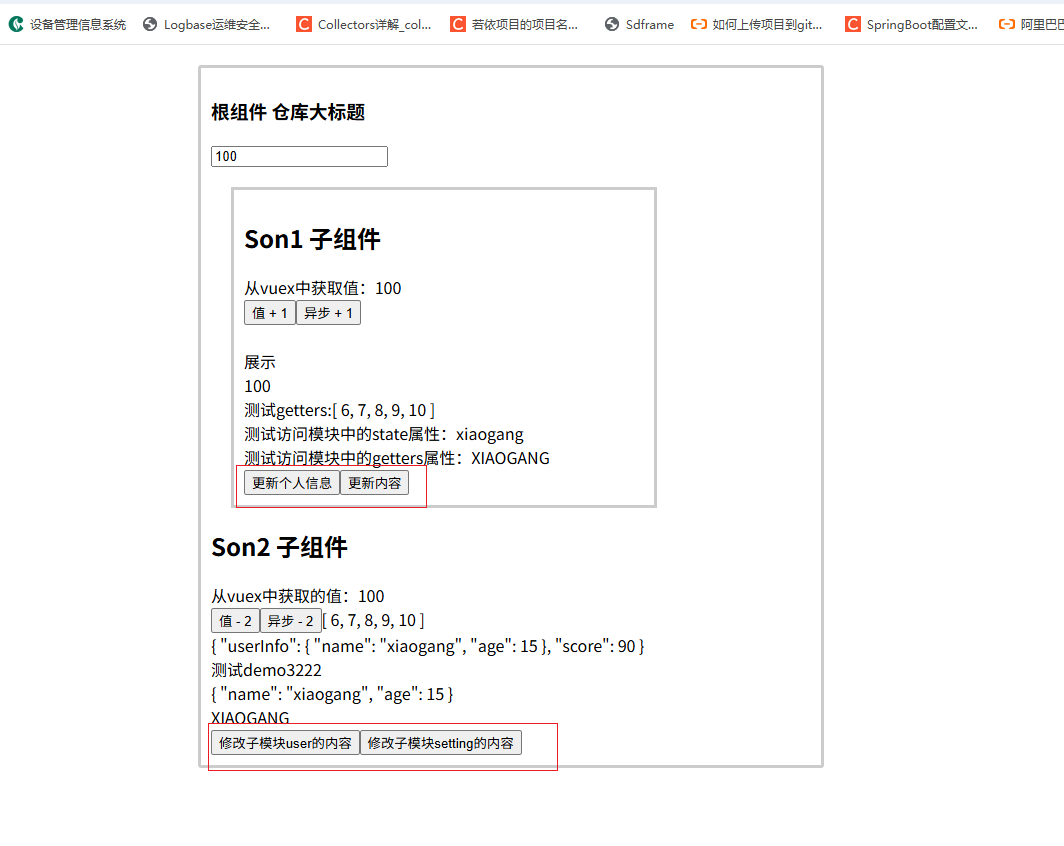
使用actions
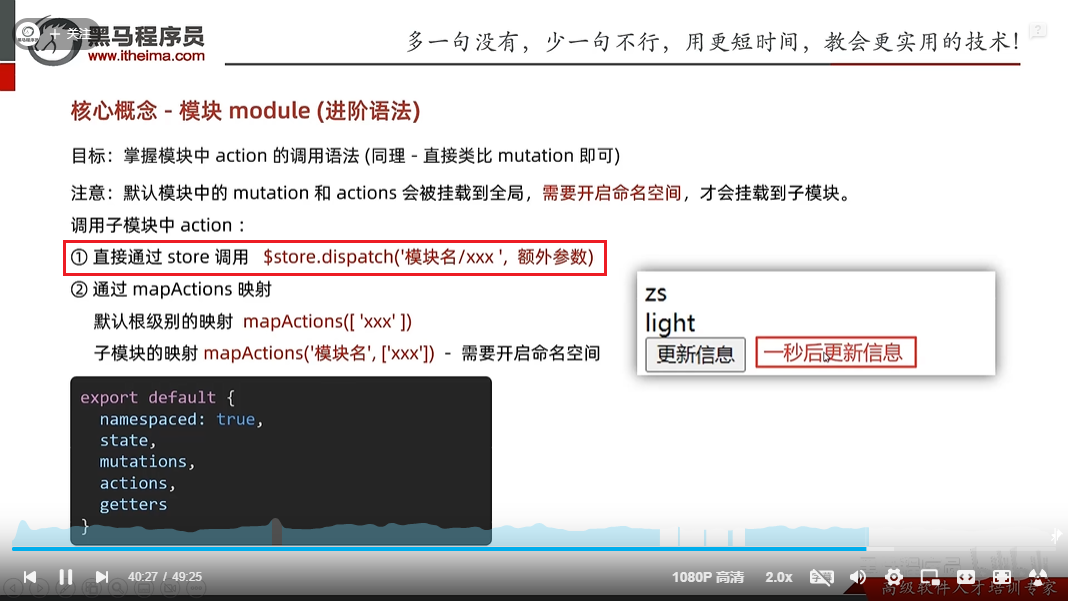
第一种方式原生:
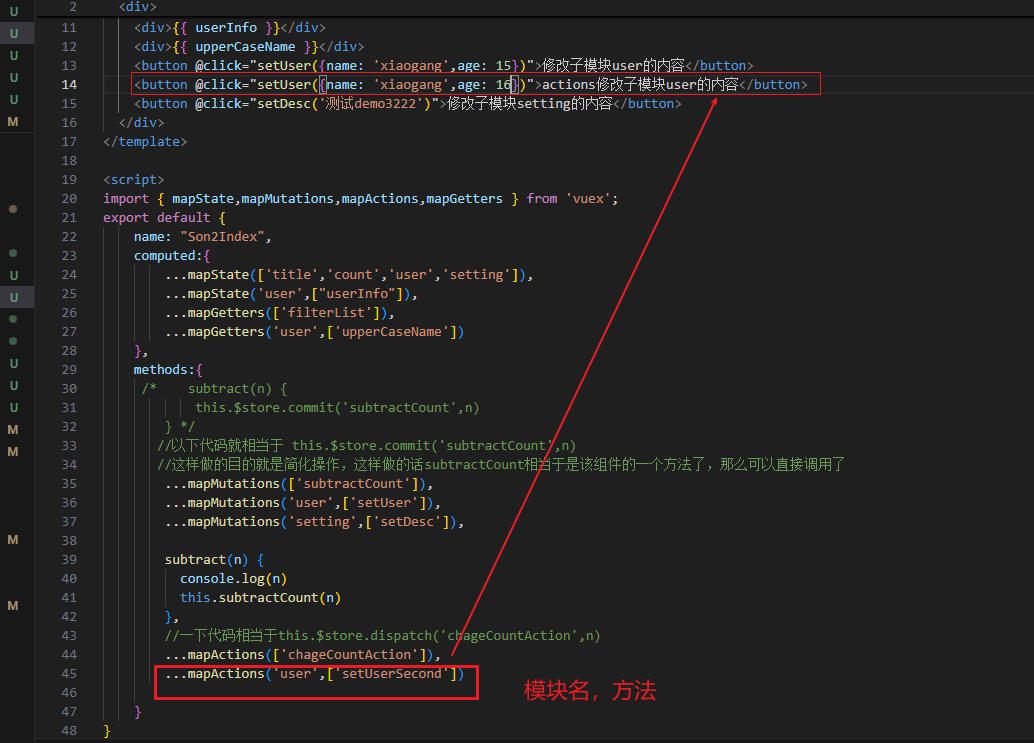
第二种方式:mapActions


 3179
3179

 被折叠的 条评论
为什么被折叠?
被折叠的 条评论
为什么被折叠?
 到【灌水乐园】发言


