


在分析源码之前,我们先分析,哪些地方用到了EventLoop?
- NioServerSocketChannel的连接监听注册
- NioSocketChannel的IO事件注册
NioServerSocketChannel连接监听
在AbstractBootstrap类的initAndRegister()方法中,当NioServerSocketChannel初始化完成后,会调用 case 标记位置的代码进行注册。
final ChannelFuture initAndRegister() {
    Channel channel = null;
    try {
        channel = channelFactory.newChannel();
        init(channel);
    } catch (Throwable t) {

    }
   //注册到boss线程的selector上。
    ChannelFuture regFuture = config().group().register(channel);
    if (regFuture.cause() != null) {
        if (channel.isRegistered()) {
            channel.close();
        } else {
            channel.unsafe().closeForcibly();
        }
    }
    return regFuture;
}
AbstractNioChannel.doRegister
按照代码的执行逻辑,最终会执行到AbstractNioChannel的 doRegister() 方法中。
@Override
protected void doRegister() throws Exception {
    boolean selected = false;
    for (;;) {
        try {
			//调用ServerSocketChannel的register方法,把当前服务端对象注册到boss线程的selector上
            selectionKey = javaChannel().register(eventLoop().unwrappedSelector(), 0, this);
            return;
        } catch (CancelledKeyException e) {
            if (!selected) {
                // Force the Selector to select now as the "canceled" SelectionKey may still be
                // cached and not removed because no Select.select(..) operation was called yet.
                eventLoop().selectNow();
                selected = true;
            } else {
                // We forced a select operation on the selector before but the SelectionKey is still cached
                // for whatever reason. JDK bug ?
                throw e;
            }
        }
    }
}
NioEventLoop的启动过程
NioEventLoop是一个线程,它的启动过程如下。
在AbstractBootstrap的doBind0方法中,获取了NioServerSocketChannel中的NioEventLoop,然后使用它来执行绑定端口的任务。
private static void doBind0(
    final ChannelFuture regFuture, final Channel channel,
    final SocketAddress localAddress, final ChannelPromise promise) {

    //启动
    channel.eventLoop().execute(new Runnable() {
        @Override
        public void run() {
            if (regFuture.isSuccess()) {
                channel.bind(localAddress, promise).addListener(ChannelFutureListener.CLOSE_ON_FAILURE);
            } else {
                promise.setFailure(regFuture.cause());
            }
        }
    });
}
SingleThreadEventExecutor.execute
然后一路执行到
SingleThreadEventExecutor.execute方法中,调用 startThread() 方法启动线程。
private void execute(Runnable task, boolean immediate) {
    boolean inEventLoop = inEventLoop();
    addTask(task);
    if (!inEventLoop) {
        startThread(); //启动线程
        if (isShutdown()) {
            boolean reject = false;
            try {
                if (removeTask(task)) {
                    reject = true;
                }
            } catch (UnsupportedOperationException e) {
                // The task queue does not support removal so the best thing we can do is to just move on and
                // hope we will be able to pick-up the task before its completely terminated.
                // In worst case we will log on termination.
            }
            if (reject) {
                reject();
            }
        }
    }

    if (!addTaskWakesUp && immediate) {
        wakeup(inEventLoop);
    }
}
startThread
private void startThread() {
    if (state == ST_NOT_STARTED) {
        if (STATE_UPDATER.compareAndSet(this, ST_NOT_STARTED, ST_STARTED)) {
            boolean success = false;
            try {
                doStartThread(); //执行启动过程
                success = true;
            } finally {
                if (!success) {
                    STATE_UPDATER.compareAndSet(this, ST_STARTED, ST_NOT_STARTED);
                }
            }
        }
    }
}
接着调用doStartThread()方法,通过 executor.execute 执行一个任务,在该任务中启动了NioEventLoop线程
private void doStartThread() {
    assert thread == null;
    executor.execute(new Runnable() { //通过线程池执行一个任务
        @Override
        public void run() {
            thread = Thread.currentThread();
            if (interrupted) {
                thread.interrupt();
            }

            boolean success = false;
            updateLastExecutionTime();
            try {
                SingleThreadEventExecutor.this.run(); //调用boss的NioEventLoop的run方法,开启轮询
            }
            //省略....
        }
    });
}
NioEventLoop的轮询过程
当NioEventLoop线程被启动后,就直接进入到NioEventLoop的run方法中。
protected void run() {
    int selectCnt = 0;
    for (;;) {
        try {
            int strategy;
            try {
                strategy = selectStrategy.calculateStrategy(selectNowSupplier, hasTasks());
                switch (strategy) {
                    case SelectStrategy.CONTINUE:
                        continue;

                    case SelectStrategy.BUSY_WAIT:

                    case SelectStrategy.SELECT:
                        long curDeadlineNanos = nextScheduledTaskDeadlineNanos();
                        if (curDeadlineNanos == -1L) {
                            curDeadlineNanos = NONE; // nothing on the calendar
                        }
                        nextWakeupNanos.set(curDeadlineNanos);
                        try {
                            if (!hasTasks()) {
                                strategy = select(curDeadlineNanos);
                            }
                        } finally {
                            // This update is just to help block unnecessary selector wakeups
                            // so use of lazySet is ok (no race condition)
                            nextWakeupNanos.lazySet(AWAKE);
                        }
                        // fall through
                    default:
                }
            } catch (IOException e) {
                // If we receive an IOException here its because the Selector is messed up. Let's rebuild
                // the selector and retry. https://github.com/netty/netty/issues/8566
                rebuildSelector0();
                selectCnt = 0;
                handleLoopException(e);
                continue;
            }

            selectCnt++;
            cancelledKeys = 0;
            needsToSelectAgain = false;
            final int ioRatio = this.ioRatio;
            boolean ranTasks;
            if (ioRatio == 100) {
                try {
                    if (strategy > 0) {
                        processSelectedKeys();
                    }
                } finally {
                    // Ensure we always run tasks.
                    ranTasks = runAllTasks();
                }
            } else if (strategy > 0) {
                final long ioStartTime = System.nanoTime();
                try {
                    processSelectedKeys();
                } finally {
                    // Ensure we always run tasks.
                    final long ioTime = System.nanoTime() - ioStartTime;
                    ranTasks = runAllTasks(ioTime * (100 - ioRatio) / ioRatio);
                }
            } else {
                ranTasks = runAllTasks(0); // This will run the minimum number of tasks
            }

            if (ranTasks || strategy > 0) {
                if (selectCnt > MIN_PREMATURE_SELECTOR_RETURNS && logger.isDebugEnabled()) {
                    logger.debug("Selector.select() returned prematurely {} times in a row for Selector {}.",
                                 selectCnt - 1, selector);
                }
                selectCnt = 0;
            } else if (unexpectedSelectorWakeup(selectCnt)) { // Unexpected wakeup (unusual case)
                selectCnt = 0;
            }
        } catch (CancelledKeyException e) {
            // Harmless exception - log anyway
            if (logger.isDebugEnabled()) {
                logger.debug(CancelledKeyException.class.getSimpleName() + " raised by a Selector {} - JDK bug?",
                             selector, e);
            }
        } catch (Error e) {
            throw (Error) e;
        } catch (Throwable t) {
            handleLoopException(t);
        } finally {
            // Always handle shutdown even if the loop processing threw an exception.
            try {
                if (isShuttingDown()) {
                    closeAll();
                    if (confirmShutdown()) {
                        return;
                    }
                }
            } catch (Error e) {
                throw (Error) e;
            } catch (Throwable t) {
                handleLoopException(t);
            }
        }
    }
}
NioEventLoop的执行流程
NioEventLoop中的run方法是一个无限循环的线程,在该循环中主要做三件事情,如图9-1所示。
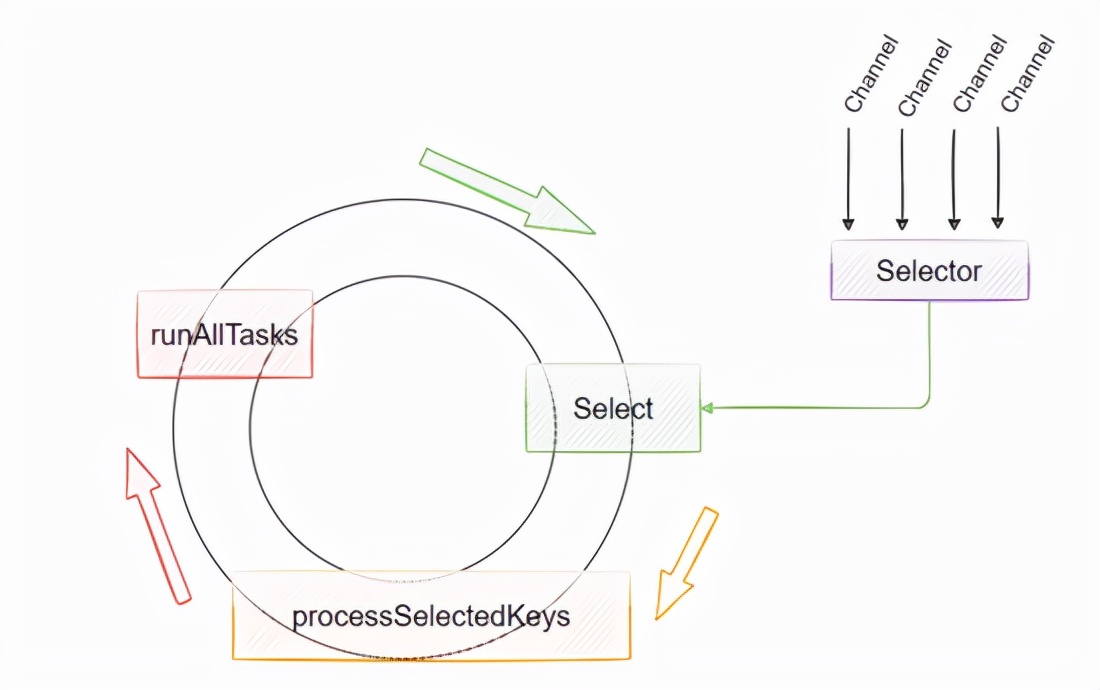
图9-1
processSelectedKeys
轮询I/O就绪事件
我们先来看I/O时间相关的代码片段:
selectStrategy.calculateStrategy(selectNowSupplier, hasTasks())
protected void run() {
        int selectCnt = 0;
        for (;;) {
            try {
                int strategy;
                try {
                    strategy = selectStrategy.calculateStrategy(selectNowSupplier, hasTasks());
                    switch (strategy) {
                    case SelectStrategy.CONTINUE:
                        continue;

                    case SelectStrategy.BUSY_WAIT:
                        // fall-through to SELECT since the busy-wait is not supported with NIO

                    case SelectStrategy.SELECT:
                        long curDeadlineNanos = nextScheduledTaskDeadlineNanos();
                        if (curDeadlineNanos == -1L) {
                            curDeadlineNanos = NONE; // nothing on the calendar
                        }
                        nextWakeupNanos.set(curDeadlineNanos);
                        try {
                            if (!hasTasks()) {
                                strategy = select(curDeadlineNanos);
                            }
                        } finally {
                            // This update is just to help block unnecessary selector wakeups
                            // so use of lazySet is ok (no race condition)
                            nextWakeupNanos.lazySet(AWAKE);
                        }
                        // fall through
                    default:
                    }
                }
                //省略....
            }
        }
}
selectStrategy处理逻辑
@Override
public int calculateStrategy(IntSupplier selectSupplier, boolean hasTasks) throws Exception {
    return hasTasks ? selectSupplier.get() : SelectStrategy.SELECT;
}
如果 hasTasks 为true,表示当前NioEventLoop线程存在异步任务的情况下,则调用 selectSupplier.get() ,否则直接返回 SELECT 。
其中 selectSupplier.get() 的定义如下:
private final IntSupplier selectNowSupplier = new IntSupplier() {
    @Override
    public int get() throws Exception {
        return selectNow();
    }
};
该方法中调用的是 selectNow() 方法,这个方法是Selector选择器中的提供的非阻塞方法,执行后会立刻返回。
- 如果当前已经有就绪的Channel,则会返回对应就绪Channel的数量
- 否则,返回0.
分支处理
在上面一个步骤中获得了strategy之后,会根据不同的结果进行分支处理。
- CONTINUE,表示需要重试。
- BUSY_WAIT,由于在NIO中并不支持BUSY_WAIT,所以BUSY_WAIT和SELECT的执行逻辑是一样的
- SELECT,表示需要通过select方法获取就绪的Channel列表,当NioEventLoop中不存在异步任务时,也就是任务队列为空,则返回该策略。
switch (strategy) {
    case SelectStrategy.CONTINUE:
        continue;

    case SelectStrategy.BUSY_WAIT:
        // fall-through to SELECT since the busy-wait is not supported with NIO

    case SelectStrategy.SELECT:
        long curDeadlineNanos = nextScheduledTaskDeadlineNanos();
        if (curDeadlineNanos == -1L) {
            curDeadlineNanos = NONE; // nothing on the calendar
        }
        nextWakeupNanos.set(curDeadlineNanos);
        try {
            if (!hasTasks()) {
                strategy = select(curDeadlineNanos);
            }
        } finally {
            // This update is just to help block unnecessary selector wakeups
            // so use of lazySet is ok (no race condition)
            nextWakeupNanos.lazySet(AWAKE);
        }
        // fall through
    default:
}
SelectStrategy.SELECT
当NioEventLoop线程中不存在异步任务时,则开始执行SELECT策略
//下一次定时任务触发截至时间,默认不是定时任务,返回 -1L
long curDeadlineNanos = nextScheduledTaskDeadlineNanos();
if (curDeadlineNanos == -1L) {
    curDeadlineNanos = NONE; // nothing on the calendar
}
nextWakeupNanos.set(curDeadlineNanos);
try {
    if (!hasTasks()) {
        //2. taskQueue中任务执行完,开始执行select进行阻塞
        strategy = select(curDeadlineNanos);
    }
} finally {
    // This update is just to help block unnecessary selector wakeups
    // so use of lazySet is ok (no race condition)
    nextWakeupNanos.lazySet(AWAKE);
}
select方法定义如下,默认情况下 deadlineNanos=NONE ,所以会调用 select() 方法阻塞。
private int select(long deadlineNanos) throws IOException {
    if (deadlineNanos == NONE) {
        return selector.select();
    }
    //计算select()方法的阻塞超时时间
    long timeoutMillis = deadlineToDelayNanos(deadlineNanos + 995000L) / 1000000L;
    return timeoutMillis <= 0 ? selector.selectNow() : selector.select(timeoutMillis);
}
最终返回就绪的channel个数,后续的逻辑中会根据返回的就绪channel个数来决定执行逻辑。
NioEventLoop.run中的业务处理
业务处理的逻辑相对来说比较容易理解
- 如果有就绪的channel,则处理就绪channel的IO事件
- 处理完成后同步执行异步队列中的任务。
- 另外,这里为了解决Java NIO中的空转问题,通过selectCnt记录了空转次数,一次循环发生了空转(既没有IO需要处理、也没有执行任何任务),那么记录下来(selectCnt); ,如果连续发生空转(selectCnt达到一定值),netty认为触发了NIO的BUG(unexpectedSelectorWakeup处理);
Java Nio中有一个bug,Java nio在Linux系统下的epoll空轮询问题。也就是在 select() 方法中,及时就绪的channel为0,也会从本来应该阻塞的操作中被唤醒,从而导致CPU 使用率达到100%。
@Override
protected void run() {
    int selectCnt = 0;
    for (;;) {
        //省略....
        selectCnt++;//selectCnt记录的是无功而返的select次数,即eventLoop空转的次数,为解决NIO BUG
        cancelledKeys = 0;
        needsToSelectAgain = false;
        final int ioRatio = this.ioRatio;
        boolean ranTasks;
        if (ioRatio == 100) { //ioRadio执行时间占比是100%,默认是50%
            try {
                if (strategy > 0) { //strategy>0表示存在就绪的SocketChannel
                    processSelectedKeys(); //执行就绪SocketChannel的任务
                }
            } finally {
             //注意,将ioRatio设置为100,并不代表任务不执行,反而是每次将任务队列执行完
                ranTasks = runAllTasks(); //确保总是执行队列中的任务
            }
        } else if (strategy > 0) { //strategy>0表示存在就绪的SocketChannel
            final long ioStartTime = System.nanoTime(); //io时间处理开始时间
            try {
                processSelectedKeys(); //开始处理IO就绪事件
            } finally {
                // io事件执行结束时间
                final long ioTime = System.nanoTime() - ioStartTime;
                //基于本次循环处理IO的时间,ioRatio,计算出执行任务耗时的上限,也就是只允许处理多长时间异步任务
                ranTasks = runAllTasks(ioTime * (100 - ioRatio) / ioRatio);
            }
        } else {
            //这个分支代表:strategy=0,ioRatio<100,此时任务限时=0,意为:尽量少地执行异步任务
            //这个分支和strategy>0实际是一码事,代码简化了一下而已
            ranTasks = runAllTasks(0); // This will run the minimum number of tasks
        }

        if (ranTasks || strategy > 0) { //ranTasks=true,或strategy>0,说明eventLoop干活了,没有空转,清空selectCnt
            if (selectCnt > MIN_PREMATURE_SELECTOR_RETURNS && logger.isDebugEnabled()) {
                logger.debug("Selector.select() returned prematurely {} times in a row for Selector {}.",
                             selectCnt - 1, selector);
            }
            selectCnt = 0;
        }
         //unexpectedSelectorWakeup处理NIO BUG
        else if (unexpectedSelectorWakeup(selectCnt)) { // Unexpected wakeup (unusual case)
            selectCnt = 0;
        }
    }
}
processSelectedKeys
通过在 select 方法中,我们可以获得就绪的I/O事件数量,从而触发执行 processSelectedKeys 方法。
private void processSelectedKeys() {
    if (selectedKeys != null) {
        processSelectedKeysOptimized();
    } else {
        processSelectedKeysPlain(selector.selectedKeys());
    }
}
处理I/O事件时,有两个逻辑分支处理:
- 一种是处理Netty优化过的selectedKeys,
- 另一种是正常的处理逻辑
processSelectedKeys方法中根据是否设置了 selectedKeys 来判断使用哪种策略,默认使用的是Netty优化过的selectedKeys,它返回的对象是 SelectedSelectionKeySet 。
processSelectedKeysOptimized
private void processSelectedKeysOptimized() {
    for (int i = 0; i < selectedKeys.size; ++i) {
        //1. 取出IO事件以及对应的channel
        final SelectionKey k = selectedKeys.keys[i];
        selectedKeys.keys[i] = null;//k的引用置null,便于gc回收,也表示该channel的事件处理完成避免重复处理

        final Object a = k.attachment(); //获取保存在当前channel中的attachment,此时应该是NioServerSocketChannel
		//处理当前的channel
        if (a instanceof AbstractNioChannel) {
             //对于boss NioEventLoop,轮询到的基本是连接事件,后续的事情就是通过他的pipeline将连接扔给一个worker NioEventLoop处理
            //对于worker NioEventLoop来说,轮循道的基本商是IO读写事件,后续的事情就是通过他的pipeline将读取到的字节流传递给每个channelHandler来处理
            processSelectedKey(k, (AbstractNioChannel) a);
        } else {
            @SuppressWarnings("unchecked")
            NioTask<SelectableChannel> task = (NioTask<SelectableChannel>) a;
            processSelectedKey(k, task);
        }

        if (needsToSelectAgain) {
            // null out entries in the array to allow to have it GC'ed once the Channel close
            // See https://github.com/netty/netty/issues/2363
            selectedKeys.reset(i + 1);

            selectAgain();
            i = -1;
        }
    }
}
processSelectedKey
private void processSelectedKey(SelectionKey k, AbstractNioChannel ch) {
    final AbstractNioChannel.NioUnsafe unsafe = ch.unsafe();
    if (!k.isValid()) {
        final EventLoop eventLoop;
        try {
            eventLoop = ch.eventLoop();
        } catch (Throwable ignored) {

        }
        if (eventLoop == this) {
            // close the channel if the key is not valid anymore
            unsafe.close(unsafe.voidPromise());
        }
        return;
    }

    try {
        int readyOps = k.readyOps(); //获取当前key所属的操作类型

        if ((readyOps & SelectionKey.OP_CONNECT) != 0) {//如果是连接类型
            int ops = k.interestOps();
            ops &= ~SelectionKey.OP_CONNECT;
            k.interestOps(ops);

            unsafe.finishConnect();
        }
        if ((readyOps & SelectionKey.OP_WRITE) != 0) { //如果是写类型
            ch.unsafe().forceFlush();
        }
		//如果是读类型或者ACCEPT类型。则执行unsafe.read()方法,unsafe的实例对象为 NioMessageUnsafe
        if ((readyOps & (SelectionKey.OP_READ | SelectionKey.OP_ACCEPT)) != 0 || readyOps == 0) {
            unsafe.read();
        }
    } catch (CancelledKeyException ignored) {
        unsafe.close(unsafe.voidPromise());
    }
}
NioMessageUnsafe.read()
假设此时是一个读操作,或者是客户端建立连接,那么代码执行逻辑如下,
@Override
public void read() {
    assert eventLoop().inEventLoop();
    final ChannelConfig config = config();
    final ChannelPipeline pipeline = pipeline(); //如果是第一次建立连接,此时的pipeline是ServerBootstrapAcceptor
    final RecvByteBufAllocator.Handle allocHandle = unsafe().recvBufAllocHandle();
    allocHandle.reset(config);

    boolean closed = false;
    Throwable exception = null;
    try {
        try {
            do {
                int localRead = doReadMessages(readBuf);
                if (localRead == 0) {
                    break;
                }
                if (localRead < 0) {
                    closed = true;
                    break;
                }

                allocHandle.incMessagesRead(localRead);
            } while (continueReading(allocHandle));
        } catch (Throwable t) {
            exception = t;
        }

        int size = readBuf.size();
        for (int i = 0; i < size; i ++) {
            readPending = false;
            pipeline.fireChannelRead(readBuf.get(i));  //调用pipeline中的channelRead方法
        }
        readBuf.clear();
        allocHandle.readComplete();
        pipeline.fireChannelReadComplete();

        if (exception != null) {
            closed = closeOnReadError(exception);

            pipeline.fireExceptionCaught(exception); //调用pipeline中的ExceptionCaught方法
        }

        if (closed) {
            inputShutdown = true;
            if (isOpen()) {
                close(voidPromise());
            }
        }
    } finally {
        if (!readPending && !config.isAutoRead()) {
            removeReadOp();
        }
    }
}
SelectedSelectionKeySet的优化
Netty中自己封装实现了一个SelectedSelectionKeySet,用来优化原本SelectorKeys的结构,它是怎么进行优化的呢?先来看它的代码定义
final class SelectedSelectionKeySet extends AbstractSet<SelectionKey> {

    SelectionKey[] keys;
    int size;

    SelectedSelectionKeySet() {
        keys = new SelectionKey[1024];
    }

    @Override
    public boolean add(SelectionKey o) {
        if (o == null) {
            return false;
        }

        keys[size++] = o;
        if (size == keys.length) {
            increaseCapacity();
        }

        return true;
    }
}
SelectedSelectionKeySet内部使用的是SelectionKey数组,所有在
processSelectedKeysOptimized方法中可以直接通过遍历数组来取出就绪的I/O事件。
而原来的 Set<SelectionKey> 返回的是HashSet类型,两者相比,SelectionKey[]不需要考虑哈希冲突的问题,所以可以实现O(1)时间复杂度的add操作。
SelectedSelectionKeySet的初始化
netty通过反射的方式,把Selector对象内部的selectedKeys和publicSelectedKeys替换为SelectedSelectionKeySet。
原本的selectedKeys和publicSelectedKeys这两个字段都是HashSet类型,替换之后变成了SelectedSelectionKeySet。当有就绪的key时,会直接填充到SelectedSelectionKeySet的数组中。后续只需要遍历即可。
private SelectorTuple openSelector() {
    final Class<?> selectorImplClass = (Class<?>) maybeSelectorImplClass;
    final SelectedSelectionKeySet selectedKeySet = new SelectedSelectionKeySet();
    //使用反射
    Object maybeException = AccessController.doPrivileged(new PrivilegedAction<Object>() {
        @Override
        public Object run() {
            try {
                //Selector内部的selectedKeys字段
                Field selectedKeysField = selectorImplClass.getDeclaredField("selectedKeys");
                //Selector内部的publicSelectedKeys字段
                Field publicSelectedKeysField = selectorImplClass.getDeclaredField("publicSelectedKeys");

                if (PlatformDependent.javaVersion() >= 9 && PlatformDependent.hasUnsafe()) {
                    //获取selectedKeysField字段偏移量
                    long selectedKeysFieldOffset = PlatformDependent.objectFieldOffset(selectedKeysField);
                    //获取publicSelectedKeysField字段偏移量
                    long publicSelectedKeysFieldOffset =
                        PlatformDependent.objectFieldOffset(publicSelectedKeysField);

                    if (selectedKeysFieldOffset != -1 && publicSelectedKeysFieldOffset != -1) {
                        //替换为selectedKeySet
                        PlatformDependent.putObject(
                            unwrappedSelector, selectedKeysFieldOffset, selectedKeySet);
                        PlatformDependent.putObject(
                            unwrappedSelector, publicSelectedKeysFieldOffset, selectedKeySet);
                        return null;
                    }
                    // We could not retrieve the offset, lets try reflection as last-resort.
                }
                Throwable cause = ReflectionUtil.trySetAccessible(selectedKeysField, true);
                if (cause != null) {
                    return cause;
                }
                cause = ReflectionUtil.trySetAccessible(publicSelectedKeysField, true);
                if (cause != null) {
                    return cause;
                }
                selectedKeysField.set(unwrappedSelector, selectedKeySet);
                publicSelectedKeysField.set(unwrappedSelector, selectedKeySet);
                return null;
            } catch (NoSuchFieldException e) {
                return e;
            } catch (IllegalAccessException e) {
                return e;
            }
        }
    });
    if (maybeException instanceof Exception) {
        selectedKeys = null;
        Exception e = (Exception) maybeException;
        logger.trace("failed to instrument a special java.util.Set into: {}", unwrappedSelector, e);
        return new SelectorTuple(unwrappedSelector);
    }
    selectedKeys = selectedKeySet;
}
异步任务的执行流程
分析完上面的流程后,我们继续来看NioEventLoop中的run方法中,针对异步任务的处理流程
@Override
protected void run() {
    int selectCnt = 0;
    for (;;) {
        ranTasks = runAllTasks();
    }
}
runAllTask
需要注意,NioEventLoop可以支持定时任务的执行,通过 nioEventLoop.schedule() 来完成。
protected boolean runAllTasks() {
    assert inEventLoop();
    boolean fetchedAll;
    boolean ranAtLeastOne = false;

    do {
        fetchedAll = fetchFromScheduledTaskQueue(); //合并定时任务到普通任务队列
        if (runAllTasksFrom(taskQueue)) { //循环执行taskQueue中的任务
            ranAtLeastOne = true;
        }
    } while (!fetchedAll);

    if (ranAtLeastOne) { //如果任务全部执行完成,记录执行完完成时间
        lastExecutionTime = ScheduledFutureTask.nanoTime();
    }
    afterRunningAllTasks();//执行收尾任务
    return ranAtLeastOne;
}
fetchFromScheduledTaskQueue
遍历scheduledTaskQueue中的任务,添加到taskQueue中。
private boolean fetchFromScheduledTaskQueue() {
    if (scheduledTaskQueue == null || scheduledTaskQueue.isEmpty()) {
        return true;
    }
    long nanoTime = AbstractScheduledEventExecutor.nanoTime();
    for (;;) {
        Runnable scheduledTask = pollScheduledTask(nanoTime);
        if (scheduledTask == null) {
            return true;
        }
        if (!taskQueue.offer(scheduledTask)) {
            // No space left in the task queue add it back to the scheduledTaskQueue so we pick it up again.
            scheduledTaskQueue.add((ScheduledFutureTask<?>) scheduledTask);
            return false;
        }
    }
}
任务添加方法execute
NioEventLoop内部有两个非常重要的异步任务队列,分别是普通任务和定时任务队列,针对这两个队列提供了两个方法分别向两个队列中添加任务。
- execute()
- schedule()
其中,execute方法的定义如下。
private void execute(Runnable task, boolean immediate) {
    boolean inEventLoop = inEventLoop();
    addTask(task); //把当前任务添加到阻塞队列中
    if (!inEventLoop) { //如果是非NioEventLoop
        startThread(); //启动线程
        if (isShutdown()) { //如果当前NioEventLoop已经是停止状态
            boolean reject = false;
            try {
                if (removeTask(task)) {
                    reject = true;
                }
            } catch (UnsupportedOperationException e) {
                // The task queue does not support removal so the best thing we can do is to just move on and
                // hope we will be able to pick-up the task before its completely terminated.
                // In worst case we will log on termination.
            }
            if (reject) {
                reject();
            }
        }
    }

    if (!addTaskWakesUp && immediate) {
        wakeup(inEventLoop);
    }
}
Nio的空轮转问题
所谓的空轮训,是指我们在执行 selector.select() 方法时,如果没有就绪的SocketChannel时,当前线程会被阻塞 。 而空轮询是指当没有就绪SocketChannel时,会被触发唤醒。
而这个唤醒是没有任何读写请求的,从而导致线程在做无效的轮询,使得CPU占用率较高。
导致这个问题的根本原因是:
在部分Linux的2.6的kernel中,poll和epoll对于突然中断的连接socket会对返回的eventSet事件集合置为POLLHUP,也可能是POLLERR,eventSet事件集合发生了变化,这就可能导致Selector会被唤醒。这是与操作系统机制有关系的,JDK虽然仅仅是一个兼容各个操作系统平台的软件,但很遗憾在JDK5和JDK6最初的版本中(严格意义上来将,JDK部分版本都是),这个问题并没有解决,而将这个帽子抛给了操作系统方,这也就是这个bug最终一直到2013年才最终修复的原因,最终影响力太广。
Netty是如何解决这个问题的呢?我们回到NioEventLoop的run方法中
@Override
protected void run() {
    int selectCnt = 0;
    for (;;) {
        //selectCnt记录的是无功而返的select次数,即eventLoop空转的次数,为解决NIO BUG
        selectCnt++;
        //ranTasks=true,或strategy>0,说明eventLoop干活了,没有空转,清空selectCnt
        if (ranTasks || strategy > 0) {
            //如果选择操作计数器的值,大于最小选择器重构阈值,则输出log
            if (selectCnt > MIN_PREMATURE_SELECTOR_RETURNS && logger.isDebugEnabled()) {
                logger.debug("Selector.select() returned prematurely {} times in a row for Selector {}.",
                             selectCnt - 1, selector);
            }
            selectCnt = 0;
        }
        //unexpectedSelectorWakeup处理NIO BUG
        else if (unexpectedSelectorWakeup(selectCnt)) { // Unexpected wakeup (unusual case)
            selectCnt = 0;
        }
    }
}
unexpectedSelectorWakeup
private boolean unexpectedSelectorWakeup(int selectCnt) {
    if (Thread.interrupted()) {
        if (logger.isDebugEnabled()) {
            logger.debug("Selector.select() returned prematurely because " +
                         "Thread.currentThread().interrupt() was called. Use " +
                         "NioEventLoop.shutdownGracefully() to shutdown the NioEventLoop.");
        }
        return true;
    }
    //如果选择重构的阈值大于0, 默认值是512次、 并且当前触发的空轮询次数大于 512次。,则触发重构
    if (SELECTOR_AUTO_REBUILD_THRESHOLD > 0 &&
        selectCnt >= SELECTOR_AUTO_REBUILD_THRESHOLD) {
        // The selector returned prematurely many times in a row.
        // Rebuild the selector to work around the problem.
        logger.warn("Selector.select() returned prematurely {} times in a row; rebuilding Selector {}.",
                    selectCnt, selector);
        rebuildSelector();
        return true;
    }
    return false;
}
rebuildSelector()
public void rebuildSelector() {
    if (!inEventLoop()) { //如果不是在eventLoop中执行,则使用异步线程执行
        execute(new Runnable() {
            @Override
            public void run() {
                rebuildSelector0();
            }
        });
        return;
    }
    rebuildSelector0();
}
rebuildSelector0
这个方法的主要作用: 重新创建一个选择器,替代当前事件循环中的选择器
private void rebuildSelector0() {
    final Selector oldSelector = selector; //获取老的selector选择器
    final SelectorTuple newSelectorTuple; //定义新的选择器

    if (oldSelector == null) { //如果老的选择器为空,直接返回
        return;
    }

    try {
        newSelectorTuple = openSelector(); //创建一个新的选择器
    } catch (Exception e) {
        logger.warn("Failed to create a new Selector.", e);
        return;
    }

    // Register all channels to the new Selector.
    int nChannels = 0;
    for (SelectionKey key: oldSelector.keys()) {//遍历注册到选择器的选择key集合
        Object a = key.attachment();
        try {
             //如果选择key无效或选择关联的通道已经注册到新的选择器,则跳出当前循环
            if (!key.isValid() || key.channel().keyFor(newSelectorTuple.unwrappedSelector) != null) {
                continue;
            }
 			//获取key的选择关注事件集
            int interestOps = key.interestOps();
            key.cancel();//取消选择key
	      //注册选择key到新的选择器
            SelectionKey newKey = key.channel().register(newSelectorTuple.unwrappedSelector, interestOps, a);
            if (a instanceof AbstractNioChannel) {//如果是nio通道,则更新通道的选择key
                // Update SelectionKey
                ((AbstractNioChannel) a).selectionKey = newKey;
            }
            nChannels ++;
        } catch (Exception e) {
            logger.warn("Failed to re-register a Channel to the new Selector.", e);
            if (a instanceof AbstractNioChannel) {
                AbstractNioChannel ch = (AbstractNioChannel) a;
                ch.unsafe().close(ch.unsafe().voidPromise());
            } else {
                @SuppressWarnings("unchecked")
                NioTask<SelectableChannel> task = (NioTask<SelectableChannel>) a;
                invokeChannelUnregistered(task, key, e);
            }
        }
    }
	//更新当前事件循环选择器
    selector = newSelectorTuple.selector;
    unwrappedSelector = newSelectorTuple.unwrappedSelector;

    try {
        // time to close the old selector as everything else is registered to the new one
        oldSelector.close(); //关闭原始选择器
    } catch (Throwable t) {
        if (logger.isWarnEnabled()) {
            logger.warn("Failed to close the old Selector.", t);
        }
    }

    if (logger.isInfoEnabled()) {
        logger.info("Migrated " + nChannels + " channel(s) to the new Selector.");
    }
}
从上述过程中我们发现,Netty解决NIO空轮转问题的方式,是通过重建Selector对象来完成的,在这个重建过程中,核心是把Selector中所有的SelectionKey重新注册到新的Selector上,从而巧妙的避免了JDK epoll空轮训问题。
连接的建立及处理过程
在9.2.4.3节中,提到了当客户端有连接或者读事件发送到服务端时,会调用NioMessageUnsafe类的read()方法。
public void read() {
    assert eventLoop().inEventLoop();
    final ChannelConfig config = config();
    final ChannelPipeline pipeline = pipeline();
    final RecvByteBufAllocator.Handle allocHandle = unsafe().recvBufAllocHandle();
    allocHandle.reset(config);

    boolean closed = false;
    Throwable exception = null;
    try {
        try {
            do {
                //如果有客户端连接进来,则localRead为1,否则返回0
                int localRead = doReadMessages(readBuf);
                if (localRead == 0) {
                    break;
                }
                if (localRead < 0) {
                    closed = true;
                    break;
                }

                allocHandle.incMessagesRead(localRead); //累计增加read消息数量
            } while (continueReading(allocHandle));
        } catch (Throwable t) {
            exception = t;
        }

        int size = readBuf.size(); //遍历客户端连接列表
        for (int i = 0; i < size; i ++) {
            readPending = false;
            pipeline.fireChannelRead(readBuf.get(i)); //调用pipeline中handler的channelRead方法。
        }
        readBuf.clear(); //清空集合
        allocHandle.readComplete();
        pipeline.fireChannelReadComplete(); //触发pipeline中handler的readComplete方法

        if (exception != null) {
            closed = closeOnReadError(exception);

            pipeline.fireExceptionCaught(exception);
        }

        if (closed) {
            inputShutdown = true;
            if (isOpen()) {
                close(voidPromise());
            }
        }
    } finally {
        if (!readPending && !config.isAutoRead()) {
            removeReadOp();
        }
    }
}
pipeline.fireChannelRead(readBuf.get(i))
继续来看pipeline的触发方法,此时的pipeline组成,如果当前是连接事件,那么pipeline = ServerBootstrap$ServerBootstrapAcceptor。
static void invokeChannelRead(final AbstractChannelHandlerContext next, Object msg) {
    final Object m = next.pipeline.touch(ObjectUtil.checkNotNull(msg, "msg"), next);
    EventExecutor executor = next.executor();
    if (executor.inEventLoop()) {
        next.invokeChannelRead(m); //获取pipeline中的下一个节点,调用该handler的channelRead方法
    } else {
        executor.execute(new Runnable() {
            @Override
            public void run() {
                next.invokeChannelRead(m);
            }
        });
    }
}
ServerBootstrapAcceptor
ServerBootstrapAcceptor是NioServerSocketChannel中一个特殊的Handler,专门用来处理客户端连接事件,该方法中核心的目的是把针对SocketChannel的handler链表,添加到当前NioSocketChannel中的pipeline中。
public void channelRead(ChannelHandlerContext ctx, Object msg) {
    final Channel child = (Channel) msg;

    child.pipeline().addLast(childHandler);  //把服务端配置的childHandler,添加到当前NioSocketChannel中的pipeline中

    setChannelOptions(child, childOptions, logger); //设置NioSocketChannel的属性
    setAttributes(child, childAttrs);

    try {
        //把当前的NioSocketChannel注册到Selector上,并且监听一个异步事件。
        childGroup.register(child).addListener(new ChannelFutureListener() {
            @Override
            public void operationComplete(ChannelFuture future) throws Exception {
                if (!future.isSuccess()) {
                    forceClose(child, future.cause());
                }
            }
        });
    } catch (Throwable t) {
        forceClose(child, t);
    }
}
pipeline的构建过程
9.6.2节中,child其实就是一个NioSocketChannel,它是在NioServerSocketChannel中,当接收到一个新的链接时,创建对象。
@Override
protected int doReadMessages(List<Object> buf) throws Exception {
    SocketChannel ch = SocketUtils.accept(javaChannel());

    try {
        if (ch != null) {
            buf.add(new NioSocketChannel(this, ch)); //这里
            return 1;
        }
    } catch (Throwable t) {
        logger.warn("Failed to create a new channel from an accepted socket.", t);

        try {
            ch.close();
        } catch (Throwable t2) {
            logger.warn("Failed to close a socket.", t2);
        }
    }

    return 0;
}
而NioSocketChannel在构造时,调用了父类AbstractChannel中的构造方法,初始化了一个pipeline.
protected AbstractChannel(Channel parent) {
    this.parent = parent;
    id = newId();
    unsafe = newUnsafe();
    pipeline = newChannelPipeline();
}
DefaultChannelPipeline
pipeline的默认实例是DefaultChannelPipeline,构造方法如下。
protected DefaultChannelPipeline(Channel channel) {
    this.channel = ObjectUtil.checkNotNull(channel, "channel");
    succeededFuture = new SucceededChannelFuture(channel, null);
    voidPromise =  new VoidChannelPromise(channel, true);

    tail = new TailContext(this);
    head = new HeadContext(this);

    head.next = tail;
    tail.prev = head;
}
初始化了一个头节点和尾节点,组成一个双向链表,如图9-2所示

图9-2
NioSocketChannel中handler链的构成
再回到ServerBootstrapAccepter的channelRead方法中,收到客户端连接时,触发了NioSocketChannel中的pipeline的添加
以下代码是DefaultChannelPipeline的addLast方法。
@Override
public final ChannelPipeline addLast(EventExecutorGroup executor, ChannelHandler... handlers) {
   ObjectUtil.checkNotNull(handlers, "handlers");

   for (ChannelHandler h: handlers) { //遍历handlers列表,此时这里的handler是ChannelInitializer回调方法
       if (h == null) {
           break;
       }
       addLast(executor, null, h);
   }

   return this;
}
addLast
把服务端配置的ChannelHandler,添加到pipeline中,注意,此时的pipeline中保存的是ChannelInitializer回调方法。
@Override
public final ChannelPipeline addLast(EventExecutorGroup group, String name, ChannelHandler handler) {
    final AbstractChannelHandlerContext newCtx;
    synchronized (this) {
        checkMultiplicity(handler); //检查是否有重复的handler
		//创建新的DefaultChannelHandlerContext节点
        newCtx = newContext(group, filterName(name, handler), handler);

        addLast0(newCtx);  //添加新的DefaultChannelHandlerContext到ChannelPipeline


        if (!registered) {
            newCtx.setAddPending();
            callHandlerCallbackLater(newCtx, true);
            return this;
        }

        EventExecutor executor = newCtx.executor();
        if (!executor.inEventLoop()) {
            callHandlerAddedInEventLoop(newCtx, executor);
            return this;
        }
    }
    callHandlerAdded0(newCtx);
    return this;
}
这个回调方法什么时候触发调用呢?其实就是在 ServerBootstrapAcceptor 这个类的channelRead方法中,注册当前NioSocketChannel时
childGroup.register(child).addListener(new ChannelFutureListener() {}
最终按照之前我们上一节课源码分析的思路,定位到AbstractChannel中的register0方法中。
private void register0(ChannelPromise promise) {
            try {
                // check if the channel is still open as it could be closed in the mean time when the register
                // call was outside of the eventLoop
                if (!promise.setUncancellable() || !ensureOpen(promise)) {
                    return;
                }
                boolean firstRegistration = neverRegistered;
                doRegister();
                neverRegistered = false;
                registered = true;
				//
                pipeline.invokeHandlerAddedIfNeeded();

            }
}
callHandlerAddedForAllHandlers
pipeline.invokeHandlerAddedIfNeeded()方法,向下执行,会进入到DefaultChannelPipeline这个类中的callHandlerAddedForAllHandlers方法中
private void callHandlerAddedForAllHandlers() {
    final PendingHandlerCallback pendingHandlerCallbackHead;
    synchronized (this) {
        assert !registered;

        // This Channel itself was registered.
        registered = true;

        pendingHandlerCallbackHead = this.pendingHandlerCallbackHead;
        // Null out so it can be GC'ed.
        this.pendingHandlerCallbackHead = null;
    }
    //从等待被调用的handler 回调列表中,取出任务来执行。
    PendingHandlerCallback task = pendingHandlerCallbackHead;
    while (task != null) {
        task.execute();
        task = task.next;
    }
}
我们发现,
pendingHandlerCallbackHead这个单向链表,是在callHandlerCallbackLater方法中被添加的,
而callHandlerCallbackLater又是在addLast方法中添加的,所以构成了一个异步完整的闭环。
ChannelInitializer.handlerAdded
task.execute()方法执行路径是
callHandlerAdded0 -> ctx.callHandlerAdded ->
-------> AbstractChannelHandlerContext.callHandlerAddded()
---------------> ChannelInitializer.handlerAdded
调用initChannel方法来初始化NioSocketChannel中的Channel.
@Override
public void handlerAdded(ChannelHandlerContext ctx) throws Exception {
    if (ctx.channel().isRegistered()) {
        // This should always be true with our current DefaultChannelPipeline implementation.
        // The good thing about calling initChannel(...) in handlerAdded(...) is that there will be no ordering
        // surprises if a ChannelInitializer will add another ChannelInitializer. This is as all handlers
        // will be added in the expected order.
        if (initChannel(ctx)) {

            // We are done with init the Channel, removing the initializer now.
            removeState(ctx);
        }
    }
}
接着,调用initChannel抽象方法,该方法由具体的实现类来完成。
private boolean initChannel(ChannelHandlerContext ctx) throws Exception {
    if (initMap.add(ctx)) { // Guard against re-entrance.
        try {
            initChannel((C) ctx.channel());
        } catch (Throwable cause) {
            // Explicitly call exceptionCaught(...) as we removed the handler before calling initChannel(...).
            // We do so to prevent multiple calls to initChannel(...).
            exceptionCaught(ctx, cause);
        } finally {
            ChannelPipeline pipeline = ctx.pipeline();
            if (pipeline.context(this) != null) {
                pipeline.remove(this);
            }
        }
        return true;
    }
    return false;
}
ChannelInitializer的实现,是我们自定义Server中的匿名内部类,ChannelInitializer。因此通过这个回调来完成当前NioSocketChannel的pipeline的构建过程。
public static void main(String[] args){
    EventLoopGroup boss = new NioEventLoopGroup();
    //2 用于对接受客户端连接读写操作的线程工作组
    EventLoopGroup work = new NioEventLoopGroup();
    ServerBootstrap b = new ServerBootstrap();
    b.group(boss, work)	//绑定两个工作线程组
        .channel(NioServerSocketChannel.class)	//设置NIO的模式
        // 初始化绑定服务通道
        .childHandler(new ChannelInitializer<SocketChannel>() {
            @Override
            protected void initChannel(SocketChannel sc) throws Exception {
                sc.pipeline()
                    .addLast(
                    new LengthFieldBasedFrameDecoder(1024,
                                                     9,4,0,0))
                    .addLast(new MessageRecordEncoder())
                    .addLast(new MessageRecordDecode())
                    .addLast(new ServerHandler());
            }
        });
}
 2万+


 扫一扫


 被折叠的 条评论
为什么被折叠?
 到【灌水乐园】发言


