


目录
1 linux任务计划cron
Linux任务计划功能的操作都是通过crontab命令来完成的,常用的参数有:
-u:表示指定某个用户,不加-u选项则为当前用户
-e:表示制定计划任务
-l:表示列出计划任务
-r:表示删除计划任务
- 编写任务计划的格式
[root@linux01 ~]# cat /etc/crontab
SHELL=/bin/bash
PATH=/sbin:/bin:/usr/sbin:/usr/bin
MAILTO=root

# For details see man 4 crontabs

# Example of job definition:
# .---------------- minute (0 - 59)
# |  .------------- hour (0 - 23)
# |  |  .---------- day of month (1 - 31)
# |  |  |  .------- month (1 - 12) OR jan,feb,mar,apr ...
# |  |  |  |  .---- day of week (0 - 6) (Sunday=0 or 7) OR sun,mon,tue,wed,thu,fri,sat
# |  |  |  |  |
# *  *  *  *  * user-name  command to be executed
格式:分 时 日 月 周 user command
分范围0-59,时范围0-23,日范围1-31,月范围1-12,周1-7
可用格式1-5表示一个范围1到5
可用格式1,2,3表示1或者2或者3
可用格式*/2表示被2整除的数字,比如小时,那就是每隔2小时
- 命令crontab -e打开任务计划编写的配置文件
[root@linux01 ~]# crontab -e
59 16 * * * echo "hello world!" > /tmp/testcron.log
[root@linux01 ~]# date
Sun Oct 28 16:58:41 CST 2018
[root@linux01 ~]# ll /tmp/
total 8
-rwx------. 1 root root 836 Oct 25 08:52 ks-script-wgZ0hw
-rw-r--r--  1 root root  13 Oct 28 16:59 testcron.log
-rw-------. 1 root root   0 Oct 25 08:45 yum.log
[root@linux01 ~]# cat /tmp/testcron.log
hello world!
命令crontab -e实际上是打开了/var/spool/cron/username文件(如果用户是root,则打开的是/var/spool/cron/root)。打开这个文件使用了vim编辑器,所以保存时在命令行模式下输入:wq即可。但是请千万不要直接去编辑那个文件,否则会出错,所以一定要使用命令crontab -e来编辑文件/var/spool/cron/username
- 命令crontab -e -u user,指定user用户打开任务计划编写的配置文件
[root@linux01 ~]# useradd user
[root@linux01 ~]# crontab -e -u user
添加以下命令
10 17 * * * echo "hello world!" > /tmp/usercron.log
[root@linux01 ~]# ll /tmp/
total 12
-rwx------. 1 root root 836 Oct 25 08:52 ks-script-wgZ0hw
-rw-r--r--  1 root root  13 Oct 28 16:59 testcron.log
-rw-r--r--  1 user user  13 Oct 28 17:10 usercron.log
-rw-------. 1 root root   0 Oct 25 08:45 yum.log
[root@linux01 ~]# cat /tmp/usercron.log
hello world!- 命令crontab -l,查看任务计划列表(默认是当前用户)
[root@linux01 ~]# crontab -l
59 16 * * * echo "hello world!" > /tmp/testcron.log- 命令crontab -l -u user,查看user用户任务计划列表
[root@linux01 ~]# crontab -l -u user
10 17 * * * echo "hello world!" > /tmp/usercron.log- 命令crontab -r,清空任务计划列表(默认是当前用户)
[root@linux01 ~]# crontab -l
59 16 * * * echo "hello world!" > /tmp/testcron.log
[root@linux01 ~]# crontab -r
[root@linux01 ~]# crontab -l
no crontab for root- 命令crontab -r -u user,清空user用户任务计划列表
[root@linux01 ~]# crontab -l -u user
10 17 * * * echo "hello world!" > /tmp/usercron.log
[root@linux01 ~]# crontab -r -u user
[root@linux01 ~]# crontab -l -u user
no crontab for user- crond服务启动:systemctl start crond.service
[root@linux01 ~]# systemctl start crond.service- 查看crond服务是否启动:systemctl status crond.service
[root@linux01 ~]# systemctl status crond.service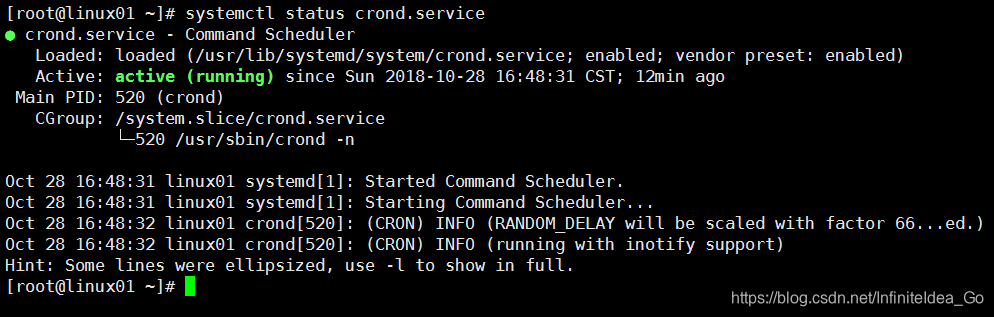
2 chkconfig工具
CentOS 6上的服务管理工具为chkconfig,Linux系统所有的预设服务都可以通过查看/etc/init.d/目录得到
[root@linux01 ~]# ls /etc/init.d/
functions netconsole network README因为CentOS 7已经不再延续CentOS 6版本的服务管理方案了。但是我们依然可以继续使用chkconfig这个命令,系统的预设服务都可以通过这样的命令实现:service 服务名 start|stop|restart;可以使用命令/etc/init.d/服务名 start
- 命令chkconfig --list列出所有的服务及其每个级别的开启状态
[root@linux01 ~]# chkconfig --list

Note: This output shows SysV services only and does not include native
      systemd services. SysV configuration data might be overridden by native
      systemd configuration.

      If you want to list systemd services use 'systemctl list-unit-files'.
      To see services enabled on particular target use
      'systemctl list-dependencies [target]'.

netconsole         0:off    1:off    2:off    3:off    4:off    5:off    6:off
network 0:off 1:off 2:on 3:on 4:on 5:on 6:off- 因为chkconfig命令是centos6以前的命令,其中以上的数字0-6代表系统运行级别:
0 - halt (Do NOT set initdefault to this)
运行级别0:系统停机状态,系统默认运行级别不能设为0,否则不能正常启动
1 - Single user mode
运行级别1:单用户工作状态,root权限,用于系统维护,禁止远程登陆
2 - Multiuser, without NFS (The same as 3, if you do not have networking)
运行级别2:多用户状态(没有NFS)
3 - Full multiuser mode
运行级别3:完全的多用户状态(有NFS),登陆后进入控制台命令行模式
4 - unused
运行级别4:系统未使用,保留
5 - X11
运行级别5:X11控制台,登陆后进入图形GUI模式
6 - reboot (Do NOT set initdefault to this)
运行级别6:系统正常关闭并重启,默认运行级别不能设为6,否则不能正常启动
- 关闭运行级别3的network服务
[root@linux01 ~]# chkconfig --level 3 network off
[root@linux01 ~]# chkconfig --list

Note: This output shows SysV services only and does not include native
      systemd services. SysV configuration data might be overridden by native
      systemd configuration.

      If you want to list systemd services use 'systemctl list-unit-files'.
      To see services enabled on particular target use
      'systemctl list-dependencies [target]'.

netconsole         0:off    1:off    2:off    3:off    4:off    5:off    6:off
network 0:off 1:off 2:on 3:off 4:on 5:on 6:off- 关闭运行级别345的network服务
[root@linux01 ~]# chkconfig --level 345 network off
[root@linux01 ~]# chkconfig --list

Note: This output shows SysV services only and does not include native
      systemd services. SysV configuration data might be overridden by native
      systemd configuration.

      If you want to list systemd services use 'systemctl list-unit-files'.
      To see services enabled on particular target use
      'systemctl list-dependencies [target]'.

netconsole         0:off    1:off    2:off    3:off    4:off    5:off    6:off
network 0:off 1:off 2:on 3:off 4:off 5:off 6:off- 把network服务从系统服务删除
[root@linux01 ~]# chkconfig --del network
[root@linux01 ~]# chkconfig --list

Note: This output shows SysV services only and does not include native
      systemd services. SysV configuration data might be overridden by native
      systemd configuration.

      If you want to list systemd services use 'systemctl list-unit-files'.
      To see services enabled on particular target use
      'systemctl list-dependencies [target]'.

netconsole 0:off 1:off 2:off 3:off 4:off 5:off 6:off- 将network服务加到系统服务
[root@linux01 ~]# chkconfig --add network
[root@linux01 ~]# chkconfig --list

Note: This output shows SysV services only and does not include native
      systemd services. SysV configuration data might be overridden by native
      systemd configuration.

      If you want to list systemd services use 'systemctl list-unit-files'.
      To see services enabled on particular target use
      'systemctl list-dependencies [target]'.

netconsole         0:off    1:off    2:off    3:off    4:off    5:off    6:off
network 0:off 1:off 2:on 3:on 4:on 5:on 6:off- /etc/init.d下自定义一个启动脚本
[root@linux01 init.d]# cp network test
[root@linux01 init.d]# chkconfig --add test
[root@linux01 init.d]# chkconfig --list

Note: This output shows SysV services only and does not include native
      systemd services. SysV configuration data might be overridden by native
      systemd configuration.

      If you want to list systemd services use 'systemctl list-unit-files'.
      To see services enabled on particular target use
      'systemctl list-dependencies [target]'.

netconsole         0:off    1:off    2:off    3:off    4:off    5:off    6:off
network            0:off    1:off    2:on    3:on    4:on    5:on    6:off
test               0:off    1:off    2:on    3:on    4:on    5:on    6:off
3 systemd管理服务
CentOS 7不使用SysV而改为systemd了,这是因为systemd支持多个服务并发启动,而SysV只能一个一个地启动,这样最终导致的结果是systemd方式启动会快很多
- systemctl list-units --all --type=service列出系统服务
[root@linux01 ~]# systemctl list-units --all --type=service
  UNIT                                LOAD      ACTIVE   SUB     DESCRIPTION
  auditd.service                      loaded    active   running Security Auditing Service
  cpupower.service                    loaded    inactive dead    Configure CPU power related setti
  crond.service                       loaded    active   running Command Scheduler
  dbus.service                        loaded    active   running D-Bus System Message Bus
● display-manager.service             not-found inactive dead    display-manager.service
  dracut-shutdown.service             loaded    inactive dead    Restore /run/initramfs
  ebtables.service                    loaded    inactive dead    Ethernet Bridge Filtering tables
  emergency.service                   loaded    inactive dead    Emergency Shell
● exim.service                        not-found inactive dead    exim.service
  firewalld.service                   loaded    active   running firewalld - dynamic firewall daem
getty@tty1.service                  loaded    active   running Getty on tty1
● ip6tables.service                   not-found inactive dead    ip6tables.service
● ipset.service                       not-found inactive dead    ipset.service
● iptables.service                    not-found inactive dead    iptables.service
  irqbalance.service                  loaded    active   running irqbalance daemon
  kdump.service                       loaded    active   exited  Crash recovery kernel arming
  kmod-static-nodes.service           loaded    active   exited  Create list of required static de
  microcode.service                   loaded    inactive dead    Load CPU microcode update
  network.service                     loaded    active   exited  LSB: Bring up/down networking
  NetworkManager-wait-online.service  loaded    active   exited  Network Manager Wait Online
几个常用的服务相关的命令
- systemctl enable crond.service //让服务开机启动
[root@linux01 ~]# systemctl enable crond.service- systemctl disable crond //禁止开机启动
[root@linux01 ~]# systemctl disabledcrond.service- systemctl status crond //查看状态
[root@linux01 ~]# systemctl status crond.service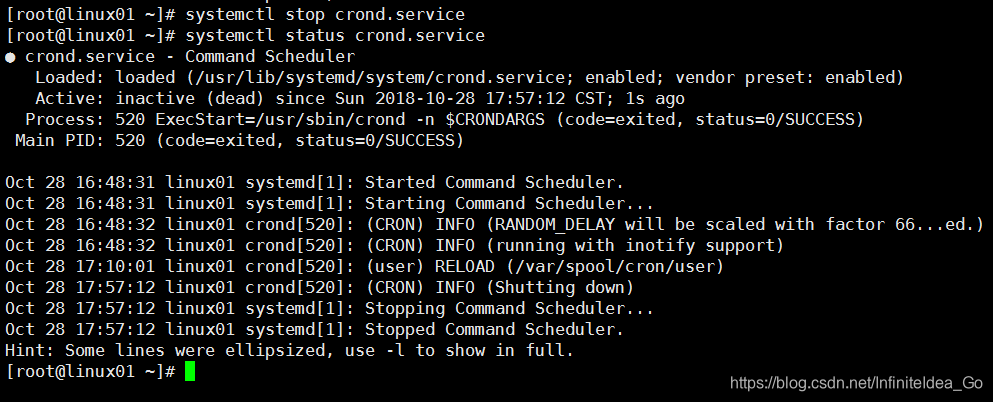
- systemctl stop crond //停止服务
[root@linux01 ~]# systemctl stop crond.service
- systemctl start crond与 //启动服务
[root@linux01 ~]# systemctl startcrond.service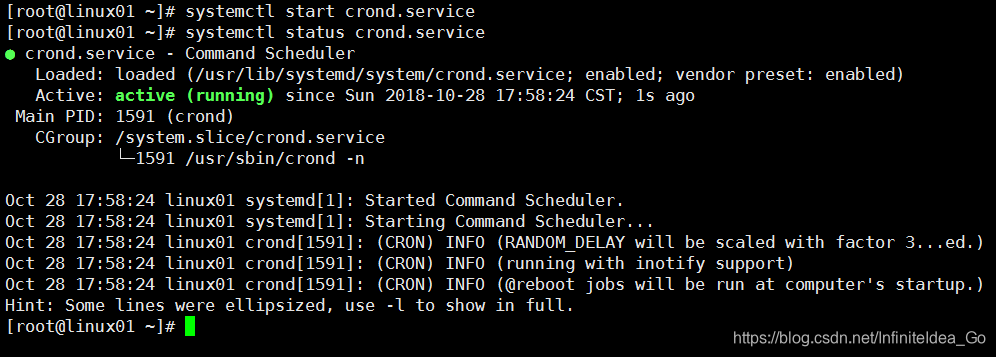
- systemctl restart crond //重启服务
[root@linux01 ~]# systemctl restart crond.service- systemctl is-enabled crond //检查服务是否开机启动
[root@linux01 ~]# systemctl is-enabled crond.service
enabled
4 unit介绍
- ls /usr/lib/systemd/system //系统所有unit,分为以下类型
[root@linux01 ~]# ls /usr/lib/systemd/system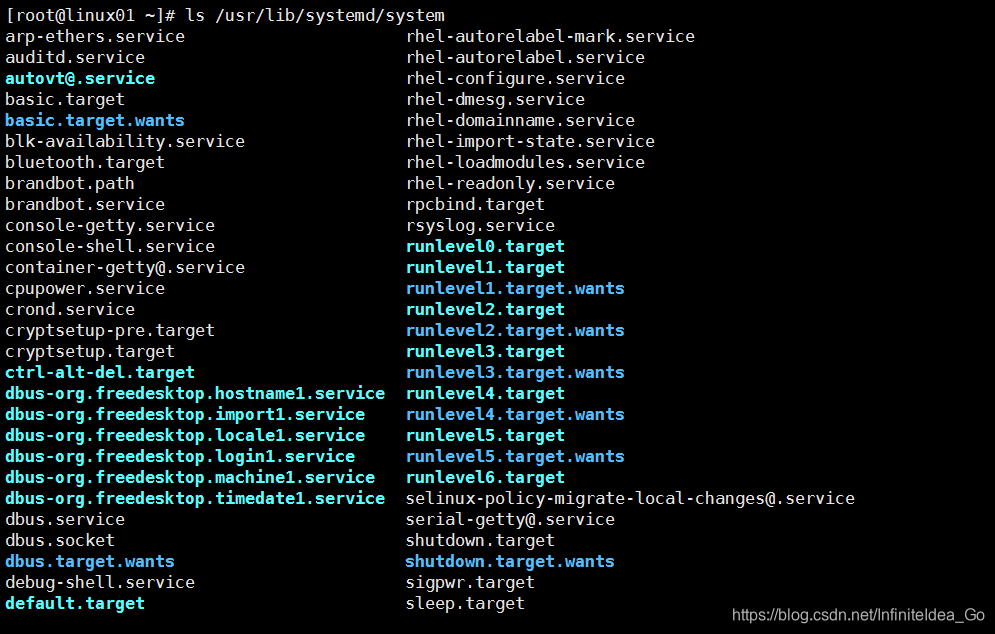
- ls -l runlevel* 列出0-6的级别
[root@linux01 ~]# ls -l /usr/lib/systemd/system/runlevel*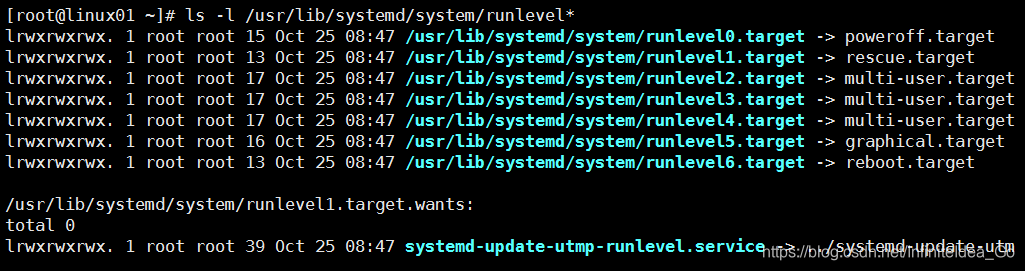
每种类型的文件都为一个unit,正是这些unit才组成了系统的各个资源(各个服务、各个设备等)
service 系统服务
target 多个unit组成的组
device 硬件设备
mount 文件系统挂载点
automount 自动挂载点
path 文件或路径
scope 不是由systemd启动的外部进程
slice 进程组
snapshot systemd快照
socket 进程间通信套接字
swap swap文件
timer 定时器
unit相关的命令
- systemctl list-units //列出正在运行的unit
[root@linux01 ~]# systemctl list-units
UNIT                              LOAD   ACTIVE SUB       DESCRIPTION
proc-sys-fs-binfmt_misc.automount loaded active waiting   Arbitrary Executable File Formats
sys-devices-pci0000:00-0000:00:07.1-ata2-host2-target2:0:0-2:0:0:0-block-sr0.device loaded a
sys-devices-pci0000:00-0000:00:10.0-host0-target0:0:0-0:0:0:0-block-sda-sda1.device loaded a
sys-devices-pci0000:00-0000:00:10.0-host0-target0:0:0-0:0:0:0-block-sda-sda2.device loaded a
sys-devices-pci0000:00-0000:00:10.0-host0-target0:0:0-0:0:0:0-block-sda-sda3.device loaded a
sys-devices-pci0000:00-0000:00:10.0-host0-target0:0:0-0:0:0:0-block-sda.device loaded active
sys-devices-pci0000:00-0000:00:11.0-0000:02:01.0-net-ens33.device loaded active plugged   82
sys-devices-pci0000:00-0000:00:11.0-0000:02:02.0-sound-card0.device loaded active plugged
sys-devices-platform-floppy.0-block-fd0.device loaded active plugged   /sys/devices/platform
sys-devices-platform-serial8250-tty-ttyS2.device loaded active plugged   /sys/devices/platfo
sys-devices-platform-serial8250-tty-ttyS3.device loaded active plugged   /sys/devices/platfo
sys-devices-pnp0-00:06-tty-ttyS0.device loaded active plugged   /sys/devices/pnp0/00:06/tty/
sys-devices-pnp0-00:07-tty-ttyS1.device loaded active plugged   /sys/devices/pnp0/00:07/tty/
sys-module-configfs.device        loaded active plugged   /sys/module/configfs
sys-subsystem-net-devices-ens33.device loaded active plugged   82545EM Gigabit Ethernet Cont
-.mount loaded active mounted /- systemctl list-units --all //列出所有,包括失败的或者inactive的
[root@linux01 ~]# systemctl list-units --all
  UNIT                            LOAD      ACTIVE   SUB       DESCRIPTION
  proc-sys-fs-binfmt_misc.automount loaded    active   waiting   Arbitrary Executable File F
  dev-cdrom.device                loaded    active   plugged   VMware_Virtual_IDE_CDROM_Driv
  dev-disk-by\x2did-ata\x2dVMware_Virtual_IDE_CDROM_Drive_10000000000000000001.device loaded
  dev-disk-by\x2dlabel-CentOS\x5cx207\x5cx20x86_64.device loaded    active   plugged   VMwar
  dev-disk-by\x2dpath-pci\x2d0000:00:07.1\x2data\x2d2.0.device loaded    active   plugged
  dev-disk-by\x2dpath-pci\x2d0000:00:10.0\x2dscsi\x2d0:0:0:0.device loaded    active   plugg
  dev-disk-by\x2dpath-pci\x2d0000:00:10.0\x2dscsi\x2d0:0:0:0\x2dpart1.device loaded    activ
  dev-disk-by\x2dpath-pci\x2d0000:00:10.0\x2dscsi\x2d0:0:0:0\x2dpart2.device loaded    activ
  dev-disk-by\x2dpath-pci\x2d0000:00:10.0\x2dscsi\x2d0:0:0:0\x2dpart3.device loaded    activ
  dev-disk-by\x2duuid-2018\x2d05\x2d03\x2d21\x2d07\x2d04\x2d00.device loaded    active   plu
  dev-disk-by\x2duuid-36a0e938\x2d9ce7\x2d4057\x2dbe14\x2d67b1a1901480.device loaded    acti
  dev-disk-by\x2duuid-6acf1896\x2d1b81\x2d471a\x2db278\x2d828cab45c8ed.device loaded    acti
  dev-disk-by\x2duuid-df1a0773\x2d646a\x2d4743\x2dbede\x2d08f050362dc4.device loaded    acti
  dev-fd0.device                  loaded    active   plugged   /dev/fd0
  dev-sda.device                  loaded    active   plugged   VMware_Virtual_S
  dev-sda1.device                 loaded    active   plugged   VMware_Virtual_S 1
  dev-sda2.device                 loaded    active   plugged   VMware_Virtual_S 2
  dev-sda3.device                 loaded    active   plugged   VMware_Virtual_S 3
  dev-sr0.device                  loaded    active   plugged   VMware_Virtual_IDE_CDROM_Driv
  dev-ttyS0.device                loaded    active   plugged   /dev/ttyS0
  dev-ttyS1.device                loaded    active   plugged   /dev/ttyS1
  dev-ttyS2.device                loaded    active   plugged   /dev/ttyS2
dev-ttyS3.device loaded active plugged /dev/ttyS3- systemctl list-units --all --state=inactive //列出inactive的unit
[root@linux01 ~]# systemctl list-units --all --state=inactive
  UNIT                               LOAD      ACTIVE   SUB  DESCRIPTION
  proc-sys-fs-binfmt_misc.mount      loaded    inactive dead Arbitrary Executable File Forma
  sys-fs-fuse-connections.mount      loaded    inactive dead FUSE Control File System
  systemd-ask-password-console.path  loaded    inactive dead Dispatch Password Requests to C
  cpupower.service                   loaded    inactive dead Configure CPU power related set
● display-manager.service            not-found inactive dead display-manager.service
  dracut-shutdown.service            loaded    inactive dead Restore /run/initramfs
  ebtables.service                   loaded    inactive dead Ethernet Bridge Filtering table
  emergency.service                  loaded    inactive dead Emergency Shell
● exim.service                       not-found inactive dead exim.service
● ip6tables.service                  not-found inactive dead ip6tables.service
● ipset.service                      not-found inactive dead ipset.service
● iptables.service                   not-found inactive dead iptables.service
  microcode.service                  loaded    inactive dead Load CPU microcode update
  plymouth-quit-wait.service         loaded    inactive dead Wait for Plymouth Boot Screen t
  plymouth-quit.service              loaded    inactive dead Terminate Plymouth Boot Screen
  plymouth-read-write.service        loaded    inactive dead Tell Plymouth To Write Out Runt
  plymouth-start.service             loaded    inactive dead Show Plymouth Boot Screen
  rc-local.service                   loaded    inactive dead /etc/rc.d/rc.local Compatibilit
  rescue.service                     loaded    inactive dead Rescue Shell
  rhel-autorelabel.service           loaded    inactive dead Relabel all filesystems, if nec
  rhel-configure.service             loaded    inactive dead Reconfigure the system on admin
  rhel-loadmodules.service           loaded    inactive dead Load legacy module configuratio
selinux-policy-migrate-local-changes@targeted.service loaded    inactive dead Migrate loca
● sendmail.service                   not-found inactive dead sendmail.service
  sshd-keygen.service                loaded    inactive dead OpenSSH Server Key Generation
● syslog.service not-found inactive dead syslog.service- systemctl list-units --type=service//列出状态为active的service
[root@linux01 ~]# systemctl list-units --type=service
UNIT                               LOAD   ACTIVE SUB     DESCRIPTION
auditd.service                     loaded active running Security Auditing Service
crond.service                      loaded active running Command Scheduler
dbus.service                       loaded active running D-Bus System Message Bus
firewalld.service                  loaded active running firewalld - dynamic firewall daemon
getty@tty1.service                 loaded active running Getty on tty1
irqbalance.service                 loaded active running irqbalance daemon
kdump.service                      loaded active exited  Crash recovery kernel arming
kmod-static-nodes.service          loaded active exited  Create list of required static devi
network.service                    loaded active exited  LSB: Bring up/down networking
NetworkManager-wait-online.service loaded active exited  Network Manager Wait Online
NetworkManager.service             loaded active running Network Manager
polkit.service                     loaded active running Authorization Manager
postfix.service                    loaded active running Postfix Mail Transport Agent
rhel-dmesg.service                 loaded active exited  Dump dmesg to /var/log/dmesg
rhel-domainname.service            loaded active exited  Read and set NIS domainname from /e
rhel-import-state.service          loaded active exited  Import network configuration from i
rhel-readonly.service              loaded active exited  Configure read-only root support
rsyslog.service                    loaded active running System Logging Service
sshd.service                       loaded active running OpenSSH server daemon
systemd-journal-flush.service      loaded active exited  Flush Journal to Persistent Storage
systemd-journald.service loaded active running Journal Service- systemctl is-active crond.service //查看某个服务是否为active
[root@linux01 ~]# systemctl is-active crond.service
active- systemctl is-enable crond.service //查看某个服务是否为enable
[root@linux01 ~]# systemctl is-enabled crond.service
enabled
5 target介绍
系统为了方便管理用target来管理unit
- systemctl list-unit-files --type=target 查看当前系统的所有 target
[root@linux01 ~]# systemctl list-unit-files --type=target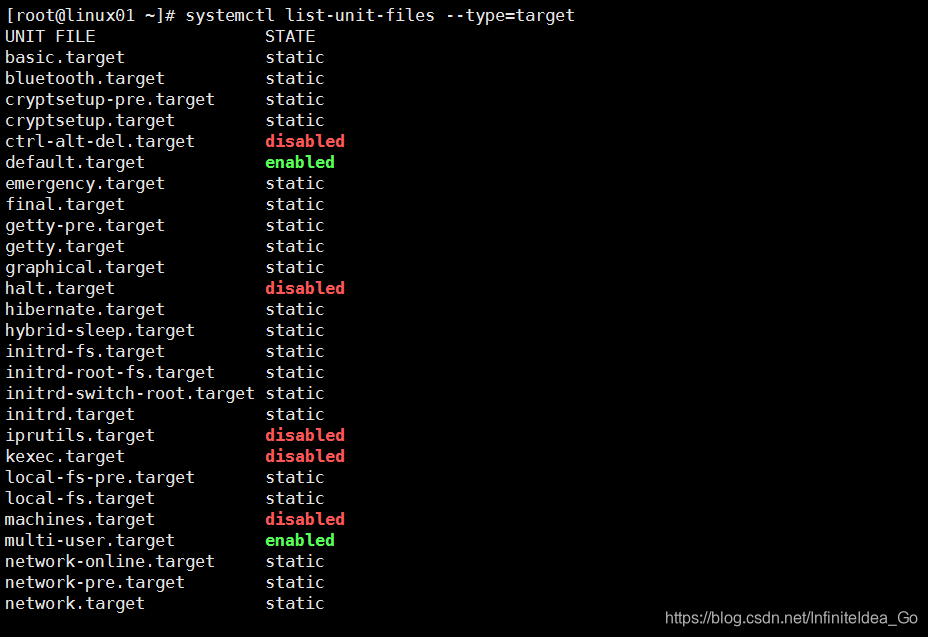
- systemctl list-dependencies multi-user.target //查看指定target下面有哪些unit
[root@linux01 ~]# systemctl list-dependencies multi-user.target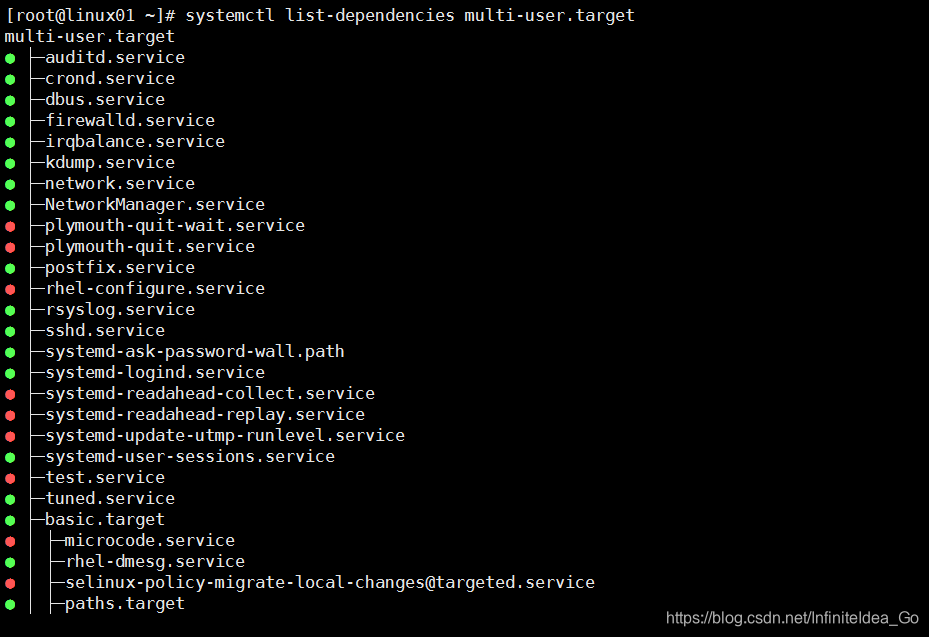
- systemctl get-default 查看系统默认的target
[root@linux01 ~]# systemctl get-default
multi-user.target- systemctl set-default multi-user.target 设置默认的target
[root@linux01 ~]# systemctl set-default multi-user.target
Removed symlink /etc/systemd/system/default.target.
Created symlink from /etc/systemd/system/default.target to /usr/lib/systemd/system/multi-user.target.上面提到的multi-user.target等同于CentOS 6的运行级别3,其实还有其他几个target对应0~6运行级别
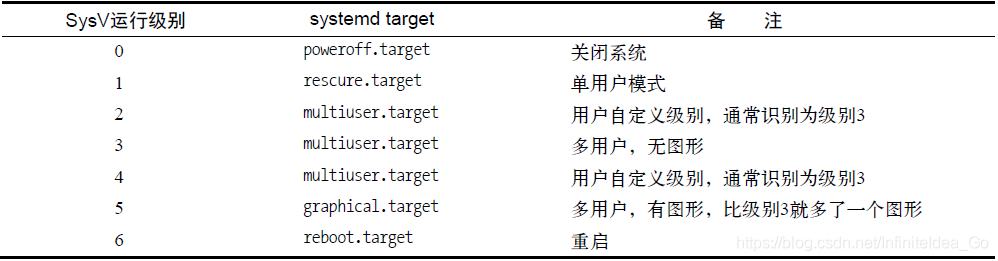
一个service属于一种类型的unit
多个unit组成了一个target
一个target里面包含了多个service,可以查看文件/usr/lib/systemd/system/sshd.service里面[install]部分的内容,它就定义了该service属于哪一个target
cat /usr/lib/systemd/system/sshd.service //看[install]部分
[root@linux01 ~]# systemctl set-default multi-user.target
Removed symlink /etc/systemd/system/default.target.
Created symlink from /etc/systemd/system/default.target to /usr/lib/systemd/system/multi-user.target.
[root@linux01 ~]# cat /usr/lib/systemd/system/sshd.service
[Unit]
Description=OpenSSH server daemon
Documentation=man:sshd(8) man:sshd_config(5)
After=network.target sshd-keygen.service
Wants=sshd-keygen.service
[Service]
Type=notify
EnvironmentFile=/etc/sysconfig/sshd
ExecStart=/usr/sbin/sshd -D $OPTIONS
ExecReload=/bin/kill -HUP $MAINPID
KillMode=process
Restart=on-failure
RestartSec=42s
[Install]
WantedBy=multi-user.target
扩展
1. anacron http://blog.youkuaiyun.com/strikers1982/article/details/4787226
2. xinetd服(默认机器没有安装这个服务,需要yum install xinetd安装)http://blog.sina.com.cn/s/blog_465bbe6b010000vi.html
3. systemd自定义启动脚本 http://www.jb51.net/article/100457.htm

 2320


 扫一扫


 被折叠的 条评论
为什么被折叠?
 到【灌水乐园】发言


