


 本文详细介绍了LVM(逻辑卷管理器)的概念、优势及如何在Linux环境下使用LVM进行磁盘分区管理,包括创建物理卷、卷组、逻辑卷,以及对逻辑卷进行扩容和缩容的操作步骤。同时,通过一个磁盘小故障案例,展示了如何解决因LVM配置不当导致的系统启动问题。
目录
1 lvm讲解
概念:LVM是logical volume manager的缩写(逻辑分区),方便对于对圈组、逻辑卷的大小进行调整,更进一步调整文件系统的大小。 优点:在使用很多硬盘的大系统中,使用LVM主要是方便管理、增加了系统的扩展性。
[root@worker1 ~]# fdisk /dev/sdb
Welcome to fdisk (util-linux 2.23.2).

Changes will remain in memory only, until you decide to write them.
Be careful before using the write command.

Device does not contain a recognized partition table
Building a new DOS disklabel with disk identifier 0x82362612.

Command (m for help): p

Disk /dev/sdb: 5368 MB, 5368709120 bytes, 10485760 sectors
Units = sectors of 1 * 512 = 512 bytes
Sector size (logical/physical): 512 bytes / 512 bytes
I/O size (minimum/optimal): 512 bytes / 512 bytes
Disk label type: dos
Disk identifier: 0x82362612

   Device Boot      Start         End      Blocks   Id  System

Command (m for help): n
Partition type:
   p   primary (0 primary, 0 extended, 4 free)
   e   extended
Select (default p): p
Partition number (1-4, default 1):
First sector (2048-10485759, default 2048):
Using default value 2048
Last sector, +sectors or +size{K,M,G} (2048-10485759, default 10485759): +1G
Partition 1 of type Linux and of size 1 GiB is set

Command (m for help): n
Partition type:
   p   primary (1 primary, 0 extended, 3 free)
   e   extended
Select (default p): p
Partition number (2-4, default 2):
First sector (2099200-10485759, default 2099200):
Using default value 2099200
Last sector, +sectors or +size{K,M,G} (2099200-10485759, default 10485759): +1G
Partition 2 of type Linux and of size 1 GiB is set

Command (m for help): n
Partition type:
   p   primary (2 primary, 0 extended, 2 free)
   e   extended
Select (default p):
Using default response p
Partition number (3,4, default 3):
First sector (4196352-10485759, default 4196352):
Using default value 4196352
Last sector, +sectors or +size{K,M,G} (4196352-10485759, default 10485759):
Using default value 10485759
Partition 3 of type Linux and of size 3 GiB is set

Command (m for help): p

Disk /dev/sdb: 5368 MB, 5368709120 bytes, 10485760 sectors
Units = sectors of 1 * 512 = 512 bytes
Sector size (logical/physical): 512 bytes / 512 bytes
I/O size (minimum/optimal): 512 bytes / 512 bytes
Disk label type: dos
Disk identifier: 0x82362612

   Device Boot      Start         End      Blocks   Id  System
/dev/sdb1            2048     2099199     1048576   83  Linux
/dev/sdb2         2099200     4196351     1048576   83  Linux
/dev/sdb3         4196352    10485759     3144704   83  Linux

Command (m for help): t
Partition number (1-3, default 3):
Hex code (type L to list all codes): 8e
Changed type of partition 'Linux' to 'Linux LVM'

Command (m for help): t
Partition number (1-3, default 3): 2
Hex code (type L to list all codes): 8e
Changed type of partition 'Linux' to 'Linux LVM'

Command (m for help): t
Partition number (1-3, default 3): 1
Hex code (type L to list all codes): 8e
Changed type of partition 'Linux' to 'Linux LVM'

Command (m for help): p

Disk /dev/sdb: 5368 MB, 5368709120 bytes, 10485760 sectors
Units = sectors of 1 * 512 = 512 bytes
Sector size (logical/physical): 512 bytes / 512 bytes
I/O size (minimum/optimal): 512 bytes / 512 bytes
Disk label type: dos
Disk identifier: 0x82362612

   Device Boot      Start         End      Blocks   Id  System
/dev/sdb1            2048     2099199     1048576   8e  Linux LVM
/dev/sdb2         2099200     4196351     1048576   8e  Linux LVM
/dev/sdb3         4196352    10485759     3144704   8e  Linux LVM

Command (m for help): w
The partition table has been altered!

Calling ioctl() to re-read partition table.
Syncing disks.
安装lvm软件包
[root@worker1 ~]# yum install -y lvm2
- 创建物理卷
[root@worker1 ~]# pvcreate /dev/sdb1
  Physical volume "/dev/sdb1" successfully created.
[root@worker1 ~]# pvcreate /dev/sdb2
  Physical volume "/dev/sdb2" successfully created.
[root@worker1 ~]# pvcreate /dev/sdb3
  Physical volume "/dev/sdb3" successfully created.
[root@worker1 ~]# pvdisplay
  "/dev/sdb3" is a new physical volume of "<3.00 GiB"
  --- NEW Physical volume ---
  PV Name               /dev/sdb3
  VG Name
  PV Size               <3.00 GiB
  Allocatable           NO
  PE Size               0
  Total PE              0
  Free PE               0
  Allocated PE          0
  PV UUID               6AzQhi-Rgic-YROC-g3uH-OnRS-Y1ek-7Nabem

  "/dev/sdb2" is a new physical volume of "1.00 GiB"
  --- NEW Physical volume ---
  PV Name               /dev/sdb2
  VG Name
  PV Size               1.00 GiB
  Allocatable           NO
  PE Size               0
  Total PE              0
  Free PE               0
  Allocated PE          0
  PV UUID               dUkvZM-TUoz-Sh5p-lA7J-x9Se-bUSb-BJm9lg

  "/dev/sdb1" is a new physical volume of "1.00 GiB"
  --- NEW Physical volume ---
  PV Name               /dev/sdb1
  VG Name
  PV Size               1.00 GiB
  Allocatable           NO
  PE Size               0
  Total PE              0
  Free PE               0
  Allocated PE          0
  PV UUID               2NvsbW-vBxD-IB2z-SnzX-8YTh-dcAx-aYzKni

[root@worker1 ~]# pvs
  PV         VG  Fmt  Attr PSize    PFree
  /dev/sdb1  vg1 lvm2 a--  1020.00m 1020.00m
  /dev/sdb2  vg1 lvm2 a--  1020.00m 1020.00m
/dev/sdb3 lvm2 --- <3.00g <3.00g- 将两个物理卷合成一个卷组
[root@worker1 ~]# vgcreate vg1 /dev/sdb1 /dev/sdb2
  Volume group "vg1" successfully created
[root@worker1 ~]# vgdisplay
  --- Volume group ---
  VG Name               vg1
  System ID
  Format                lvm2
  Metadata Areas        2
  Metadata Sequence No  1
  VG Access             read/write
  VG Status             resizable
  MAX LV                0
  Cur LV                0
  Open LV               0
  Max PV                0
  Cur PV                2
  Act PV                2
  VG Size               1.99 GiB
  PE Size               4.00 MiB
  Total PE              510
  Alloc PE / Size       0 / 0
  Free  PE / Size       510 / 1.99 GiB
  VG UUID               KbrWJN-SaAa-2Sw9-898v-50FG-0W4g-b5JqFu

[root@worker1 ~]# vgs
  VG  #PV #LV #SN Attr   VSize VFree
vg1 2 0 0 wz--n- 1.99g 1.99g- 创建100M的逻辑卷
[root@worker1 ~]# lvcreate -L 100M -n lv1 vg1
Logical volume "lv1" created.- 对创建的逻辑卷格式化为ext4格式
[root@worker1 ~]# mkfs.ext4 /dev/vg1/lv1
mke2fs 1.42.9 (28-Dec-2013)
Filesystem label=
OS type: Linux
Block size=1024 (log=0)
Fragment size=1024 (log=0)
Stride=0 blocks, Stripe width=0 blocks
25688 inodes, 102400 blocks
5120 blocks (5.00%) reserved for the super user
First data block=1
Maximum filesystem blocks=33685504
13 block groups
8192 blocks per group, 8192 fragments per group
1976 inodes per group
Superblock backups stored on blocks:
    8193, 24577, 40961, 57345, 73729

Allocating group tables: done
Writing inode tables: done
Creating journal (4096 blocks): done
Writing superblocks and filesystem accounting information: done- 挂载到mnt目录下
[root@worker1 ~]# mount /dev/vg1/lv1 /mnt/
[root@worker1 ~]# df -h
Filesystem           Size  Used Avail Use% Mounted on
/dev/sda3             18G  1.9G   17G  11% /
devtmpfs             908M     0  908M   0% /dev
tmpfs                917M     0  917M   0% /dev/shm
tmpfs                917M  8.6M  908M   1% /run
tmpfs                917M     0  917M   0% /sys/fs/cgroup
/dev/sda1            197M  103M   94M  53% /boot
tmpfs                184M     0  184M   0% /run/user/0
/dev/mapper/vg1-lv1 93M 1.6M 85M 2% /mnt- /dev/vg1/lv1和/dev/mapper/vg1-lv1指向同一个源文件
[root@worker1 ~]# ls -l /dev/vg1/lv1
lrwxrwxrwx 1 root root 7 Sep 26 05:10 /dev/vg1/lv1 -> ../dm-0
[root@worker1 ~]# ls -l /dev/mapper/vg1-lv1
lrwxrwxrwx 1 root root 7 Sep 26 05:10 /dev/mapper/vg1-lv1 -> ../dm-0- 对逻辑卷进行扩容(ext4的文件系统)
先在挂载目录下创建文件和目录
[root@worker1 ~]# mkdir /mnt/test
[root@worker1 ~]# echo "hello world" > /mnt/test.txt
[root@worker1 ~]# ls /mnt/
lost+found  test  test.txt
卸载正在挂载的逻辑卷
[root@worker1 ~]# umount /dev/vg1/lv1
重新设定逻辑卷为200M
[root@worker1 ~]# lvresize -L 200M /dev/vg1/lv1
  Size of logical volume vg1/lv1 changed from 100.00 MiB (25 extents) to 200.00 MiB (50 extents).
  Logical volume vg1/lv1 successfully resized.
检查磁盘错误
[root@worker1 ~]# e2fsck -f /dev/vg1/lv1
e2fsck 1.42.9 (28-Dec-2013)
Pass 1: Checking inodes, blocks, and sizes
Pass 2: Checking directory structure
Pass 3: Checking directory connectivity
Pass 4: Checking reference counts
Pass 5: Checking group summary information
/dev/vg1/lv1: 13/25688 files (7.7% non-contiguous), 8898/102400 blocks
更新磁盘信息
[root@worker1 ~]# resize2fs /dev/vg1/lv1
resize2fs 1.42.9 (28-Dec-2013)
Resizing the filesystem on /dev/vg1/lv1 to 204800 (1k) blocks.
The filesystem on /dev/vg1/lv1 is now 204800 blocks long.
重新挂载逻辑卷
[root@worker1 ~]# mount /dev/vg1/lv1 /mnt/
[root@worker1 ~]# df -h
Filesystem           Size  Used Avail Use% Mounted on
/dev/sda3             18G  1.9G   17G  11% /
devtmpfs             908M     0  908M   0% /dev
tmpfs                917M     0  917M   0% /dev/shm
tmpfs                917M  8.6M  908M   1% /run
tmpfs                917M     0  917M   0% /sys/fs/cgroup
/dev/sda1            197M  103M   94M  53% /boot
tmpfs                184M     0  184M   0% /run/user/0
/dev/mapper/vg1-lv1  190M  1.6M  175M   1% /mnt
[root@worker1 ~]# ls /mnt/
lost+found  test  test.txt
[root@worker1 ~]# cat /mnt/test.txt
hello world- 对逻辑卷进行缩容(ext4的文件系统)
检查磁盘错误
[root@worker1 ~]# e2fsck -f /dev/vg1/lv1
e2fsck 1.42.9 (28-Dec-2013)
Pass 1: Checking inodes, blocks, and sizes
Pass 2: Checking directory structure
Pass 3: Checking directory connectivity
Pass 4: Checking reference counts
Pass 5: Checking group summary information
/dev/vg1/lv1: 13/49400 files (7.7% non-contiguous), 11886/204800 blocks
更新逻辑卷的大小
[root@worker1 ~]# resize2fs /dev/vg1/lv1 100M
resize2fs 1.42.9 (28-Dec-2013)
Resizing the filesystem on /dev/vg1/lv1 to 102400 (1k) blocks.
The filesystem on /dev/vg1/lv1 is now 102400 blocks long.
重新设定逻辑卷的大小
[root@worker1 ~]# lvresize -L 100M /dev/vg1/lv1
  WARNING: Reducing active logical volume to 100.00 MiB.
  THIS MAY DESTROY YOUR DATA (filesystem etc.)
Do you really want to reduce vg1/lv1? [y/n]: y
  Size of logical volume vg1/lv1 changed from 200.00 MiB (50 extents) to 100.00 MiB (25 extents).
  Logical volume vg1/lv1 successfully resized.
[root@worker1 ~]# lvs
  LV   VG  Attr       LSize   Pool Origin Data%  Meta%  Move Log Cpy%Sync Convert
  lv1  vg1 -wi-a----- 100.00m
[root@worker1 ~]# mount /dev/vg1/lv1 /mnt/
[root@worker1 ~]# df -h
Filesystem           Size  Used Avail Use% Mounted on
/dev/sda3             18G  1.9G   17G  11% /
devtmpfs             908M     0  908M   0% /dev
tmpfs                917M     0  917M   0% /dev/shm
tmpfs                917M  8.6M  908M   1% /run
tmpfs                917M     0  917M   0% /sys/fs/cgroup
/dev/sda1            197M  103M   94M  53% /boot
tmpfs                184M     0  184M   0% /run/user/0
/dev/mapper/vg1-lv1   93M  1.6M   85M   2% /mnt
[root@worker1 ~]# ls /mnt/
lost+found  test  test.txt
[root@worker1 ~]# cat /mnt/test.txt
hello world- 对逻辑卷进行扩容(xfs的文件系统)
将逻辑卷卸载进行xfs文件格式化
[root@worker1 ~]# mkfs.xfs /dev/vg1/lv1
mkfs.xfs: /dev/vg1/lv1 appears to contain an existing filesystem (ext4).
mkfs.xfs: Use the -f option to force overwrite.
[root@worker1 ~]# mkfs.xfs -f /dev/vg1/lv1
meta-data=/dev/vg1/lv1           isize=256    agcount=4, agsize=6400 blks
         =                       sectsz=512   attr=2, projid32bit=1
         =                       crc=0        finobt=0
data     =                       bsize=4096   blocks=25600, imaxpct=25
         =                       sunit=0      swidth=0 blks
naming   =version 2              bsize=4096   ascii-ci=0 ftype=0
log      =internal log           bsize=4096   blocks=853, version=2
         =                       sectsz=512   sunit=0 blks, lazy-count=1
realtime =none                   extsz=4096   blocks=0, rtextents=0
挂载逻辑卷
[root@worker1 ~]# mount /dev/vg1/lv1 /mnt/
设定逻辑卷的大小
[root@worker1 ~]# lvresize -L 300M /dev/vg1/lv1
  Size of logical volume vg1/lv1 changed from 100.00 MiB (25 extents) to 300.00 MiB (75 extents).
  Logical volume vg1/lv1 successfully resized.
[root@worker1 ~]# lvs
  LV   VG  Attr       LSize   Pool Origin Data%  Meta%  Move Log Cpy%Sync Convert
  lv1  vg1 -wi-ao---- 300.00m
xfs系统文件需要执行
[root@worker1 ~]# xfs_growfs /dev/vg1/lv1
meta-data=/dev/mapper/vg1-lv1    isize=256    agcount=4, agsize=6400 blks
         =                       sectsz=512   attr=2, projid32bit=1
         =                       crc=0        finobt=0
data     =                       bsize=4096   blocks=25600, imaxpct=25
         =                       sunit=0      swidth=0 blks
naming   =version 2              bsize=4096   ascii-ci=0 ftype=0
log      =internal               bsize=4096   blocks=853, version=2
         =                       sectsz=512   sunit=0 blks, lazy-count=1
realtime =none                   extsz=4096   blocks=0, rtextents=0
data blocks changed from 25600 to 76800
[root@worker1 ~]# df -h
Filesystem           Size  Used Avail Use% Mounted on
/dev/sda3             18G  1.9G   17G  11% /
devtmpfs             908M     0  908M   0% /dev
tmpfs                917M     0  917M   0% /dev/shm
tmpfs                917M  8.6M  908M   1% /run
tmpfs                917M     0  917M   0% /sys/fs/cgroup
/dev/sda1            197M  103M   94M  53% /boot
tmpfs                184M     0  184M   0% /run/user/0
/dev/mapper/vg1-lv1 297M 5.5M 292M 2% /mnt- 将卷组进行扩容
[root@worker1 ~]# vgextend vg1 /dev/sdb3
  Volume group "vg1" successfully extended
[root@worker1 ~]# vgs
  VG  #PV #LV #SN Attr   VSize  VFree
  vg1   3   1   0 wz--n- <4.99g <4.70g
2 磁盘小故障案例
- 系统重启后出现如下界面
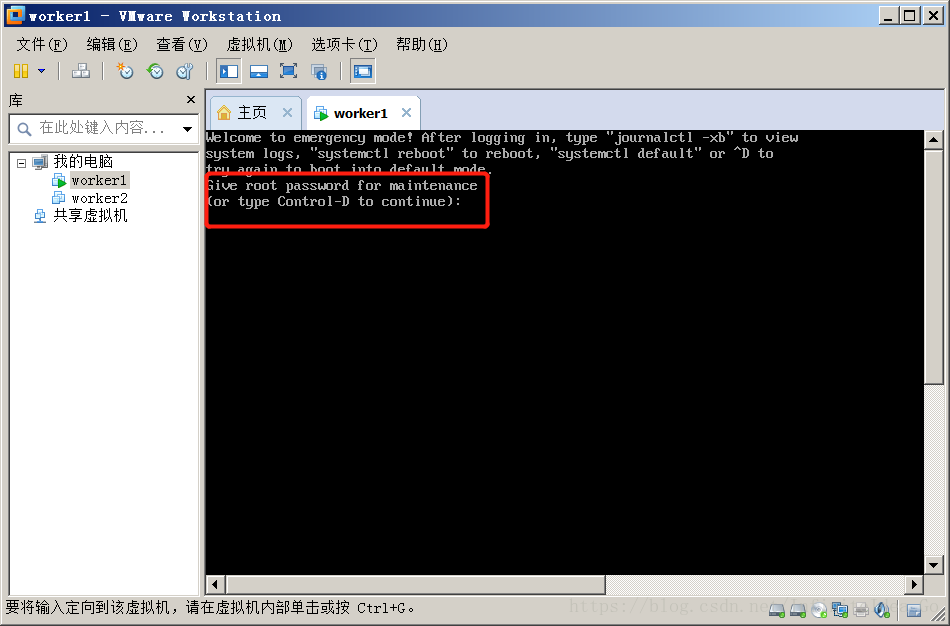
原因是因为对原来磁盘分区,做了lvm的实验,导致系统启动挂载出问题,进入/etc/fstab配置文件,把分区的磁盘挂载信息删掉即可
[root@worker1 ~]# vi /etc/fstab


#
# /etc/fstab
# Created by anaconda on Wed Sep  5 22:52:19 2018
#
# Accessible filesystems, by reference, are maintained under '/dev/disk'
# See man pages fstab(5), findfs(8), mount(8) and/or blkid(8) for more info
#
UUID=f1491541-788d-4fc2-9693-7d350e9d3d92 /                       xfs     defaults        0 0
UUID=cd98c29e-3b2d-46b6-a4cd-239327f04623 /boot                   xfs     defaults        0 0
UUID=e9d9316c-94a2-4fa0-a559-b56a431fb735 swap                    swap    defaults        0 0
/dev/sdb                                  /mnt                    xfs     defaults        0 0
~
把/dev/sdb /mnt xfs defaults 0 0删掉,保存配置文件,重新登陆即可正常


 1373
1373

 被折叠的 条评论
为什么被折叠?
被折叠的 条评论
为什么被折叠?
 到【灌水乐园】发言


