


JdbcTemplate 是Spring 提供的一个JDBC模板类,是对JDBC的封装,简化JDBC代码,当然,你也可以不用,可以让Spring集成其它的ORM框架,例如:MyBatis,Hibernate 等。其中JDBC关于数据库的连接也是一个重要的内容,想要了解更多的大家可以移步至:✏️✏️✏️ JDBC_ChinaRainbowSea的博客-优快云博客
下面我们正式开始对 JdbcTemplate 上的学习,完成增删改查。
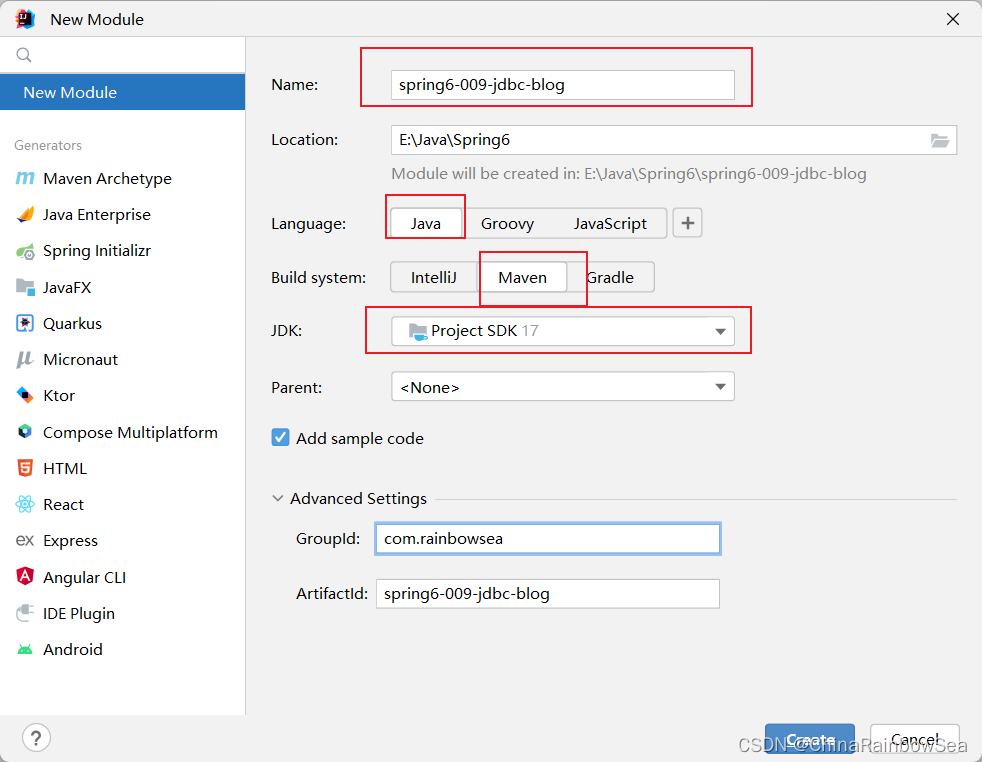
2. 环境准备
这里,我们新建一个模块,方便学习,如下:因为我们这里是Spring6,而Spring6最低支持的JDK是17,所以我这里是 JDK17的。
新建好模块以后,我们需要导入相关的依赖,这里我们通过 maven 导入依赖。关于Maven 的内容呢,大家可以移步至:✏️✏️✏️Maven_ChinaRainbowSea的博客-优快云博客 ,进行更多的学习了解
具体的依赖有:
spring context 依赖 (spring6 的依赖)
mysql-connector-java(关于MySQL驱动的依赖,因为我们要连接数据库,这里我们连接的是MySQL数据库)
spring-jdbc (spring jdbc,这个依赖中有JdbcTemplate)
junit (Junit4 单元测试依赖)
特殊的还有这个,也得添加上
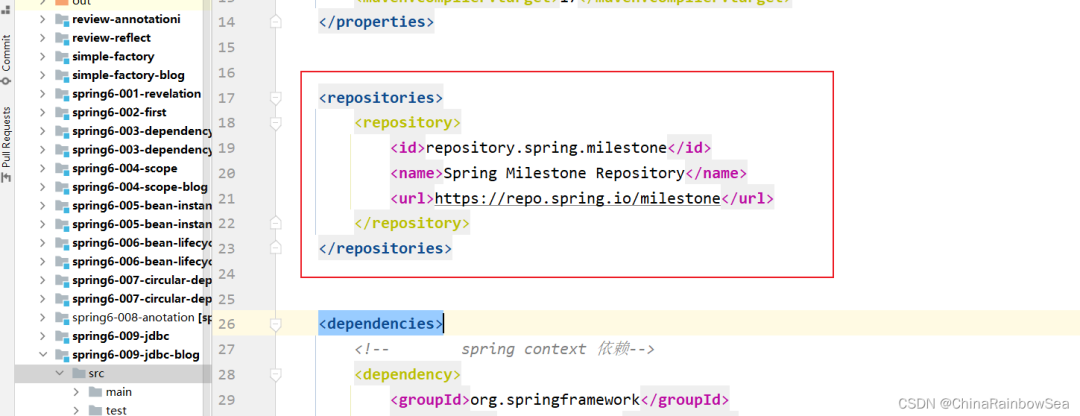
<repositories>
<repository>
<id>repository.spring.milestone</id>
<name>Spring Milestone Repository</name>
<url>https://repo.spring.io/milestone</url>
</repository>
</repositories>

<?xml version="1.0" encoding="UTF-8"?>
<projectxmlns="http://maven.apache.org/POM/4.0.0"
xmlns:xsi="http://www.w3.org/2001/XMLSchema-instance"
xsi:schemaLocation="http://maven.apache.org/POM/4.0.0 http://maven.apache.org/xsd/maven-4.0.0.xsd">
<modelVersion>4.0.0</modelVersion>

<groupId>com.rainbowsea</groupId>
<artifactId>spring6-009-jdbc-blog</artifactId>
<version>1.0-SNAPSHOT</version>

<properties>
<maven.compiler.source>17</maven.compiler.source>
<maven.compiler.target>17</maven.compiler.target>
</properties>


<repositories>
<repository>
<id>repository.spring.milestone</id>
<name>Spring Milestone Repository</name>
<url>https://repo.spring.io/milestone</url>
</repository>
</repositories>


<dependencies>
<!--        spring context 依赖-->
<dependency>
<groupId>org.springframework</groupId>
<artifactId>spring-context</artifactId>
<version>6.0.11</version>
</dependency>

<!-- mysql驱动 -->
<dependency>
<groupId>mysql</groupId>
<artifactId>mysql-connector-java</artifactId>
<version>8.0.30</version>
</dependency>

<!--spring jdbc,这个依赖中有JdbcTemplate-->
<dependency>
<groupId>org.springframework</groupId>
<artifactId>spring-jdbc</artifactId>
<version>6.0.0-M2</version>
</dependency>

<!-- junit4 -->
<dependency>
<groupId>junit</groupId>
<artifactId>junit</artifactId>
<version>4.13.2</version>
<scope>test</scope>
</dependency>
</dependencies>

</project>
3. 数据准备
首先,我们创建一个名为 spring6的数据库,想要了解SQL语句的内容的,大家可以移步至✏️✏️✏️ SQL语法学习_ChinaRainbowSea的博客-优快云博客
/* 判断该数据库是否存在,不存在,创建*/
CREATE DATABASE IF NOTEXISTS spring6;
然后在 spring6 数据库中创建一个名为 user 的数据表
CREATETABLE `user` (
`id` intNOTNULL AUTO_INCREMENT,
`real_name` varchar(255) ,
`age` int ,
PRIMARY KEY (`id`) USING BTREE
) ;
-- ----------------------------
-- Records of user
-- ----------------------------
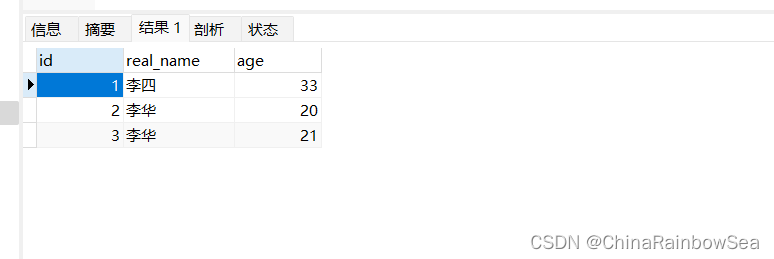
INSERTINTO `user` VALUES (1, '李四', 33);
INSERTINTO `user` VALUES (2, '李华', 20);
INSERTINTO `user` VALUES (3, '李华', 21);

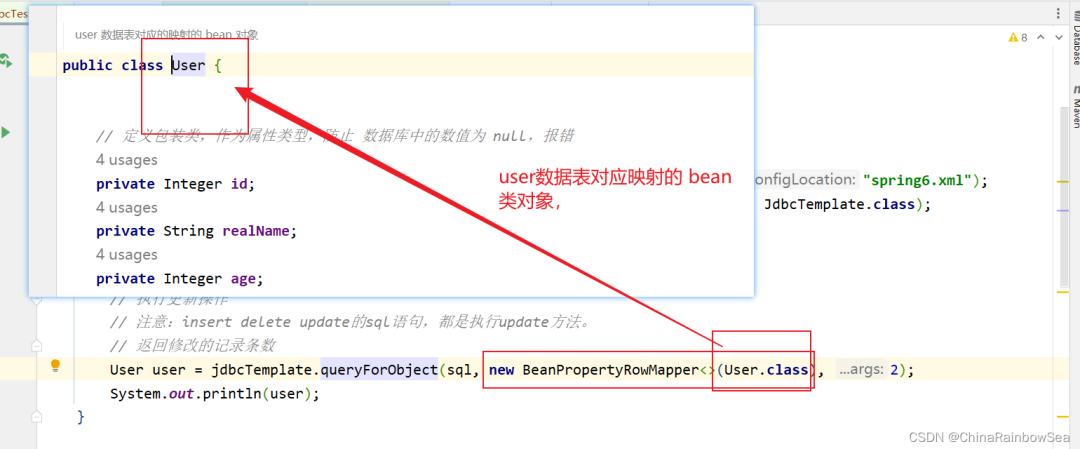
准备实体类:表user对应的实体类User。根据user 数据表结构创建对于的Bean 实体类。
注意: 这里我们定义用对应简单类型的包装类,来定义成员变量,防止数据库的数值为Null时,报错,中断。

package com.rainbowsea.spring6.bean;


/**
 * user 数据表对应的映射的 bean 对象
 */
publicclassUser {


// 定义包装类,作为属性类型,防止 数据库中的数值为 null,报错
private Integer id;
private String realName;
private Integer age;

publicUser(Integer id, String realName, Integer age) {
this.id = id;
this.realName = realName;
this.age = age;
    }


publicUser() {
    }


public Integer getId() {
return id;
    }

publicvoidsetId(Integer id) {
this.id = id;
    }

public String getRealName() {
return realName;
    }

publicvoidsetRealName(String realName) {
this.realName = realName;
    }

public Integer getAge() {
return age;
    }

publicvoidsetAge(Integer age) {
this.age = age;
    }

@Override
public String toString() {
return"User{" +
"id=" + id +
", realName='" + realName + '\'' +
", age=" + age +
'}';
    }
}
配置编写相关的spring.xml的信息
JdbcTemplate 是Spring 提供好的类,这类的完整类名是:org.springframework.jdbc.core.JdbcTemplate 。这个类上的使用,我们 new 对象就好了,而Spring 可以帮我们 new 对象,所以,我们就将这个new JdbcTemplate 对象这件事交给 Spring 来做。直接将这个类配置到
spring.xml的配置文件当中,纳入 Bean管理即可。
我们来看一下这个JdbcTemplate源码:
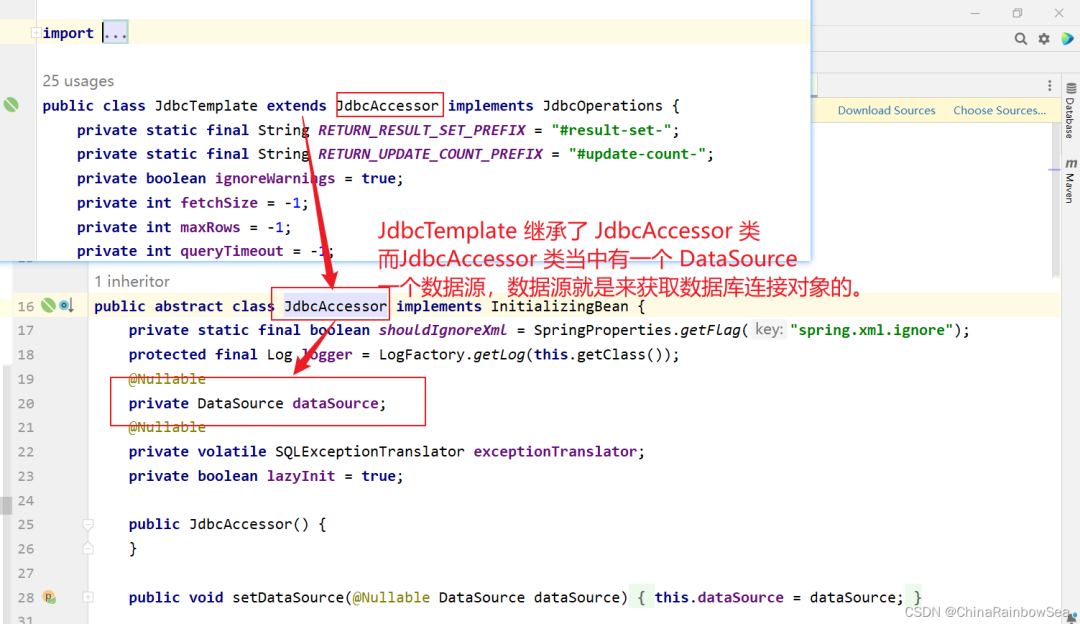
所以这里,我们只需要配置好 DataSource 数据源,用来连接数据库即可,将DataSource 属性进行 set 注入赋值上。可以看到JdbcTemplate中有一个DataSource属性,这个属性是数据源,我们都知道连接数据库需要Connection对象,而生成Connection对象是数据源负责的。所以我们需要给JdbcTemplate设置数据源属性。
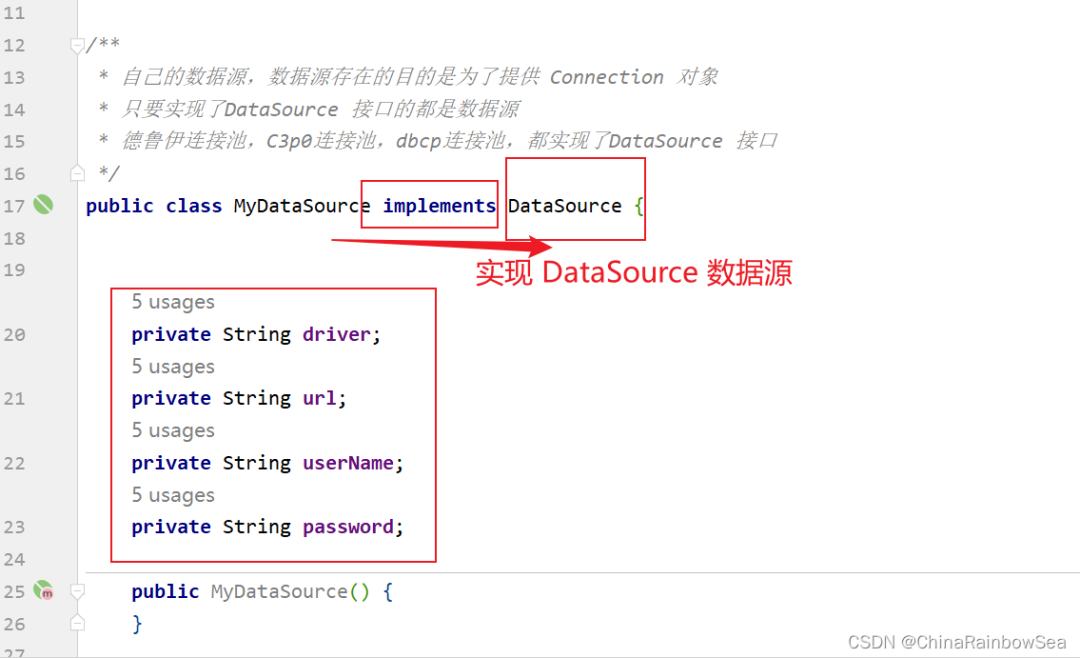
所有的数据源都是要实现javax.sql.DataSource接口的。这个数据源可以自己写一个,也可以用写好的,比如:阿里巴巴的德鲁伊连接池,c3p0,dbcp等。我们这里自己先手写一个数据源。
自己的数据源,数据源存在的目的是为了提供 Connection 对象;只要实现了DataSource 接口的都是数据源:德鲁伊连接池,C3p0连接池,dbcp连接池,都实现了DataSource 接口
如下:
重写其中的**public Connection getConnection() throws SQLException ** 方法,注意是没有参数的。
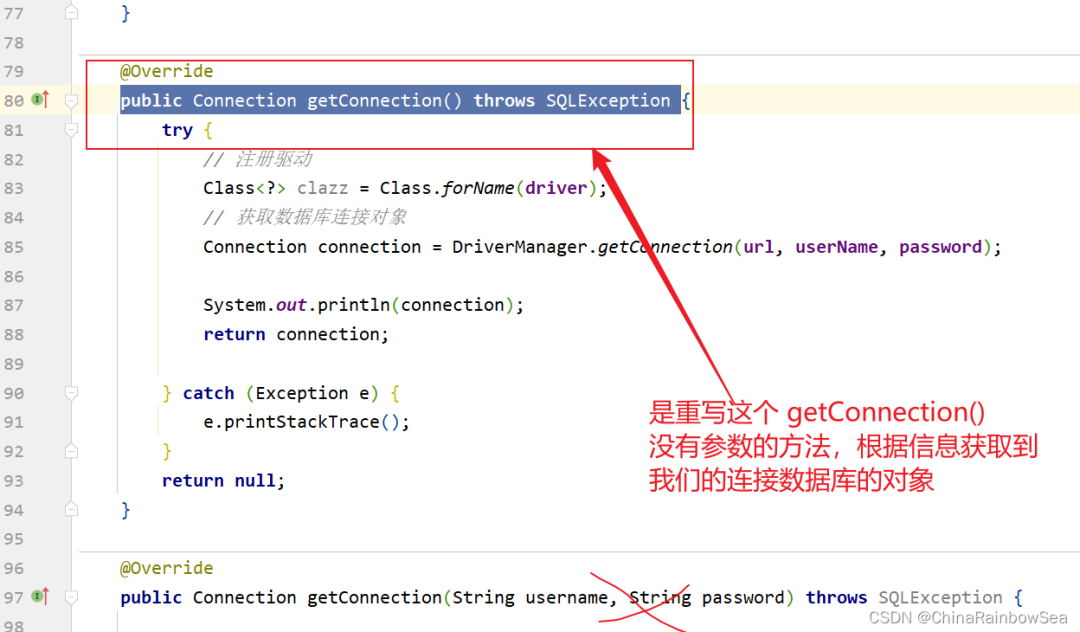
@Override
public Connection getConnection()throws SQLException {
try {
// 注册驱动
            Class<?> clazz = Class.forName(driver);
// 获取数据库连接对象
Connectionconnection= DriverManager.getConnection(url, userName, password);

            System.out.println(connection);
return connection;

        } catch (Exception e) {
            e.printStackTrace();
        }
returnnull;
    }
package com.rainbowsea.spring6.bean;

import javax.sql.DataSource;
import java.io.PrintWriter;
import java.sql.Connection;
import java.sql.DriverManager;
import java.sql.SQLException;
import java.sql.SQLFeatureNotSupportedException;
import java.util.logging.Logger;


/**
 * 自己的数据源,数据源存在的目的是为了提供 Connection 对象
 * 只要实现了DataSource 接口的都是数据源
 * 德鲁伊连接池,C3p0连接池,dbcp连接池,都实现了DataSource 接口
 */
publicclassMyDataSourceimplementsDataSource {


private String driver;
private String url;
private String userName;
private String password;

publicMyDataSource() {
    }

publicMyDataSource(String driver, String url, String userName, String password) {
this.driver = driver;
this.url = url;
this.userName = userName;
this.password = password;
    }


public String getDriver() {
return driver;
    }

publicvoidsetDriver(String driver) {
this.driver = driver;
    }

public String getUrl() {
return url;
    }

publicvoidsetUrl(String url) {
this.url = url;
    }

public String getUserName() {
return userName;
    }

publicvoidsetUserName(String userName) {
this.userName = userName;
    }

public String getPassword() {
return password;
    }

publicvoidsetPassword(String password) {
this.password = password;
    }


@Override
public String toString() {
return"MyDataSource{" +
"driver='" + driver + '\'' +
", url='" + url + '\'' +
", userName='" + userName + '\'' +
", password='" + password + '\'' +
'}';
    }

@Override
public Connection getConnection()throws SQLException {
try {
// 注册驱动
            Class<?> clazz = Class.forName(driver);
// 获取数据库连接对象
Connectionconnection= DriverManager.getConnection(url, userName, password);

            System.out.println(connection);
return connection;

        } catch (Exception e) {
            e.printStackTrace();
        }
returnnull;
    }

@Override
public Connection getConnection(String username, String password)throws SQLException {

returnnull;

    }

@Override
public PrintWriter getLogWriter()throws SQLException {
returnnull;
    }

@Override
publicvoidsetLogWriter(PrintWriter out)throws SQLException {

    }

@Override
publicvoidsetLoginTimeout(int seconds)throws SQLException {

    }

@Override
publicintgetLoginTimeout()throws SQLException {
return0;
    }

@Override
public Logger getParentLogger()throws SQLFeatureNotSupportedException {
returnnull;
    }

@Override
public <T> T unwrap(Class<T> iface)throws SQLException {
returnnull;
    }

@Override
publicbooleanisWrapperFor(Class<?> iface)throws SQLException {
returnfalse;
    }
}
写完数据源,我们需要把这个数据源传递给JdbcTemplate。因为JdbcTemplate中有一个DataSource属性;同时获取为该 DataSource 数据源,通过Spring的set 注入,为其中的成员变量赋值。就是连接我们MySQL数据库的一些信息。如下:
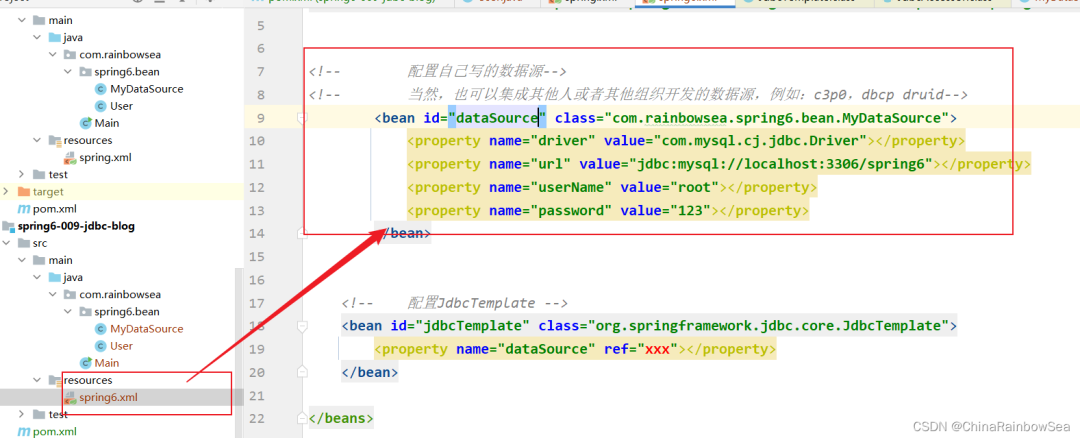
<!--        配置自己写的数据源-->
<!--        当然,也可以集成其他人或者其他组织开发的数据源,例如:c3p0,dbcp druid-->
<beanid="dataSource"class="com.rainbowsea.spring6.bean.MyDataSource">
<propertyname="driver"value="com.mysql.cj.jdbc.Driver"></property>
<propertyname="url"value="jdbc:mysql://localhost:3306/spring6"></property>
<propertyname="userName"value="root"></property>
<propertyname="password"value="123"></property>
</bean>
这时候,我们就可以将这个数据源传递给JdbcTemplate。因为JdbcTemplate中有一个DataSource属性。
<?xml version="1.0" encoding="UTF-8"?>
<beansxmlns="http://www.springframework.org/schema/beans"
xmlns:xsi="http://www.w3.org/2001/XMLSchema-instance"
xsi:schemaLocation="http://www.springframework.org/schema/beans http://www.springframework.org/schema/beans/spring-beans.xsd">
<!-- 配置自己写的数据源-->
<!-- 当然,也可以集成其他人或者其他组织开发的数据源,例如:c3p0,dbcp druid-->
<beanid="dataSource"class="com.rainbowsea.spring6.bean.MyDataSource">
<propertyname="driver"value="com.mysql.cj.jdbc.Driver"></property>
<propertyname="url"value="jdbc:mysql://localhost:3306/spring6"></property>
<propertyname="userName"value="root"></property>
<propertyname="password"value="123"></property>
</bean>
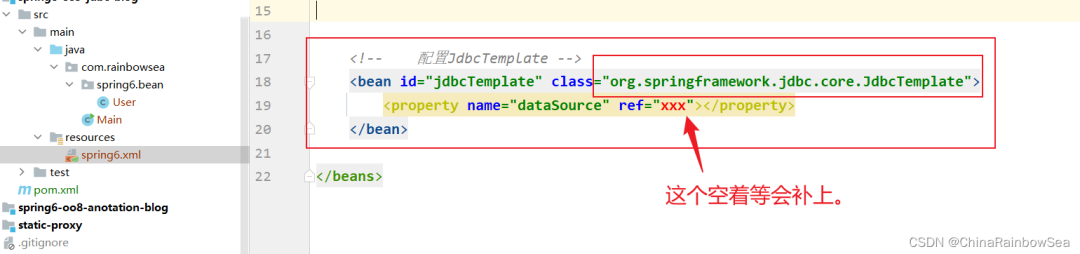
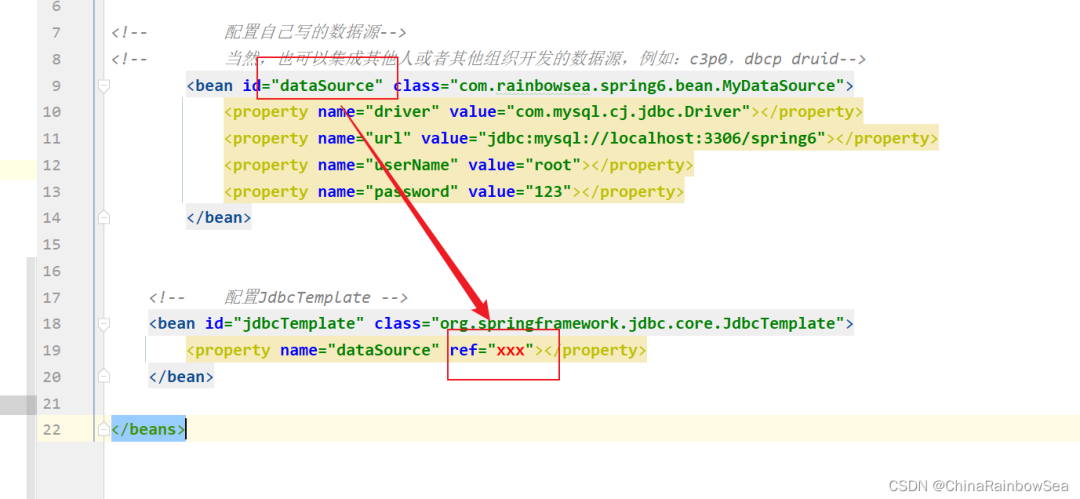
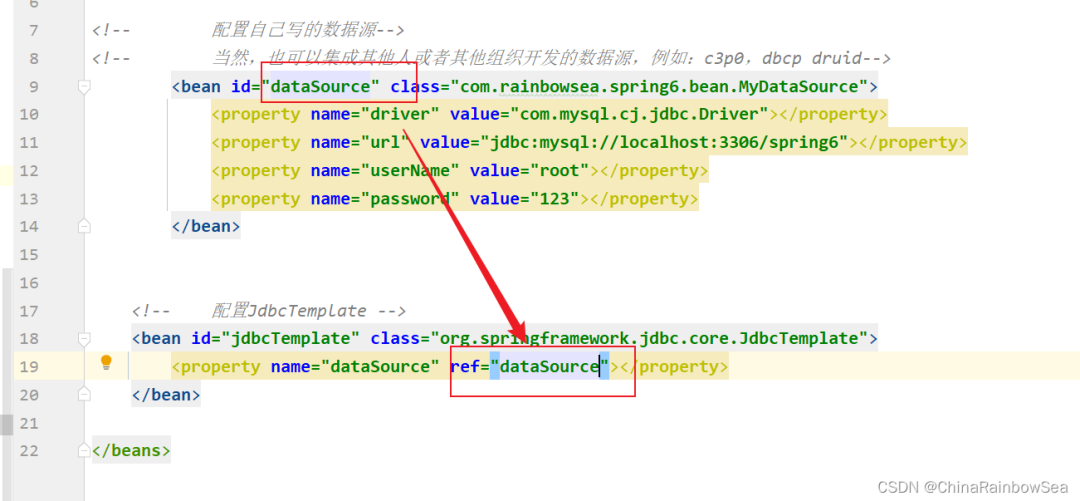
<!-- 配置JdbcTemplate -->
<beanid="jdbcTemplate"class="org.springframework.jdbc.core.JdbcTemplate">
<propertyname="dataSource"ref="dataSource"></property>
</bean>
</beans>
这里,我们的环境准备好了,数据表也准备好了,下面就可以开始通过Spring 的JdbcTemplate 操作数据库了(对数据库进行增删改查)的操作了。具体内容如下。
4. 开始
4.1 从数据表中插入(添加)数据
首先,我们通过 Spring 读取上面我们配置好的spinrg.xml 文件当中的,从而实例化 JdbcTemplate 类对象。
然后使用:jdbcTemplate.update() 的方法,执行SQL语句。
需要注意的是:在Spring当中的JdbcTemplate,对于数据库上的增删改,执行SQL语句都是使用update() 的方法处理的。
第一个参数:String sql
第二个参数: @Nullable Object... args 是一个可变参数(是一个数组),表示
表示:SQL语句当中的
?占位符的要填入的值。
返回值:int 表示修改/更新的记录条数。


package com.rainbowsea.test;
import org.junit.Test;
import org.springframework.context.ApplicationContext;
import org.springframework.context.support.ClassPathXmlApplicationContext;
import org.springframework.jdbc.core.JdbcTemplate;
publicclassJdbcTest {
@Test
publicvoidtestInsert() {
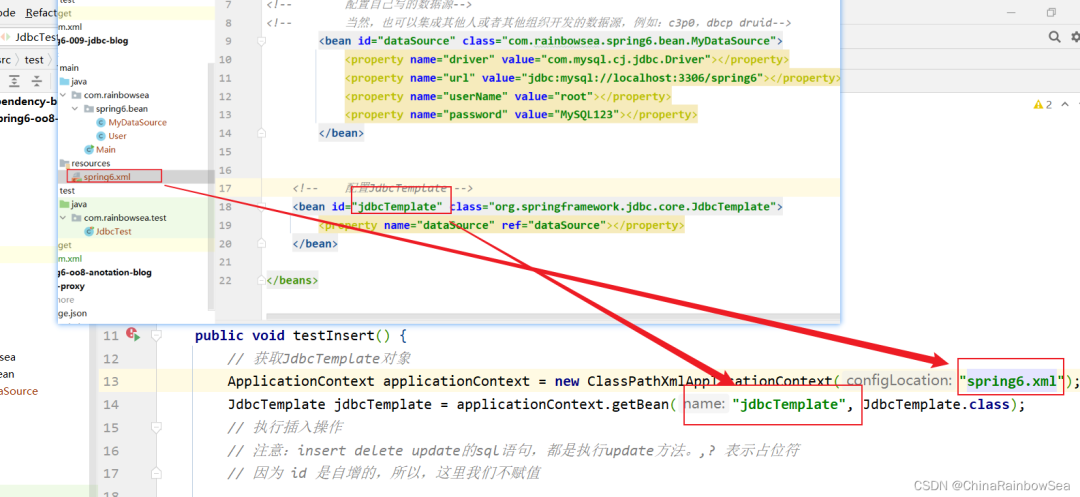
// 获取JdbcTemplate对象
ApplicationContextapplicationContext=newClassPathXmlApplicationContext("spring6.xml");
JdbcTemplatejdbcTemplate= applicationContext.getBean("jdbcTemplate", JdbcTemplate.class);
// 执行插入操作
// 注意:insert delete update的sql语句,都是执行update方法。,? 表示占位符
// 因为 id 是自增的,所以,这里我们不赋值
Stringsql="insert into user(real_name,age) values(?,?)";
// 返回修改的记录条数
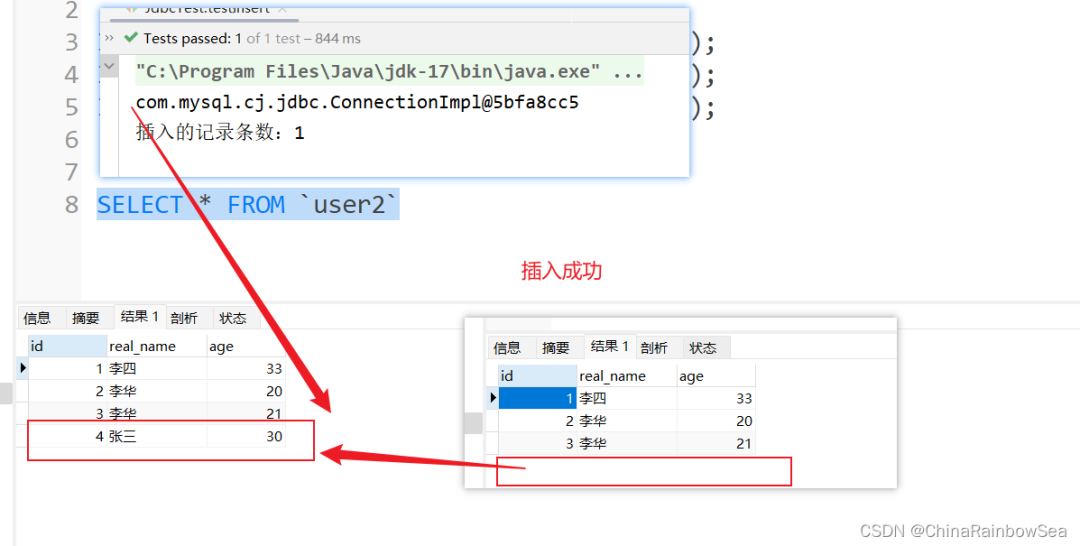
intcount= jdbcTemplate.update(sql, "张三", 30);
System.out.println("插入的记录条数:" + count);
}
}
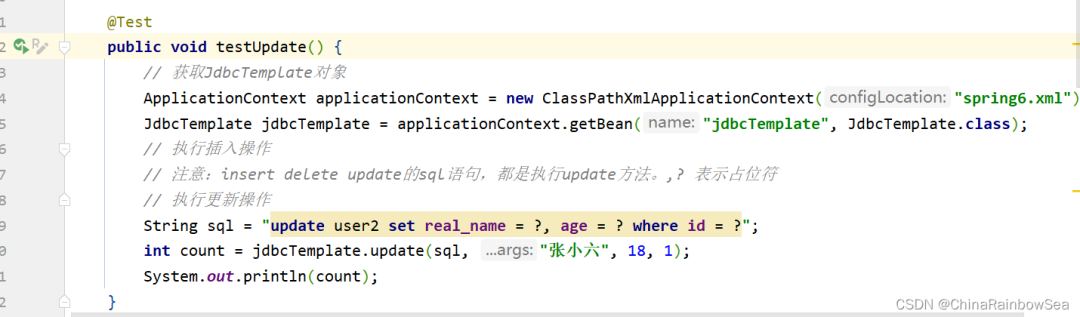
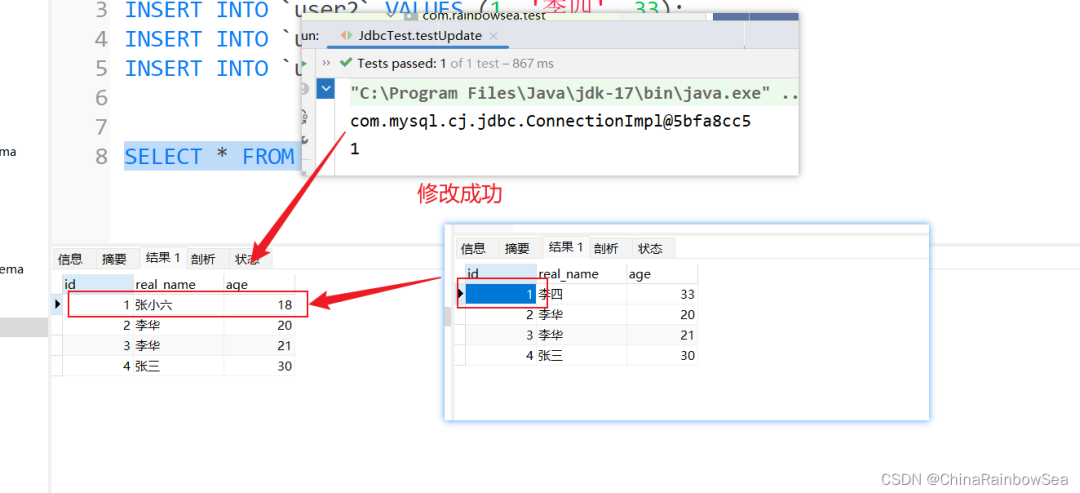
4.2 从数据表中修改数据
在Spring当中的JdbcTemplate,对于数据库上的增删改,执行SQL语句都是使用update() 的方法处理的。
我们这里:将id 为1的,real_name修改为:张小六,age 为 18
package com.rainbowsea.test;

import org.junit.Test;
import org.springframework.context.ApplicationContext;
import org.springframework.context.support.ClassPathXmlApplicationContext;
import org.springframework.jdbc.core.JdbcTemplate;

publicclassJdbcTest {


@Test
publicvoidtestUpdate() {
// 获取JdbcTemplate对象
ApplicationContextapplicationContext=newClassPathXmlApplicationContext("spring6.xml");
JdbcTemplatejdbcTemplate= applicationContext.getBean("jdbcTemplate", JdbcTemplate.class);
// 执行插入操作
// 注意:insert delete update的sql语句,都是执行update方法。,? 表示占位符
// 执行更新操作
Stringsql="update user2 set real_name = ?, age = ? where id = ?";
intcount= jdbcTemplate.update(sql, "张小六", 18, 1);
        System.out.println(count);
    }
}
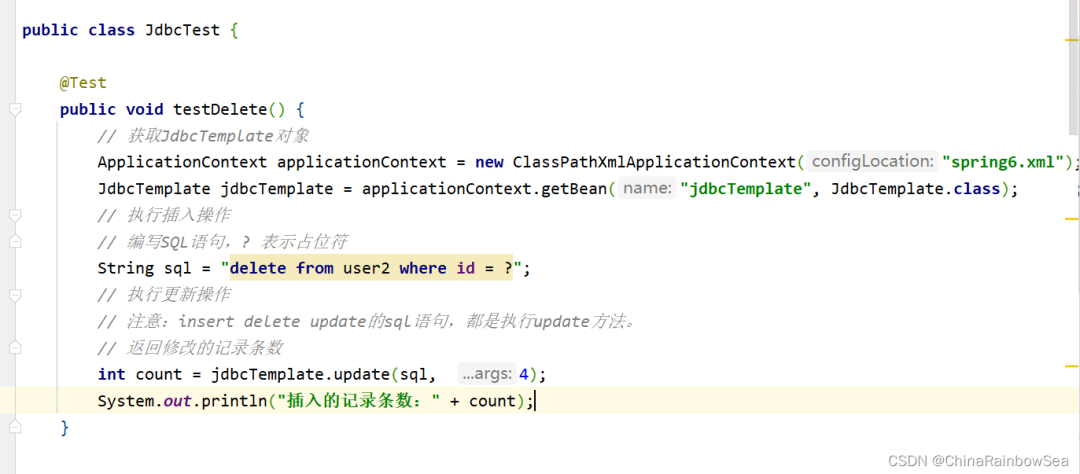
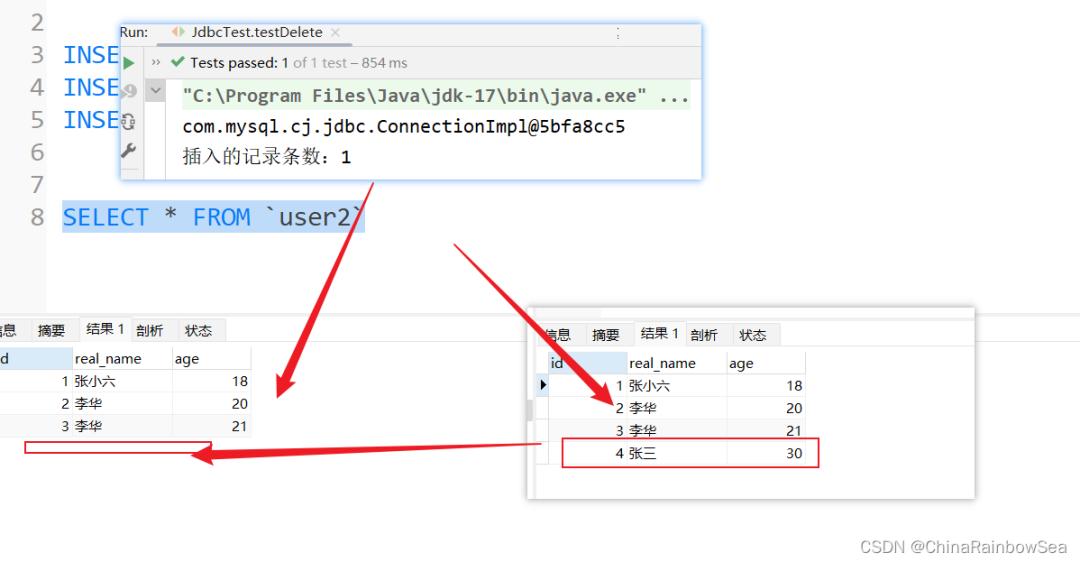
4.3 从数据表中删除数据
在Spring当中的JdbcTemplate,对于数据库上的增删改,执行SQL语句都是使用update() 的方法处理的。
我们这里:将id 为4的一条记录删除了。
package com.rainbowsea.test;

import org.junit.Test;
import org.springframework.context.ApplicationContext;
import org.springframework.context.support.ClassPathXmlApplicationContext;
import org.springframework.jdbc.core.JdbcTemplate;

publicclassJdbcTest {

@Test
publicvoidtestDelete() {
// 获取JdbcTemplate对象
ApplicationContextapplicationContext=newClassPathXmlApplicationContext("spring6.xml");
JdbcTemplatejdbcTemplate= applicationContext.getBean("jdbcTemplate", JdbcTemplate.class);
// 执行插入操作
// 编写SQL语句,? 表示占位符
Stringsql="delete from user2 where id = ?";
// 执行更新操作
// 注意:insert delete update的sql语句,都是执行update方法。
// 返回修改的记录条数
intcount= jdbcTemplate.update(sql,  4);
        System.out.println("插入的记录条数:" + count);
    }
}
4.4 从数据表中查询一个对象
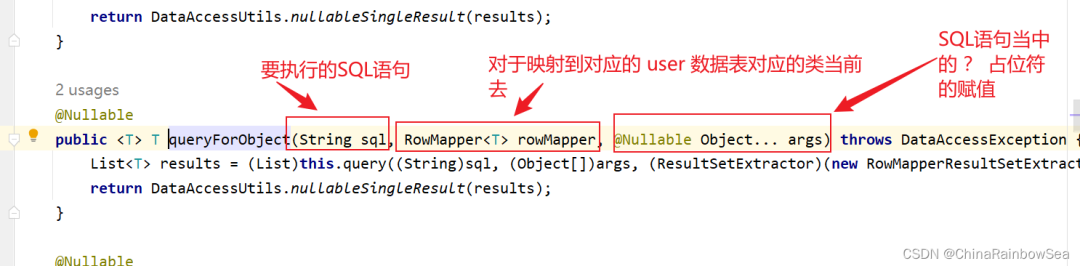
关于查询一条记录,使用 jdbcTemplate.queryForObject() 方法:

第一个参数:String sql 要执行的SQL语句
第二个参数:BeanPropertyRowMapper 与对应数据库表中 bean 类的相映射的类。一般用: new BeanPropertyRowMapper<>(T.class) 这样的对象装配上。Bean属性值和数据库记录行的映射对象。在构造方法中指定映射的对象类型。

第三个参数:SQL语句当中的
?占位符。可变长参数,给sql语句的占位符问号传值。返回值:运用了泛型,也就是对应数据库表中在Java当中相对应,映射的 bean 类。
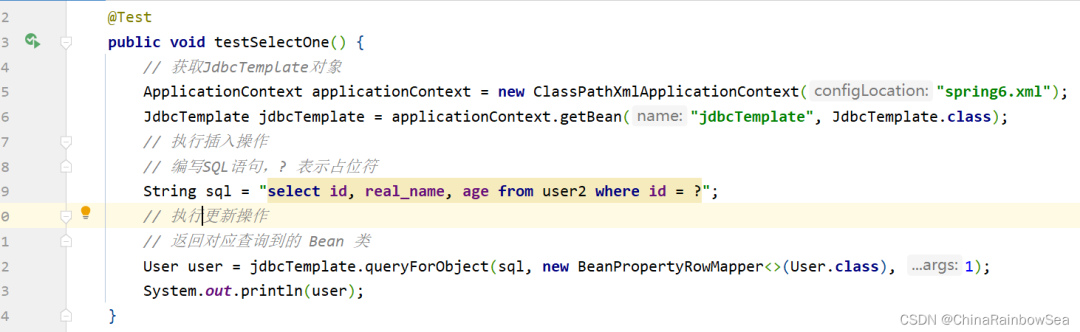
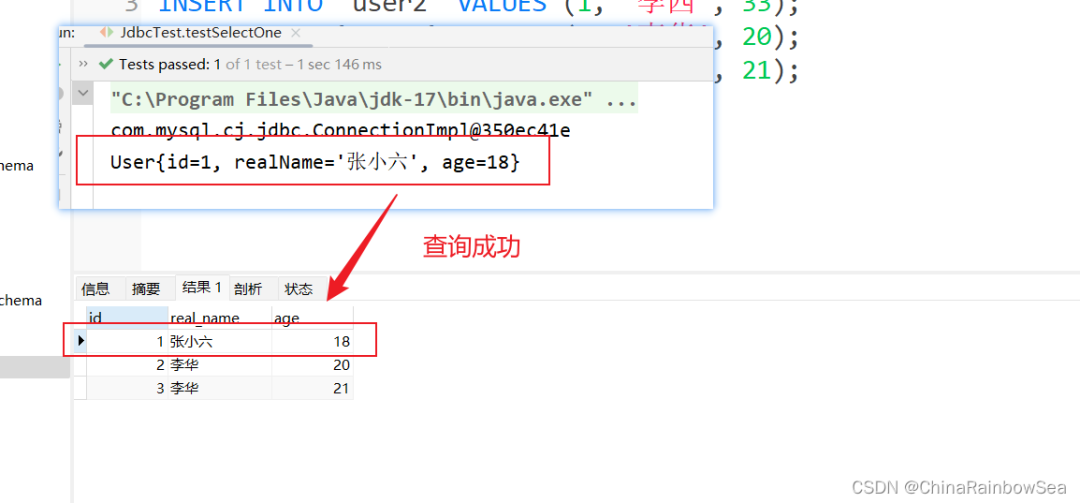
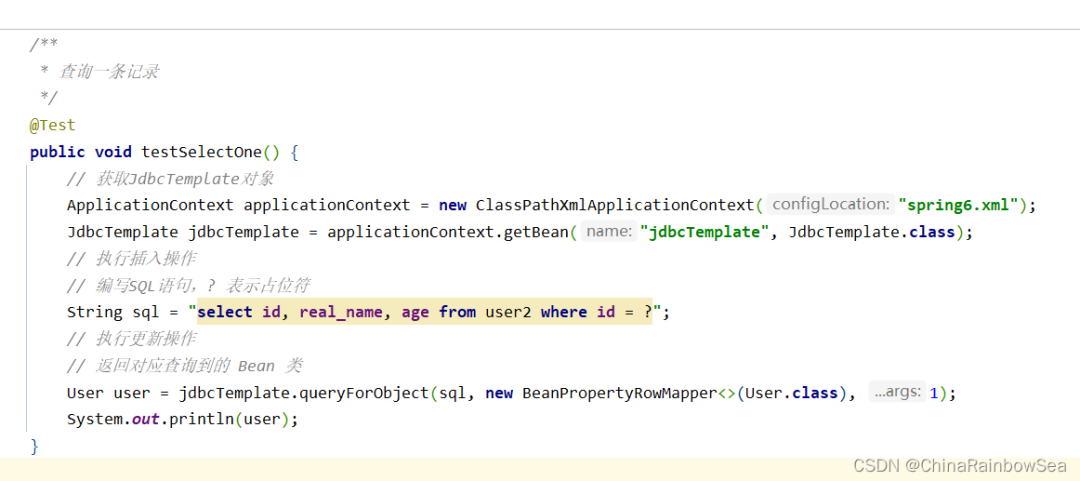
这里我们查询一个id为1的,其中的ID,real_name,age 的一条记录
import com.rainbowsea.spring6.bean.User;
import org.junit.Test;
import org.springframework.context.ApplicationContext;
import org.springframework.context.support.ClassPathXmlApplicationContext;
import org.springframework.jdbc.core.BeanPropertyRowMapper;
import org.springframework.jdbc.core.JdbcTemplate;

publicclassJdbcTest {

@Test
publicvoidtestSelectOne() {
// 获取JdbcTemplate对象
ApplicationContextapplicationContext=newClassPathXmlApplicationContext("spring6.xml");
JdbcTemplatejdbcTemplate= applicationContext.getBean("jdbcTemplate", JdbcTemplate.class);
// 执行插入操作
// 编写SQL语句,? 表示占位符
Stringsql="select id, real_name, age from user2 where id = ?";
// 执行更新操作
// 返回对应查询到的 Bean 类
Useruser= jdbcTemplate.queryForObject(sql, newBeanPropertyRowMapper<>(User.class), 1);
        System.out.println(user);
    }
}
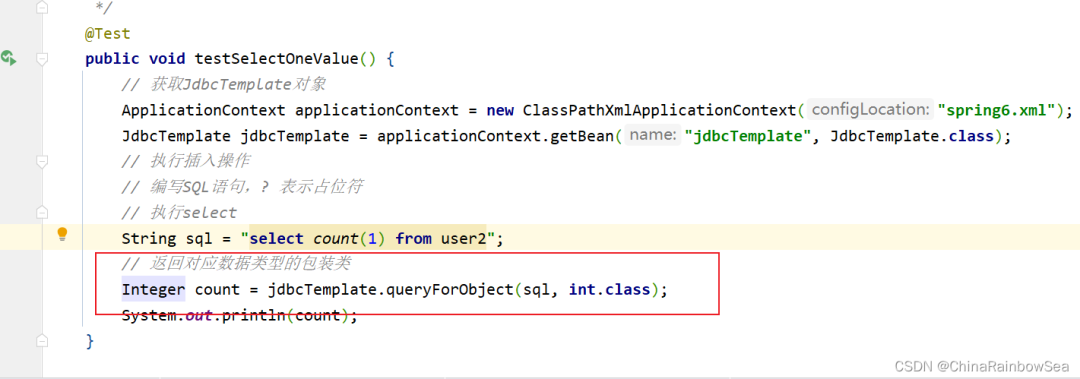
4.5 从数据表中查询一个值
查询数据表当中有几条记录,对应查询数据表中的一个值的内容,我们同样还是使用:jdbcTemplate.queryForObject() 方法来进行。不同的是,这个参数是两个的,是对应的类对象,
比如这里我们查询的是一个数据表中有几条记录,几条记录,就是一个值了,一个数值类型的类对象了,可以是 int.class,也可以是 long.class,还可以是 short.class 因为只要是数值类型就可以了。
返回值是对应类的包装类,


import com.rainbowsea.spring6.bean.User;
import org.junit.Test;
import org.springframework.context.ApplicationContext;
import org.springframework.context.support.ClassPathXmlApplicationContext;
import org.springframework.jdbc.core.BeanPropertyRowMapper;
import org.springframework.jdbc.core.JdbcTemplate;
import java.util.List;
publicclassJdbcTest {
/**
* 查询数据表中的一个值
*/
@Test
publicvoidtestSelectOneValue() {
// 获取JdbcTemplate对象
ApplicationContextapplicationContext=newClassPathXmlApplicationContext("spring6.xml");
JdbcTemplatejdbcTemplate= applicationContext.getBean("jdbcTemplate", JdbcTemplate.class);
// 执行插入操作
// 编写SQL语句,? 表示占位符
// 执行select
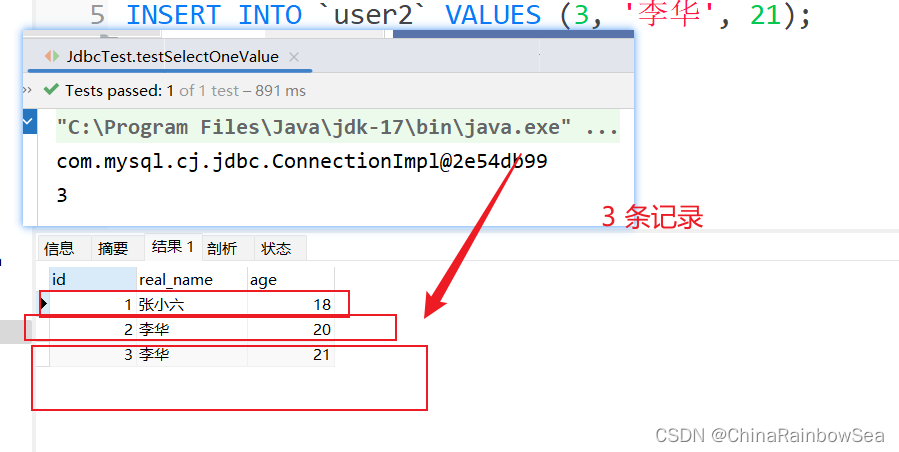
Stringsql="select count(1) from user2";
// 返回对应数据类型的包装类
Integercount= jdbcTemplate.queryForObject(sql, int.class);
System.out.println(count);
}
}
用 Long.class 也是可以的。

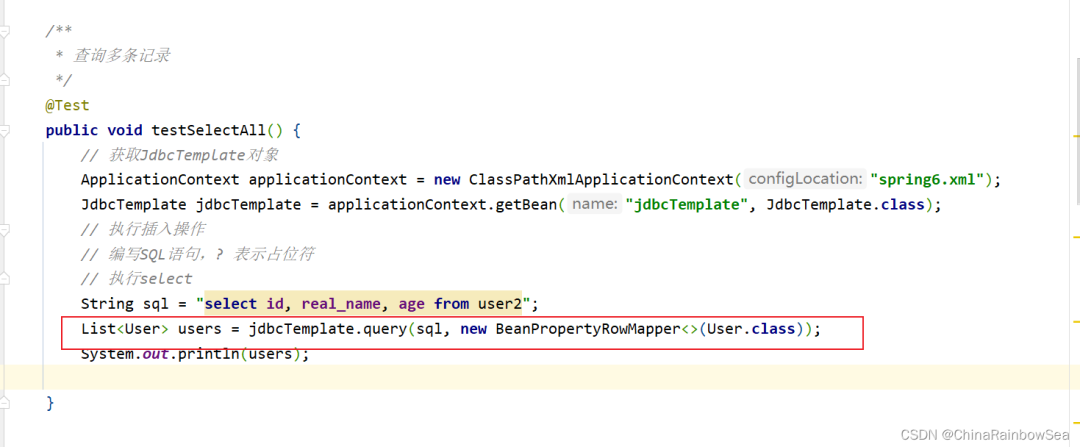
4.6 从数据表中查询多条记录
查询数据表中的多个对象,我们就要使用:jdbcTemplate.query() 方法了
第一个参数:同样还是:要执行的SQL语句
第二个参数:。Bean属性值和数据库记录行的映射对象。在构造方法中指定映射的对象类型。;BeanPropertyRowMapper 与对应数据库表中 bean 类的相映射的类。一般用: new BeanPropertyRowMapper<>(T.class) 这样的对象装配上。
返回值:是一个List 集合了,因为我们查询到的多条记录,自然就是存储到集合当中去了。

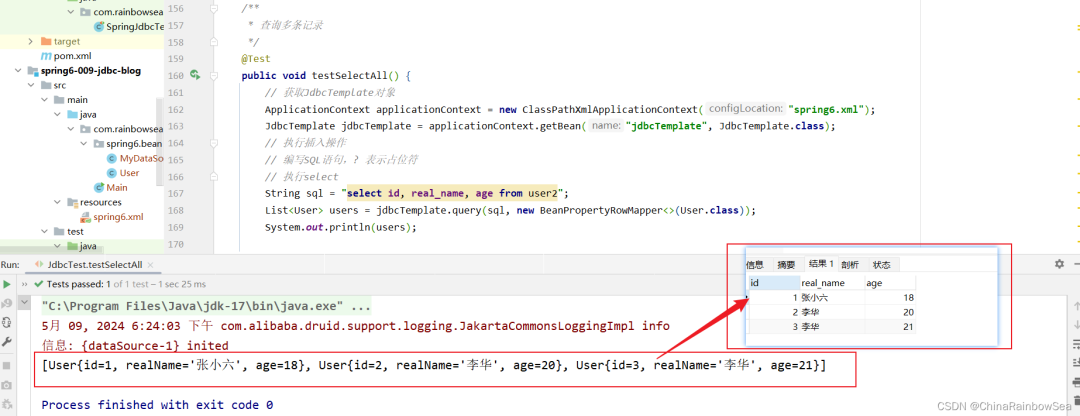
这里我们查询,user2 表中的所有用户的所有信息。
import com.rainbowsea.spring6.bean.User;
import org.junit.Test;
import org.springframework.context.ApplicationContext;
import org.springframework.context.support.ClassPathXmlApplicationContext;
import org.springframework.jdbc.core.BeanPropertyRowMapper;
import org.springframework.jdbc.core.JdbcTemplate;
import java.util.List;
publicclassJdbcTest {
/**
* 查询多条记录
*/
@Test
publicvoidtestSelectAll() {
// 获取JdbcTemplate对象
ApplicationContextapplicationContext=newClassPathXmlApplicationContext("spring6.xml");
JdbcTemplatejdbcTemplate= applicationContext.getBean("jdbcTemplate", JdbcTemplate.class);
// 执行插入操作
// 编写SQL语句,? 表示占位符
// 执行select
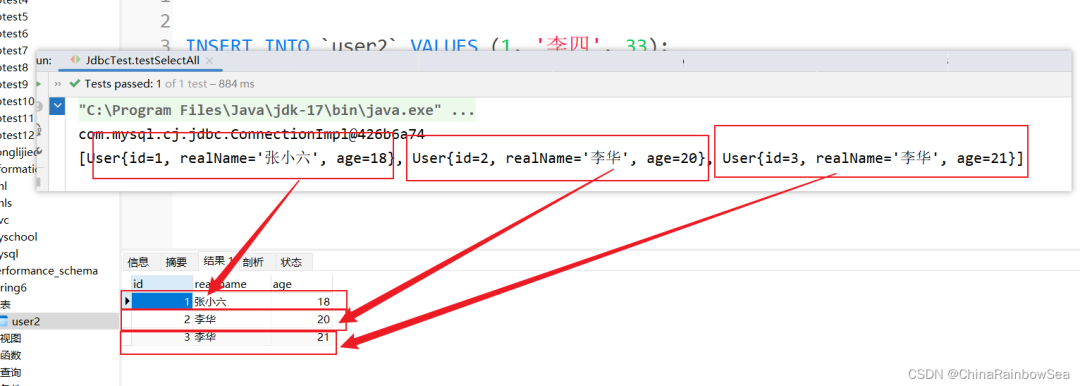
Stringsql="select id, real_name, age from user2";
List<User> users = jdbcTemplate.query(sql, newBeanPropertyRowMapper<>(User.class));
System.out.println(users);
}
}
4.7 从数据表中批量添加数据
对于数据表中的批量添加数据,我们这里需要用上:jdbcTemplate.batchUpdate() 方法
第一个参数:String sql 要执行的SQL语句
第二个参数: List<Object[]> batchArgs 是一个List集合当中存储 Object[ ] 数组,注意是数组,这个List 就是,我们批量插入数据时,对于SQL语句当中的
?占位符的传值,因为这个参数是: List<Object[]> batchArgs,所以我们需要将我们 ?占位符的值,放入到List 集合当中,再作为参数,传给jdbcTemplate.batchUpdate() 方法。
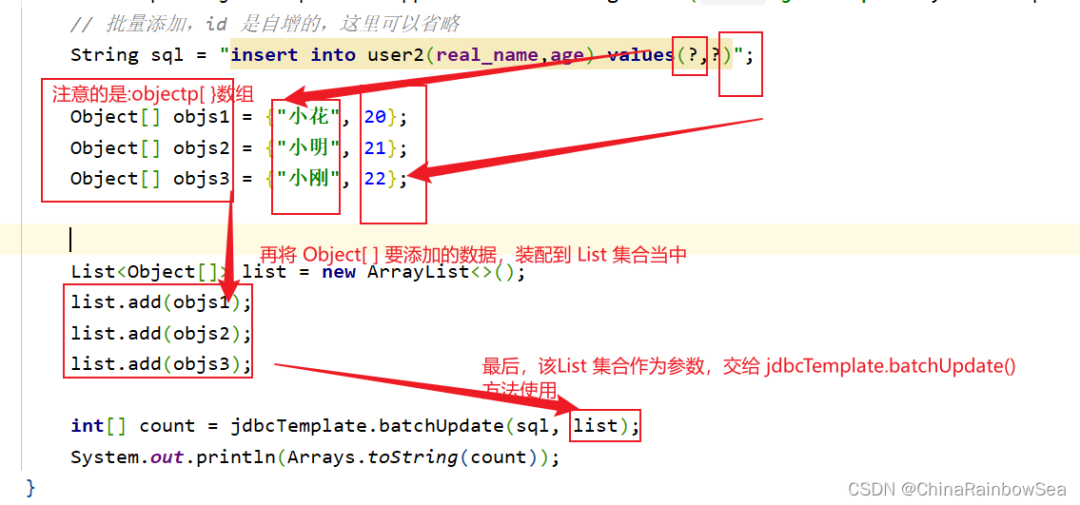
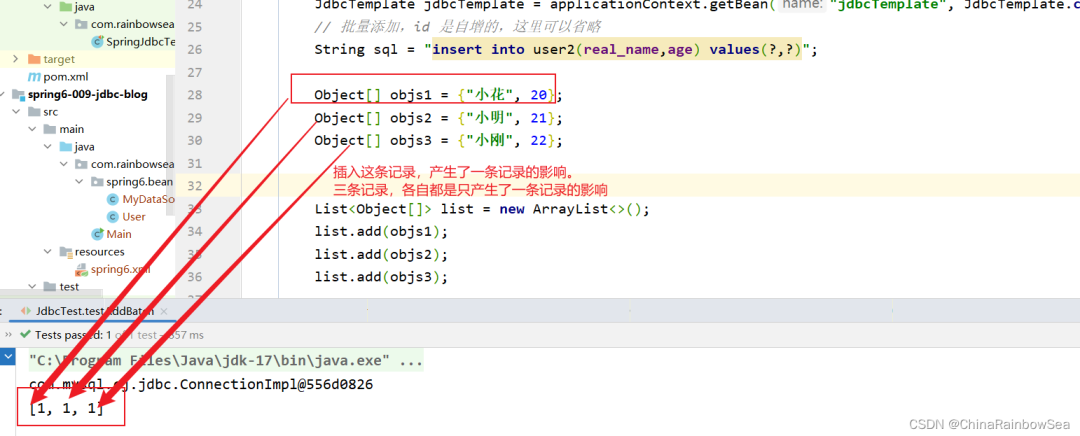
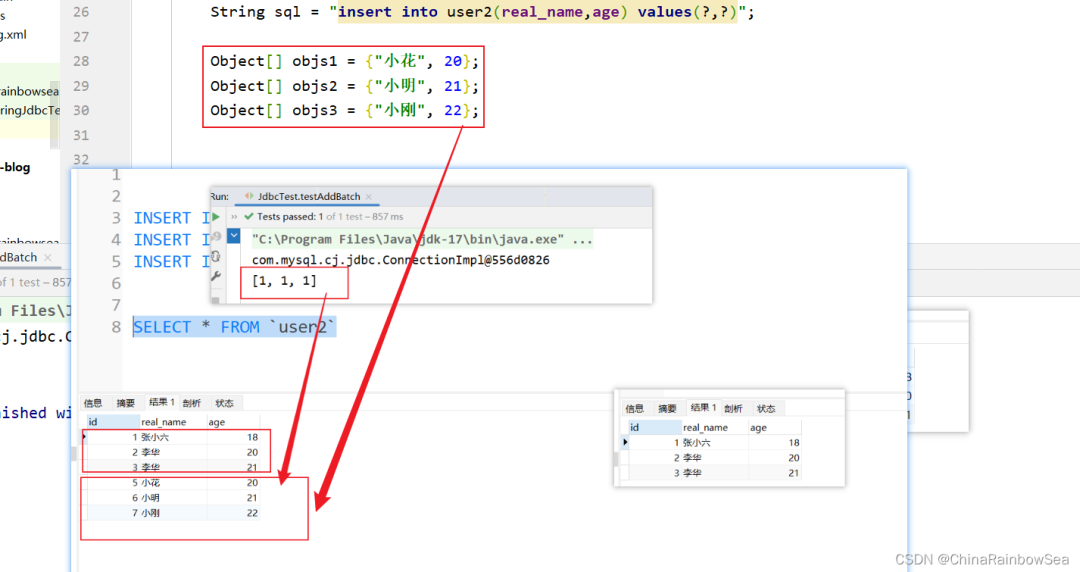
返回值:就是你各个批量插入的记录的,各个成功的记录条数,比如这里我们批量添加了3条记录,那么如果三条记录都插入成功了的话,就是[1,1,1]。表示每执行一次这个:"insert into user2(real_name,age) values(?,?)"; SQL语句就会影响到一条记录。
插入这条记录,产生了一条记录的影响。
三条记录,各自都是只产生了一条记录的影响

import com.rainbowsea.spring6.bean.User;
import org.junit.Test;
import org.springframework.context.ApplicationContext;
import org.springframework.context.support.ClassPathXmlApplicationContext;
import org.springframework.jdbc.core.BeanPropertyRowMapper;
import org.springframework.jdbc.core.JdbcTemplate;
import java.util.ArrayList;
import java.util.Arrays;
import java.util.List;
publicclassJdbcTest {
/**
* 批量添加数据
*/
@Test
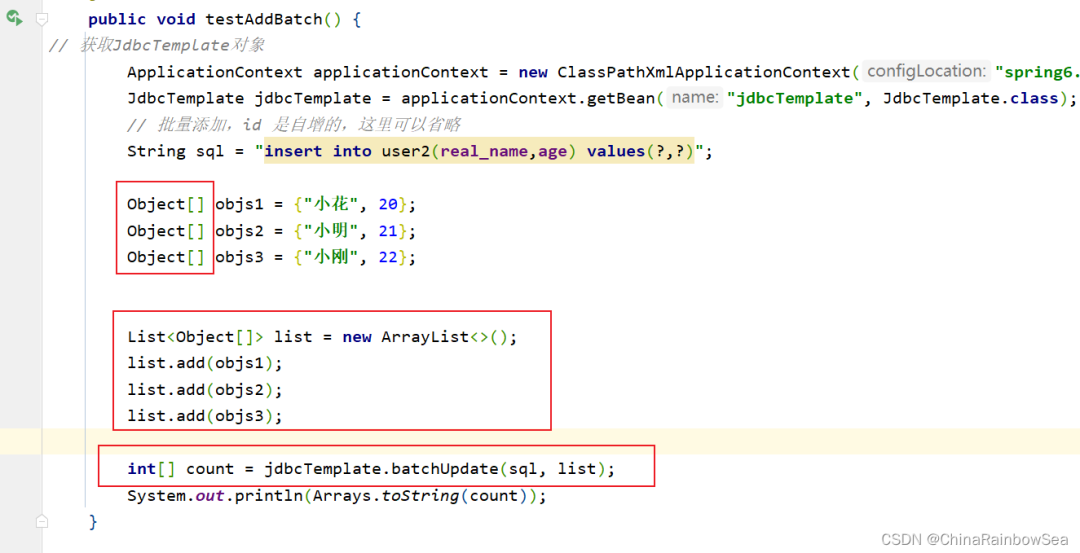
publicvoidtestAddBatch() {
// 获取JdbcTemplate对象
ApplicationContextapplicationContext=newClassPathXmlApplicationContext("spring6.xml");
JdbcTemplatejdbcTemplate= applicationContext.getBean("jdbcTemplate", JdbcTemplate.class);
// 批量添加,id 是自增的,这里可以省略
Stringsql="insert into user2(real_name,age) values(?,?)";
Object[] objs1 = {"小花", 20};
Object[] objs2 = {"小明", 21};
Object[] objs3 = {"小刚", 22};
// 将要修改的数据封装到 List 集合当中,再作为参数传入
List<Object[]> list = newArrayList<>();
list.add(objs1);
list.add(objs2);
list.add(objs3);
int[] count = jdbcTemplate.batchUpdate(sql, list);
System.out.println(Arrays.toString(count));
}
}
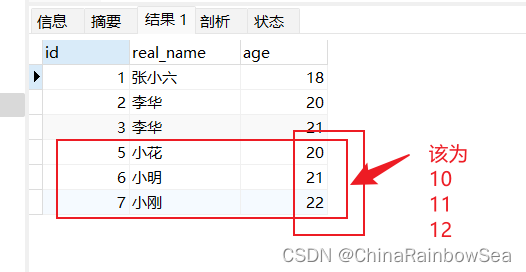
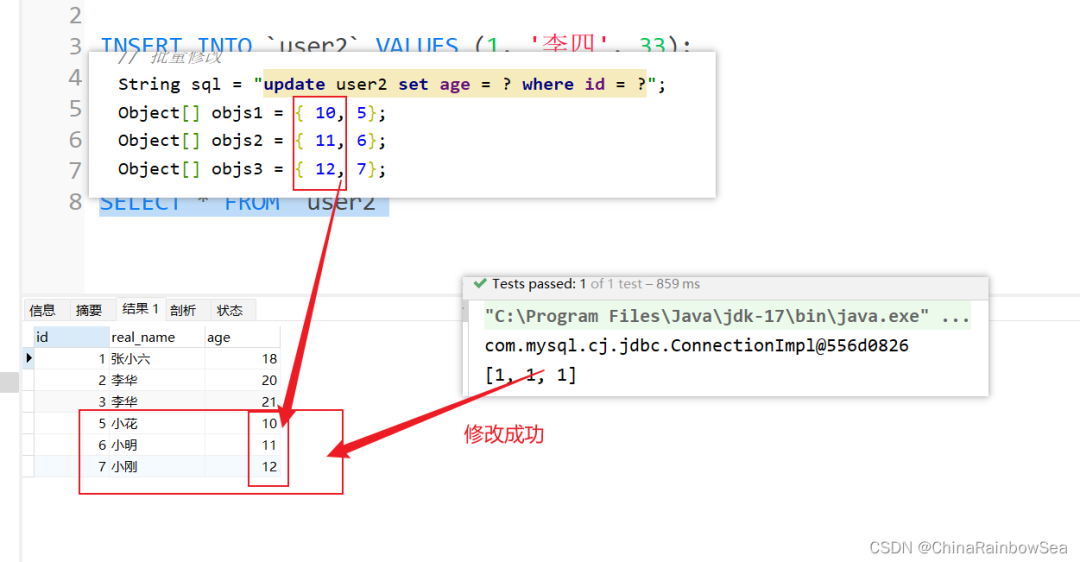
4.8 从数据表中批量修改数据
从数据表中批量修改数据还是使用:jdbcTemplate.batchUpdate() 方法。唯一不同的就是执行的SQL语句不同而已。下面我们将id 为 5,6,7 的 age 改为 10,11,12

import com.rainbowsea.spring6.bean.User;
import org.junit.Test;
import org.springframework.context.ApplicationContext;
import org.springframework.context.support.ClassPathXmlApplicationContext;
import org.springframework.jdbc.core.BeanPropertyRowMapper;
import org.springframework.jdbc.core.JdbcTemplate;

import java.util.ArrayList;
import java.util.Arrays;
import java.util.List;

publicclassJdbcTest {

/**
     * 批量修改
     */
@Test
publicvoidtestUpdateBatch() {
// 获取JdbcTemplate对象
ApplicationContextapplicationContext=newClassPathXmlApplicationContext("spring6.xml");
JdbcTemplatejdbcTemplate= applicationContext.getBean("jdbcTemplate", JdbcTemplate.class);
// 批量修改
Stringsql="update user2 set age = ? where id = ?";
        Object[] objs1 = { 10, 5};
        Object[] objs2 = { 11, 6};
        Object[] objs3 = { 12, 7};

// 将要修改的数据封装到 List 集合当中,再作为参数传入
        List<Object[]> list = newArrayList<>();
        list.add(objs1);
        list.add(objs2);
        list.add(objs3);

int[] count = jdbcTemplate.batchUpdate(sql, list);
        System.out.println(Arrays.toString(count));
    }
}
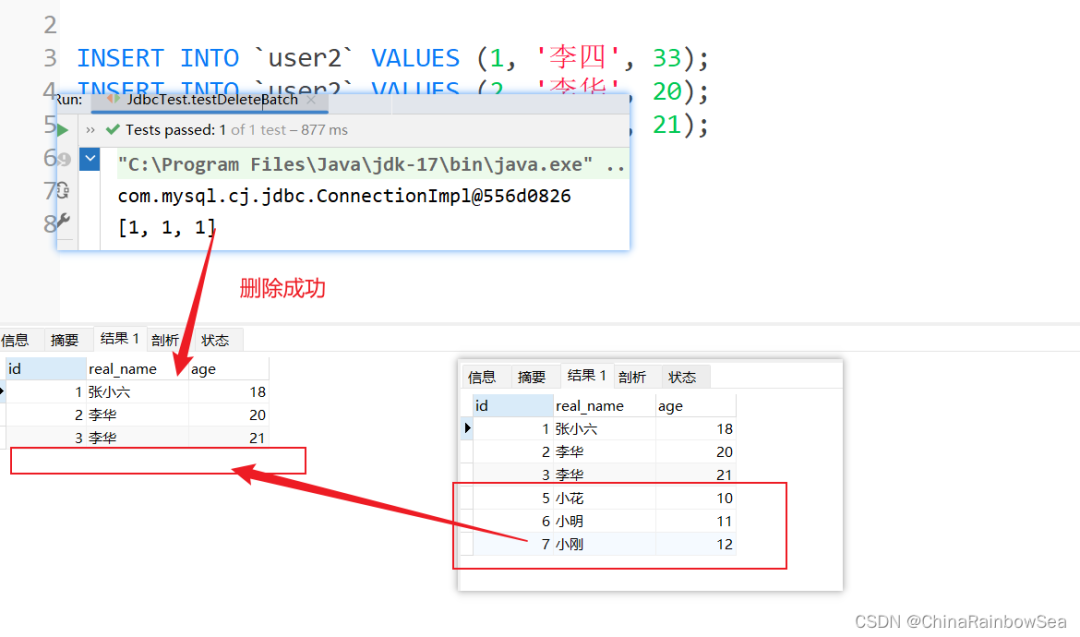
4.9 从数据表中批量删除数据
从数据表中批量删除数据还是使用:jdbcTemplate.batchUpdate() 方法。唯一不同的就是执行的SQL语句不同而已。下面我们将user 数据表中的 id 为 5,6,7 的记录删除了。

import com.rainbowsea.spring6.bean.User;
import org.junit.Test;
import org.springframework.context.ApplicationContext;
import org.springframework.context.support.ClassPathXmlApplicationContext;
import org.springframework.jdbc.core.BeanPropertyRowMapper;
import org.springframework.jdbc.core.JdbcTemplate;

import java.util.ArrayList;
import java.util.Arrays;
import java.util.List;

publicclassJdbcTest {


/**
     * 批量删除
     */
@Test
publicvoidtestDeleteBatch() {
// 获取JdbcTemplate对象
ApplicationContextapplicationContext=newClassPathXmlApplicationContext("spring6.xml");
JdbcTemplatejdbcTemplate= applicationContext.getBean("jdbcTemplate", JdbcTemplate.class);

// 批量删除
Stringsql="delete from user2 where id = ?";
        Object[] objs1 = {5};
        Object[] objs2 = {6};
        Object[] objs3 = {7};

// 将要修改的数据封装到 List 集合当中,再作为参数传入
        List<Object[]> list = newArrayList<>();
        list.add(objs1);
        list.add(objs2);
        list.add(objs3);

int[] count = jdbcTemplate.batchUpdate(sql, list);
        System.out.println(Arrays.toString(count));
    }
}
4.10 JdbcTemplate 使用回调函数
使用回调函数,可以参与的更加细节:例如:如果你想写JDBC代码,可以使用callback回调函数
想要执行回调函数,用使用上 jdbcTemplate.execute() 方法,

第一个参数是:String sql 要执行的SQL语句
第二个参数是:PreparedStatementCallback action ,是个接口,我们要传其实例化对象,
PreparedStatementCallback,一般我们通常是使用 lambda 表达式 ,简化代码。
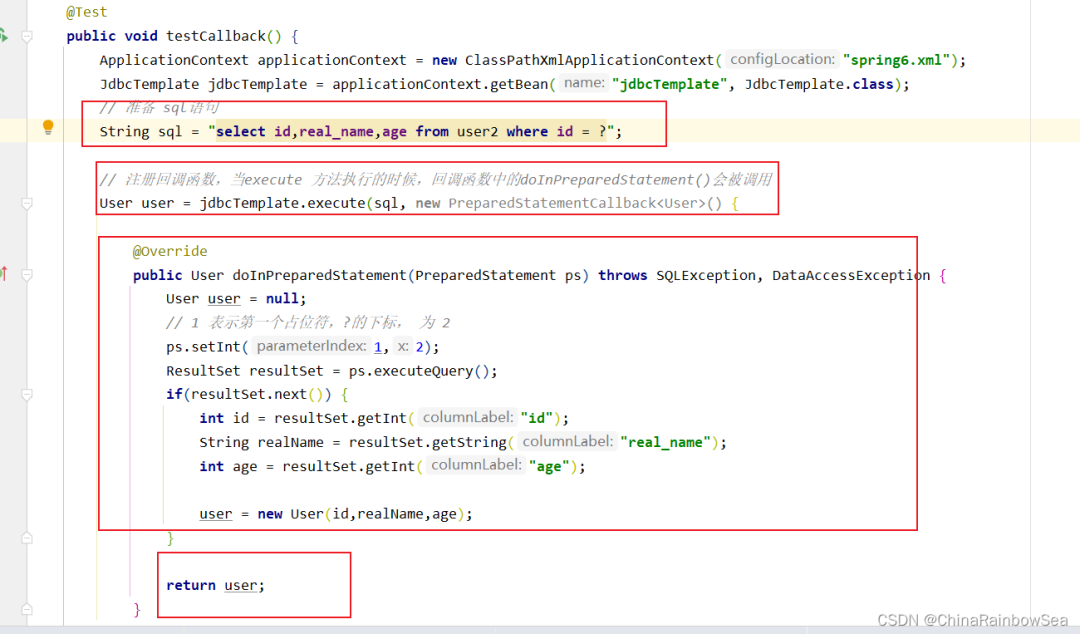
需要注意的是:注册回调函数,当execute 方法执行的时候,回调函数中的doInPreparedStatement()会被调用
返回值:就是这里运用的泛型,返回值,就是你传的 T.class 的 Bean 对象。


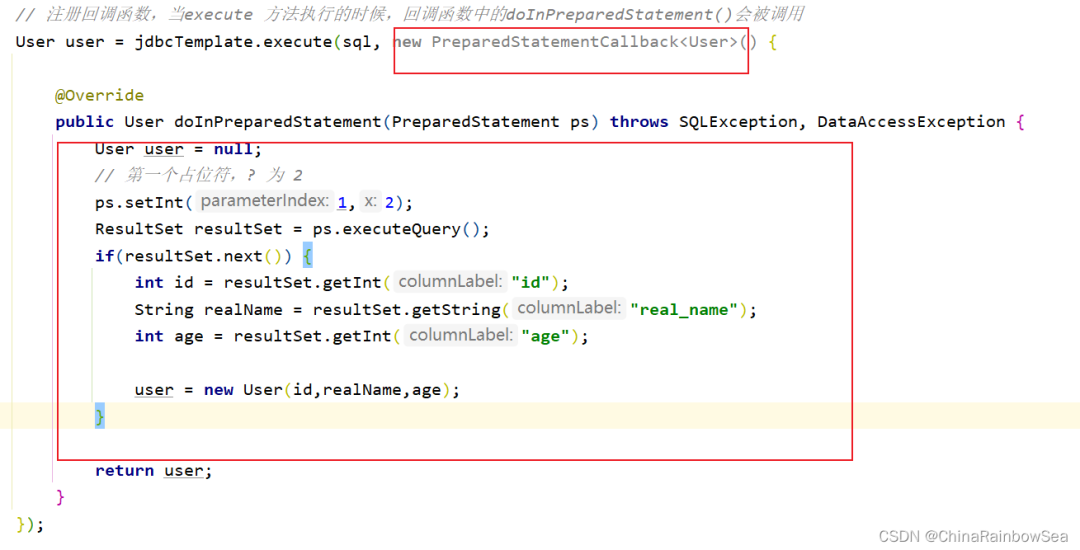
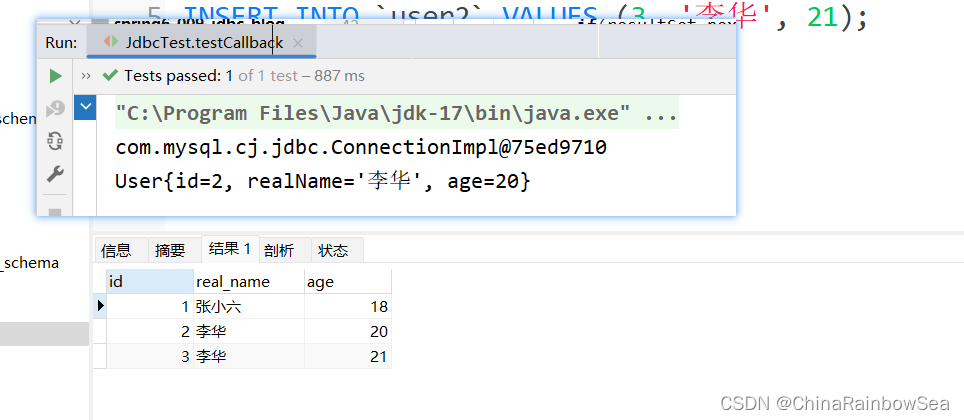
这里我们使用回调函数,查询 user 数据表中 id 为 2的 用户的,id, real_name,age 的记录信息
import com.rainbowsea.spring6.bean.User;
import org.junit.Test;
import org.springframework.context.ApplicationContext;
import org.springframework.context.support.ClassPathXmlApplicationContext;
import org.springframework.dao.DataAccessException;
import org.springframework.jdbc.core.BeanPropertyRowMapper;
import org.springframework.jdbc.core.JdbcTemplate;
import org.springframework.jdbc.core.PreparedStatementCallback;

import java.sql.PreparedStatement;
import java.sql.ResultSet;
import java.sql.SQLException;
import java.util.ArrayList;
import java.util.Arrays;
import java.util.List;

publicclassJdbcTest {


/**
     * 回调函数
     * 如果你想写JDBC代码,可以使用callback回调函数
     */
@Test
publicvoidtestCallback() {
ApplicationContextapplicationContext=newClassPathXmlApplicationContext("spring6.xml");
JdbcTemplatejdbcTemplate= applicationContext.getBean("jdbcTemplate", JdbcTemplate.class);
// 准备 sql语句
Stringsql="select id,real_name,age from user2 where id = ?";

// 注册回调函数,当execute 方法执行的时候,回调函数中的doInPreparedStatement()会被调用
Useruser= jdbcTemplate.execute(sql, newPreparedStatementCallback<User>() {

@Override
public User doInPreparedStatement(PreparedStatement ps)throws SQLException, DataAccessException {
Useruser=null;
// 1 表示第一个占位符,?的下标, 为 2
                ps.setInt(1,2);
ResultSetresultSet= ps.executeQuery();
if(resultSet.next()) {
intid= resultSet.getInt("id");
StringrealName= resultSet.getString("real_name");
intage= resultSet.getInt("age");

                    user = newUser(id,realName,age);
                }

return user;
            }
        });

        System.out.println(user);


    }
}
4.11 JdbcTemplate 配合使用上德鲁伊连接池
上面演示的是用我们自己写的数据源。这里我们其实也是可以使用别人写好的。例如比较牛的德鲁伊连接池。
第一步:引入德鲁伊连接池的依赖。(毕竟是别人写的,我需要导入,才能使用),使用 maven 导入。
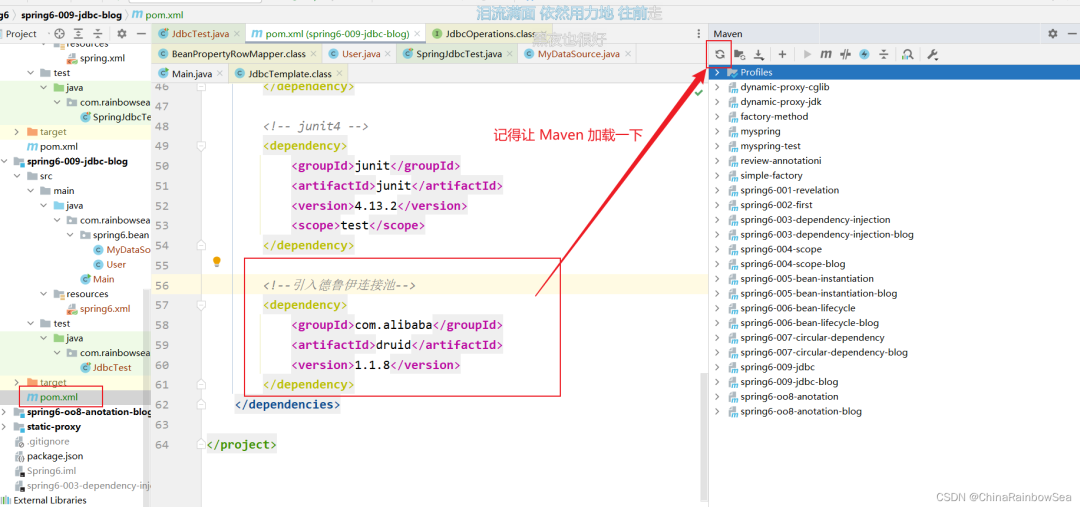
<!--引入德鲁伊连接池-->
<dependency>
<groupId>com.alibaba</groupId>
<artifactId>druid</artifactId>
<version>1.1.8</version>
</dependency>
第二步:将德鲁伊中的数据源配置到 spring.xml 配置文件中。和配置我们自己写的一样。就是一些:对应数据库的注册驱动,指明数据库的所在位置,以及连接数据库的账号和密码。
需要特别注意的是:注意这里是:driverClassName,是简单类型进行set注入对属性赋值,简单类型可以用 value

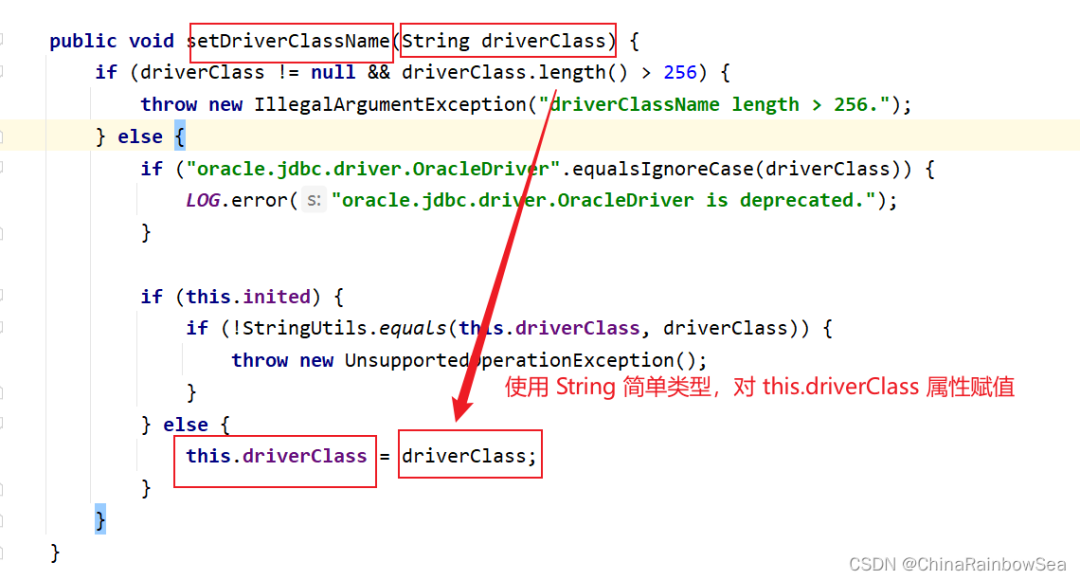
而如果是使用:driver,用 ref了

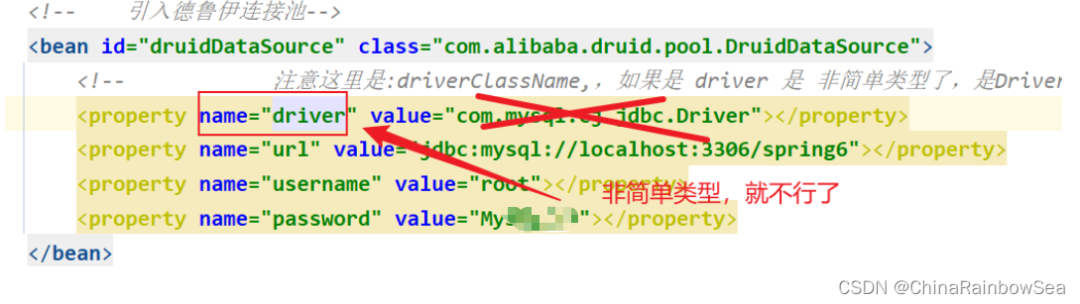
这里我们用:driverClassName,进行简单类型的set 注入,对 this.driver 成员变量的属性赋值。
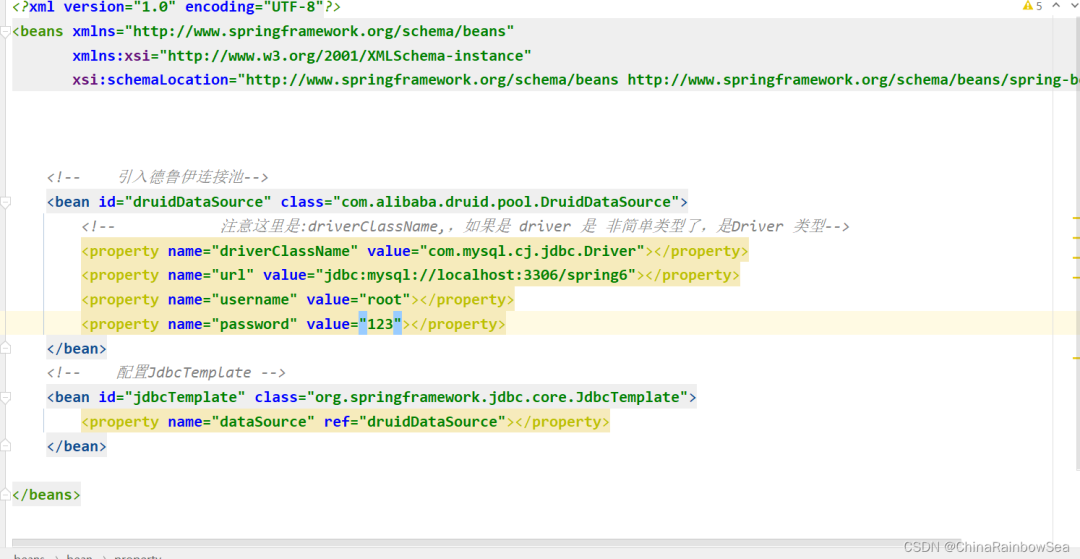
<?xml version="1.0" encoding="UTF-8"?>
<beansxmlns="http://www.springframework.org/schema/beans"
xmlns:xsi="http://www.w3.org/2001/XMLSchema-instance"
xsi:schemaLocation="http://www.springframework.org/schema/beans http://www.springframework.org/schema/beans/spring-beans.xsd">


<!--    引入德鲁伊连接池-->
<beanid="druidDataSource"class="com.alibaba.druid.pool.DruidDataSource">
<!--            注意这里是:driverClassName,,如果是 driver 是 非简单类型了,是Driver 类型-->
<propertyname="driverClassName"value="com.mysql.cj.jdbc.Driver"></property>
<propertyname="url"value="jdbc:mysql://localhost:3306/spring6"></property>
<propertyname="username"value="root"></property>
<propertyname="password"value="123"></property>
</bean>
<!--    配置JdbcTemplate -->
<beanid="jdbcTemplate"class="org.springframework.jdbc.core.JdbcTemplate">
<propertyname="dataSource"ref="druidDataSource"></property>
</bean>

</beans>
下面,我们测试,使用德鲁伊数据库连接池,进行对数据库的查询:
查询id 为1的一条记录。

查询成功。
我们再使用德鲁伊进行多个数据的查询。同样也是没有问题的。
5. 总结:
JdbcTemplate 是Spring 提供的一个JDBC模板类,是对JDBC的封装,简化JDBC代码,当然,你也可以不用,可以让Spring集成其它的ORM框架,例如:MyBatis,Hibernate 等。
使用JdbcTemplate 需要导入的如下 jar依赖
1. spring context 依赖 (spring6 的依赖)
2. mysql-connector-java(关于MySQL驱动的依赖,因为我们要连接数据库,这里我们连接的是MySQL数据库)
3. spring-jdbc (spring jdbc,这个依赖中有JdbcTemplate)
4. junit (Junit4 单元测试依赖)
在Spring当中的JdbcTemplate,对于数据库上的增删改,执行SQL语句都是使用
update()的方法处理的。关于查询一条记录,使用 jdbcTemplate.queryForObject() 方法:
查询数据表中的多个对象,我们就要使用:jdbcTemplate.query() 方法了
查询数据表当中有几条记录,对应查询数据表中的一个值的内容,我们同样还是使用:jdbcTemplate.queryForObject() 方法来进行。不同的是,这个参数是两个的,是对应的类对象。需要注意的第二个参数,使用的是:对应返回类型的 T.class 类
使用回调函数,可以参与的更加细节:例如:如果你想写JDBC代码,可以使用callback回调函数
想要执行回调函数,用使用上 jdbcTemplate.execute() 方法, 需要注意的是:注册回调函数,当execute 方法执行的时候,回调函数中的doInPreparedStatement()会被调用
对于数据表中的批量添加删除修改数据,我们这里需要用上:jdbcTemplate.batchUpdate() 方法
6. 最后:
“在这个最后的篇章中,我要表达我对每一位读者的感激之情。你们的关注和回复是我创作的动力源泉,我从你们身上吸取了无尽的灵感与勇气。我会将你们的鼓励留在心底,继续在其他的领域奋斗。感谢你们,我们总会在某个时刻再次相遇。”


 122
122

 被折叠的 条评论
为什么被折叠?
被折叠的 条评论
为什么被折叠?
 到【灌水乐园】发言


