


 本文介绍如何在Android应用中使用Retrofit 2.9.0进行网络请求,包括创建Retrofit实例、定义实体类、接口注解、添加依赖及解决HTTP链接安全问题。同时探讨了OkHttp和Gson的配合,以及如何处理不同类型的网络操作和请求头。
一、概念
是由Square公司开发的一款 RESTful API 请求框架,它通过注解将HTTP请求抽象为Java/Kotlin接口,简化了网络请求的定义与调用,其核心价值是将网络请求的“配置逻辑”(如URL、请求方法、参数)与“执行逻辑”解耦,让代码更简洁、可维护。
Retrofit本身不执行网络请求,而是将接口定义的请求参数转换为 OkHttp 可识别的 Request 对象,最终通过 OkHttp 完成TCP连接、数据传输等底层操作。
| HttpClient | Android 6中移除(API数量多扩展困难)。 |
| HttpURLConnection | 目前官方集成的。 |
| OKHttp | Square公司出品,底层通讯的实现。 |
| Retrofit | Square公司出品,上层接口的封装(注解代替代码)更方便进行网络请求。 |
二、基本使用
Retrofit把网络请求的 URL 分成了两部分设置:创建Retrofit实例时通过 .baseUrl("...") 设置的 + 网络访问接口的函数注解 @GET("...") 设置的。
2.1 添加依赖
implementation 'com.squareup.retrofit2:retrofit:2.9.0'    //会连带下载 OkHttp和Okio
implementation 'com.squareup.retrofit2:converter-gson:2.k6.1'    //JSON序列化库
2.2 构建Retrofit对象
若需为不同接口配置不同的超时/拦截器,需创建多个OkHttpClient实例,再分别初始化多个Retrofit实例(每个Retrofit关联一个OkHttpClient)。
val retrofit = Retrofit.Builder()
    //配置重复的根路径
    .baseUrl("https://www.baidu.com/")
    //关联自定义的OkHttpClient
    .client(okHttpClient)
    //指定解析数据使用的转换库(这里是Gson),使来自接口的json字符串解析成我们定义好的对应bean类
    .addConverterFactory(GsonConverterFactory.create())
    .build()
2.2.1 数据转换接口 Converter
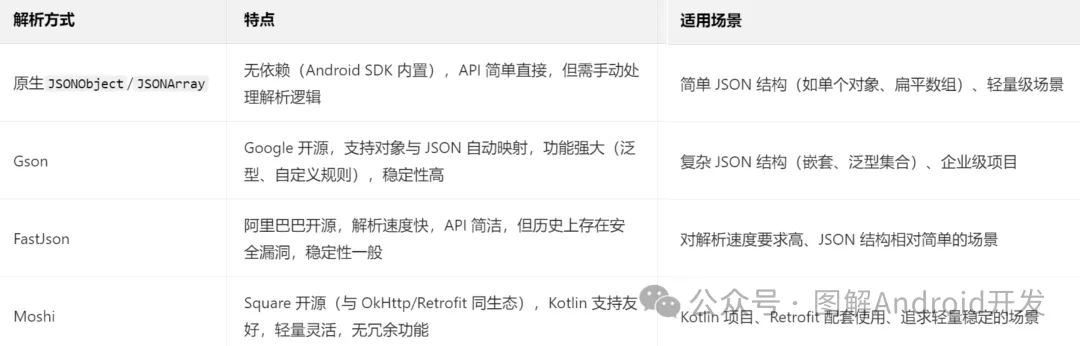
是Retrofit的数据转换接口,负责将HTTP请求的“请求体”(如Java对象)序列化为网络传输的字节流(如JSON字符串),以及将HTTP响应的“响应体”(如JSON字符串)反序列化为Java/Kotlin对象。Android中常用的JSON解析方式可分为原生解析和第三方库解析两类,核心差异在于易用性、性能和功能扩展性。
val gson = GsonBuilder()
    //默认情况下,Gson将Date对象序列化为时间戳,可自定义格式
    .setDateFormat("yyyy-MM-dd HH:mm:ss")
    //下划线命名(如user_name → userName)
    .setFieldNamingPolicy(FieldNamingPolicy.LOWER_CASE_WITH_UNDERSCORES)
    .create()

val retrofit = Retrofit.Builder()
    .addConverterFactory(GsonConverterFactory.create(gson))
手动使用 Gson 类转换
//解析List<T>、Map<K,V>等泛型类型时,需通过TypeToken获取泛型类型(因Java泛型擦除,无法直接用List<User>.class)。
val gson = Gson()    //通过 GsonBuilder 可以更多配置,如为时间戳格式的Date指定时间格式
//反序列化:Json字符串 -> Object实例
val dataBean = gson.fromJson(jsonStr)
//序列化:Object实例 -> Json字符串
val jsonStr = gson.toJson(user)
2.2.2 返回值转换器 CallAdapter
是Retrofit的返回值转换接口,负责将Retrofit默认的Call<T>返回值转换为其他类型(如RxJava的Observable<T>),从而扩展异步请求的实现方式。 Kotlin协程无需额外配置,Retrofit v2.6.0 开始内置 CoroutineCallAdapterFactory。
2.3 定义实体类(数据模型)
根据Json内容,编写对应的实体类。字段名需与Json键名完全一致(大小写敏感),若不一致,需使用@SerializedName注解映射。
data class PersonBean(    //建议类名后缀加Bean与正常类区分
    val name: String = "",    //非空类型+默认值,避免Jon中字段缺失带来null问题
    @SerializedName("age")    //这里与Json键名一致就行
    val a_g_e: Int = 0
    transient val type = false //transient标记的字段不参与序列化/反序列化
)
2.4 定义网络访问接口
- 根据 API 编写网络访问接口。Retrofit 将 Http 请求抽象成接口,并在接口里面采用注解来配置网络请求参数(每个形参都要注解),用动态代理将该接口“翻译”成一个 Http 请求再执行。
- 命名通常以功能名称开头+Service结尾。返回值类型必须声明成 Retrofit 内置的 Call 类型,通过泛型指定服务器返回的具体数据类型(使用Call<ResponseBody>则返回没经过Gson转换的原始数据类即json字符串)(使用RxJava声明的是Observable<Person>类型)(使用协程可直接返回对象类型,见下文Android封装用法)。
| 函数注解 | 说明 |
| @GET | 从服务器获取数据。 |
| @POST | 向服务器提交数据。 |
| @DELETE | 删除服务器上的数据。 |
| @PUT @PATCH | 修改服务器上的数据。put更新资源、patch部分更新。 |
| @Headers | 添加固定请求头 |
| 参数注解 | 说明 |
| @Header | 动态添加请求头。 |
| @Path | 替换路径。 |
| @Query | 替代参数值(通常结合get请求)。 |
| @Feild | 替换参数值(通常结合post请求)。 |
| @FormUrlEncoded | 用于表单数据数据提交。 |
2.4.1 GET 示例
interface GetService {
    //接口1:https://www.baidu.com/person.json
    @GET("person.json")    //表示发起的是GET请求,传入请求的地址(相对路径,重复根路径在后面配置)
    fun getPerson(): Call<list<Person>>
    //接口2:https://www.baidu.com/<page>/person.json
    @GET("{page}/get_data.json")    //使用 {page} 占位
    fun getData(@Path("page") page: Int): Call<Data>    //使用 @Path("page")注解来声明对应参数
    //接口3:https://www.baidu.com/person.json?u=<user>&t=<token>
    @GET("person.json")
    fun getData(@Query("u") user: String, @Query("t") token: String): Call<Data>
    //接口4:https://api.caiyunapp.com/v2/place?query=北京&token={token}&lang=zh_CN
    @GET("v2/place?token=${GlobalApplication.TOKEN}&lang=zh_CN")    //不变的参数固定写在GET里
    fun searchPlaces(@Query("query") query: String): Call<PlaceResponse>
}
2.4.2 POST 示例
interface PostService {
    //接口6:https://www.baidu.com/data/create{"id": 1, "content": "The description for this data."}
    @POST("data/create")
    fun createData(@Body data: Data): Call<ResponseBody>    //将Data对象中的数据转换成JSON格式的文本,并放到HTTP请求的body部分
}
2.4.3 DELETE 示例
interface DeleteService {
    //接口5:https://www.baidu.com/data/<id>
    @DELETE("data/{id}")
    fun deleteData(@Path("id") id: String): Call<ResponseBody>    //该泛型表示能接受任意类型切不会进行解析
}
2.4.4 Headers 示例
interface PersonService {
    /*接口7:http://example.com/get_data.json
    User-Agent: okhttp    //header参数就是键值对
    Cache-Control: max-age=0
    */

    //静态声明(添加固定请求头)
    @Headers("User-Agent: okhttp", "Cache-Control: max-age=0")
    @GET("get_data.json")
    fun getData(): Call<Data>
    //动态声明(动态添加请求头)
    @GET("get_data.json")
    fun getData(@Header("User-Agent") userAgent: String, @Header("Cache-Control") cacheControl: String): Call<Data>
}
2.5 发起网络请求
//创建网络请求接口的实例
val personService = retrofit.create(PersonService::class.java)
//获取Call对象(对发送请求进行封装)
val personCall: Call<list<Person>> = personService.getPerson()
//发送网络请求(异步是.enqueue(),同步是.excute())
personCall.enqueue(object : Callback<List<person>> {    //接口回调
    override fun onResponse(call: Call<List<person>>, response: Response<List<person>>) {
        //对response做判断
        val list = response.body()    //得到解析后的对象
    }
    override fun onFailure(call: Call<List<person>>, t: Trouble) {
        t.printStackTrace()
    }
})
2.6 Android写法
2.6.1 Retrofit客户端
object RetrofitClient {
    //Cookie
    private val cookieJar by lazy {
        PersistentCookieJar(SetCookieCache(), SharedPrefsCookiePersistor(APP.context))
    }
    //OkHttpClient
    private val okHeepClient by lazy {
        OkHttpClient.Builder()
            .cookieJar(cookieJar)
            .build()
    }
    //Retrofit
    private val retrofit by lazy {
        Retrofit.Builder()
            .client(okHeepClient)
            .baseUrl(ApiService.BASE_URL)
            .addConverterFactory(GsonConverterFactory.create())
            .build()
    }
    //ApiService
    val apiService: ApiService by lazy {
        retrofit.create(ApiService::class.java)
    }
}
2.6.2 返回数据的基类
//返回数据的基类
data class ApiResponse<T>(
    val errorCode: Int,
    val errorMsg: String,
    val data: T?
) {
    fun getResult(): Result<T> {    //使用Result类包装返回结果(数据或异常)
        return if (errorCode == 0 && data != null) {
            Result.success(data)
        } else {
            Result.failure(ApiException(errorMsg))
        }
    }
}

//异常封装
class ApiException(
    errorMsg: String
) : Exception(errorMsg)
2.6.3 API接口
在接口方法前添加suspend关键字,返回值直接为数据模型(无需Call<T>)。
interface ApiService {
    companion object {
        const val BASE_URL = "https://www.wanandroid.com/"
    }
    //登录
    @FormUrlEncoded
    @POST("user/login")
    suspend fun login(
        @Field("username") userName: String,
        @Field("password") password: String
    ): ApiResponse<LoginBean>
}
2.6.4 协程使用
//数据源
//为了“静态”调用,该类无需其他功能就定义成 object 类,有的话使用伴生对象写联网方法
object LoginRemoteDataResource {
    suspend fun login(userName: String, password: String) =
        RetrofitClient.apiService.login(userName, password).getResult()
}

//仓库
interface IRepository {
    suspend fun login(userName: String, password: String): Result<LoginBean>
}
class Repository : IRepository {
    override suspend fun login(userName: String, password: String) =
        LoginRemoteDataResource.login(userName, password)
}

//ViewModel
class SplashViewModel : ViewModel() {
    private val repository: IRepository = Repository()
    private val _loginData = MutableLiveData<Result<LoginBean>>()
    val loginData =  _loginData as LiveData<Result<LoginBean>> //幕后属性,提供不可变版本供外部访问

    suspend fun login(userName: String, password: String){
        val result = repository.login(userName, password)
        _loginData.value = result
    }
}

//UI
viewModel.loginData.observe(this) { it ->    //对Result包装的返回结果是数据还是异常做判断
        it.onSuccess {
            activity.switchFragment(R.id.action_splashLoginFragment_to_mainActivity)
            activity.finish()
        }.onFailure {
            showToast(it.message.orEmpty())
        }
    }
}
三、异常处理
封装工具类(如ErrorHandler),集中处理不同类型的错误,避免重复代码。 根据错误类型向用户展示提示(如网络异常提示“检查网络连接”,401提示“登录已过期”)。 在Release版本中仅记录关键错误信息,避免敏感数据泄露,Debug版本可打印详细日志便于调试。
| 错误类型 | 原因 | 异常类型、处理方式 |
| 网络异常 | 设备无网络、网络信号差、服务器不可达、请求超时、连接失败。 | IOException(如SocketTimeoutException、UnknownHostException) |
| HTTP错误码 | Response.isSuccessful()返回false(响应码不在200-299范围内,如请求参数错误(400)、未授权(401)、资源不存在(404)、服务器内部错误(500)等。 | 通过Response.code()获取错误码,Response.errorBody()获取错误信息(需转换为字符串)。HttpException。 |
| 数据解析异常 | 服务器返回的JSON与本地数据模型字段不匹配(如字段缺失、类型错误)。 | 在Call.enqueue()的onFailure()或协程的catch块中捕获。JsonParseException、MoshiJsonException。 |
runCatching {
    RetrofitClient.apiService.getData("")
}.onFailure { throwable ->
    when(throwable) {
        is IOException -> {
            //网络异常
        }
        is JsonParseException ->{
            //解析异常
        }
        is HttpException -> {
            //http异常(4xx/5xx)
            val errorCode = throwable.code()
            val errorMsg = throwable.response()?.errorBody()?.toString() ?: "未知错误"
        }
    }
}
四、解决 http 链接无法访问
Android 9开始默认只允许使用 HTTPS 类型的网络请求,HTTP明文传输因为有安全隐患不再支持。net:ERR_CLEARTEXT_NOT_PERMITTED
3.1 方式一
直接在 AndroidManifest 的 <application> 中添加如下代码:
android:usesCleartextTraffic="true"3.2 方式二
右键res目录→New→Directory→创建一个xml目录,右键xml目录→New→File→创建一个network_security_config.xml文件,修改内容如下:
<?xml version="1.0" encoding="utf-8"?>
<network-security-config>
    <domain-config cleartextTrafficPermitted="false">
        <domain includeSubdomains="true">www.baidu.com</domain>
    </domain-config>
</network-security-config>
Manifest {
//添加网络访问权限
<uses-permission android:name="android.permission.INTERNET" />
//允许HTTP访问
<application
android:networkSecurityConfig="@xml/network_security_config"
</application>
}


 1920
1920

 被折叠的 条评论
为什么被折叠?
被折叠的 条评论
为什么被折叠?
 到【灌水乐园】发言


