


 该博客围绕网络配置展开,先进行子网划分,将192.168.1.0/24划分为多个子网。接着为R1、R2、R3、R4配置IP地址,开启OSPF协议,进行DR/BDR选举、OSPF认证和区域汇总。还实现全网可达,配置空接口防环,最后进行测试。
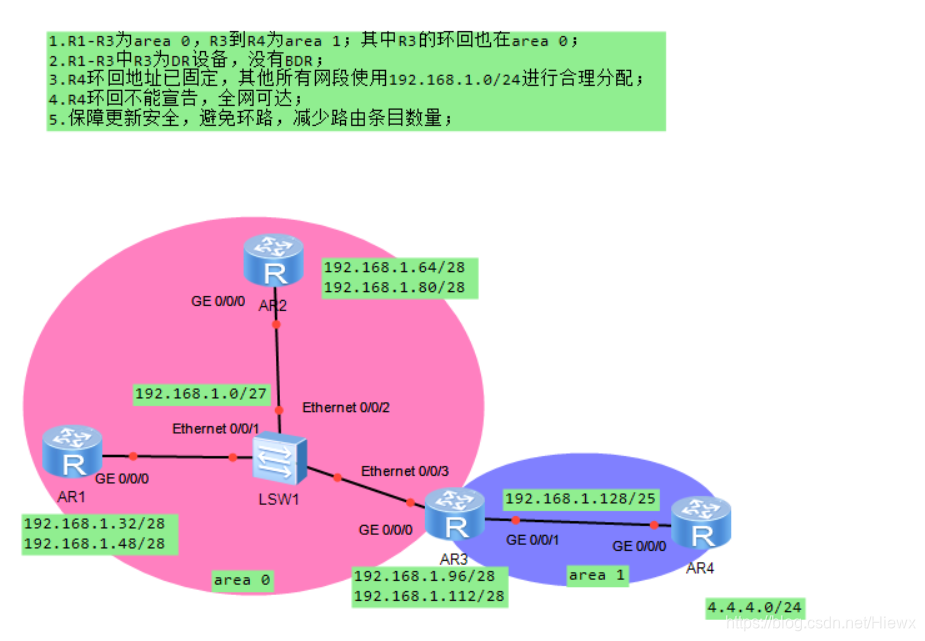
1.子网划分
192.168.1.0/24 两个区域划分两个子网,借一位
192.168.1.0 000000 192.168.1.0/25 area 0 划分四个子网,借两位
192.168.1.0 00 00000 192.168.1.0/27 骨干 划分三个子网,借两位
192.168.1.0 01 00000 192.168.1.32/27 R1环回,划分两个子网,借一位
192.168.1.001 0 0000 192.168.1.32/28
192.168.1.001 1 0000 192.168.1.48/28
192.168.1.0 10 00000 192.168.1.64/27 R2环回,划分两个子网,借一位
192.168.1.010 0 0000 192.168.1.64/28
192.168.1.010 1 0000 192.168.1.80/28
192.168.1.0 11 00000 192.168.1.96/27 R3环回,划分两个子网,借一位
192.168.1.011 0 0000 192.168.1.96/28
192.168.1.011 1 0000 192.168.1.112/28
192.168.1.1 000000 192.168.1.128/25 area 1 R3-R4
2.配置IP地址
R1:
[R1]interface g0/0/0
[R1-GigabitEthernet0/0/0]ip address 192.168.1.1 27
[R1-GigabitEthernet0/0/0]q
[R1]interface LoopBack 0
[R1-LoopBack0]ip address 192.168.1.33 28
[R1-LoopBack0]q
[R1]interface LoopBack 1
[R1-LoopBack1]ip address 192.168.1.49 28
[R1-LoopBack1]q
R2:
[R2]interface g0/0/0
[R2-GigabitEthernet0/0/0]ip address 192.168.1.2 27
[R2-GigabitEthernet0/0/0]q
[R2]interface LoopBack 0
[R2-LoopBack0]ip address 192.168.1.65 28
[R2-LoopBack0]q
[R2]interface LoopBack 1
[R2-LoopBack1]ip address 192.168.1.81 28
[R2-LoopBack1]q
R3:
[R3]interface g0/0/0
[R3-GigabitEthernet0/0/0]ip address 192.168.1.3 27
[R3-GigabitEthernet0/0/0]q
[R3]interface LoopBack 0
[R3-LoopBack0]ip address 192.168.1.97 28
[R3-LoopBack0]q
[R3]interface LoopBack 1
[R3-LoopBack1]ip address 192.168.1.113 28
[R3-LoopBack1]q
[R3]interface g0/0/1
[R3-GigabitEthernet0/0/1]ip address 192.168.1.129 25
[R3-GigabitEthernet0/0/1]q
R4:
[R4]interface g0/0/0
[R4-GigabitEthernet0/0/0]ip address 192.168.1.130 25
[R4-GigabitEthernet0/0/0]q
[R4]interface LoopBack 0
[R4-LoopBack0]ip address 4.4.4.4 24
[R4-LoopBack0]q
3.开启OSPF协议
R1:
[R1]ospf 1 router-id 1.1.1.1
[R1-ospf-1]area 0
[R1-ospf-1-area-0.0.0.0]network 192.168.1.0 0.0.0.255
R2:
[R2]ospf 1 router-id 2.2.2.2
[R2-ospf-1]area 0
[R2-ospf-1-area-0.0.0.0]network 192.168.1.0 0.0.0.255
R3:
[R3]ospf 1 router-id 3.3.3.3
[R3-ospf-1]area 1
[R3-ospf-1-area-0.0.0.1]network 192.168.1.129 0.0.0.0
[R3-ospf-1]area 0
[R3-ospf-1-area-0.0.0.0]network 192.168.1.97 0.0.0.0
[R3-ospf-1-area-0.0.0.0]network 192.168.1.113 0.0.0.0
R4:
[R4]ospf 1 router-id 4.4.4.4
[R4-ospf-1]area 1
[R4-ospf-1-area-0.0.0.1]network 192.168.1.130 0.0.0.0
4.DR/BDR选举
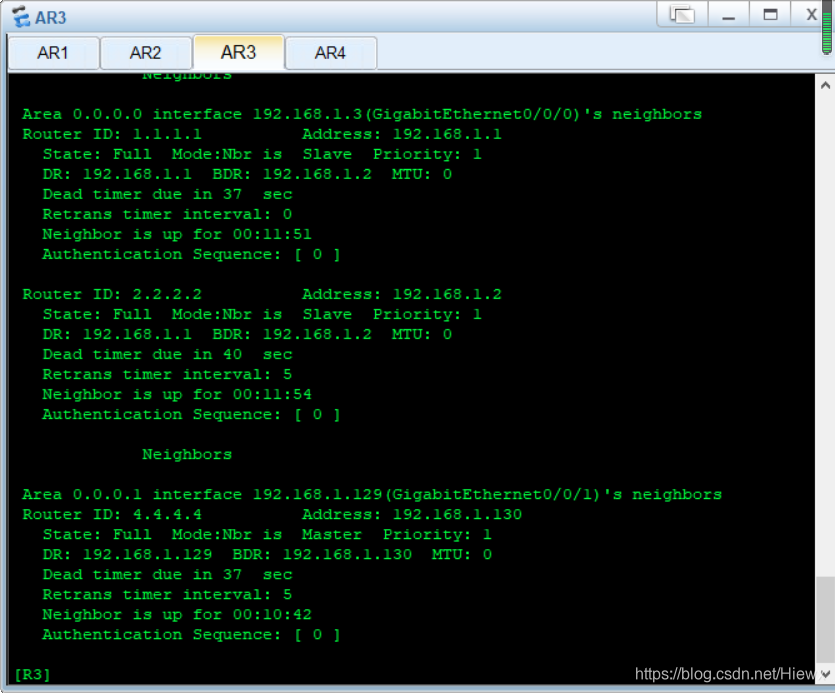
R1:
[R1]interface g0/0/0
[R1-GigabitEthernet0/0/0]ospf dr-priority 0
<R1>reset ospf process
Warning: The OSPF process will be reset. Continue? [Y/N]:y
R2:
[R2]interface g0/0/0
[R2-GigabitEthernet0/0/0]ospf dr-priority 0
<R2>reset ospf process
Warning: The OSPF process will be reset. Continue? [Y/N]:y
R3:
[R3]interface g0/0/0
[R3-GigabitEthernet0/0/0]ospf dr-priority 2
<R3>reset ospf process
Warning: The OSPF process will be reset. Continue? [Y/N]:y

5.OSPF认证
R1:
[R1]interface g0/0/0
[R1-GigabitEthernet0/0/0]ospf authentication-mode md5 1 cipher 123
[R1-GigabitEthernet0/0/0]q
R2:
[R2]interface g0/0/0
[R2-GigabitEthernet0/0/0]ospf authentication-mode md5 1 cipher 123
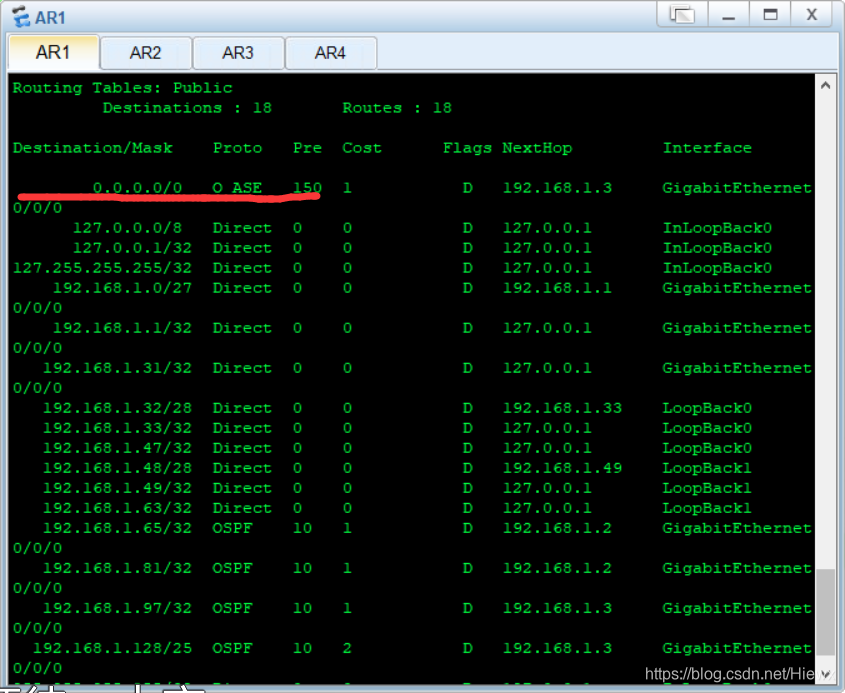
6.OSPF区域汇总
R3:
[R3]ospf 1
[R3-ospf-1]area 0
[R3-ospf-1-area-0.0.0.0]abr-summary 192.168.1.0 255.255.255.128
[R3-ospf-1-area-0.0.0.0]q
[R3-ospf-1]area 1
[R3-ospf-1-area-0.0.0.1]abr-summary 192.168.1.128 255.255.255.128
7.全网可达(边界路由器R3上配置缺省,并手工写一条缺省指向R4)
[R3]ospf 1
[R3-ospf-1]default-route-advertise always
[R3-ospf-1]q
[R3]ip route-static 0.0.0.0 0 192.168.1.130
8.空接口防环
[R3]ip route-static 192.168.1.0 25 NULL 0
[R3]ip route-static 192.168.1.128 25 NULL 0
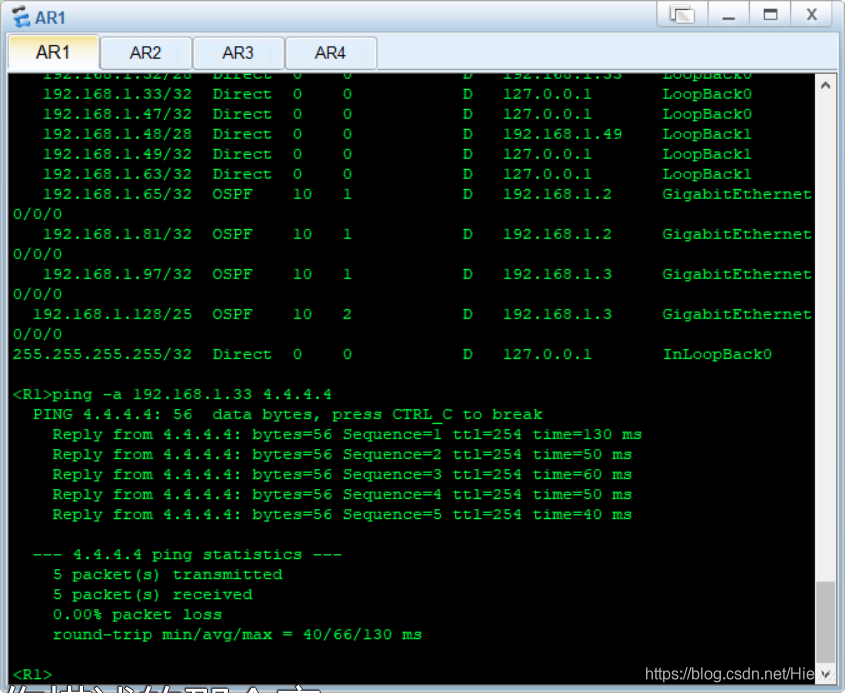
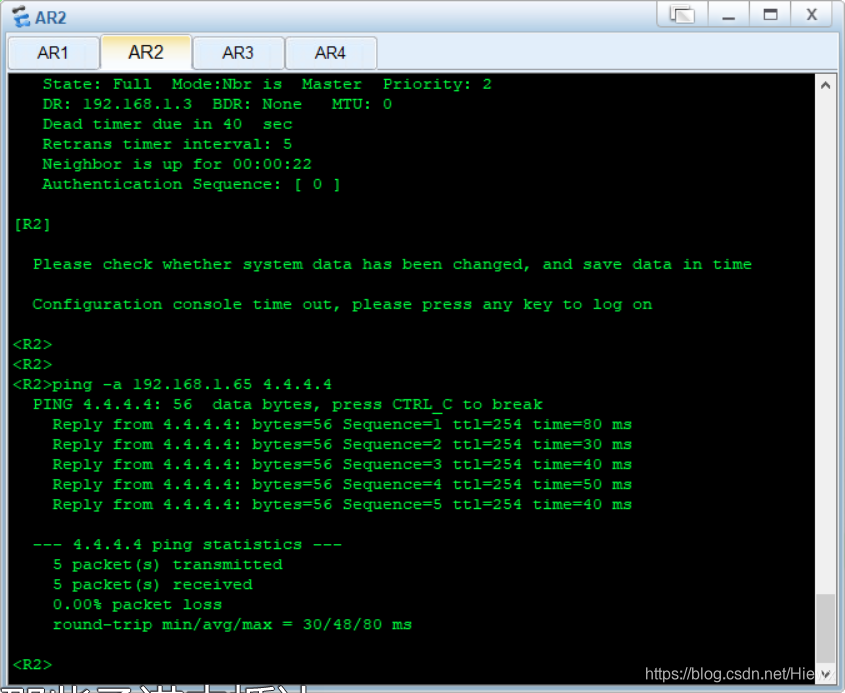
9.测试


 3731
3731

 被折叠的 条评论
为什么被折叠?
被折叠的 条评论
为什么被折叠?
 到【灌水乐园】发言


