


本篇主要通过 vue3 + codemirror6 实现代码编辑器功能,包含了JSON格式校验功能。
注意: CodeMirror@6 只支持vue3,若要使用vue2请使用历史版本。
官方网站:CodeMirror https://codemirror.net
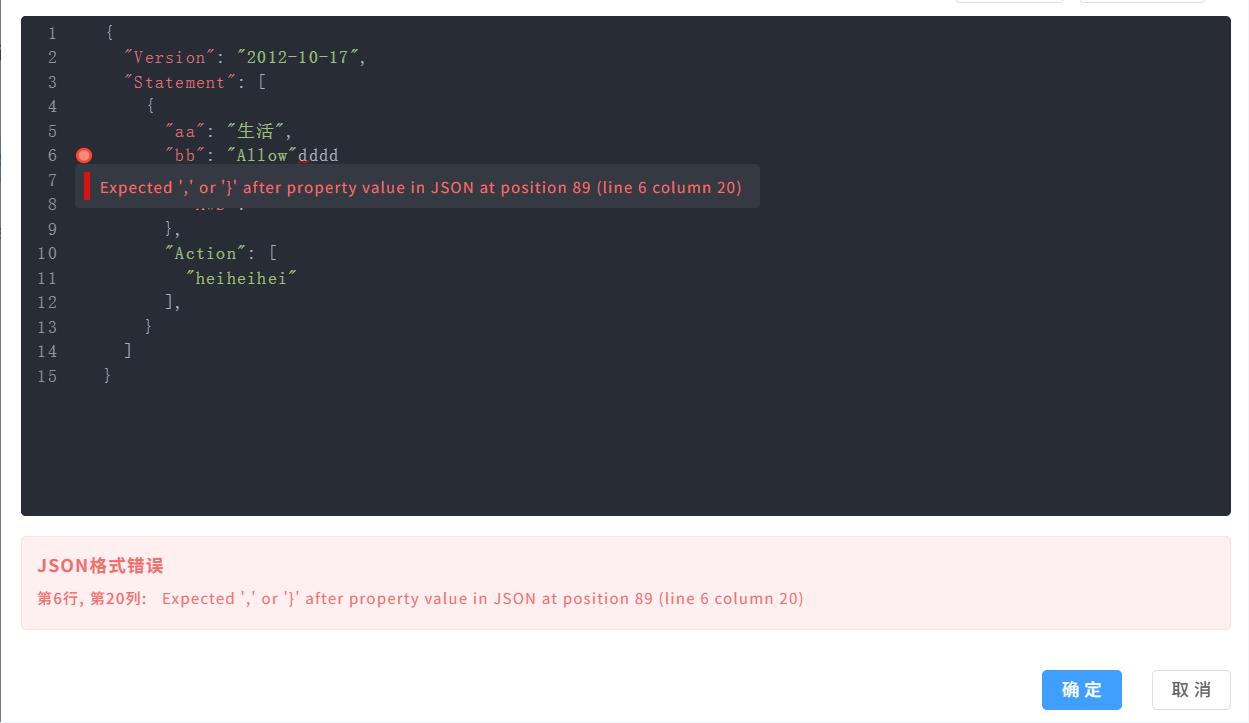
先上图
人狠话不多,直接开始:
一、安装核心依赖
npm install codemirror               //CodeMirror 6核心库
npm install @codemirror/lang-json    //JSON语言支持(语法高亮、解析等)
npm install @codemirror/lint         //代码校验功能(错误提示、lint gutter等)
npm install @codemirror/view --save
npm install @codemirror/state --save
npm install @codemirror/theme-one-dark --save
可选依赖(根据需要进行安装)
#主题
npm install @codemirror/theme-one-dark

# 其他语言支持
npm install @codemirror/lang-javascript
npm install @codemirror/lang-html
npm install @codemirror/lang-css

# 其他功能
npm install @codemirror/autocomplete
npm install @codemirror/commands
npm install @codemirror/search
参考版本
"vue": "^3.5.13",
"@codemirror/lang-json": "^6.0.2",
"@codemirror/lint": "^6.8.5",
"@codemirror/state": "^6.5.2",
"@codemirror/theme-one-dark": "^6.1.3",
"@codemirror/view": "^6.38.2",
二、设置模板template
<template>
<!-- json编辑器 -->
  <div ref="editorElement" class="editor-container"></div>

<!-- 底部报错信息 -->
  <div v-if="lintErrors.length" class="error-panel">
     <div class="error-title">JSON格式错误</div>
     <div
        v-for="(error, index) in lintErrors"
        :key="index"
        class="error-item"
     >
       <span class="error-position">
          第{{ error.line }}行, 第{{ error.column }}列:
       </span>
       {{ error.message }}
     </div>
   </div>
</template>
注意:在Vue3中使用CodeMirror 6的正确方式不使用<codemirror>组件标签,而是通过编程方式创建编辑器实例。
CodeMirror 6是框架无关的 - 它不是Vue组件,而是纯JavaScript库
通过API创建实例 - 使用new EditorView()创建编辑器
手动挂载到DOM - 通过parent选项指定容器元素
三、引入资源包
<script setup>
import { nextTick, onMounted, onUnmounted, ref } from "vue";
import { ElMessage } from "element-plus";
import { EditorView, lineNumbers } from "@codemirror/view";
import { EditorState } from "@codemirror/state";
import { json } from "@codemirror/lang-json";  //引入json语言支持
import { oneDark } from "@codemirror/theme-one-dark"; //引入one dark 主题
import { linter, lintGutter } from "@codemirror/lint";  //代码校验功能(错误提示、lint gutter等)

//......................
</script>
四、配置扩展
<script setup>
//......................

// 配置扩展
const extensions = [
  lineNumbers(),     //启用行号
  json(),            // 语法json或者其他格式
  //jsonParseLinter(), // 官方linter
  customLinter,      // 使用自定义linter,验证逻辑并返回诊断信息(必须;独立工作)
  lintGutter(),      // 在编辑器行号旁,显示错误标记,悬停显示linter返回的错误信息;(可选,但推荐;依赖linter提供数据)
  oneDark,
  EditorView.theme({   //设置样式
    "&": { //整体样式
      height: "400px",
      fontSize: "14px",
      // border: "1px solid #dcdfe6",
      borderRadius: "4px"
    },
    ".cm-tooltip-lint": {  //提示框样式
      backgroundColor: "#fef0f0",
      border: "1px solid #f56c6c",
      color: "#f56c6c",
      borderRadius: "4px",
      padding: "6px 8px",
      fontSize: "12px"
    },
    ".cm-lineNumbers": {  //行号样式
      padding: "0 8px",
      color: "#909399",
      fontFamily: "monospace"
    },
  }),
  // EditorView.updateListener.of(update => {  //实时监听
  //    if (update.docChanged) {
  //       console.log('内容变化:', update.state.doc.toString()
  //    )
  //   }
  // })
];

</script>
五、初始化编辑器
<script setup>
//......................
const props = defineProps(["initialData"]);
const editorElement = ref(null);         //编辑器dom
let editorView = null;                     //编辑器实例

// 初始JSON数据
const initialJson = JSON.stringify({
  name: "示例数据",
  version: "1.0.0",
  items: [1, 2, 3],
  enabled: true
}, null, 2);

onMounted(() => {
  // 初始化编辑器,从父级获取初始数据
  nextTick(() => {
    if (editorElement.value) {

      editorView = new EditorView({
        state: EditorState.create({
          doc:  props.initialData || initialJson,  //编辑器数据(格式为json字符串)
          extensions  //绑定配置扩展信息
        }),
        parent: editorElement.value
      });

    }
  });
});
</script>
六、代码校验
代码校验功能,需要两个扩展: linter 和 linterGutter 。
同时,配置扩展时,lintGutter() 必须在 linter 扩展之后(实测顺序错了也没问题,建议按照正确顺序来)。
linter 执行验证 -> 返回诊断信息数组
linterGutter 接受诊断信息 -> 在界面上显示标记
官方推荐 jsonParseLinter ,本次使用 linter 自定义校验。据说 jsonParseLinter 属于开箱即用,也不用做什么乱七八糟的配置,至于我为啥没用 jsonParseLinter,因为安装以后出现了乱七八糟的问题,我太懒了,所以还是用手吧。
6-1、添加自定义校验
<script setup>
//......................
const lintErrors = ref([]); //底部错误列表

// 自定义lint函数
const customLinter = linter(view => {
  const diagnostics = []; // lintGutter报错提示
  lintErrors.value = [];  // 清空错误列表
  const content = view.state.doc.toString(); //获取编辑框内容
  if (!content.trim()) return diagnostics;
  try {
    const parsed = JSON.parse(content);
     // 业务验证:确保是对象
    if(Object.prototype.toString.call(parsed) !== '[object Object]'){
      const pos = 0;
       // lintGutter报错提示
      diagnostics.push({
        from: pos,
        to: Math.min(pos + 1, view.state.doc.length),
        severity: "error",
        message: "请输入正确的JSON格式"
      });
       // 底部错误列表
      lintErrors.value.push({
        message: "请输入正确的JSON格式",
        line: 1,
        column: 1
      });
    }
  } catch (error) {
    let pos = 0;
    let line = 1;
    let column = 1;
    let errorMessage = error.message;
    // 解析错误位置
    const match = error.message.match(/at position (\d+)/);
    // 1、json格式错误
    if (match) {
      const lineObj = view.state.doc.lineAt(pos);
      pos = parseInt(match[1]);
      line = lineObj.number;   //错误行号
      column = pos - line.from + 1;  //错误列号
      errorMessage = error.message.replace(/^JSON\.parse:\s*/, ''); //错误内容
    }else{
      // 2、string    (Unexpected token 'a', "a" is not valid JSON)
      // 3、undefined ("undefined" is not valid JSON)
      // 4、[         (Unexpected end of JSON input)
      pos = 0;
      line = 1;
      column = 1;
      errorMessage = error.message;
    }
    // lintGutter报错提示
    diagnostics.push({
      from: pos,
      to: Math.min(pos + 1, view.state.doc.length),
      severity: "error",
      message: errorMessage
    });
    // 底部错误列表
    lintErrors.value.push({
      message: errorMessage,
      line: line,
      column: column
    });
  }
  return diagnostics;
});
注意:自定义函数可以有多个,只需要在配置扩展中依次添加即可。
自定义校验函数可以根据需求随意发挥,这里的需求是对 json 数据进行校验,但是由于编辑器内可以输入 string、number、boolean、null、undefined 等,只是 try JSON.parse 报错并不全面,所以进行了一些特殊处理。如果哪位大佬有更好的 JSON 校验方法,可以教教小弟,不胜感激。
6-2、更新配置扩展
// 更新配置扩展
const extensions = [
//..............................
  //jsonParseLinter(), // 官方linter
  customLinter,      // 使用自定义linter,验证逻辑并返回诊断信息
  lintGutter(),      // 在编辑器行号旁,显示错误标记,悬停显示linter返回的错误信息
//................
];
七、其他语法
1、获取内容
const content = editorView.state.doc.toString()2、设置内容
editorView.dispatch({
   changes: {
   from: 0,
   to: editorView.state.doc.length,
   insert: '新的内容'
}})
写在最后
之前用的 vue2 + vue-codemirror,与vue3相比有很大的不同,所以记录一下,希望能帮到需要的同学,哪里有优化的地方,欢迎大家提供宝贵意见


 3659
3659

 被折叠的 条评论
为什么被折叠?
被折叠的 条评论
为什么被折叠?
 到【灌水乐园】发言


