


官方教程:https://www.rabbitmq.com/tutorials/tutorial-one-java.html
RabbitMQ是主流的消息队列之一,消息队列是用来传递消息的,生产消息的为生产者producer,消费消息的为消费者consumer。
RabbitMQ使用的是AMQP Advanced Message Queuing Protocol 高级消息队列协议。
主要的三种模式为:direct,fanout,topic
架构如下:

Publisher:生产者,生产消息的组件。
Exchange:交换机,对生产者传来的消息进行解析并传给队列,交换机类型分为 fanout、direct、Topic、headers,其中headers交换机是根据消息对象的 headers 属性值进行匹配的,性能较差,一般不使用。
Queue:队列,因为其是 FIFO 结构,所以消息会按先进先出的顺序被发送给消费者消费。
Binding:交换机与队列的绑定关系,生产者在发送消息时会携带一个 RoutingKey ,在消息到达交换机后,交换机会根据 RoutingKey 匹配对应 BindingKey 的队列,然后把消息发送给该队列。
Virtual Host:又称为 vhost,相当于一个文件夹,包含一个或多个 Exchange 与 Queue 的组合。
Broker:表示消息队列服务器实体。
Consumer:消费者,专门消费消息的组件。
Connection:队列与消费者之间的组件,在由队列向消费者发送消息时,需要先建立连接,创建连接对象。
Channel:通道。消息由队列发送直消费者时,用于传输的通道对象。
四大核心概念指的是生产者、交换机、队列、消费者。
一图流:
零. 使用场景——解耦、削峰、异步
解耦:如果在java内用异步线程池去完成,过于复杂,耦合过度,需要自己维护线程池、持久化、高可用,使用的还是jvm内存,不可取。使用第三方的中间件,性能更加高效,并且高内聚、低耦合,具备高可靠、高可用、持久化等功能,还能使用集群,便于维护和拓展。
削峰:在某个模块接收到超过最大承受的并发量时,可以通过 MQ 排队来使这些削减同一时刻处理的消息量。减小并发量。
异步:将一些不需要顺序执行的操作移步执行来节省时间,比如在完成业务后,发短信、发邮件等操作。
缺点:
1、复杂性提高,引入了其他问题。如消息丢失、重复消费、消息顺序执行等。这些解决方案下面会说到。
2、宕机后不可用。可以创建集群来解决。
几种 MQ 实现总结:
ActiveMQ:老牌的 MQ,可靠性高,但支持的并发量低,目前维护也比较少。适用于并发量低的项目。
Kafka:支持超高并发场景,但是消息可靠性较差(消费失败后不支持重试)。适用于产生大量数据的数据收集服务。
RocketMQ:支持超高并发场景,可靠性高。但支持的客户端语言不多。适用于高并发的互联网项目。
RabbitMQ:支持一般的高并发场景(万级),可靠性高。支持客户端语言较多。但是其实现是通过 Erlang 语言,不方便学习。适用于中小型项目。
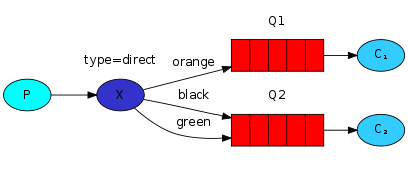
一. direct
业务流程:生产者生产信息给交换机,交换机根据生产者给的路由,去分发这条信息给和该路由绑定的队列(若路由没绑定任何队列,则该信息丢失),消费者从对应的队列中拉取信息。
导入maven依赖
这里不导入slf4j-nop这个包的话,就会报错
<dependencies>
        <dependency>
            <groupId>org.slf4j</groupId>
            <artifactId>slf4j-nop</artifactId>
            <version>1.7.31</version>
        </dependency>
        <dependency>
            <groupId>com.rabbitmq</groupId>
            <artifactId>amqp-client</artifactId>
            <version>5.13.0</version>
        </dependency>
    </dependencies>
生产者代码:
- 建立一个连接工厂
- 在连接工厂中配置端口号、ip地址、账号密码等信息
- 创建连接
- 从连接中获取通道Channel
- 创建队列,只有在队列不存在的时候,才会创建;如果出现名字一样,参数不同的队列,将会报错
- 设置交换机名字(这里可以为空,即使用默认交换机) 默认就是direct模式的
- 绑定队列和路由[没绑定,则路由为队列名]
- 设置要发送到的路由
- 生产信息
- 关闭连接(这里使用try with resources,自动关闭)
package direct;

import com.rabbitmq.client.Channel;
import com.rabbitmq.client.Connection;
import com.rabbitmq.client.ConnectionFactory;

import java.io.IOException;
import java.nio.charset.StandardCharsets;
import java.util.concurrent.TimeoutException;

public class Producer {
    public static void main(String[] args) {
        ConnectionFactory connectionFactory = new ConnectionFactory();

        connectionFactory.setHost("xxxxx");
        connectionFactory.setPort(5672);
        connectionFactory.setUsername("guest");
        connectionFactory.setPassword("guest");
        connectionFactory.setVirtualHost("/");


        try (
                Connection connection = connectionFactory.newConnection("生产者");
                Channel channel = connection.createChannel()
        ) {
            String exchangeName = "hzh.direct";
            String routeKey = "order";
            String exchangeType = "direct";
            String message = "hzhNb";

            // 声明交换机
            channel.exchangeDeclare(exchangeName, exchangeType, true);
            // 声明队列

/*
            1. 队列名称 queue – the name of the queue
            2. 是否持久化 未持久化也会存磁盘,但是重启会丢失数据 durable – true if we are declaring a durable queue (the queue will survive a server restart)

			补充:消息持久化注意事项
			将消息标记为持久性并不能完全保证消息不会丢失。虽然它告诉 RabbitMQ 将消息保存到磁盘,但是当 RabbitMQ 已经接受一条消息并且还没有保存它时,仍然有很短的时间窗口。此外,RabbitMQ 不会对每条消息都执行fsync(2) —— 它可能只是保存到缓存中,而不是真正写入磁盘。持久性保证不强,但对于我们简单的任务队列来说已经足够了。如果您需要更强的保证,那么您可以使用 发布者确认。
            3. 排他性 exclusive – true if we are declaring an exclusive queue (restricted to this connection)
            4. 是否自动删除 autoDelete – true if we are declaring an autodelete queue (server will delete it when no longer in use)
            5. 携带附属参数 arguments – other properties (construction arguments) for the queue
             */

            channel.queueDeclare("queue5", true, false, false, null);
            channel.queueDeclare("queue6", true, false, false, null);
            channel.queueDeclare("queue7", true, false, false, null);
            // 绑定队列
            channel.queueBind("queue5", exchangeName, "order");
            channel.queueBind("queue6", exchangeName, "order");
            channel.queueBind("queue7", exchangeName, "course");

            channel.basicPublish(exchangeName, routeKey, null, message.getBytes(StandardCharsets.UTF_8));
            System.out.println("SUCCESS");

        } catch (IOException e) {
            e.printStackTrace();
        } catch (TimeoutException e) {
            e.printStackTrace();
        }

    }
}
消费者代码:
- 建立一个连接工厂
- 在连接工厂中配置端口号、ip地址、账号密码等信息
- 创建连接
- 从连接中获取通道Channel
- 消费信息(可以重写成功以及失败两个函数)
- 关闭连接(这里使用try with resources,自动关闭)
package simple;

import com.rabbitmq.client.*;

import java.io.IOException;
import java.nio.charset.StandardCharsets;
import java.util.concurrent.TimeoutException;

public class Consumer {
    public static void main(String[] args) {

        ConnectionFactory connectionFactory = new ConnectionFactory();
        connectionFactory.setHost("xxxxxxx");
        connectionFactory.setPort(5672);
        connectionFactory.setUsername("guest");
        connectionFactory.setPassword("guest");
        connectionFactory.setVirtualHost("/");

        try (
                Connection connection = connectionFactory.newConnection("消费者");
                Channel channel = connection.createChannel()
        ) {
            String queueName = "queue2";
            channel.basicConsume(queueName, true, new DeliverCallback() {
                @Override
                public void handle(String consumerTag, Delivery message) throws IOException {
                    System.out.println("收到消息为:" + new String(message.getBody(), StandardCharsets.UTF_8));
                }
            }, new CancelCallback() {
                @Override
                public void handle(String consumerTag) throws IOException {
                    System.out.println("消息接受失败!!!");
                }
            });
            System.out.println(queueName + "开始接受消息");
            // 因为只有一条消息,所以使用Thread.yield();和System.in.read()或者不关闭,效果都是一样的
            Thread.yield();
        } catch (IOException e) {
            e.printStackTrace();
        } catch (TimeoutException e) {
            e.printStackTrace();
        }

    }
}
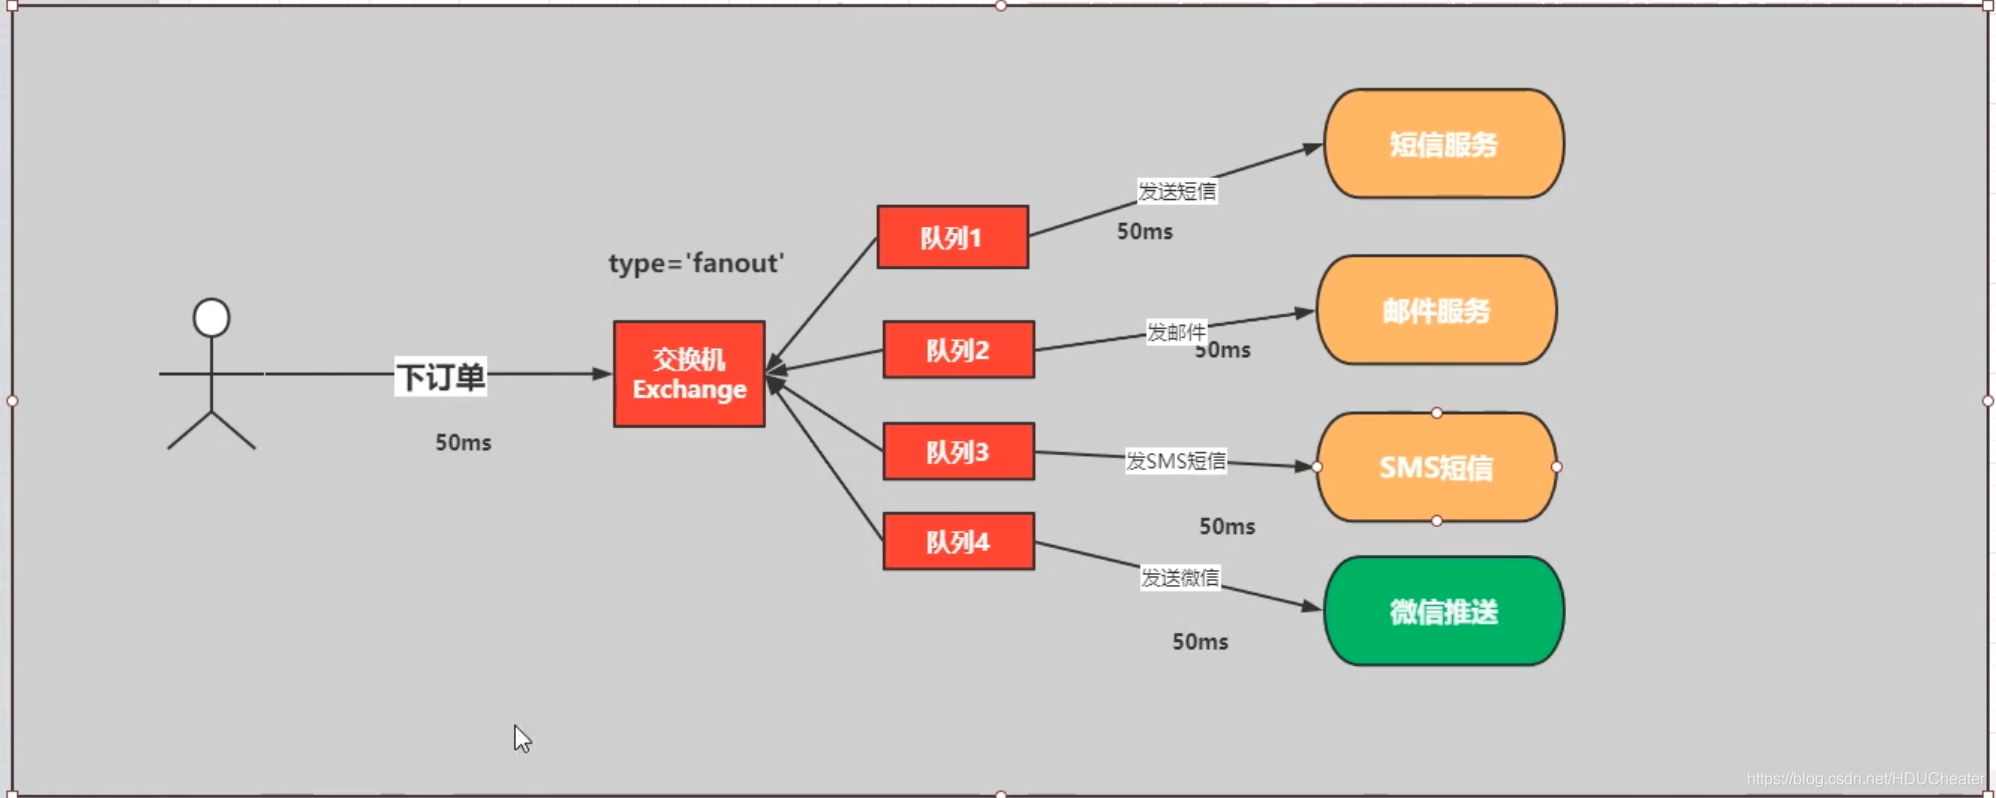
二. Fanout 广播模式
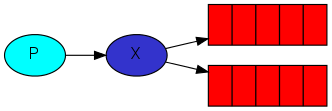
简单来说,就是生产者生产的信息广播给所有的消费者;同样的需求,direct也可以实现,和direct相比,fanout节省了匹配路由的时间。
package routing;

import com.rabbitmq.client.Channel;
import com.rabbitmq.client.Connection;
import com.rabbitmq.client.ConnectionFactory;

import java.io.IOException;
import java.nio.charset.StandardCharsets;
import java.util.concurrent.TimeoutException;

public class Producer {
    public static void main(String[] args) {
        // 1: 创建连接工程
        ConnectionFactory connectionFactory = new ConnectionFactory();
        // 2: 设置连接属性
        connectionFactory.setHost("xxxxxx");
        connectionFactory.setPort(5672);
        connectionFactory.setUsername("guest");
        connectionFactory.setPassword("guest");
        connectionFactory.setVirtualHost("/");


        try (// 3: 创建连接Connection
             Connection  connection = connectionFactory.newConnection("生产者");
             // 4: 通过连接获取通道Channel
             Channel channel = connection.createChannel()
        ){
            // 4: 通过通道创建交换机,声明队列,绑定关系,路由key,发送消息和接受消息
            String exchangeName = "amq.fanout";
            String routeKey = "";
            // 5: 准备消息内容
            String message = "hahaha";

            // 交换机 队列 路由key 状态控制 主题
            // 交换机没自定义就默认

            channel.basicPublish(exchangeName, routeKey, null, message.getBytes(StandardCharsets.UTF_8));
            System.out.println("SUCCESS");
            // 7: 关闭连接
            // 8: 关闭通道
        } catch (IOException e) {
            e.printStackTrace();
        } catch (TimeoutException e) {
            e.printStackTrace();
        }

    }
}
package routing;

import com.rabbitmq.client.*;

import java.io.IOException;
import java.nio.charset.StandardCharsets;
import java.util.concurrent.TimeoutException;

public class Consumer {
    private static Runnable runnable = new Runnable() {
        @Override
        public void run() {
            ConnectionFactory connectionFactory = new ConnectionFactory();
            connectionFactory.setHost("xxxxxxx");
            connectionFactory.setPort(5672);
            connectionFactory.setUsername("guest");
            connectionFactory.setPassword("guest");
            connectionFactory.setVirtualHost("/");

            try (
                    Connection connection = connectionFactory.newConnection("消费者");
                    Channel channel = connection.createChannel()
            ) {
                String queueName = Thread.currentThread().getName();
                channel.basicConsume(queueName, true, new DeliverCallback() {
                    @Override
                    public void handle(String consumerTag, Delivery message) throws IOException {
                        System.out.println(queueName + "收到消息为:" + new String(message.getBody(), StandardCharsets.UTF_8));
                    }
                }, new CancelCallback() {
                    @Override
                    public void handle(String consumerTag) throws IOException {
                        System.out.println("消息接受失败!!!");
                    }
                });
                System.out.println(queueName + "开始接受消息");
                Thread.yield();
            } catch (IOException e) {
                e.printStackTrace();
            } catch (TimeoutException e) {
                e.printStackTrace();
            }
        }
    };

    public static void main(String[] args) {
        new Thread(runnable,"queue1").start();
        new Thread(runnable,"queue2").start();
        new Thread(runnable,"queue3").start();

    }
}
三. Topic 主题订阅模式
可以通过#和*来匹配想要订阅的主题
#代表0或更多的路径
*代表有且只有一段路径
package topic;

import com.rabbitmq.client.Channel;
import com.rabbitmq.client.Connection;
import com.rabbitmq.client.ConnectionFactory;

import java.io.IOException;
import java.nio.charset.StandardCharsets;
import java.util.concurrent.TimeoutException;

public class Producer {
    public static void main(String[] args) {
        // 1: 创建连接工程
        ConnectionFactory connectionFactory = new ConnectionFactory();
        // 2: 设置连接属性
        connectionFactory.setHost("xxxxxxxxx");
        connectionFactory.setPort(5672);
        connectionFactory.setUsername("guest");
        connectionFactory.setPassword("guest");
        connectionFactory.setVirtualHost("/");


        try (// 3: 创建连接Connection
             Connection  connection = connectionFactory.newConnection("生产者");
             // 4: 通过连接获取通道Channel
             Channel channel = connection.createChannel()
        ){
            // 4: 通过通道创建交换机,声明队列,绑定关系,路由key,发送消息和接受消息
            String exchangeName = "amq.topic";
            String routeKey = "com.hzh.hello.123";
            // 5: 准备消息内容
            String message = "hahaha";

            // 交换机 队列 路由key 状态控制 主题
            // 交换机没自定义就默认

            channel.basicPublish(exchangeName, routeKey, null, message.getBytes(StandardCharsets.UTF_8));
            System.out.println("SUCCESS");
            // 7: 关闭连接
            // 8: 关闭通道
        } catch (IOException e) {
            e.printStackTrace();
        } catch (TimeoutException e) {
            e.printStackTrace();
        }

    }
}
四. 工作队列
一对多,使用默认交换机
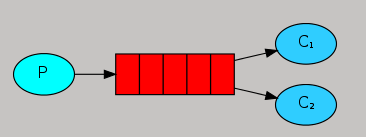
有两种分发模式,一种是公平模式,一种是轮询模式。
公平模式,就是按照线程未处理的数量,给压力小的队列派发新的任务。可以通过设置Qos来设置一次派发信息的数量,在消费者处理并确认这些信息之前,他们不会被派发新的信息。可以在消费者端获取消息时将 channel 的参数 basicQos 设为1(默认0),那么就会在消息分发时优先选择空闲的消费者分发。如果不存在空闲队列,那么还是轮询分发。
package work.fair;

import com.rabbitmq.client.Channel;
import com.rabbitmq.client.Connection;
import com.rabbitmq.client.ConnectionFactory;

import java.io.IOException;
import java.nio.charset.StandardCharsets;
import java.util.concurrent.TimeoutException;

public class Producer {
    public static void main(String[] args) {

        ConnectionFactory connectionFactory = new ConnectionFactory();
        connectionFactory.setHost("xxxxxxxx");
        connectionFactory.setPort(5672);
        connectionFactory.setUsername("guest");
        connectionFactory.setPassword("guest");
        connectionFactory.setVirtualHost("/");

        try (
             Connection  connection = connectionFactory.newConnection("生产者");
             Channel channel = connection.createChannel();
        ){
            String message = "RiNiXianRen";
            for (int i = 0; i < 20; i++) {
                channel.basicPublish("", "queue1", null, (message + i).getBytes(StandardCharsets.UTF_8));
            }
            System.out.println("SUCCESS");

        } catch (IOException e) {
            e.printStackTrace();
        } catch (TimeoutException e) {
            e.printStackTrace();
        }

    }
}
package work.fair;

import com.rabbitmq.client.*;

import java.io.IOException;
import java.nio.charset.StandardCharsets;
import java.util.concurrent.TimeoutException;

public class Consumer {
    private static Runnable runnable = new Runnable() {
        @Override
        public void run() {
            ConnectionFactory connectionFactory = new ConnectionFactory();
            connectionFactory.setHost("121.196.245.103");
            connectionFactory.setPort(5672);
            connectionFactory.setUsername("guest");
            connectionFactory.setPassword("guest");
            connectionFactory.setVirtualHost("/");

            try (
                    Connection connection = connectionFactory.newConnection("消费者");
                    Channel channel = connection.createChannel()
            ) {
                String queueName = "queue1";
                String name = Thread.currentThread().getName();
                // 抢到的线程获得的消息数
                channel.basicQos(1);
                // 公平分发一定要手动应答
                channel.basicConsume(queueName, false, new DeliverCallback() {
                    @Override
                    public void handle(String consumerTag, Delivery message) throws IOException {
                        System.out.println(name + "收到消息为:" + new String(message.getBody(), StandardCharsets.UTF_8));
                        channel.basicAck(message.getEnvelope().getDeliveryTag(),false);
                    }
                }, new CancelCallback() {
                    @Override
                    public void handle(String consumerTag) throws IOException {
                        System.out.println("消息接受失败!!!");
                    }
                });
                System.out.println(name + "开始接受消息");
                System.in.read();
            } catch (IOException e) {
                e.printStackTrace();
            } catch (TimeoutException e) {
                e.printStackTrace();
            }
        }
    };

    public static void main(String[] args) {
        new Thread(runnable, "消费者1").start();
        new Thread(runnable, "消费者2").start();
    }
}
轮询模式,就是平均分发消息给所有消费者,所有消费者将获得相同数量的消息,可以并行执行。
package work.poll;

import com.rabbitmq.client.Channel;
import com.rabbitmq.client.Connection;
import com.rabbitmq.client.ConnectionFactory;

import java.io.IOException;
import java.nio.charset.StandardCharsets;
import java.util.concurrent.TimeoutException;

public class Producer {
    public static void main(String[] args) {

        ConnectionFactory connectionFactory = new ConnectionFactory();
        connectionFactory.setHost("xxxxxx");
        connectionFactory.setPort(5672);
        connectionFactory.setUsername("guest");
        connectionFactory.setPassword("guest");
        connectionFactory.setVirtualHost("/");

        try (
             Connection  connection = connectionFactory.newConnection("生产者");
             Channel channel = connection.createChannel();
        ){
            Thread.sleep(10000);
            String message = "RiNiXianRen";
            for (int i = 0; i < 20; i++) {
                channel.basicPublish("", "queue1", null, (message + i).getBytes(StandardCharsets.UTF_8));
            }
            System.out.println("SUCCESS");

        } catch (IOException e) {
            e.printStackTrace();
        } catch (TimeoutException e) {
            e.printStackTrace();
        } catch (InterruptedException e) {
            e.printStackTrace();
        }

    }
}
package work.poll;

import com.rabbitmq.client.*;

import java.io.IOException;
import java.nio.charset.StandardCharsets;
import java.util.concurrent.TimeoutException;

public class Consumer {
    private static Runnable runnable = new Runnable() {
        @Override
        public void run() {
            ConnectionFactory connectionFactory = new ConnectionFactory();
            connectionFactory.setHost("xxxxxxx");
            connectionFactory.setPort(5672);
            connectionFactory.setUsername("guest");
            connectionFactory.setPassword("guest");
            connectionFactory.setVirtualHost("/");

            try (
                    Connection connection = connectionFactory.newConnection("消费者");
                    Channel channel = connection.createChannel()
            ) {
                String queueName = "queue1";
                String name = Thread.currentThread().getName();
                channel.basicConsume(queueName, true, new DeliverCallback() {
                    @Override
                    public void handle(String consumerTag, Delivery message) throws IOException {
                        System.out.println(name + "收到消息为:" + new String(message.getBody(), StandardCharsets.UTF_8));
                    }
                }, new CancelCallback() {
                    @Override
                    public void handle(String consumerTag) throws IOException {
                        System.out.println("消息接受失败!!!");
                    }
                });
                System.out.println(name + "开始接受消息");
                System.in.read();
            } catch (IOException e) {
                e.printStackTrace();
            } catch (TimeoutException e) {
                e.printStackTrace();
            }
        }
    };

    public static void main(String[] args) {
        new Thread(runnable, "消费者1").start();
        new Thread(runnable, "消费者2").start();
    }
}
五. SpringBoot整合
5.1. direct模式
模拟业务:
5.1.1. 依赖导入
web + spring framework rabbitmq
5.1.2. 配置
生产者和消费者要配置不同的端口号
server:
  port: 8080

spring:
  rabbitmq:
    username: 用户名
    password: 密码
    virtual-host: /
    host: ip地址
    port: 5672
5.1.3. 生产者
5.1.3.1. 配置类
配置类放在生产者和消费者里写都可以。
fanout模式是生产者发消息到交换机,然后交换机将消息发给与交换机绑定的所有队列里,所以我们先实例化一个交换机与若干个队列并注册为Bean,然后将交换机与队列绑定。
package com.hzh.springbootorderrabbitmqproducer.config;

import org.springframework.amqp.core.Binding;
import org.springframework.amqp.core.BindingBuilder;
import org.springframework.amqp.core.FanoutExchange;
import org.springframework.amqp.core.Queue;
import org.springframework.context.annotation.Bean;
import org.springframework.context.annotation.Configuration;

/**
 * @program: springboot-order-rabbitmq-producer
 * @description:
 * @author: Riter
 * @create: 2021-08-14 21:22
 **/

@Configuration
public class RabbitMQConfiguration {

    @Bean
    public FanoutExchange fanoutExchange() {
        return new FanoutExchange("fanout_order_exchange", true, false);
    }

    @Bean
    public Queue smsQueue() {
        return new Queue("sms.fanout.queue", true);
    }

    @Bean
    public Queue textQueue() {
        return new Queue("text.fanout.queue", true);
    }

    @Bean
    public Queue emailQueue() {
        return new Queue("email.fanout.queue", true);
    }

    @Bean
    public Binding smsBinding() {
        return BindingBuilder.bind(smsQueue()).to(fanoutExchange());
    }

    @Bean
    public Binding textBinding() {
        return BindingBuilder.bind(textQueue()).to(fanoutExchange());
    }

    @Bean
    public Binding emailBinding() {
        return BindingBuilder.bind(emailQueue()).to(fanoutExchange());
    }

}
5.1.3.2 Service
使用rabbitTemplate来操作消息,
convertAndSend方法封装了channel的内部实现,我们就不需要手写channel了,直接选定交换机、路由以及发送的信息就可以了。[fanout模式路由都为空,每个绑定的队列都会收到消息]
package com.hzh.springbootorderrabbitmqproducer.service;

import org.springframework.amqp.rabbit.core.RabbitTemplate;
import org.springframework.beans.factory.annotation.Autowired;
import org.springframework.stereotype.Service;

/**
 * @program: springboot-order-rabbitmq-producer
 * @description: 服务类
 * @author: Riter
 * @create: 2021-08-13 17:20
 **/

@Service
public class OrderService {

    @Autowired
    private RabbitTemplate rabbitTemplate;

    /**
     * @param userId:
     * @param productId:
     * @param num:
     * @return void
     * @author Riter
     * @description TODO
     * @date 2021/8/13 5:41 下午
     */
    public void makeOrder(String userId, String productId, int num) {
        // 生成订单
        String orderId = userId + productId + num;
        System.out.println("订单生成成功:" + orderId);

        // 通过MQ来完成消息的分发
        String exchangeName = "fanout_order_exchange";
        String routingKey = "";
        String message = orderId;
        rabbitTemplate.convertAndSend(exchangeName, routingKey, message);
    }
}
5.1.3.3 测试类
使用Service类发送消息
package com.hzh.springbootorderrabbitmqproducer;

import com.hzh.springbootorderrabbitmqproducer.service.OrderService;
import org.junit.jupiter.api.Test;
import org.springframework.beans.factory.annotation.Autowired;
import org.springframework.boot.test.context.SpringBootTest;

@SpringBootTest
class SpringbootOrderRabbitmqProducerApplicationTests {

    @Autowired
    private OrderService orderService;

    @Test
    void contextLoads() {
        orderService.makeOrder("山东菏泽曹县", "牛逼", 666);
    }
}
5.1.4. 消费者
5.1.4.1. Service
一共写三个,改一下绑定的队列名即可;
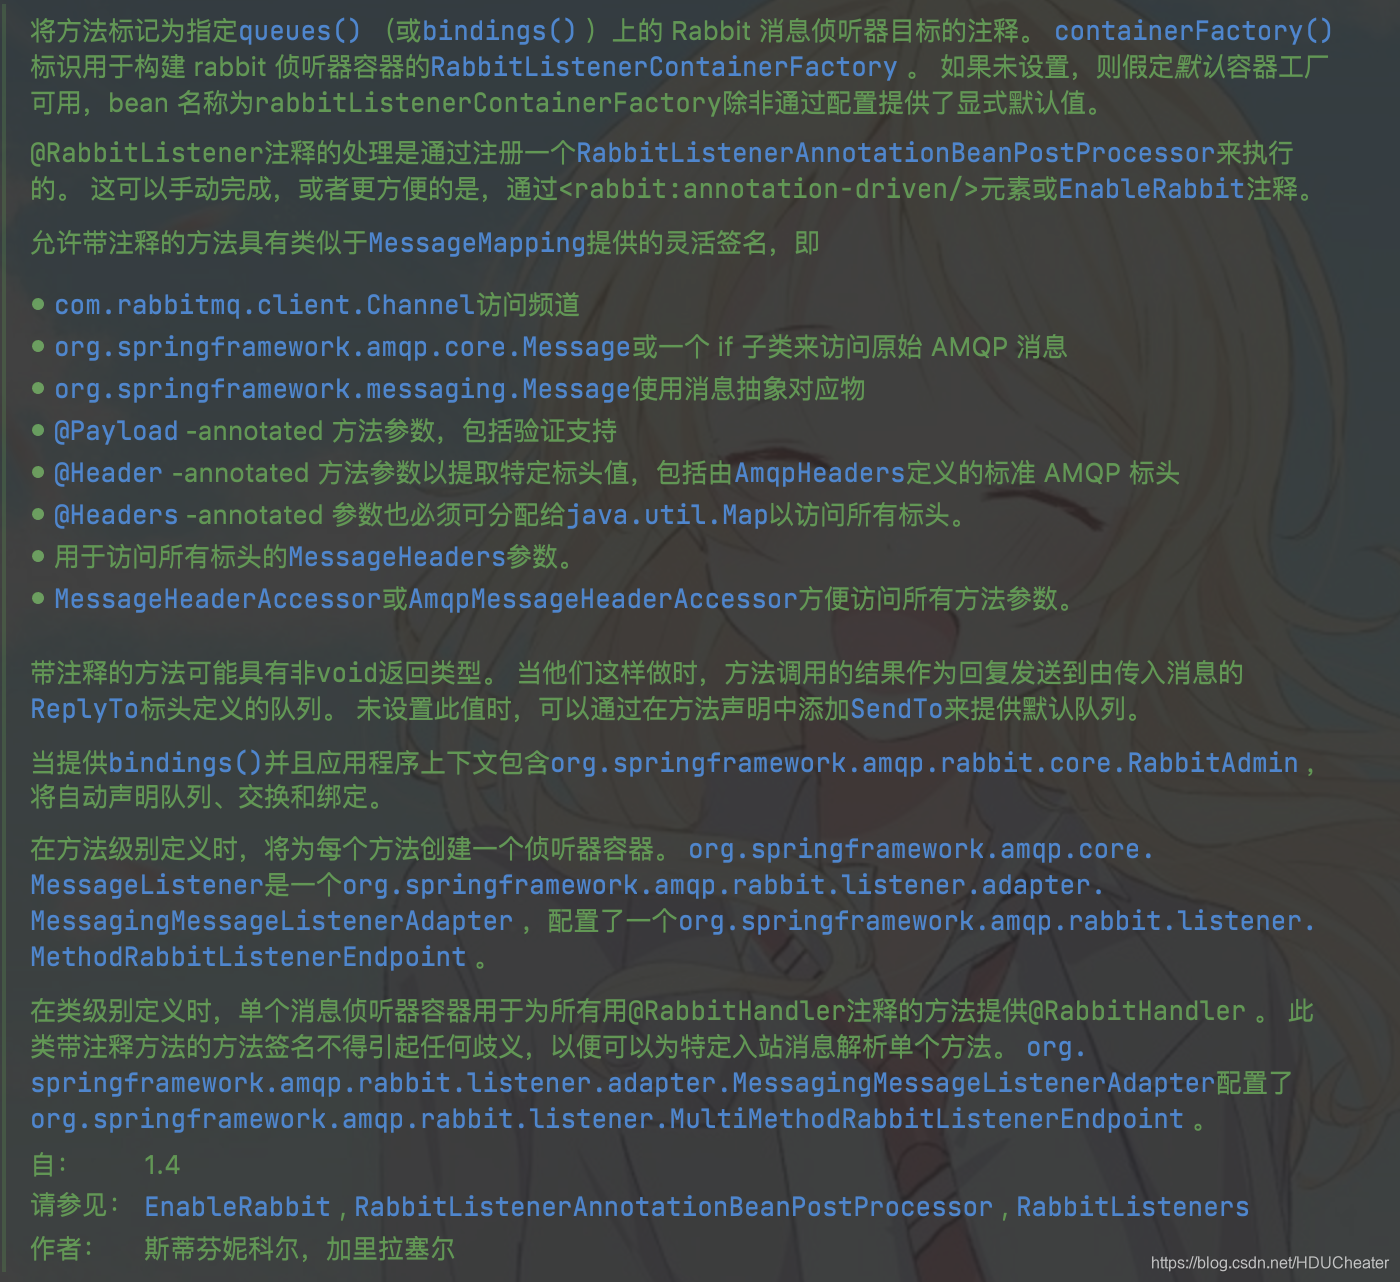
这里需要用到RabbitListener这个注解来注解类;
然后RabbitHandler这个注解来注解方法;
相当于就是前面的basicConsume里选择消费的队列以及重写方法handle()
package com.hzh.springbootorderrabbitmqconsumer.service.fanout;

import org.springframework.amqp.rabbit.annotation.RabbitHandler;
import org.springframework.amqp.rabbit.annotation.RabbitListener;
import org.springframework.stereotype.Service;

/**
 * @program: springboot-order-rabbitmq-producer
 * @description:
 * @author: Riter
 * @create: 2021-08-15 15:22
 **/
@Service
@RabbitListener(queues = {"email.fanout.queue"})
public class FanoutEmailConsumer {

    @RabbitHandler
    public void receiveMessage(String message) {
        System.out.println("email fanout收到消息 ->" + message);
    }
}
5.2. direct模式
5.2.1. 生产者
修改交换机
@Bean
    public DirectExchange directExchange() {
        return new DirectExchange("direct_order_exchange", true, false);
    }
修改队列名 [不改也没事就是了,为了直观]
@Bean
    public Queue smsQueue() {
        return new Queue("sms.direct.queue", true);
    }

    @Bean
    public Queue textQueue() {
        return new Queue("text.direct.queue", true);
    }

    @Bean
    public Queue emailQueue() {
        return new Queue("email.direct.queue", true);
    }
修改绑定的交换机,并加上路由
@Bean
    public Binding smsBinding() {
        return BindingBuilder.bind(smsQueue()).to(directExchange()).with("sms");
    }

    @Bean
    public Binding textBinding() {
        return BindingBuilder.bind(textQueue()).to(directExchange()).with("text");
    }

    @Bean
    public Binding emailBinding() {
        return BindingBuilder.bind(emailQueue()).to(directExchange()).with("email");
    }
修改service
public void makeOrder(String userId, String productId, int num) {
        // 生成订单
        String orderId = userId + productId + num;
        System.out.println("订单生成成功:" + orderId);

        // 通过MQ来完成消息的分发
        String exchangeName = "direct_order_exchange";
        String message = orderId;
        rabbitTemplate.convertAndSend(exchangeName, "text", message);
        rabbitTemplate.convertAndSend(exchangeName, "email", message);
    }
5.2.2. 消费者
改一下RabbitListener消费的队列名即可
5.3. topic
这里不采用配置类的方法,采用注解
以email为例:
package com.hzh.springbootorderrabbitmqconsumer.service.topic;

import org.springframework.amqp.core.ExchangeTypes;
import org.springframework.amqp.rabbit.annotation.*;
import org.springframework.stereotype.Service;

/**
 * @program: springboot-order-rabbitmq-producer
 * @description:
 * @author: Riter
 * @create: 2021-08-15 15:22
 **/
@Service
@RabbitListener(bindings = @QueueBinding(
        value = @Queue(value = "sms.topic.queue", durable = "true", autoDelete = "false"),
        exchange = @Exchange(value = "topic_order_exchange", type = ExchangeTypes.TOPIC),
        key = "*.email.#"
))
public class TopicEmailConsumer {

    @RabbitHandler
    public void receiveMessage(String message) {
        System.out.println("email topic收到消息 ->" + message);
    }
}
6. 高级特性
6.1. TTL
延时队列,可以配置x-dead-letter-exchange以及x-dead-letter-routing-key使得过期信息进入死信队列。
6.1.1. 给队列设置过期时间
过期以后,整个队列的消息都将被清空
package com.hzh.springbootorderrabbitmqproducer.config;

import org.springframework.amqp.core.Binding;
import org.springframework.amqp.core.BindingBuilder;
import org.springframework.amqp.core.DirectExchange;
import org.springframework.amqp.core.Queue;
import org.springframework.context.annotation.Bean;
import org.springframework.context.annotation.Configuration;

import java.util.HashMap;
import java.util.Map;

/**
 * @program: springboot-order-rabbitmq-producer
 * @description:
 * @author: Riter
 * @create: 2021-08-15 20:06
 **/

@Configuration
public class TTLRabbitMQConfiguration {
    @Bean
    public DirectExchange ttlDirectExchange() {
        return new DirectExchange("ttl_direct_exchange", true, false);
    }

    @Bean
    public Queue ttlQueue() {
        Map<String, Object> args = new HashMap<>();
        args.put("x-message-ttl", 5000);
        return new Queue("ttl.direct.queue", true, false, false, args);
    }

    @Bean
    public Binding ttlBinding() {
        return BindingBuilder.bind(ttlQueue()).to(ttlDirectExchange()).with("ttl");
    }
}
6.1.2. 给消息设置过期时间
package com.hzh.springbootorderrabbitmqproducer.config;

import org.springframework.amqp.core.Binding;
import org.springframework.amqp.core.BindingBuilder;
import org.springframework.amqp.core.DirectExchange;
import org.springframework.amqp.core.Queue;
import org.springframework.context.annotation.Bean;
import org.springframework.context.annotation.Configuration;

import java.util.HashMap;
import java.util.Map;

/**
 * @program: springboot-order-rabbitmq-producer
 * @description:
 * @author: Riter
 * @create: 2021-08-15 20:06
 **/

@Configuration
public class TTLRabbitMQConfiguration {
    @Bean
    public DirectExchange ttlDirectExchange() {
        return new DirectExchange("ttl_direct_exchange", true, false);
    }

    @Bean
    public Queue ttlMessageQueue() {
        return new Queue("ttl.direct.queue", true);
    }

    @Bean
    public Binding ttlMessageBinding() {
        return BindingBuilder.bind(ttlMessageQueue()).to(ttlDirectExchange()).with("ttlMessage");
    }
}
package com.hzh.springbootorderrabbitmqproducer.service;

import org.springframework.amqp.AmqpException;
import org.springframework.amqp.core.Message;
import org.springframework.amqp.core.MessagePostProcessor;
import org.springframework.amqp.rabbit.core.RabbitTemplate;
import org.springframework.beans.factory.annotation.Autowired;
import org.springframework.stereotype.Service;

/**
 * @program: springboot-order-rabbitmq-producer
 * @description: 服务类
 * @author: Riter
 * @create: 2021-08-13 17:20
 **/

@Service
public class OrderService {

    @Autowired
    private RabbitTemplate rabbitTemplate;

    /**
     * @param userId:
     * @param productId:
     * @param num:
     * @return void
     * @author Riter
     * @description TODO
     * @date 2021/8/13 5:41 下午
     */
    public void makeOrder(String userId, String productId, int num) {
        // 生成订单
        String orderId = userId + productId + num;
        System.out.println("订单生成成功:" + orderId);

        // 通过MQ来完成消息的分发
        String exchangeName = "ttl_direct_exchange";
        String routingKey = "ttlMessage";
        // 给消息设置过期时间
        String message = orderId;

        MessagePostProcessor messagePostProcessor = new MessagePostProcessor() {
            @Override
            public Message postProcessMessage(Message message) throws AmqpException {
                message.getMessageProperties().setExpiration("5000");
                message.getMessageProperties().setContentEncoding("UTF-8");
                return message;
            }
        };
        rabbitTemplate.convertAndSend(exchangeName, routingKey, orderId, messagePostProcessor);
    }
}
6.1.3. 对比
1、为消息设置过期时间会有一个缺陷,因为队列是先进先出结构,所以如果为消息设置过期时间,那么先进的消息一定会先被执行,后面的一定会先等到前面的消息执行完成后才被执行,如果前面的消息过期时间长于后面的,那么后面的消息即使到达过期时间后也不会被执行,必须等到前面的消息发送完才能执行。所以只适用于发送的延时消息按过期时间递增顺序的场景。
2、直接为队列设置过期时间,因为是进入队列的消息都会被分配相同的过期时间,所以不会产生上面的问题,所以也存在弊端。如果需要配置多个过期时间,那么每次都需要重新声明一个死信交换机、死信队列以及绑定关系。这样会造成配置臃肿。所以只适用于配置过期时间种类数较少的场景。
3、可以看出这两种方式都存在不足之处,有没有一种完美的方案呢?在 1 中,可以将消息按过期时间发送放在交换机里执行。因为交换机并不存在顺序执行,所以就避免了 1 的问题。
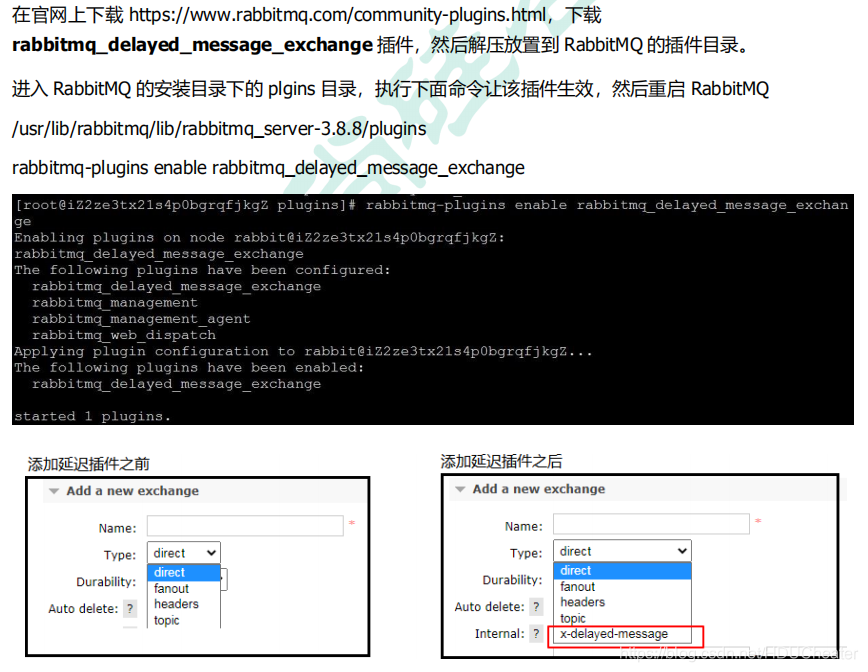
@Configuration
public class DelayedQueueConfig {
    public static final String DELAYED_QUEUE_NAME = "delayed.queue";
    public static final String DELAYED_EXCHANGE_NAME = "delayed.exchange";
    public static final String DELAYED_ROUTING_KEY = "delayed.routingkey";
    @Bean
    public Queue delayedQueue() {
        return new Queue(DELAYED_QUEUE_NAME);
    }
    //自定义交换机 我们在这里定义的是一个延迟交换机
    @Bean
    public CustomExchange delayedExchange() {
        Map<String, Object> args = new HashMap<>();
        //自定义交换机的类型
        args.put("x-delayed-type", "direct");
        return new CustomExchange(DELAYED_EXCHANGE_NAME, "x-delayed-message", true, false,args);
    }
    @Bean
    public Binding bindingDelayedQueue(@Qualifier("delayedQueue") Queue queue,
                                       @Qualifier("delayedExchange") CustomExchange
                                               delayedExchange) {
        return BindingBuilder.bind(queue).to(delayedExchange).with(DELAYED_ROUTING_KEY).noargs();
    }
}
public static final String DELAYED_EXCHANGE_NAME = "delayed.exchange";
    public static final String DELAYED_ROUTING_KEY = "delayed.routingkey";
    public RabbitTemplate rabbitTemplate;
    @GetMapping("sendDelayMsg/{message}/{delayTime}")
    public void sendMsg(@PathVariable String message,@PathVariable Integer delayTime) {
        rabbitTemplate.convertAndSend(DELAYED_EXCHANGE_NAME, DELAYED_ROUTING_KEY, message,
                correlationData ->{
                    correlationData.getMessageProperties().setDelay(delayTime);
                    return correlationData;
                });
        log.info(" 当 前 时 间 : {}, 发 送 一 条 延 迟 {} 毫秒的信息给队列 delayed.queue:{}", new Date(),delayTime, message);
    }
public static final String DELAYED_QUEUE_NAME = "delayed.queue";
    @RabbitListener(queues = DELAYED_QUEUE_NAME)
    public void receiveDelayedQueue(Message message) {
        String msg = new String(message.getBody());
        log.info("当前时间:{},收到延时队列的消息:{}", new Date().toString(), msg);
    }
6.1.4. 死信队列
存储因为1. 超时、2. 超过最大长度、3. 被消费者拒绝(Nack 或 reject ) 而被删除的消息的队列
package com.hzh.springbootorderrabbitmqproducer.config;

import org.springframework.amqp.core.Binding;
import org.springframework.amqp.core.BindingBuilder;
import org.springframework.amqp.core.DirectExchange;
import org.springframework.amqp.core.Queue;
import org.springframework.context.annotation.Bean;
import org.springframework.context.annotation.Configuration;
import org.springframework.stereotype.Service;

/**
 * @program: springboot-order-rabbitmq-producer
 * @description:
 * @author: Riter
 * @create: 2021-08-15 21:57
 **/

@Configuration
public class DeadRabbitMQConfiguration {
    @Bean
    public DirectExchange deadDirectExchange() {
        return new DirectExchange("dead_direct_exchange", true, false);
    }

    @Bean
    public Queue deadQueue() {
        return new Queue("dead.direct.queue", true);
    }

    @Bean
    public Binding deadBinding() {
        return BindingBuilder.bind(deadQueue()).to(deadDirectExchange()).with("dead");
    }
}
package com.hzh.springbootorderrabbitmqproducer.config;

import org.springframework.amqp.core.Binding;
import org.springframework.amqp.core.BindingBuilder;
import org.springframework.amqp.core.DirectExchange;
import org.springframework.amqp.core.Queue;
import org.springframework.context.annotation.Bean;
import org.springframework.context.annotation.Configuration;

import java.util.HashMap;
import java.util.Map;

/**
 * @program: springboot-order-rabbitmq-producer
 * @description:
 * @author: Riter
 * @create: 2021-08-15 20:06
 **/

@Configuration
public class TTLRabbitMQConfiguration {
    @Bean
    public DirectExchange ttlDirectExchange() {
        return new DirectExchange("ttl_direct_exchange", true, false);
    }

    @Bean
    public Queue ttlQueue() {
        Map<String, Object> args = new HashMap<>();
        // 超时进入死信队列
        args.put("x-message-ttl", 5000);
        // 超过max长度进入死信队列
        args.put("x-max-length", 5);
        args.put("x-dead-letter-exchange", "dead_direct_exchange");
//        fanout不需要配置这个key
        args.put("x-dead-letter-routing-key", "dead");
        return new Queue("ttl.direct.queue", true, false, false, args);
    }

    @Bean
    public Binding ttlBinding() {
        return BindingBuilder.bind(ttlQueue()).to(ttlDirectExchange()).with("ttl");
    }

}
六. 消息可靠性
6.1. 组件持久化
将交换机、队列都设置为durable;
消息持久化的话,springboot的rabbitTemplate已经封装好了;
不用springboot的话,手动配一下:
deliveryMode 设为 2,就可以实现持久化
AMQP.BasicProperties.Builder builder = new AMQP.BasicProperties.Builder();
builder.deliveryMode(2);
AMQP.BasicProperties properties = builder.build();
channel.basicPublish("", QUEUE_NAME, properties, msg.getBytes());
6.2. 生产者到交换机
消息是否到达交换机都会触发,回调方法参数会返回是否成功的 boolean值
6.2.1. 配置
spring.rabbitmq.publisher-confirm-type=correlated(老版本是spring.rabbitmq.publisher-confirms=true)
有三种type:
- none:禁用发布确认模式,默认值
- correlated:发布消息成功到交换机后,会触发回调方法
- simple:其一效果和 CORRELATED 值一样会触发回调方法,其二在发布消息成功后使用 rabbitTemplate 调用 waitForConfirms 或 waitForConfirmsOrDie 方法等待 broker 节点返回发送结果,根据返回结果来判定下一步的逻辑,要注意的点是waitForConfirmsOrDie 方法如果返回 false 则会关闭 channel,则接下来无法发送消息到 broker
配置回调接口:
@Component
@Slf4j
public class MyCallBack implements RabbitTemplate.ConfirmCallback {
    /**
     * 交换机不管是否收到消息的一个回调方法
     * CorrelationData:消息相关数据
     * ack:交换机是否收到消息
     */
    @Override
    public void confirm(CorrelationData correlationData, boolean ack, String cause) {
        String id = correlationData != null?correlationData.getId():"";
        if(ack){
            log.info("交换机已经收到 id 为:{}的消息",id);
        }else{
            log.info("交换机还未收到 id 为:{}消息,由于原因:{}",id,cause);
        }
    }
}
6.2.2. 生产者
@RestController
@RequestMapping("/confirm")
@Slf4j
public class Producer {
    public static final String CONFIRM_EXCHANGE_NAME = "confirm.exchange";
    @Autowired
    private RabbitTemplate rabbitTemplate;
    @Autowired
    private MyCallBack myCallBack;
    //依赖注入 rabbitTemplate 之后再设置它的回调对象
    @PostConstruct
    public void init(){
        rabbitTemplate.setConfirmCallback(myCallBack);
    }

    @GetMapping("sendMessage/{message}")
    public void sendMessage(@PathVariable String message){
        //指定消息 id 为 1
        CorrelationData correlationData1=new CorrelationData("1");
        String routingKey="key1";
        rabbitTemplate.convertAndSend(CONFIRM_EXCHANGE_NAME,routingKey,message+routingKey,correlationData1);
        CorrelationData correlationData2=new CorrelationData("2");
        routingKey="key2";
        rabbitTemplate.convertAndSend(CONFIRM_EXCHANGE_NAME,routingKey,message+routingKey,correlationData2);
        log.info("发送消息内容:{}",message);
    }
}
6.3. 交换机到队列
之前说过,如果消息到交换机的时候,没有找到匹配的队列(路由),消息将会丢失,而如果配置了 Mandatory 参数可以在消息在交换机丢失时触发回调方法。
6.3.1. 配置
#开启回调函数
spring.rabbitmq.publisher-returns=true
#是否在交换机没有匹配合适的队列后返回给生产者,false表示丢弃
spring.rabbitmq.template.mandatory=true
配置 ReturnCallback 回调接口
@Component
@Slf4j
public class MyCallback implements RabbitTemplate.ConfirmCallback,RabbitTemplate.ReturnCallback {
    /**
     * 交换机不管是否收到消息的一个回调方法
     * CorrelationData
     * 消息相关数据
     * ack
     * 交换机是否收到消息
     */
    @Override
    public void confirm(CorrelationData correlationData, boolean ack, String cause) {
        String id=correlationData!=null?correlationData.getId():"";
        if(ack){
            log.info("交换机已经收到 id 为:{}的消息",id);
        }else{
            log.info("交换机还未收到 id 为:{}消息,由于原因:{}",id,cause);
        }
    }
    //当消息无法路由的时候的回调方法
    @Override
    public void returnedMessage(Message message, int replyCode, String replyText, String
            exchange, String routingKey) {
        log.error(" 消 息 {}, 被 交 换 机 {} 退 回 , 退 回 原 因 :{}, 路 由 key:{}",new String(message.getBody()),exchange,replyText,routingKey);
    }
}
可以将这些组件配置到 rabbitTemplate 对象中
rabbitTemplate.setConfirmCallback(myCallback);
rabbitTemplate.setMandatory(true);
rabbitTemplate.setReturnCallback(myCallback);
6.4. 队列到消费者
默认情况下,消息发送到消费者后会立刻返回给队列一个确认标识,显示签收。而如果消费者在确认标识返回成功后,执行业务到一半时发生异常,那么这条消息就没有执行完,所以需要关闭自动确认,等到业务执行完毕后才进行手动的确认。在SpringBoot 对 RabbitMQ 封装的依赖中,提供了队列的补偿机制,如果队列在一段时间没有收到消费者的确认消息,那么就会重新发送消息。
手动确认又分为三种方式,单个确认、批量确认和异步确认。
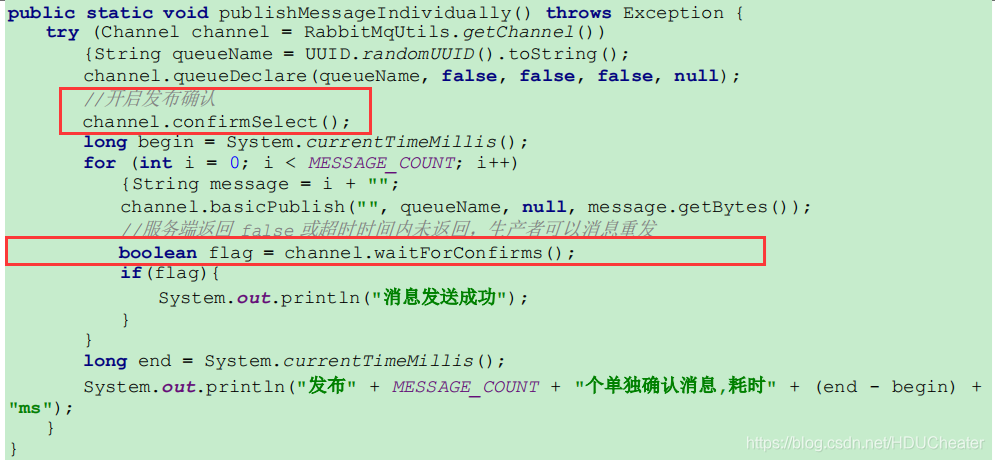
6.4.1. 单个确认
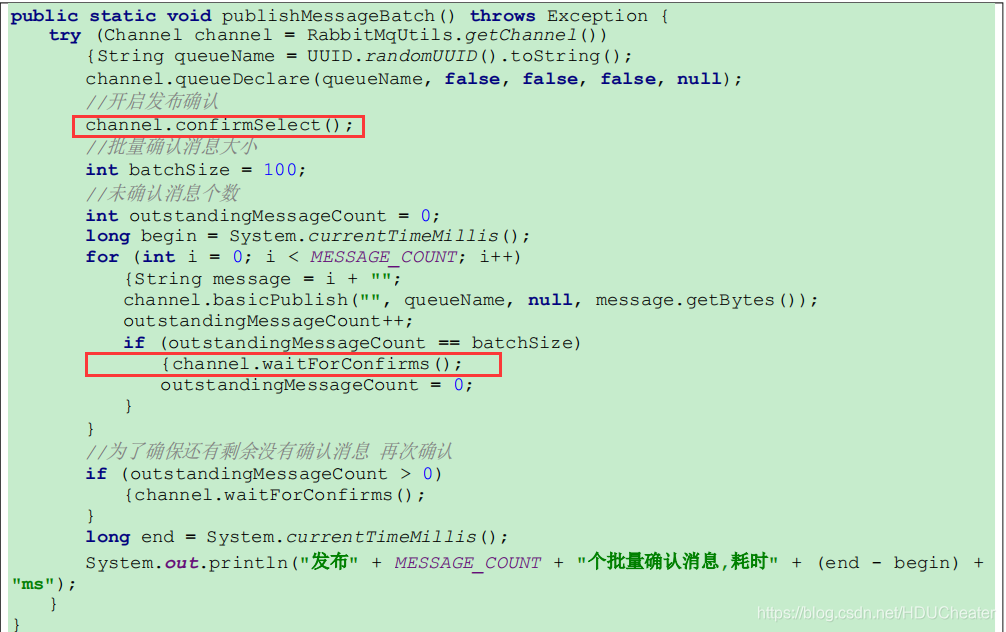
6.4.2. 批量确认
方式和单个确认一样,因为 waitForConfirms 方法作用的就是当前消息以及之前的所有未确认消息。
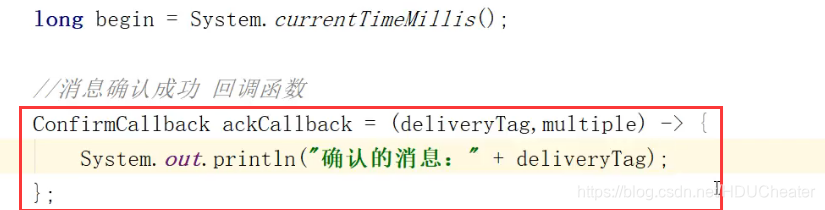
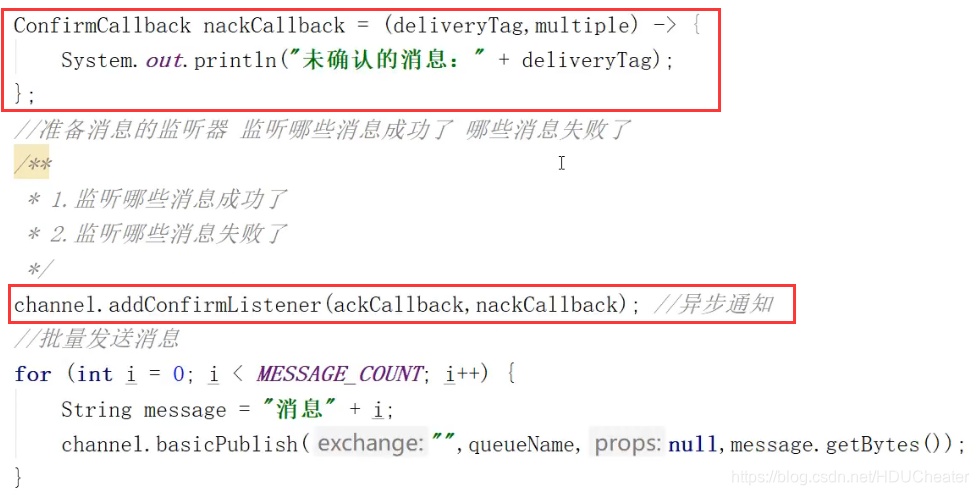
6.4.3. 异步确认
配置:
1.在配置文件中将手动确认打开

2.在业务最后添加手动确认的代码
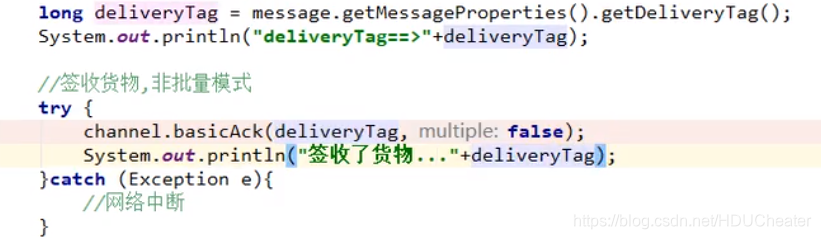
3.multiple表示签收是否批量,也就是是否包括前面未签收的消息。deleveryTag 是一个自增的消息唯一标识
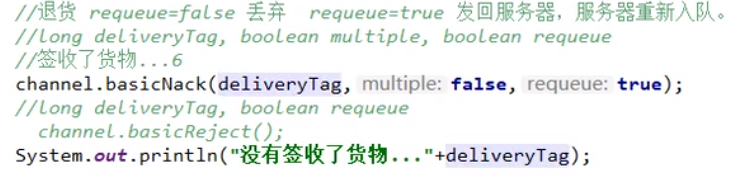
此外,如果发生异常,可以取消这次确认,并选择是否重新加入队列。拒绝确认有两种方式。一种Nack,一种是 Reject。区别是 Nack 会将当前消息之前的所有未确认的消息也取消确认,而 Reject 只针对于当前消息。(未确认/取消确认的消息会被标记为 unacked 状态,即使宕机也不会丢失,发出的消息如果没有接收到返回信息每隔一段时间会重新发送一次)。
实现:
通过添加回调接口来在执行完毕失败后自动返回结果。
6.5. 补偿机制
在 SpringBoot 为 RabbitMQ 封装的依赖中,提供一种补偿机制,如果消息在消费者端抛出异常,那么该消息就会进行重发。默认情况下会隔5秒一直进行重发,直到消费者正常执行完毕。
配置:
spring:
  rabbitmq:
    listener:
      simple:
        retry:
          enabled: true       # 自动触发补偿机制
          max-attempts: 5     # 补偿机制尝试次数
          max-interval: 10000   # 重试最大间隔时间
          initial-interval: 2000  # 重试初始间隔时间
          multiplier: 2 # 间隔时间乘子,间隔时间*乘子=下一次的间隔时间,最大不能超过设置的最大间隔时间
自定义补偿机制:
对于封装的补偿机制存在一些不足,因为其是无差别补偿,也就是只要消费者没有响应就会重发,但是对于一些异常导致没有响应即使发几次都会导致没有响应(如数据计算异常,数据类型转换异常),这样的补偿机制就会消耗 CPU 资源。所以对于这些异常可以捕获然后直接处理。对于其他异常(如调用第三方接口失败)则可以进行补偿重试。
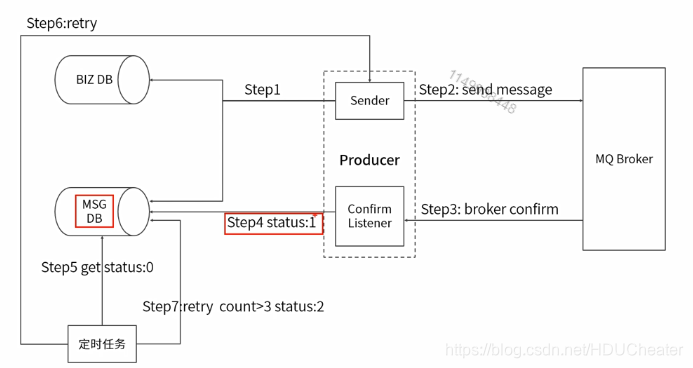
架构:
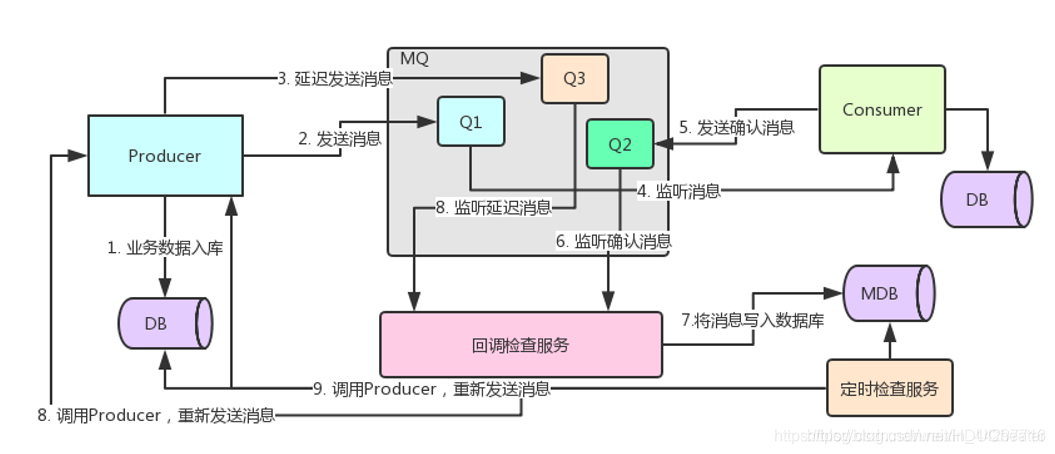
各步骤:
1、发生业务操作,业务数据写入数据库
2、生产者将消息发送给MQ的队列Q1
3、发送了一条与step2中一摸一样的延迟消息到对了Q3
4、消费者监听Q1,获取到了step2中发送的业务消息
5、消费者在收到生产者的业务消息后,发送了一条确认消息(记录收到的消息信息)到Q2
6、回调检查服务监听了Q2,获取到了消费者发送的确认消息
7、回调检查服务将这条确认消息写入数据库等待之后的比对
8、Q3中的延迟消息延迟时间已到,被回调检查服务接收到,之后就拿着这条延迟消息在数据库中比对,如果比对成功,证明消费者接收到了生产者的业务消息并处理成功(如果不处理成功谁会傻了吧唧发送确认消息呢);如果比对失败,证明消费者没有接收到生产者的业务消息,或者说消费者接收到了业务消息之后始终没有处理成功相关的业务并发送确认消息。这时回调检查服务就会调用生产者的相关业务接口,让生产者再次发送这条失败的消息
9、有一种最极端的情况,step2和step3的消息都发送失败了或者说在消息传递过程中发生意外丢失了!定时检查服务会一直轮询保存确认消息的数据库中的消息数据,并于生产者的业务数据库中的业务数据进行比对,如果两者比对数量一致,则代表业务执行没有问题;如果比对不一致,确认消息数据库的数据量小于生产者业务数据量的话,就证明消费者没有接收到生产者发送的消息。这时定时检查服务会通知生产者再次发送消息到MQ的队列Q1
6.6. 消息幂等性
由于消息补偿机制的存在,可以更加有效保证消息可以被消费,但是带来的问题是可能某个消息执行的比较久,导致同一条消息再次被发送给了消费者,而前一条消息顺利执行完,这样一条消息就会被多次执行,所以消费者端的方法需要涉及成幂等性,也就是对于一条消息,无论被消费者消费几次,效果都是一样的。实现方案主要有两种。
1、唯一ID+指纹码。
唯一ID指的是使用 UUID、或者操作数据的主键,而指纹码是与业务相关的ID,比如雪花算法就是根据当前时间戳生成的,生成的ID就属于指纹码。
在生产者发送时创建 Messgae 对象,将业务数据以及唯一ID+指纹码保存到Meaasge对象中进行发送
Message message = MessageBuilder.withBody(msg.getBytes()).setContentType(MessageProperties.CONTENT_TYPE_JSON)
                .setContentEncoding("utf-8").setMessageId(UUID.randomUUID() + "").build();
amqpTemplate.convertAndSend(queueName, message);
然后再消费者端接收,获取ID,以其为主键添加到mysql中,如果抛出异常说明已经执行过,没有抛出异常继续执行。
缺点是高并发场景下会受到性能瓶颈限制。可以通过分库分表解决。
2、redis 操作。
在消费者方法开始使用 redis 的 setnx 方法来处理判断数据可以一步到位,是实现幂等性的最佳方案。
6.7. 备用交换机
在消息发给交换机后,如果交换机没有找到匹配的队列,那么这个消息默认会丢失,可以配置消息在交换机上没有匹配到队列后的回调消息,以及将此条消息重新发回生产者。但是也可以配置一个备用交换机,在没有匹配到队列后发给备用交换机。
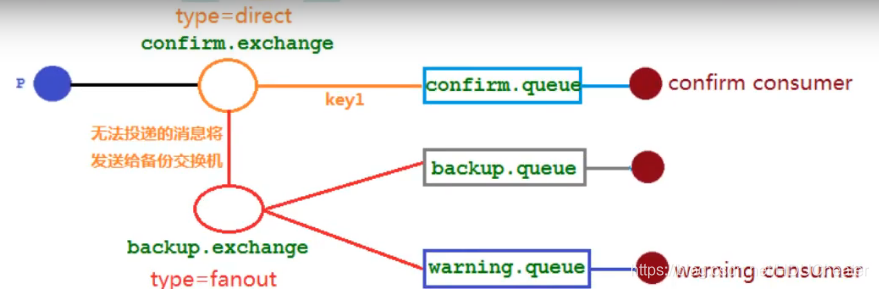
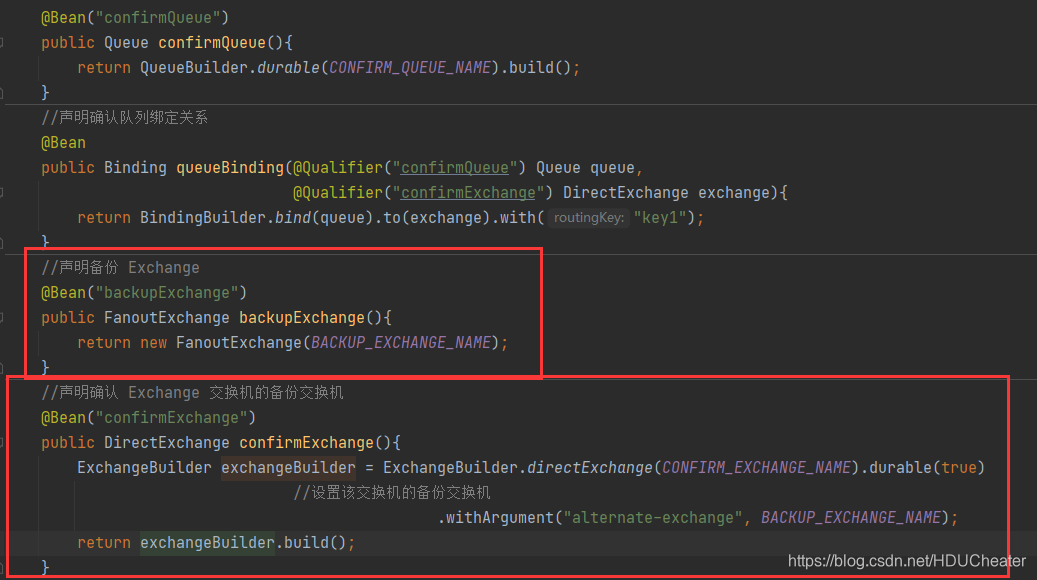
在同时配置备用交换机、returnCallBack 回调接口下,如果消息没有匹配到对应的消息,那么会优先采用备用交换机。
七. 集群
https://www.jianshu.com/p/b7cc32b94d2a
RabbitMQ基于Erlang编写,天生具备分布式特性,支持集群,不用像kafka一样通过zookeeper来保存集群元数据。用的比较多的是镜像集群。
八. 分布式事务
https://www.cnblogs.com/hhhshct/p/11496536.html


 575
575

 被折叠的 条评论
为什么被折叠?
被折叠的 条评论
为什么被折叠?
 到【灌水乐园】发言


