


 本文详细介绍了Vue 3.0中关于ref引用的使用,包括DOM元素和组件实例的引用,以及如何在组件中控制文本框和按钮的切换与自动聚焦。此外,还探讨了动态组件的切换与状态保持,以及插槽的使用,包括基础用法、具名插槽和作用域插槽。最后,讲解了自定义指令的创建和使用,如私有、全局指令及updated函数的应用。
一、ref 引用
1. 什么是 ref 引用
ref 用来辅助开发者在不依赖于 jQuery 的情况下,获取 DOM 元素或组件的引用。
每个 vue 的组件实例上,都包含一个 $refs 对象,里面存储着对应的 DOM 元素或组件的引用。默认情况下,组件的 $refs 指向一个空对象。
2. 使用 ref 引用 DOM 元素
<!--使用ref属性,为对应dom添加引用名称-->
<h3 ref="myh3">myref</h3>
<button @click="getRef">获取对ref的引用</button>

methods:{
    getRef(){
        //通过this.$refs.引用的名称,可获取dom元素的引用
        console.log(this.$refs.myh3)
        //操作dom元素,把文本颜色改为红色
        this.$refs.myh3.style.color='red'
    },
}
3. 使用 ref 引用组件实例
<!--使用ref属性,为对应dom添加引用名称-->
<my-counter ref="counterRef"></my-counter>
<button @click="getRef">获取对ref的引用</button>

methods:{
    getRef(){
        //引用到组件的实例之后,就可以调用组件上的methods方法
        this.$refs.counterRef.add()
    }
}
4. 控制文本框和按钮的按需切换
通过布尔值 inputVisible
<template>
    <input type="text" v-if="inputVisible">
    <button v-else @click='showInput"></button>
</template>
export default{
    data(){
        return{
            inputVisible: false,
        }
    },
    methods:{
        showInput(){
            this.inputVisible = true
        },
    },
}
5. 让文本框自动获得焦点
当文本框展示出来之后,如果希望它立即获得焦点,则可以为其添加 ref 引用,并调用原生 DOM 对象的.focus()
<template>
    <input type="text" v-if="inputVisible ref="ipt">
    <button v-else @click='showInput"></button>
</template>

methods:{
    showInput(){
        this.inputVisible=true
        //获取文本框的dom引用,并调用.focus()获得焦点
        this.$refs.ipt.focus()
    }
}
以上代码会报错,是因为组件dom的渲染是异步的。this.$refs.ipt.focus()执行时dom还没渲染。
6. this.$nextTick(cb) 方法
$nextTick(cb) 会把 cb 回调推迟到下一个 DOM 更新周期之后执行。通俗的理解是:等组件的DOM 异步地重新渲染完成后,再执行 cb 回调函数。从而能保证 cb 回调函数可以操作到最新的 DOM 元素。
<template>
    <input type="text" v-if="inputVisible ref="ipt">
    <button v-else @click='showInput"></button>
</template>

methods:{
    showInput(){
        this.inputVisible=true
        //把对input文本框的操作,推迟到下一次dom更新之后,否则页面上根本不存在文本框元素
        this.$nextTick(()=>{
            this.$refs.ipt.focus()
        })
    }
}
二、动态组件
1. 什么是
动态切换组件的显示与隐藏。vue 提供了一个内置的 <component> 组件,专门用来实现组件
的动态渲染。
① <component> 是组件的占位符
② 通过 is 属性动态指定要渲染的组件名称
③ <component is="要渲染的组件的名称"></component>
data(){
    return{
        //1.当前要渲染的组件名称
        comName: 'myhome'
    }
}

<template>
    //3. 点击按钮,动态切换组件名称
    <button @click="comName='myhome'"></button>
    <button @click="comName='mymovie'"></button>
    //2. 通过is属性,动态指定要渲染的组件名称
    <component :is="comName"></component>
</template>
2. 使用 keep-alive 保持状态
默认情况下,切换动态组件时无法保持组件的状态。可以使用 vue 内置的 <keep-alive> 组件保持动态组件的状态。
<keep-alive>
    <component :is="comName"></component>
</keep-alive>
三、插槽
1. 什么是插槽
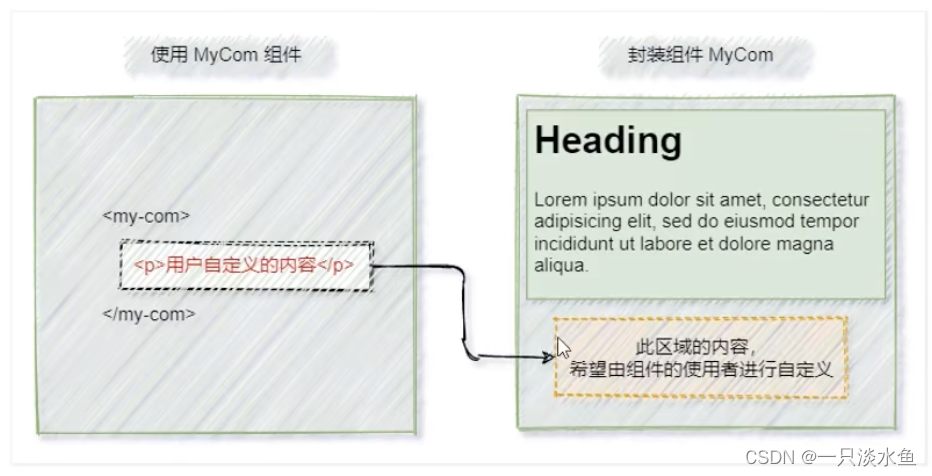
在封装组件时,把不确定的、希望由用户指定的部分定义为插槽。
2. 插槽的基础用法
在封装组件时,可以通过 <slot> 元素定义插槽,从而为用户预留内容占位符。
如果在封装组件时没有预留任何 <slot> 插槽,则用户提供的任何自定义内容都会被丢弃。
<template>
    <p>aaa</p>
    <slot></slot>
    <p>aaa</p>
</template>

<my-com-1>
    <p>自定义内容</p>
</my-com-1>
后备内容:
可以为预留的 <slot> 插槽提供后备内容(默认内容)。如果组件的使用者没有为插槽提供任何
内容,则后备内容会生效。
<template>
    <p>aaa</p>
    <slot>默认内容</slot>
    <p>aaa</p>
</template>
3. 具名插槽
如果在封装组件时需要预留多个插槽节点,则需要为每个 <slot> 插槽指定具体的 name 名称。
<div class="container">
    <header>
        <slot name="header"></slot>
    </header>
    <main>
        <slot></slot>
    </main>
    <footer>
        <slot name="footer"></slot>
    </footer>
</div>
注意:没有指定 name 名称的插槽,会有隐含的名称叫做 “default”。
<my-com-2>
    <template v-slot:header>
        <h1>头部</h1>
    </template>
    <template v-slot:default>
        <p>内容</p>
    </template>
    <template v-slot:footer>
        <p>尾部</p>
    </template>
</my-com-2>
向具名插槽提供内容的时候,在 <template> 元素上使用 v-slot 指令,并以 v-slot 的参数的形式提供其名称。
简写形式:v-slot: 替换为字符 #
<my-com-2>
    <template #header>
        <h1>头部</h1>
    </template>
    <template #default>
        <p>内容</p>
    </template>
    <template #footer>
        <p>尾部</p>
    </template>
</my-com-2>
4. 作用域插槽
在封装组件的过程中,可以为预留的 <slot> 插槽绑定 props 数据。
<div>
    <slot :info="information"></slot>
</div>

<my-test>
    <template v-slot:default="scope">
    {{ scope }}
    </template>
</my-test>
解构作用域插槽的 Prop
<my-table>
    <template #default="{ user }">
        <td>{{ user.id }}</td>
        <td>{{ user.name }}</td>
        <td>{{ user.state }}</td>
    </template>
</my-table>
在封装 MyTable 组件的过程中,可以通过作用域插槽把表格每一行的数据传递给组件的使用者。
<tbody>
    <tr v-for="item in list" :key="item.id">
        <slot :user="item"></slot>
    </tr>
</tbody>
在使用 MyTable 组件时,自定义单元格的渲染方式,并接收作用域插槽对外提供的数据。
<my-table>
    <template #default="{ user }">
        <td>{{ user.id }}</td>
        <td>{{ user.name }}</td>
        <td>
            <input type="checkbox" :checked="user.state">
        </td>
    </template>
</my-table>
四、自定义指令
1. 私有自定义指令
在每个 vue 组件中,可以在 directives 节点下声明私有自定义指令。
export default{
    name: 'Myhome',
    directives: {
        //自定义一个私有指令
        focus: {
            //当被绑定的元素插入到dom中时,自动触发mounted函数
            mounted(el){
                el.focus()    //让被绑定的元素自动获得焦点
            }
        }
    }
}
使用自定义指令:需要加上 v- 前缀。
<!-- 声明自定义指令时,指令的名字时focus-->
<!--使用自定义指令时,需要加上v-指令前缀-->
<input v-focus />
2. 全局自定义指令
全局共享的自定义指令需要通过“单页面应用程序的实例对象”进行声明。
const app = Vue.createApp({})
//注册一个全局自定义指令 'v-focus'
app.directive('focus',{
    //当被绑定的元素插入到dom中时,自动触发mounted函数
    mounted(el){
        el.focus()
    }
})
3. updated 函数
mounted 函数只在元素第一次插入 DOM 时被调用,当 DOM 更新时 mounted 函数不会被触发。 updated 函数会在每次 DOM 更新完成后被调用。
app.directive('focus',{
    mounted(el){//第一次插入dom时触发这个函数
        el.focus()
    },
    updated(el){   //每次dom更新时都会触发updated函数
        el.focus()
    }
})
如果 mounted 和updated 函数中的逻辑完全相同,则可以简写:
app.directive('focus',(el) => {
    //在mounted和updated时都会触发相同的业务逻辑
    el.focus()
})
4. 指令的参数值
在绑定指令时,可以通过“等号”的形式为指令绑定具体的参数值.
<input type="text" v-model.number="count" v-focus v-color="'red'">
<p v-color="cyan>{{count}}</p>

<button @click="count++">+1</button>

app.directive('color', (el,binding) => {
    el.style.color = binding.value
})


 1455
1455

 被折叠的 条评论
为什么被折叠?
被折叠的 条评论
为什么被折叠?
 到【灌水乐园】发言


