intDisplaying_Random_Text(Matimage,char*window_name,RNGrng){intlineType=8;for(inti=1;i<NUMBER;i++){Pointorg;org.x=rng.uniform(x_1,x_2);org.y=rng.uniform(y_1,y_2);putText(image,"Testing text rendering",org,rng.uniform(0,8),rng.uniform(0,100)*0.05+0.1,randomColor(rng),rng.uniform(1,10),lineType);imshow(window_name,image);if(waitKey(DELAY)>=0){return-1;}}return0;}
这些看起来都很熟悉,但是这一句:
putText(image,"Testing text rendering",org,rng.uniform(0,8),rng.uniform(0,100)*0.05+0.1,randomColor(rng),rng.uniform(1,10),lineType);
#include "opencv2/core/core.hpp"#include "opencv2/imgproc/imgproc.hpp"#include "opencv2/highgui/highgui.hpp"#include <iostream>intmain(intargc,char**argv){constchar*filename=argc>=2?argv[1]:"lena.jpg";MatI=imread(filename,CV_LOAD_IMAGE_GRAYSCALE);if(I.empty())return-1;Matpadded;//expand input image to optimal sizeintm=getOptimalDFTSize(I.rows);intn=getOptimalDFTSize(I.cols);// on the border add zero valuescopyMakeBorder(I,padded,0,m-I.rows,0,n-I.cols,BORDER_CONSTANT,Scalar::all(0));Matplanes[]={Mat_<float>(padded),Mat::zeros(padded.size(),CV_32F)};MatcomplexI;merge(planes,2,complexI);// Add to the expanded another plane with zerosdft(complexI,complexI);// this way the result may fit in the source matrix// compute the magnitude and switch to logarithmic scale// => log(1 + sqrt(Re(DFT(I))^2 + Im(DFT(I))^2))split(complexI,planes);// planes[0] = Re(DFT(I), planes[1] = Im(DFT(I))magnitude(planes[0],planes[1],planes[0]);// planes[0] = magnitude MatmagI=planes[0];magI+=Scalar::all(1);// switch to logarithmic scalelog(magI,magI);// crop the spectrum, if it has an odd number of rows or columnsmagI=magI(Rect(0,0,magI.cols&-2,magI.rows&-2));// rearrange the quadrants of Fourier image so that the origin is at the image center intcx=magI.cols/2;intcy=magI.rows/2;Matq0(magI,Rect(0,0,cx,cy));// Top-Left - Create a ROI per quadrant Matq1(magI,Rect(cx,0,cx,cy));// Top-RightMatq2(magI,Rect(0,cy,cx,cy));// Bottom-LeftMatq3(magI,Rect(cx,cy,cx,cy));// Bottom-RightMattmp;// swap quadrants (Top-Left with Bottom-Right)q0.copyTo(tmp);q3.copyTo(q0);tmp.copyTo(q3);q1.copyTo(tmp);// swap quadrant (Top-Right with Bottom-Left)q2.copyTo(q1);tmp.copyTo(q2);normalize(magI,magI,0,1,CV_MINMAX);// Transform the matrix with float values into a // viewable image form (float between values 0 and 1).imshow("Input Image",I);// Show the resultimshow("spectrum magnitude",magI);waitKey();return0;}
#include <opencv2/core/core.hpp>#include <iostream>#include <string>usingnamespacecv;usingnamespacestd;classMyData{public:MyData():A(0),X(0),id(){}explicitMyData(int):A(97),X(CV_PI),id("mydata1234")// explicit to avoid implicit conversion{}voidwrite(FileStorage&fs)const//Write serialization for this class{fs<<"{"<<"A"<<A<<"X"<<X<<"id"<<id<<"}";}voidread(constFileNode&node)//Read serialization for this class{A=(int)node["A"];X=(double)node["X"];id=(string)node["id"];}public:// Data MembersintA;doubleX;stringid;};//These write and read functions must be defined for the serialization in FileStorage to workvoidwrite(FileStorage&fs,conststd::string&,constMyData&x){x.write(fs);}voidread(constFileNode&node,MyData&x,constMyData&default_value=MyData()){if(node.empty())x=default_value;elsex.read(node);}// This function will print our custom class to the consoleostream&operator<<(ostream&out,constMyData&m){out<<"{ id = "<<m.id<<", ";out<<"X = "<<m.X<<", ";out<<"A = "<<m.A<<"}";returnout;}intmain(intac,char**av){if(ac!=2){help(av);return1;}stringfilename=av[1];{//writeMatR=Mat_<uchar>::eye(3,3),T=Mat_<double>::zeros(3,1);MyDatam(1);FileStoragefs(filename,FileStorage::WRITE);fs<<"iterationNr"<<100;fs<<"strings"<<"[";// text - string sequencefs<<"image1.jpg"<<"Awesomeness"<<"baboon.jpg";fs<<"]";// close sequencefs<<"Mapping";// text - mappingfs<<"{"<<"One"<<1;fs<<"Two"<<2<<"}";fs<<"R"<<R;// cv::Matfs<<"T"<<T;fs<<"MyData"<<m;// your own data structuresfs.release();// explicit closecout<<"Write Done."<<endl;}{//readcout<<endl<<"Reading: "<<endl;FileStoragefs;fs.open(filename,FileStorage::READ);intitNr;//fs["iterationNr"] >> itNr;itNr=(int)fs["iterationNr"];cout<<itNr;if(!fs.isOpened()){cerr<<"Failed to open "<<filename<<endl;help(av);return1;}FileNoden=fs["strings"];// Read string sequence - Get nodeif(n.type()!=FileNode::SEQ){cerr<<"strings is not a sequence! FAIL"<<endl;return1;}FileNodeIteratorit=n.begin(),it_end=n.end();// Go through the nodefor(;it!=it_end;++it)cout<<(string)*it<<endl;n=fs["Mapping"];// Read mappings from a sequencecout<<"Two "<<(int)(n["Two"])<<"; ";cout<<"One "<<(int)(n["One"])<<endl<<endl;MyDatam;MatR,T;fs["R"]>>R;// Read cv::Matfs["T"]>>T;fs["MyData"]>>m;// Read your own structure_cout<<endl<<"R = "<<R<<endl;cout<<"T = "<<T<<endl<<endl;cout<<"MyData = "<<endl<<m<<endl<<endl;//Show default behavior for non existing nodescout<<"Attempt to read NonExisting (should initialize the data structure with its default).";fs["NonExisting"]>>m;cout<<endl<<"NonExisting = "<<endl<<m<<endl;}cout<<endl<<"Tip: Open up "<<filename<<" with a text editor to see the serialized data."<<endl;return0;}
代码分析
这里我们仅讨论XML和YAML文件输入。你的输出(和相应的输入)文件可能仅具有其中一个扩展名以及对应的文件结构。XML和YAML的串行化分别采用两种不同的数据结构: mappings (就像STL map) 和 element sequence (比如 STL vector>。二者之间的区别在map中每个元素都有一个唯一的标识名供用户访问;而在sequences中你必须遍历所有的元素才能找到指定元素。
FileNoden=fs["strings"];// 读取字符串序列 - 获取节点if(n.type()!=FileNode::SEQ){cerr<<"strings is not a sequence! FAIL"<<endl;return1;}FileNodeIteratorit=n.begin(),it_end=n.end();// 遍历节点for(;it!=it_end;++it)cout<<(string)*it<<endl;
Write Done.
Reading:
100image1.jpg
Awesomeness
baboon.jpg
Two 2; One 1
R=[1, 0, 0;
0, 1, 0;
0, 0, 1]T=[0; 0; 0]MyData={id= mydata1234, X= 3.14159, A= 97}
Attempt to read NonExisting (should initialize the data structure with its default).
NonExisting={id= , X= 0, A= 0}
Tip: Open up output.xml with a text editor to see the serialized data.
#include <stdio.h>#include <iostream>#include <opencv2/core/core.hpp>#include <opencv2/imgproc/imgproc.hpp>#include <opencv2/highgui/highgui.hpp>usingnamespacecv;// The new C++ interface API is inside this namespace. Import it.usingnamespacestd;#define DEMO_MIXED_API_USE intmain(intargc,char**argv){constchar*imagename=argc>1?argv[1]:"lena.jpg";#ifdef DEMO_MIXED_API_USEPtr<IplImage>IplI=cvLoadImage(imagename);// Ptr<T> is safe ref-counting pointer classif(IplI.empty()){cerr<<"Can not load image "<<imagename<<endl;return-1;}MatI(IplI);// Convert to the new style container. Only header created. Image not copied. #elseMatI=imread(imagename);// the newer cvLoadImage alternative, MATLAB-style functionif(I.empty())// same as if( !I.data ){cerr<<"Can not load image "<<imagename<<endl;return-1;}#endif
在此,你可一看到新的结构再无指针问题,哪怕使用旧的函数,并在最后结束时将结果转换为 Mat 对象。
1
2
3
4
5
6
// convert image to YUV color space. The output image will be created automatically. MatI_YUV;cvtColor(I,I_YUV,CV_BGR2YCrCb);vector<Mat>planes;// Use the STL's vector structure to store multiple Mat objects split(I_YUV,planes);// split the image into separate color planes (Y U V)
// Method 1. process Y plane using an iteratorMatIterator_<uchar>it=planes[0].begin<uchar>(),it_end=planes[0].end<uchar>();for(;it!=it_end;++it){doublev=*it*1.7+rand()%21-10;*it=saturate_cast<uchar>(v*v/255);}for(inty=0;y<I_YUV.rows;y++){// Method 2. process the first chroma plane using pre-stored row pointer.uchar*Uptr=planes[1].ptr<uchar>(y);for(intx=0;x<I_YUV.cols;x++){Uptr[x]=saturate_cast<uchar>((Uptr[x]-128)/2+128);// Method 3. process the second chroma plane using individual element accessuchar&Vxy=planes[2].at<uchar>(y,x);Vxy=saturate_cast<uchar>((Vxy-128)/2+128);}}
此处可看到,我们可以以三种方式遍历图像的所有像素:迭代器,C指针和单独元素访问方式你可在 OpenCV如何扫描图像、利用查找表和计时 中获得更深入的了解。从旧的函数名转换新版本非常容易,仅需要删除 cv 前缀,并且使用 Mat 数据结构。下面的例子中使用了加权加法:
MatnoisyI(I.size(),CV_8U);// Create a matrix of the specified size and type// Fills the matrix with normally distributed random values (around number with deviation off).// There is also randu() for uniformly distributed random number generationrandn(noisyI,Scalar::all(128),Scalar::all(20));// blur the noisyI a bit, kernel size is 3x3 and both sigma's are set to 0.5GaussianBlur(noisyI,noisyI,Size(3,3),0.5,0.5);constdoublebrightness_gain=0;constdoublecontrast_gain=1.7;#ifdef DEMO_MIXED_API_USE// To pass the new matrices to the functions that only work with IplImage or CvMat do:// step 1) Convert the headers (tip: data will not be copied).// step 2) call the function (tip: to pass a pointer do not forget unary "&" to form pointers)IplImagecv_planes_0=planes[0],cv_noise=noisyI;cvAddWeighted(&cv_planes_0,contrast_gain,&cv_noise,1,-128+brightness_gain,&cv_planes_0);#elseaddWeighted(planes[0],contrast_gain,noisyI,1,-128+brightness_gain,planes[0]);#endifconstdoublecolor_scale=0.5;// Mat::convertTo() replaces cvConvertScale. // One must explicitly specify the output matrix type (we keep it intact - planes[1].type())planes[1].convertTo(planes[1],planes[1].type(),color_scale,128*(1-color_scale));// alternative form of cv::convertScale if we know the datatype at compile time ("uchar" here).// This expression will not create any temporary arrays ( so should be almost as fast as above)planes[2]=Mat_<uchar>(planes[2]*color_scale+128*(1-color_scale));// Mat::mul replaces cvMul(). Again, no temporary arrays are created in case of simple expressions.planes[0]=planes[0].mul(planes[0],1./255);
正如你所见,变量 planes 也是 Mat 类型的。无论如何,将 Mat 转换为 IplImage 都可通过简单的赋值操作符自动实现。
 1
 2
 3
 4
 5
 6
 7
 8
 9
10
11
12
13
merge(planes,I_YUV);// now merge the results backcvtColor(I_YUV,I,CV_YCrCb2BGR);// and produce the output RGB imagenamedWindow("image with grain",CV_WINDOW_AUTOSIZE);// use this to create images#ifdef DEMO_MIXED_API_USE// this is to demonstrate that I and IplI really share the data - the result of the above// processing is stored in I and thus in IplI too.cvShowImage("image with grain",IplI);#elseimshow("image with grain",I);// the new MATLAB style function show
新的 imshow highgui函数可接受 Mat 和 IplImage 数据结构。 编译并运行例程,如果输入以下第一幅图像,程序将输出以下第二幅或者第三幅图像。
你可以在点击此处看到动态示例: YouTube here ,并可以 点击此处 下载源文件,或者在OpenCV源代码库中找到源文件:samples/cpp/tutorial_code/core/interoperability_with_OpenCV_1/interoperability_with_OpenCV_1.cpp 。


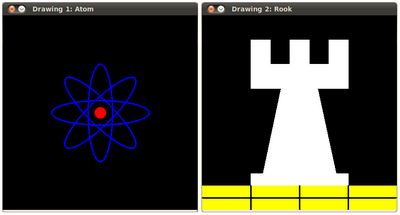
 本文介绍使用OpenCV进行基本绘图操作的方法,包括点、线、椭圆等图形的绘制,以及如何利用随机数生成器绘制随机图形。同时探讨了离散傅立叶变换的应用、XML/YAML文件的读写操作,并展示了如何在新旧版本间进行代码迁移。
 和
和
 指定的2D点。可定义为:
 之间的整数来定义。
 )。
)。


![M = \sqrt[2]{ {Re(DFT(I))}^2 + {Im(DFT(I))}^2}](https://i-blog.csdnimg.cn/blog_migrate/09294506691884a53300d2b5eac14c41.png)


 被折叠的 条评论
为什么被折叠?
被折叠的 条评论
为什么被折叠?
 到【灌水乐园】发言


