Python3.3 64位 c++调用

Python3.6 安装jpype1 遇到的一些坑以及最后安装jpype1成功的解决方法,不得不说 因为需要调用jar包,而一直使用的是Python。 Python调用 jar包,这里必然涉及到jpype1 包的安装。 当耗费了大半天的时间,一直在纠结如何通过VS C++的插件导致 pip install jpype1 失败的问题。 环境: Win 10 Python 3.6 (64 bit) Java:jdk1.8.0_91 (64 bit)python调用jvm,遇到的一些坑: 阅读详情

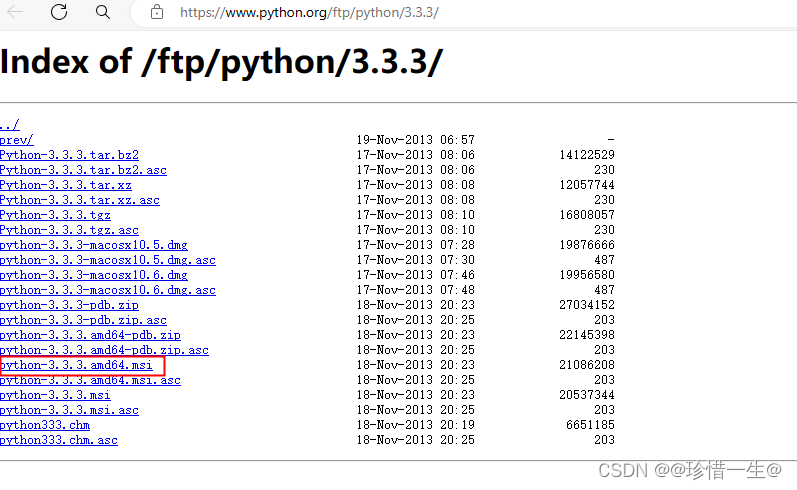
1 下载 python-3.3.3.amd64.msi 安装

https://www.python.org/ftp/python/3.3.3/
在这里插入图片描述

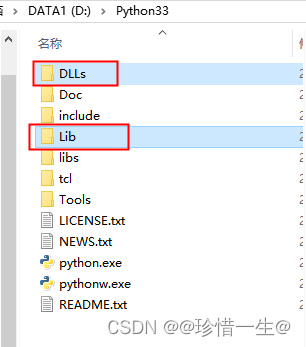
2 安装后 拷贝依赖库到软件运行环境下

在这里插入图片描述

3 搜索拷贝python33.dll 到软件运行环境下

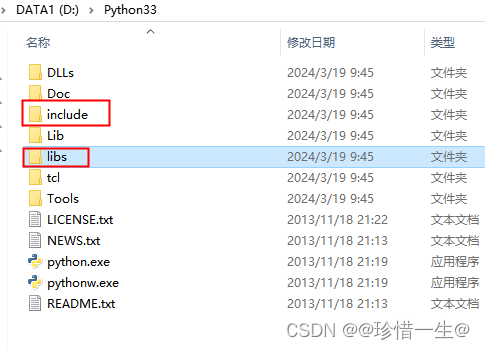
4 链接库和头文件拷贝到自己使用的位置

在这里插入图片描述

5 链接 python33.lib

6 可能出现的问题

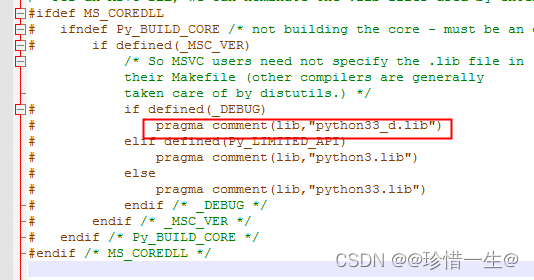
(Release和Debug使用的是同一套库)在debug模式下,会出现说找不到python33_d.lib的链接错误,出现这个错误的原因是python_d.lib是库的调试后形式,当我们以debug模式编译工程时,python就用这个lib文件,但是这个文件是不可用的。对于这点,可以强制要求python在任何情况下都是用非调试版本,就可以了。要做到这一点
a) 在python目录include文件夹下,打开pyconfig.h,找到如下语句
在这里插入图片描述

将python33_d.lib改成python33.lib//注意更改一下路径,路径不正确会依旧提示找不到lib

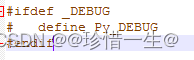
b) 找到
在这里插入图片描述
将其屏蔽

表面肌电信号手势识别控制智能小车:从采集到运动控制全链路解析 表面肌电信号(sEMG)是肌肉收缩时产生的微弱生物电信号,幅值仅数十微伏至数毫伏,却蕴含着丰富的手势意图信息。通过电极采集、信号放大与滤波、特征提取和模式识别,可以将握拳、张手等动作转化为控制指令,驱动智能小车实现前进、后退与转向。这一技术融合了嵌入式系统、信号处理与运动控制,在智能硬件、康复辅助和交互式机器人领域具有广泛的应用价值和教学意义。本文从sEMG的物理特征出发,讲解前端采集链路设计、时域特征提取与LDA分类器部署,并结合STM32平台给出完整的运动控制实现方案,帮助开发者理解从生物信号到机电系统 阅读详情

相关推荐

中兴U30air随身WiFi刷机全攻略:从ABD开启到系统调试(附工具包)

本文提供中兴U30air随身WiFi刷机全攻略,从ADB开启到系统调试的详细步骤,包括必备工具清单、ADB调试模式解锁、Bootloader解锁及自定义ROM刷入与调优。适合技术爱好者深度定制设备,提升网络性能和功能扩展。

weixin_29235923的博客 1945

1、Python3安装教程---Windows 64位机

参考安装教程https://www.cnblogs.com/lvtaohome/p/11121377.html https://www.runoob.com/python3/python3-install.html 1、登录网址https://www.python.org/downloads/ 下载Python3 , 根据需求选择不同环境下的版本,我是Windows版本。 2、进入windows版,如下图所示,点...

naturly的博客 1555

python 识别滑块验证码

博客来源于: https://www.cnblogs.com/wyh0923/p/16528354.html # -*- coding: utf-8 -*- # https://gov.pkulaw.cn/ 1. import io 2. import json 3. from pathlib import Path 4. from PIL import Image 5. import bas...

2102

Window 64位操作系统下 python3 安装 PyOpengl

Python3 安装 PyOpenGl

qq_43647590的博客 1507

Python 爬虫实战:爬取股票数据做 K 线图可视化

摘要:本文介绍基于Python的股票数据爬取与K线图可视化全流程技术方案。通过Requests库抓取东方财富网股票数据,使用Pandas进行清洗处理,并利用mplfinance库实现专业K线图绘制。文章详细讲解了数据爬取接口分析、反爬策略配置、K线图绘制方法(包含基础K线图和带均线的进阶版本),以及核心统计指标计算。该方案可应用于股票价格趋势分析,为投资决策提供数据支持,同时强调了数据使用的合规性和技术优化方向。

2503_91057718的博客 2045

SI案例分享--PCB通孔互连新技术的应用(VeCS)

本文介绍了VeCS的物理结构和制造过程,并通过全波仿真模拟和测量,分析了VeCS的电性能,并与传统的测量方法进行了比较。结果表明,由于有一个连续的参考平面,VeCS的TDR阻抗可以很容易地控制到目标阻抗,同时可以大大减轻信道上的串扰,的确是一种性能不错的PCB互连创新设计方案。

一只豌豆象的博客 2116

安装python3.7.3(windows-64位)

python3.7.3安装1.下载2.安装 1.下载 下载地址 ctrl + F 查找 Windows x86-64 executable installer 点击它,下载它 2.安装 至此安装完毕, 环境变量已经在第一步中设置为自动添加, 命令行也可以运行python了 ...

weixin_43723979的博客 6236

一文学会python基础知识

1. python 运行环境 1.1 脚本式环境 1.2 交互式环境 2. python 注释 3. 变量及变量命名 4. 关键词 BIFS 5. 标准操作符 6. 条件判断 7. 循环 8. python 数据类型 9. python 序列 9.1 序列-字符串(str) 9.2 序列-列表 9.3 序列-元组 10. 字典 11. 集合 12. python内存管理及可变、不可变对象 13. 函数 13.1 函数参数 13.2 return and yiled(生成器) 13.3 参数传递处理 ...

weixin_43178406的博客 26万+

Python3.7.0安装教程(32位&64位)

链接:https://pan.baidu.com/s/13RLldV0EZOEckCXxOfb1iQ 提取码:0206 目录 一.软件介绍 二.安装教程 一.软件介绍 Python是一种跨平台的计算机程序设计语言。是一种面向对象的动态类型语言,最初被设计用于编写自动化脚本(shell),随着版本的不断更新和语言新功能的添加,越来越多被用于独立的、大型项目的开发。 二.安装教程 1.解压软件安装包 2.双击打开【python-3.7.0】文件夹。 3.在桌面鼠标右击我的电脑选择属性查看自.

不知名前端开发的小世界 1万+

利用Python实现Springer文献关键词爬虫

🔧 如何分析Springer的搜索结果HTML结构🕷️ 编写高性能异步爬虫抓取论文元数据📊 使用Pandas导出Excel🧠 如何处理作者、摘要、DOI等字段🔄 如何优化爬虫稳定性与可扩展性。

2201_76125261的博客 415

分析4-20mA检查电路分析

本文介绍了一种工业领域常用的4-20mA电流信号调理电路,可将标准电流信号转换为适合MCU采集的电压信号。电路包含三个关键模块:首先通过10Ω取样电阻将4-20mA电流转换为0.04-0.2V电压;然后采用同向比例运算放大器KTA333-ST5进行信号放大;最后通过二阶有源低通滤波器滤除工业环境中的高频干扰。文章详细分析了各模块的工作原理和参数设计,并以压力传感器和温度变送器为例说明了实际应用中的参数调整方法。该电路具有抗干扰能力强、精度高等特点,适用于工业压力、温度等模拟量信号的采集处理。

qq_37999850的博客 1329

python安装详细步骤windows10,windows如何安装python3

与大多数 UNIX 系统和服务不同,Windows 系统没有预安装 Python。Python 仅支持微软产品支持生命周期内的 Windows 版本python一级证书有用吗。这里以在 Windows 10 系统上安装 Python 3.7 的版本为例,如果需要 Windows XP支持,请安装 Python 3.4。Windows提供了许多不同的安装程序,每个安装程序都有一定的优点和缺点。

2301_81895257的博客 1002

SIMATIC S7-1200, S7-1500 PID 控制[手册]

SIMATIC S7-1200, S7-1500 PID 控制[手册]

C++调用python(VS2015+Python3.5 64位)

本文讲解关于在C++中调用python的环境配置和简单函数功能实现,废话就不赘述了。 一、首先环境配置 1.创建控制台应用程序testpy,新建源文件main.cpp 2.进入属性管理器,右击项目,选择属性。(也可以新建项目属性表,方便后期项目) 选择c/c++>>常规>>附加包含目录>>添加python3.5安装路径下,incliude文件夹路径 ...

ganwenbo2011的博客 1117

深度学习工具包 DeepLearningToolbox

深度学习工具包Deprecation notice.-----This toolbox is outdated and no longer maintained.There are much better tools available for deep learning than this toolbox, e.g. [Theano](http://deeplearning.net/software/theano/), [torch](http://torch.ch/) or [tensorflow](http://www.tensorflow.org/)I would suggest you use one of the tools mentioned above rather than use this toolbox.Best, Rasmus.DeepLearnToolbox================A Matlab toolbox for Deep Learning.Deep Learning is a new subfield of machine learning that focuses on learning deep hierarchical models of data.It is inspired by the human brain&#39;s apparent deep (layered, hierarchical) architecture.A good overview of the theory of Deep Learning theory is[Learning Deep Architectures for AI](http://www.iro.umontreal.ca/~bengioy/papers/ftml_book.pdf)For a more informal introduction, see the following videos by Geoffrey Hinton and Andrew Ng.* [The Next Generation of Neural Networks](http://www.youtube.com/watch?v=AyzOUbkUf3M) (Hinton, 2007)* [Recent Developments in Deep Learning](http://www.youtube.com/watch?v=VdIURAu1-aU) (Hinton, 2010)* [Unsupervised Feature Learning and Deep Learning](http://www.youtube.com/watch?v=ZmNOAtZIgIk) (Ng, 2011)If you use this toolbox in your research please cite [Prediction as a candidate for learning deep hierarchical models of data](http://www2.imm.dtu.dk/pubdb/views/publication_details.php?id=6284)```@MASTERSTHESIS\{IMM2012-06284, author = "R. B. Palm", title = "Prediction as a candidate for learning deep hierarchical models of data", year = "2012",}```Contact: rasmusbergpalm at gmail dot comDirectories included in the toolbox-----------------------------------`NN/` - A library for Feedforward Backpropagation Neural Networks`CNN/` - A library for Convolutional Neural Networks`DBN/` - A library for Deep Belief Networks`SAE/` - A library for Stacked Auto-Encoders`CAE/` - A library for Convolutional Auto-Encoders`util/` - Utility functions used by the libraries`data/` - Data used by the examples`tests/` - unit tests to verify toolbox is workingFor references on each library check REFS.mdSetup-----1. Download.2. addpath(genpath(&#39;DeepLearnToolbox&#39;));Example: Deep Belief Network---------------------```matlabfunction test_example_DBNload mnist_uint8;train_x = double(train_x) / 255;test_x = double(test_x) / 255;train_y = double(train_y);test_y = double(test_y);%% ex1 train a 100 hidden unit RBM and visualize its weightsrand(&#39;state&#39;,0)dbn.sizes = [100];opts.numepochs = 1;opts.batchsize = 100;opts.momentum = 0;opts.alpha = 1;dbn = dbnsetup(dbn, train_x, opts);dbn = dbntrain(dbn, train_x, opts);figure; visualize(dbn.rbm{1}.W&#39;); % Visualize the RBM weights%% ex2 train a 100-100 hidden unit DBN and use its weights to initialize a NNrand(&#39;state&#39;,0)%train dbndbn.sizes = [100 100];opts.numepochs = 1;opts.batchsize = 100;opts.momentum = 0;opts.alpha = 1;dbn = dbnsetup(dbn, train_x, opts);dbn = dbntrain(dbn, train_x, opts);%unfold dbn to nnnn = dbnunfoldtonn(dbn, 10);nn.activation_function = &#39;sigm&#39;;%train nnopts.numepochs = 1;opts.batchsize = 100;nn = nntrain(nn, train_x, train_y, opts);[er, bad] = nntest(nn, test_x, test_y);assert(er < 0.10, &#39;Too big error&#39;);```Example: Stacked Auto-Encoders---------------------```matlabfunction test_example_SAEload mnist_uint8;train_x = double(train_x)/255;test_x = double(test_x)/255;train_y = double(train_y);test_y = double(test_y);%% ex1 train a 100 hidden unit SDAE and use it to initialize a FFNN% Setup and train a stacked denoising autoencoder (SDAE)rand(&#39;state&#39;,0)sae = saesetup([784 100]);sae.ae{1}.activation_function = &#39;sigm&#39;;sae.ae{1}.learningRate = 1;sae.ae{1}.inputZeroMaskedFraction = 0.5;opts.numepochs = 1;opts.batchsize = 100;sae = saetrain(sae, train_x, opts);visualize(sae.ae{1}.W{1}(:,2:end)&#39;)% Use the SDAE to initialize a FFNNnn = nnsetup([784 100 10]);nn.activation_function = &#39;sigm&#39;;nn.learningRate = 1;nn.W{1} = sae.ae{1}.W{1};% Train the FFNNopts.numepochs = 1;opts.batchsize = 100;nn = nntrain(nn, train_x, train_y, opts);[er, bad] = nntest(nn, test_x, test_y);assert(er < 0.16, &#39;Too big error&#39;);```Example: Convolutional Neural Nets---------------------```matlabfunction test_example_CNNload mnist_uint8;train_x = double(reshape(train_x&#39;,28,28,60000))/255;test_x = double(reshape(test_x&#39;,28,28,10000))/255;train_y = double(train_y&#39;);test_y = double(test_y&#39;);%% ex1 Train a 6c-2s-12c-2s Convolutional neural network %will run 1 epoch in about 200 second and get around 11% error. %With 100 epochs you&#39;ll get around 1.2% errorrand(&#39;state&#39;,0)cnn.layers = { struct(&#39;type&#39;, &#39;i&#39;) %input layer struct(&#39;type&#39;, &#39;c&#39;, &#39;outputmaps&#39;, 6, &#39;kernelsize&#39;, 5) %convolution layer struct(&#39;type&#39;, &#39;s&#39;, &#39;scale&#39;, 2) %sub sampling layer struct(&#39;type&#39;, &#39;c&#39;, &#39;outputmaps&#39;, 12, &#39;kernelsize&#39;, 5) %convolution layer struct(&#39;type&#39;, &#39;s&#39;, &#39;scale&#39;, 2) %subsampling layer};cnn = cnnsetup(cnn, train_x, train_y);opts.alpha = 1;opts.batchsize = 50;opts.numepochs = 1;cnn = cnntrain(cnn, train_x, train_y, opts);[er, bad] = cnntest(cnn, test_x, test_y);%plot mean squared errorfigure; plot(cnn.rL);assert(er<0.12, &#39;Too big error&#39;);```Example: Neural Networks---------------------```matlabfunction test_example_NNload mnist_uint8;train_x = double(train_x) / 255;test_x = double(test_x) / 255;train_y = double(train_y);test_y = double(test_y);% normalize[train_x, mu, sigma] = zscore(train_x);test_x = normalize(test_x, mu, sigma);%% ex1 vanilla neural netrand(&#39;state&#39;,0)nn = nnsetup([784 100 10]);opts.numepochs = 1; % Number of full sweeps through dataopts.batchsize = 100; % Take a mean gradient step over this many samples[nn, L] = nntrain(nn, train_x, train_y, opts);[er, bad] = nntest(nn, test_x, test_y);assert(er < 0.08, &#39;Too big error&#39;);%% ex2 neural net with L2 weight decayrand(&#39;state&#39;,0)nn = nnsetup([784 100 10]);nn.weightPenaltyL2 = 1e-4; % L2 weight decayopts.numepochs = 1; % Number of full sweeps through dataopts.batchsize = 100; % Take a mean gradient step over this many samplesnn = nntrain(nn, train_x, train_y, opts);[er, bad] = nntest(nn, test_x, test_y);assert(er < 0.1, &#39;Too big error&#39;);%% ex3 neural net with dropoutrand(&#39;state&#39;,0)nn = nnsetup([784 100 10]);nn.dropoutFraction = 0.5; % Dropout fraction opts.numepochs = 1; % Number of full sweeps through dataopts.batchsize = 100; % Take a mean gradient step over this many samplesnn = nntrain(nn, train_x, train_y, opts);[er, bad] = nntest(nn, test_x, test_y);assert(er < 0.1, &#39;Too big error&#39;);%% ex4 neural net with sigmoid activation functionrand(&#39;state&#39;,0)nn = nnsetup([784 100 10]);nn.activation_function = &#39;sigm&#39;; % Sigmoid activation functionnn.learningRate = 1; % Sigm require a lower learning rateopts.numepochs = 1; % Number of full sweeps through dataopts.batchsize = 100; % Take a mean gradient step over this many samplesnn = nntrain(nn, train_x, train_y, opts);[er, bad] = nntest(nn, test_x, test_y);assert(er < 0.1, &#39;Too big error&#39;);%% ex5 plotting functionalityrand(&#39;state&#39;,0)nn = nnsetup([784 20 10]);opts.numepochs = 5; % Number of full sweeps through datann.output = &#39;softmax&#39;; % use softmax outputopts.batchsize = 1000; % Take a mean gradient step over this many samplesopts.plot = 1; % enable plottingnn = nntrain(nn, train_x, train_y, opts);[er, bad] = nntest(nn, test_x, test_y);assert(er < 0.1, &#39;Too big error&#39;);%% ex6 neural net with sigmoid activation and plotting of validation and training error% split training data into training and validation datavx = train_x(1:10000,:);tx = train_x(10001:end,:);vy = train_y(1:10000,:);ty = train_y(10001:end,:);rand(&#39;state&#39;,0)nn = nnsetup([784 20 10]); nn.output = &#39;softmax&#39;; % use softmax outputopts.numepochs = 5; % Number of full sweeps through dataopts.batchsize = 1000; % Take a mean gradient step over this many samplesopts.plot = 1; % enable plottingnn = nntrain(nn, tx, ty, opts, vx, vy); % nntrain takes validation set as last two arguments (optionally)[er, bad] = nntest(nn, test_x, test_y);assert(er < 0.1, &#39;Too big error&#39;);```[![Bitdeli Badge](https://d2weczhvl823v0.cloudfront.net/rasmusbergpalm/deeplearntoolbox/trend.png)](https://bitdeli.com/free "Bitdeli Badge")

jdk-8u144-linux-x64.tar.gz.

该资源为搭建Linux系统Java环境用,资源的后缀为tar.gz格式的压缩包

Cpp调用Python3,使用matplotlib画(二维)图----1.配置(Clion,mingW64, python, matplotlib)...

To my knowledge so far, Cpp画图是真滴捉急, 那就调用python帮帮忙吧。 百度了好久,试了好几次,终于走完了配置的过程。我要记录一下。 1.0 配置:(操作系统)64位Win7, (Cpp的IDE是)Clion。 1.1 安装Clion   官网下载就可以了,地址 https://www.jetbrains.com/clion/ 1.2 安...

weixin_30244681的博客 571

Data-Structures-and-Algorithm-Analysis-in-Java.pdf

作者: Weiss, Mark A. 出版社: Addison Wesley Data Structures and Algorithm Analysis in Java is an “advanced algorithms” book that fits between traditional CS2 and Algorithms Analysis courses. In the old ACM Curriculum Guidelines, this course was known as CS7. This text is for readers who want to learn good programming and algorithm analysis skills simultaneously so that they can develop such programs with the maximum amo...

python调用c++静态库_python调用C++动态链接库

系统:win7 64位python 版本:python3.6.5 32位C++编译:MinGW (Minimalist GNU for Windows)。注意这是win32 的版本,注意位数应当与已经安装的Python保持一致。1,安装下载MinGW, Download mingw-get-setup.exe (86.5 kB)安装过程:(1)默认安装目录 C:\MinGW(2)一定选上安装...

weixin_39709979的博客 1521

Win10系统安装了64位Python3.7和32位Python3.6,互不影响?(Python程序打包引发的问题)(Python调C++的DLL)

Win10系统安装了64位Python3.7和32位Python3.6,互不影响?(Python程序打包引发的问题)(Python调C++的DLL) 最近在用Python调C++的DLL,因为调DLL一般用的是32位的Python,但我之前已经安装了64位的Python37,所以又在另一个目录下安装了一个32位的Python36。 调DLL的程序写好了,然后打包程序的时候出问题了,打完包的.exe文件打不开且一直报错,报错如图所示: 这什么情况??经过一番百度操作,找到了下面这个规则: 这我就懂了?看了

weixin_50392410的博客 896

C++调用Python(详细教程步骤)

C++调用Python详细教程,一步步实现,减少坑,以及实现过程中遇到的坑的解决方法。 环境 Qt5.13 msvc2017 64 Python3.7 64 配置 将Python安装目录下的include libs拷贝到Qt工程目录下 .pro配置 win32:CONFIG(release, debug|release): LIBS += -L$$PWD/libs/ -lpython...

Qt自定义控件及应用开发 705

python导入dll_无法在python中导入自定义DLL

我试图用^ {< CD1>}将一个C++类暴露给Python,所以我要通过this tutorial。我用以下源代码创建了一个visual studio .dll项目:#include using namespace boost::python;struct World{void set(std::string msg) { this->msg = msg; }std::stri...

weixin_36127981的博客 692

python ctp接口_【转】CTP Python API及Demo(利用Swig 封装)Windows版(traderapi)

原文链接:https://blog.csdn.net/pjjing/article/details/773384231. 环境准备:1) VS 20152) Python 3.7 64位3) CTP API (从 http://www.sfit.com.cn/5_2_DocumentDown.htm 下载,此文档使用的是 http://www.sfit.com.cn/APIHistory1....

weixin_39727743的博客 834

利用ctypes模块在python中嵌入C++函数

环境: Windows10、python3.6 1. 生成64位动态链接库(dll) 打开visual studio 2017,创建新项目,选择Visual C++下的Windows桌面下的动态链接库(DLL),填好位置、名称,勾选“未解决方案创建目录”后点击确定。 在项目目录下的源文件目录下的.cpp文件中写入函数,如下是指数函数f(x)=exf(x)=e^xf(x)=ex的近似计算。 /...

Una_zh 398

python调用函数库_Python调用动态库函数返回字符串

系统环境Centos 6.10 64位Python:3.6.8库函数源码//add.cpp#include #include #include using namespace std;extern "C"char* addchar(char* in){char ret[64]={0};strcat(ret, "in so");strcat(ret, in);return ret;}extern "...

weixin_39616416的博客 156

Python 安装到生成 .pyd 文件的全流程

Python 安装到生成 .pyd 文件的全流程

qq_39220046的博客 2401

C++ 调用TensorFlow 报错('sys' has no attribute 'argv')之解决方法二

1.环境。windows7 64位操作系统、Python3.5.2 64位、VS2013 2.配置工程。 2.1将Python目录下的Include、libs文件夹拷贝到跟.vcxproj 同一个目录。       工程----属性----C/C++ 常规----附加包含目录----Include        工程----属性----链接器 常规--- 附加库目录----

sz76211822的专栏 3303

python37使用其他版本版本pyd_【转】CTP Python API及Demo(利用Swig 封装)Windows版(traderapi)...

原文链接:https://blog.csdn.net/pjjing/article/details/773384231. 环境准备:1) VS 20152) Python 3.7 64位3) CTP API (从 http://www.sfit.com.cn/5_2_DocumentDown.htm 下载,此文档使用的是 http://www.sfit.com.cn/APIHistory1....

weixin_39622419的博客 179

告别C++依赖:手把手教你用Swig 4.3.0将CTP v6.7.8行情接口封装成Python模块(Windows 64位)

本文详细介绍了如何使用Swig 4.3.0在Windows 64位环境下将CTP v6.7.8行情接口从C++封装为Python模块,解决二级指针处理和中文编码转换等核心问题。通过实战指南,量化交易开发者可以高效地将CTP API集成到Python策略中,提升开发效率。

weixin_30952535的博客 464
上一篇: vs utf-8 无bom 中文 编译失败
下一篇: xerces-c_2_8_0 vs2017编译(64、32)
@珍惜一生@
博客等级 码龄10年 145粉丝 47原创
评论
成就一亿技术人!
拼手气红包6.0元
还能输入1000个字符
 
 条评论被折叠 查看
添加红包

请填写红包祝福语或标题

个

红包个数最小为10个

元

红包金额最低5元

当前余额3.43元 前往充值 >
需支付:10.00元
成就一亿技术人!
领取后你会自动成为博主和红包主的粉丝 规则
hope_wisdom
发出的红包
实付元
使用余额支付
点击重新获取
扫码支付
钱包余额 0

抵扣说明:

1.余额是钱包充值的虚拟货币,按照1:1的比例进行支付金额的抵扣。
2.余额无法直接购买下载,可以购买VIP、付费专栏及课程。

余额充值