


YOLOv5:解读general.py
前言
- 记录一下自己阅读general.py代码的一些重要点,方便自己查阅。特别感谢,在参考里,列举的博文链接,写得很好,对本人阅读理解yolo.py代码,有很大帮助。
- 由于本人水平有限,难免出现错漏,敬请批评改正。
- 更多精彩内容,可点击进入YOLO系列专栏、自然语言处理
专栏或我的个人主页查看- 基于DETR的人脸伪装检测
- YOLOv7训练自己的数据集(口罩检测)
- YOLOv8训练自己的数据集(足球检测)
- YOLOv5:TensorRT加速YOLOv5模型推理
- YOLOv5:IoU、GIoU、DIoU、CIoU、EIoU
- 玩转Jetson Nano(五):TensorRT加速YOLOv5目标检测
- YOLOv5:添加SE、CBAM、CoordAtt、ECA注意力机制
- YOLOv5:yolov5s.yaml配置文件解读、增加小目标检测层
- Python将COCO格式实例分割数据集转换为YOLO格式实例分割数据集
- YOLOv5:使用7.0版本训练自己的实例分割模型(车辆、行人、路标、车道线等实例分割)
- 使用Kaggle GPU资源免费体验Stable Diffusion开源项目
前提条件
- 熟悉Python
相关介绍
- Python是一种跨平台的计算机程序设计语言。是一个高层次的结合了解释性、编译性、互动性和面向对象的脚本语言。最初被设计用于编写自动化脚本(shell),随着版本的不断更新和语言新功能的添加,越多被用于独立的、大型项目的开发。
- PyTorch 是一个深度学习框架,封装好了很多网络和深度学习相关的工具方便我们调用,而不用我们一个个去单独写了。它分为 CPU 和 GPU 版本,其他框架还有 TensorFlow、Caffe 等。PyTorch 是由 Facebook 人工智能研究院(FAIR)基于 Torch 推出的,它是一个基于 Python 的可续计算包,提供两个高级功能:1、具有强大的 GPU 加速的张量计算(如 NumPy);2、构建深度神经网络时的自动微分机制。
- YOLOv5是一种单阶段目标检测算法,该算法在YOLOv4的基础上添加了一些新的改进思路,使其速度与精度都得到了极大的性能提升。它是一个在COCO数据集上预训练的物体检测架构和模型系列,代表了Ultralytics对未来视觉AI方法的开源研究,其中包含了经过数千小时的研究和开发而形成的经验教训和最佳实践。
general.py
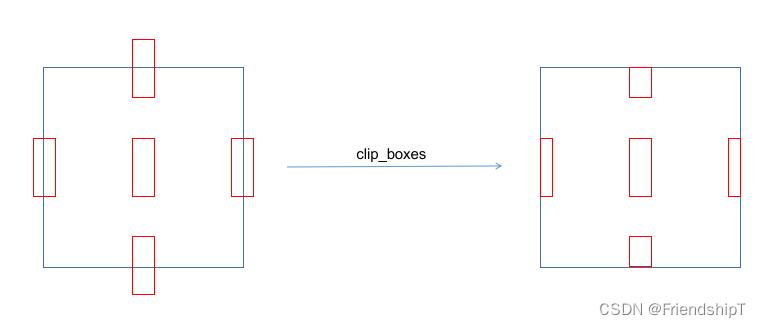
clip_boxes
- 在 Python 中,torch.clamp_() 和numpy.clip()是一个用于限制数值范围的方法,该方法接受三个参数:最小值、最大值和需要被限制的数值。
- 方法的作用是将给定的数值限制在最小值和最大值之间,返回一个新的值。如果原始数值小于最小值,则返回最小值;如果原始数值大于最大值,则返回最大值;如果原始数值在最小值和最大值之间,则返回原始数值。
def clip_boxes(boxes, shape):
    # Clip boxes (xyxy) to image shape (height, width)
    if isinstance(boxes, torch.Tensor):  # faster individually
        boxes[..., 0].clamp_(0, shape[1])  # x1
        boxes[..., 1].clamp_(0, shape[0])  # y1
        boxes[..., 2].clamp_(0, shape[1])  # x2
        boxes[..., 3].clamp_(0, shape[0])  # y2
    else:  # np.array (faster grouped)
        boxes[..., [0, 2]] = boxes[..., [0, 2]].clip(0, shape[1])  # x1, x2
        boxes[..., [1, 3]] = boxes[..., [1, 3]].clip(0, shape[0])  # y1, y2
scale_boxes ★ \bigstar ★
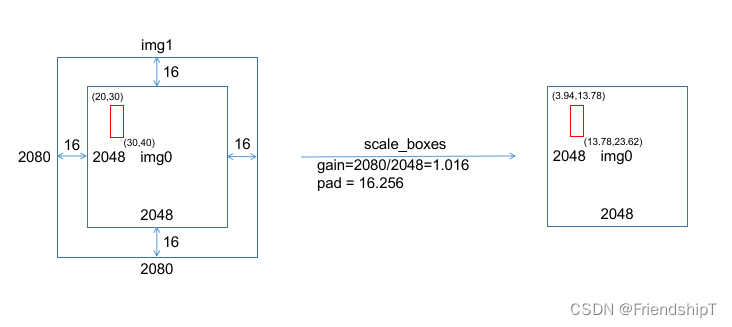
def scale_boxes(img1_shape, boxes, img0_shape, ratio_pad=None):
    # Rescale boxes (xyxy) from img1_shape to img0_shape
    if ratio_pad is None:  # calculate from img0_shape
        gain = min(img1_shape[0] / img0_shape[0], img1_shape[1] / img0_shape[1])  # gain  = old / new
        pad = (img1_shape[1] - img0_shape[1] * gain) / 2, (img1_shape[0] - img0_shape[0] * gain) / 2  # wh padding
    else:
        gain = ratio_pad[0][0]
        pad = ratio_pad[1]

    boxes[..., [0, 2]] -= pad[0]  # x padding
    boxes[..., [1, 3]] -= pad[1]  # y padding
    boxes[..., :4] /= gain
    clip_boxes(boxes, img0_shape)
    return boxes
xywh2xyxy
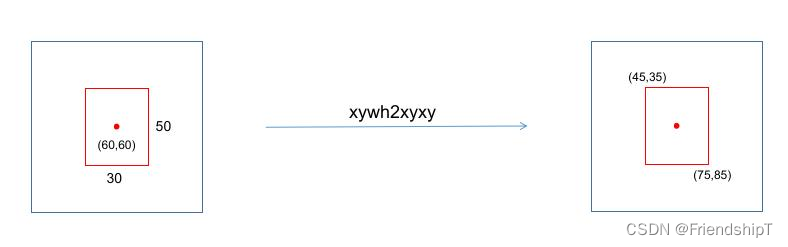
def xywh2xyxy(x):
    # Convert nx4 boxes from [x, y, w, h] to [x1, y1, x2, y2] where xy1=top-left, xy2=bottom-right
    y = x.clone() if isinstance(x, torch.Tensor) else np.copy(x)
    y[..., 0] = x[..., 0] - x[..., 2] / 2  # top left x
    y[..., 1] = x[..., 1] - x[..., 3] / 2  # top left y
    y[..., 2] = x[..., 0] + x[..., 2] / 2  # bottom right x
    y[..., 3] = x[..., 1] + x[..., 3] / 2  # bottom right y
    return y
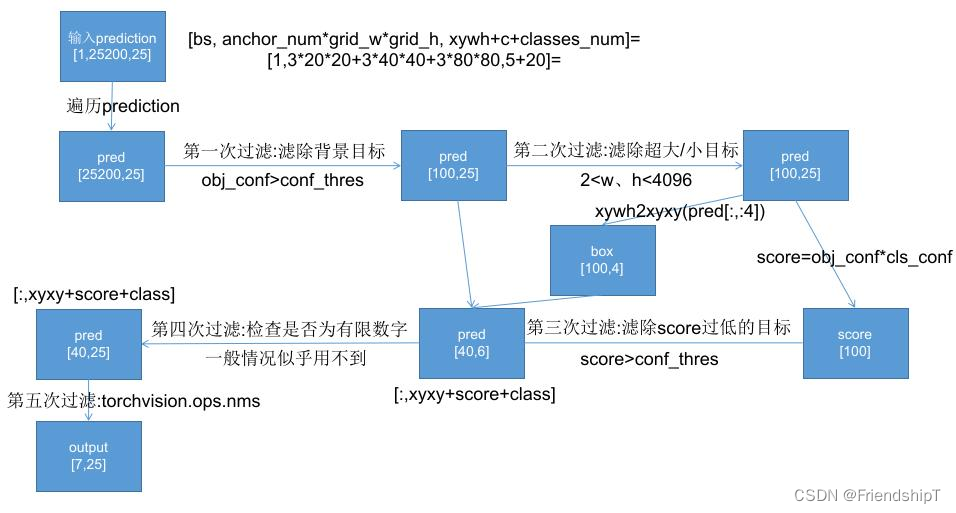
non_max_suppression ★ ★ ★ \bigstar\bigstar\bigstar ★★★
- torchvision.ops.nms 是 PyTorch 的 torchvision 库中提供的一个函数,用于实现非极大值抑制(Non-Maximum Suppression,NMS)操作。这个函数对输入的候选框(bounding boxes)进行排序,并根据给定的 IoU 阈值去除重叠度较高的框。
- 函数的输入参数如下:
- boxes:一个包含候选框的张量,每个框由一个或多个边界框坐标组成。每个边界框由四个元素表示,分别是左上角和右下角的坐标(x1, y1, x2, y2)。
- scores:一个与 boxes 相同形状的张量,表示每个框的置信度分数。
- iou_thres:一个阈值,用于控制哪些框被认为是重叠的。
- 函数的输出是一个张量,其中包含经过非极大值抑制处理后的结果。
- 传统的NMS算法,具体流程如下:
- 步骤一:将所有矩形框按照不同的类别标签分组,组内按照置信度高低得分进行排序;
- 步骤二:将步骤一中得分最高的矩形框拿出来,遍历剩余矩形框,计算与当前得分最高的矩形框的交并比,将剩余矩形框中大于设定的IOU阈值的框删除;
- 步骤三:将步骤二结果中,对剩余的矩形框重复步骤二操作,直到处理完所有矩形框;
- 在YOLOv5中,non_max_suppression函数,具体流程如下:
def non_max_suppression(
        prediction,
        conf_thres=0.25,
        iou_thres=0.45,
        classes=None,
        agnostic=False,
        multi_label=False,
        labels=(),
        max_det=300,
        nm=0,  # number of masks
):
    """Non-Maximum Suppression (NMS) on inference results to reject overlapping detections
    Arguments:
            prediction : 1个 ,[bs, anchor_num*grid_w*grid_h, xywh+c+5classes] = [4,3*260*260+3*130*130+3*65*65*65,10] = [4, 266175, 10]

    Returns:
         list of detections, on (n,6) tensor per image [xyxy, conf, cls]
    """

    # Checks
    assert 0 <= conf_thres <= 1, f'Invalid Confidence threshold {conf_thres}, valid values are between 0.0 and 1.0'
    assert 0 <= iou_thres <= 1, f'Invalid IoU {iou_thres}, valid values are between 0.0 and 1.0'
    if isinstance(prediction, (list, tuple)):  # YOLOv5 model in validation model, output = (inference_out, loss_out)
        prediction = prediction[0]  # select only inference output

    device = prediction.device # 设置推理设备
    mps = 'mps' in device.type  # Apple MPS
    if mps:  # MPS not fully supported yet, convert tensors to CPU before NMS
        prediction = prediction.cpu()
    bs = prediction.shape[0]  # batch size
    nc = prediction.shape[2] - nm - 5  # number of classes # 这里的5表示[x,y,w,h,conf]这5个数值
    xc = prediction[..., 4] > conf_thres  # candidates # 预测框置信度> conf_thres阈值,选为候选框,xc = [True,False,....]

    # Settings
    # min_wh = 2  # (pixels) minimum box width and height # 预测物体宽度和高度的大小范围 [min_wh, max_wh]
    max_wh = 7680  # (pixels) maximum box width and height #
    max_nms = 30000  # maximum number of boxes into torchvision.ops.nms()
    time_limit = 0.5 + 0.05 * bs  # seconds to quit after # 每个图像最多检测物体的个数
    redundant = True  # require redundant detections # 是否需要冗余的detections
    multi_label &= nc > 1  # multiple labels per box (adds 0.5ms/img)
    merge = False  # use merge-NMS

    t = time.time()
    mi = 5 + nc  # mask start index
    # batch_size个output  存放最终筛选后的预测框结果
    output = [torch.zeros((0, 6 + nm), device=prediction.device)] * bs
    # 遍历预测框结果
    for xi, x in enumerate(prediction):  # image index, image inference
        # Apply constraints # 第一次过滤 虑除超小anchor标和超大anchor
        # x[((x[..., 2:4] < min_wh) | (x[..., 2:4] > max_wh)).any(1), 4] = 0  # width-height

        # # 第二次过滤 根据conf_thres虑除背景目标(obj_conf<conf_thres 0.1的目标 置信度极低的目标)
        x = x[xc[xi]]  # confidence

        # Cat apriori labels if autolabelling
        if labels and len(labels[xi]):
            lb = labels[xi]
            v = torch.zeros((len(lb), nc + nm + 5), device=x.device)
            v[:, :4] = lb[:, 1:5]  # box
            v[:, 4] = 1.0  # conf
            v[range(len(lb)), lb[:, 0].long() + 5] = 1.0  # cls
            x = torch.cat((x, v), 0)

        # If none remain process next image
        ## 经过前两次过滤后如果该feature map没有目标框了,就结束这轮直接进行下一张图
        if not x.shape[0]:
            continue

        # Compute conf
        x[:, 5:] *= x[:, 4:5]  # conf = obj_conf * cls_conf

        # Box/Mask # (center x, center y, width, height) to (x1, y1, x2, y2) 左上角 右下角
        box = xywh2xyxy(x[:, :4])  # center_x, center_y, width, height) to (x1, y1, x2, y2)
        mask = x[:, mi:]  # zero columns if no masks

        # Detections matrix nx6 (xyxy, conf, cls)
        if multi_label:
            # 第三次过滤:针对每个类别score(obj_conf * cls_conf) > conf_thres
            # 这里一个框是有可能有多个物体的,所以要筛选
            # nonzero: 获得矩阵中的非0(True)数据的下标  a.t(): 将a矩阵拆开
            # i: box下标    j: 类别index   过滤了两个score太低的
            i, j = (x[:, 5:mi] > conf_thres).nonzero(as_tuple=False).T
            # pred = [43, xyxy+score+class] [43, 6]
            # unsqueeze(1): [43] => [43, 1] add batch dimension
            # box[i]: [43,4] xyxy
            # pred[i, j + 5].unsqueeze(1): [43,1] score  对每个i,取第(j+5)个位置的值(第j个class的值cla_conf)
            # j.float().unsqueeze(1): [43,1] class
            x = torch.cat((box[i], x[i, 5 + j, None], j[:, None].float(), mask[i]), 1)
        else:  # best class only
            conf, j = x[:, 5:mi].max(1, keepdim=True) # 一个类别直接取分数最大类的即可
            x = torch.cat((box, conf, j.float(), mask), 1)[conf.view(-1) > conf_thres]

        # Filter by class 是否只保留特定的类别  默认None  不执行这里
        if classes is not None:
            x = x[(x[:, 5:6] == torch.tensor(classes, device=x.device)).any(1)]

        # Apply finite constraint
        # 检测数据是否为有限数 Apply finite constraint  第四次过滤,这次可有可无,一般没什么用 所以这里给他注释了
        # if not torch.isfinite(x).all():
        #     x = x[torch.isfinite(x).all(1)]

        # Check shape
        n = x.shape[0]  # number of boxes
        if not n:  # no boxes # 如果经过第三次过滤该feature map没有目标框了,就结束这次直接进行下一张图
            continue
        # 如果经过第三次过滤该feature map还要很多框(>max_nms)   就需要排序
        x = x[x[:, 4].argsort(descending=True)[:max_nms]]  # sort by confidence and remove excess boxes

        # Batched NMS # 第五次过滤 Batched NMS
        c = x[:, 5:6] * (0 if agnostic else max_wh)  # classes
        # 做个切片 得到boxes和scores   不同类别的box位置信息加上一个很大的数但又不同的数c
        # 这样作非极大抑制的时候不同类别的框就不会掺和到一块了  这是一个作nms挺巧妙的技巧
        boxes, scores = x[:, :4] + c, x[:, 4]  # boxes (offset by class), scores
        # 返回nms过滤后的bounding box(boxes)的索引(降序排列)
        # i=tensor([18, 19, 32, 25, 27])   nms后只剩下比较少的预测框了
        i = torchvision.ops.nms(boxes, scores, iou_thres)  # NMS

        i = i[:max_det]  # limit detections # 限制NMS后的最大框数

        if merge and (1 < n < 3E3):  # Merge NMS (boxes merged using weighted mean)
            # update boxes as boxes(i,4) = weights(i,n) * boxes(n,4)
            iou = box_iou(boxes[i], boxes) > iou_thres  # iou matrix
            weights = iou * scores[None]  # box weights 正比于 iou * scores
            # bounding box合并  其实就是把权重和框相乘再除以权重之和
            x[i, :4] = torch.mm(weights, x[:, :4]).float() / weights.sum(1, keepdim=True)  # merged boxes
            if redundant:
                i = i[iou.sum(1) > 1]  # require redundancy

        output[xi] = x[i]
        if mps:
            output[xi] = output[xi].to(device)
        # 看下时间超没超时  超时没做完的就不做了
        if (time.time() - t) > time_limit:
            LOGGER.warning(f'WARNING ⚠️ NMS time limit {time_limit:.3f}s exceeded')
            break  # time limit exceeded

    return output
未完待续
在general.py中,不止上面提到的类和函数,但上面提及的类和函数是general.py中最关键的部分。其余函数,有兴趣者,可自行查阅。如果有空,我也会继续补充。
参考
[1] https://github.com/ultralytics/yolov5
[2] 【YOLOV5-5.x 源码解读】datasets.py_满船清梦压星河HK的博客-优快云博客
[3] https://blog.youkuaiyun.com/weixin_51322383/article/details/130447757
[4] https://blog.youkuaiyun.com/qq_38253797/article/details/117920079
- 记录一下自己阅读general.py代码的一些重要点,方便自己查阅。特别感谢,在参考里,列举的博文链接,写得很好,对本人阅读理解yolo.py代码,有很大帮助。
- 由于本人水平有限,难免出现错漏,敬请批评改正。
- 更多精彩内容,可点击进入YOLO系列专栏、自然语言处理
专栏或我的个人主页查看- 基于DETR的人脸伪装检测
- YOLOv7训练自己的数据集(口罩检测)
- YOLOv8训练自己的数据集(足球检测)
- YOLOv5:TensorRT加速YOLOv5模型推理
- YOLOv5:IoU、GIoU、DIoU、CIoU、EIoU
- 玩转Jetson Nano(五):TensorRT加速YOLOv5目标检测
- YOLOv5:添加SE、CBAM、CoordAtt、ECA注意力机制
- YOLOv5:yolov5s.yaml配置文件解读、增加小目标检测层
- Python将COCO格式实例分割数据集转换为YOLO格式实例分割数据集
- YOLOv5:使用7.0版本训练自己的实例分割模型(车辆、行人、路标、车道线等实例分割)
- 使用Kaggle GPU资源免费体验Stable Diffusion开源项目


 2358
2358

 被折叠的 条评论
为什么被折叠?
被折叠的 条评论
为什么被折叠?
 到【灌水乐园】发言


