


 本文详细分析了Spring Boot如何内嵌Tomcat实现独立运行,从`refresh()`方法开始,讲解了创建Servlet容器、DispatcherServlet自动配置、RegistrationBean的作用,以及finishRefresh()方法中启动WebServer的过程。Spring Boot通过重写`onRefresh()`和`finishRefresh()`方法,创建并初始化Tomcat,加载Servlet。同时,文章提供了如何不使用内嵌Tomcat的配置方法。
概述
我们知道 Spring Boot 能够创建独立的 Spring 应用,内部嵌入 Tomcat 容器(Jetty、Undertow),让我们的 jar 无需放入 Servlet 容器就能直接运行。那么对于 Spring Boot 内部嵌入 Tomcat 容器的实现你是否深入的学习过?或许你可以通过这篇文章了解到相关内容。
在上一篇 《SpringApplication 启动类的启动过程》 文章分析了 SpringApplication#run(String... args) 启动 Spring 应用的主要流程,不过你是不是没有看到和 Tomcat 相关的初始化工作呢?
别急,在刷新 Spring 应用上下文的过程中会调用 onRefresh() 方法,在 Spring Boot 的 ServletWebServerApplicationContext 中重写了该方法,此时会创建一个 Servlet 容器(默认为 Tomcat),并添加 IoC 容器中的 Servlet、Filter 和 EventListener 至 Servlet 上下文。
例如 Spring MVC 中的核心组件 DispatcherServlet 对象会添加至 Servlet 上下文,不熟悉 Spring MVC 的小伙伴可查看我前面的 《精尽Spring MVC源码分析 - 一个请求的旅行过程》 这篇文章。同时,在 《精尽Spring MVC源码分析 - 寻找遗失的 web.xml》 这篇文章中有提到过 Spring Boot 是如何加载 Servlet 的,感兴趣的可以先去看一看,本文会做更加详细的分析。
接下来,我们一起来看看 Spring Boot 内嵌 Tomcat 的实现。
文章的篇幅有点长,处理过程有点绕,每个小节我都是按照优先顺序来展述的,同时,主要的流程也标注了序号,请耐心查看📝
如何使用
在我们的 Spring Boot 项目中通常会引入 spring-boot-starter-web 这个依赖,该模块提供全栈的 WEB 开发特性,包括 Spring MVC 依赖和 Tomcat 容器,这样我们就可以打成 jar 包直接启动我们的应用,如下:
<dependency> <groupId>org.springframework.boot</groupId> <artifactId>spring-boot-starter-web</artifactId> </dependency>
如果不想使用内嵌的 Tomcat,我们可以这样做:
<packaging>war</packaging> <dependency> <groupId>org.springframework.boot</groupId> <artifactId>spring-boot-starter-web</artifactId> <exclusions> <exclusion> <groupId>org.springframework.boot</groupId> <artifactId>spring-boot-starter-tomcat</artifactId> </exclusion> </exclusions> </dependency> <dependency> <groupId>javax.servlet</groupId> <artifactId>javax.servlet-api</artifactId> <version>4.0.1</version> <scope>provided</scope> </dependency>
然后启动类这样写:
// 方式三 @SpringBootApplication public class Application extends SpringBootServletInitializer { // 可不写 public static void main(String[] args) { SpringApplication.run(DemoApplication.class, args); } @Override protected SpringApplicationBuilder configure(SpringApplicationBuilder builder) { return builder.sources(Application.class); } }
这样你打成 war 包就可以放入外部的 Servlet 容器中运行了,具体实现查看下一篇文章,本文分析的主要是 Spring Boot 内嵌 Tomcat 的实现。
回顾
在上一篇 《SpringApplication 启动类的启动过程》 文章分析 SpringApplication#run(String... args) 启动 Spring 应用的过程中讲到,在创建好 Spring 应用上下文后,会调用其 AbstractApplication#refresh() 方法刷新上下文,该方法涉及到 Spring IoC 的所有内容,参考 《死磕Spring之IoC篇 - Spring 应用上下文 ApplicationContext》
/** * 刷新上下文,在哪会被调用? * 在 **Spring MVC** 中,{@link org.springframework.web.context.ContextLoader#initWebApplicationContext} 方法初始化上下文时,会调用该方法 */ @Override public void refresh() throws BeansException, IllegalStateException { // <1> 来个锁,不然 refresh() 还没结束,你又来个启动或销毁容器的操作,那不就乱套了嘛 synchronized (this.startupShutdownMonitor) { // <2> 刷新上下文环境的准备工作,记录下容器的启动时间、标记'已启动'状态、对上下文环境属性进行校验 prepareRefresh(); // <3> 创建并初始化一个 BeanFactory 对象 `beanFactory`,会加载出对应的 BeanDefinition 元信息们 ConfigurableListableBeanFactory beanFactory = obtainFreshBeanFactory(); // <4> 为 `beanFactory` 进行一些准备工作,例如添加几个 BeanPostProcessor,手动注册几个特殊的 Bean prepareBeanFactory(beanFactory); try { // <5> 对 `beanFactory` 在进行一些后期的加工,交由子类进行扩展 postProcessBeanFactory(beanFactory); // <6> 执行 BeanFactoryPostProcessor 处理器,包含 BeanDefinitionRegistryPostProcessor 处理器 invokeBeanFactoryPostProcessors(beanFactory); // <7> 对 BeanPostProcessor 处理器进行初始化,并添加至 BeanFactory 中 registerBeanPostProcessors(beanFactory); // <8> 设置上下文的 MessageSource 对象 initMessageSource(); // <9> 设置上下文的 ApplicationEventMulticaster 对象,上下文事件广播器 initApplicationEventMulticaster(); // <10> 刷新上下文时再进行一些初始化工作,交由子类进行扩展 onRefresh(); // <11> 将所有 ApplicationListener 监听器添加至 `applicationEventMulticaster` 事件广播器,如果已有事件则进行广播 registerListeners(); // <12> 设置 ConversionService 类型转换器,**初始化**所有还未初始化的 Bean(不是抽象、单例模式、不是懒加载方式) finishBeanFactoryInitialization(beanFactory); // <13> 刷新上下文的最后一步工作,会发布 ContextRefreshedEvent 上下文完成刷新事件 finishRefresh(); } // <14> 如果上面过程出现 BeansException 异常 catch (BeansException ex) { if (logger.isWarnEnabled()) { logger.warn("Exception encountered during context initialization - " + "cancelling refresh attempt: " + ex); } // <14.1> “销毁” 已注册的单例 Bean destroyBeans(); // <14.2> 设置上下文的 `active` 状态为 `false` cancelRefresh(ex); // <14.3> 抛出异常 throw ex; } // <15> `finally` 代码块 finally { // Reset common introspection caches in Spring's core, since we // might not ever need metadata for singleton beans anymore... // 清除相关缓存,例如通过反射机制缓存的 Method 和 Field 对象,缓存的注解元数据,缓存的泛型类型对象,缓存的类加载器 resetCommonCaches(); } } }
在该方法的第 10 步可以看到会调用 onRefresh() 方法再进行一些初始化工作,这个方法交由子类进行扩展,那么在 Spring Boot 中的 ServletWebServerApplicationContext 重写了该方法,会创建一个 Servlet 容器(默认为 Tomcat),也就是当前 Spring Boot 应用所运行的 Web 环境。
第 13 步会调用 onRefresh() 方法,ServletWebServerApplicationContext 重写了该方法,启动 WebServer,对 Servlet 进行加载并初始化
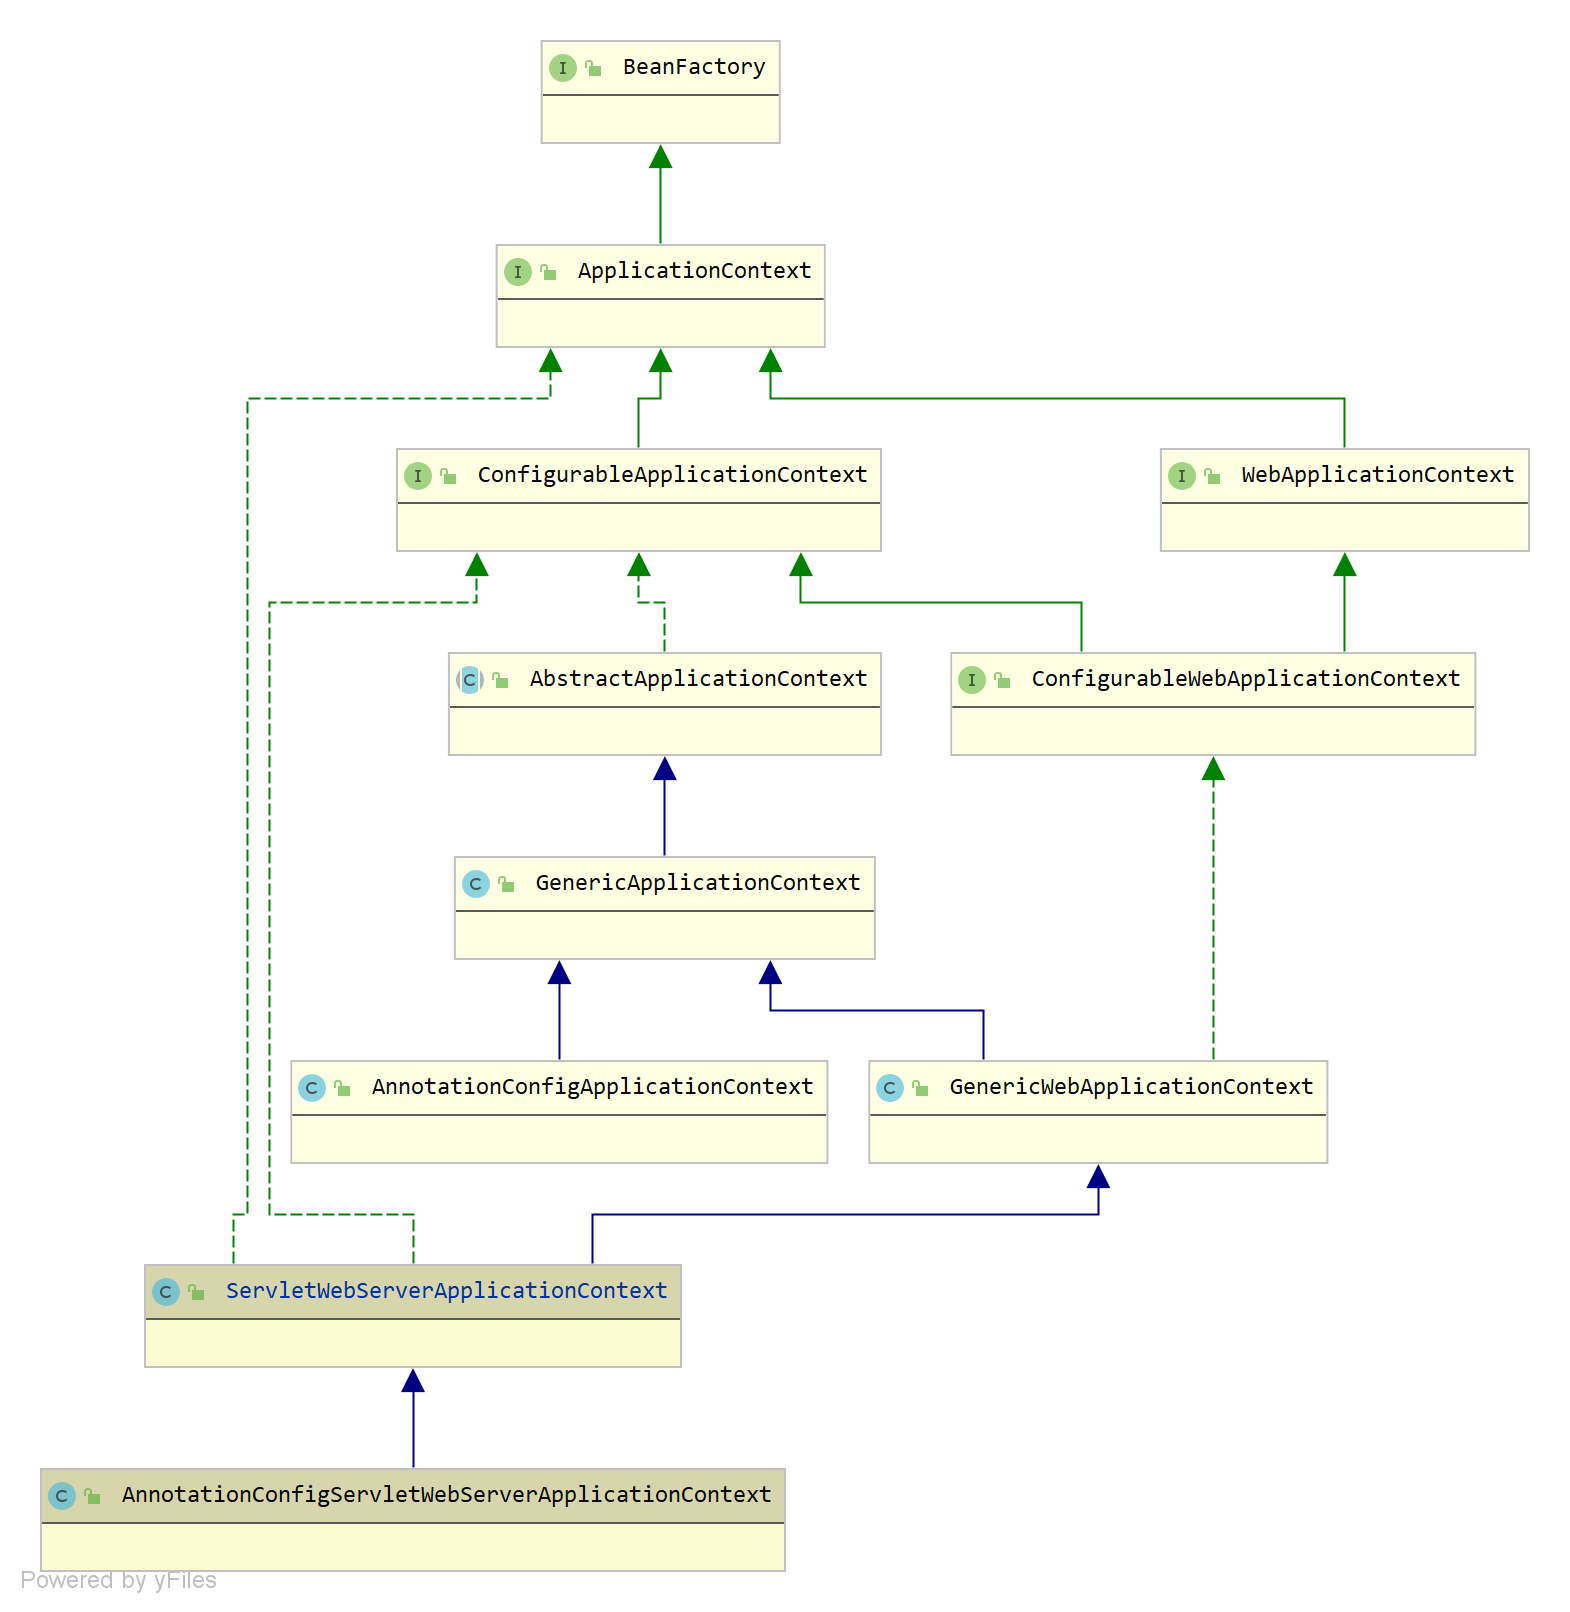
类图
由于整个 ApplicationContext 体系比较庞大,下面列出了部分类
DispatcherServlet 自动配置类
在开始之前,我们先来看看 org.springframework.boot.autoconfigure.web.servlet.DispatcherServletAutoConfiguration 这个自动配置类,部分如下:
@AutoConfigureOrder(Ordered.HIGHEST_PRECEDENCE) // 最高优先级的自动配置 @Configuration(proxyBeanMethods = false) // 作为一个配置类,不进行 CGLIB 提升 @ConditionalOnWebApplication(type = Type.SERVLET) // Servlet 应用的类型才注入当前 Bean @ConditionalOnClass(DispatcherServlet.class) // 存在 DispatcherServlet 这个类才注入当前 Bean @AutoConfigureAfter(ServletWebServerFactoryAutoConfiguration.class) // 在 ServletWebServerFactoryAutoConfiguration 后面进行自动配置 public class DispatcherServletAutoConfiguration { public static final String DEFAULT_DISPATCHER_SERVLET_BEAN_NAME = "dispatcherServlet"; public static final String DEFAULT_DISPATCHER_SERVLET_REGISTRATION_BEAN_NAME = "dispatcherServletRegistration"; // 作为一个配置类,不进行 CGLIB 提升 @Configuration(proxyBeanMethods = false) // 满足条件则注入当前 DispatcherServlet(需要 Spring 上下文中不存在) @Conditional(DefaultDispatcherServletCondition.class) // 存在 ServletRegistration 这个类才注入当前 Bean @ConditionalOnClass(ServletRegistration.class) // 注入两个配置对象 @EnableConfigurationProperties({ HttpProperties.class, WebMvcProperties.class }) protected static class DispatcherServletConfiguration { // 定义一个 DispatcherServlet 的 Bean @Bean(name = DEFAULT_DISPATCHER_SERVLET_BEAN_NAME) public DispatcherServlet dispatcherServlet(HttpProperties httpProperties, WebMvcProperties webMvcProperties) { DispatcherServlet dispatcherServlet = new DispatcherServlet(); dispatcherServlet.setDispatchOptionsRequest(webMvcProperties.isDispatchOptionsRequest()); dispatcherServlet.setDispatchTraceRequest(webMvcProperties.isDispatchTraceRequest()); dispatcherServlet.setThrowExceptionIfNoHandlerFound(webMvcProperties.isThrowExceptionIfNoHandlerFound()); dispatcherServlet.setPublishEvents(webMvcProperties.isPublishRequestHandledEvents()); dispatcherServlet.setEnableLoggingRequestDetails(httpProperties.isLogRequestDetails()); return dispatcherServlet; } @Bean @ConditionalOnBean(MultipartResolver.class) @ConditionalOnMissingBean(name = DispatcherServlet.MULTIPART_RESOLVER_BEAN_NAME) public MultipartResolver multipartResolver(MultipartResolver resolver) { // Detect if the user has created a MultipartResolver but named it incorrectly return resolver; } } // 作为一个配置类,不进行 CGLIB 提升 @Configuration(proxyBeanMethods = false) // 满足条件则注入当前 DispatcherServletRegistrationBean @Conditional(DispatcherServletRegistrationCondition.class) // 存在 ServletRegistration 这个类才注入当前 Bean @ConditionalOnClass(ServletRegistration.class) // 注入一个配置对象 @EnableConfigurationProperties(WebMvcProperties.class) // 先注入上面的 DispatcherServletConfiguration 对象 @Import(DispatcherServletConfiguration.class) protected static class DispatcherServletRegistrationConfiguration { // 为 DispatcherServlet 定义一个 RegistrationBean 对象,目的是往 ServletContext 上下文中添加 DispatcherServlet @Bean(name = DEFAULT_DISPATCHER_SERVLET_REGISTRATION_BEAN_NAME) // 需要存在名称为 `dispatcherServlet` 类型为 DispatcherServlet 的 Bean @ConditionalOnBean(value = DispatcherServlet.class, name = DEFAULT_DISPATCHER_SERVLET_BEAN_NAME) public DispatcherServletRegistrationBean dispatcherServletRegistration(DispatcherServlet dispatcherServlet, WebMvcProperties webMvcProperties, ObjectProvider<MultipartConfigElement> multipartConfig) { DispatcherServletRegi
 最低0.47元/天 解锁文章


 1429
1429

 被折叠的 条评论
为什么被折叠?
被折叠的 条评论
为什么被折叠?
 到【灌水乐园】发言


