


 本文详细记录了使用SSM(Spring、SpringMVC、MyBatis)框架进行数据库连接及配置的过程,包括数据库创建、jar包导入、web配置、pojo类编写、mybatis-config.xml配置、service层实现、spring配置文件以及SpringMVC的web.xml配置。整个过程展示了SSM整合中的复杂配置步骤。
之前光听说SSM是配置地狱,但是没有真切的感受到,现在真是,确确实实的配置地狱
一、创建数据库并连接
新建个数据库新建个表,用于和网站进行连接
CREATE DATABASE `ssmbuild`;

USE `ssmbuild`;

DROP TABLE IF EXISTS `books`;

CREATE TABLE `books` (
`bookID` INT(10) NOT NULL AUTO_INCREMENT COMMENT '书id',
`bookName` VARCHAR(100) NOT NULL COMMENT '书名',
`bookCounts` INT(11) NOT NULL COMMENT '数量',
`detail` VARCHAR(200) NOT NULL COMMENT '描述',
KEY `bookID` (`bookID`)
) ENGINE=INNODB DEFAULT CHARSET=utf8;
INSERT  INTO `books`(`bookID`,`bookName`,`bookCounts`,`detail`)
VALUES
(1,'Java',1,'从入门到放弃'),
(2,'MySQL',10,'从删库到跑路'),
(3,'Linux',5,'从进门到进牢');
创建完成后再java中链接数据库
二、jar包导入
需要导入的jar包比较多
首先是mybatis和数据库需要的包:
mysql-connect-java java链接数据库
mybatis
mybatis-spring
c3p0 数据库连接池
然后是spring需要的包:
spring-webmvc
spring-jdbc
spring-aop
然后是springmvc需要的包:
jstl
servlet-api
最后是测试类的
junit
和
lombok
<dependency>
            <groupId>org.projectlombok</groupId>
            <artifactId>lombok</artifactId>
            <version>1.18.22</version>
        </dependency>
        <dependency>
            <groupId>junit</groupId>
            <artifactId>junit</artifactId>
            <version>4.11</version>
            <scope>test</scope>
        </dependency>
        <dependency>
            <groupId>mysql</groupId>
            <artifactId>mysql-connector-java</artifactId>
            <version>8.0.25</version>
        </dependency>
        <dependency>
            <groupId>org.mybatis</groupId>
            <artifactId>mybatis</artifactId>
            <version>3.4.6</version>
        </dependency>
        <dependency>
            <groupId>org.springframework</groupId>
            <artifactId>spring-webmvc</artifactId>
            <version>5.3.10</version>
        </dependency>
        <dependency>
            <groupId>org.springframework</groupId>
            <artifactId>spring-jdbc</artifactId>
            <version>5.3.10</version>
        </dependency>
        <dependency>
            <groupId>javax.servlet</groupId>
            <artifactId>servlet-api</artifactId>
            <version>2.5</version>
        </dependency>
        <dependency>
            <groupId>javax.servlet</groupId>
            <artifactId>jstl</artifactId>
            <version>1.2</version>
        </dependency>
        <dependency>
            <groupId>org.mybatis</groupId>
            <artifactId>mybatis-spring</artifactId>
            <version>2.0.6</version>
        </dependency>
        <dependency>
            <groupId>org.springframework</groupId>
            <artifactId>spring-aop</artifactId>
            <version>5.3.10</version>
        </dependency>
        <!-- https://mvnrepository.com/artifact/com.mchange/c3p0 -->
        <dependency>
            <groupId>com.mchange</groupId>
            <artifactId>c3p0</artifactId>
            <version>0.9.5.2</version>
        </dependency>
再编写一个maven资源导入配置以防万一
<build>
        <resources>
            <resource>
                <directory>src/main/java</directory>
                <includes>
                    <include>**/*.properties</include>
                    <include>**/*.xml</include>
                </includes>
                <filtering>false</filtering>
            </resource>
            <resource>
                <directory>src/main/resources</directory>
                <includes>
                    <include>**/*.properties</include>
                    <include>**/*.xml</include>
                </includes>
                <filtering>false</filtering>
            </resource>
        </resources>
    </build>
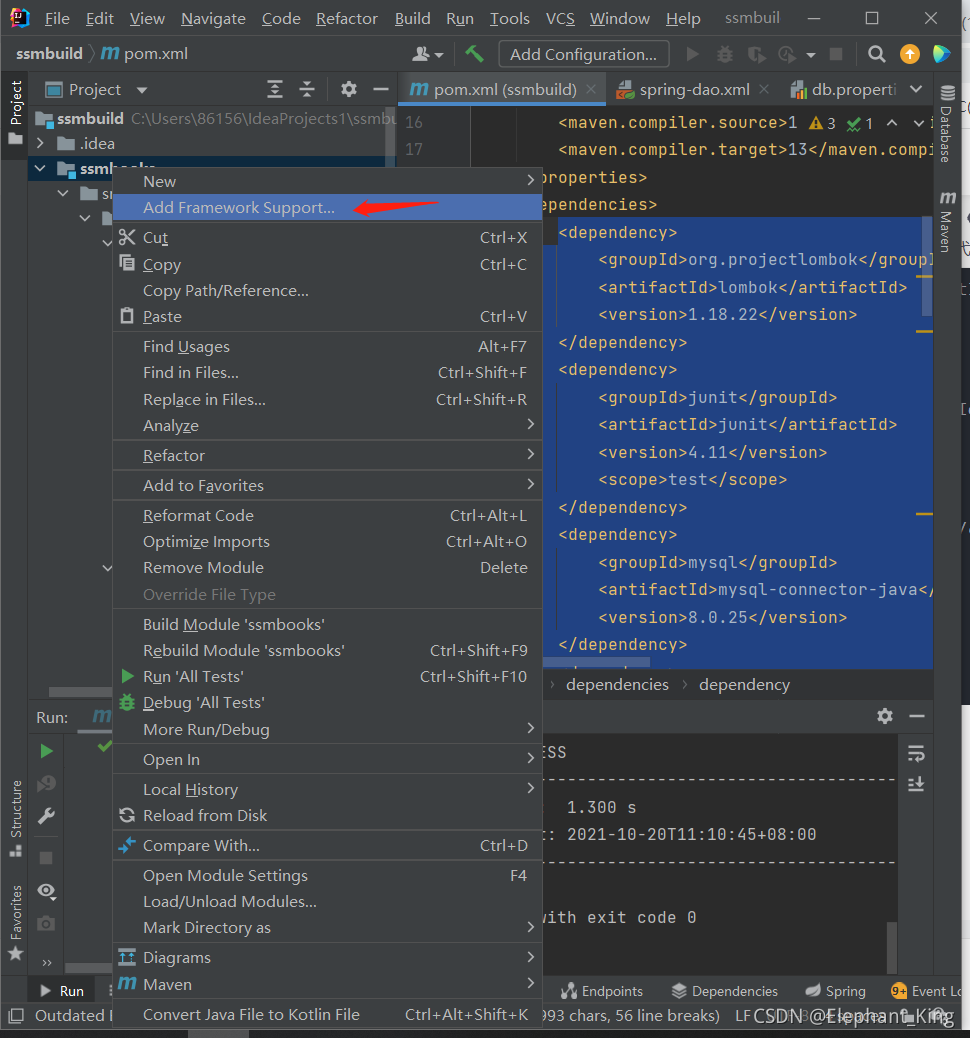
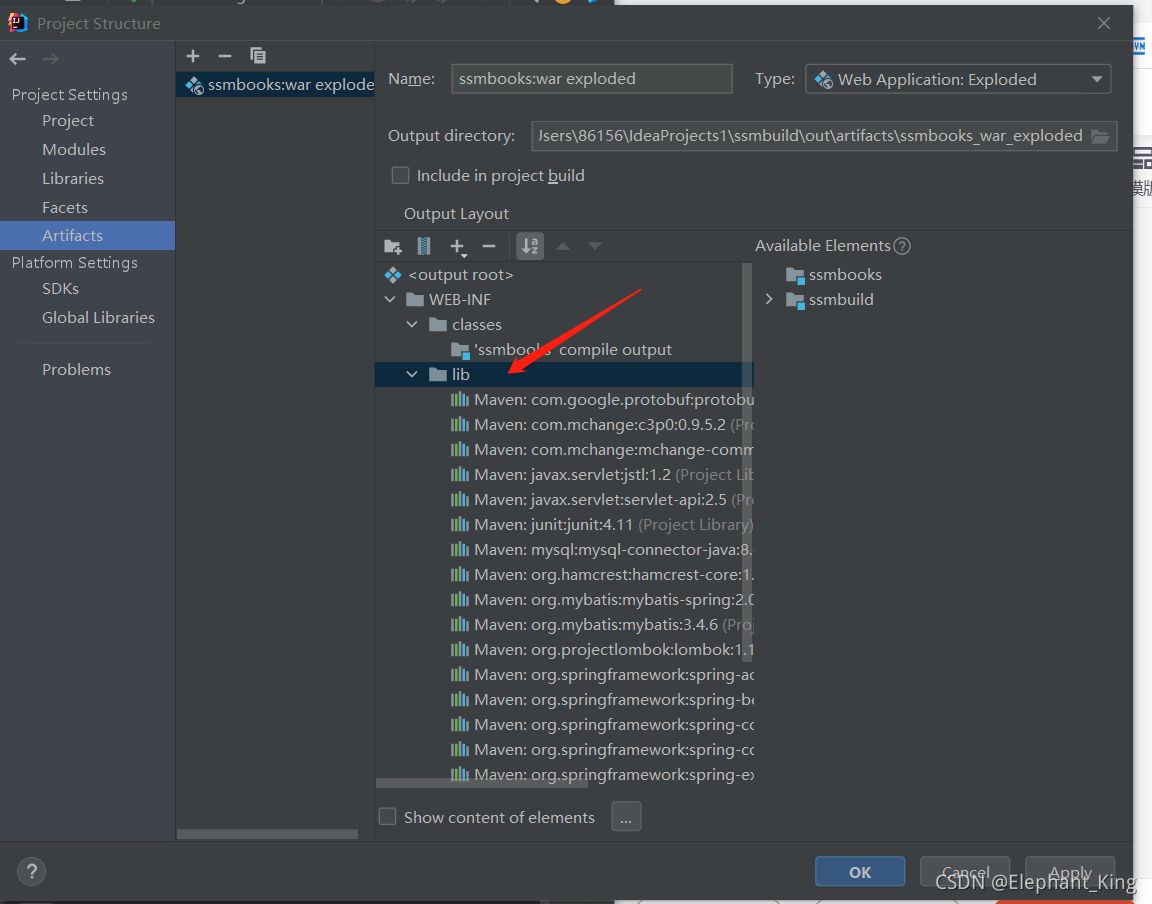
三、导入web配置并打包jar包
四、编写pojo类
lombok偷懒了
@Data
@NoArgsConstructor
@AllArgsConstructor
public class Books {
    private int bookID;
    private String bookName;
    private int bookCounts;
    private String detail;
}
五、配置mybatis-config.xml文件
<?xml version="1.0" encoding="UTF-8" ?>
<!DOCTYPE configuration
        PUBLIC "-//mybatis.org//DTD Config 3.0//EN"
        "http://mybatis.org/dtd/mybatis-3-config.dtd">
<configuration>
    <typeAliases>
        <package name="com.kuang.pojo"/>
    </typeAliases>
    <mappers>
        <mapper url="com/kuang/dao/BooksMapper.xml"/>
    </mappers>
</configuration>
因为此处是SSM整合,所以mybatis的配置大部分都放在了Spring中进行,保留这个文件主要的作用是证明这个工程中使用了mybatis
六、在dao层中实现增删改查接口并创建配置文件mapper.xml
dao层中的BooksMapper接口
public interface BooksMapper {
    //增加一本书
    int addBook(Books books);
    //删除一本书
    int deleteBookByID(@Param("bookID") int id);
    //查询一本书
    Books queryBookByID(int id);
    //修改一本书
    int updateBook(Books books);
    //查找所有书
    List<Books> queryAllBook();
}
BooksMapper.xml配置文件
<?xml version="1.0" encoding="UTF-8" ?>
<!DOCTYPE mapper
        PUBLIC "-//mybatis.org//DTD Config 3.0//EN"
        "http://mybatis.org/dtd/mybatis-3-mapper.dtd">
<mapper namespace="com.kuang.dao.BooksMapper">
    <insert id="addBook" parameterType="Books">
        insert into smmbuild.books(bookName,bookCounts,detail)
        value (#{bookName},#{bookCounts},#{detail});
    </insert>
    <delete id="deleteBookByID" parameterType="int">
        delete smmbuild.books
        where bookID=#{bookID};
    </delete>
    <update id="updateBook" parameterType="Books">
        update ssmbuild.books
        set bookName=#{bookName},bookCount=#{bookCounts},detail=#{details}
        where bookID=#{bookID};
    </update>
    <select id="queryBook" parameterType="int" resultMap="Books">
        select smmbuild.books
        where bookID=#{bookID};
    </select>
    <select id="queryAllBook" resultMap="Books">
        select * from smmbuild.books;
    </select>
</mapper>
整合了SSM还需要在mybatis中配置吗??????
七、编写service层调用dao层
BooksService接口
public interface BooksService {
    //增加一本书
    int addBook(Books book);
    //删除一本书
    int deleteBookByID(@Param("bookID") int id);
    //查询一本书
    Books queryBookByID(int id);
    //修改一本书
    int updateBook(Books books);
    //查找所有书
    List<Books> queryAllBook();
}
实现类
public class BooksServiceImpl implements BooksService{
    private BooksMapper booksMapper;


    public void setBooksMapper(BooksMapper booksMapper) {
        this.booksMapper = booksMapper;
    }


    @Override
    public int addBook(Books books) {
        return booksMapper.addBook(books);
    }

    @Override
    public int deleteBookByID(int id) {
        return deleteBookByID(id);
    }

    @Override
    public Books queryBookByID(int id) {
        return queryBookByID(id);
    }

    @Override
    public int updateBook(Books books) {
        return updateBook(books);
    }

    @Override
    public List<Books> queryAllBook() {
        return queryAllBook();
    }
}
因为主要需求就是增删改查,所以也没有额外增加service层代码
注意:此处一定要编写一个set方法用于后面的spring注入
八、编写spring-dao.xml配置文件
首先需要编写连接数据库的文件 db.properties
jdbc.driver=com.mysql.jdbc.Driver
jdbc.url=jdbc:mysql://localhost:3306/ssmbuild?useSSL=true&useUnicode=true&characterEncoding=utf8
jdbc.username=root
jdbc.password=123456
<?xml version="1.0" encoding="UTF-8"?>
<beans xmlns="http://www.springframework.org/schema/beans"
       xmlns:xsi="http://www.w3.org/2001/XMLSchema-instance"
       xmlns:context="http://www.springframework.org/schema/context"
       xmlns:mvc="http://www.springframework.org/schema/mvc"
       xsi:schemaLocation="http://www.springframework.org/schema/beans
       http://www.springframework.org/schema/beans/spring-beans.xsd
       http://www.springframework.org/schema/context
       https://www.springframework.org/schema/context/spring-context.xsd
       http://www.springframework.org/schema/mvc
       https://www.springframework.org/schema/mvc/spring-mvc.xsd">
    <!--1.关联数据库配置文件-->
    <context:property-placeholder location="classpath:db.properties"/>

    <!--2.连接池-->
    <bean id="dataSource" class="com.mchange.v2.c3p0.ComboPooledDataSource">
        <property name="driverClass" value="${driver}"/>
        <property name="jdbcUrl" value="${url}"/>
        <property name="user" value="${username}"/>
        <property name="password" value="${password}"/>
    </bean>

    <!--sqlSessionFactory-->
    <bean id="sqlSessionFactory" class="org.mybatis.spring.SqlSessionFactoryBean">
        <property name="dataSource" ref="dataSource"/>
        <!--绑定配置文件-->
        <property name="configLocation" value="classpath:mybatis-config.xml"/>
    </bean>


    <!--本来需要创建实体类,这个类可以扫描接口,不用新建类了-->
    <!--配置dao接口扫描包,动态实现Dao接口可以注入到Spring容器中-->
    <bean class="org.mybatis.spring.mapper.MapperScannerConfigurer">
        <property name="sqlSessionTemplateBeanName" value="sqlSessionFactory"/>
        <property name="basePackage" value="com.kuang.dao"/>

    </bean>
</beans>
dao层的spring主要完成四件事:
1.关联数据库配置文件db.properties
2.创建连接池,此处用的是c3p0连接池,并且将db.properties中的信息导入
3.配置sqlSessionFactory
4.因为用Spring来配置dao层比用Mybatis层需要多配制一个实体类,所以需要配置一个自动扫描接口的bean,配置后就不用再实现dao层的接口了
九、编写spring-service.xml配置
再配置之前,首先需要将三个xml(包括后面的mvc.xml)关联,所以新建了一个applicationContext.xml,负责import三个xml文件,让其产生关联
<?xml version="1.0" encoding="UTF-8"?>
<beans xmlns="http://www.springframework.org/schema/beans"
       xmlns:xsi="http://www.w3.org/2001/XMLSchema-instance"
       xmlns:context="http://www.springframework.org/schema/context"
       xmlns:mvc="http://www.springframework.org/schema/mvc"
       xsi:schemaLocation="http://www.springframework.org/schema/beans
       http://www.springframework.org/schema/beans/spring-beans.xsd
       http://www.springframework.org/schema/context
       https://www.springframework.org/schema/context/spring-context.xsd
       http://www.springframework.org/schema/mvc
       https://www.springframework.org/schema/mvc/spring-mvc.xsd">
        <import resource="classpath:spring-dao.xml"/>
        <import resource="classpath:spring-service.xml"/>
        <import resource="classpath:springmvc-servlet.xml"/>
</beans>
配置spring-service.xml
<?xml version="1.0" encoding="UTF-8"?>
<beans xmlns="http://www.springframework.org/schema/beans"
       xmlns:xsi="http://www.w3.org/2001/XMLSchema-instance"
       xmlns:context="http://www.springframework.org/schema/context"
       xmlns:mvc="http://www.springframework.org/schema/mvc"
       xsi:schemaLocation="http://www.springframework.org/schema/beans
       http://www.springframework.org/schema/beans/spring-beans.xsd
       http://www.springframework.org/schema/context
       https://www.springframework.org/schema/context/spring-context.xsd
       http://www.springframework.org/schema/mvc
       https://www.springframework.org/schema/mvc/spring-mvc.xsd">
        <!--确认包下的注解可用-->
        <context:annotation-config></context:annotation-config>
        <!--将业务类注入到Spring,可以通过配置或者注解实现-->
        <bean id="booksServiceImpl" class="com.kuang.service.BooksServiceImpl">
                <property name="booksMapper" ref="booksMapper"/>
        </bean>

        <!--声明式事务配置-->
        <bean id="dataSourceTransactionManager" class="org.springframework.jdbc.datasource.DataSourceTransactionManager">
                <!--注入数据源-->
                <property name="dataSource" ref="dataSource"/>
        </bean>

        <!--aop事务支持-->
</beans>
主要干四件事:
1.使注解可用
2.将Service注入,并且一定需要xml关联,因为service层需要调用Dao层,并且需要调用service的set方法进行注入,不关联就会爆红。
3.声明式事务支持
4.如果需要织入,需要额外导入织入包并在此处编写aop
十、在web.xml中配置springmvc与过滤器
<servlet>
        <servlet-name>springmvc</servlet-name>
        <servlet-class>org.springframework.web.servlet.DispatcherServlet</servlet-class>
        <init-param>
            <param-name>contextConfigLocation</param-name>
            <param-value>classpath:springmvc-servlet.xml</param-value>
        </init-param>
        <load-on-startup>1</load-on-startup>
    </servlet>
    <filter>
        <filter-name>characterEncodingFilter</filter-name>
        <filter-class>org.springframework.web.filter.CharacterEncodingFilter</filter-class>
        <init-param>
            <param-name>encoding</param-name>
            <param-value>utf-8</param-value>
        </init-param>
    </filter>
        <filter-mapping>
            <filter-name>characterEncodingFilter</filter-name>
            <url-pattern>/*</url-pattern>
        </filter-mapping>
都是老朋友了,但是需要注意一点的是,用于解决乱码的filter有一个专门的类可以实现,不用手动编写了
十一、编写springmvc-servlet.xml文件
<?xml version="1.0" encoding="UTF-8"?>
<beans xmlns="http://www.springframework.org/schema/beans"
       xmlns:xsi="http://www.w3.org/2001/XMLSchema-instance"
       xmlns:context="http://www.springframework.org/schema/context"
       xmlns:mvc="http://www.springframework.org/schema/mvc"
       xsi:schemaLocation="http://www.springframework.org/schema/beans
       http://www.springframework.org/schema/beans/spring-beans.xsd
       http://www.springframework.org/schema/context
       https://www.springframework.org/schema/context/spring-context.xsd
       http://www.springframework.org/schema/mvc
       https://www.springframework.org/schema/mvc/spring-mvc.xsd">


    <context:component-scan base-package="com.kuang.controller"/>
    <mvc:default-servlet-handler />
    <mvc:annotation-driven />
    <!-- 视图解析器 -->
    <bean class="org.springframework.web.servlet.view.InternalResourceViewResolver"
          id="internalResourceViewResolver">
        <!-- 前缀 -->
        <property name="prefix" value="/WEB-INF/jsp/" />
        <!-- 后缀 -->
        <property name="suffix" value=".jsp" />
    </bean>
</beans>
配置老四样,并且在WEB-INF下创建jsp文件夹,并把这个配置文件也import到applicationContext.xml中


 2073
2073

 被折叠的 条评论
为什么被折叠?
被折叠的 条评论
为什么被折叠?
 到【灌水乐园】发言


