


鸽了两个月没写博客,快变鸽王了,( ´◔ ‸◔`)。今天终于把 SpringSocial 源码分析篇完结了,整理了一下,先发上来分享给大家。后面要加油了,(ง •̀_•́)ง。废话不多说,下面进入正文环节。
从上一章我们已经可以知道 SpringSocial 的整体结构与使用流程。这一章我们按使用流程走一遍源码,顺便验证一下整体结构。

还是以上面这张流程图为主,我们先从 SocialAuthenticationFilter 开始,跟着流程把大体源码读一遍。
首先阅读源码很好用的一个方式就是跑代码来 Debug,因为自己一行一行的看的话,比较枯燥,而且也会漏掉一些东西。这里我们使用上一章的代码来 Debug 。从上图或者官网我们都可以知道入口在 SocialAuthenticationFilter 文件中。
下面开始我们漫长的代码分析,建议大家看的时候,打开自己的 IDE 跟着看,不然很容易晕车的。
第一步,我们从 SocialAuthenticationFilter 说起。先看下 SocialAuthenticationFilter 的继承结构 :
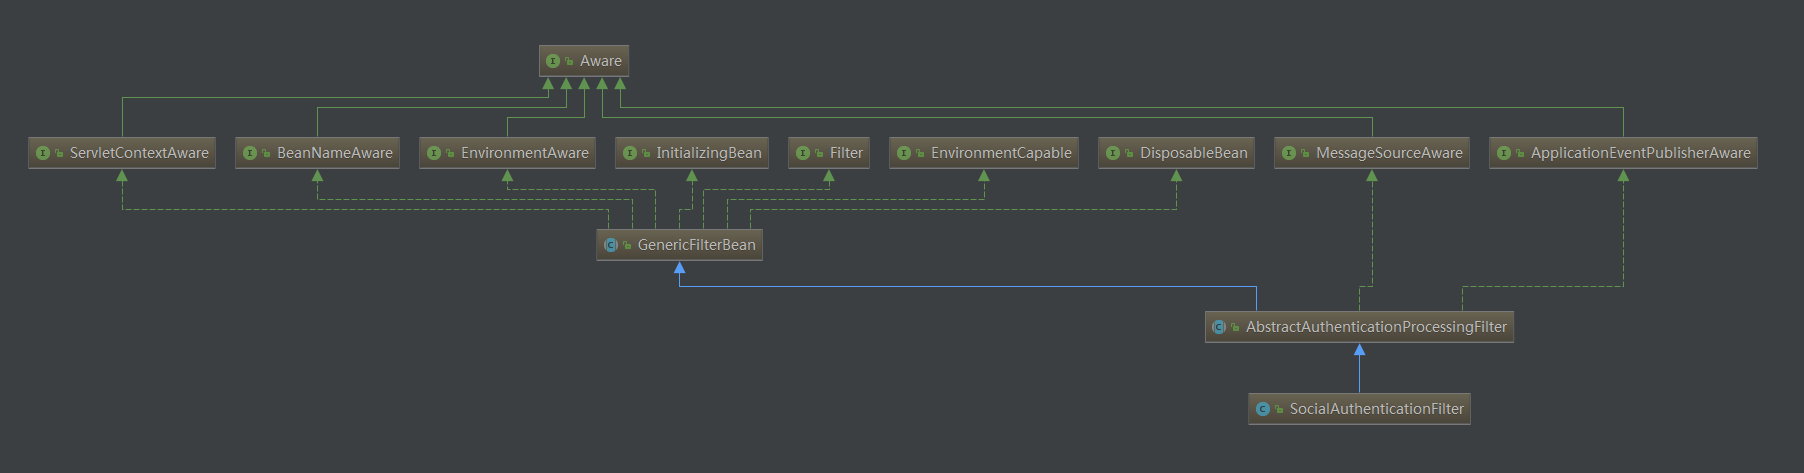
我们可以发现,SocialAuthenticationFilter 的父类是 AbstractAuthenticationProcessingFilter,在 SpringSecurity 体系中可以通过自定义 SpringSocialConfigurer 将 AbstractAuthenticationProcessingFilter 加入到过滤器链中,参与用户的认证流程。
对于 Filter 我们关注他的 doFilter 方法绝对没有问题。
// AbstractAuthenticationProcessingFilter.java
// 193 行
public void doFilter(ServletRequest req, ServletResponse res, FilterChain chain)
      throws IOException, ServletException {

   HttpServletRequest request = (HttpServletRequest) req;
   HttpServletResponse response = (HttpServletResponse) res;

   if (!requiresAuthentication(request, response)) {
      chain.doFilter(request, response);

      return;
   }

   if (logger.isDebugEnabled()) {
      logger.debug("Request is to process authentication");
   }

   Authentication authResult;

   try {
      // 1. 调用 attemptAuthentication
      authResult = attemptAuthentication(request, response);
      if (authResult == null) {
         // return immediately as subclass has indicated that it hasn't completed
         // authentication
         return;
      }
      sessionStrategy.onAuthentication(authResult, request, response);
   }
   catch (InternalAuthenticationServiceException failed) {
      logger.error(
            "An internal error occurred while trying to authenticate the user.",
            failed);
      unsuccessfulAuthentication(request, response, failed);

      return;
   }
   catch (AuthenticationException failed) {
      // Authentication failed
      unsuccessfulAuthentication(request, response, failed);

      return;
   }

   // Authentication success
   if (continueChainBeforeSuccessfulAuthentication) {
      chain.doFilter(request, response);
   }

   successfulAuthentication(request, response, chain, authResult);
}

// 282 行
// 2. attemptAuthentication 是一个抽象方法,具体的实现交给子类
public abstract Authentication attemptAuthentication(HttpServletRequest request,
			HttpServletResponse response) throws AuthenticationException, IOException,
ServletException;
标记 1 : 调用了 attemptAuthentication 方法。
标记 2 : 按标记 1 找到,我们可以发现该方法是一个抽象方法,具体的实现应该在子类中。在我们这里,具体的实现应该在 SocialAuthenticationFilter 中。
// SocialAuthenticationFilter.java
// 160 行
public Authentication attemptAuthentication(HttpServletRequest request, HttpServletResponse response) throws AuthenticationException {
   if (detectRejection(request)) {
      if (logger.isDebugEnabled()) {
         logger.debug("A rejection was detected. Failing authentication.");
      }
      throw new SocialAuthenticationException("Authentication failed because user rejected authorization.");
   }

   Authentication auth = null;
   // 1. 获取系统中所有的 providerId (第三方系统在本系统中的唯一标识符)
   Set<String> authProviders = authServiceLocator.registeredAuthenticationProviderIds();
   // 2. 根据请求找到匹配当前环境的 providerId
   String authProviderId = getRequestedProviderId(request);
   // authProviders 不为空,authProviderId 不为空且 authProviders 包含 authProviderId
   // 变相校验 authProviderId 是一个合法的 providerId
   if (!authProviders.isEmpty() && authProviderId != null && authProviders.contains(authProviderId)) {
      // 3. 按 providerId 获取到对应的 SocialAuthenticationService
      SocialAuthenticationService<?> authService = authServiceLocator.getAuthenticationService(authProviderId);
      // 4. 调用 attemptAuthService 方法,获取 Authentication,这里注意一下 Authentication 接口
      // 是后面 SocialAuthenticationToken 的父接口
      auth = attemptAuthService(authService, request, response);
      if (auth == null) {
         throw new AuthenticationServiceException("authentication failed");
      }
   }
   return auth;
}

// 263 行
private Authentication attemptAuthService(final SocialAuthenticationService<?> authService, final HttpServletRequest request, HttpServletResponse response)
			throws SocialAuthenticationRedirectException, AuthenticationException {
		// 5. 使用 AuthService 获取 SocialAuthenticationToken
		final SocialAuthenticationToken token = authService.getAuthToken(request, response);
		if (token == null) return null;

		Assert.notNull(token.getConnection());

		Authentication auth = getAuthentication();
		if (auth == null || !auth.isAuthenticated()) {
            // 6. 当前用户状态还没有认证过,使用 token 去认证,走 SpringSecurity 认证流程
			return doAuthentication(authService, request, token);
		} else {
            // 7. 已认证的话,校验当前用户是否创建过 Connection,没有则创建,创建完毕跳转到指定页面
			addConnection(authService, request, token, auth);
			return null;
		}
	}
标记 1 : 获取系统中所有的 providerId (每一个 providerId 对应一个第三方服务商)。
实际上调用的 SocialAuthenticationServiceRegistry 的 registeredAuthenticationProviderIds 方法
// SocialAuthenticationServiceRegistry.java
// 27 行
private Map<String, SocialAuthenticationService<?>> authenticationServices = new HashMap<String, SocialAuthenticationService<?>>();

// 41 行
/**
* Add a {@link SocialAuthenticationService} to this registry.
* @param authenticationService a SocialAuthenticationService to register
*/
public void addAuthenticationService(SocialAuthenticationService<?> authenticationService) {
		addConnectionFactory(authenticationService.getConnectionFactory());
		authenticationServices
    .put(authenticationService.getConnectionFactory().getProviderId(),
     	authenticationService);
	}

// 58 行
public Set<String> registeredAuthenticationProviderIds() {
   return authenticationServices.keySet();
}
authenticationServices 是一个 Map<String, SocialAuthenticationService<?>>,key 为 providerId,value 为该 providerId 在系统中对应的 SocialAuthenticationService。
我们跟踪一下其什么时候注入 key、value,我们发现其 addAuthenticationService 方法调用如下:
// SecurityEnabledConnectionFactoryConfigurer.java
// 40 行
public void addConnectionFactory(ConnectionFactory<?> connectionFactory) {
 // 这里调用 register 的 addAuthenticationService 方法
 registry.addAuthenticationService(wrapAsSocialAuthenticationService(connectionFactory);
}

// 49 行
private <A> SocialAuthenticationService<A> wrapAsSocialAuthenticationService(ConnectionFactory<A> cf) {
    if (cf instanceof OAuth1ConnectionFactory) {
        // 使用 OAuth1 协议时
        return new OAuth1AuthenticationService<A>((OAuth1ConnectionFactory<A>) cf);
    } else if (cf instanceof OAuth2ConnectionFactory) {
        // 使用 OAuth2 协议时,使用当前 ConnectionFactory 创建一个对应的 AuthenticationService
        // 注意这里可以通过 ConnectionFactoy 设置 service 的 scope
        final OAuth2AuthenticationService<A> authService = new OAuth2AuthenticationService<A>((OAuth2ConnectionFactory<A>) cf);
        authService.setDefaultScope(((OAuth2ConnectionFactory<A>) cf).getScope());
        return authService;
    }
    throw new IllegalArgumentException("The connection factory must be one of OAuth1ConnectionFactory or OAuth2ConnectionFactory");
	}
SecurityEnabledConnectionFactoryConfigurer 是 ConnectionFactoryConfigurer 的实现类,继续跟一下,看哪里调用的 addConnectionFactory 方法。这个时候我们发现通过 IDEA 的 Find Usages 功能找不到该方法被引用的地方。线索似乎在这里断掉了,这个时候不要急,我们尝试找一下 SecurityEnabledConnectionFactoryConfigurer 的 Find Usages,我们可以发现在 SocialConfiguration 的 connectionFactoryLocator 方法中使用了该类,把该类的一个实例化对象作为参数传入遍历调用的 SocialConfigurer 的 addConnectionFactories 方法中。
这里重点说明一下 SocialConfiguration 这个类。在这个类中,通过 IOC 注入收集了系统中所有 SocialConfigurer 的实现。并在 ConnectionFactoryLocator 构造时。遍历 SocialConfigurer 调用 addConnectionFactories 方法。
这里大概明白了 SpringSocial 的套路,用户自定义 SocialConfigurer,SocialConfiguration 的实现,来自定义设置(自定义的 ConnectionFactory、UserConnectionRepositoty 自定义设置等),这里进行全局收集,调用用户的实现,使其生效。配置主要围绕 ConnectionFactory、UserIdSource、UserConnectionRepository 三个方面,这和我们之前文章的分析不谋而合,整个框架还是围绕的 Connection 的产生与存储。
// SocialConfiguration.java
// 39 行
private List<SocialConfigurer> socialConfigurers;

// 46 行
// 使用 SpringIOC 将系统中所有的 SocialConfigurer 实现类注入进来
@Autowired
public void setSocialConfigurers(List<SocialConfigurer> socialConfigurers) {
    Assert.notNull(socialConfigurers, "At least one configuration class must implement SocialConfigurer (or subclass SocialConfigurerAdapter)");
    Assert.notEmpty(socialConfigurers, "At least one configuration class must implement SocialConfigurer (or subclass SocialConfigurerAdapter)");
    this.socialConfigurers = socialConfigurers;
}

// 54 行
// 如果开启了 securityEnabled 就是用 SecurityEnabledConnectionFactoryConfigurer,否则就是用
// DefaultConnectionFactoryConfigurer
@Bean
public ConnectionFactoryLocator connectionFactoryLocator() {
    if (securityEnabled) {
        SecurityEnabledConnectionFactoryConfigurer cfConfig = new SecurityEnabledConnectionFactoryConfigurer();
        for (SocialConfigurer socialConfigurer : socialConfigurers) {
            // 遍历注入的 SocialConfigurer 实现,调用其 addConnectionFactories 方法
            // 本质上是遍历用户实现的 SocialConfigurer 的实现类,使用户的配置生效
            socialConfigurer.addConnectionFactories(cfConfig, environment);
        }
        return cfConfig.getConnectionFactoryLocator();
    } else {
        DefaultConnectionFactoryConfigurer cfConfig = new DefaultConnectionFactoryConfigurer();
        for (SocialConfigurer socialConfigurer : socialConfigurers) {
            socialConfigurer.addConnectionFactories(cfConfig, environment);
        }
        return cfConfig.getConnectionFactoryLocator();
    }
}
我们跟着看一下 SocialConfigurer 接口。
其实我们前面章节实践的时候,就会自定义它的子类 SocialConfigurerAdapter 与 SocialAutoConfigurerAdapter 的实现类,并分别实现 getUsersConnectionRepository 与 createConnectionFactory 方法来自定义 UserConnectionRepository 与 ConnectionFactory。
// SocialConfigurer.java
public interface SocialConfigurer {

   /**
    * Callback method to allow configuration of {@link ConnectionFactory}s.
    * @param connectionFactoryConfigurer A configurer for adding {@link ConnectionFactory} instances.
    * @param environment The Spring environment, useful for fetching application credentials needed to create a {@link ConnectionFactory} instance.
    */
   void addConnectionFactories(ConnectionFactoryConfigurer connectionFactoryConfigurer, Environment environment);
}
具体看一下 SocialConfigurer 的实现类,看看在 addConnectionFactories 中到底做了些什么。
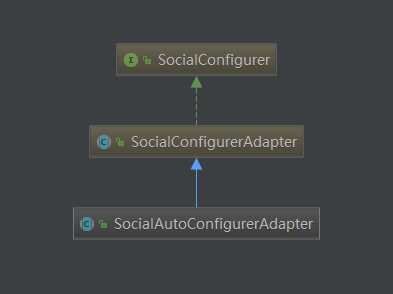
SocialConfigurer 的非内部类实现只有两个,SocialConfigurerAdapter 是抽象类,addConnectionFactories 正真的实现逻辑在 SocialAutoConfigurerAdapter 类中
// SocialAutoConfigurerAdapter .java
public abstract class SocialAutoConfigurerAdapter extends SocialConfigurerAdapter {
    public SocialAutoConfigurerAdapter() {
    }

    // 向 ConnectionFactoryConfigurer 中添加 ConnectionFactory
    public void addConnectionFactories(ConnectionFactoryConfigurer configurer, Environment environment) {
        // 这里调用 createConnectionFactory 是一个抽象方法
        configurer.addConnectionFactory(this.createConnectionFactory());
    }
	// 交给子类实现
    protected abstract ConnectionFactory<?> createConnectionFactory();
}
可以看到最终是在 SocialAutoConfigurerAdapter 的 addConnectionFactories 方法中添加 ConnectionFactory,我们可以自定义 SocialAutoConfigurerAdapter 的实现类,实现 createConnectionFactory 方法,将我们自定义的 ConnectionFactory 注册到 ConnectionFactoryConfigurer 中。
// SocialConfigurerAdapter.java
public abstract class SocialConfigurerAdapter implements SocialConfigurer {

   /**
    * Default implementation of {@link #addConnectionFactories(ConnectionFactoryConfigurer, Environment)}.
    * Implemented as a no-op, adding no connection factories.
    */
   public void addConnectionFactories(ConnectionFactoryConfigurer connectionFactoryConfigurer, Environment environment) {
   }

   /**
    * Default implementation of {@link #getUserIdSource()}.
    * Returns null, indicating that this configuration class doesn't provide a UserIdSource (another configuration class must provide one, however).
    * @return null
    */
   public UserIdSource getUserIdSource() {
      return null;
   }

   /**
    * Default implementation of {@link #getUsersConnectionRepository(ConnectionFactoryLocator)} that creates an in-memory repository.
    */
   public UsersConnectionRepository getUsersConnectionRepository(ConnectionFactoryLocator connectionFactoryLocator) {
      return new InMemoryUsersConnectionRepository(connectionFactoryLocator);
   }

}
我们重写 getUsersConnectionRepository 方法,可以自定 UsersConnectionRepository 的配置,默认使用的是基于内存的存储方式。
OK,到了这里饶了半天,我们终于把 标记 1 的逻辑跟踪完了,是不是有点晕车啊。其实前面这些分析可以终结为以下几点:
- 获取系统中配置的所有
providerId - 是怎么通过
providerId获取到SocialAuthenticationService的,他们的对应关系是什么时候初始化的。- 实际存储关系是一个
HashMap,以 key - value 形式进行存储的 - 初始化时机是在
addConnectionFactory时,通过ConnectionFactory构造SocialAuthenticationService,然后put进HashMap
- 实际存储关系是一个
- 通过上面衍生出
ConnectionFactory的初始化调用,最后一步步跟踪,发现是在SocialConfiguration中收集全局用户自定义的SocialConfigurer的实现,遍历调用其addConnectionFactories方法进行添加的。
下面收回我们的思绪,继续回到我们的 SocialAuthenticationFilter 中,简单看一下如何从请求中获取当前 providerId 的。
标记 2 : 从请求中获取 providerId
private String getRequestedProviderId(HttpServletRequest request) {
   String uri = request.getRequestURI();
   int pathParamIndex = uri.indexOf(';');

   if (pathParamIndex > 0) {
      // 去掉 ; 以及它后面的内容
      // strip everything after the first semi-colon
      uri = uri.substring(0, pathParamIndex);
   }

   // uri must start with context path
   // 去掉 contextPath (服务路径)
   uri = uri.substring(request.getContextPath().length());

   // remaining uri must start with filterProcessesUrl
   if (!uri.startsWith(filterProcessesUrl)) {
      return null;
   }

   // 去掉 filterProcessUrl,SocialAuthentication 的拦截 Url,默认是 /auth,可以自定义
   uri = uri.substring(filterProcessesUrl.length());

   // expect /filterprocessesurl/provider, not /filterprocessesurlproviderr
   // 最后去掉一个 /,获取到 providerId,所以这里可以得出默认路径应该是
   // /contextPath/filterprocessurl/providerId
   if (uri.startsWith("/")) {
      return uri.substring(1);
   } else {
      return null;
   }
}
标记 3 : 如果从请求中获取的 providerId 在系统中有找到,获取该 providerId 对应的 SocialAuthenticationService
标记 3 实际上分为两步:
- 第一步看请求中的
providerId在全局的providerIds中能否找到,相当于校验providerId是否合法。 - 第二步通过
providerId获取对应的SocialAuthenticationService,这一步的具体逻辑我们在标记 1 中已经具体跟踪过了。
标记 4 : 调用 attemptAuthService 方法,尝试获取 Authentication
标记 4 主要是一个跳转,核心实现逻辑在标记 5 中。
标记 5 : 调用 SocialAuthenticationService 的 getAuthToken 方法获取 SocialAuthenticationToken
// OAuth2AuthenticationService.java
public SocialAuthenticationToken getAuthToken(HttpServletRequest request, HttpServletResponse response) throws SocialAuthenticationRedirectException {
   // 从请求中尝试获取授权码
   String code = request.getParameter("code");
   if (!StringUtils.hasText(code)) {
      // 请求中如果没有授权码,表示不是回调回来的,引导用户跳转到 Service Provider 对应的授权页面
      OAuth2Parameters params =  new OAuth2Parameters();
      // 设置回调地址,buildReturnToUrl 主要是对根据配置对当前请求地址进行参数拼接,默认不配置的话
      // 当前请求地址就是回调地址
      params.setRedirectUri(buildReturnToUrl(request));
      // 设置 scope
      setScope(request, params);
      // 设置 state
      params.add("state", generateState(connectionFactory, request));
      addCustomParameters(params);
      // 通过抛出异常的方式进行跳转, 在 AbstractAuthenticationProcessingFilter 的 doFilter
      // 中捕获异常,进一步调用对应的 AuthenticationFailureHandler 的 onAuthenticationFailure
      // 方法,在该方法中判断,如果是 SocialAuthenticationRedirectException,则引导用户进行跳转,
      // 否则,调用默认委派类( SimpleUrlAuthenticationFailureHandler )
      // 的 onAuthenticationFailure 方法进行处理
      // buildAuthenticateUrl 方法会拼接 client_id 与 response_type 参数,如果使用的第三方还需要
      // 其他参数,可以重写 OAuthOperation 的 buildAuthenticateUrl 方法配合 properties 设置
      throw new SocialAuthenticationRedirectException(getConnectionFactory().getOAuthOperations().buildAuthenticateUrl(params));
   } else if (StringUtils.hasText(code)) {
      try {
         // 如果从请求中获取到了授权码,表示该请求是第三方服务回调回来的
         // 设置回调地址,buildReturnToUrl 主要是对根据配置对当前请求地址进行参数拼接,默认不配置的话
         // 当前请求地址就是回调地址
         String returnToUrl = buildReturnToUrl(request);
         // 调用 ConnectionFactory 对应的 ServiceProvider 的 OAuthOperations 进行
         // AccessToken 获取,并将其封装成 AccessGrant,exchangeForAccess 详讲....
         AccessGrant accessGrant = getConnectionFactory().getOAuthOperations().exchangeForAccess(code, returnToUrl, null);
         // TODO avoid API call if possible (auth using token would be fine)
         // 使用封装的 AccessGrant 创建 Connection,createConnection 详讲....
         Connection<S> connection = getConnectionFactory().createConnection(accessGrant);
         // 使用 Connection 构建 AuthenticationToken 返回回去,继续 SpringSecurity 的认证流程
         return new SocialAuthenticationToken(connection, null);
      } catch (RestClientException e) {
         logger.debug("failed to exchange for access", e);
         return null;
      }
   } else {
      return null;
   }
}
标记 5 中主要是 getAuthToken 方法的实现逻辑,其中有两种情况:
- 请求中存在授权码: 使用获取到的授权码,通过当前
OAuth2AuthenticationService对应的ConnectionFactory请求获取当前用户在第三方服务商上的Token,然后将这个Token最终封装为Connection,最后将Connection封装成SocialAuthenticationToken(SpringSecurity认证框架中的Token)。 - 请求中没有授权码: 根据当前
OAuth2AuthenticationService找到对应第三方服务商的配置,引导用户跳转到其授权页面 (比如 QQ 登录页面)。
标记 6 : 当前用户状态还没有认证过,使用 token 去认证,走 SpringSecurity 认证流程
// SocialAuthenticationFilter.java
// 已经获取到了用户的 AccessToken,并将其封装成了 SocialAuthenticationToken,进行
// SpringSecurity 的认证流程
private Authentication doAuthentication(SocialAuthenticationService<?> authService, HttpServletRequest request, SocialAuthenticationToken token) {
   try {
      // 判断当前的 SocialAuthenticationService 的模式是否支持认证
      if (!authService.getConnectionCardinality().isAuthenticatePossible()) return null;
      token.setDetails(authenticationDetailsSource.buildDetails(request));
      // SpringSecurity 的标准流程, 调用 AuthenticationManager 的 authenticate 方法进行认证,
      // 实质是调用 ProviderManager 的 authenticate 方法,遍历所有 AuthenticationProvider,
      // 找到匹配的 SocialAuthenticationProvide,并调用其 authenticate 方法
      Authentication success = getAuthenticationManager().authenticate(token);
      Assert.isInstanceOf(SocialUserDetails.class, success.getPrincipal(), "unexpected principle type");
      // 如果设置了 updateConnections,每次第三方认证后获取 Connection 后,
      // 都对 Connection 进行更新,Connection 包含
      // Connectionkey(providerId、providerUserId)、DisplayName、ProfileUrl、ImageUrl
      updateConnections(authService, token, success);
      return success;
   } catch (BadCredentialsException e) {
      // 当前登录的第三方用户,还没有绑定本系统账号
      // connection unknown, register new user?
      if (signupUrl != null) {
         //  如果有配置注册引导页面,存储 ConnectionData 到 session 中,引导用户跳转到注册页面
         // store ConnectionData in session and redirect to register page
         sessionStrategy.setAttribute(new ServletWebRequest(request), ProviderSignInAttempt.SESSION_ATTRIBUTE, new ProviderSignInAttempt(token.getConnection()));
         // 专门用来跳转到的异常,上面未携带授权码时,也是抛出该类型异常
         throw new SocialAuthenticationRedirectException(buildSignupUrl(request));
      }
      throw e;
   }
}
在标记 5 中我们获取到了 SpringSecurity 框架下的 Token,这时候我们会去根据该 Token 判断当前用户的认证状态。如果当前用户还没有认证过,我们会走标记 6 的逻辑。标记 6 的逻辑实质上走的就是基础的 SpringSecurity 认证逻辑了。
这里有几点要注意:
- 认证完了之后会调用
updateConnection对Repository中的Connection进行更新 - 如果在
Repository里面没有找到与第三方服务商的用户 ( 比如 QQ 用户 ) 对应的本系统用户且系统没有设置后端静默注册,这里会根据是否配置默认注册页面来做对应处理- 配置了注册页面,会通过特殊异常方式 ( 外面异常捕捉会对该类型异常做特殊处理 ),引导用户跳转到注册页面。
- 未配置注册页面,会直接抛出异常,导致认证失败。
PS: 前面虽然跳转到第三方授权页面 ( 比如 QQ 登录页面进行了认证 ),但是在我们系统中,当前用户还没有认证
当前的 SocialAuthenticationService 的模式是否支持认证由下面枚举状态决定
// ConnectionCardinality (SocialAuthenticationService 状态集合)
public enum ConnectionCardinality {
   /**
    * only one connected providerUserId per userId and vice versa
    * 系统中一个 userId 对应一个第三方服务商的 providerUserId,反之亦然
    */
   ONE_TO_ONE(false, false),

   /**
    * many connected providerUserIds per userId, but only one userId per providerUserId
    * 系统中一个 userId 对应多个 providerUserId,但是一个 providerUserId 对应一个 userId
    */
   ONE_TO_MANY(false, true),

   /**
    * only one providerUserId per userId, but many userIds per providerUserId.
    * Authentication of users not possible
    * 系统中一个 userId 对应一个 providerUserId,但是一个 providerUserId 对应多个 userId
    * 这种情况不能用来做用户认证
    */
   MANY_TO_ONE(true, false),

   /**
    * no restrictions. Authentication of users not possible
    * 系统中一个 userId 对应多个 providerUserId,一个 providerUserId 对应多个 userId (没有限制)
    * 这种情况不能用来做用户认证
    */
   MANY_TO_MANY(true, true);

   private final boolean multiUserId;
   private final boolean multiProviderUserId;

   private ConnectionCardinality(boolean multiUserId, boolean multiProviderUserId) {
      this.multiUserId = multiUserId;
      this.multiProviderUserId = multiProviderUserId;
   }

   /**
    * allow many userIds per providerUserId. If true, authentication is not possible
    * @return true if multiple local users are allowed per provider user ID
    */
   public boolean isMultiUserId() {
      return multiUserId;
   }

   /**
    * allow many providerUserIds per userId
    * @return true if users are allowed multiple connections to a provider
    */
   public boolean isMultiProviderUserId() {
      return multiProviderUserId;
   }

   public boolean isAuthenticatePossible() {
      return !isMultiUserId();
   }
}
标记 7 : 已认证的话,校验当前用户是否创建过 Connection,没有则创建,创建完毕跳转到指定页面
private void addConnection(final SocialAuthenticationService<?> authService, HttpServletRequest request, SocialAuthenticationToken token, Authentication auth) {
   // already authenticated - add connection instead
   String userId = userIdSource.getUserId();
   Object principal = token.getPrincipal();
   if (userId == null || !(principal instanceof ConnectionData)) return;

   Connection<?> connection = addConnection(authService, userId, (ConnectionData) principal);
   if(connection != null) {
      String redirectUrl = authService.getConnectionAddedRedirectUrl(request, connection);
      if (redirectUrl == null) {
         // use default instead
         redirectUrl = connectionAddedRedirectUrl;
      }
      throw new SocialAuthenticationRedirectException(redirectUrl);
   }
}
到了这里,上面标记的几个点基本上都看完了,整个流程也差不多了。下面会根据上面的一些情况对 SpringSocial 的一些细节和 SpringSecurity 的后续认证流程进行一些补充说明。
标记 6 后续的 SpringSecurity 认证流分析
到了标记 6 所在步骤, SpringSecurity 的认证流程基本上如下:
-
调用
AuthenticationManager的authenticate方法,将之前获取的token做为参数传递进去 -
上面的
authenticate方法实质上会调用ProviderManager(AuthenticationManager的实现类 ) 的authenticate方法。ProviderManager顾名思义,它拥有系统中所有的AuthenticationProvider,在authenticate方法中会对这些provider进行遍历,根据传递进来的token参数找到匹配的provider方法,并调用其authenticate方法。// ProviderManager.java
public Authentication authenticate(Authentication authentication) throws AuthenticationException { Class<? extends Authentication> toTest = authentication.getClass(); AuthenticationException lastException = null; Authentication result = null; boolean debug = logger.isDebugEnabled(); // 遍历 provider for (AuthenticationProvider provider : getProviders()) { // 按传递进来的 token 进行过滤,找到匹配的 if (!provider.supports(toTest)) { continue; } if (debug) { logger.debug("Authentication attempt using " + provider.getClass().getName()); } try { // 核心代码,调用匹配的 provider 的认证方法 result = provider.authenticate(authentication); if (result != null) { copyDetails(authentication, result); break; } } catch (AccountStatusException e) { prepareException(e, authentication); // SEC-546: Avoid polling additional providers if auth failure is due to // invalid account status throw e; } catch (InternalAuthenticationServiceException e) { prepareException(e, authentication); throw e; } catch (AuthenticationException e) { lastException = e; } } ...... } -
在我们当前流程中,匹配的
provider是SocialAuthenticationProvider,我们来跟踪一下它authenticate方法的逻辑。// SocialAuthenticationProvider.java
// 57 行
public Authentication authenticate(Authentication authentication) throws AuthenticationException {
   Assert.isInstanceOf(SocialAuthenticationToken.class, authentication, "unsupported authentication type");
   Assert.isTrue(!authentication.isAuthenticated(), "already authenticated");
   SocialAuthenticationToken authToken = (SocialAuthenticationToken) authentication;
   String providerId = authToken.getProviderId();
   // 1. 从封装的 SocialAuthenticationToken 中获取 Connection
   Connection<?> connection = authToken.getConnection();
   // 2. 使用 Connection 从持久化(数据库)中获取对应的 UserId
   String userId = toUserId(connection);
   if (userId == null) {
      // 2.1 如果没有找到对应的UserId,抛出异常,在上面捕获后,如果配置了默认的注册页面,会引导用户
      // 跳转到注册页面进行注册,如果没有配置,则直接抛出异常
      throw new BadCredentialsException("Unknown access token");
   }
   // 3. 使用 userId 继续走 SpringSecurity 认证流程
   UserDetails userDetails = userDetailsService.loadUserByUserId(userId);
   if (userDetails == null) {
      throw new UsernameNotFoundException("Unknown connected account id");
   }

    // 4. 将查询出的用户信息与之前的 Connection 重新封装一个 SocialAuthenticationToken 返回
   return new SocialAuthenticationToken(connection, userDetails, authToken.getProviderAccountData(), getAuthorities(providerId, userDetails));
}

// 77 行,从数据中查找 Connection 对应的 userId
protected String toUserId(Connection<?> connection) {
		List<String> userIds = usersConnectionRepository.findUserIdsWithConnection(connection);
		// only if a single userId is connected to this providerUserId
		return (userIds.size() == 1) ? userIds.iterator().next() : null;
	}
上面的操作,总结起来就是如下几步:
- 从
Token中获取之前封装进去的Connection。 - 根据
Connection从数据库中查询对应的UserId(UserId代表的是用户在本系统中的唯一标识,不一定是Id,只要是唯一的就可以)。 - 使用
UserId继续走SpringSecurity的认证流程,会使用该UserId去数据库中查询用户信息,封装成UserDetail返回。
我们这里着重跟踪一下第二步,使用
Connection从数据库中查询出对应的UserId,我们发现最终调用的是usersConnectionRepository的findUserIdsWithConnection方法,我们看下对应源码:// JdbcUsersConnectionRepository.java
// 83 行
public List<String> findUserIdsWithConnection(Connection<?> connection) {
   // 1. 获取 ConnectionKey,ConnectionKey 在创建 Connection 时,initKey 方法填充
   ConnectionKey key = connection.getKey();
   // 2. 从数据库中按 providerId 与 providerUserId 查询用户在本地系统中的唯一标识
   List<String> localUserIds = jdbcTemplate.queryForList("select userId from " + tablePrefix + "UserConnection where providerId = ? and providerUserId = ?", String.class, key.getProviderId(), key.getProviderUserId());
   // 3. 如果没有找到用户在本地系统中对应的唯一标识且给 repository 设置了 ConnectionSignUp
   if (localUserIds.size() == 0 && connectionSignUp != null) {
      // 4. 调用自己实现的 execute 方法,在本系统中注册用户,返回注册成功后用户在本系统中的唯一标识
      String newUserId = connectionSignUp.execute(connection);
      if (newUserId != null)
      {
         // 5. 使用用户在本系统中的唯一标示与 Connection 进行绑定操作
         createConnectionRepository(newUserId).addConnection(connection);
         return Arrays.asList(newUserId);
      }
   }
   return localUserIds;
}
上面的操作,继续总结一下:
- 获取
Connection的Key,实质上ConnectionKey是对providerId与providerUserId的一个封装对象。 - 使用
ConnectionKey中的providerId与providerUserId从数据库中查询用户在本系统中的唯一标示。 - 如果查询不到,表示该第三方用户还没有绑定过本系统用户
- 如果
repository设置了ConnectionSignUp,会调用ConnectionSignUp的execute方法 ( 该方法也是需要我们自己实现,一般会在里面进行注册操作 ),帮用户进行注册。然后进行绑定。具体的配置方式,在下面讲账户关联数据库中会进行详细说明。 - 如果没有设置,直接返回空集合。
- 如果
- 从
然后我们来看一下,存储第三方用户账户与本系统用户账户关系的数据库
数据库表结构是 SpringSocial 设计好的,我们可以自定前缀,程序运行时会自动向数据库中创建,为了防止权限不够,可以在程序运行前,手动创建。
-- This SQL contains a "create table" that can be used to create a table that JdbcUsersConnectionRepository can persist
-- connection in. It is, however, not to be assumed to be production-ready, all-purpose SQL. It is merely representative
-- of the kind of table that JdbcUsersConnectionRepository works with. The table and column names, as well as the general
-- column types, are what is important. Specific column types and sizes that work may vary across database vendors and
-- the required sizes may vary across API providers.

create table UserConnection (userId varchar(255) not null,
 providerId varchar(255) not null,
 providerUserId varchar(255),
 rank int not null,
 displayName varchar(255),
 profileUrl varchar(512),
 imageUrl varchar(512),
 accessToken varchar(512) not null,
 secret varchar(512),
 refreshToken varchar(512),
 expireTime bigint,
 primary key (userId, providerId, providerUserId));
create unique index UserConnectionRank on UserConnection(userId, providerId, rank);
对数据库的自定义设置
-
自定义 jdbc 存储的表前缀
-
自定义
SocialConfigurer的实现类,重写getUsersConnectionRepository方法,在该方法中调用setTablePrefix方法给表设置自定义前缀。 -
注意该
Config的Order要设置为 1,因为系统中存在多个SocialConfigurer的实现类时,会取第一个实现类的getUsersConnectionRepository方法返回值作为默认实现。 -
登录时发现未绑定,设置自动注册。调用
setConnectionSignUp接入自定义的注册逻辑。// SocialConfig.java (自定义 SocialConfigurerAdapter 实现类)
@Autowired(required = false)
private ConnectionSignUp connectionSignUp;

@Override
public UsersConnectionRepository getUsersConnectionRepository(ConnectionFactoryLocator connectionFactoryLocator) {
    // dataSource 数据源
    // Encryptors.noOpText() 加密方式 - 不加密
    // 默认建表 sql 与 JdbcUsersConnectionRepository 类在用一个目录下
    JdbcUsersConnectionRepository repository = new JdbcUsersConnectionRepository(dataSource, connectionFactoryLocator, Encryptors.noOpText());
    // 设置数据库表前缀,默认为 UserConnection,可以在这个基础上自定义前缀
    repository.setTablePrefix("hblolj_");
    // 自定义默认注册逻辑,社交登录后在数据库中(按服务商类型 + 用户在服务商的唯一标识)没有找到对	  // 应的用户信息,便会调用 ConnectionSignUp 的 execute 方法。我们可以在自定义的 execute 	 // 方法中为用户进行注册。
    if (connectionSignUp != null){
        repository.setConnectionSignUp(connectionSignUp);
    }
    return repository;
}
// CustomConnectionSignUp.java (自定义 ConnectionSignUp 实现类)
/**
 * @author: hblolj
 * @Date: 2019/3/19 15:29
 * @Description:
 * @Version:
 **/
@Component
public class CustomConnectionSignUp implements ConnectionSignUp {

    @Override
    public String execute(Connection<?> connection) {
        // TODO: 2019/3/19 根据用户在第三方服务商的信息给用户在业务服务器上注册一个账户
        // 返回用户在业务系统上的唯一标识,这里不做实际操作,模拟返回用户在第三方服务器上 nickName
        return connection.getDisplayName();
    }
}
-
自定义注册页面
-
登录时发现未绑定,引导用户跳转到注册页面
- 如果没有设置自动注册
ConnectionSignUp的实现,且当前第三方账户在本系统中没有进行过绑定。SocialAuthenticationProvider的authenticate方法中调用的toUserId方法返回的userId为null,想先执行会抛出BadCredentialsException。(详细分析可以参考上面 标记 6 后续的 SpringSecurity 认证流分析 的第三步)。 - 这个异常最终会在
SocialAuthenticationFilter的doAuthentication方法中被捕获,在catch中会判断signupUrl这个属性是否为空。不为空,就通过抛出指定类型异常的方式redirect到该页面。为空,就直接抛出异常。 - 这里的
signupUrl代表的就是注册页面,那么我们在哪里可以自定义配置这个signupUrl呢?我们可以跟踪发现signupUrl是SocialAuthenticationFilter的一个属性,通过setSignupUrl方法被初始化。而setSignupUrl方法的调用时机在SpringSocialConfigurer类的configure方法中,将SpringSocialConfigurer的signupUrl属性赋值给SocialAuthenticationFilter的signupUrl。
所以我们只需要自定义一个
SpringSocialConfigurer的实现来替代默认的SpringSocialConfigurer,且设置SpringSocialConfigurer的signupUrl即可。// SocialConfig.java (自定义 SocialConfigurerAdapter 实现类)
/** * SpringSocial 认证配置 * 将该 Config 添加到 WebSecurityConfig 中 * @return */ @Bean public SpringSocialConfigurer customSocialSecurityConfig(){ // return new SpringSocialConfigurer(); CustomSpringSocialConfigurer configurer = new CustomSpringSocialConfigurer(securityProperties.getSocial().getFilterProcessesUrl()); // 配置注册页面,当找不到用户时,会跳转到该页面 configurer.signupUrl(securityProperties.getBrowser().getSignUpUrl()); // 设置登录成功跳转地址 configurer.postLoginUrl("/hello"); return configurer; } - 如果没有设置自动注册
-
添加接口,注册页面访问该接口进行注册、绑定
注册页面只是注册的一半,我们还需要准备一个注册接口,在这个接口中完成以下两步:
- 在本系统中注册一个用户
- 将注册的用户与第三方账户进行绑定
@Autowired
private ProviderSignInUtils providerSignInUtils;

@PostMapping("/regist")
public void regist(@RequestParam String username, @RequestParam String password, HttpServletRequest request){

    log.info("regist");

    // TODO: 2019/3/19 注册用户
    // 不管是注册还是绑定,都会获取到用户在业务系统中的唯一标识
    // 注册完成后进行绑定
    // doPostSignUp 会从 Session 中取出抛出异常时存储的 ProviderSignInAttempt,
    // 使用其进行绑定,所以只有第三方登录状态才可以使用该注册,并且在本次 Session 中
    providerSignInUtils.doPostSignUp(username, new ServletWebRequest(request));
}
与 SpringSecurity 的集成
SpringSocial 与 SpringSecurity 的集成,与我们前面集成自定义的短信登录、微信登录其实差不多,都是将自定义的过滤器加入到 SpringSecurity 的过滤器链中,达到加入整个认证流程的效果。
// WebSecurityConfig.java (WebSecurityConfigurerAdapter 的实现类,SpringSecurity 的配置类)
@Autowired
private SmsCodeAuthenticationConfig smsCodeAuthenticationConfig;

@Autowired
private WxAuthenticationConfig wxAuthenticationConfig;

/**
 * Social 认证配置
 */
@Autowired
private SpringSocialConfigurer customSocialConfig;

@Override
protected void configure(HttpSecurity http) throws Exception {

    http.apply(smsCodeAuthenticationConfig) // 将短信认证加入认证流程
                .and()
            .apply(wxAuthenticationConfig) // 将微信认证加入认证流程
                .and()
            .apply(customSocialConfig) // 将 SpringSocial 认证加入认证流程
                .....
// CustomSpringSocialConfigurer.java (SpringSocialConfigurer 的实现类)
/**
 * @author: hblolj
 * @Date: 2019/3/18 14:07
 * @Description:
 * @Version:
 **/
public class CustomSpringSocialConfigurer extends SpringSocialConfigurer{

    // 自定义 SocialAuthenticationFilter 拦截的 Url
    private String filterProcessesUrl;

    public CustomSpringSocialConfigurer(String filterProcessesUrl) {
        this.filterProcessesUrl = filterProcessesUrl;
    }

    @Override
    protected <T> T postProcess(T object) {

        SocialAuthenticationFilter filter = (SocialAuthenticationFilter) super.postProcess(object);

        filter.setFilterProcessesUrl(filterProcessesUrl);

        return (T) filter;
    }
}
绑定、解绑的使用
我们目前的绑定只能通过自动注册、自定义注册页面注册的动作来完成。但是在我们的实际需求中,可能在用户的个人信息页面,支持用户灵活的绑定或解绑定第三方账号。那么这些操作在 SpringSocial 中是怎么实现的呢?
首先通过前面的分析,我们应该知道绑定、解绑的核心是对我们系统中用户账号与对应的第三方系统中用户账号的关联关系的建立与消除。他有两个前置条件:
- 用户在当前系统已经登录了
- 用户通过第三方系统登录获取到在第三方系统上的唯一标识
在 SpringSocial 的 官网 上,我们可以看到它提供了一个 ConnectController 控制器,用来负责将用户引导服务提供商进行授权,并在授权后响应回调,协调应用程序与服务商之前的连接关系(绑定、解绑)。
我们看一下它的源码,里面具体方法就不一个一个去看了,主要结合注释与方法源码,把总结出来的结果说一下:
// ConnectController.java
/**
 * Generic UI controller for managing the account-to-service-provider connection flow.
 * <ul>
 * <li>GET /connect/{providerId}  - Get a web page showing connection status to {providerId}.</li>
 * <li>POST /connect/{providerId} - Initiate an connection with {providerId}.</li>
 * <li>GET /connect/{providerId}?oauth_verifier||code - Receive {providerId} authorization callback and establish the connection.</li>
 * <li>DELETE /connect/{providerId} - Disconnect from {providerId}.</li>
 * </ul>
 * @author Keith Donald
 * @author Craig Walls
 * @author Roy Clarkson
 */
@Controller
@RequestMapping("/connect")
public class ConnectController implements InitializingBean {
	.........
}
通过上面的注释与对应方法的源码,最后总结如下
- ConnectController
- 接收回调与现实绑定与解绑结果
- Get /connect/{providerId}
- 根据获取到的用户是否存在 connectio
- 存在: 跳转到 connect/{providerId}Connected
- 不存在: 跳转到 connect/{providerId}Connect
- 根据获取到的用户是否存在 connectio
- Get /connect/{providerId}
- 绑定
- Post /connect/{providerId}
- 引导用户到 Service Provider 授权,回调回来访问 Get /connect/{providerId}
- Post /connect/{providerId}
- 解绑
- Delete /connect/{providerId}
- 解绑后,redirect 到 Get /connect/{providerId}
- Delete /connect/{providerId}
- 查看当前用户绑定状态
- Get /connect
- 跳转到 connect/status
- Get /connect
- 接收回调与现实绑定与解绑结果
从上面的分析结果,我们需要自定义一些 View 来承载与实现上面的结果。
下面示例代码中的 callback 是 providerId
/**
 * 可以自定义一个名称为 qqConnectedView 的 Bean 来覆盖此默认实现
 * callbackConnect 是解绑成功
 * @return
 */
@Bean({"connect/callbackConnect"})
@ConditionalOnMissingBean(name = "qqConnectView")
public View qqConnectView(){
    return new CustomConnectionView();
}

/**
 * callbackConnected 是绑定成功
 * @return
 */
@Bean({"connect/callbackConnected"})
@ConditionalOnMissingBean(name = "qqConnectedView")
public View qqConnectedView(){
    return new CustomConnectionView();
}
// CustomConnectionView.java (自定义视图类,用来返回用户绑定、解绑结果)
/**
 * @author: hblolj
 * @Date: 2019/3/19 17:31
 * @Description:
 * @Version:
 **/
@Slf4j
public class CustomConnectionView extends AbstractView{

    @Override
    protected void renderMergedOutputModel(Map<String, Object> model, HttpServletRequest httpServletRequest, HttpServletResponse httpServletResponse) throws Exception {

        httpServletResponse.setContentType("text/html;charset=UTF-8");

        if (model.get("connections") == null){
            // 从数据库中查询该用户与对应的 providerId 已经没有关联关系了
            httpServletResponse.getWriter().write("<h3>解绑成功</h3>");
        }else {
            // 从数据库中查询出该用户与对应的 providerId 任然存在关联关系
            httpServletResponse.getWriter().write("<h3>绑定成功</h3>");
        }
    }
}
// CustomConnectionStatusView.java (自定义视图类,用来查询返回用户当前第三方服务商的绑定情况)
/**
 * @author: hblolj
 * @Date: 2019/3/19 17:02
 * @Description:
 * @Version:
 **/
@Component("connect/status")
public class CustomConnectionStatusView extends AbstractView{

    @Autowired
    private ObjectMapper objectMapper;

    /**
     * 查询出当前用户在系统中的第三方服务的绑定的绑定情况
     * @param model
     * @param httpServletRequest
     * @param httpServletResponse
     * @throws Exception
     */
    @Override
    protected void renderMergedOutputModel(Map<String, Object> model, HttpServletRequest httpServletRequest, HttpServletResponse httpServletResponse) throws Exception {

//        model.addAttribute("providerIds", this.connectionFactoryLocator.registeredProviderIds());
//        model.addAttribute("connectionMap", connections);

        // 获取到用户在当前系统中所有第三方登录关联记录
        Map<String, List<Connection<?>>> connections = (Map<String, List<Connection<?>>>) model.get("connectionMap");
        Map<String, Boolean> result = new HashMap<>();
        for (String key : connections.keySet()) {
            result.put(key, org.apache.commons.collections.CollectionUtils.isNotEmpty(connections.get(key)));
        }

        httpServletResponse.setContentType("application/json;charset=UTF-8");
        httpServletResponse.getWriter().write(objectMapper.writeValueAsString(result));
    }
}
设置 SocialAuthenticationFilter 的拦截 Url
- 在自定义 CustomSpringSocialConfigurer 时注入,上面已经实现
登录成功的跳转页面设置
- 在构造 customSocialSecurityConfig 时设置,上面已经实现


 350


 扫一扫


 被折叠的 条评论
为什么被折叠?
 到【灌水乐园】发言


