


 本文深入探讨了webpack核心组件Tapable的工作原理,详细分析了不同类型的Hook及其应用场景,包括SyncHook、BailHook、WaterfallHook和LoopHook等。通过代码生成和执行流程的解析,揭示了Tapable如何提升事件驱动型应用的执行效率。

桔妹导读:在上一期的总览中,我们介绍了 webpack 整体的编译过程,那么这次就来分析下基础的 Tapable。如有疑问或想要交流,欢迎在文末留言。
1.
概述
在webpack 整个编译过程中暴露出来大量的 Hook 供内部/外部插件使用,同时支持扩展各种插件,而内部处理的代码,也依赖于 Hook 和插件,这部分的功能就依赖于 Tapable。webpack 的整体执行过程,总的来看就是事件驱动的。从一个事件,走向下一个事件。Tapable 用来提供各种类型的 Hook。我们通过下面一个直观的使用例子,初步认识一下 Tapable:
const {
  SyncHook
} = require('tapable')


// 创建一个同步 Hook,指定参数
const hook = new SyncHook(['arg1', 'arg2'])


// 注册
hook.tap('a', function (arg1, arg2) {
  console.log('a')
})


hook.tap('b', function (arg1, arg2) {
  console.log('b')
})


hook.call(1, 2)
看起来起来功能和 EventEmit 类似,先注册事件,然后触发事件。不过 Tapable 的功能要比 EventEmit 强大。从官方介绍中,可以看到 Tapable 提供了很多类型的 Hook,分为同步和异步两个大类(异步中又区分异步并行和异步串行),而根据事件执行的终止条件的不同,由衍生出 Bail/Waterfall/Loop 类型。
下图展示了每种类型的作用:
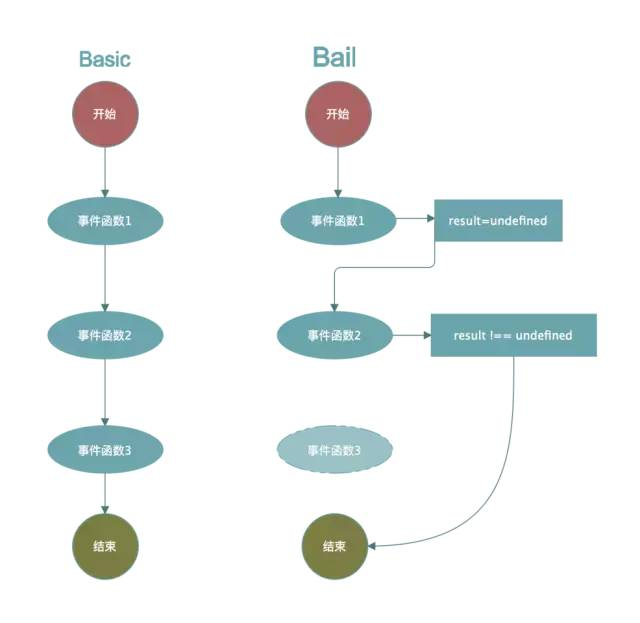
BasicHook:执行每一个,不关心函数的返回值,有 SyncHook、AsyncParallelHook、AsyncSeriesHook。
我们平常使用的 eventEmit 类型中,这种类型的钩子是很常见的。
BailHook: 顺序执行 Hook,遇到第一个结果 result !== undefined 则返回,不再继续执行。有:SyncBailHook、AsyncSeriseBailHook, AsyncParallelBailHook。
什么样的场景下会使用到 BailHook 呢?设想如下一个例子:假设我们有一个模块 M,如果它满足 A 或者 B 或者 C 三者任何一个条件,就将其打包为一个单独的。这里的 A、B、C 不存在先后顺序,那么就可以使用 AsyncParallelBailHook 来解决:
x.hooks.拆分模块的Hook.tap('A', () => {
   if (A 判断条件满足) {
     return true
   }
 })
 x.hooks.拆分模块的Hook.tap('B', () => {
   if (B 判断条件满足) {
     return true
   }
 })
 x.hooks.拆分模块的Hook.tap('C', () => {
   if (C 判断条件满足) {
     return true
   }
 })
如果 A 中返回为 true,那么就无须再去判断 B 和 C。但是当 A、B、C 的校验,需要严格遵循先后顺序时,就需要使用有顺序的 SyncBailHook(A、B、C 是同步函数时使用) 或者 AsyncSeriseBailHook(A、B、C 是异步函数时使用)。
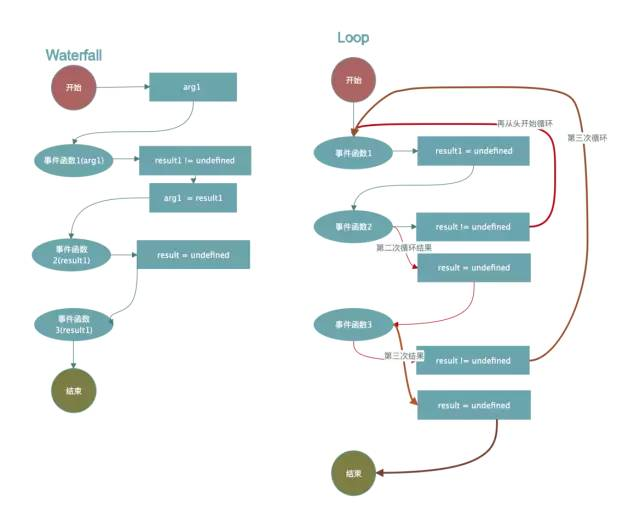
WaterfallHook: 类似于 reduce,如果前一个 Hook 函数的结果 result !== undefined,则 result 会作为后一个 Hook 函数的第一个参数。既然是顺序执行,那么就只有 Sync 和 AsyncSeries 类中提供这个Hook:SyncWaterfallHook,AsyncSeriesWaterfallHook
当一个数据,需要经过 A,B,C 三个阶段的处理得到最终结果,并且 A 中如果满足条件 a 就处理,否则不处理,B 和 C 同样,那么可以使用如下:
x.hooks.tap('A', (data) => {
   if (满足 A 需要处理的条件) {
     // 处理数据 data
     return data
   } else {
     return
   }
 })
x.hooks.tap('B', (data) => {
   if (满足B需要处理的条件) {
     // 处理数据 data
     return data
   } else {
     return
   }
 })
 x.hooks.tap('C', (data) => {
   if (满足 C 需要处理的条件) {
     // 处理数据 data
     return data
   } else {
     return
   }
 })
LoopHook: 不停的循环执行 Hook,直到所有函数结果 result === undefined。同样的,由于对串行性有依赖,所以只有 SyncLoopHook 和 AsyncSeriseLoopHook (PS:暂时没看到具体使用 Case)
2.
原理
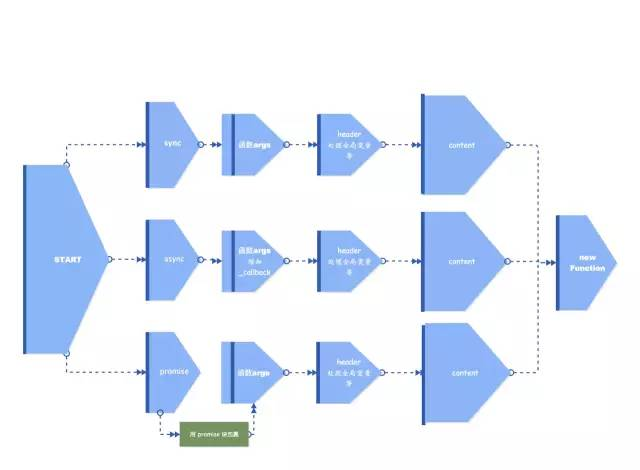
我们先给出 Tapable 代码的主脉络:
hook 事件注册 ——> hook 触发 ——> 生成 hook 执行代码 ——> 执行
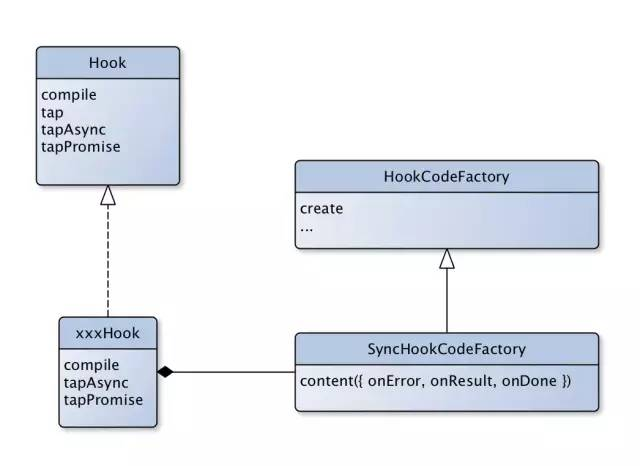
hook 类关系图很简单,各种 hook 都继承自一个基本的 Hook 抽象类,同时内部包含了一个 xxxCodeFactory 类,会在生成 hook 执行代码中用到。
▍事件注册
Tapable 基本逻辑是,先通过类实例的 tap 方法注册对应 Hook 的处理函数:
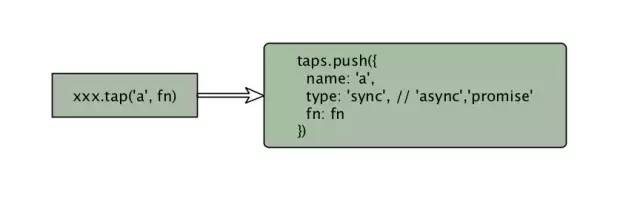
Tapable 提供了 tap/tapAsync/tapPromise 这三个注册事件的方法(实现逻辑在 Hook 基类中),分别针对同步(tap)/异步(tapAsync/tapPromise),对要 push 到 taps 中的内容赋给不一样的 type 值,如上图所示。
对于 SyncHook, SyncBailHook, SyncLoopHook, SyncWaterfallHook 这四个同步类型的 Hook, 则会覆写基类中 tapAsync 和 tapPromise 方法,防止使用者在同步 Hook 中误用异步方法。
tapAsync() {throw new Error("tapAsync is not supported on a SyncHook"); } tapPromise() {throw new Error("tapPromise is not supported on a SyncHook"); }
▍事件触发
与 tap/tapAsync/tapPromise 相对应的,Tapable 中提供了三种触发事件的方法 call/callAsync/promise。这三这方法也位于基类 Hook 中,具体逻辑如下:
this.call = this._call = this._createCompileDelegate("call", "sync");this.promise = this._promise = this._createCompileDelegate("promise", "promise");this.callAsync = this._callAsync = this._createCompileDelegate("callAsync", "async");   // ..._createCall(type) {return this.compile({taps: this.taps,interceptors: this.interceptors,args: this._args,type: type  });}
_createCompileDelegate(name, type) {const lazyCompileHook = (...args) => {this[name] = this._createCall(type);return this[name](...args);  };return lazyCompileHook;}
无论是 call, 还是 callAsync 和 promise,最终都会调用到 compile 方法,再此之前,其区别就是 compile 中所传入的 type 值的不同。而 compile 根据不同的 type 类型生成了一个可执行函数,然后执行该函数。
注意上面代码中有一个变量名称 lazyCompileHook,懒编译。当我们 new Hook 的时候,其实会先生成了 promise, call, callAsync 对应的 CompileDelegate 代码,其实际的结构是:
this.call = (...args) => {this[name] = this._createCall('sync');return this['call'](...args);}this.promise = (...args) => {this[name] = this._createCall('promise');return this['promise'](...args);}this.callAsync = (...args) => {this[name] = this._createCall('async');return this['callAsync'](...args);}
当在触发 hook 时,比如执行 xxhook.call() 时,才会编译出对应的执行函数。这个过程就是所谓的“懒编译”,即用的时候才编译,已达到最优的执行效率。
接下来我们主要看 compile 的逻辑,这块也是 Tapable 中大部分的逻辑所在。
▍执行代码生成
在看源码之前,我们可以先写几个简单的 demo,看一下 Tapable 最终生成了什么样的执行代码,来直观感受一下:
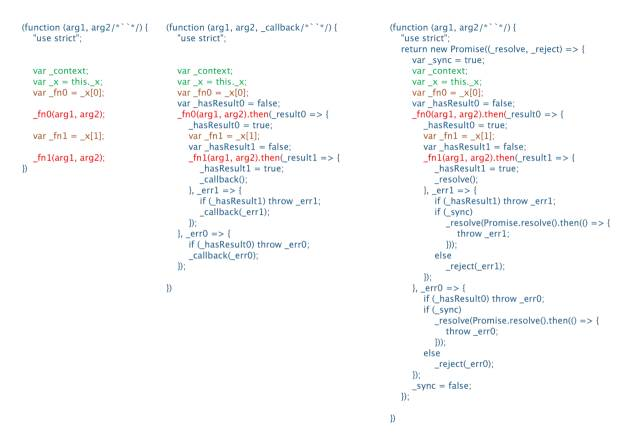
上图分别是 SyncHook.call, AsyncSeriesHook.callAsync 和AsyncSeriesHook.promise 生成的代码。_x 中保存了注册的事件函数,_fn${index} 则是每一个函数的执行,而生成的代码中根据不同的 Hook 以及以不同的调用方式, _fn${index} 会有不同的执行方式。这些差异是如何通过代码生成的呢?我们来细看 compile 方法。
compile 这个方法在基类中并没有实现,其实现位于派生出来的各个类中。以 SyncHook 为例,看一下:
class SyncHookCodeFactory extends HookCodeFactory {  content({ onError, onResult, onDone, rethrowIfPossible }) {return this.callTapsSeries({onError: (i, err) => onError(err),      onDone,      rethrowIfPossible    });  }}
const factory = new SyncHookCodeFactory();
class SyncHook extends Hook {   // ... 省略其他代码  compile(options) {    factory.setup(this, options);return factory.create(options);  }}
这里生成可执行代码使用了工厂模式:HookCodeFactory 是一个用来生成代码的工厂基类,每一个 Hook 中派生出一个子类。所有的 Hook 中 compile 都调用到了 create 方法。先来看一下这个 create 方法做了什么。
create(options) {this.init(options);switch(this.options.type) {case "sync":return new Function(this.args(), "\"use strict\";\n" + this.header() + this.content({onError: err => `throw ${err};\n`,onResult: result => `return ${result};\n`,onDone: () => "",rethrowIfPossible: true }));case "async":return new Function(this.args({after: "_callback" }), "\"use strict\";\n" + this.header() + this.content({onError: err => `_callback(${err});\n`,onResult: result => `_callback(null, ${result});\n`,onDone: () => "_callback();\n" }));case "promise":let code = ""; code += "\"use strict\";\n"; code += "return new Promise((_resolve, _reject) => {\n"; code += "var _sync = true;\n"; code += this.header(); code += this.content({onError: err => {let code = ""; code += "if(_sync)\n"; code += `_resolve(Promise.resolve().then(() => { throw ${err}; }));\n`; code += "else\n"; code += `_reject(${err});\n`;return code; },onResult: result => `_resolve(${result});\n`,onDone: () => "_resolve();\n" }); code += "_sync = false;\n"; code += "});\n";return new Function(this.args(), code); }}
乍一看代码有点多,简化一下,画个图,就是下面的流程:
由此可以看到,create 中只实现了代码的主模板,实现了公共的部分(函数参数和函数一开始的公共参数),然后留出差异的部分 content,交给各个子类来实现。然后横向对比一下各个 Hook 中继承自 HookCodeFactory 的子 CodeFactory,看一下 content 的实现差异:
//syncHookclass SyncHookCodeFactory extends HookCodeFactory { content({ onError, onResult, onDone, rethrowIfPossible }) {return this.callTapsSeries({onError: (i, err) => onError(err), onDone, rethrowIfPossible }); }}//syncBailHookcontent({ onError, onResult, onDone, rethrowIfPossible }) {return this.callTapsSeries({onError: (i, err) => onError(err),onResult: (i, result, next) => `if(${result} !== undefined) {\n${onResult(result)};\n} else {\n${next()}}\n`, onDone, rethrowIfPossible });}//AsyncSeriesLoopHookclass AsyncSeriesLoopHookCodeFactory extends HookCodeFactory { content({ onError, onDone }) {return this.callTapsLooping({onError: (i, err, next, doneBreak) => onError(err) + doneBreak(true), onDone }); }}// 其他的结构都类似,便不在这里贴代码了
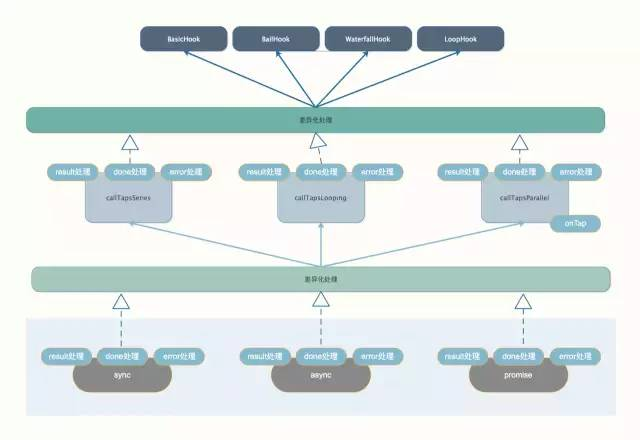
可以看到,在所有的子类中,都实现了 content 方法,根据不同钩子执行流程的不同,调用了 callTapsSeries/callTapsParallel/callTapsLooping 并且会有 onError, onResult, onDone, rethrowIfPossible 这四中情况下的代码片段。
callTapsSeries/callTapsParallel/callTapsLooping 都在基类的方法中,这三个方法中都会走到一个 callTap 的方法。先看一下 callTap 方法。代码比较长,不想看代码的可以直接看后面的图。
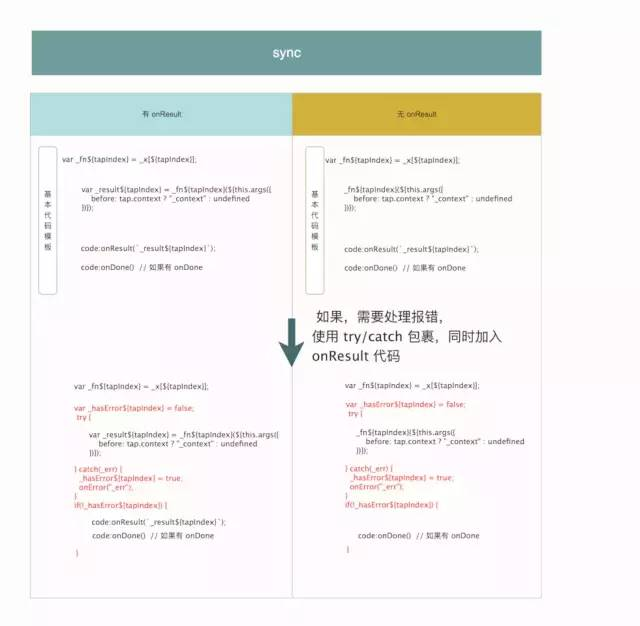
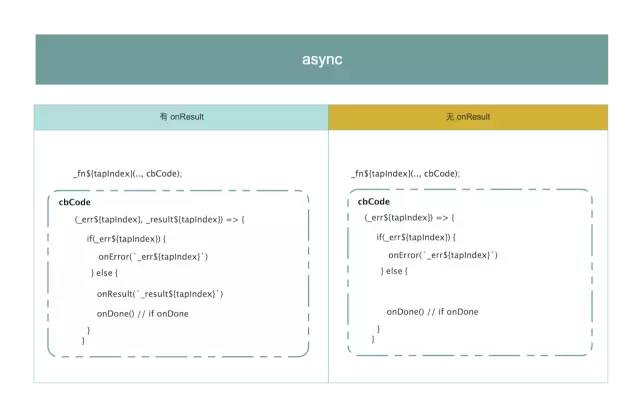
callTap(tapIndex, { onError, onResult, onDone, rethrowIfPossible }) {let code = "";let hasTapCached = false;// 这里的 interceptors 先忽略for(let i = 0; i < this.options.interceptors.length; i++) {const interceptor = this.options.interceptors[i];if(interceptor.tap) {if(!hasTapCached) { code += `var _tap${tapIndex} = ${this.getTap(tapIndex)};\n`; hasTapCached = true; } code += `${this.getInterceptor(i)}.tap(${interceptor.context ? "_context, " : ""}_tap${tapIndex});\n`; } } code += `var _fn${tapIndex} = ${this.getTapFn(tapIndex)};\n`;const tap = this.options.taps[tapIndex];switch(tap.type) {case "sync":if(!rethrowIfPossible) { code += `var _hasError${tapIndex} = false;\n`; code += "try {\n"; }if(onResult) { code += `var _result${tapIndex} = _fn${tapIndex}(${this.args({ before: tap.context ? "_context" : undefined })});\n`; } else { code += `_fn${tapIndex}(${this.args({ before: tap.context ? "_context" : undefined })});\n`; }if(!rethrowIfPossible) { code += "} catch(_err) {\n"; code += `_hasError${tapIndex} = true;\n`; code += onError("_err"); code += "}\n"; code += `if(!_hasError${tapIndex}) {\n`; }if(onResult) { code += onResult(`_result${tapIndex}`); }if(onDone) { code += onDone(); }if(!rethrowIfPossible) { code += "}\n"; }break;case "async":let cbCode = "";if(onResult) cbCode += `(_err${tapIndex}, _result${tapIndex}) => {\n`;else cbCode += `_err${tapIndex} => {\n`; cbCode += `if(_err${tapIndex}) {\n`; cbCode += onError(`_err${tapIndex}`); cbCode += "} else {\n";if(onResult) { cbCode += onResult(`_result${tapIndex}`); }if(onDone) { cbCode += onDone(); } cbCode += "}\n"; cbCode += "}"; code += `_fn${tapIndex}(${this.args({ before: tap.context ? "_context" : undefined, after: cbCode })});\n`;break;case "promise": code += `var _hasResult${tapIndex} = false;\n`; code += `_fn${tapIndex}(${this.args({ before: tap.context ? "_context" : undefined })}).then(_result${tapIndex} => {\n`; code += `_hasResult${tapIndex} = true;\n`;if(onResult) { code += onResult(`_result${tapIndex}`); }if(onDone) { code += onDone(); } code += `}, _err${tapIndex} => {\n`; code += `if(_hasResult${tapIndex}) throw _err${tapIndex};\n`; code += onError(`_err${tapIndex}`); code += "});\n";break; }return code;}
也是对应的分成 sync/async/promise ,上面代码翻译成图,如下
sync 类型:
async 类型:
promise 类型
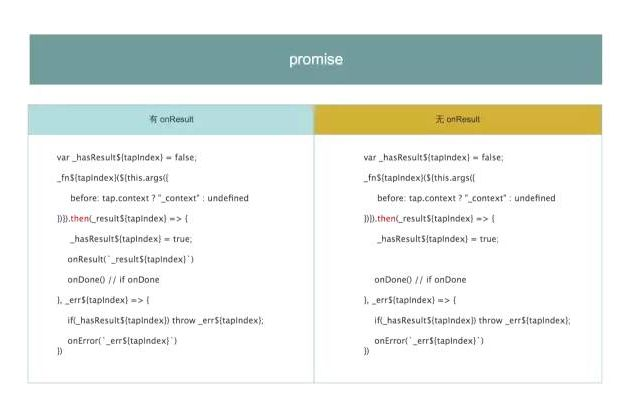
总的来看, callTap 内是一次函数执行的模板,也是根据调用方式的不同,分为 sync/async/promise 三种。
然后看 callTapsSeries 方法:
callTapsSeries({ onError, onResult, onDone, rethrowIfPossible }) {if(this.options.taps.length === 0)return onDone();const firstAsync = this.options.taps.findIndex(t => t.type !== "sync");const next = i => {if(i >= this.options.taps.length) {return onDone(); }const done = () => next(i + 1);const doneBreak = (skipDone) => {if(skipDone) return "";return onDone(); }return this.callTap(i, {onError: error => onError(i, error, done, doneBreak),// onResult 和 onDone 的判断条件,就是说有 onResult 或者 onDone onResult: onResult && ((result) => {return onResult(i, result, done, doneBreak); }),onDone: !onResult && (() => {return done(); }),rethrowIfPossible: rethrowIfPossible && (firstAsync < 0 || i < firstAsync) }); };return next(0);}
注意看 this.callTap 中 onResult 和 onDone 的条件,就是说要么执行 onResult, 要么执行 onDone。先看简单的直接走 onDone 的逻辑。那么结合上面 callTap 的流程,以 sync 为例,可以得到下面的图:
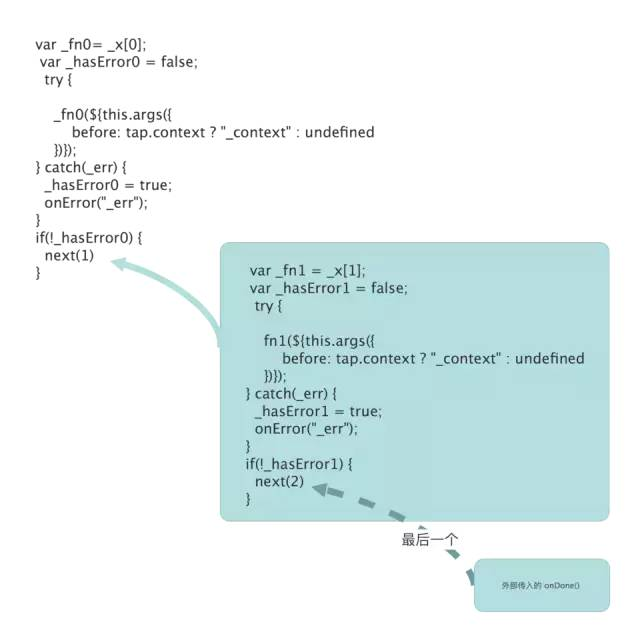
对于这种情况,callTapsSeries 的结果是递归的生成每一次的调用 code,直到最后一个时,直接调用外部传入的 onDone 方法得到结束的 code, 递归结束。而对于执行 onResult 的流程,看一下 onResult 代码:return onResult(i, result, done, doneBreak)。简单理解,和上面图中流程一样的,只不过在 done 的外面用 onResult 包裹了一层关于 onResult 的逻辑。
接着我们看 callTapsLooping 的代码:
callTapsLooping({ onError, onDone, rethrowIfPossible }) {if(this.options.taps.length === 0)return onDone();const syncOnly = this.options.taps.every(t => t.type === "sync");let code = "";if(!syncOnly) { code += "var _looper = () => {\n"; code += "var _loopAsync = false;\n"; }// 在代码开始前加入 do 的逻辑 code += "var _loop;\n"; code += "do {\n"; code += "_loop = false;\n";// interceptors 先忽略,只看主要部分for(let i = 0; i < this.options.interceptors.length; i++) {const interceptor = this.options.interceptors[i];if(interceptor.loop) { code += `${this.getInterceptor(i)}.loop(${this.args({ before: interceptor.context ? "_context" : undefined })});\n`; } } code += this.callTapsSeries({ onError,onResult: (i, result, next, doneBreak) => {let code = ""; code += `if(${result} !== undefined) {\n`; code += "_loop = true;\n";if(!syncOnly) code += "if(_loopAsync) _looper();\n"; code += doneBreak(true); code += `} else {\n`; code += next(); code += `}\n`;return code; },onDone: onDone && (() => {let code = ""; code += "if(!_loop) {\n"; code += onDone(); code += "}\n";return code; }),rethrowIfPossible: rethrowIfPossible && syncOnly }) code += "} while(_loop);\n";if(!syncOnly) { code += "_loopAsync = true;\n"; code += "};\n"; code += "_looper();\n"; }return code;}
先简化到最简单的逻辑就是下面这段,很简单的 do/while 逻辑。
var _loopdo { _loop = false // callTapsSeries 生成中间部分代码} while(_loop)
callTapsSeries 前面了解了其代码,这里调用 callTapsSeries 时,有 onResult 逻辑,也就是说中间部分会生成类似下面的代码(仍是以 sync 为例)
var _fn${tapIndex} = _x[${tapIndex}];var _hasError${tapIndex} = false;  try {
    fn1(${this.args({        before: tap.context ? "_context" : undefined    })});} catch(_err) {  _hasError${tapIndex} = true;  onError("_err");}if(!_hasError${tapIndex}) {   // onResult 中生成的代码   if(${result} !== undefined) {    _loop = true;    // doneBreak 位于 callTapsSeries 代码中    //(skipDone) => {    //    if(skipDone) return "";    //    return onDone();    //  }    doneBreak(true); // 实际为空语句  } else {    next()  }}
通过在 onResult 中控制函数执行完成后到执行下一个函数之间,生成代码的不同,就从 callTapsSeries 中衍生出了 LoopHook 的逻辑。
然后我们看 callTapsParallel:
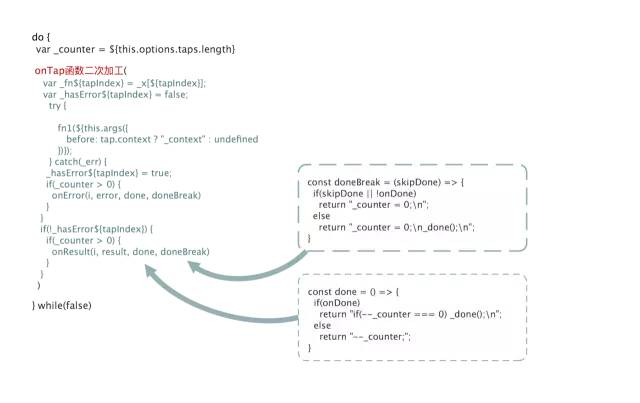
callTapsParallel({ onError, onResult, onDone, rethrowIfPossible, onTap = (i, run) => run() }) {if(this.options.taps.length <= 1) {return this.callTapsSeries({ onError, onResult, onDone, rethrowIfPossible }) }let code = ""; code += "do {\n"; code += `var _counter = ${this.options.taps.length};\n`;if(onDone) { code += "var _done = () => {\n"; code += onDone(); code += "};\n"; }for(let i = 0; i < this.options.taps.length; i++) {const done = () => {if(onDone)return "if(--_counter === 0) _done();\n";elsereturn "--_counter;"; };const doneBreak = (skipDone) => {if(skipDone || !onDone)return "_counter = 0;\n";elsereturn "_counter = 0;\n_done();\n"; } code += "if(_counter <= 0) break;\n"; code += onTap(i, () => this.callTap(i, {onError: error => {let code = ""; code += "if(_counter > 0) {\n"; code += onError(i, error, done, doneBreak); code += "}\n";return code; },onResult: onResult && ((result) => {let code = ""; code += "if(_counter > 0) {\n"; code += onResult(i, result, done, doneBreak); code += "}\n";return code; }),onDone: !onResult && (() => {return done(); }), rethrowIfPossible }), done, doneBreak); } code += "} while(false);\n";return code;}
由于 callTapsParallel 最终生成的代码是并发执行的,那么代码流程就和两个差异较大。上面代码看起来较多,捋一下主要结构,其实就是下面的图(仍是以 sync 为例)
总结一下 callTap 中实现了 sync/promise/async 三种基本的一次函数执行的模板,同时将涉及函数执行流程的代码 onError/onDone/onResult 部分留出来。而 callTapsSeries/callTapsLooping/callTapsParallel 中,通过传入不同的 onError/onDone/onResult 实现出不同流程的模板。不过 callTapsParallel 由于差异较大,通过在 callTap 外包裹一层 onTap 函数,对生成的结果进行再次加工。
到此,我们得到了 series/looping/parallel 三大类基础模板。我们注意到,callTapsSeries/callTapsLooping/callTapsParallel 中同时也暴露出了自己的 onError, onResult, onDone, rethrowIfPossible, onTap,由此来实现每个子 Hook 根据不同情况对基础模板进行定制。以 SyncBailHook 为例,它和 callTapsSeries 得到的基础模板的主要区别在于函数执行结束时机不同。因此对于 SyncBailHook 来说,修改 onResult 即可达到目的:
class SyncBailHookCodeFactory extends HookCodeFactory { content({ onError, onResult, onDone, rethrowIfPossible }) {return this.callTapsSeries({ onError: (i, err) => onError(err), // 修改一下 onResult,如果 函数执行得到的 result 不为 undefined 则直接返回结果,否则继续执行下一个函数 onResult: (i, result, next) => `if(${result} !== undefined) {\n${onResult(result)};\n} else {\n${next()}}\n`, onDone, rethrowIfPossible }); }}
最后我们来用一张图,整体的总结一下 compile 部分生成最终执行代码的思路:总结出通用的代码模板,将差异化部分拆分到函数中并且暴露给外部来实现。
3.
总结
相比于简单的 EventEmit 来说,Tapable 作为 webpack 底层事件流库,提供了丰富的事件。而最终事件触发后的执行,是先动态生成执行的 code,然后通过 new Function 来执行。
相比于我们平时直接遍历或者递归的调用每一个事件来说,这种执行方法效率上来说相对更高效。虽然平时写代码时,对于一个循环,是拆开来写每一个还是直接 for 循环,在效率上来说看不出什么,但是对 webpack 来说,由于其整体是由事件机制推动,内部存在大量这样的逻辑。那么这种拆开来直接执行每一个函数的方式,便可看出其优势所在。
本文作者
▬

崔 静
滴滴 | 高级软件开发工程师
2015年,因为颜控,掉入前端深坑无法自拔,也是同年加入滴滴,正式踏上前端之路。喜欢技术和挑战,爱潜水,要做一条徜徉大海的前端鱼。
同时:我们的团队正在招聘高级/资深前端开发工程师,欢迎投递简历至:cuijing@didiglobal.com。
推荐阅读
▬


更多推荐
▬
滴滴开源 / Open Source
Mpx | Booster | Chameleon | DDMQ | DroidAssist | Rdebug | Doraemonkit | Kemon | Mand Moblie | virtualApk | 获取更多项目
技术干货 / Recommended article
深度解密 Go 语言:关于 interface 的 10 个问题 | 滴滴宋世君:DS(数据分析师),究竟是做什么的? | 一个 Golang 项目的测试实践全记录 | 阅读更多内容


 1073
1073

 被折叠的 条评论
为什么被折叠?
被折叠的 条评论
为什么被折叠?
 到【灌水乐园】发言


