


 本文介绍了Spring框架中bean的配置方法,包括别名配置、bean的创建以及如何通过import导入多个配置文件。通过示例代码展示了如何在beans.xml中定义bean、设置别名以及在主配置文件中导入多个子配置,便于团队开发中管理对象。
一、闲话
哈哈哈,spring确实有趣,设计这些框架的是真的牛,更不用说那些创造开发语言的大牛了
二、配置说明
1、别名alias
<?xml version="1.0" encoding="UTF-8"?>
<beans xmlns="http://www.springframework.org/schema/beans"
       xmlns:xsi="http://www.w3.org/2001/XMLSchema-instance"
       xsi:schemaLocation="http://www.springframework.org/schema/beans
       http://www.springframework.org/schema/beans/spring-beans.xsd">

    <bean id="hello2" class="com.decade.pojo.Hello2">
    	<constructor-arg ref="hello"/>
    	<constructor-arg name="name" value="decades2"/>
    </bean>

    <alias name="hello2" alias="helloAlias"/>
</beans>
经过别名的配置后,我们程序中使用helloAlias也可以取到相应的对象
import com.decade.pojo.Hello2;
import org.springframework.context.ApplicationContext;
import org.springframework.context.support.ClassPathXmlApplicationContext;

public class MyTest {
    public static void main(String[] args) {
        // 获取spring的IOC容器
        ApplicationContext context = new ClassPathXmlApplicationContext("beans.xml");

        // 我们创建的对象都在spring中,我们需要使用这些对象就需要去上下文中获取
        Hello2 hello = (Hello2) context.getBean("hello2");

		// 使用别名也可以获取到对应的对象
        Hello2 hello2 = (Hello2) context.getBean("helloAlias");
        System.out.println("对象的name属性值为=====" + hello);
    }
}
2、Bean的配置
<?xml version="1.0" encoding="UTF-8"?>
<beans xmlns="http://www.springframework.org/schema/beans"
       xmlns:xsi="http://www.w3.org/2001/XMLSchema-instance"
       xsi:schemaLocation="http://www.springframework.org/schema/beans
       http://www.springframework.org/schema/beans/spring-beans.xsd">

    <!-- 使用spring来创建对象,在spring中这些对象都称为bean
     原先创建对象的方式为    类型  变量名 = new 类型()
     创建一个Hello对象就是  Hello hello = new Hello()
     这里我们使用bean容器进行对象的创建,所以这里
     id = 变量名
     class = 类型
     name="alias,al2" 这里的name是bean的别名配置项,程序通过alias或al2都可以获取到这个对象
     property = 对象的属性,并且可以通过name和value对其赋值
     -->
    <bean id="hello" class="com.decade.pojo.Hello" name="alias,al2">
        <property name="name" value="decade"/>
    </bean>
</beans>
更多配置可参考我的另外一篇博客:Spring—DI依赖注入
3、import
这个配置一般用于团队开发,它可以将多个配置文件导入合并为一个
假如我们的团队每个人都开发不同的类,然后我们注册到了不同的配置文件中,这样我们就可以使用import将所有人的beans.xml合并到一个总的XML文件中,id重名的对象会被合并
假若我创建的配置文件命名为beans.xml
<?xml version="1.0" encoding="UTF-8"?>
<beans xmlns="http://www.springframework.org/schema/beans"
       xmlns:xsi="http://www.w3.org/2001/XMLSchema-instance"
       xsi:schemaLocation="http://www.springframework.org/schema/beans
       http://www.springframework.org/schema/beans/spring-beans.xsd">

    <bean id="hello" class="com.decade.pojo.Hello">
        <property name="name" value="decade"/>
    </bean>

    <bean id="hello2" class="com.decade.pojo.Hello2">
        <constructor-arg ref="hello"/>
        <constructor-arg name="name" value="decades2"/>
    </bean>

    <alias name="hello2" alias="helloAlias"/>
</beans>
那么在项目组中就可以创建一个applicationContext.xml来引入我的配置文件
<?xml version="1.0" encoding="UTF-8"?>
<beans xmlns="http://www.springframework.org/schema/beans"
       xmlns:xsi="http://www.w3.org/2001/XMLSchema-instance"
       xsi:schemaLocation="http://www.springframework.org/schema/beans
       http://www.springframework.org/schema/beans/spring-beans.xsd">

    <import resource="beans.xml"/>
</beans>
我们程序中就可以直接从这个总的xml配置文件获取对象啦
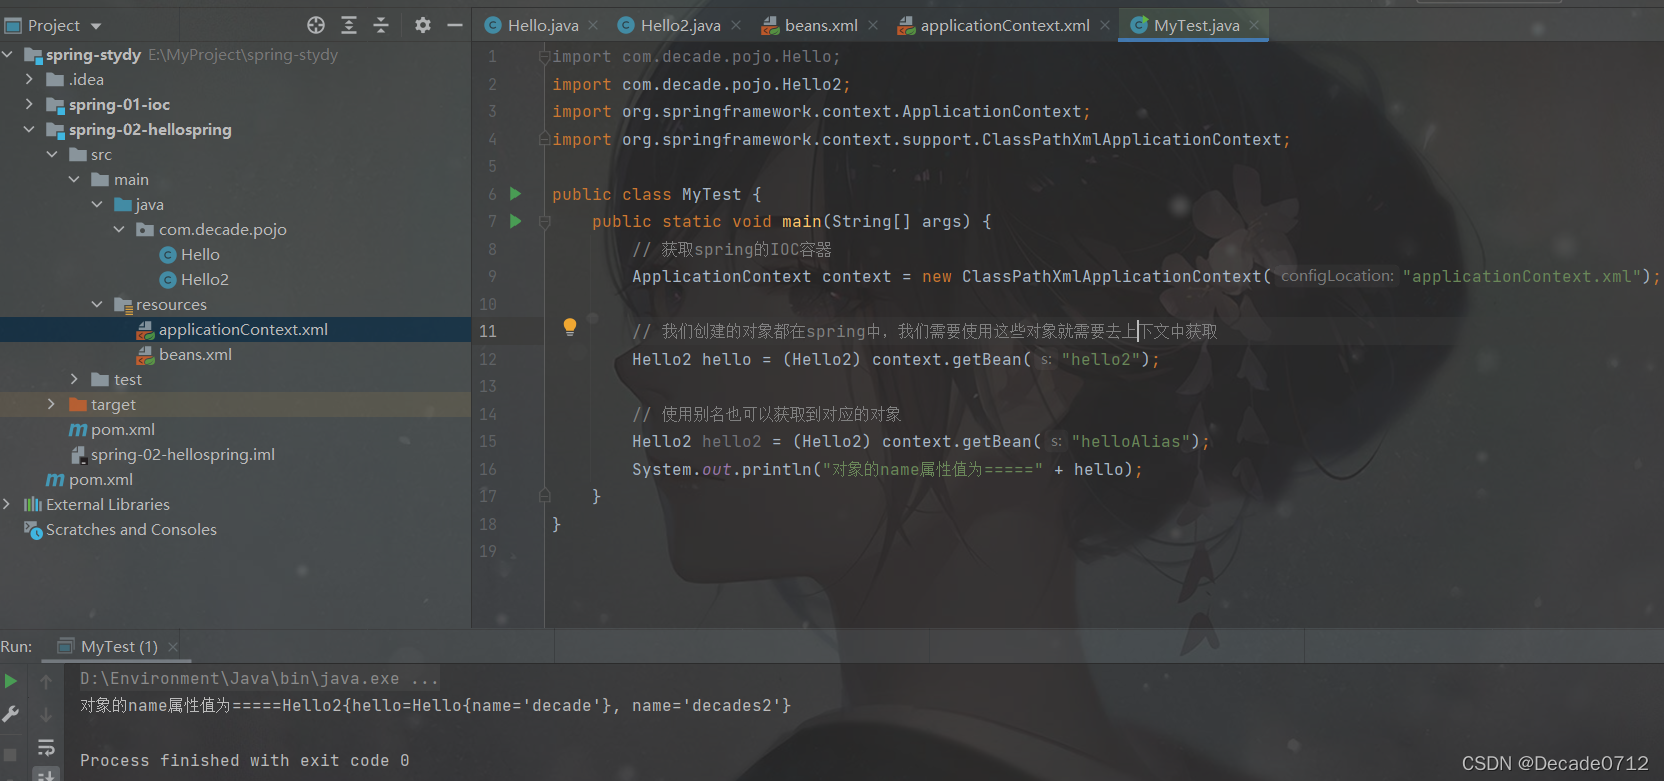
import com.decade.pojo.Hello2;
import org.springframework.context.ApplicationContext;
import org.springframework.context.support.ClassPathXmlApplicationContext;

public class MyTest {
    public static void main(String[] args) {
        // 获取spring的IOC容器
        ApplicationContext context = new ClassPathXmlApplicationContext("applicationContext.xml");

        // 我们创建的对象都在spring中,我们需要使用这些对象就需要去上下文中获取
        Hello2 hello = (Hello2) context.getBean("hello2");

        // 使用别名也可以获取到对应的对象
        Hello2 hello2 = (Hello2) context.getBean("helloAlias");
        System.out.println("对象的name属性值为=====" + hello);
    }
}
运行结果如下
如有错误,欢迎指正


 983
983

 被折叠的 条评论
为什么被折叠?
被折叠的 条评论
为什么被折叠?
 到【灌水乐园】发言


