


 本文介绍了事务的四大特性ACID,并详细讲解了Spring中的声明式事务管理,包括如何启用事务、@Transactional注解的工作原理以及事务的传播行为。同时,探讨了Spring与Mybatis的两种整合方式,包括通过XML映射文件和Mapper接口的方式。
事务
1、什么是事务
事务是数据库操作最基本单元,逻辑上一组操作,要么都成功,如果有一个失败所有操作都失败
2.事务的四个特性(ACID)
(1)原子性
不可分割,一个事务就是一个最小的无法分割的独立单元,不允许部分成功部分失败
(2)一致性
保证事务前后的数据完整性保持一致
(3)隔离性
一个事务的执行不能被其他事务干扰
(4)持久性
事务一旦提交则不可逆,他对数据库中数据的改变是永久性的
Spring中的声明式事务管理: transcation
1)配置信息中引入事务的命名空间
 xmlns:tx="http://www.springframework.org/schema/tx"
 http://www.springframework.org/schema/tx
 http://www.springframework.org/schema/tx/spring-tx.xsd
2)启用事务:用注解驱动的方式来管理事务
<tx:annotation-driven/>
3)在 spring.xml 中配置事务管理器 : id=" transcationManager "
     <!-- 5)配置事务管理器
         id="transactionManager" id名必须是transactionManager,不能更改
     -->
    <bean id="transactionManager" class="org.springframework.jdbc.datasource.DataSourceTransactionManager">
        <property name="dataSource" ref="dataSource"/>
    </bean>
- 在要使用事务的方法或类上,添加注解 @Transcational,spring会自动提交,回滚事务
 /**
     事务注解(@Transactional):
              加在方法上,表示此方法受事务管理(自动提交,回滚事务)
              加在类上,那么这个类中的所有方法都受事务管理

     最后要注意的是,在业务方法中不要自己try-catch捕获异常,否则spring无法自动回滚事务
 */
    @Transactional
    public void business1(){
        productMapper.delete(100000005);
        productMapper.delete(100000006);
        int i = 1/0;
        productMapper.delete(100000007);

    }
@Transcational 的工作原理:
认情况下,数据库处于自动提交模式,每一条语句处于一个单独的事务中,在这条语句执行完毕时,如果执行成功则隐式的提交事务,如果执行失败则隐式的回滚事务。
事务管理,是一组相关的操作处于一个事务之中,因此必须关闭数据库的自动提交模式。这点,Spring会在org/springframework/jdbc/datasource/DataSourceTransactionManager.java中将底层连接的自动提交特性设置为false
注解 @Transcational:
1、 @Transcational 默认情况下,只有方法出现的 是RuntimeException或Error以及它们的子类时(未检查异常),才会导致事务回滚 如果要改变默认情况
@Transactional(rollbackFor=异常类.class)
那么方法如果出现了该异常,或该异常的子类异常时,就会回滚 @Transactional(noRollbackFor=异常类.class)
当遇到这种异常时,不会回滚事务
注意:在业务方法中不要自己try-catch捕获异常,否则spring无法自动回滚事务
2、@Transactional(readOnly = true|false) :true表示只读(只有查询) false(会有增删改)
设置为true,性能会有所提升,但是底层数据库驱动支持(对mysql支持)
3、事务超时设置:
@Transactional(timeout=30) //默认是30秒
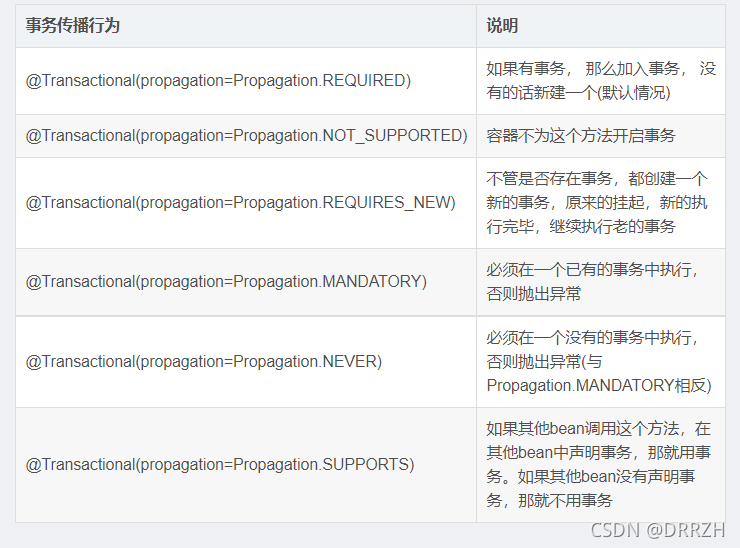
4、 事务的传播行为: @Transcational (propagation=传播行为)
只有两个业务类的方法相互调用时,传播行为才会有效
ProductService 商品业务类
@Transactional(propagation=REQUIRED)
biz1() { // 事务1
biz2();
}
OrderService 订单业务类
@Transactional(propagation=REQUIRES_NEW)
biz2(); // 事务2
Spring和Mybatis整合:
方法一: 通过 XXXMapper.xml 映射文件整合
1)配置 pom.xml 文件,加入所需要的依赖
    <dependencies>
        <!-- spring jar 包-->
        <dependency>
            <groupId>org.springframework</groupId>
            <artifactId>spring-context</artifactId>
            <version>4.3.18.RELEASE</version>
        </dependency>

        <!-- junit jar 包-->
        <dependency>
            <groupId>junit</groupId>
            <artifactId>junit</artifactId>
            <version>4.12</version>
        </dependency>

        <!-- mysql 的驱动包-->
        <dependency>
            <groupId>mysql</groupId>
            <artifactId>mysql-connector-java</artifactId>
            <version>8.0.12</version>
        </dependency>

        <!--logback 日志包-->
        <dependency>
            <groupId>ch.qos.logback</groupId>
            <artifactId>logback-classic</artifactId>
            <version>1.2.3</version>
        </dependency>

        <!-- mybatis jar 包-->
        <dependency>
            <groupId>org.mybatis</groupId>
            <artifactId>mybatis</artifactId>
            <version>3.4.5</version>
        </dependency>

        <!-- 数据库连接池 alibaba 的 druid  -->
        <dependency>
            <groupId>com.alibaba</groupId>
            <artifactId>druid</artifactId>
            <version>1.1.7</version>
        </dependency>

        <!-- mybatis与spring整合的jar包-->
        <dependency>
            <groupId>org.mybatis</groupId>
            <artifactId>mybatis-spring</artifactId>
            <version>1.3.1</version>
        </dependency>

        <!--spring管理的 jdbc ,以及事务相关的-->
        <dependency>
            <groupId>org.springframework</groupId>
            <artifactId>spring-jdbc</artifactId>
            <version>4.3.17.RELEASE</version>
        </dependency>
    </dependencies>
2)把关键对象的创建交给 spring 控制反转(IOC),生成:连接池对象,SqlSessionFactory工厂类,SqlSession对象
<?xml version="1.0" encoding="UTF-8" ?>
<!-- xmlns 是xml的命名空间
    要引入新的 context命名空间
-->
<beans xmlns="http://www.springframework.org/schema/beans"
       xmlns:context="http://www.springframework.org/schema/context"
       xmlns:xsi="http://www.w3.org/2001/XMLSchema-instance"
       xsi:schemaLocation="http://www.springframework.org/schema/beans
 http://www.springframework.org/schema/beans/spring-beans.xsd
 http://www.springframework.org/schema/context
 http://www.springframework.org/schema/context/spring-context.xsd">

    <!--
       读取 jdbc.properties 中的内容
            property-placeholder: 占位符
            location: 属性文件的位置
    -->
    <context:property-placeholder location="classpath:jdbc.properties"/>

    <!-- 1) 获得数据库连接池对象,并交由 spring 同一管理 -->
    <bean id="dataSource" class="com.alibaba.druid.pool.DruidDataSource">

        <!-- 连接数据库的驱动,连接字符串,用户名和登录密码-->
        <property name="driverClassName" value="${drivername}"/>
        <property name="url" value="${url}"/>
        <property name="username" value="${jdbc.username}"/>
        <property name="password" value="${password}"/>

        <!-- 数据池中最大连接数和最小连接数-->
        <property name="maxActive" value="${max}"/>
        <property name="minIdle" value="${min}"/>
    </bean>

    <!-- 2) 获取 SqlSessionFactory 对象,并交由 spring 管理-->
    <bean id="sqlSessionFactory" class="org.mybatis.spring.SqlSessionFactoryBean">
        <!-- 注入连接池
         给 sqlsessionFactory 的属性 dataSource 赋值
            ref="引用该 spring容器 中的另一个 bean的id"
        -->
        <property name="dataSource" ref="dataSource"/>
        <!-- 注入 映射文件 mapper
         给 sqlsessionFactory 的属性 mapperLocation 赋值
           value="映射文件 XXXmapper.xml 的相对路径"
          -->
        <property name="mapperLocations" value="classpath:com/chen/mapper/*.xml"/>
    </bean>

    <!-- 3) 获取 SqlSession 对象,并交由 spring 管理  用SqlSessionTemplate得到的SqlSession可以不用我们自己操心事务的管理,以及关闭操作-->
    <bean id="sqlSession" class="org.mybatis.spring.SqlSessionTemplate">
        <!-- 给 SqlSessionTemplate 的构造函数赋值-->
        <constructor-arg index="0" ref="sqlSessionFactory" />
    </bean>
</beans>
3)配置 XXXMapper.xml 映射文件
<?xml version="1.0" encoding="UTF-8" ?>
<!DOCTYPE mapper PUBLIC "-//mybatis.org//DTD Mapper 3.0//EN" "http://mybatis.org/dtd/mybatis-3-mapper.dtd">
<mapper namespace="com.chen.mapper.ProductMapper">
    <select id="selectPage" parameterType="map" resultType="com.chen.entity.Product">
        select id,name from product limit #{start},#{size}
    </select>
</mapper>
- 使用 SqlSession 进行操作
public class SpringMybatisTest {
    /*
    * 1. 创建spring容器
           根据xml文件应用程序Context容器(上下文)
           classpath指配置文件的位置, 起点有java, resources. 写路径时相对这个起点去写
    * */
    static ClassPathXmlApplicationContext context = new ClassPathXmlApplicationContext("classpath:spring.xml");

    @Test
    public void test1(){

        /* 得到 SqlSession 对象*/
        SqlSession sqlSession = (SqlSession) context.getBean("sqlSession");

        Map<String, Object> map = new HashMap<String, Object>();
        map.put("start",0);
        map.put("size",5);

        // 调用 Mapper映射文件里的方法
        List<Product> list = sqlSession.selectList("com.chen.mapper.ProductMapper.selectPage", map);

        for (Product product : list) {
            System.out.println(product);
        }
    }
}
方法二:通过 Mapper接口的方式整合
1) 在配置文件 pom.xml 中加入依赖
 <dependencies>
        <!-- spring 容器相关 -->
        <dependency>
            <groupId>org.springframework</groupId>
            <artifactId>spring-context</artifactId>
            <version>4.3.17.RELEASE</version>
        </dependency>
        <!-- spring jdbc -->
        <dependency>
            <groupId>org.springframework</groupId>
            <artifactId>spring-jdbc</artifactId>
            <version>4.3.17.RELEASE</version>
        </dependency>
        <!-- mybatis-->
        <dependency>
            <groupId>org.mybatis</groupId>
            <artifactId>mybatis</artifactId>
            <version>3.4.5</version>
        </dependency>
        <!-- 与spring整合 -->
        <dependency>
            <groupId>org.mybatis</groupId>
            <artifactId>mybatis-spring</artifactId>
            <version>1.3.1</version>
        </dependency>
        <!-- 数据库驱动 -->
        <dependency>
            <groupId>mysql</groupId>
            <artifactId>mysql-connector-java</artifactId>
            <version>8.0.12</version>
        </dependency>
        <!-- 连接池 -->
        <dependency>
            <groupId>com.alibaba</groupId>
            <artifactId>druid</artifactId>
            <version>1.1.7</version>
        </dependency>
        <!-- 日志
         slf4j 接口               logback 是实现
         commons-logging 接口     桥接 - slf4j
        -->
        <dependency>
            <groupId>ch.qos.logback</groupId>
            <artifactId>logback-classic</artifactId>
            <version>1.2.3</version>
        </dependency>
        <!-- 日志桥接 -->
        <dependency>
            <groupId>org.slf4j</groupId>
            <artifactId>jcl-over-slf4j</artifactId>
            <version>1.7.25</version>
        </dependency>

        <!-- 单元测试 -->
        <dependency>
            <groupId>junit</groupId>
            <artifactId>junit</artifactId>
            <version>4.12</version>
        </dependency>
    </dependencies>
2)在 spring.xml 配置文件中
    <!-- 1) 读取properties中的内容-->
    <context:property-placeholder location="classpath:jdbc.properties"/>

    <!-- 2) 数据库连接池 -->
    <bean id="dataSource" class="com.alibaba.druid.pool.DruidDataSource">
        <property name="driverClassName" value="${drivername}"/>
        <property name="url" value="${url}"/>
        <property name="username" value="${jdbc.username}"/>
        <property name="password" value="${password}"/>
        <property name="maxActive" value="${max}"/>
        <property name="minIdle" value="${min}"/>
    </bean>

    <!-- 3) 获取 SqlSessionFactory 工厂类-->
    <bean id="sessionFactory" class="org.mybatis.spring.SqlSessionFactoryBean">
        <property name="dataSource" ref="dataSource"/>
    </bean>

    <!-- 4) 搜索有哪些 mapper 实现类,把mapper接口自动配置成 spring 中的 <bean>-->
    <bean id="scannerConfigurer" class="org.mybatis.spring.mapper.MapperScannerConfigurer">

        <!-- name="basePackage":(起始)包名, 从这个包开始扫描-->
        <property name="basePackage" value="com.chen.mapper"/>

    </bean>
3)编写 mapper接口
public interface ProductMapper {

    /**
     * 增
     */
    @Insert("insert into product(name,price) values(#{name},#{price})")
    void insert(Product product);

    /**
     * 删
     */
    @Delete("delete from product where id=#{id}")
    void delete(int id);

    /**
     * 改
     */
    @Update("update product set name=#{name},price=#{price} where id=#{id}")
    void update(Product product);

    /**
     * 查: 根据id查
     */
    @Select("select id,name,price from product where id=#{id}")
    Product findById(int id);

    /**
     * 分页查询(物理分页)
     */
    @Select("select id,name,price from product limit #{start},#{size}")
    List<Product> findByPage(Map map);

    /**
     * 分页查询(逻辑分页)
     */
    @Select("select id, name,price from product")
    List<Product> PageLogical(RowBounds rowBounds);

    /**
     *  当 *.java -> *.class时,方法的参数名信息会丢失,所以再按m名称去找,则无法找到该参数名
     *  mybatis的mapper映射中,默认方法最多只接收一个参数, 多个参数需要用map或list等集合包装
     *  要突破这个限制需要使用@Param注解,把它加在方法参数上,建立方法参数和sql中#{}之间的联系:
     * @param m
     * @param n
     * @return
     */
    @Select("select id, name,price from product limit #{start},#{size}")
    List<Product> Page(@Param("start")int m,@Param("size")int n);

    /**
     * 动态sql,配合 XXXMapper.xml 映射文件进行 动态sql拼接
     *  注意: 1) 目录结构要一致
     *         2) xml中 namespace的取值与接口的包名类名要一致
     *         3) 接口中的方法名与xml中标签id对应
     *         4) 接口中的方法名不能重复(不支持重载)
     */
    void deleteByIds(List<Integer> ids);
}
4)使用 XXXMapper.xml 配合 Mapper接口 进行 动态 SQL 的拼接
<mapper namespace="com.chen.mapper.ProductMapper">

    <!-- id名必须和ProductMapper接口中的方法名保持一致-->
    <delete id="deleteByIds" parameterType="list" >
        delete from product where id in
        <foreach collection="list" item="i" open="("  separator="," close=")">
            #{i}
        </foreach>
    </delete>

</mapper>
- 测试Mapper接口
public class MapperTest {
    //获得spring容器
    static ClassPathXmlApplicationContext context = new ClassPathXmlApplicationContext("spring.xml");

    @Test
    public void test1(){
        // 利用反射,得到spring自动配置的 ProductMapper 的 <bean>
        ProductMapper mapper = context.getBean(ProductMapper.class);
        Product p = new Product();
        p.setName("kobe");
        p.setPrice(6666.66);
        mapper.insert(p);
    }
}


 1317
1317

 被折叠的 条评论
为什么被折叠?
被折叠的 条评论
为什么被折叠?
 到【灌水乐园】发言


