


开发进阶业务弹框相关业务
一、什么是Ability?
开发模式提供的开发功能抽象的描述。
其中重要的是UiAbility,界面组件能力,负责所有界面的处理。
通过配置可以变更单例,多例,指定实例,在module.json5中进行配置
如:
单例:lunchType:'singleton'
多例:lunchType:'standard'
指定实例:lunchType:'specified'
Ability生命周期
4个状态,2个回调

创建ability
onCreate()
	|
执行页面加载回调:拉起UI
onWindowStageCreate()
	|
当进入前台
onForeground()
	|
当进入后台
onBackground()
	|
在销毁之前执行销毁窗口回调
onWindowStageDestroy()
	|
应用销毁
onDestory()
二、Ability使用步骤(单例和多例)
当一个项目有多个ability时,则需要进行配置,才可以启动子模块

1.单例和多例
操作步骤:
1.在module.json5中进行配置单例、多例、指定实例。
单例:lunchType:'singleton'
多例:lunchType:'standard'
	格式:
	"abilities": [
      {"launchType": "singleton"}
     ]
2.唤起页面:
	//2.1 链接上下文
	  private cont = getContext(this) as common.UIAbilityContext
	//2.2 定义参数Want
	const want: Want = {
      // deviceId:'', 标识ID,可选
      bundleName: 'com.www.myapplication', //包名: appScope
      moduleName: 'entry', // 模块名称 module.json5
      abilityName: 'EntryAbilityNext', //应用名称  module.json5
      parameters: {} // 参数
    }
	//2.3 拉起页面
	con.startAbility(want)


3.若传递了参数,则需要在拉起页面中的ability中进行接收
  onCreate(want: Want, launchParam: AbilityConstant.LaunchParam): void {
    this.getParams(want)
  }
  onNewWant(want: Want, launchParam: AbilityConstant.LaunchParam): void {
    this.getParams(want)
  }

  getParams(want: Want) {
    const par = want.parameters as Record<string, string>
    AppStorage.setOrCreate('message', par.message)
  }
2.指定实例
操作步骤:
思路:
// 子模块配置指定实例
// 链接上下文
// 配置Want
// 调用函数并传参,结束接收数据
// 创建MyAbilityStage , 并重写函数onAcceptWant
// 配置module.json 定义路径
// 在子模块UiAbility接收参数(onCreat和onNewWant)
1.在module.json5中进行配置单例、多例、指定实例。
"abilities": [
指定实例:lunchType:'specified'
{"launchType": "specified"}
]
2.唤起页面:
//2.1 链接上下文
private cont = getContext(this) as common.UIAbilityContext
//2.2 定义参数Want
//2.3 拉起页面
this.cont.startAbilityForResult({
bundleName: 'com.www.myapplication', //包名: appScope
moduleName: 'OtherApplication', // 模块名称 module.json5
abilityName: 'OtherApplicationAbility', // 模块名称 module.json5
parameters: {
message: '传递子给的模块数据' // 参数
key:id // 用于指定实例
}
})
.then((res) => {
// 返回的数据
const data = res.want?.parameters as Record<string, string>
console.log('system===>回调接收数据' + JSON.stringify(data.message))
this.message = data.message
}).catch((err: BusinessError) => {
promptAction.showToast({ message: '开启实例异常' + JSON.stringify(err) })
})
3.若传递了参数,则需要在拉起页面中的ability中进行接收
onCreate(want: Want, launchParam: AbilityConstant.LaunchParam): void {
this.getParams(want)
}
onNewWant(want: Want, launchParam: AbilityConstant.LaunchParam): void {
this.getParams(want)
}
getParams(want: Want) {
const par = want.parameters as Record<string, string>
AppStorage.setOrCreate('message', par.message)
}
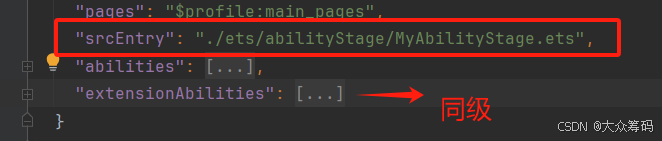
4. 在拉起页面创建MyAbilityStage类
export default class MyAbilityStage extends AbilityStage {
// 重写函数
override onAcceptWant(want: Want) {
if (want.abilityName === 'InnerEntryAbility') {
console.log('system===>重写' + want.abilityName)
const param = want.parameters as Record<string, string>
return 'InnerEntryAbility' + param.key
}
return ''
}
}
5.在module.json5中配置,见下面
"srcEntry": "./ets/abilityStage/MyAbilityStage.ets",
6.在拉起页面编辑往主模块返回数据
// 链接上下文
const cont = getContext(this) as common.UIAbilityContext
// want :拉起主应用
// 调用函数,返回结果并可以关闭当前应用
cont.terminateSelfWithResult({ // 返回参数使用的
resultCode: 200, want: {
bundleName: 'com.www.myapplication',
moduleName: 'entry',
abilityName: 'EntryAbility',
parameters: {
message: '子模块数据处理完成'
}
}
}, () => {
// 关闭应用
})
三、窗口的使用
思路:
1.ability中初始化生命周期将windowStage保存到全局应用中。
2.在需要开启子窗口的位置,设置大小,位置,加载页面遮罩层等UI,并接收window结果值保存到全局应用中
3.在小窗口位置调用window,执行关闭并操作其他业务(关闭主窗口的遮罩层,则需要进行使用订阅)
1.ability中初始化生命周期将windowStage保存到全局应用中。
onWindowStageCreate(windowStage: window.WindowStage): void {
	AppStorage.setOrCreate('windowStage',windowStage)
}
2.在需要开启子窗口的位置,设置大小,位置,加载页面遮罩层等UI,并接收window结果值保存到全局应用中
1.变量
  // 读取全局应用状态
  private windowStage: window.WindowStage | undefined = AppStorage.get('windowStage')
  // 遮罩层
  @State isShow: boolean = false


2.遮罩层UI
if (this.isShow) {
        Rect()
          .width('100%')
          .height('100%')
          .backgroundColor("#ffddecec")
          .opacity(0.2)
      }


3.设置子窗口大小,位置:
// 弹出小窗口 .并将数据保存到应用状态管理中
this.windowStage?.createSubWindow('dLog').then((win: window.Window) => {
   const system = display.getDefaultDisplaySync() // 获取系统的数据,获取到宽高
   // 画小弹框的大小
   win.resize(system.width * 0.8, system.height * 0.2)
   // 所在位置
   win.moveWindowTo(system.width / 9, system.height - (system.height / 4))

   this.isShow = true
   //设置加载路径
   win.setUIContent('pages/CodePage', () => { // 需要重新创建一个entry
     //开启弹框
     win.showWindow().then(() => {})
   })
   // 保存应用
   AppStorage.setOrCreate('window', win)
 })
3.在小窗口位置调用window,执行关闭并操作其他业务(关闭主窗口的遮罩层,则需要进行使用订阅)
  private win: window.Window | undefined = AppStorage.get('window')

//关闭窗口并关闭主窗口遮罩层(小窗口发布)
  this.win?.destroyWindow(()=>{ // emit 发布
    getContext(this).eventHub.emit('close') // 点击取消或者确定使用订阅关闭遮罩层
    router.replaceUrl({url:'pages/HomePage'}) // 只有在会调用才可以进行跳转,同步操作
  })


// 主窗口进行订阅,并执行相关操作
  // 生命周期加载订阅
  aboutToAppear(): void {
    getContext(this).eventHub.on('close', () => { // on订阅
      this.isShow = false // 关闭遮罩层
    })
  }
四、通知的开启
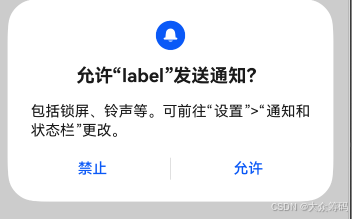
  // 开启通知,在组件加载的时候
  async getNotification() {
    let context = getContext(this) as common.UIAbilityContext;
    let result = await notificationManager.isNotificationEnabled()
    if (!result) {
      notificationManager.requestEnableNotification(context)
    }
  }
五、长时任务与停止:
案例文件看:绑定的(音乐APP) 文件
应用退至后台,在后台需要长时间作业,如音乐、导航,为防止引用进程挂起,需要申请长时任务,使应用长时间在后台运行
需要开启权限: ohos.permission.KEEP_BACKGROUND_RUNNING (在后台持续运行)
若需要链接网络资源需要接入网络权限
常见函数:
AVPlayClass 类中的静态  static player: media.AVPlayer | null = null
1. // 创建播放器
	AVPlayClass.player = await media.createAVPlayer()
2.// 监听状态是否变化
    AVPlayClass.player.on('stateChange', async (state: media.AVPlayerState) => {
 // state状态有:
 // initialized:初始化
 // prepared: 准备
 // paused: 暂停
 // completed: 完成
})

3.// 调用准备函数
	await AVPlayClass.player?.prepare()
  // 开启播放
  	await AVPlayClass.player?.play()
  // 播放暂停
  	await AVPlayClass.player?.pause()
  // 重置(如当前的音乐被删除时,所有状态回复初始化状态,重新加载)
 	await AVPlayClass.player?.reset()

4.// 获取当前播放时长
 AVPlayClass.player.on('timeUpdate', (len: number) => {
      if (len == 0) { // 此处有坑,初始化不能连续播放,刚开始都是从零开始的,因此加入判断
        return
      }
      AVPlayClass.timeUpdate = len
    })

5. // 设置播放进度
AVPlayClass.player!.seek(AVPlayClass.timeUpdate, media.SeekMode.SEEK_PREV_SYNC)
	// 监听函数
	//监听歌曲设置的时长
    AVPlayClass.player.on('seekDone', () => {
      if (AVPlayClass.isPlay) {
        AVPlayClass.player?.play() // 开启播放
      }
    })
6. // 监听播放总时长 ,在prepare后进行触发
	AVPlayClass.player.on('durationUpdate', (len: number) => {
      AVPlayClass.duration = len
    })
长时任务(如:音乐)
根据图示:
1.创建音乐进行初始化 createAVPlayer()
  this.player:media.AVPlayer | null  = await media.createAVPlayer()
// 成功调用reset接口后触发该状态机上报:initialized状态

2. 此时可以使用监听状态的变化执行相关的操作
// 监听状态是否变化
    AVPlayClass.player.on('stateChange', async (state: media.AVPlayerState) => {
switch (state) {
        case 'initialized': // 初始化
          await AVPlayClass.player?.prepare()
          break
        case 'prepared': // 准备
          AVPlayClass.isPlay = true
          // 监听设置的时候进行播放
          AVPlayClass.player!.seek(AVPlayClass.timeUpdate, media.SeekMode.SEEK_PREV_SYNC)
          // await AVPlayClass.player?.play()
          break
        case 'paused': // 暂停
          AVPlayClass.isPlay = false
          // 当数据播放需要修改数据
          break
        case 'completed': // 播放结束后触发该状态机上报
          await AVPlayClass.end()
          if (AVPlayClass.playList.length == 0) {
            return
          }
          // 分模式判断,并看是否大于1
          if (AVPlayClass.playMode == 'random' && AVPlayClass.playList.length > 1) {
            let index = 0
            do {
              index = Math.floor(Math.random() * AVPlayClass.playList.length)
            } while (AVPlayClass.playIndex == index)
            AVPlayClass.playIndex = index
          } else if (AVPlayClass.playMode == 'auto') {
            AVPlayClass.playIndex++
            AVPlayClass.playIndex = (AVPlayClass.playIndex + AVPlayClass.playList.length) % AVPlayClass.playList.length
          }
          AVPlayClass.singPlay(AVPlayClass.playList[AVPlayClass.playIndex])
          break;
      }

})

3.// 开启后,可以设置,进度、播放、暂停、重置功能

扩展万能计算公式:当切换下一个播放时使用
AVPlayClass.playIndex++ // 当前播放下标先进行调位
      AVPlayClass.playIndex = (AVPlayClass.playIndex + AVPlayClass.playList.length) % AVPlayClass.playList.length
可能会在后台运行
  private avSessions: avSession.AVSession | null = null

// 在组件加载时就需要进行初始化操作
	  // 创建AV会话
  createAVSession() {
    avSession.createAVSession(getContext(this), this.url, 'audio').then((res) => { // audio是,枚举的类型 type AVSessionType = 'audio' | 'video' | 'voice_call' | 'video_call';
      res.activate() // 开启/激活
      this.avSessions = res
    })
  }


// 当应用组件销毁时,后台销毁
  this.avSessions?.destroy() // 销毁后台会话
六、代理提醒
使用代理提醒需要先开启必要的条件
1.启用权限: ohos.permission.PUBLISH_AGENT_REMINDER (代理权限代理任务)
2.开启通知的功能 getNotification()
 async getNotification() {
    let context = getContext(this) as common.UIAbilityContext;
    let result = await notificationManager.isNotificationEnabled()
    if (!result) {
      notificationManager.requestEnableNotification(context)
    }
  }
6.1:倒计时代理提醒
思路:
1.开启权限
2.开启通知
3.创建倒计时实例:reminderAgentManager.ReminderRequestTimer
4.发布后台代理提醒:reminderAgentManager.publishReminder(实例对象)返回ID值,可用于后面的关闭通知
实例:
1. 实例:
private reminderReq: reminderAgentManager.ReminderRequestTimer | null = null // 参数
2. 赋值
this.reminderReq = {
triggerTimeInSeconds: 5, // 多长时间开启(单位s)
actionButton: [ // 按钮功能 延时和关闭功能
{ title: '关闭', type: reminderAgentManager.ActionButtonType.ACTION_BUTTON_TYPE_CLOSE }// 关闭
],
wantAgent: {
pkgName: 'com.www.myapplication', // 包名
abilityName: 'EntryAbility' // ability名字
},
title: '标题', // 标题
content: '内容', // 内容
expiredContent: '异常提示,超时的内容', // 提醒过期后需要显示的内容。
notificationId: this.reId, // 通知ID 可以不写 : 指明提醒使用的通知的id号,相同id号的提醒会覆盖。
reminderType: reminderAgentManager.ReminderType.REMINDER_TYPE_TIMER, //倒计时类型
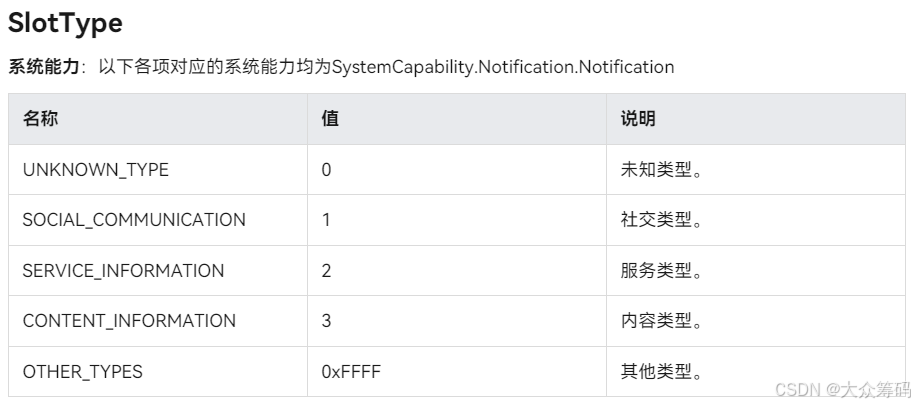
slotType: notificationManager.SlotType.SOCIAL_COMMUNICATION // 系统能力:社交类型,还有其他类型见下面
}
3. 开启后台代理: 返回ID
const id =await reminderAgentManager.publishReminder(this.reminderReq)
6.2:日历代理提醒
思路:
1.开启权限
2.开启通知
3.创建日历实例:reminderAgentManager.ReminderRequestCalendar
4.发布后台代理提醒:reminderAgentManager.publishReminder(实例对象)返回ID值,可用于后面的关闭通知
实例:
1. 实例:
  private reminderReqCalendar: reminderAgentManager.ReminderRequestCalendar | null = null // 参数
2. 赋值
this.reminderReqCalendar = {
      dateTime: { // 参数容易报错,建议09 不用带0,并且要大于当前时间
        year: 2999,
        month: 9,
        day: 29,
        hour: 10,
        minute: 55
      },
      wantAgent: {
        pkgName: 'com.www.myapplication',
        abilityName: 'EntryAbility'
      },
      actionButton: [
        { title: '关闭', type: reminderAgentManager.ActionButtonType.ACTION_BUTTON_TYPE_CLOSE }, // 关闭
        { title: '延时', type: reminderAgentManager.ActionButtonType.ACTION_BUTTON_TYPE_SNOOZE }// 延迟的次数
      ],
      ringDuration: 5, // 延长时间
      snoozeTimes: 3, // 提醒次数
      timeInterval: 5, // 延迟提醒时间
      notificationId: this.reId,
      title: '标题',
      content: '内容',
      expiredContent: '没看到提示',
      snoozeContent: '这是延迟的内容',
      slotType: notificationManager.SlotType.SOCIAL_COMMUNICATION,
      reminderType: reminderAgentManager.ReminderType.REMINDER_TYPE_CALENDAR // 提醒类型为倒计时类型
    }
3. 开启后台代理: 返回ID
   const id =await reminderAgentManager.publishReminder(this.reminderReqCalendar )
6.3:闹钟代理提醒
思路:
1.开启权限
2.开启通知
3.创建日历实例:reminderAgentManager.ReminderRequestAlarm
4.发布后台代理提醒:reminderAgentManager.publishReminder(实例对象)返回ID值,可用于后面的关闭通知
实例:
1. 实例:
   private reminderRequestAlarm: reminderAgentManager.ReminderRequestAlarm | null = null // 参数
2. 赋值
this.reminderRequestAlarm = {
            hour: 22,
            minute: 27,
            wantAgent: {
              pkgName: 'com.www.myapplication',
              abilityName: 'EntryAbility'
            },
            actionButton: [
              { title: '关闭', type: reminderAgentManager.ActionButtonType.ACTION_BUTTON_TYPE_CLOSE }, // 关闭
              { title: '延时', type: reminderAgentManager.ActionButtonType.ACTION_BUTTON_TYPE_SNOOZE }// 延迟的次数
            ],
            ringDuration: 5, // 延长时间
            snoozeTimes: 3, // 提醒次数
            timeInterval: 5, // 延迟提醒时间
            notificationId: this.reId,
            title: '标题',
            content: '内容',
            expiredContent: '没看到提示',
            snoozeContent: '你已经延迟了,这是延迟的内容',
            slotType: notificationManager.SlotType.SOCIAL_COMMUNICATION,
            reminderType: reminderAgentManager.ReminderType.REMINDER_TYPE_ALARM // 提醒类型为倒计时类型
          }

3. 开启后台代理: 返回ID
   const id =await reminderAgentManager.publishReminder(this.reminderRequestAlarm )
6.4:获取所有代理ID
reminderAgentManager.getValidReminders() // 接收一个数组
6.5:关闭某一个代理
reminderAgentManager.cancelReminder(开启代理返回的ID)
6.6:关闭所有代理
reminderAgentManager.cancelAllReminders()
七、文件管理

fs创建函数:
	.获取7级沙箱路径(系统文件):
			getContext(this).filesDir // 图片使用
			getContext(this).cacheDir // 写入文档路径(必须这个沙箱)

	.获取5级沙箱路径(应用级文件):
			getContext(this).getApplicationContext()

	.读取本地文件(仅限rawfile文件内的)
            let buff = getContext(this).resourceManager.getRawFileContentSync('startIcon.png')

	.判断文件是否存在:
		    fs.accessSync('url路径')
		    fs.access('url路径')

	.打开文件:
			fs.openSync(url, fs.OpenMode.READ_WRITE | fs.OpenMode.CREATE) // 当后面的参数不写,在没有文件则会异常
			fs.open(url, fs.OpenMode.READ_WRITE | fs.OpenMode.CREATE) // 当后面的参数不写,在没有文件则会异常

	.写入文件:
			fs.writeSync(file.fd, arr.buffer) // fd:描述符
			fs.write(file.fd, arr.buffer) // fd:描述符

	.关闭文件:
			fs.closeSync(file.fd) // 关闭
			fs.close(file.fd) // 关闭

	.获取文件夹下的所有文件返回集合:
			fs.listFileSync(getContext(this).filesDir)
			//可以实现递归功能
			fs.listFileSync(path, { recursion: true })

	// 当在页面回显沙箱路径文件时,需要加入file:// 前缀
	例: Image('file://'+'沙箱路径')
7.1文件上传到网络(图片为例),并接收网络图片路径:request.uploadFile
***上传文件不会返回网络请求的路径,需要只要访问服务器端路径才可以,访问网络资源
思路:
加入权限: ohos.permission.INTERNET
将本地文件添加到沙箱文件cache文件夹下: 选择本地文件可以使用picker选择器返回路径,若是rawfile文件,则直接读取getContext(this).resourceManager.getRawFileContentSync(‘如:startIcon.png’)
请求网络上传文件
// 1.将文件写入cache中
          this.path = getContext(this).cacheDir // 写入缓存路径
          let name = Math.random() + 'uploadFile.png'
          this.name = name
          // 打开文件
          let file = fs.openSync(this.path + '/' + name, fs.OpenMode.READ_WRITE | fs.OpenMode.CREATE)
          // 读取本地文件
          let buff = getContext(this).resourceManager.getRawFileContentSync('startIcon.png')
          fs.writeSync(file.fd, buff.buffer) // 写入
          fs.closeSync(file.fd)

// 2.请求http并加入权限
    // 配置参数
    let config: request.UploadConfig = {
            url: 'http://122.51.240.24:31001/upload', // 上传服务器路径
            header: {
              // 请求头
              "Accept": "*/*",
              'Authorization': AppStorage.get(USER_TOKEN) as string || null, // 若上传需要token时
              "Content-Type": 'multipart/form-data' // 必须是这个
            },
            method: 'POST', // 参数是date,这边的请求为post
            files: [ // 可以时多个 request.File[] 类型
              {
                filename: name, // 文件名称( name格式: name.png )
                name: 'file', // 服务器识别的名称
                uri: 'internal://cache/' + name, // 沙箱文件路径在cache中 // name 沙箱中的名字
                type: 'png' // 文件类型
              }
            ],
            data: [] // 携带的其他信息
          }
          const task = await request.uploadFile(getContext(this), config) // 上传文件
task.on('complete', (res) => {
            console.log('system===>complete' + JSON.stringify(res))
          })
          task.on('fail', (res) => {
            console.error('system===>fail' + JSON.stringify(res))
          })
          // 此处可以接收道网络路径但是,不会正常返回,里面存在同步异步问题,需要对整体的函数进行Promise()处理
		task.on('headerReceive', (header) => {
        // const body = JSON.parse(header['body'] as string) as Record<string,string>
        const body = JSON.parse(header['body'] as string) as ResponseData<string>
        imagePaths.push(new ImageListModel({ image: body.data as string })) // ImageListModel:为ResousreStr类型,封装了
      })
完整案例,并封装为函数
export const uploadImage = async (context: Context, config: request.File[]): Promise<ImageListModel[]> => {
  // 自定义异步
  return new Promise<ImageListModel[]>(async (resolve, reject) => {
    let uploadConfig: request.UploadConfig = {
      url: BASE_URL + "/files/imageUpload",
      header: {
        'content-type': 'multipart/form-data',
        'Authorization': AppStorage.get(USER_TOKEN) as string || null
      },
      method: "POST",
      files: config,
      data: []
    }
    try {

      const task = await request.uploadFile(context, uploadConfig)

      // 接收网络图片地址
      let imagePaths: ImageListModel[] = []
      task.on('complete', (item: request.TaskState[]) => {
        resolve(imagePaths)
      })
      task.on('headerReceive', (header) => {
        // const body = JSON.parse(header['body'] as string) as Record<string,string>
        const body = JSON.parse(header['body'] as string) as ResponseData<string>
        imagePaths.push(new ImageListModel({ image: body.data as string }))
      })
      task.on('fail', (item: request.TaskState[]) => {
        reject(new Error('上传失败'))
      })
    } catch (e) {
      reject(e)
    }
  })
}
7.2网络文件下载到本地(图片为例):request.downloadFile
思路:
加入权限: ohos.permission.INTERNET
定义接收路径
请求网络下载路径(参数:请求路径,本地文件路径)
Button("下载网络文件")
        .onClick(() => {
          // 定义目录 本地路径
          this.path = getContext(this).filesDir + '/' + new Date().getTime() + '.png'
          if (fs.accessSync(this.path)) { // 校验是否存在
            fs.unlinkSync(this.path) // 删除
          }

          // 下载 == 知道网络路径 // https://cdn.atstudy.com/user/17046943688265194.png
          request.downloadFile(getContext(this), {
            url: 'https://img1.baidu.com/it/u=1776577142,714598743&fm=253&fmt=auto&app=138&f=JPEG?w=705&h=500', // 网络路径
            filePath: this.path // 本地路径 // 若不指定则在cache缓存文件中
          })
            .then((res) => {
              res.on('complete', () => {
                console.log('system===>下载完成')
                this.path = 'file://' + this.path
              })
              res.on('fail', () => {
                console.error('system===>下载失败')
              })
              res.on('progress', (receivedSize: number, totalSize: number) => {
                console.log('system===>' + receivedSize / totalSize * 100 + '%')
              })
              // 返回结果集
            }).catch((e: BusinessError) => {
            console.error('system===>' + JSON.stringify(e))
          })
        })
7.3.文件写入沙箱中
Button('写入沙箱路径:需要映射:' + this.path)
        .onClick(() => {
          // 定义沙箱路径和文件名称
          this.path = getContext(this).filesDir + '/' + (Math.random() * 1000).toFixed(0) +
            'startIcon.png' // 获取沙箱路径 获取系统文件的路径为第七级
          let file = fs.openSync(this.path, fs.OpenMode.READ_WRITE | fs.OpenMode.CREATE) // 打开文件 // 有问题需要加创建写入
          // 读取文件
          let arr = getContext(this).resourceManager.getRawFileContentSync('startIcon.png') // 只能说rawFile文件夹下的
          console.log('system===>' + arr.buffer)
          fs.writeSync(file.fd, arr.buffer) // fd:描述符
          fs.closeSync(file.fd) // 关闭
        })
7.4.路径迁移:SaveButton安全控件(沙箱文件,在相册中显示)

  @State saveButton: SaveButtonOptions = { // 定义按钮选项,还可以有其他选项,看官网
    icon: SaveIconStyle.FULL_FILLED,
    text: SaveDescription.SAVE_IMAGE,
    buttonType: ButtonType.Circle
  }


// 安全控件,将文件保存至相册
      SaveButton(this.saveButton).onClick(async (event: ClickEvent, result: SaveButtonOnClickResult) => {
        if (result == SaveButtonOnClickResult.SUCCESS) { // 可以下载
          // 定义目录 本地路径
          let name = new Date().getTime() + '.png'
          this.path = getContext(this).filesDir + '/' + name
          if (fs.accessSync(this.path)) {
            fs.unlinkSync(this.path)
          }
          const res = await request.downloadFile(getContext(this), {
            url: 'https://img1.baidu.com/it/u=1776577142,714598743&fm=253&fmt=auto&app=138&f=JPEG?w=705&h=500', // 网络路径
            filePath: this.path // 本地路径 // 若不指定则在cache缓存文件中
          })
          res.on('complete', async () => {
            console.log('system===>下载完成')
            // this.path = 'file://' + this.path

            // 将文件保存至相册

            // 获取相册
            let helper = photoAccessHelper.getPhotoAccessHelper(getContext(this));
            // onClick触发后10秒内通过createAsset接口创建图片文件,10秒后createAsset权限收回。
            let mediaChangeRequest =
              photoAccessHelper.MediaAssetChangeRequest.createImageAssetRequest(getContext(this), this.path)
            await helper.applyChanges(mediaChangeRequest) //提交媒体变更请求
            // UI回显
            this.path = 'file://' + this.path
          })
        }
      })
7.5.图片选择器:PhotoViewPicker
// 跳转选择图册
          const photoViewPicker = new photoAccessHelper.PhotoViewPicker();
          let options: photoAccessHelper.PhotoSelectOptions = new photoAccessHelper.PhotoSelectOptions()
          options.MIMEType = photoAccessHelper.PhotoViewMIMETypes.IMAGE_TYPE // 类型
          options.maxSelectNumber = 3 // 最大数量

          const photoSelectResult = await photoViewPicker.select(options)
          if (photoSelectResult.photoUris.length) {
            this.path = photoSelectResult.photoUris
          }
7.6.文档选择器:DocumentViewPicker
let file = new picker.DocumentViewPicker()

          let options = new picker.DocumentSelectOptions()
          options.maxSelectNumber = 3 // 最大选择数量
          const res = await file.select(options)
          if (res) {
            this.fileConcat = res
          }
7.7.视频选择器(相册/文档)
1.文档: 获取选择视频:
let context = getContext(this) as common.Context; // 请确保getContext(this)返回结果为UIAbilityContext
        let audioPicker = new picker.DocumentViewPicker(context);
        audioPicker.select(new picker.AudioSelectOptions()).then((audioSelectResult: Array<string>) => {
          this.path = audioSelectResult[0]
          console.log('system===>path' + this.path)
        }).catch((err: BusinessError) => {
          console.error('system===>AudioViewPicker.select failed with err: ' + JSON.stringify(err));
        });
2.图库: 获取选择视频:
let audioPicker = new photoAccessHelper.PhotoViewPicker();
        let options = new photoAccessHelper.PhotoSelectOptions()
        audioPicker.select(options).then((res)=>{
          this.path = res.photoUris[0]
          console.log('system===>'+this.path)
        }).catch((err: BusinessError) => {
          console.error('system===>AudioViewPicker.select failed with err: ' + JSON.stringify(err));
        });
7.8.保存文件
let file = new picker.DocumentViewPicker()

let options = new picker.DocumentSaveOptions()
options.newFileNames = ['001pox.xml']
const path = await file.save(options)
console.log('system===>保存文档' + JSON.stringify(path))


 4566
4566

 被折叠的 条评论
为什么被折叠?
被折叠的 条评论
为什么被折叠?
 到【灌水乐园】发言


