


 本文深入讲解AAC音频文件的ADTS头结构,包括固定头信息和可变头信息的详细解析,以及如何通过代码实现AAC音频帧的定位和提取。文章提供了具体的C语言代码示例,演示如何从AAC原始码流中读取并解析ADTS帧。
0. AAC介绍
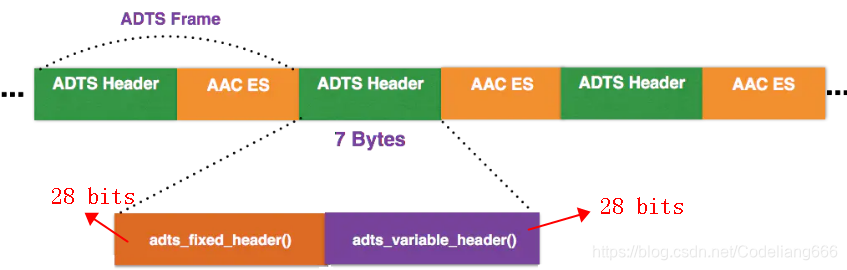
AAC音频文件的每一帧都由一个ADTS头和AAC ES(AAC音频数据)组成。
以下是wiki的介绍:https://wiki.multimedia.cx/index.php?title=ADTS
0.1 其包括固定头信息:adts_fixed_header()
ADTS头的固定头信息在每个帧中都是一样的。
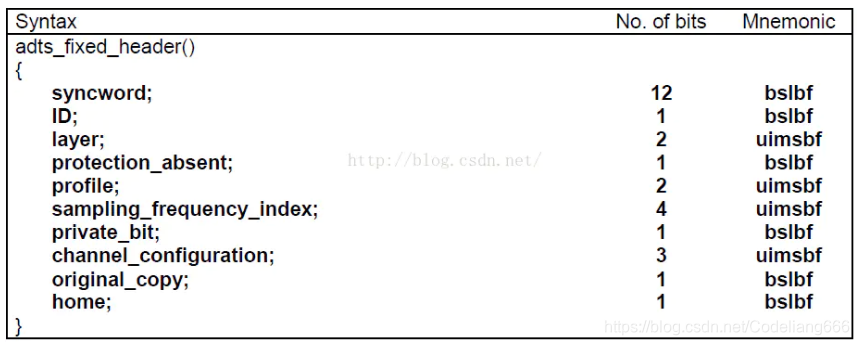
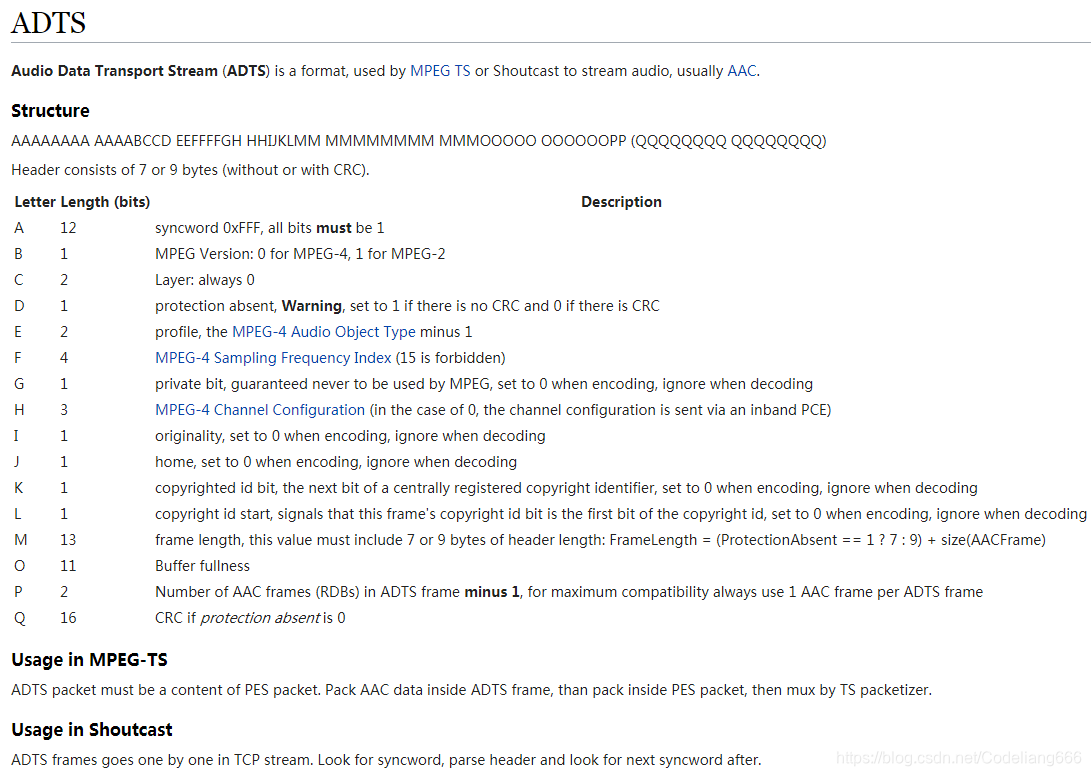
syncword:帧同步标识一个帧的开始,固定为0xFFF
ID:MPEG 标示符。0表示MPEG-4,1表示MPEG-2
layer:固定为’00’
protection_absent:标识是否进行误码校验。0表示有CRC校验,1表示没有CRC校验
profile:标识使用哪个级别的AAC。1: AAC Main 2:AAC LC (Low Complexity) 3:AAC SSR (Scalable Sample Rate) 4:AAC LTP (Long Term Prediction)
sampling_frequency_index:标识使用的采样率的下标
private_bit:私有位,编码时设置为0,解码时忽略
channel_configuration:标识声道数
original_copy:编码时设置为0,解码时忽略
home:编码时设置为0,解码时忽略
0.2 可变头信息:adts_variable_header()
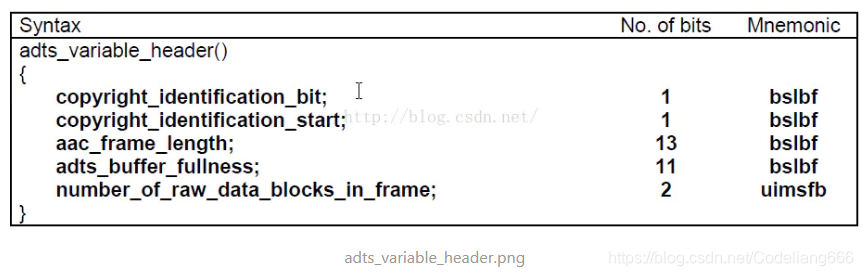
copyrighted_id_bit:编码时设置为0,解码时忽略
copyrighted_id_start:编码时设置为0,解码时忽略
aac_frame_length:ADTS帧长度包括ADTS长度和AAC声音数据长度的和(单位是字节)。即 aac_frame_length = (protection_absent == 0 ? 9 : 7) + audio_data_length
adts_buffer_fullness:固定为0x7FF。表示是码率可变的码流
number_of_raw_data_blocks_in_frame:表示当前帧有number_of_raw_data_blocks_in_frame + 1 个原始帧(一个AAC原始帧包含一段时间内1024个采样及相关数据)。
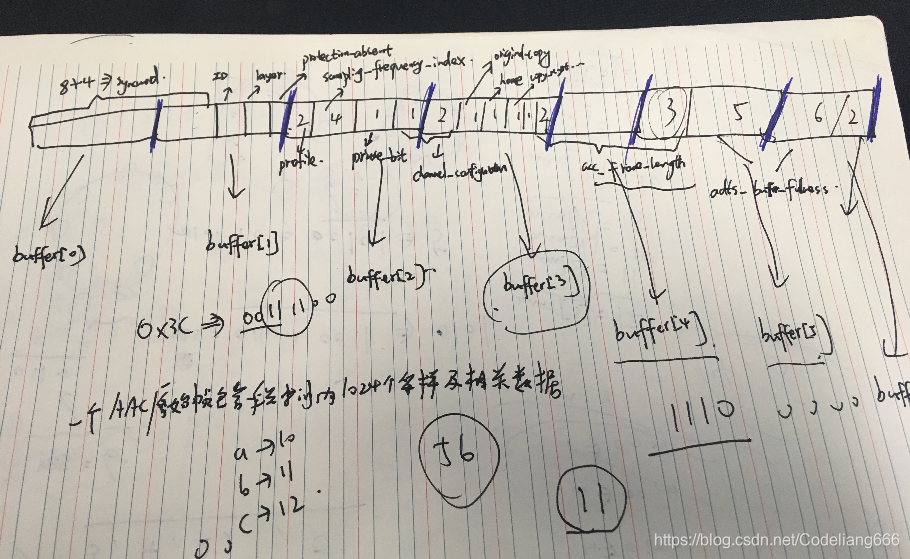
这个ADTS头信息有点难理解,建议在小本本上画一画,就能搞清楚下面这部分代码了。
//Sync words
if ((buffer[0] == 0xff) && ((buffer[1] & 0xf0) == 0xf0)) {

	size |= ((buffer[3] & 0x03) << 11);     //high 2 bit
	size |= buffer[4] << 3;                //middle 8 bit
	size |= ((buffer[5] & 0xe0) >> 5);        //low 3bit
	//size存储的是aac_frame_length,即ADTS长度和AAC声音数据长度的和
	break;
}
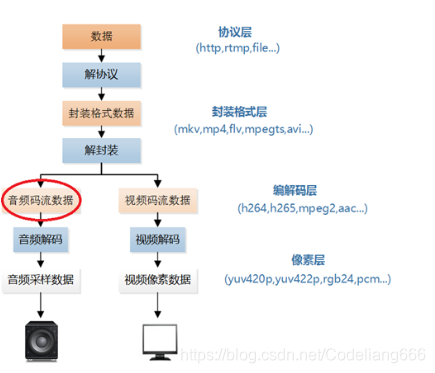
0.3 音频码流在视频播放器的位置
1. 代码
extern "C"
{
#ifdef __cplusplus
#define __STDC_CONSTANT_MACROS

#endif

}
extern "C" {

#include <stdio.h>
#include <stdlib.h>
#include <string.h>
#include <math.h>
}


int getADTSframe(unsigned char* buffer, int buf_size, unsigned char* data, int* data_size) {
	// buffer是每次传进来的1024*1024字节的数据
	// buf_size是成功读取1个字节的总的个数,这里读取成功即1024*1024,
	//也可能末尾读着读着没了,那就没这么多
	// data即传进来的aacframe,空间大小是1024*5个字节
	// data_size是aac_frame_length:ADTS帧长度包括ADTS长度和AAC声音数据长度的和
	//
	int size = 0;


	// 避免空指针,这个代码是有意义的,在实际的android开发中,
	// 有时候遇到系统稳定性问题,比如死机,解dump会发现空指针,
	// 我们找到函数的位置,然后加这个避免空指针的代码即可解决.
	if (!buffer || !data || !data_size) {
		return -1;
	}

	while (1) {
		if (buf_size < 7) {
			//ADTS头一般是7个字节,如果对数据进行CRC校验,还需要2个Byte的校验码,
			//所以ADTS头实际长度是7个字节或者9个字节,
			//所以若传进来的buf_size<7,那么也就没必要继续解析文件头了
			return -1;
		}
		//Sync words
		if ((buffer[0] == 0xff) && ((buffer[1] & 0xf0) == 0xf0)) {

			size |= ((buffer[3] & 0x03) << 11);     //high 2 bit
			size |= buffer[4] << 3;                //middle 8 bit
			size |= ((buffer[5] & 0xe0) >> 5);        //low 3bit
			//size存储的是aac_frame_length,即ADTS长度和AAC声音数据长度的和
			break;
		}
		--buf_size;
		++buffer;
	}

	if (buf_size < size) {
		//数据分割,若小于一个aac_frame_length帧长度,直接return
		return 1;
	}

	memcpy(data, buffer, size);
	//由buffer所指内存区域复制size个字节到data所指内存区域
	//把重要信息存到aacframe指针里面
	//需要知道profile以及sampling_frequency_index
	*data_size = size;

	return 0;
}

int simplest_aac_parser(const char* url)
{
	int data_size = 0;
	int size = 0;
	int cnt = 0;
	int offset = 0;

	//FILE *myout=fopen("output_log.txt","wb+");
	FILE* myout = stdout;

	unsigned char* aacframe = (unsigned char*)malloc(1024 * 10);
	unsigned char* aacbuffer = (unsigned char*)malloc(1024 * 2048);

	FILE* ifile = fopen(url, "rb");
	if (!ifile) {
		printf("Open file error");
		return -1;
	}

	printf("-----+- ADTS Frame Table -+------+\n");
	printf(" NUM | Profile | Frequency| Size |\n");
	printf("-----+---------+----------+------+\n");

	while (!feof(ifile)) {
		data_size = fread(aacbuffer + offset, 1, 1024 * 2048 - offset, ifile);
		unsigned char* input_data = aacbuffer;

		while (1)
		{
			int ret = getADTSframe(input_data, data_size, aacframe, &size );
			if (ret == -1) {
				break;
			}
			else if (ret == 1) {
				memcpy(aacbuffer, input_data, data_size);
				offset = data_size;
				break;
			}

			char profile_str[10] = { 0 };
			char frequence_str[10] = { 0 };

			unsigned char profile = aacframe[2] & 0xC0;
			profile = profile >> 6;
			//获取标识使用哪个级别的AAC。1: AAC Main
			//2:AAC LC (Low Complexity)
			//3:AAC SSR (Scalable Sample Rate)
			//4:AAC LTP (Long Term Prediction)

			switch (profile) {
			case 0: sprintf(profile_str, "Main"); break;
			case 1: sprintf(profile_str, "LC"); break;
			case 2: sprintf(profile_str, "SSR"); break;
			default:sprintf(profile_str, "unknown"); break;
			}

			unsigned char sampling_frequency_index = aacframe[2] & 0x3C;
			sampling_frequency_index = sampling_frequency_index >> 2;
			//获取标识使用的采样率的下标

			switch (sampling_frequency_index) {
			case 0: sprintf(frequence_str, "96000Hz"); break;
			case 1: sprintf(frequence_str, "88200Hz"); break;
			case 2: sprintf(frequence_str, "64000Hz"); break;
			case 3: sprintf(frequence_str, "48000Hz"); break;
			case 4: sprintf(frequence_str, "44100Hz"); break;
			case 5: sprintf(frequence_str, "32000Hz"); break;
			case 6: sprintf(frequence_str, "24000Hz"); break;
			case 7: sprintf(frequence_str, "22050Hz"); break;
			case 8: sprintf(frequence_str, "16000Hz"); break;
			case 9: sprintf(frequence_str, "12000Hz"); break;
			case 10: sprintf(frequence_str, "11025Hz"); break;
			case 11: sprintf(frequence_str, "8000Hz"); break;
			default:sprintf(frequence_str, "unknown"); break;
			}


			fprintf(myout, "%5d| %8s|  %8s| %5d|\n", cnt, profile_str, frequence_str, size);
			data_size -= size;
			input_data += size;
			cnt++;
		}

	}
	fclose(ifile);
	free(aacbuffer);
	free(aacframe);

	return 0;
}


int main()
{
	simplest_aac_parser("nocturne.aac");
	return 0;
}
nocturne.aac 音源获取链接: https://github.com/leixiaohua1020/simplest_mediadata_test
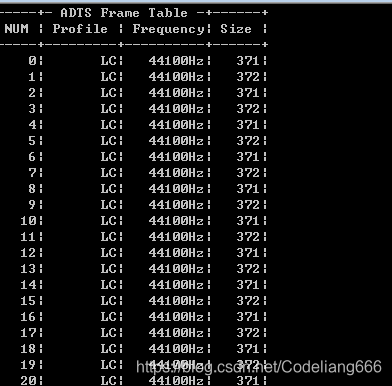
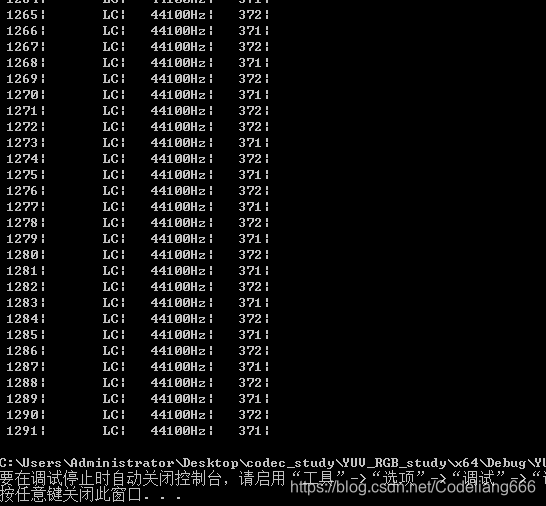
2. 结果
本程序的输入为一个AAC原始码流(裸流)的文件路径,输出为该码流中ADTS frame的统计数据
…
参考链接:
- https://www.jianshu.com/p/b5ca697535bd
- https://blog.youkuaiyun.com/leixiaohua1020/article/details/50535042?locationNum=3&fps=1


 276
276

 被折叠的 条评论
为什么被折叠?
被折叠的 条评论
为什么被折叠?
 到【灌水乐园】发言


