


布局优化
去除不必要的嵌套和节点
这是最基本的一条,但也是最不好做到的一条,往往不注意的时候难免会一些嵌套等。- 首次不需要的节点设置为
GONE或使用ViewStud. - 使用
Relativelayout代替LinearLayout.
平时写布局的时候要多注意,写完后可以通过Hierarchy Viewer或在手机上通过开发者选项中的显示布局边界来查看是否有不必要的嵌套。
- 首次不需要的节点设置为
使用
include
include可以用于将布局中一些公共的部分提取出来。在需要的时候使用即可,比喻一些页面统一的loading页。
include标签的layout属性指定所要包含的布局文件,我们也可以通过android:id或者一些其他的属性来覆盖被引入布局的根节点所对应
的属性值。
xml

 <include

    layout="@layout/loading"

    android:id="@+id/loading_main" />
loading.xml内容为:<RelativeLayout xmlns:android="http://schemas.android.com/apk/res/android" android:layout_width="match_parent" android:layout_height="match_parent"> <ProgressBar android:id="@+id/pb_loadiing" android:layout_width="28dip" android:layout_height="28dip" android:layout_centerInParent="true" android:indeterminateDrawable="@drawable/progressbar_anim_drawable" /> <TextView android:layout_below="@id/pb_loadiing" android:layout_centerHorizontal="true" android:layout_marginTop="10dp" android:layout_width="wrap_content" android:layout_height="wrap_content" android:text="loading..." android:textSize="15sp" /> </RelativeLayout>使用
<merge>标签
merge可以有效的解决布局的层级关系。我们通过一个例子来说明一下:<FrameLayout xmlns:android="http://schemas.android.com/apk/res/android" android:layout_width="fill_parent" android:layout_height="fill_parent"> <ImageView android:layout_width="fill_parent" android:layout_height="fill_parent" android:scaleType="center" android:src="@drawable/ic_launcher" /> <TextView android:layout_width="wrap_content" android:layout_height="wrap_content" android:layout_marginBottom="20dip" android:textSize="22sp" android:textColor="#990000" android:layout_gravity="center_horizontal|bottom" android:text="TEST" /> </FrameLayout>我们在一个页面中显示该部分内容,运行后观察
Hierarchy Viewer。
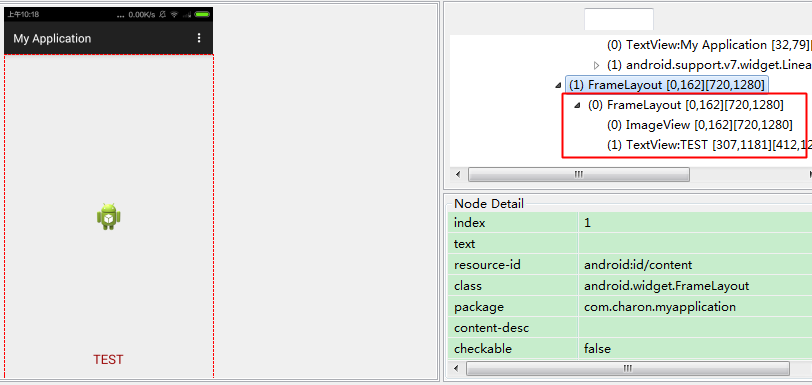
我们会发现除了我们布局最外层还会有一层FrameLayout,这是因为Activity内容视图的parent view就是一个FrameLayout,所以对于我们来说无意中已经多了一层毫无意义的布局。
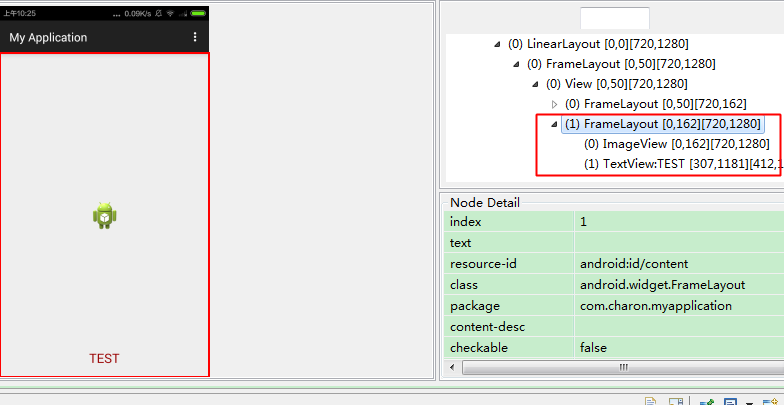
接下来merge的功能就能发挥了,修改代码如下。<merge xmlns:android="http://schemas.android.com/apk/res/android"> <ImageView android:layout_width="fill_parent" android:layout_height="fill_parent" android:scaleType="center" android:src="@drawable/ic_launcher" /> <TextView android:layout_width="wrap_content" android:layout_height="wrap_content" android:layout_marginBottom="20dip" android:textSize="22sp" android:textColor="#990000" android:layout_gravity="center_horizontal|bottom" android:text="TEST" /> </merge>接下来我们在用
Hierarchy Viewer观察就会发现完美的去掉了一层FrameLayout
当然上面我们使用merge是因为跟布局正好是FrameLayout并且没有backgroud和padding等这些属性。如果根本局是LinearLayout等,就没法直接使用merge了。
在include的时候很容易造成布局层级嵌套过多,结合merge使用能有效解决这个问题。使用
ViewStub
ViewStub标签与include一样可以用来引入一个外部布局,但是Viewstub引入的布局默认不会解析与显示,宽高为0,View也为null,这样就会在解析layout时节省cpu和内存。简单的理解就是ViewStub是
include加上GONE.ViewStub常用来引入那些默认不会显示,只在特殊情况下显示的布局,如进度布局、网络失败显示的刷新布局、信息出错出现的提示布局等.<?xml version="1.0" encoding="utf-8"?> <RelativeLayout xmlns:android="http://schemas.android.com/apk/res/android" android:layout_width="match_parent" android:layout_height="match_parent" > …… <ViewStub android:id="@+id/network_unreachble" android:layout_width="match_parent" android:layout_height="match_parent" android:layout="@layout/network_unreachble" /> </RelativeLayout>在代码中通过
(ViewStub)findViewById(id)找到ViewStub,使用inflate()展开ViewStub,然后得到子View,如下:private View mNetErrorView; private void showNetError() { if (mNetErrorView != null) { mNetErrorView.setVisibility(View.VISIBLE); return; } ViewStub stub = (ViewStub)findViewById(R.id.network_unreachble); // 解析并且显示该部分,返回值就是解析后的该`View` mNetErrorView = stub.inflate(); Button networkSetting = (Button)mNetErrorView.findViewById(R.id.bt_network); } private void showNormal() { if (mNetErrorView != null) { mNetErrorView.setVisibility(View.GONE); } }或者也可以通过第二种方式:
View viewStub = findViewById(R.id.network_unreachble);
// ViewStub被展开后的布局所替换
viewStub.setVisibility(View.VISIBLE);
// 获取展开后的布局
mNetErrorView =  findViewById(R.id.network_unreachble);
减少不必要的
Inflate
如上一步中stub.infalte()后将该View进行记录或者是ListView中item inflate的时候。
- 邮箱 :charon.chui@gmail.com
- Good Luck!


 210
210

 被折叠的 条评论
为什么被折叠?
被折叠的 条评论
为什么被折叠?
 到【灌水乐园】发言


