


 本文详细介绍了SpringBoot的实践应用,涵盖Lombok简化POJO、SpringMVC自定义配置、整合JDBC与事务、数据库连接池Hikari、MyBatis及通用Mapper使用、Redis集成、Junit单元测试等内容。
Spring Boot实践
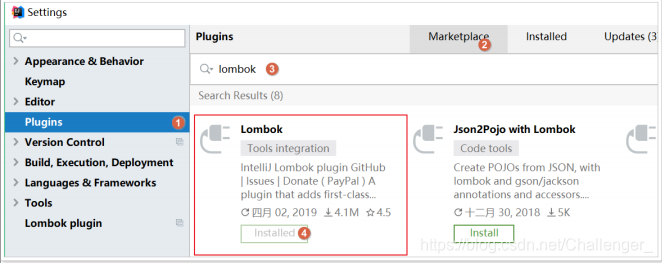
1. Lombok
我们编写pojo时,经常需要编写构造函数和getter、setter方法,属性多的时候,就非常浪费时间,使用lombok插件可以解决这个问题:
在IDEA中安装lombok插件;不安装插件在IDEA中使用lombok的注解虽然编译能通过,但是源码会报错。所以为了让IDEA更好的辨别lombok注解则才安装插件。
需要在maven工程中的 pom.xml 文件引入依赖:
然后可以在Bean上使用:
@Data :自动提供getter和setter、hashCode、equals、toString等方法
@Getter:自动提供getter方法
@Setter:自动提供setter方法
@Slf4j:自动在bean中提供log变量,其实用的是slf4j的日志功能。
例如;在javabean上加@Data,那么就可以省去getter和setter等方法的编写,lombok插件会自动生成。
package com.example.pojo;

import lombok.Data;
import lombok.extern.slf4j.Slf4j;

import java.util.Date;

//在编译阶段会根据注解自动生成对应的方法,data包含get/set/hashCode/equals/toString等方法
@Data
@Slf4j
public class User {

    private Long id;
    private String username;
    private String password;
    private String name;
    private Integer age;
    private String sex;
    private Date birthday;
    private String note;
    private Date created;
    private Date updated;

}
2. 整合SpringMVC
虽然默认配置已经可以使用SpringMVC了,不过我们有时候需要进行自定义配置。可以在 application.yml 文件中配置日志级别控制:
2.1. 修改端口
logging:
  level:
    com.example: debug
    org.springframework: info
#映射端口
server:
  port: 80
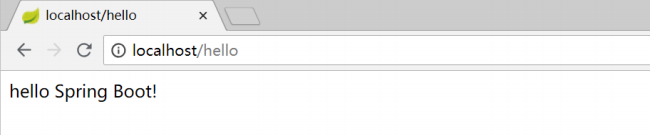
重启服务后测试:
2.2. 访问静态资源
现在,我们的项目是一个jar工程,那么就没有webapp,我们的静态资源该放哪里呢?
回顾我们在上面看的源码,有一个叫做ResourceProperties的类,里面就定义了静态资源的默认查找路径:
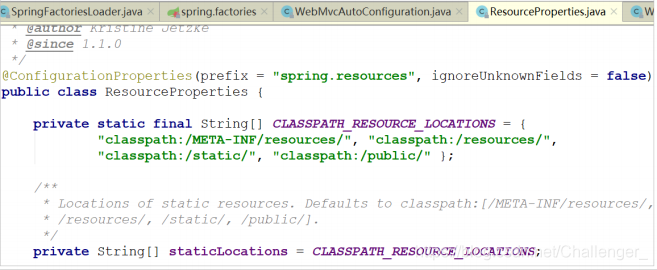
默认的静态资源路径为:
- classpath:/META-INF/resources/
- classpath:/resources/
- classpath:/static/
- classpath:/public
只要静态资源放在这些目录中任何一个,SpringMVC都会帮我们处理。
注意:如果访问图片时候没有显示;可以先将项目先clean再启动,或者创建 public、resources 文件夹,然后
图片放置到public或resources中。
2.3. 添加拦截器
拦截器不是一个普通属性,而是一个类,所以就要用到java配置方式了。在SpringBoot官方文档中有这么一段说明:
If you want to keep Spring Boot MVC features and you want to add additional MVC configuration(interceptors, formatters, view controllers, and other features), you can add your own @Configuration class of type WebMvcConfigurer but without @EnableWebMvc . If you wish to provide custom instances of RequestMappingHandlerMapping , RequestMappingHandlerAdapter , or ExceptionHandlerExceptionResolver , you can declare a WebMvcRegistrationsAdapter instance to provide such components. If you want to take complete control of Spring MVC, you can add your own @Configuration annotated with @EnableWebMvc .
翻译:
如果你想要保持Spring Boot 的一些默认MVC特征,同时又想自定义一些MVC配置(包括:拦截器,格式化器,
视图控制器、消息转换器 等等),你应该让一个类实现 WebMvcConfigurer ,并且添加 @Configuration 注解,但是千万不要加 @EnableWebMvc 注解。如果你想要自定义 HandlerMapping 、 HandlerAdapter 、 ExceptionResolver 等组件,你可以创建一个 WebMvcRegistrationsAdapter 实例 来提供以上组件。
如果你想要完全自定义SpringMVC,不保留SpringBoot提供的一切特征,你可以自己定义类并且添加
@Configuration 注解和 @EnableWebMvc 注解
总结:通过实现 WebMvcConfigurer 并添加 @Configuration 注解来实现自定义部分SpringMvc配置。
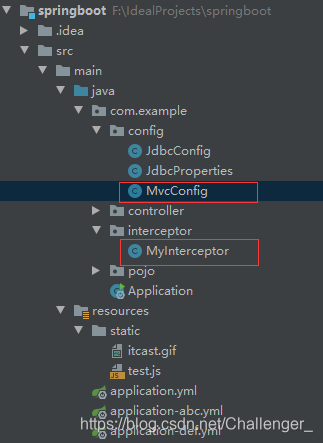
- 创建 com\example\interceptor\MyInterceptor.java 拦截器,内容如下:
package com.example.interceptor;

import lombok.extern.slf4j.Slf4j;
import org.springframework.web.servlet.HandlerInterceptor;
import org.springframework.web.servlet.ModelAndView;

import javax.servlet.http.HttpServletRequest;
import javax.servlet.http.HttpServletResponse;

@Slf4j
public class MyInterceptor implements HandlerInterceptor {

    @Override
    public boolean preHandle(HttpServletRequest request, HttpServletResponse response, Object handler) throws Exception {
        log.debug("这是MyInterceptor的preHandle方法");
        return true;
    }

    @Override
    public void postHandle(HttpServletRequest request, HttpServletResponse response, Object handler, ModelAndView modelAndView) throws Exception {
        log.debug("这是MyInterceptor的postHandle方法");
    }

    @Override
    public void afterCompletion(HttpServletRequest request, HttpServletResponse response, Object handler, Exception ex) throws Exception {
        log.debug("这是MyInterceptor的afterCompletion方法");
    }
}
- 定义配置类 com\example\config\MvcConfig.java,用于注册拦截器,内容如下:
package com.example.config;

import com.example.interceptor.MyInterceptor;
import org.springframework.context.annotation.Configuration;
import org.springframework.web.servlet.config.annotation.InterceptorRegistry;
import org.springframework.web.servlet.config.annotation.WebMvcConfigurer;

@Configuration
public class MvcConfig implements WebMvcConfigurer {

    //注册拦截器
    public MyInterceptor myInterceptor() {
        return new MyInterceptor();
    }

    //添加拦截器到spring mvc拦截器链
    @Override
    public void addInterceptors(InterceptorRegistry registry) {
        registry.addInterceptor(myInterceptor()).addPathPatterns("/*");
    }
}
结构如下:
接下来访问http://localhost/hello 并查看日志:

3. 整合jdbc和事务
在 pom.xml 文件中添加如下依赖:
        <dependency> <groupId>org.springframework.boot</groupId>
            <artifactId>spring-boot-starter-jdbc</artifactId>
        </dependency>
当然,不要忘了数据库驱动,SpringBoot并不知道我们用的什么数据库,这里我们选择MySQL;同样的在 pom.xml文件中添加如下依赖:
        <dependency>
            <groupId>mysql</groupId>
            <artifactId>mysql-connector-java</artifactId>
            <version>5.1.6</version>
        </dependency>
至于事务,SpringBoot中通过注解来控制。就是我们熟知的 @Transactional 使用的时候设置在对应的类或方法上即可。
创建 com\example\service\UserService.java 业务类如下:
package com.example.service;

import com.example.pojo.User;
import org.springframework.stereotype.Service;
import org.springframework.transaction.annotation.Transactional;

@Service
public class UserService {

    //根据id查询
    public User queryById() {
        return new User();
    }

    //新增保存用户
    @Transactional
    public void saveUser(User user) {
        System.out.println("新增用户...");
    }
}
4. 整合连接池
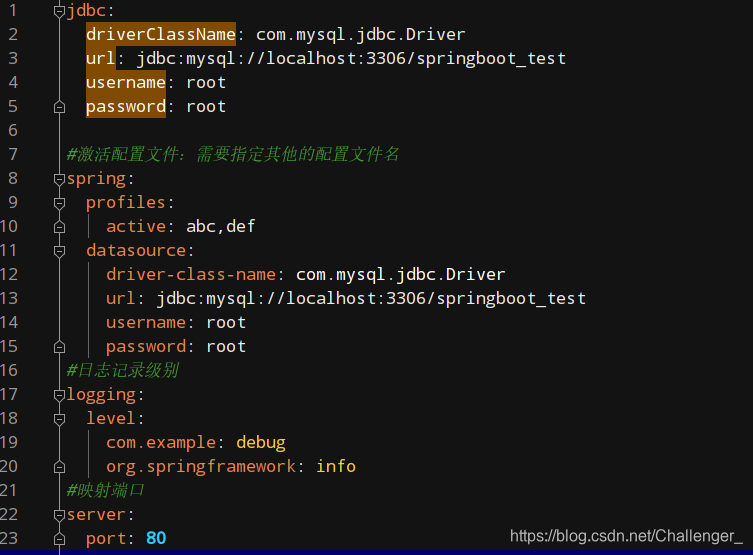
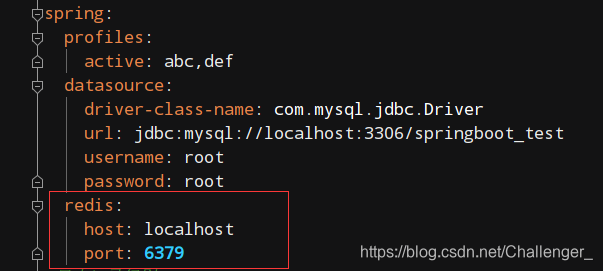
数据库连接池使用默认的hikari,在配置文件application.yml中配置如下:
spring:
  profiles:
    active: abc,def
  datasource:
    driver-class-name: com.mysql.jdbc.Driver
    url: jdbc:mysql://localhost:3306/springboot_test
    username: root
    password: root
【注意】
把 JdbcConfig 类中的druid的配置删除或注释;
在配置完hikari数据库连接池后的 application.yml 文件如下:
5. 整合mybatis
5.1. mybatis
- SpringBoot官方并没有提供Mybatis的启动器,不过Mybatis官网自己实现了。在项目的 pom.xml 文件中加入如下依赖:
        <!--mybatis-->
        <dependency>
            <groupId>org.mybatis.spring.boot</groupId>
            <artifactId>mybatis-spring-boot-starter</artifactId>
            <version>2.1.3</version>
        </dependency>
- 配置 application.yml ,常用配置如下:
#mybatis配置
mybatis:
  # 实体类别名包路径
  type-aliases-package: com.example.pojo
  # 映射文件路径
  # mapper-locations: classpath:mappers/*xml
  #日志配置
  configuration:
    log-impl: org.apache.ibatis.logging.stdout.StdOutImpl
- 配置Mapper扫描
需要注意,这里没有配置mapper接口扫描包,因此我们需要给每一个Mapper接口添加 @Mapper 注解,才能被识别。
@Mapper
public interface UserMapper {
}
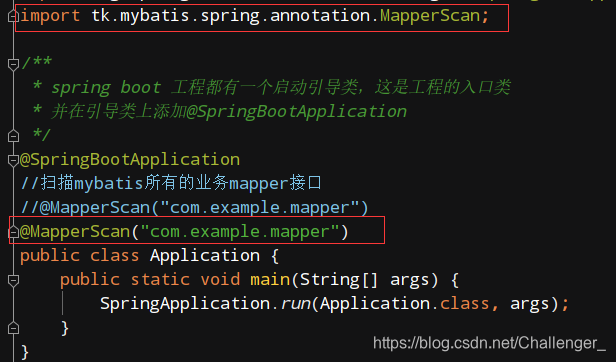
或者,我们也可以不加注解,而是在启动类上添加扫描包注解(推荐):
@SpringBootApplication
//扫描mybatis所有的业务mapper接口
@MapperScan("com.example.mapper")
public class Application {
    public static void main(String[] args) {
        SpringApplication.run(Application.class, args);
    }
}
5.2. 通用mapper
通用Mapper:可以实现自动拼接sql语句;所有的mapper都不需要编写任何方法也就是不用编写sql语句。可以提高开发效率。
- 通用Mapper的作者也为自己的插件编写了启动器,我们直接引入即可。在项目的 pom.xml 文件中加入如下依赖:
        <!--通用mapper-->
        <dependency>
            <groupId>tk.mybatis</groupId>
            <artifactId>mapper-spring-boot-starter</artifactId>
            <version>2.1.5</version>
        </dependency>
注意:一旦引入了通用Mapper的启动器,会覆盖Mybatis官方启动器的功能,因此需要移除对官方Mybatis启动器的依赖。
- 编写UserMapper
无需任何配置就可以使用了。如果有特殊需要,可以到通用mapper官网查看:https://github.com/abel533/Mapper/wiki/3.config
编写 com\example\mapper\UserMapper.java 如下:
package com.example.mapper;

import com.example.pojo.User;
import tk.mybatis.mapper.common.Mapper;

public interface UserMapper extends Mapper<User> {
}
- 把启动类上的@MapperScan注解修改为通用mapper中自带的:
- 在User实体类上加JPA注解修改 com\example\pojo\User.java 如下:
@Data
@Table(name = "tb_user")
public class User {

    @Id
    //主键回填
    @KeySql(useGeneratedKeys = true)
    private Long id;

    //user_name --> userName
    private String userName;
    private String password;
    private String name;
    private Integer age;
    private String sex;
    private Date birthday;
    private String note;
    private Date created;
    private Date updated;

}
- 对 UserService 的代码进行简单改造
@Service
public class UserService {

    @Autowired
    private UserMapper userMapper;

    //根据id查询
    public User queryById(Long id) {
        return userMapper.selectByPrimaryKey(id);
    }

    //新增保存用户
    @Transactional
    public void saveUser(User user) {
        System.out.println("新增用户...");
        //选择性新增;如果属性为空则该属性不会出现在insert语句上
        userMapper.insertSelective(user);
    }
}
6. 启动测试
将 HelloController 进行简单改造:
@RestController
public class HelloController {

    @Autowired
    private UserService userService;
    /** 根据id获取用户
     *  @param id 用户id
     *  @return 用户
     */
    @GetMapping("/user/{id}")
    public User queryById(@PathVariable Long id) {
        return userService.queryById(id);
    }
}
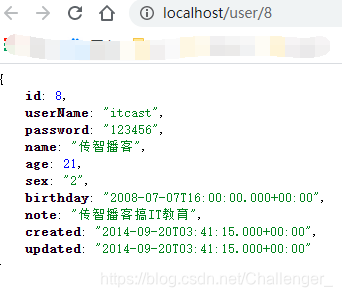
启动项目进行测试 http://localhost/user/用户id --> http://localhost/user/8,查看:
7. Junit测试
- 在springboot项目中如果要使用Junit进行单元测试,则需要添加如下的依赖:
        <dependency>
            <groupId>org.springframework.boot</groupId>
            <artifactId>spring-boot-starter-test</artifactId>
        </dependency>
- 在测试包下编写测试类
在测试类上面必须要添加 @SpringBootTest 注解。
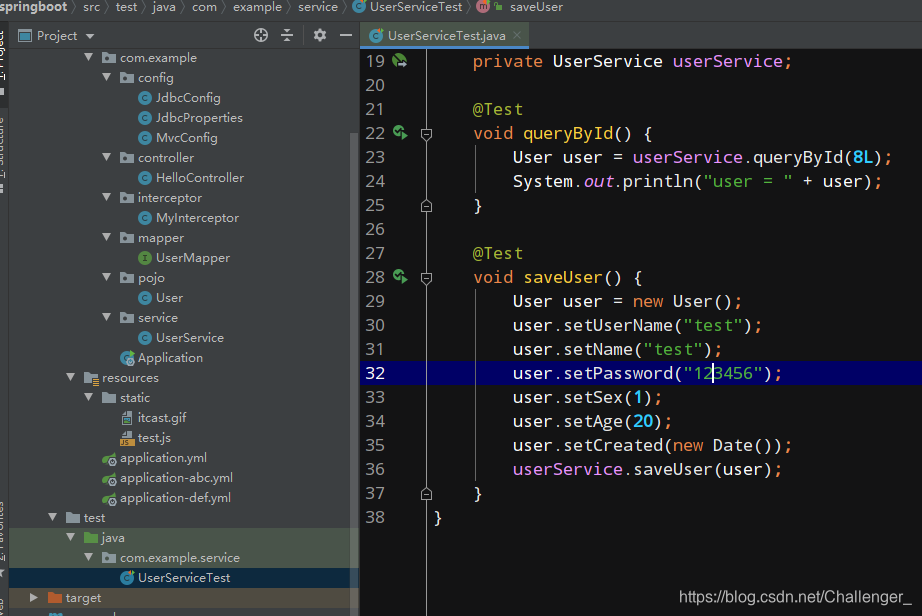
编写测试类 com\example\service\UserServiceTest.java
package com.example.service;

import com.example.pojo.User;
import org.junit.jupiter.api.Test;
import org.junit.runner.RunWith;
import org.springframework.beans.factory.annotation.Autowired;
import org.springframework.boot.test.context.SpringBootTest;
import org.springframework.test.context.junit4.SpringRunner;

import java.util.Date;

import static org.junit.jupiter.api.Assertions.*;

@RunWith(SpringRunner.class)
@SpringBootTest
class UserServiceTest {

    @Autowired
    private UserService userService;

    @Test
    void queryById() {
        User user = userService.queryById(8L);
        System.out.println("user = " + user);
    }

    @Test
    void saveUser() {
        User user = new User();
        user.setUserName("test");
        user.setName("test");
        user.setPassword("123456");
        user.setSex(1);
        user.setAge(20);
        user.setCreated(new Date());
        userService.saveUser(user);
    }
}
测试代码结构如下:
8. 整合Redis
在 pom.xml 文件中添加如下依赖;
        <dependency>
            <groupId>org.springframework.boot</groupId>
            <artifactId>spring-boot-starter-data-redis</artifactId>
        </dependency>
配置 application.yml 文件;
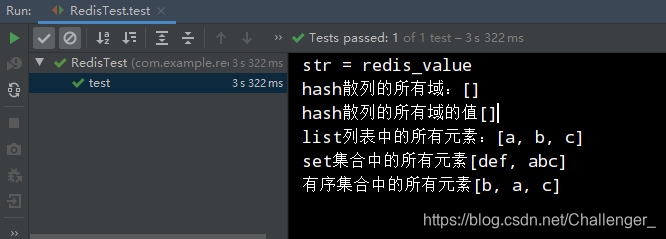
编写 com\example\redis\RedisTest.java 测试代码;
package com.example.redis;

import org.junit.Test;
import org.junit.runner.RunWith;
import org.springframework.beans.factory.annotation.Autowired;
import org.springframework.boot.test.context.SpringBootTest;
import org.springframework.data.redis.core.RedisTemplate;
import org.springframework.test.context.junit4.SpringRunner;

import java.util.List;
import java.util.Set;

@RunWith(SpringRunner.class)
@SpringBootTest
public class RedisTest {

    @Autowired
    private RedisTemplate redisTemplate;

    @Test
    public void test() {
        //字符串
        //redisTemplate.opsForValue().set("str","redis");
        //System.out.println("str = " + redisTemplate.opsForValue().get("str"));
        redisTemplate.boundValueOps("str").set("redis_value");
        System.out.println("str = " + redisTemplate.boundValueOps("str").get());

        //hash 散列
        redisTemplate.boundHashOps("h_hey").put("name", "redis_hash");
        redisTemplate.boundHashOps("h_hey").put("age", 18);
        //获取所有域
        Set set = redisTemplate.boundHashOps("h_key").keys();
        System.out.println("hash散列的所有域:" + set);
        //获取所有值
        List list1 = redisTemplate.boundHashOps("h_key").values();
        System.out.println("hash散列的所有域的值" + list1);

        //list 列表
        redisTemplate.boundListOps("h_key").leftPush("c");
        redisTemplate.boundListOps("h_key").leftPush("b");
        redisTemplate.boundListOps("h_key").leftPush("a");
        //获取全部元素
        List list2 = redisTemplate.boundListOps("h_key").range(0, -1);
        System.out.println("list列表中的所有元素:" + list2);

        //set 集合
        redisTemplate.boundSetOps("s_key").add("abc","def");
        Set set1 = redisTemplate.boundSetOps("s_key").members();
        System.out.println("set集合中的所有元素" + set1);

        //sorted 有序集合
        redisTemplate.boundZSetOps("z_key").add("a", 30);
        redisTemplate.boundZSetOps("z_key").add("b", 10);
        redisTemplate.boundZSetOps("z_key").add("c", 50);
        Set z_set = redisTemplate.boundZSetOps("z_key").range(0, -1);
        System.out.println("有序集合中的所有元素" + z_set);
    }

}
测试结果:


 449
449

 被折叠的 条评论
为什么被折叠?
被折叠的 条评论
为什么被折叠?
 到【灌水乐园】发言


