


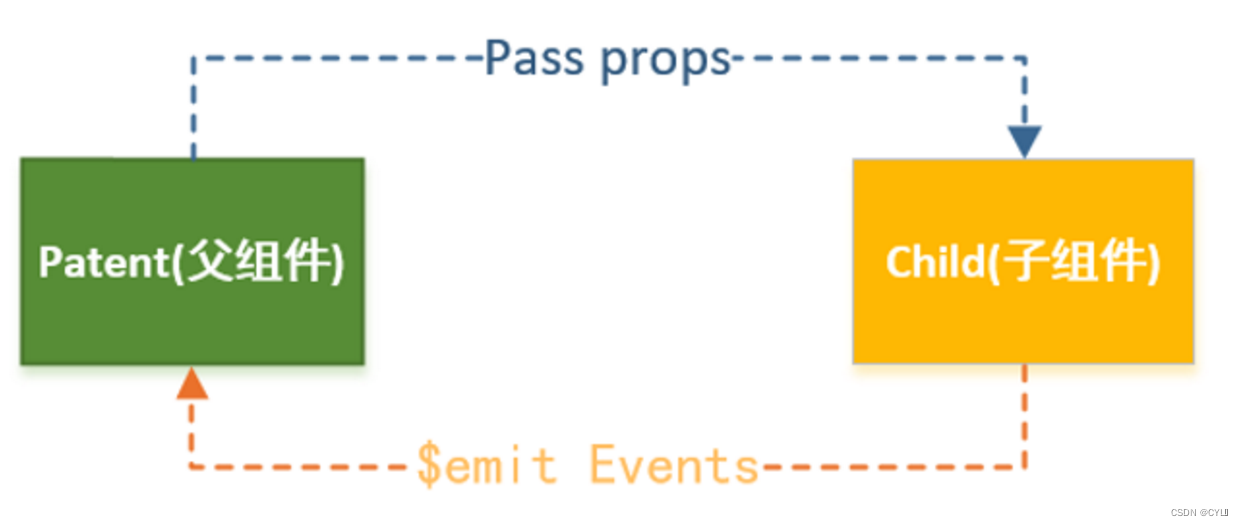
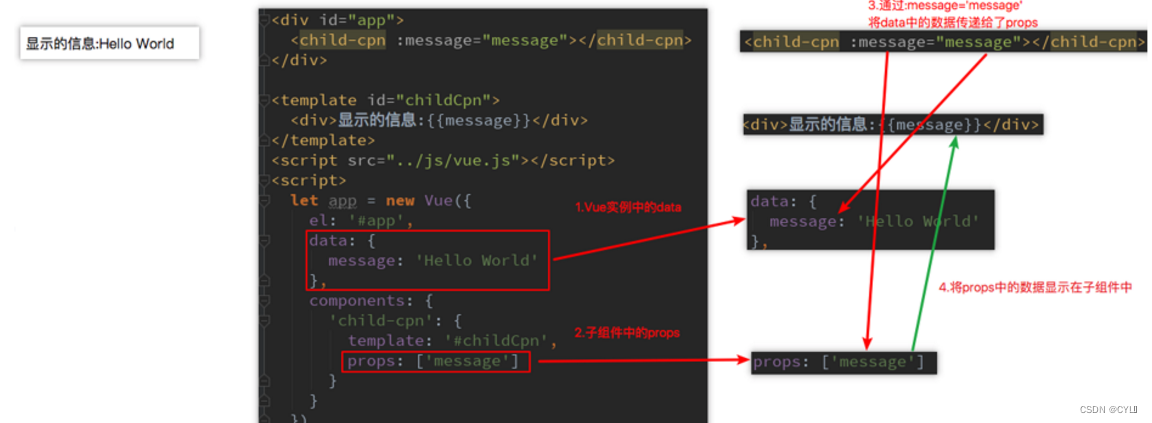
一.父传子
父组件向子组件传递信息,通过props
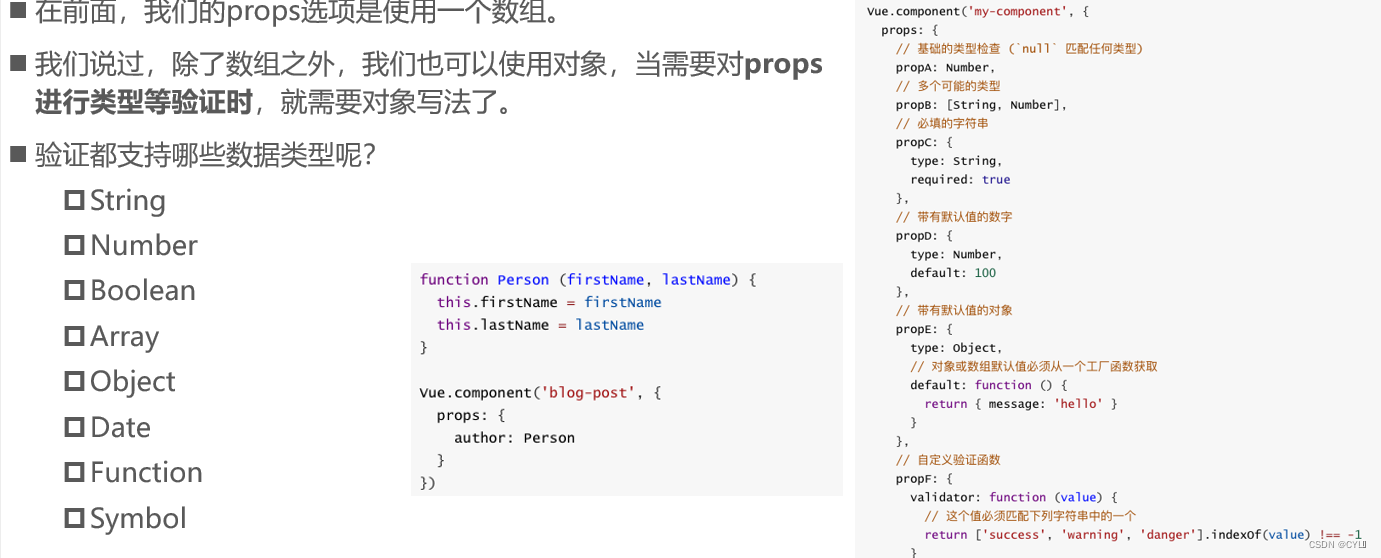
props数据验证:
二.子传父
#props用于父组件向子组件传递数据,还有一种比较常见的是子组件传递数据或事件到父组件中。
当子组件需要向父组件传递数据时,就要用到自定义事件了。
我们之前学习的v-on不仅仅可以用于监听DOM事件,也可以用于组件间的自定义事件。
#自定义事件的流程:
在子组件中,通过$emit()来触发事件。
在父组件中,通过v-on来监听子组件事件。
  <div id="app">
        <cpn @increment="changeTotal" @decrement="changeTotal"></cpn>//v-on来监听子组件事件
        <h2>点击次数:{{total}}</h2>
    </div>
    <template id="cp">
        <div>
            <button @click="increment">+1</button>
            <button @click="decrement">-1</button>
        </div>
    </template>
    <script>
        new Vue({
            el: "#app",
            data: {
                total: 0
            },
            methods: {
                changeTotal(counter) {
                    this.total = counter
                }
            },
            components: {
                "cpn": {
                    template: "#cp",
                    data() {
                        return {
                            counter: 0
                        }
                    },
                    methods: {
                        increment() {
                            this.counter++;
                            //触发事件,increment为触发事件,this.counter为要传递的数据
                            this.$emit("increment", this.counter)
                        },
                        decrement() {
                            this.counter--;
                            this.$emit("decrement", this.counter)
                        }
                    }
                },
            },
        })
    </script>
三. 非父子组件之间的通信
1.创建bus
import Vue from 'vue';

// 使用 Event Bus来实现非父子组件之间的通信
const bus = new Vue();

export default bus;
2.使用bus
发送方:
<template>
  <div class="wrapper">
    <hr />
    <br />
    <button @click="send">send</button>
  </div>
</template>
<script>
  import Bus from '../../utils/bus';
  export default {
    data() {
      return {
        message: '',
      };
    },
    methods: {
      send() {
        this.message = '这是传递到接受方中的数据!';
        Bus.$emit('msg', this.message);
      },
    },
  };
</script>
接受方:
<template>
  <div class="wrapper">
    <hr />
    <br />
    <p>{{message}}</p>
  </div>
</template>
<script>
  import Bus from '../../utils/bus';
  export default {
    data() {
      return {
        message: '',
      };
    },
    mounted() {
      let self = this;
      Bus.$on('msg', (e) => {
        self.message = e;
      });
    },
  };
</script>
四.父子组件间的通信方式
$children的访问
$children的缺陷:
#通过$children访问子组件时,是一个数组类型,访问其中的子组件必须通过索引值。
this.$children[0].showMessage()//showMessage()为子组件的一个方法
#但是当子组件过多,我们需要拿到其中一个时,往往不能确定它的索引值,甚至还可能会发生变化 。
#有时候,我们想明确获取其中一个特定的组件,这个时候就可以使用$refs
$refs的访问
#$refs和ref指令通常是一起使用的。
#首先,我们通过ref给某一个子组件绑定一个特定的ID。
#其次,通过this.$refs.ID就可以访问到该组件了
.ref如果绑定在组件中的,那么通过this.$refs.refname获取一个对象数组
ref如果绑定在普通元素中,那么通过this.\ $refs.refname获取一个元素对象
子组件:
<child-cpn1 ref='child1'></child-cpn1>
<child-cpn1 ref='child2'></child-cpn1>
<button @click='showRefsCpn'>通过refs访问组件<button>
父组件:
showRefsCpn(){
console.log(this.$refs.child1.message)
console.log(this.$refs.child2.message)
}
$parent
#如果我们想在子组件中直接访问父组件,可以通过$parent(不建议使用)


 1407
1407

 被折叠的 条评论
为什么被折叠?
被折叠的 条评论
为什么被折叠?
 到【灌水乐园】发言


