


 本文围绕QML代码中property的默认default属性展开。通过CustomButton.qml和Main.qml的例程,先展示未达预期效果的代码,经修改后实现红色背景显示文字。最后使用default关键词简化代码,再次运行得到预期结果,说明了default属性的作用。
我们在看QML代码的时候,可能经常会看到有property的默认default属性.这个属性有什么用处呢?在今天的例程中,我们来具体讲解一下.
根据QML语言的介绍,任何一个QML的object,有且只有一个default属性.在英文的文章中,具体描述如下:
	An object definition can have a single default property. A default property is the property to which
a value is assigned if anobject is declared within another object's definition without declaring it
as a value for a particular property.
这里重点是对Object起作用的.说起来比较难懂,我们就来做一个例子.
CustomButton.qml
import QtQuick 2.0

Item {
    id:root
    property string text: "Label"
    width: 100
    height: 32


    Item{
        id: container
        anchors.fill: parent
    }

    Column {
        anchors.centerIn: parent
        spacing: units.gu(2)

        Text {
            id: label
            text: root.text
        }
    }
}
这是一个用来显示一个文字的Component.我们可以在我们的Main.qml中进行使用:
Main.qml
  CustomButton{
            anchors.centerIn: parent
            width: units.gu(30)
            height: units.gu(20)

            text: "Hello, the world!"

            Rectangle{
                          anchors.fill: parent
                           color:"red"
                       }
        }
    }
运行我们的代码:
我们可以看到我们没有看见在我们的代码中所希望看到的**"Hello, the world!"**.这是因为我们的如下的代码覆盖了整个的区域:
  Rectangle{
            anchors.fill: parent
            color:"red"
            }
为了实现我们能够在最地下画上一个红色的底,在之上再写上我们的文字.我们对我们的CustomButton.qml做如下对的修改:
CustomButton.qml(更改)
import QtQuick 2.0

Item {
    id:root
    property string text: "Label"
    property alias content:container.children;
    width: 100
    height: 32


    Item{
        id: container
        anchors.fill: parent
    }

    Column {
        anchors.centerIn: parent
        spacing: units.gu(2)

        Text {
            id: label
            text: root.text
        }
    }
}
在这里,我们定义了一个属性content.它被指向我们Component之中的container.children.在我们的Main.qml中,我们也重新修改我们的应用:
Main.qml(更改)
 CustomButton{
      anchors.centerIn: parent
      width: units.gu(30)
      height: units.gu(20)

      text: "Hello, the world!"

      content: [
          Rectangle{
              anchors.fill: parent
              color:"red"
          }
      ]
  }
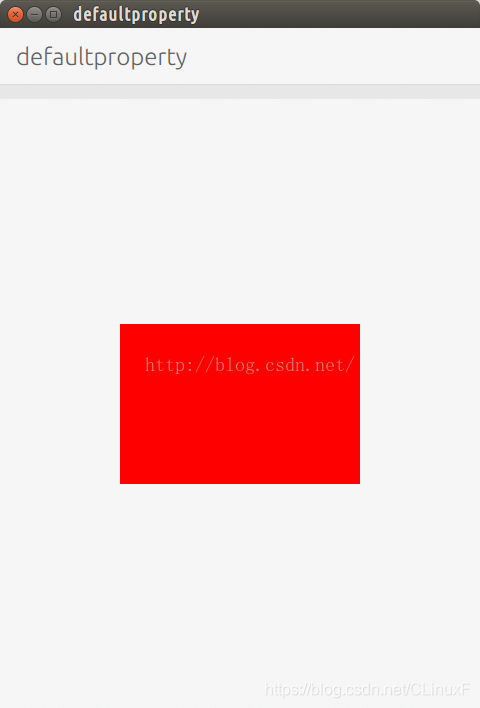
经过这样的改造,我们重新运行我们的应用:

显然这次我们看到了我们所希望的结果.在红色的背景下,显示了我们希望的文字**"Hello, the world!"**.
到目前位置,我们还没有使用到我们的default属性.我们可以更进一步修改我们的CustomButtom.qml如下:
CustomButtom.qml (最后更改)
import QtQuick 2.0

Item {
    id:root
    property string text: "Label"
    default property alias content:container.children;
    width: 100
    height: 32


    Item{
        id: container
        anchors.fill: parent
    }

    Column {
        anchors.centerIn: parent
        spacing: units.gu(2)

        Text {
            id: label
            text: root.text
        }
    }
}
很显然,我们使用了一个默认的属性default关键词,这样在我们的应用Main.qml中,我们可以重新把我们的代码改为如下:
Main.qml (最后更改)
 CustomButton{
      anchors.centerIn: parent
      width: units.gu(30)
      height: units.gu(20)

      text: "Hello, the world!"

      Rectangle{
          anchors.fill: parent
          color:"red"
      }
  }
显然,这里没有使用content那样复杂的写法,但是我们重新运行我们的应用:

显然得到了我们想要的结果.和上面第一次运行的结果是完全不同的(第一次中没有文字的显现).这说明,我们的Rectangle是直接赋给我们的CustomButtom中的content,并得以显示.
参考:https://blog.youkuaiyun.com/ubuntutouch/article/details/48623671


 724
724

 被折叠的 条评论
为什么被折叠?
被折叠的 条评论
为什么被折叠?
 到【灌水乐园】发言


