


 一、项目介绍
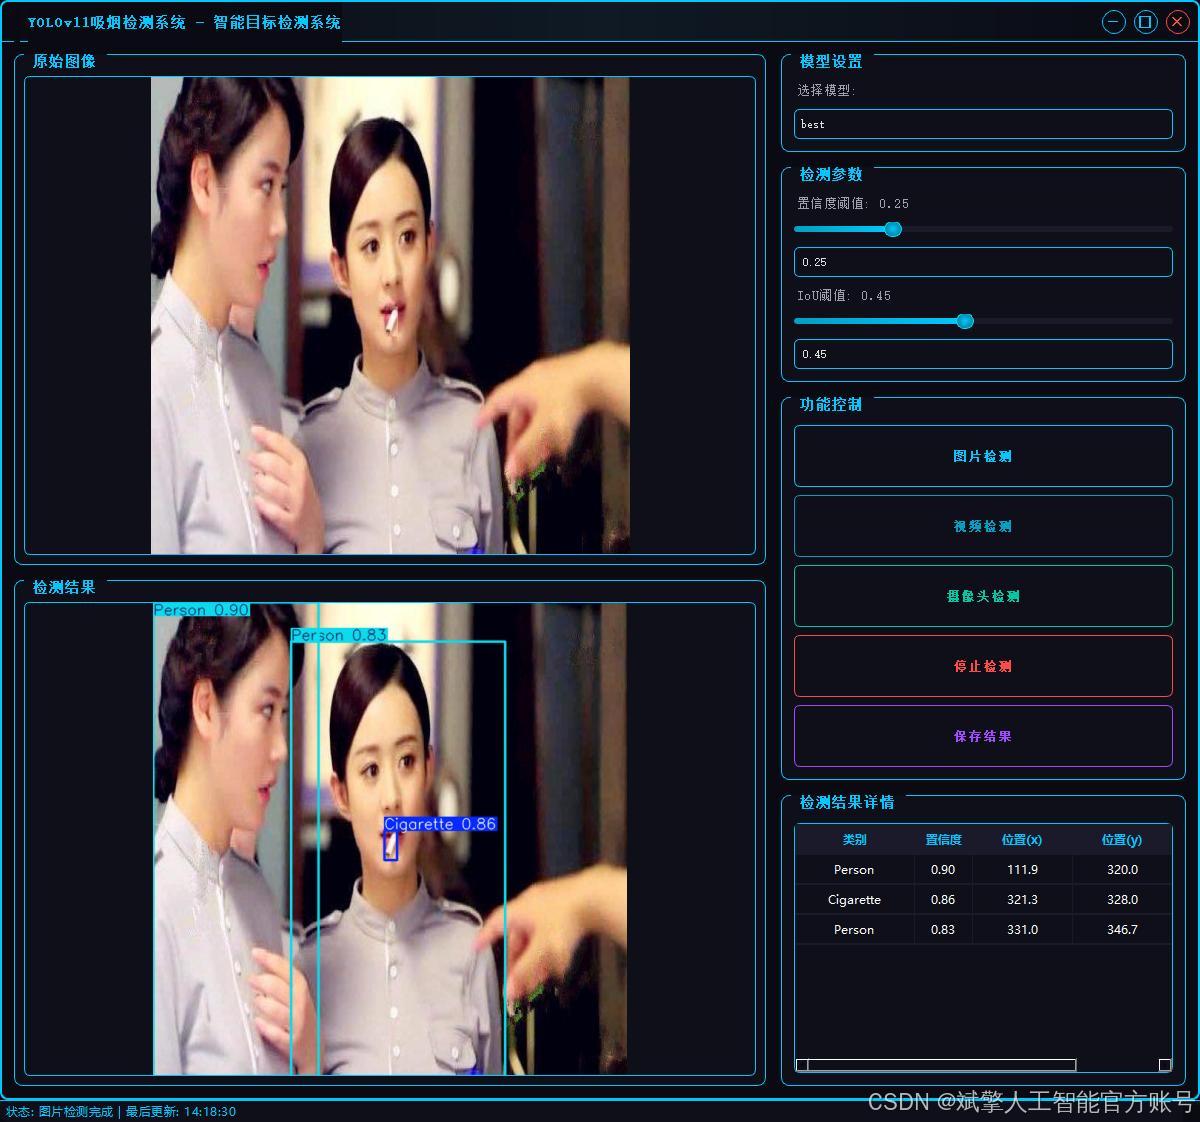
本项目旨在开发一个基于YOLOv11架构的高精度、实时吸烟行为检测系统。系统通过对监控画面或图像进行端到端的分析,能够精准识别并定位五种关键目标:香烟(Cigarette)、人(Person)、烟雾(Smoke)、电子烟(Vape) 以及综合性的吸烟行为(smoking)。该模型在包含超过12,000张标注图像的数据集上进行了充分训练,展现出强大的特征学习与泛化能力。此类技术可广泛应用于安全生产监控、公共场所禁烟监管、智能安防等领域,为自动化违规行为识别提供有效的技术解决方案,助力实现智能化管理。
目录
基于深度学习YOLOv11的吸烟识别检测系统(YOLOv11+YOLO数据集+UI界面+登录注册界面+Python项目源码+模型)_哔哩哔哩_bilibili
基于深度学习YOLOv11的吸烟识别检测系统(YOLOv11+YOLO数据集+UI界面+登录注册界面+Python项目源码+模型)
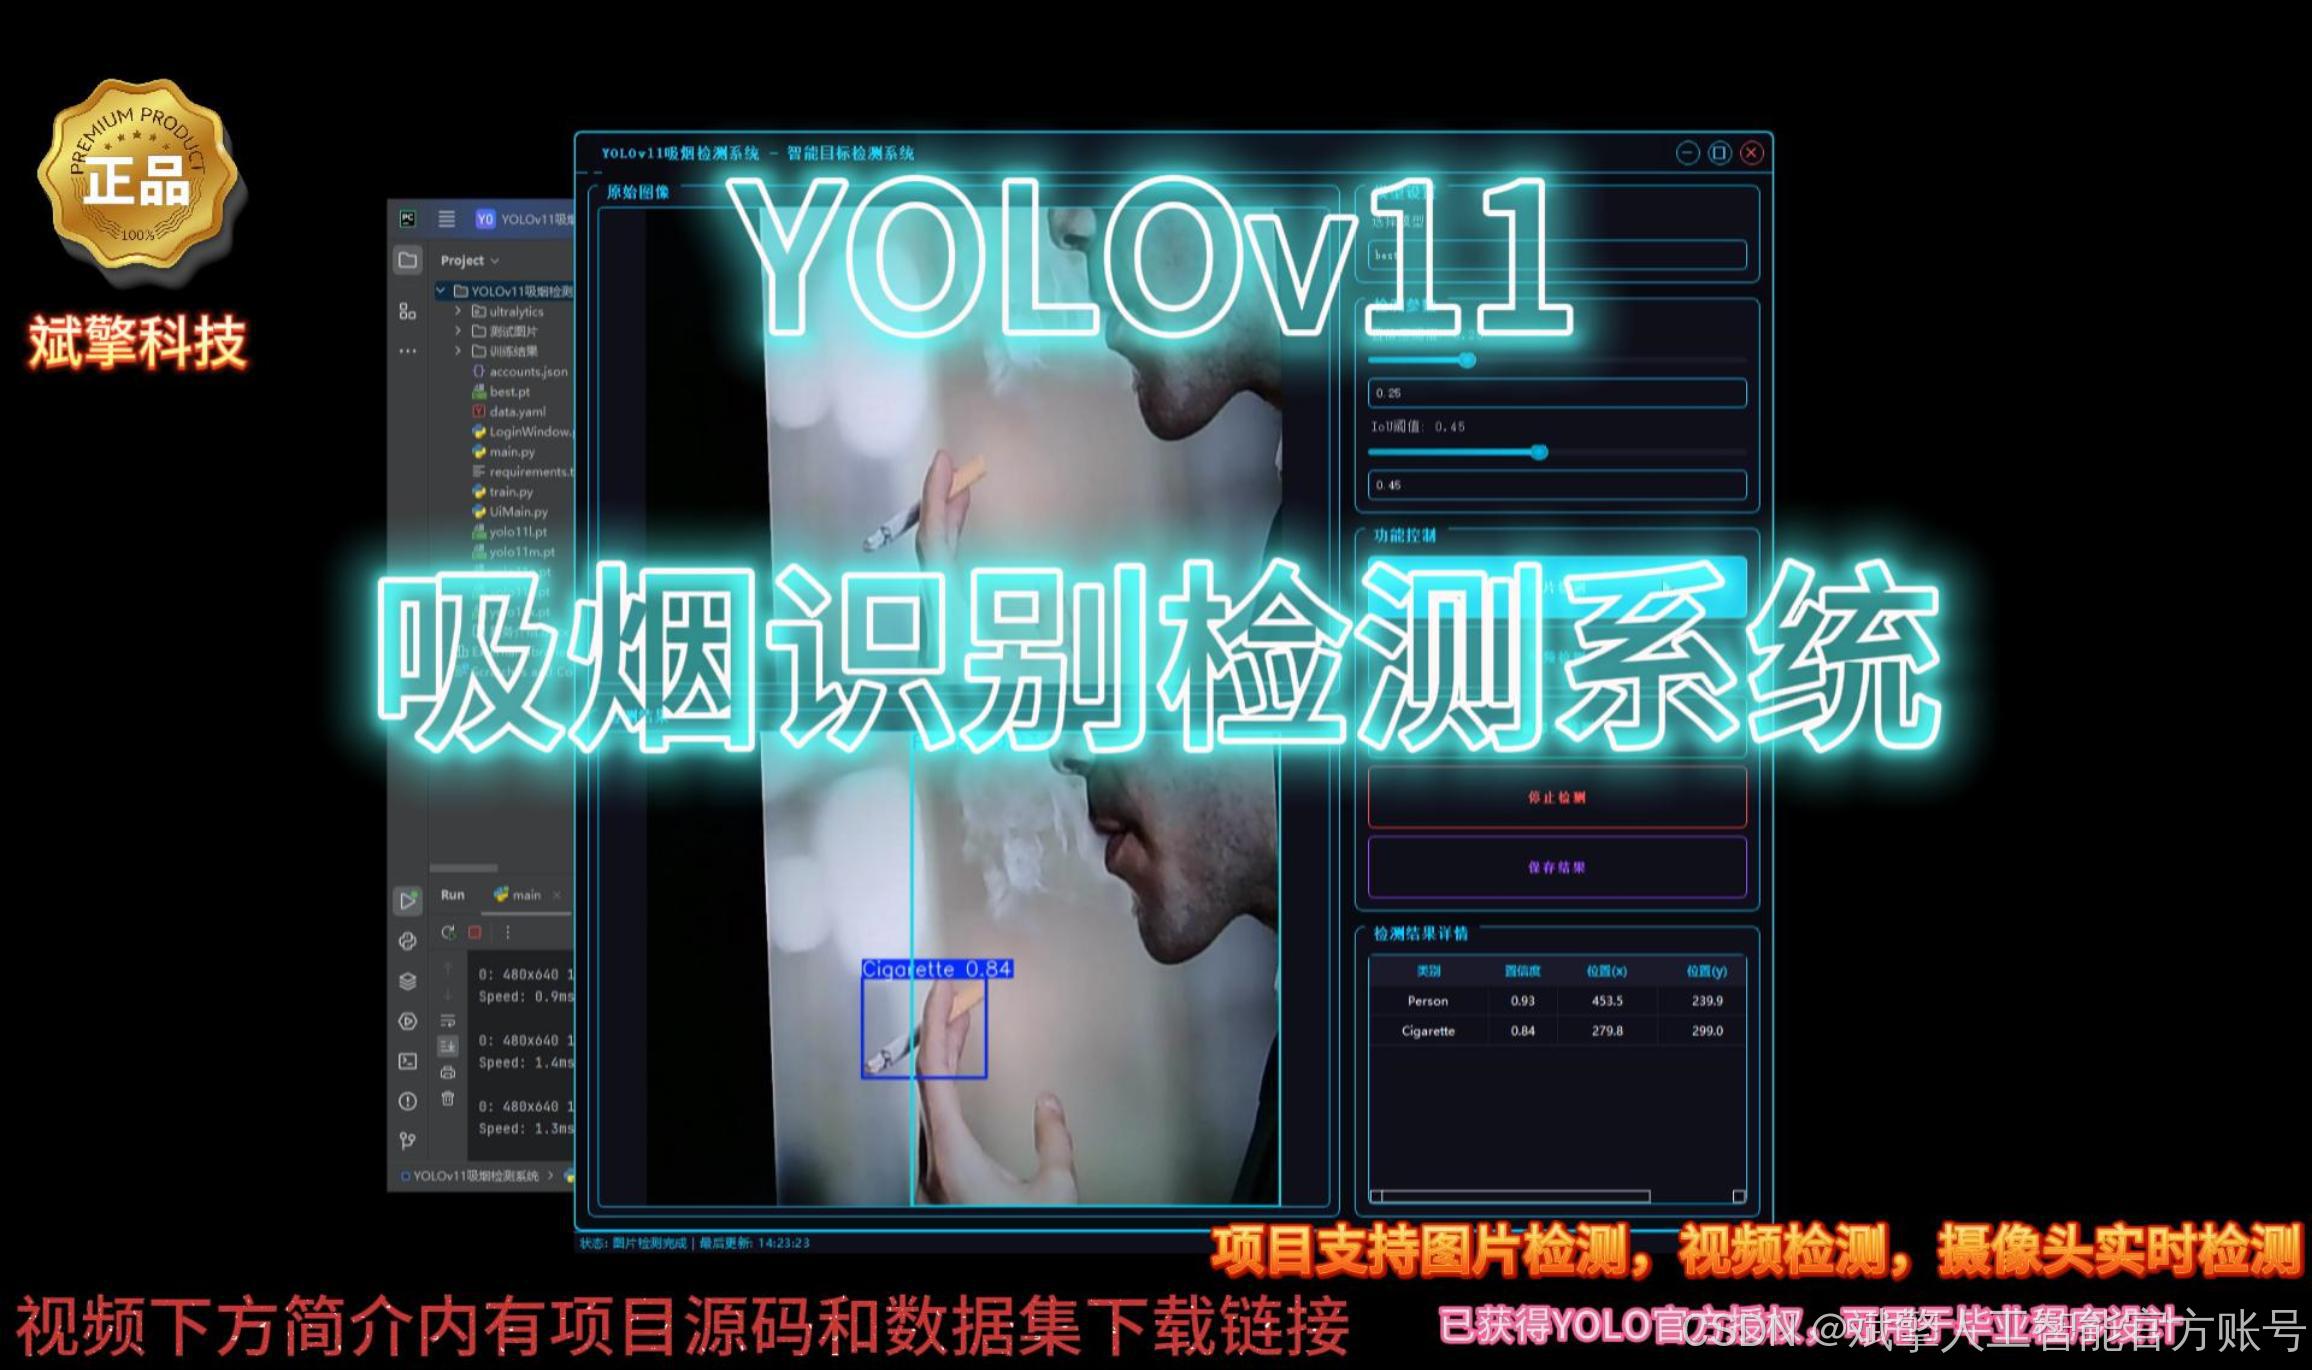
二、项目功能展示
✅ 用户登录注册:支持密码检测和安全性验证。
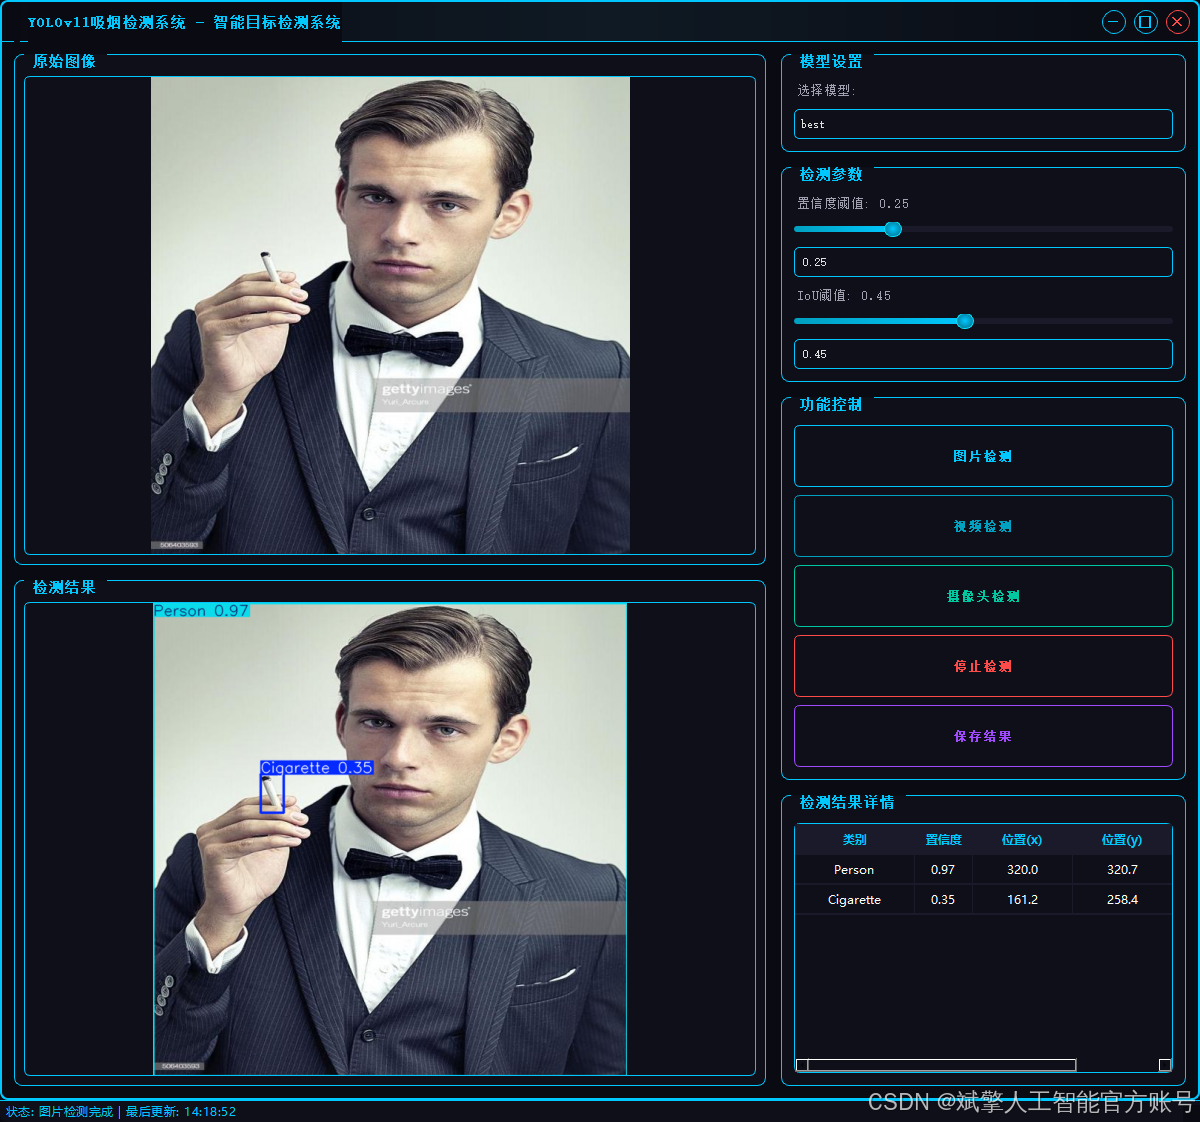
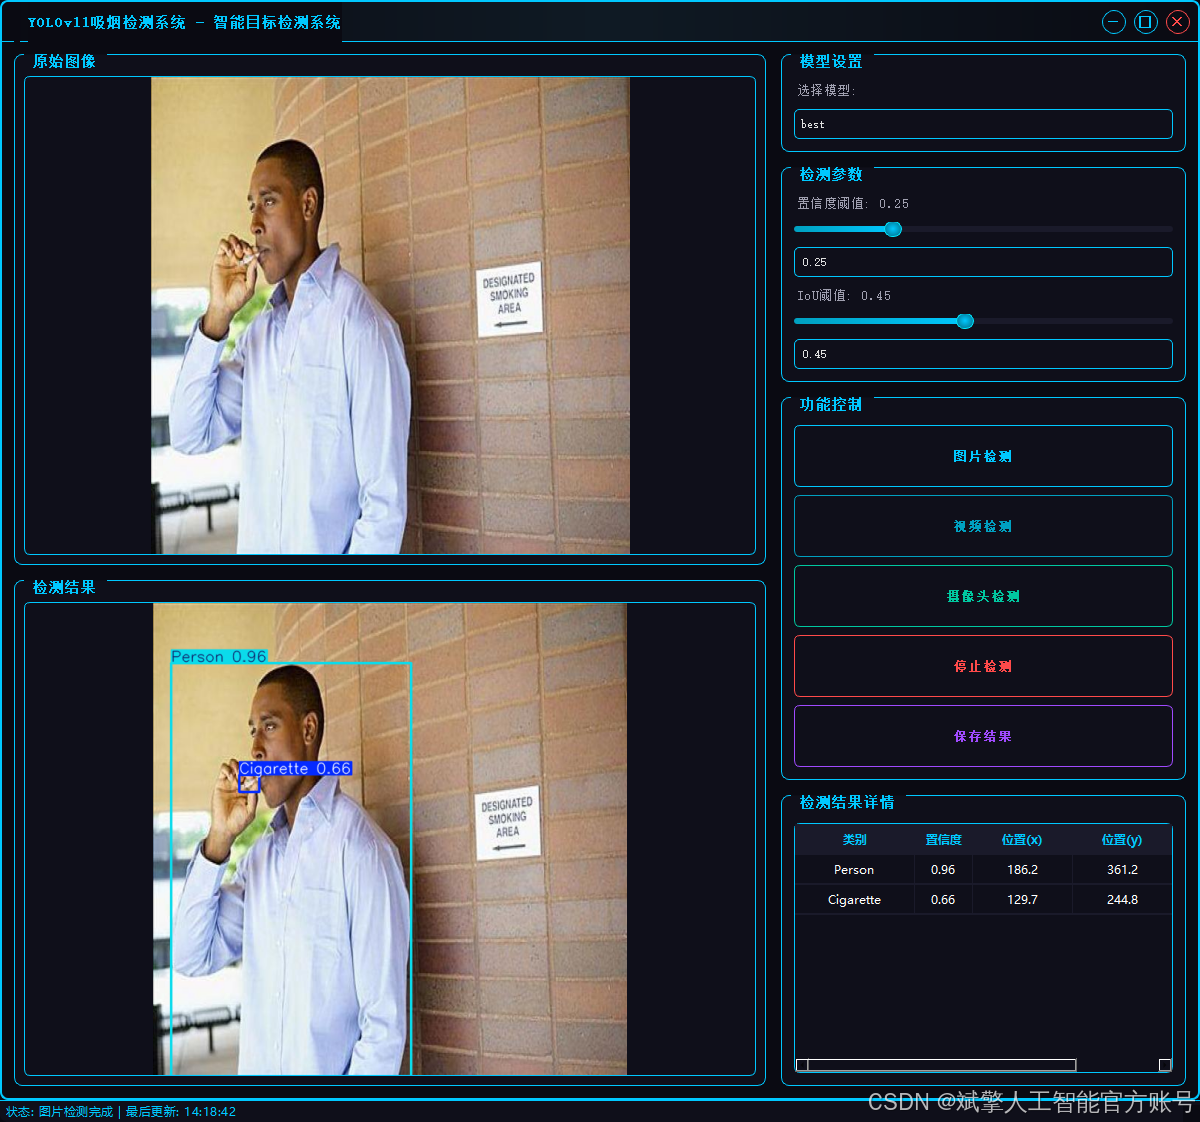
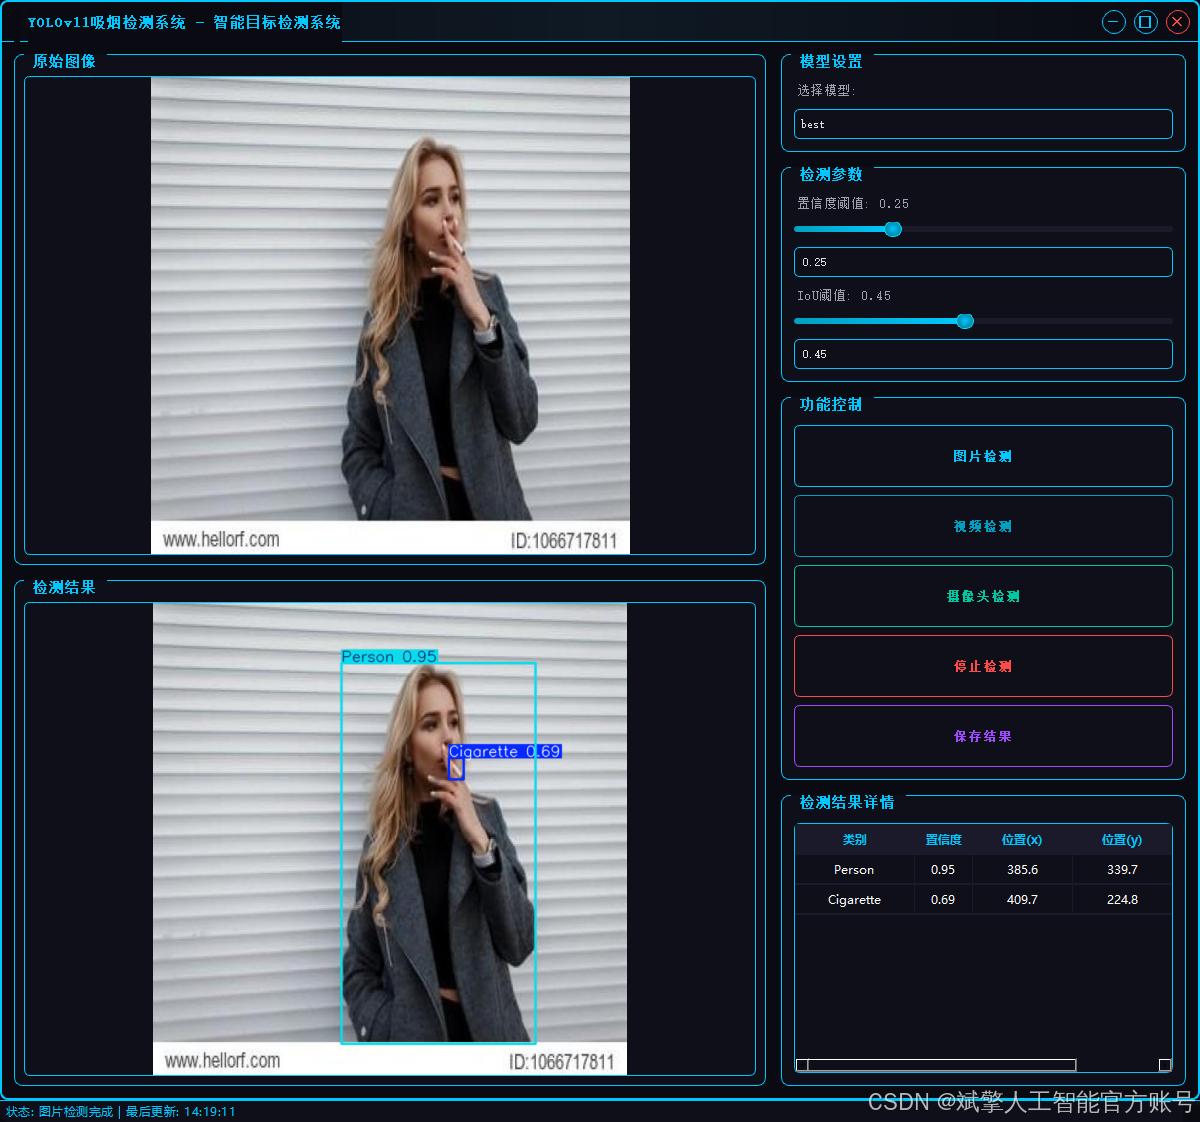
✅ 三种检测模式:基于YOLOv11模型,支持图片、视频和实时摄像头三种检测,精准识别目标。
✅ 双画面对比:同屏显示原始画面与检测结果。
✅ 数据可视化:实时表格展示检测目标的类别、置信度及坐标。
✅智能参数调节:提供置信度滑块,动态优化检测精度,适应不同场景需求。
✅科幻风交互界面:深色主题搭配动态光效,减少视觉疲劳,提升操作体验。
✅多线程高性能架构:独立检测线程保障流畅运行,实时状态提示,响应迅速无卡顿。
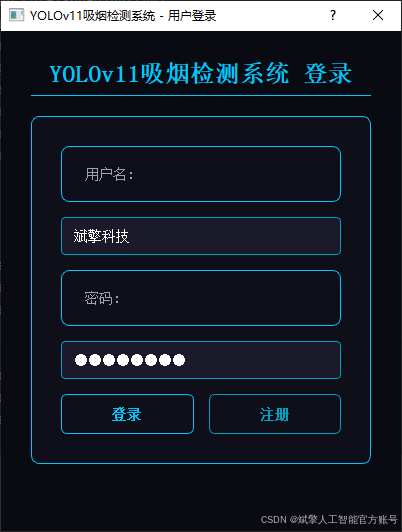

2.1 用户登录系统
-
提供用户登录和注册功能
-
用户名和密码验证
-
账户信息本地存储(accounts.json)
-
密码长度至少6位的安全要求
2.2 检测功能
-
图片检测:支持JPG/JPEG/PNG/BMP格式图片的火焰烟雾检测
-
视频检测:支持MP4/AVI/MOV格式视频的逐帧检测
-
摄像头检测:实时摄像头流检测(默认摄像头0)
-
检测结果保存到"results"目录
2.3 检测结果显示
-
显示原始图像和检测结果图像
-
检测结果表格展示,包含:
-
检测到的类别
-
置信度分数
-
物体位置坐标(x,y)、
-
2.4 参数配置
-
模型选择
-
置信度阈值调节(0-1.0)
-
IoU(交并比)阈值调节(0-1.0)
-
实时同步滑块和数值输入框
2.5 其他功能
-
检测结果保存功能
-
视频检测时自动保存结果视频
-
状态栏显示系统状态和最后更新时间
-
无边框窗口设计,可拖动和调整大小
3. 技术特点
-
采用多线程处理检测任务,避免界面卡顿
-
精美的UI设计,具有科技感的视觉效果:
-
发光边框和按钮
-
悬停和按下状态效果
-
自定义滑块、表格和下拉框样式
-
-
检测结果保存机制
-
响应式布局,适应不同窗口大小
4. 系统流程
-
用户登录/注册
-
选择检测模式(图片/视频/摄像头)
-
调整检测参数(可选)
-
开始检测并查看结果
-
可选择保存检测结果
-
停止检测或切换其他模式
三、数据集介绍
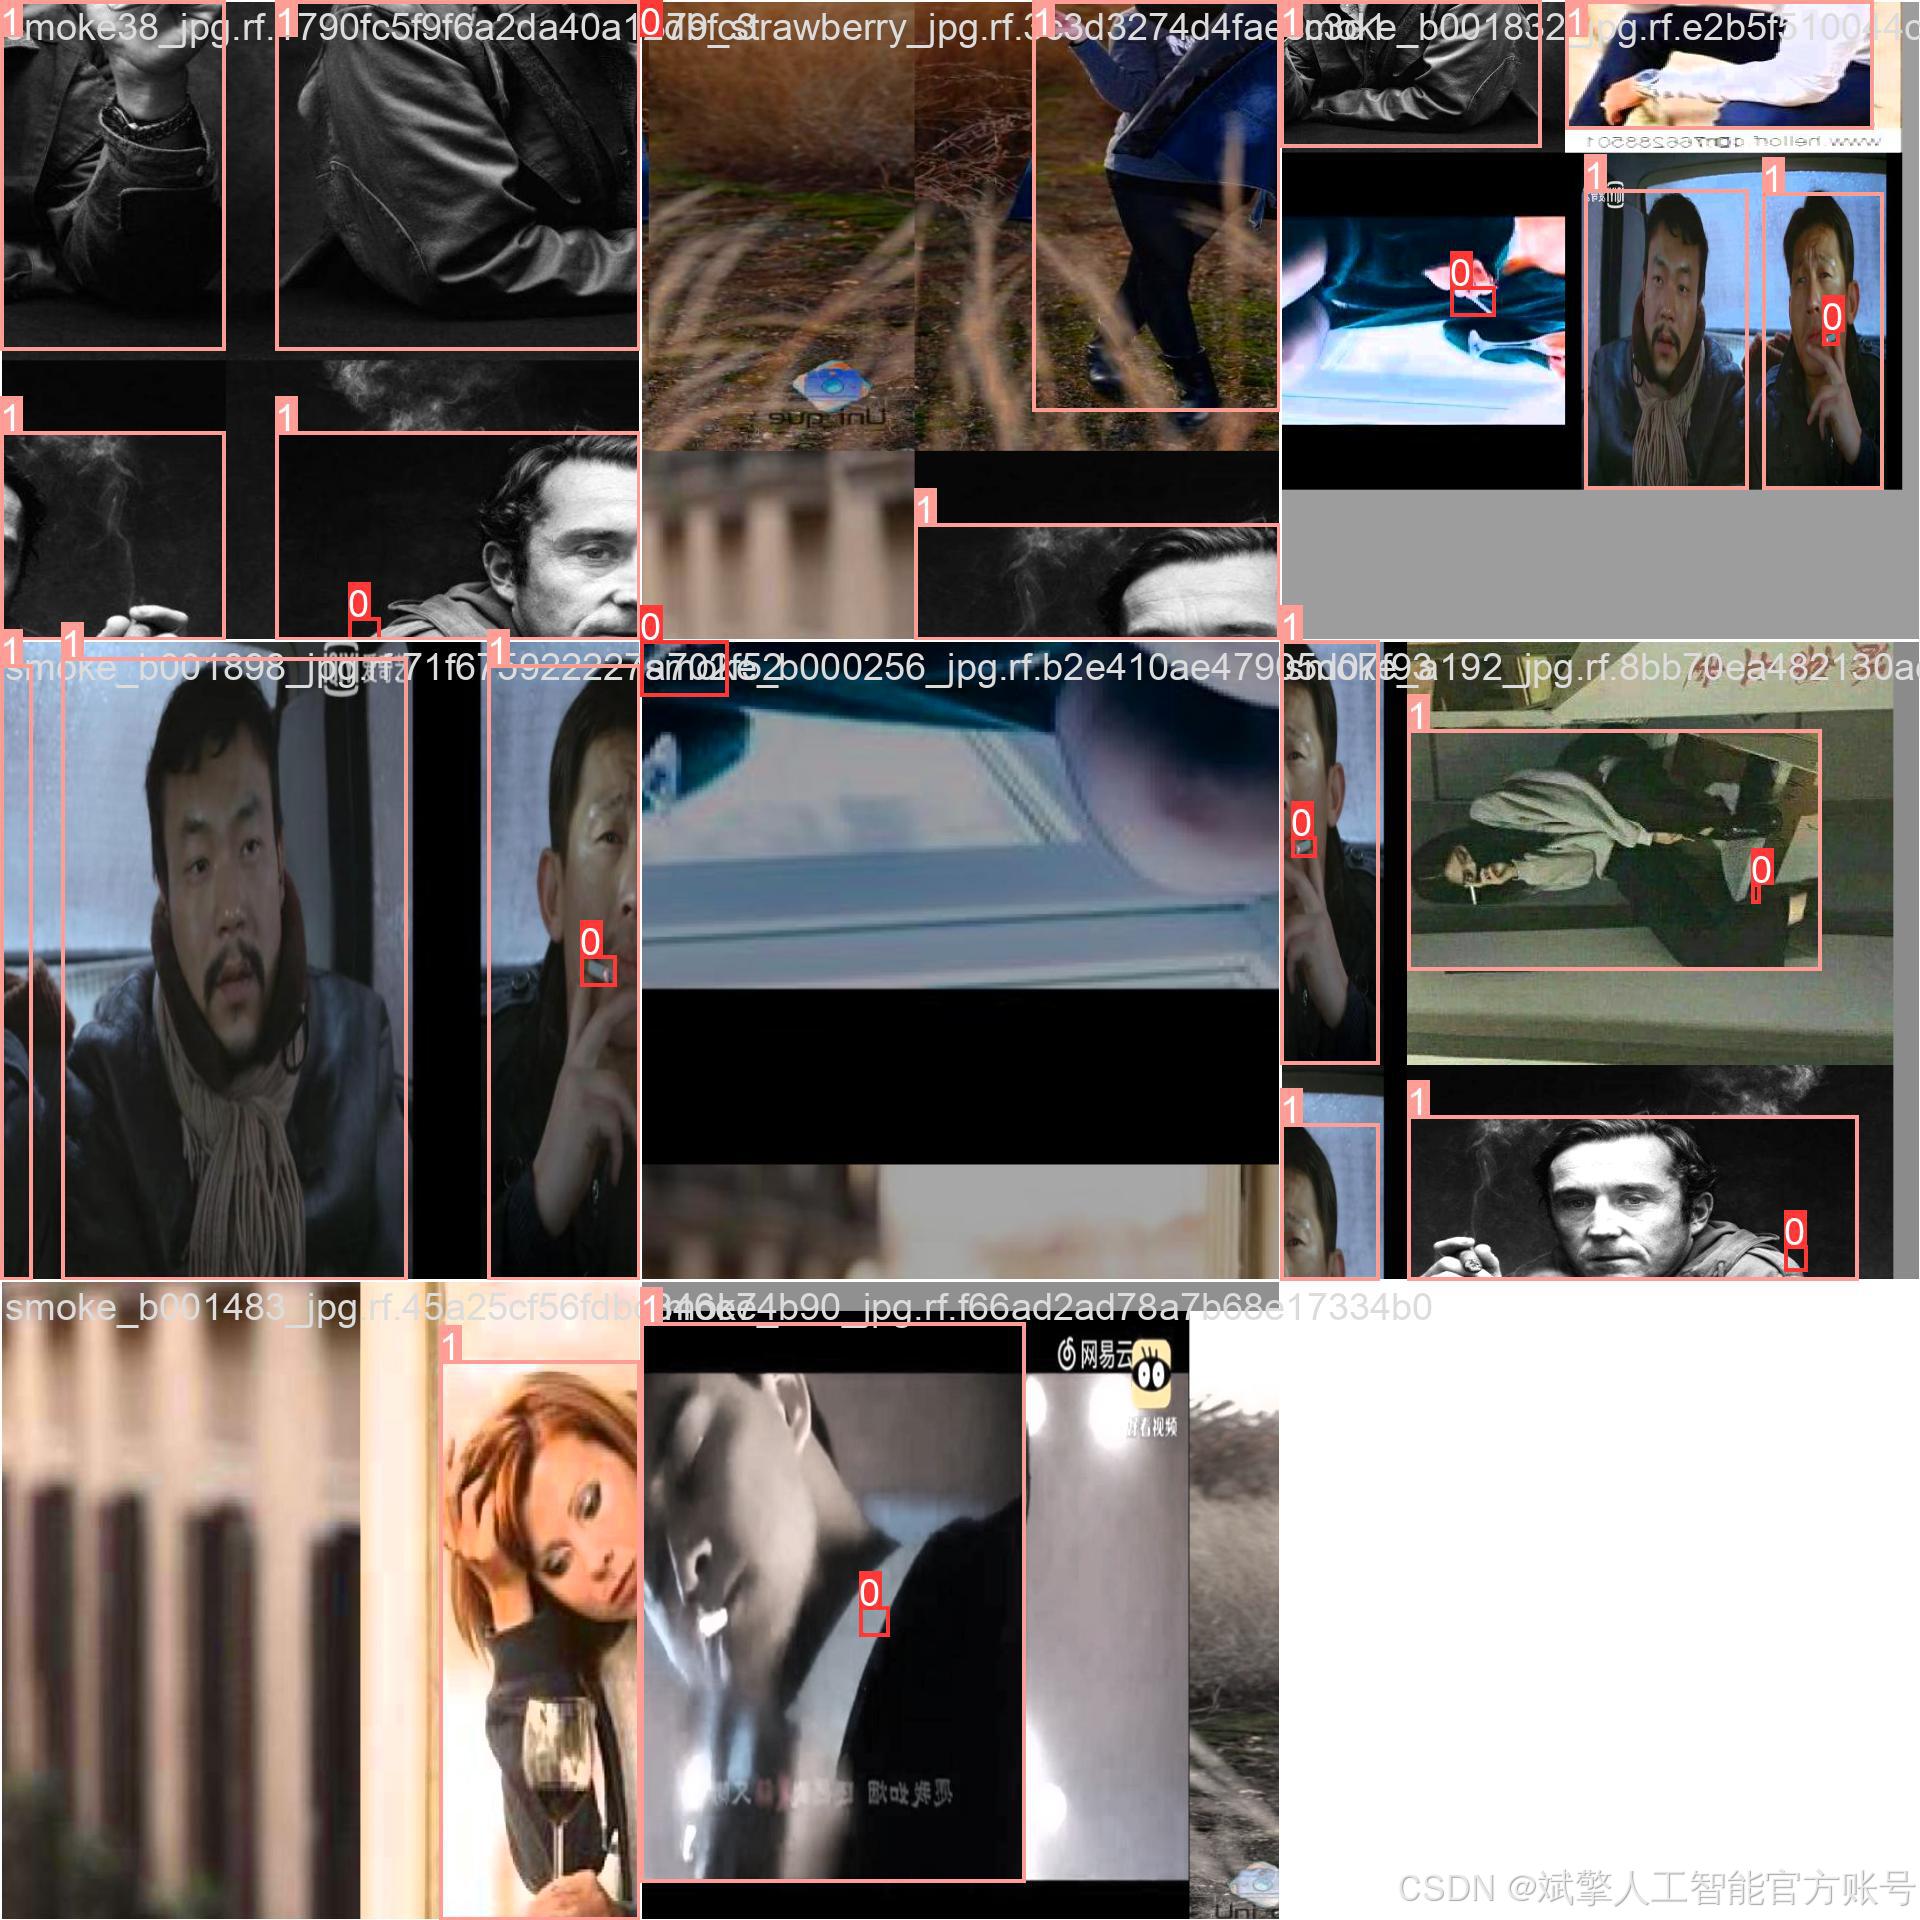
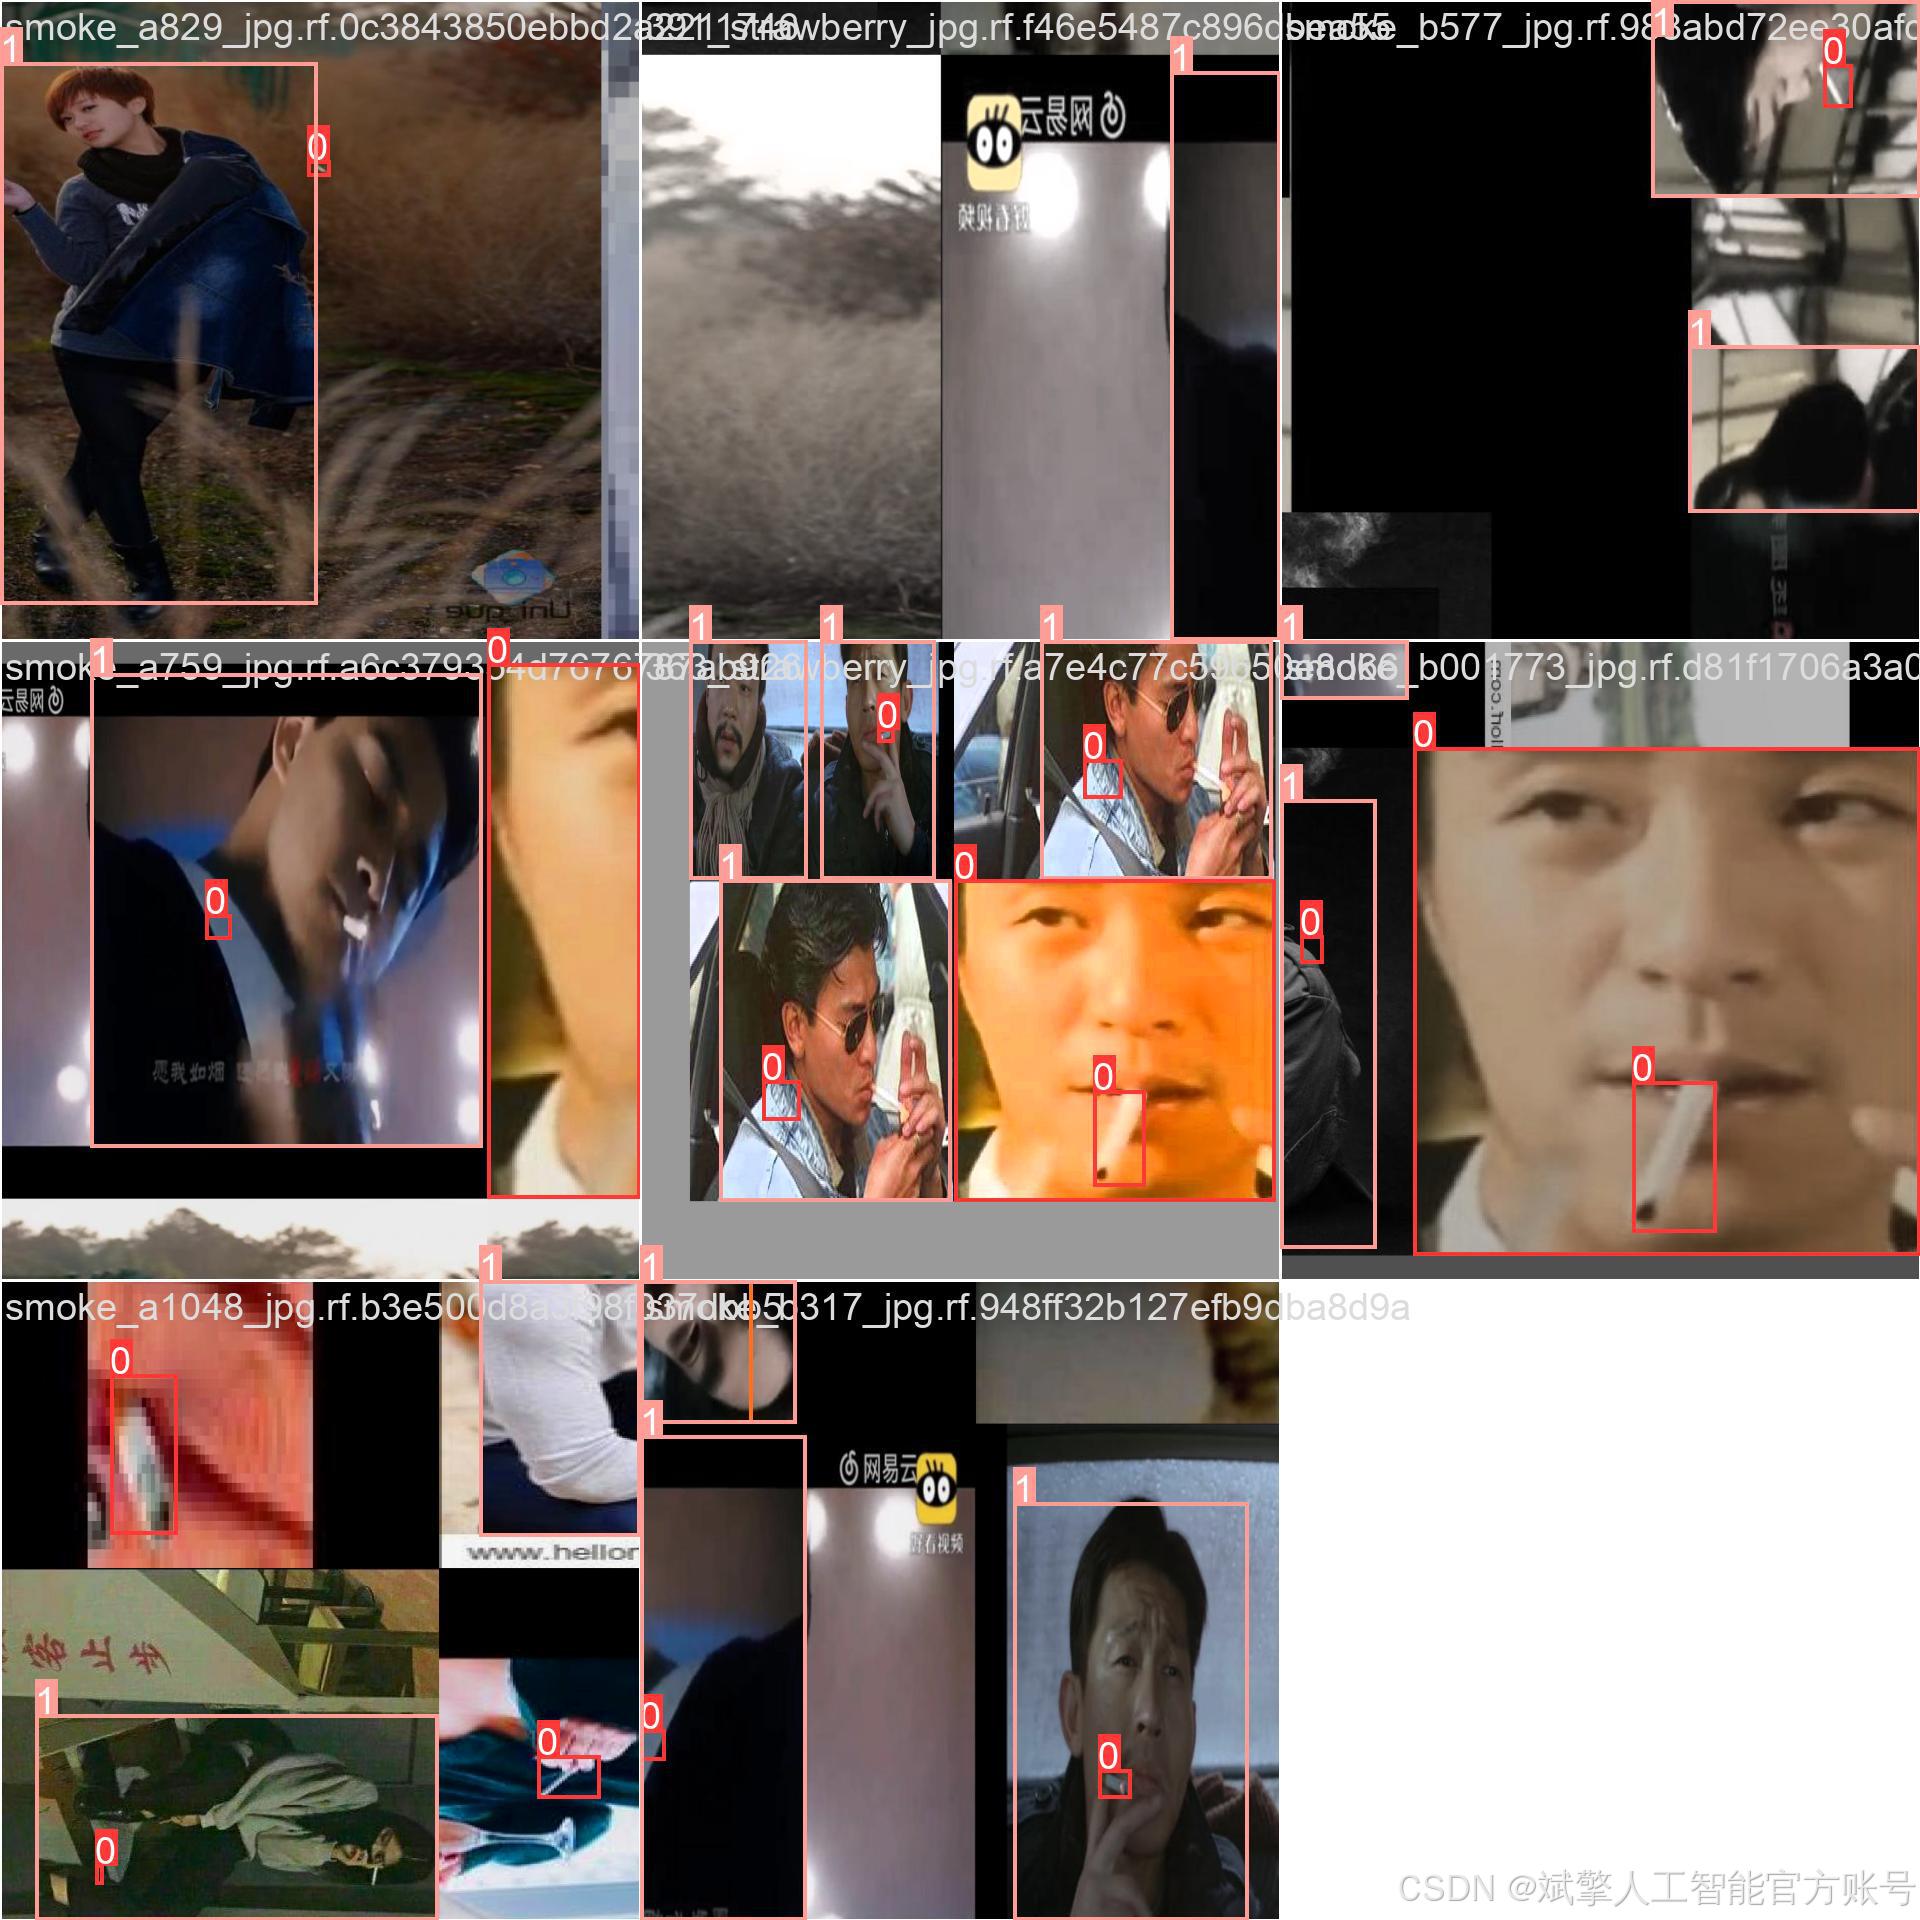
本系统的性能核心依赖于一个大规模、高质量且经过精心标注的专用数据集。该数据集针对吸烟行为的复杂场景(如室内、室外、不同光照条件、不同姿态)进行了全面构建。
1. 数据规模与划分:
数据集总计12,486张图像,按照机器学习最佳实践进行划分,以确保模型训练的充分性和评估的客观性:
-
训练集(Training Set): 12,046 张图像。用于模型的主干训练,让模型学习并拟合各类目标的视觉特征。
-
验证集(Validation Set): 318 张图像。用于在训练过程中评估模型性能,调整超参数,并监控是否过拟合。
-
测试集(Test Set): 122 张图像。作为完全未参与训练的隐藏数据,用于最终评估模型在真实应用场景中的泛化能力和准确率。
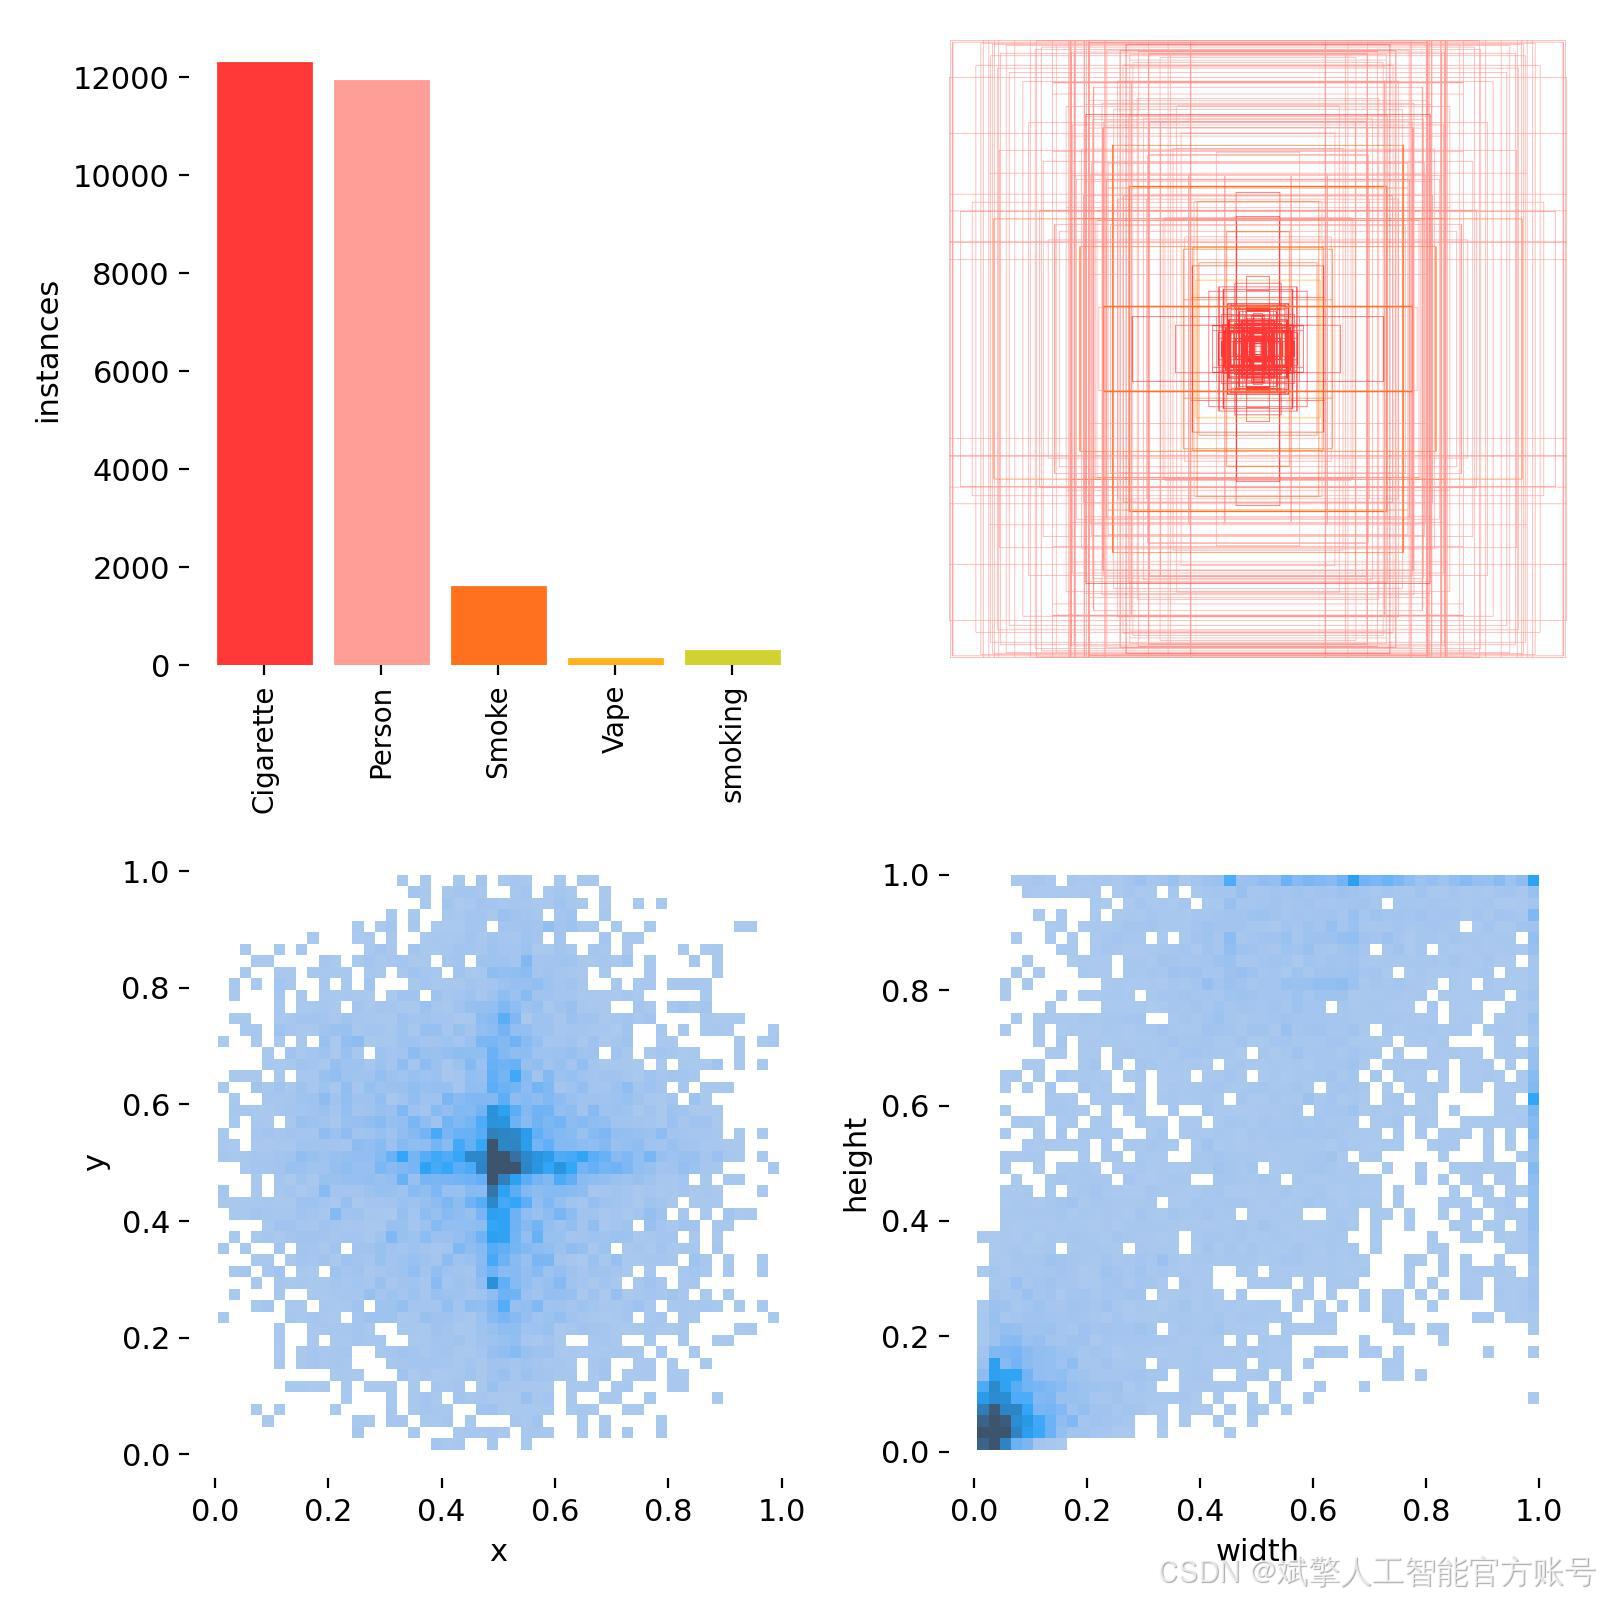
2. 类别定义(names: nc=5):
数据集的标注包含以下五个互相关联的类别,这种多类别设计使模型能够理解吸烟场景的上下文信息,而不仅仅是孤立地检测物体。
-
Cigarette: 传统香烟的过滤嘴或烟体部分,通常是关键的小目标。 -
Person: 场景中的人物。检测到人物有助于系统将吸烟行为与特定个体关联。 -
Smoke: 呼出的或燃烧产生的烟雾,这是一种半透明、无固定形态的目标,检测难度较高。 -
Vape: 电子烟设备,其形状与传统香烟不同,是现代吸烟行为的重要标志。 -
smoking: (综合性行为标签) 通常指香烟或电子烟正处于被手持并位于口、手附近的状态。该标签直接标识了“吸烟”这个动作行为,是系统输出的核心判断之一。
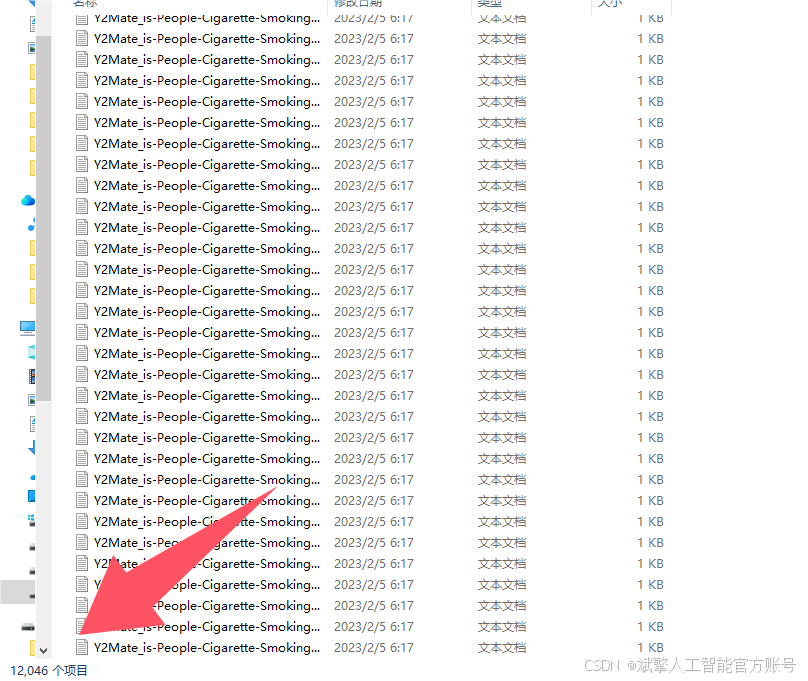
数据集配置文件
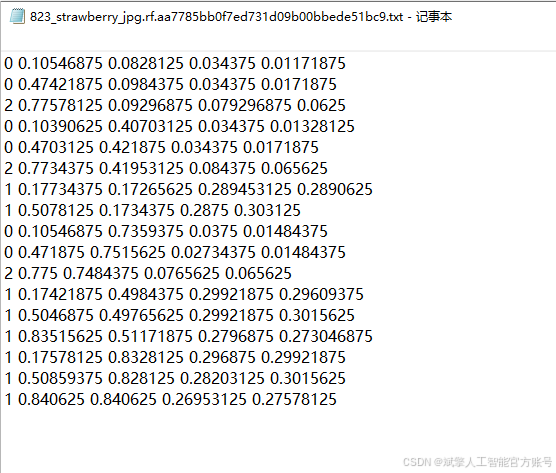
数据集采用标准化YOLO格式组织:
train: F:\吸烟检测数据集\train\images
val: F:\吸烟检测数据集\valid\images
test: F:\吸烟检测数据集\test\images

nc: 5
names: ['Cigarette', 'Person', 'Smoke', 'Vape', 'smoking']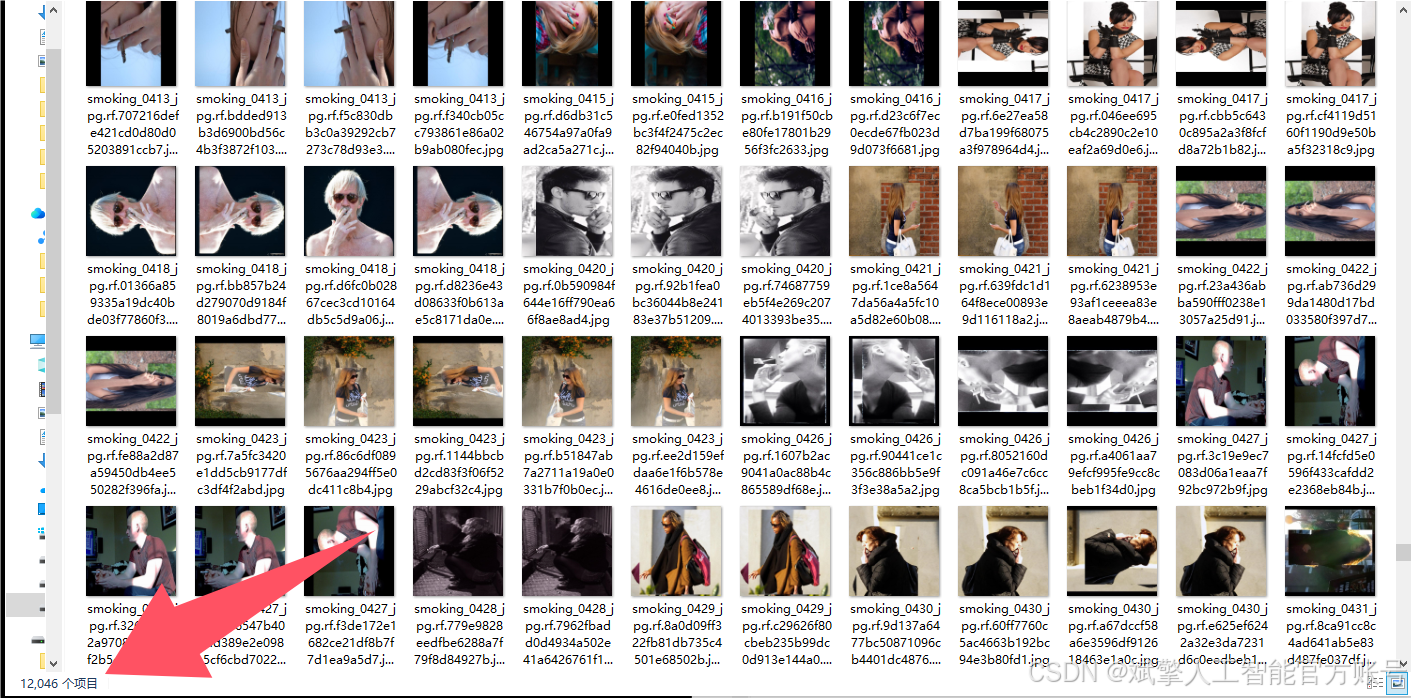
四、项目环境配置
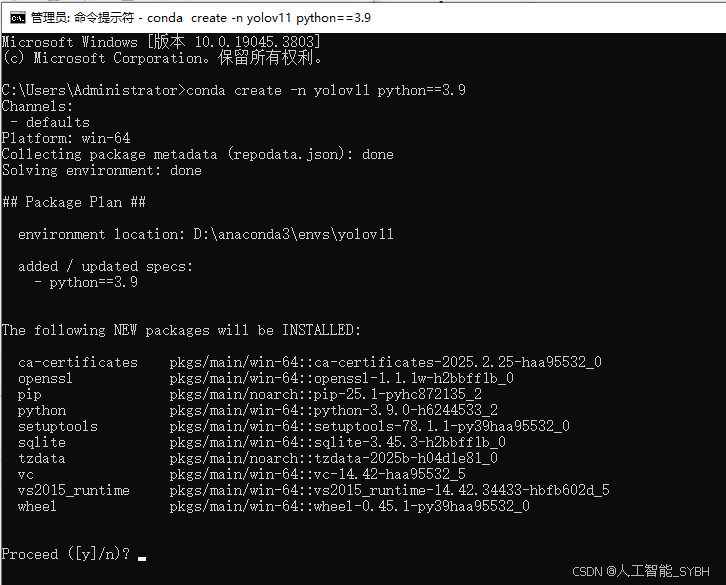
创建虚拟环境
首先新建一个Anaconda环境,每个项目用不同的环境,这样项目中所用的依赖包互不干扰。
终端输入
conda create -n yolov11 python==3.9
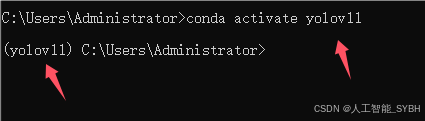
激活虚拟环境
conda activate yolov11
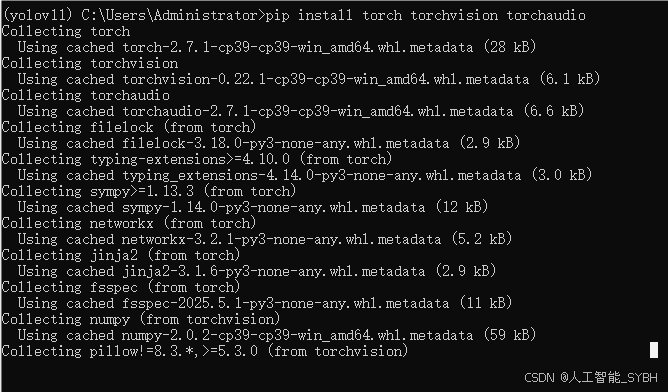
安装cpu版本pytorch
pip install torch torchvision torchaudio
安装所需要库
pip install -r requirements.txt
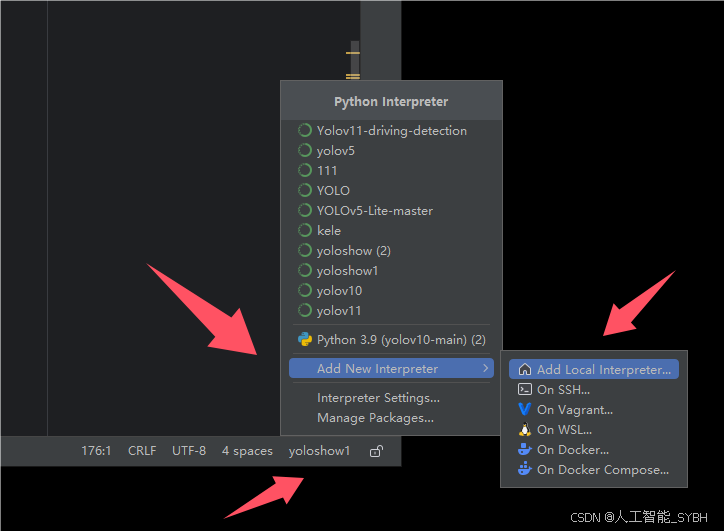
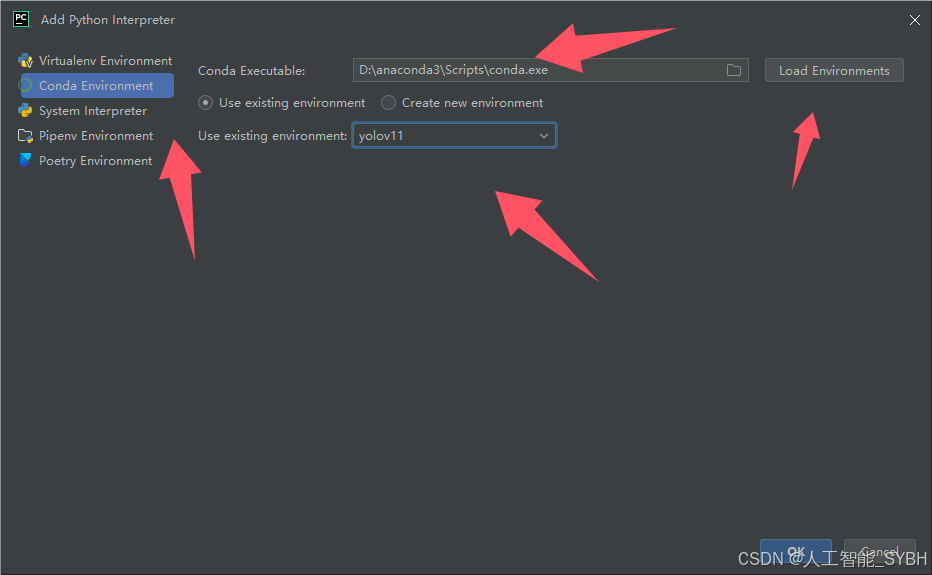
pycharm中配置anaconda
五、模型训练
训练代码
from ultralytics import YOLO

model_path = 'yolo11s.pt'
data_path = 'data.yaml'

if __name__ == '__main__':
    model = YOLO(model_path)
    results = model.train(data=data_path,
                          epochs=100,
                          batch=8,
                          device='0',
                          workers=0,
                          project='runs',
                          name='exp',
                          )
根据实际情况更换模型 # yolov11n.yaml (nano):轻量化模型,适合嵌入式设备,速度快但精度略低。 # yolov11s.yaml (small):小模型,适合实时任务。 # yolov11m.yaml (medium):中等大小模型,兼顾速度和精度。 # yolov11b.yaml (base):基本版模型,适合大部分应用场景。 # yolov11l.yaml (large):大型模型,适合对精度要求高的任务。
--batch 8:每批次8张图像。--epochs 100:训练100轮。--datasets/data.yaml:数据集配置文件。--weights yolov11s.pt:初始化模型权重,yolov11s.pt是预训练的轻量级YOLO模型。
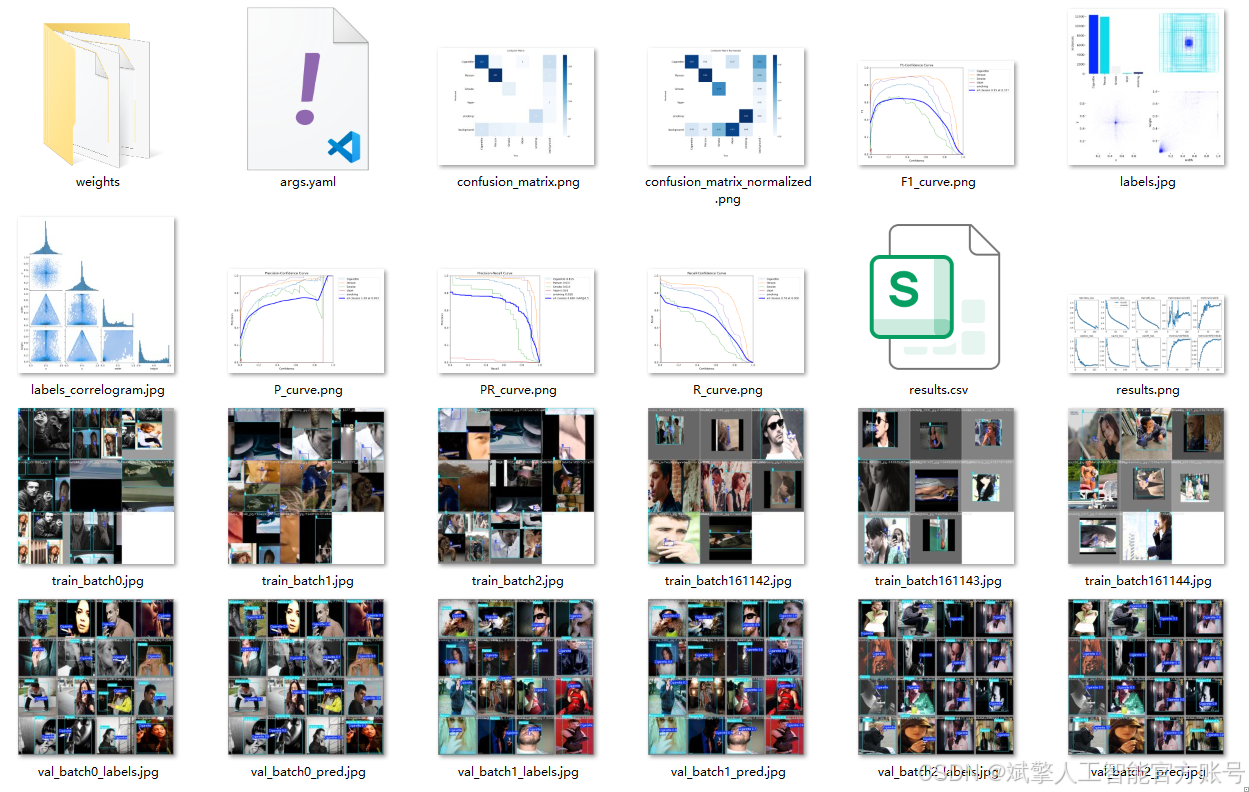
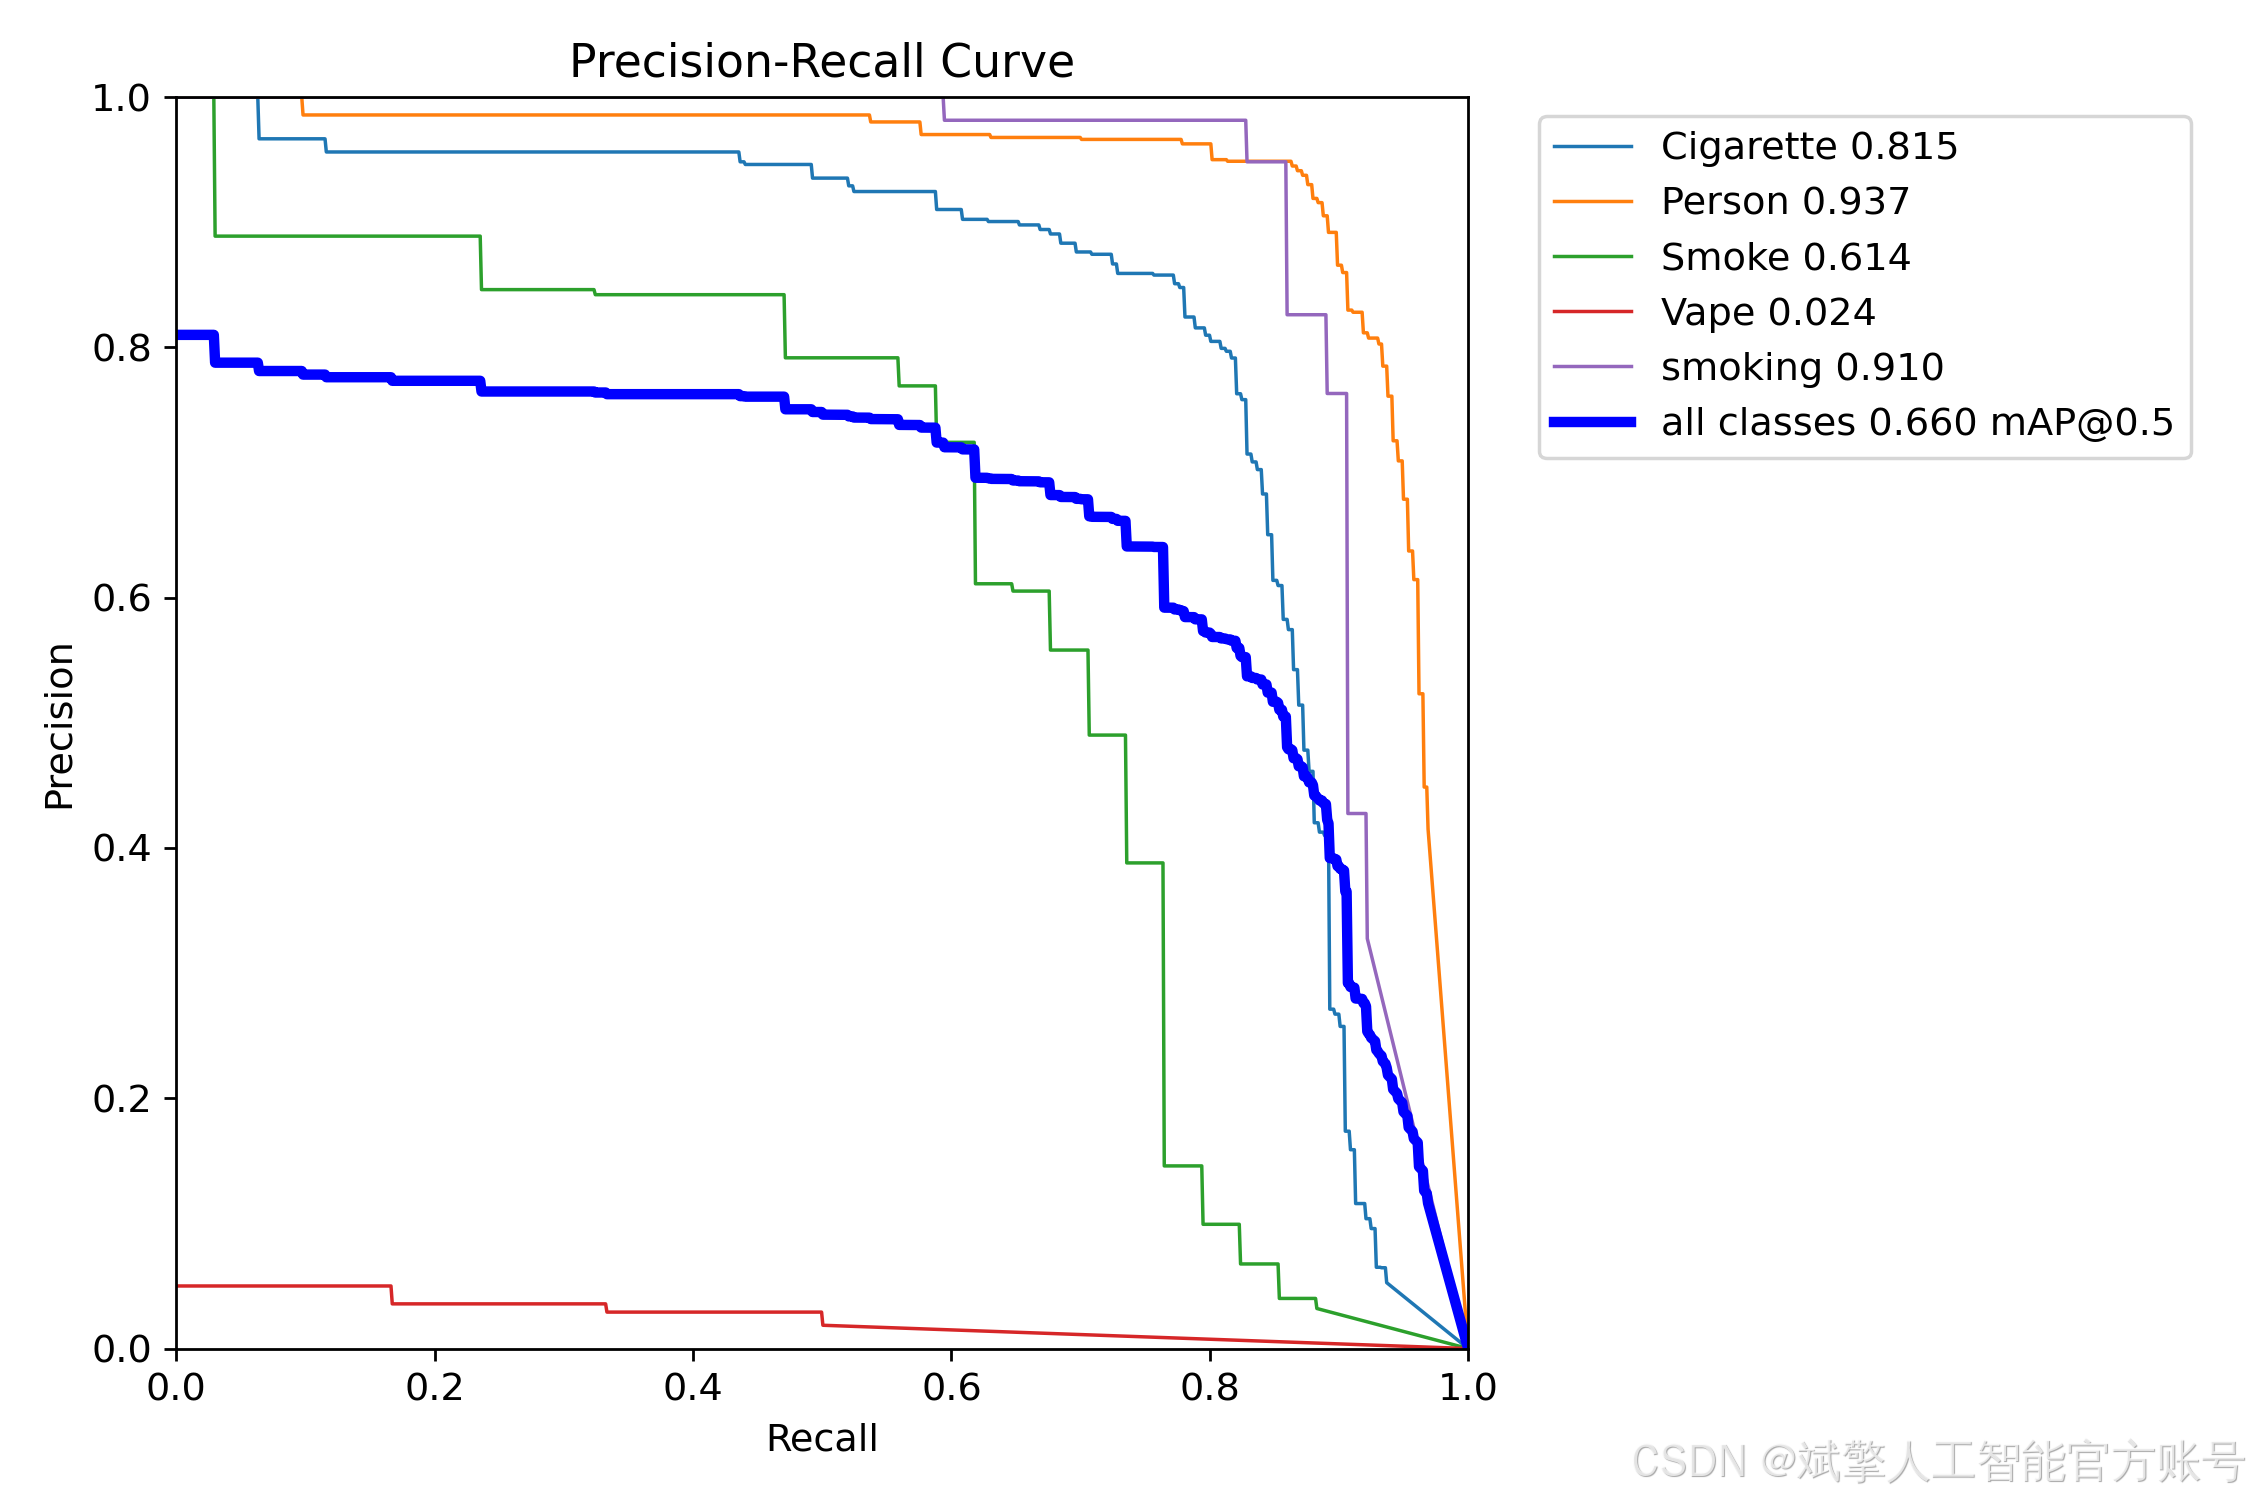
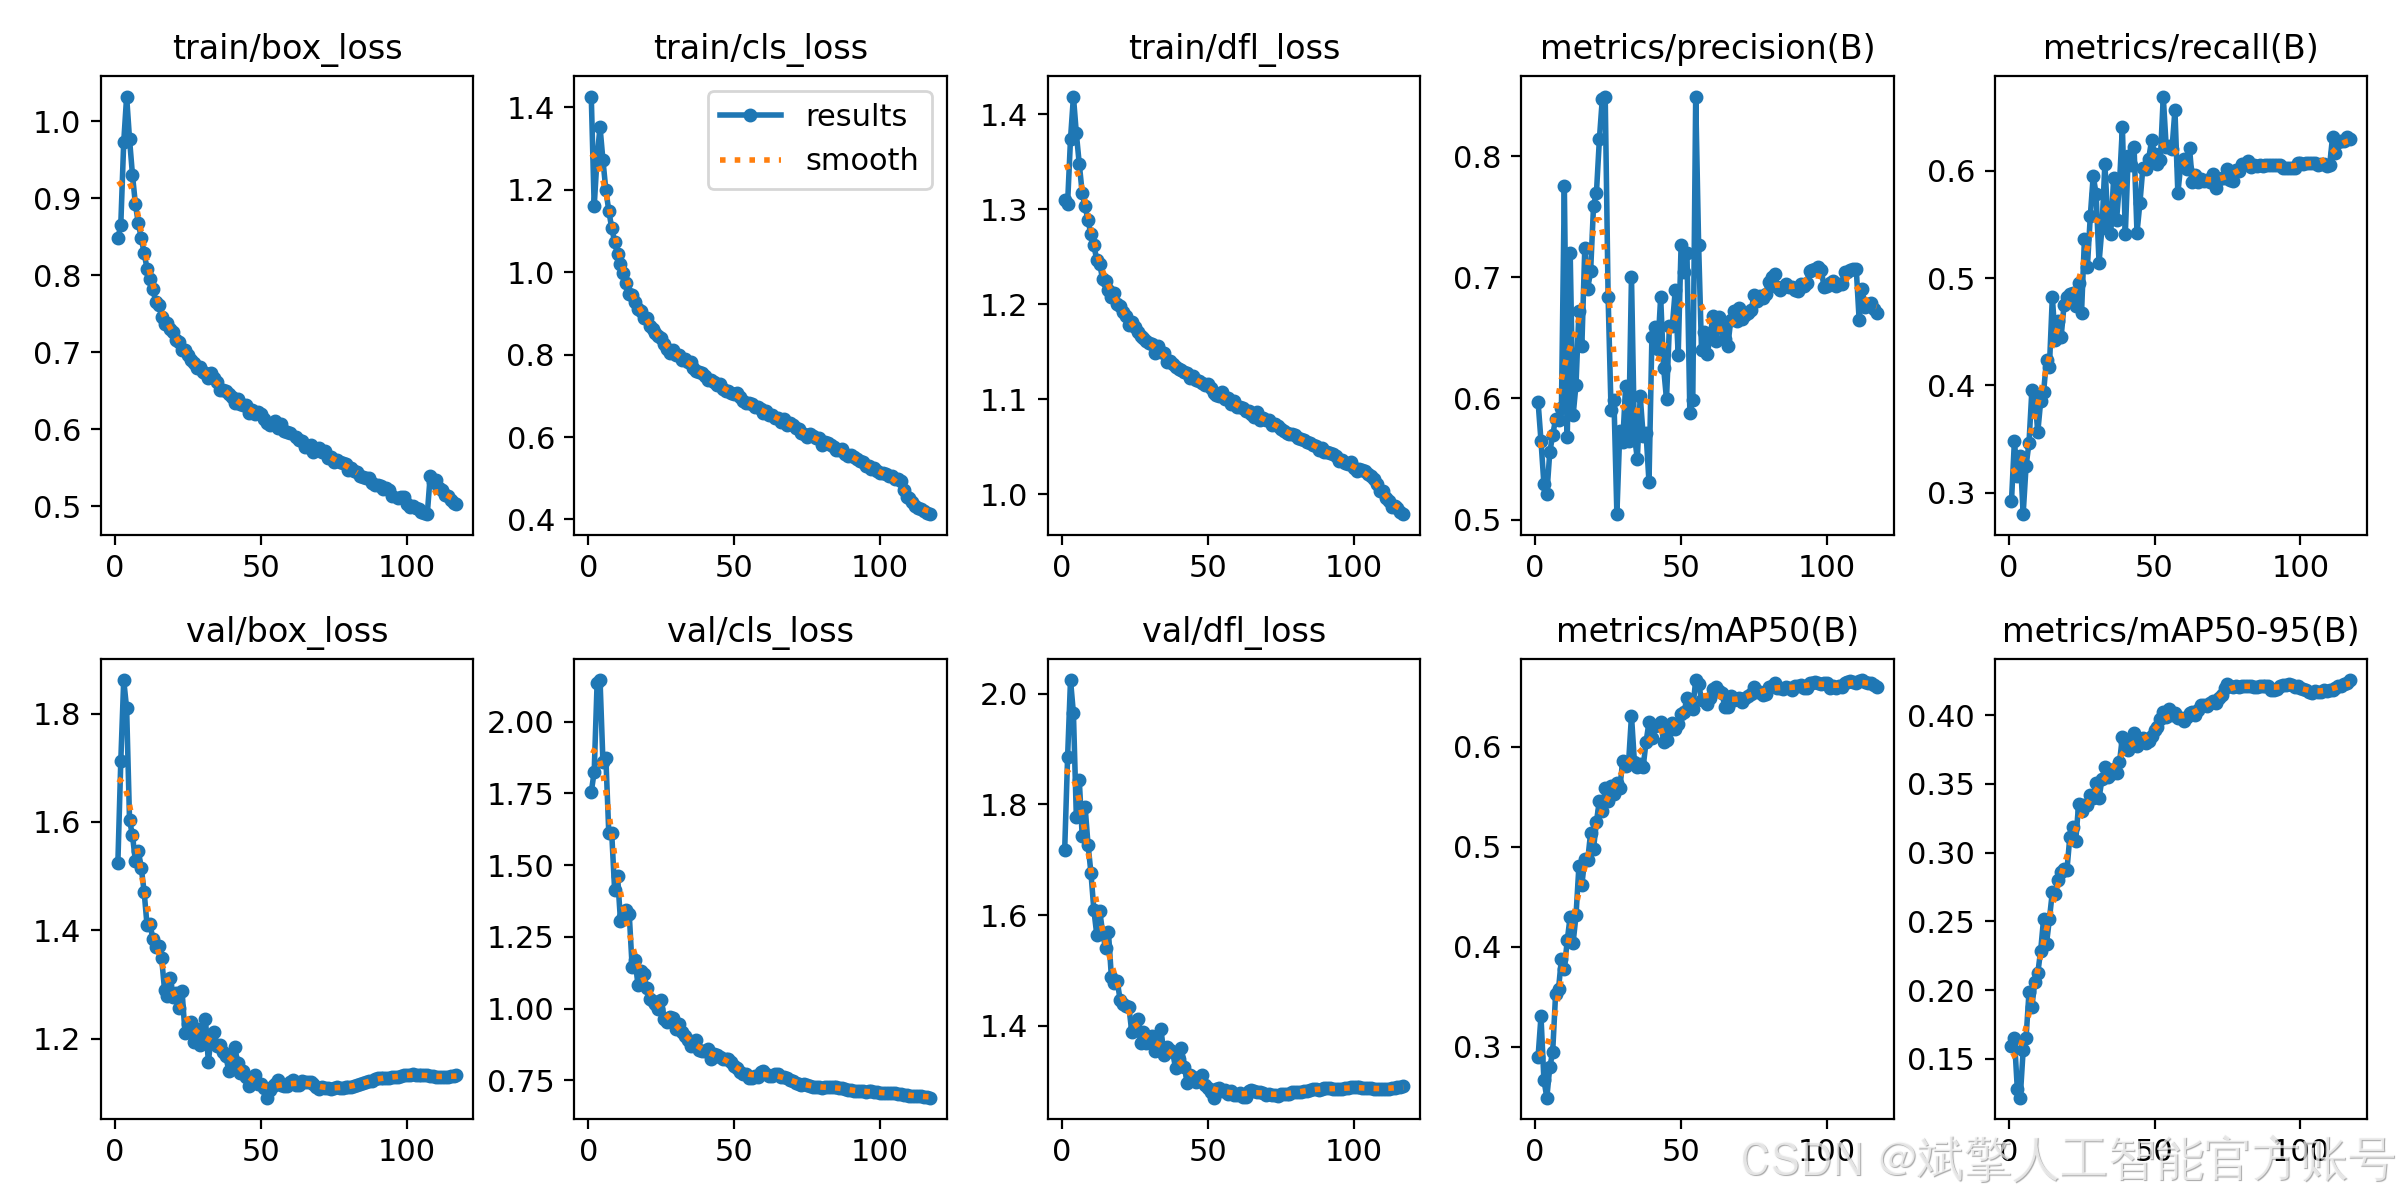
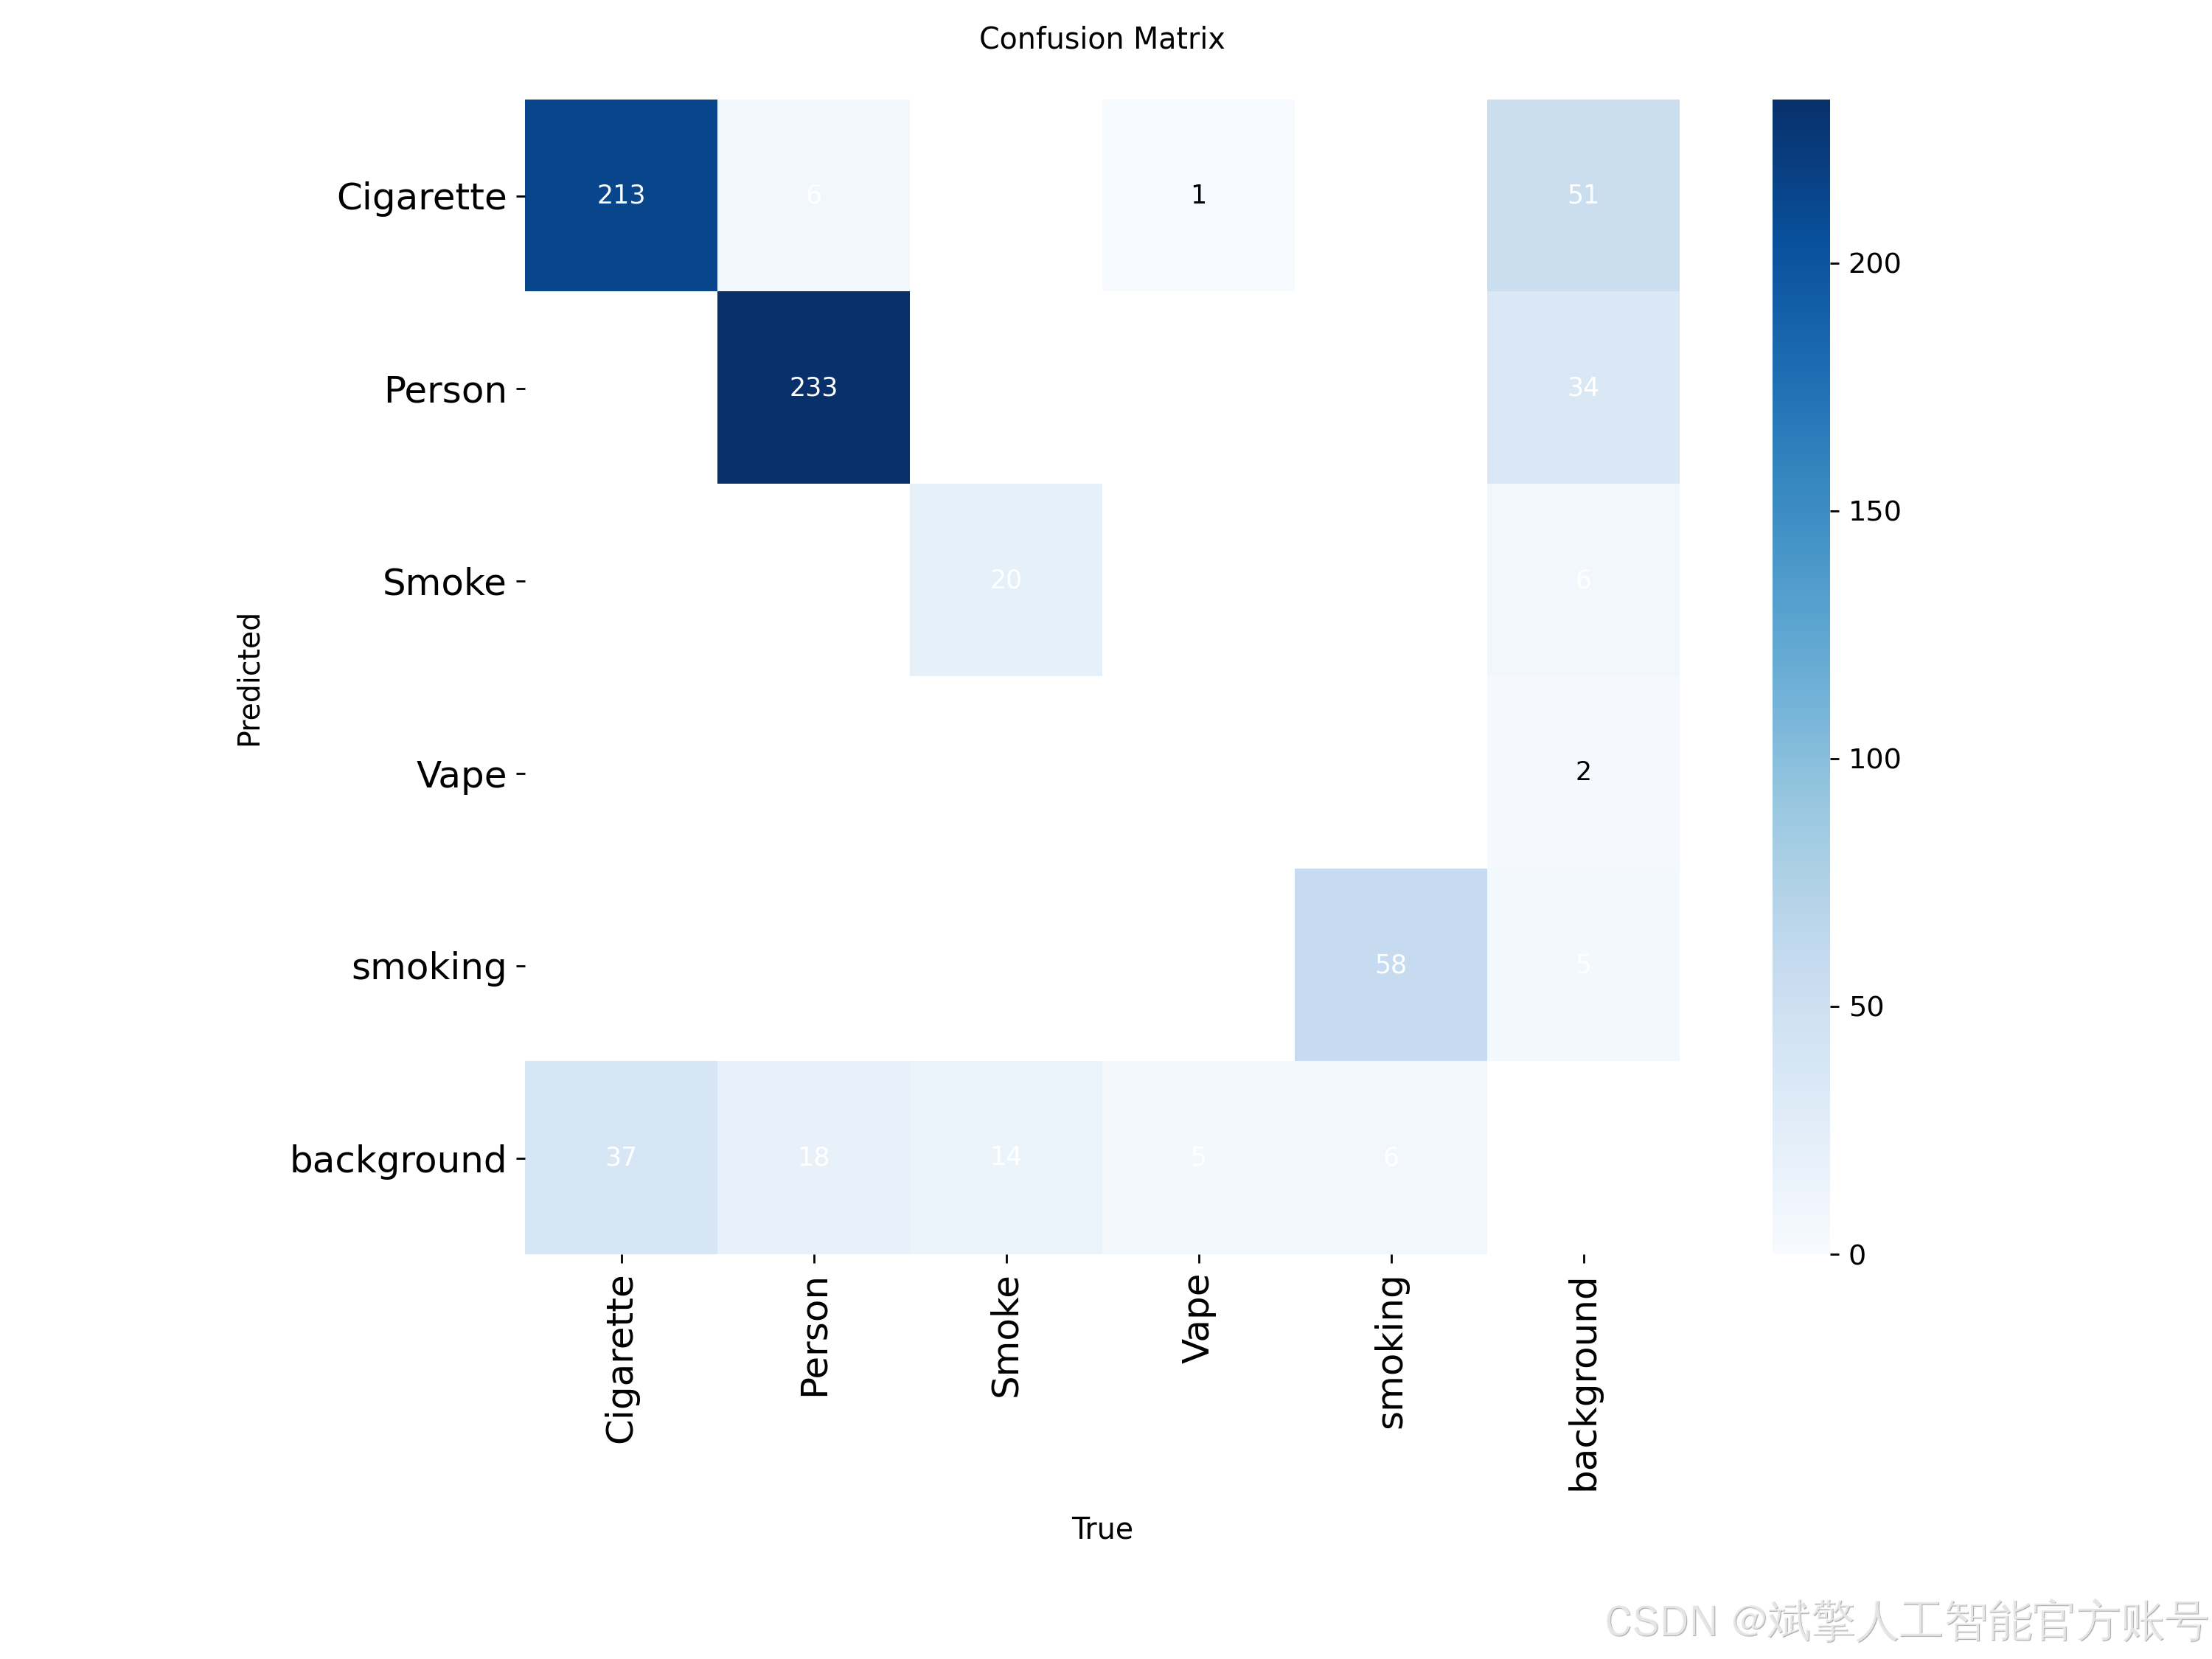
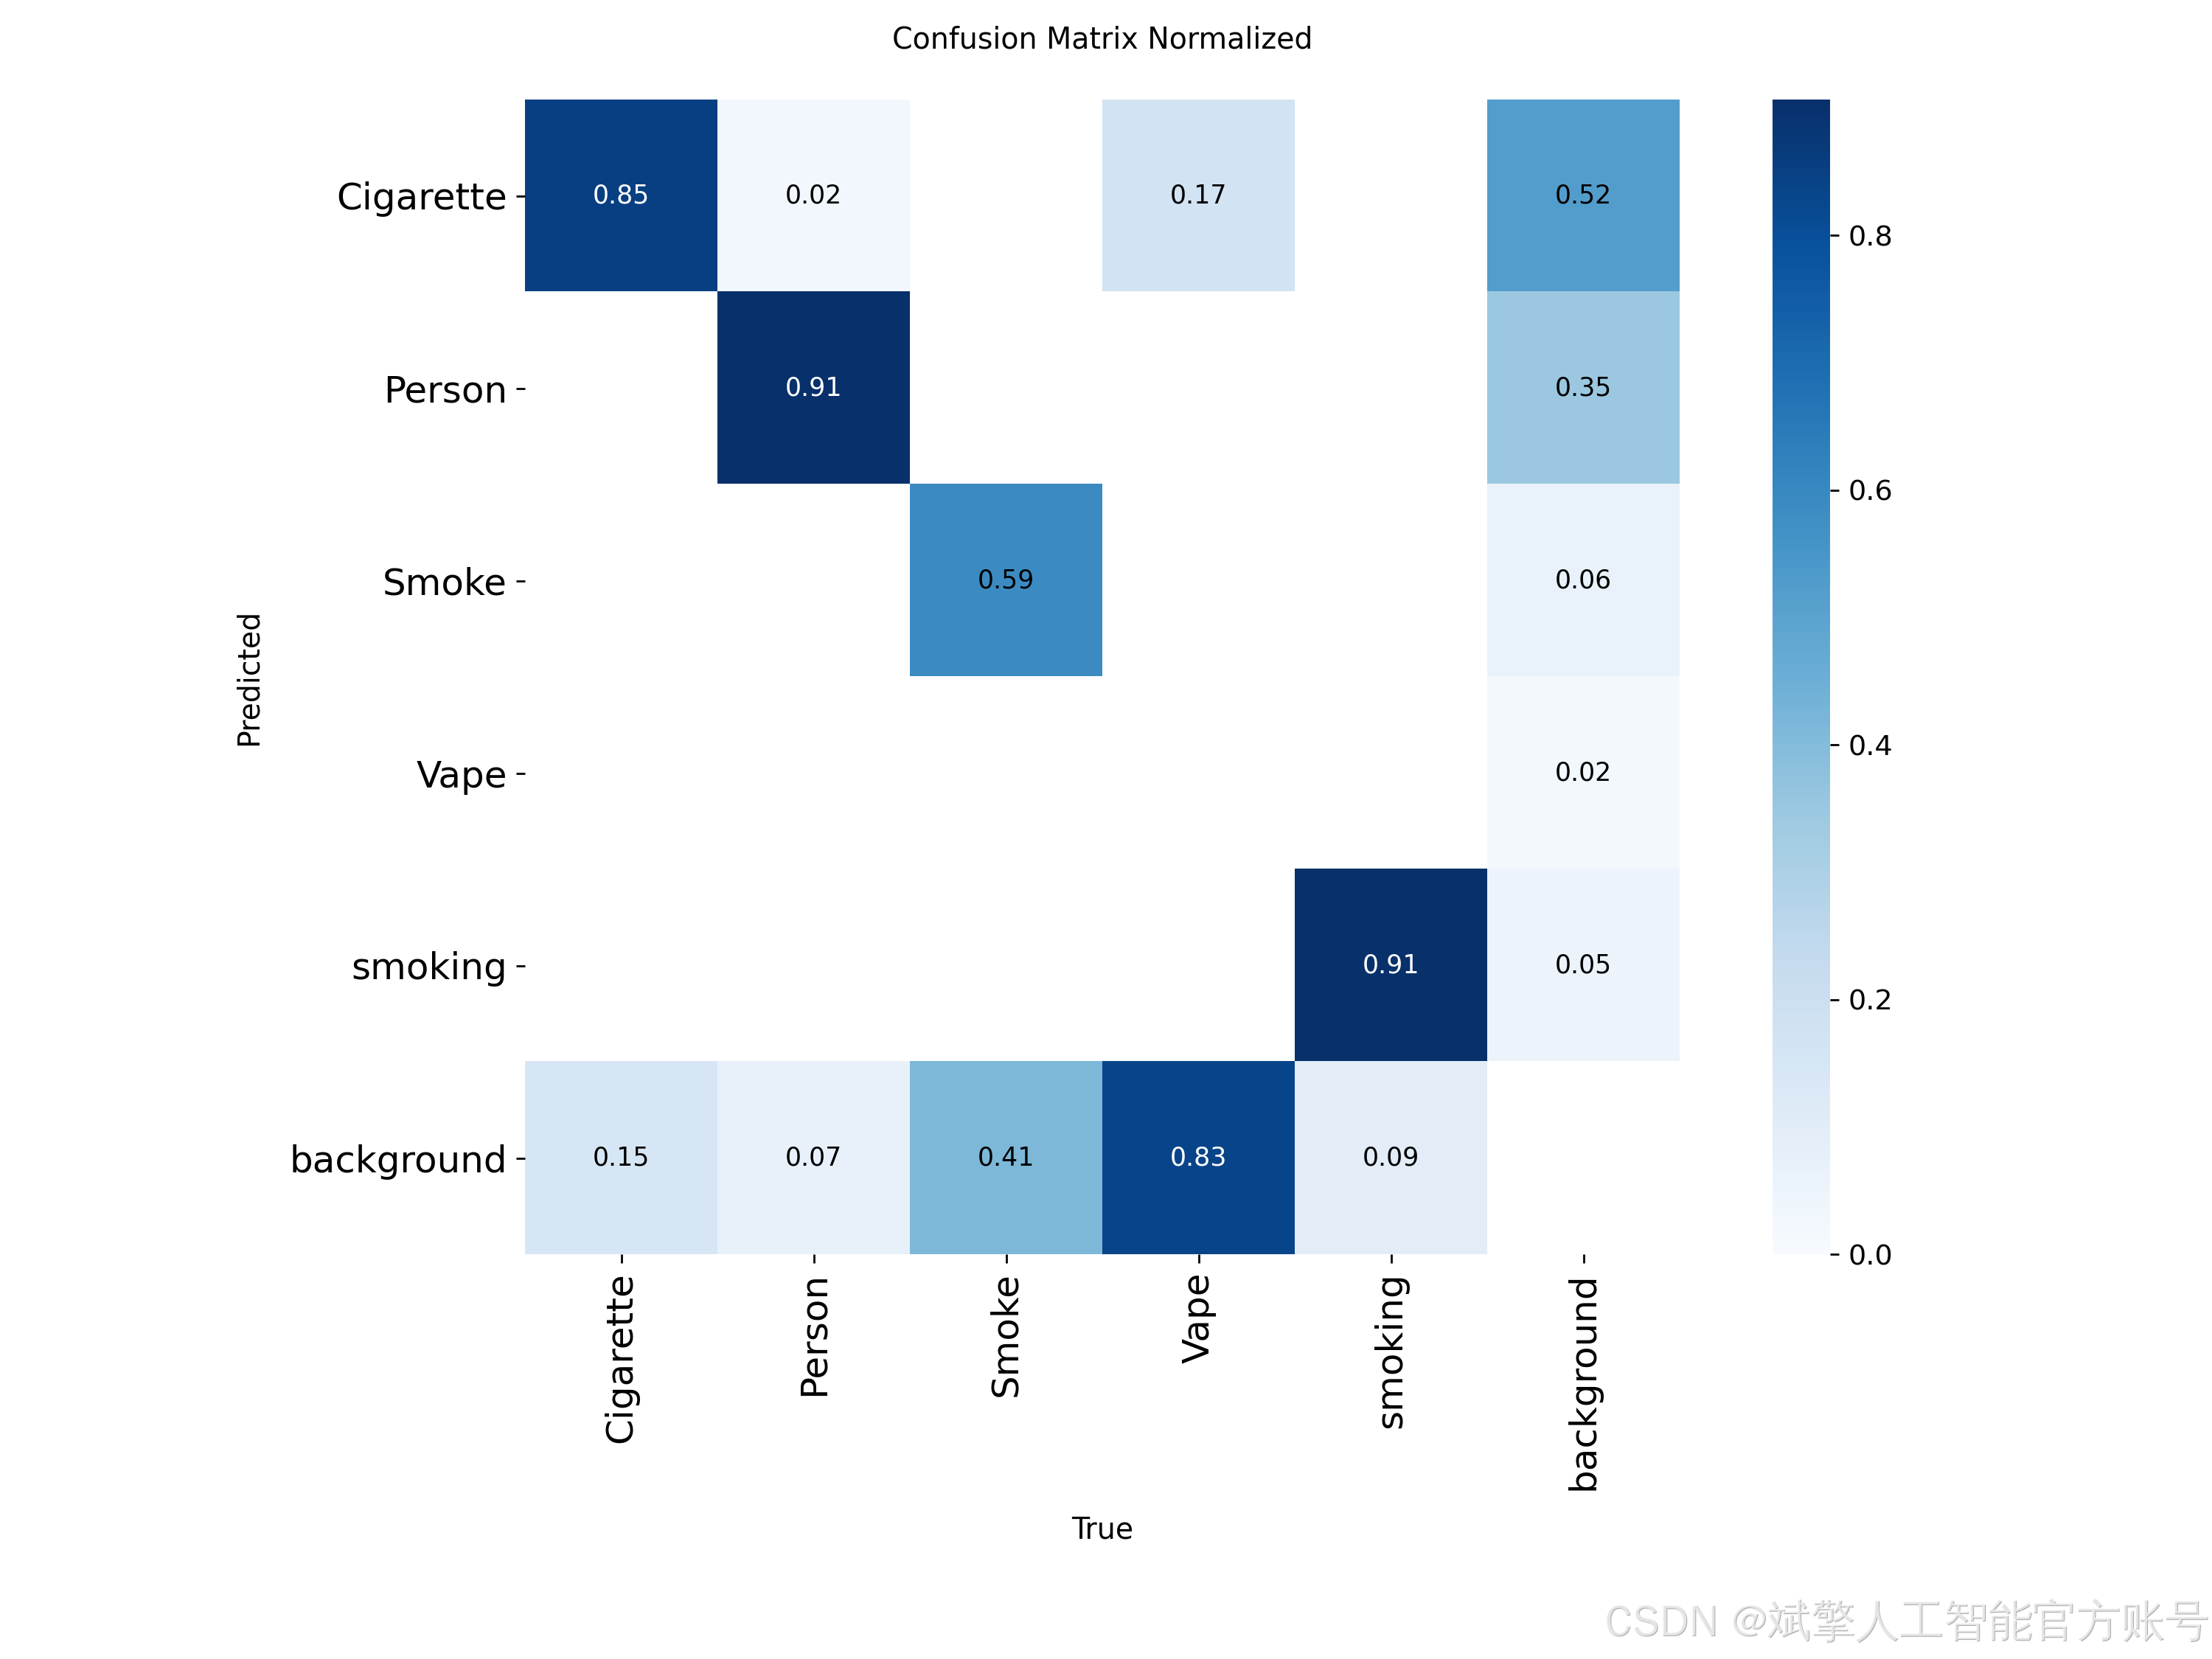
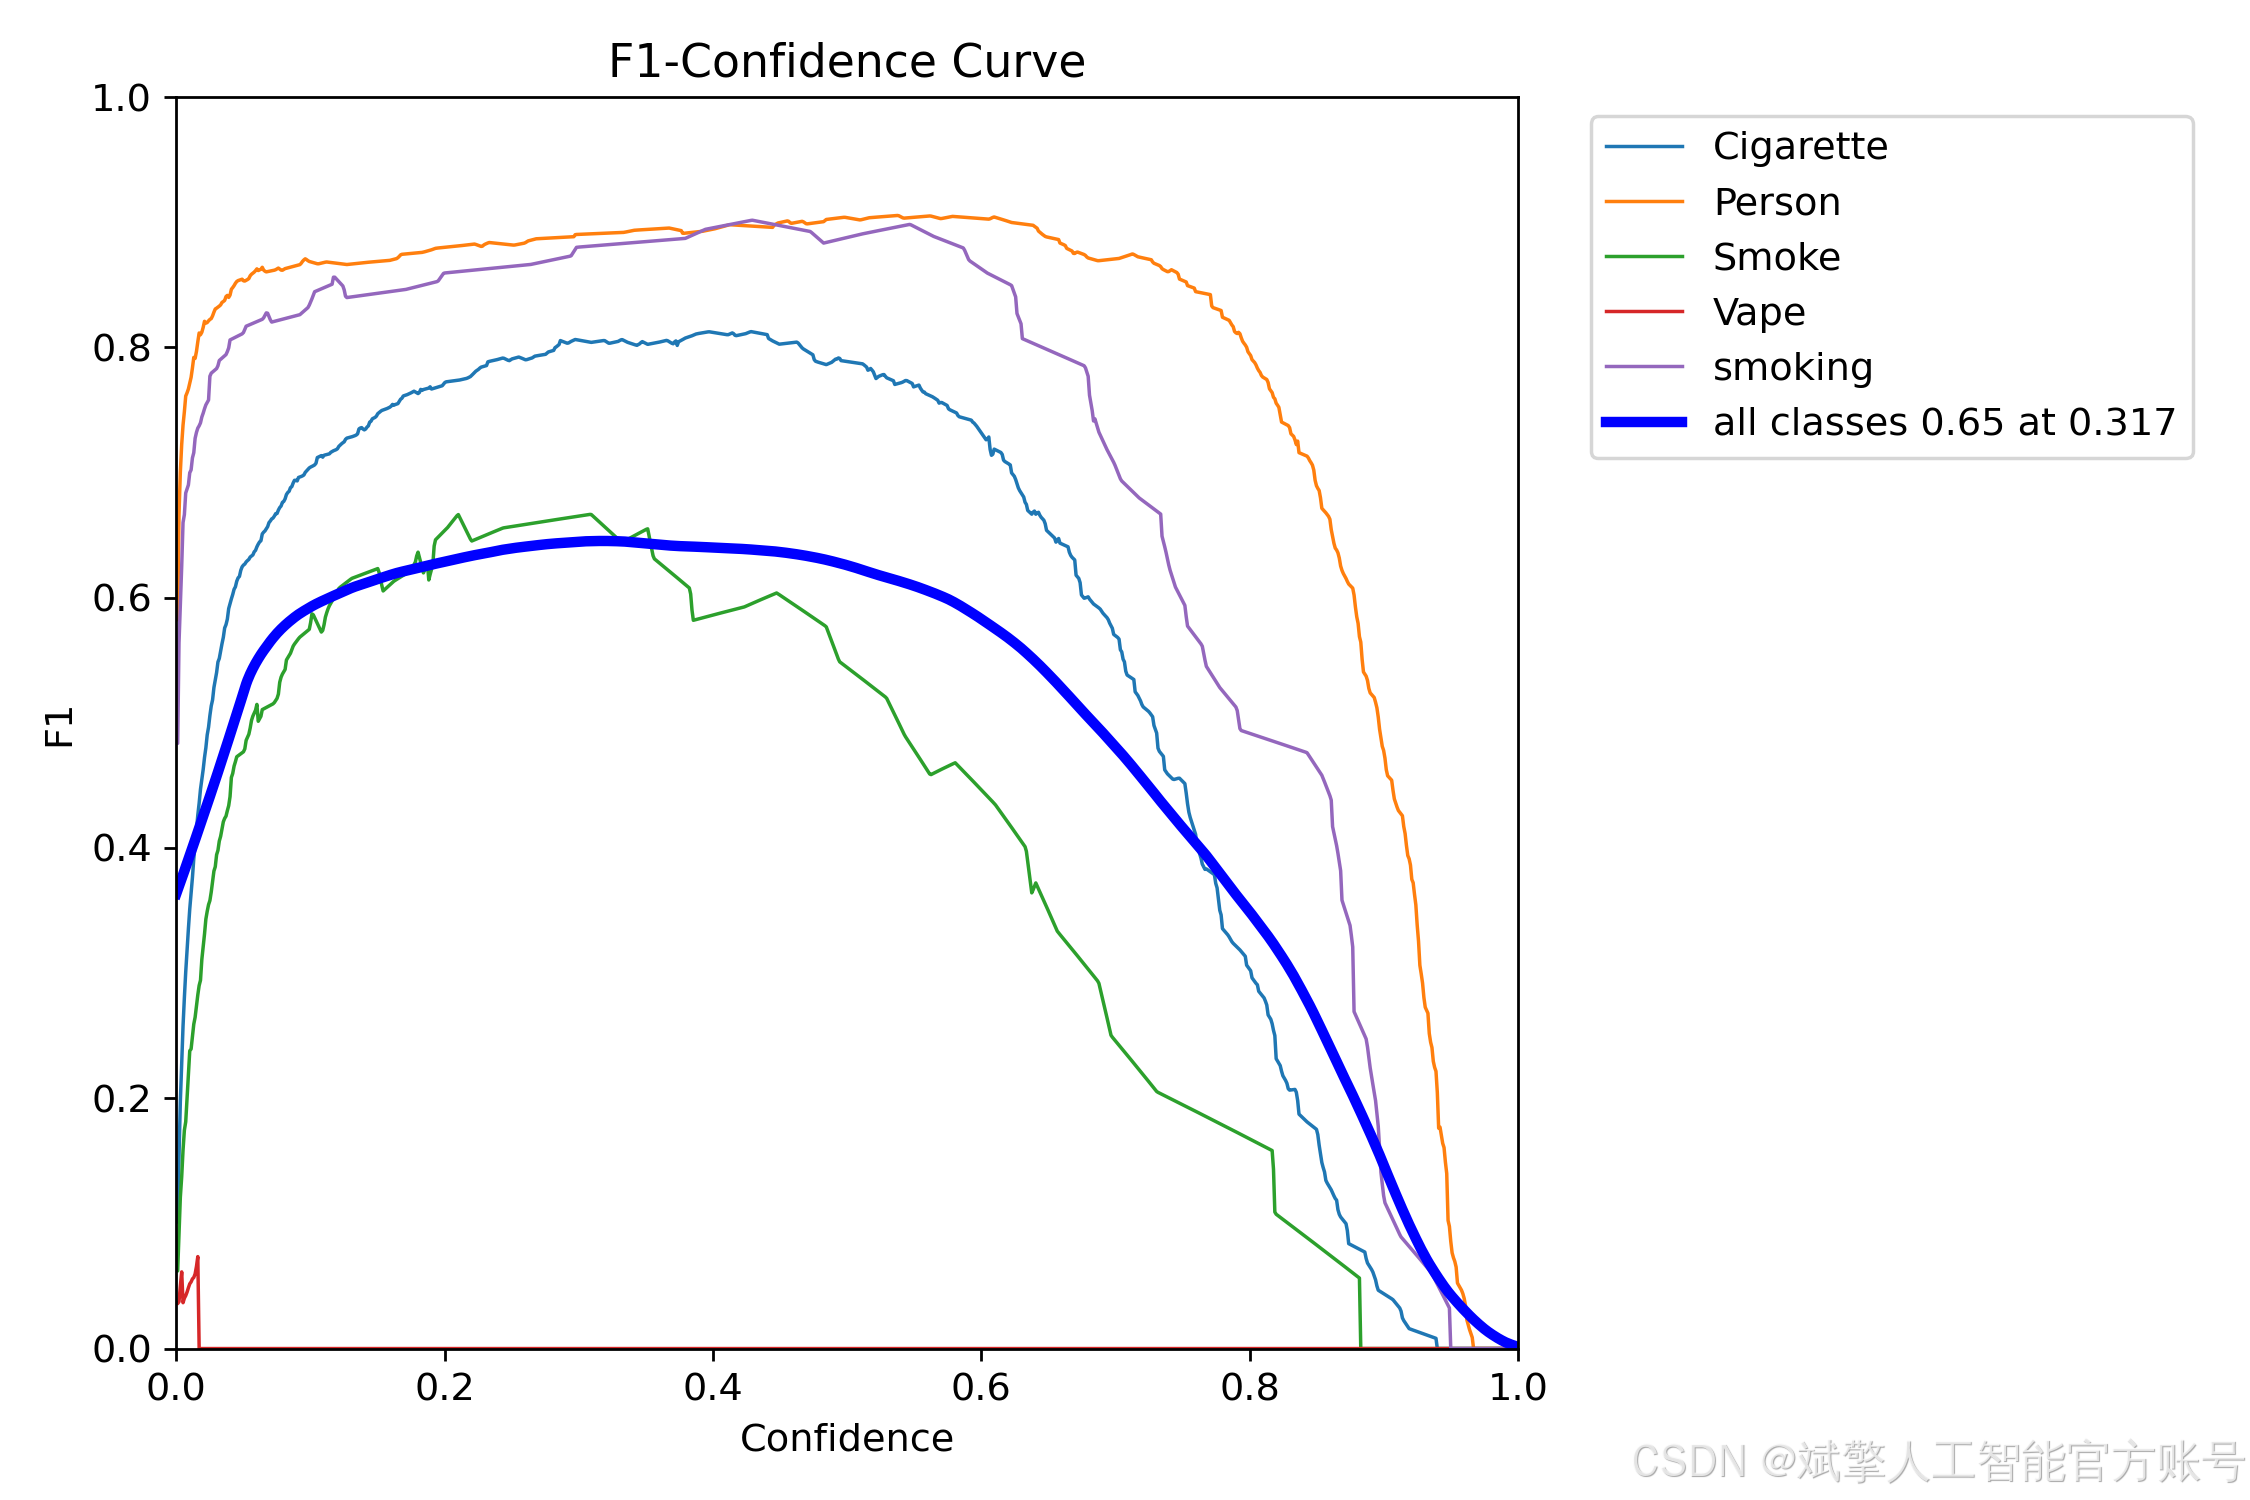
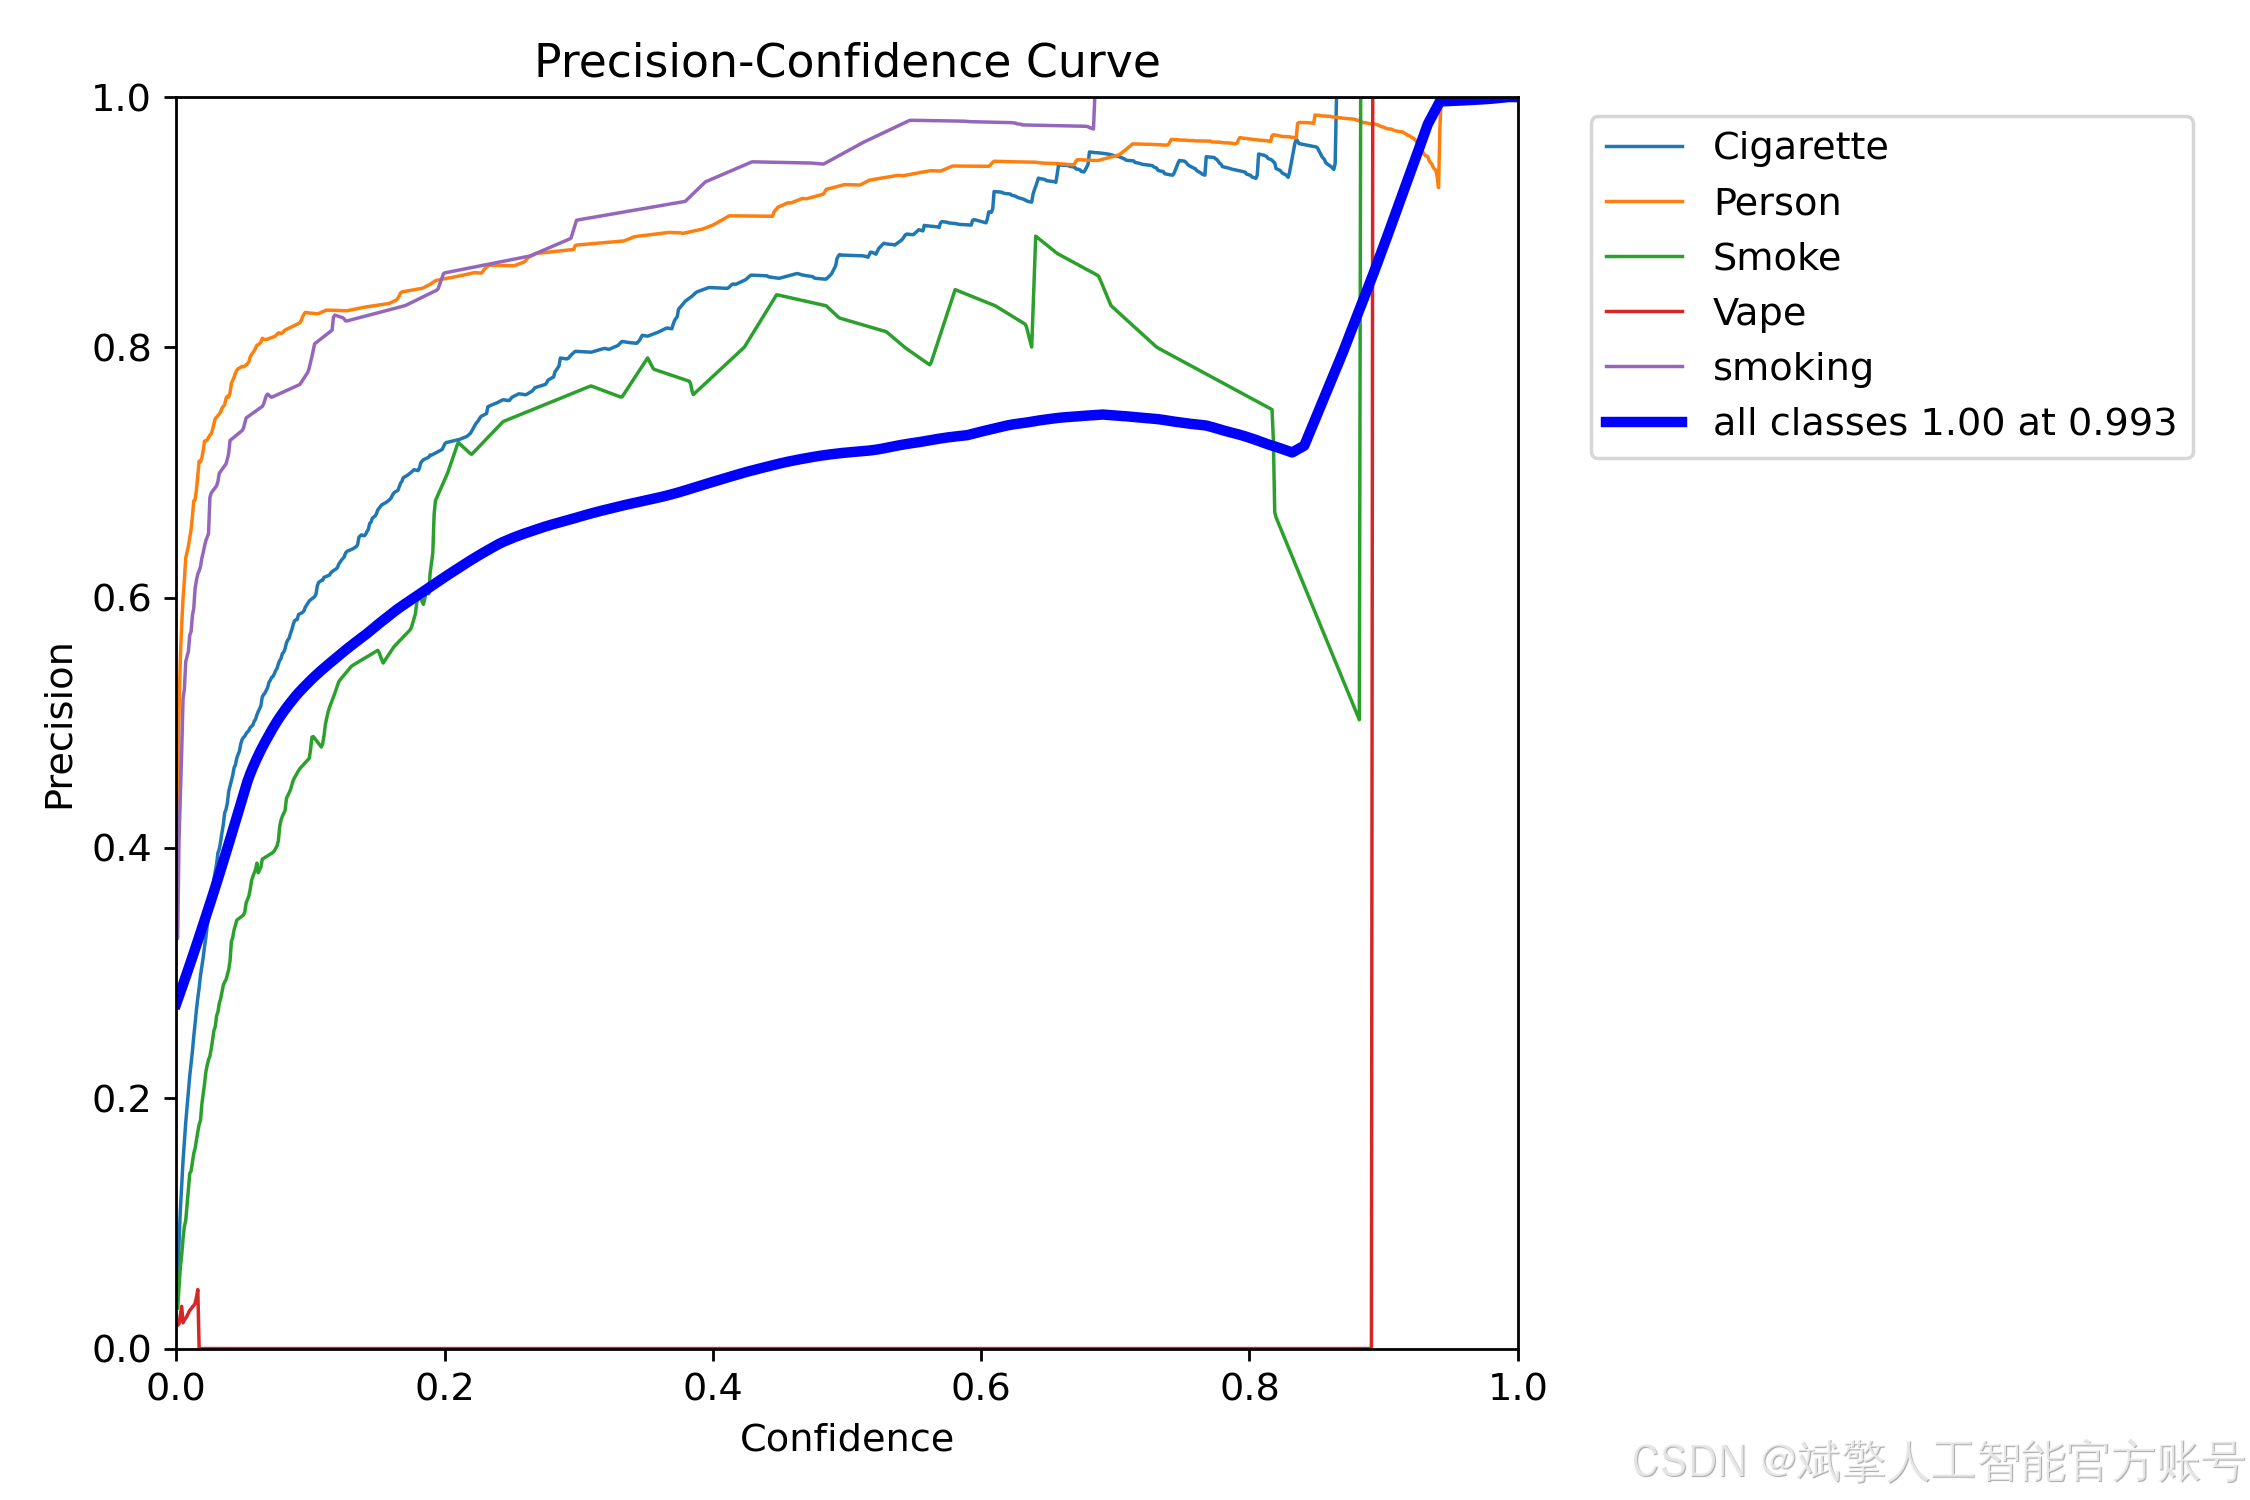
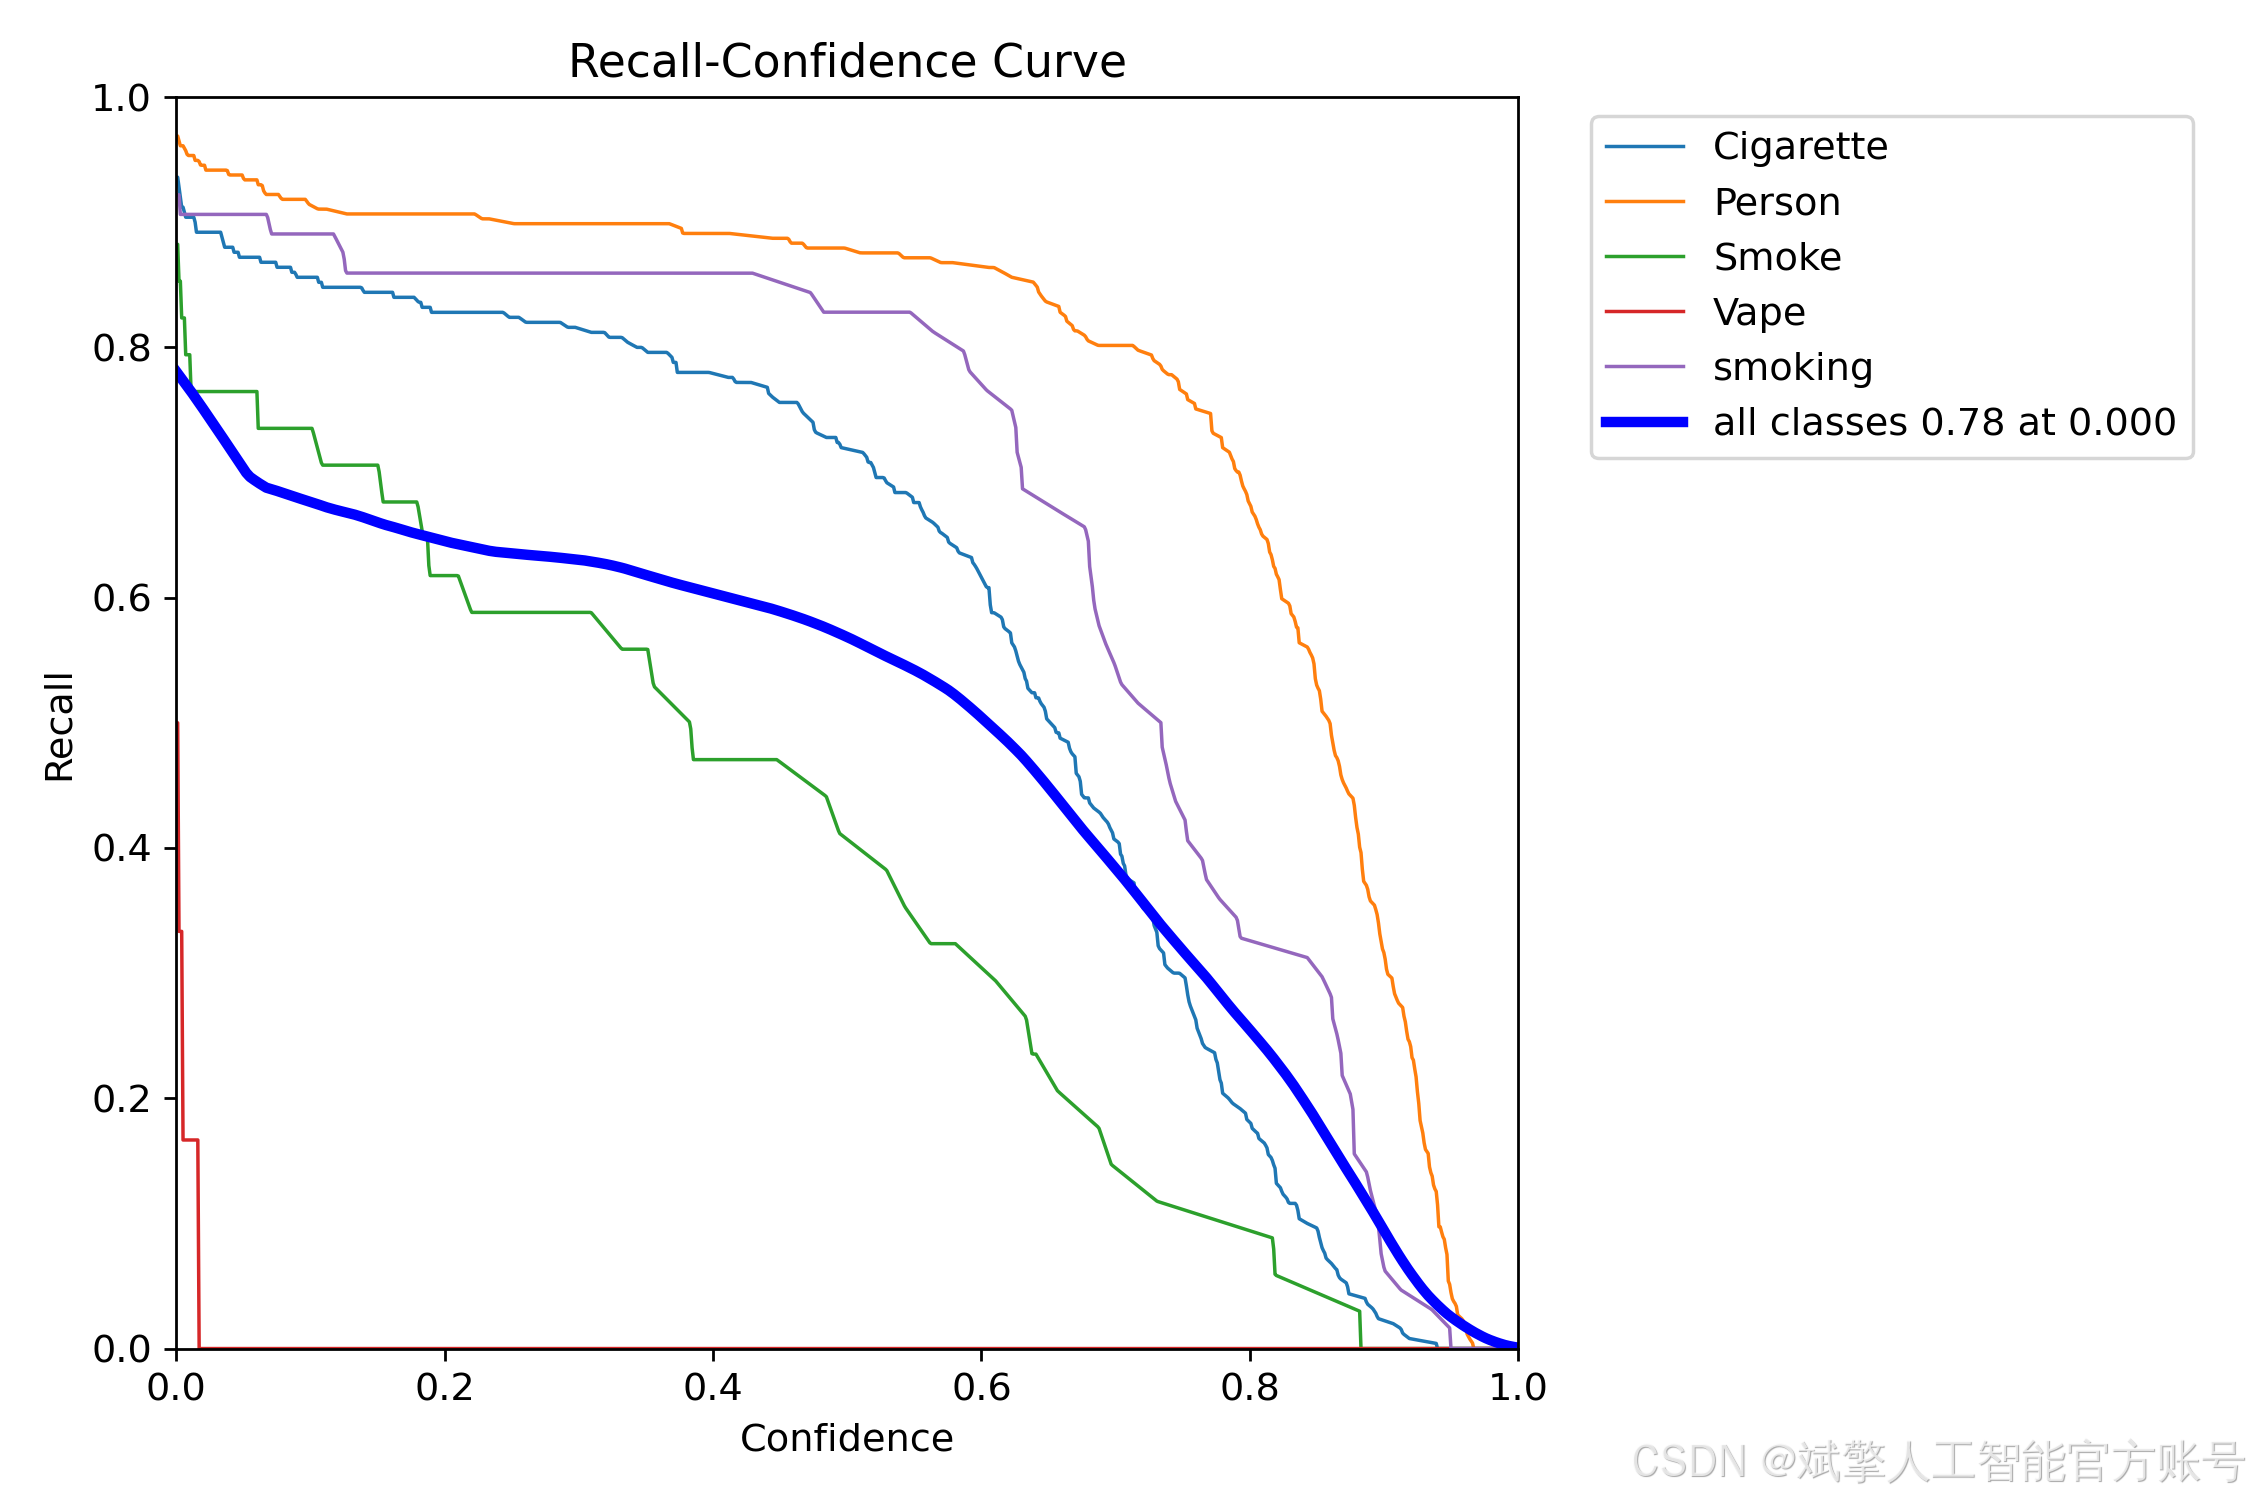
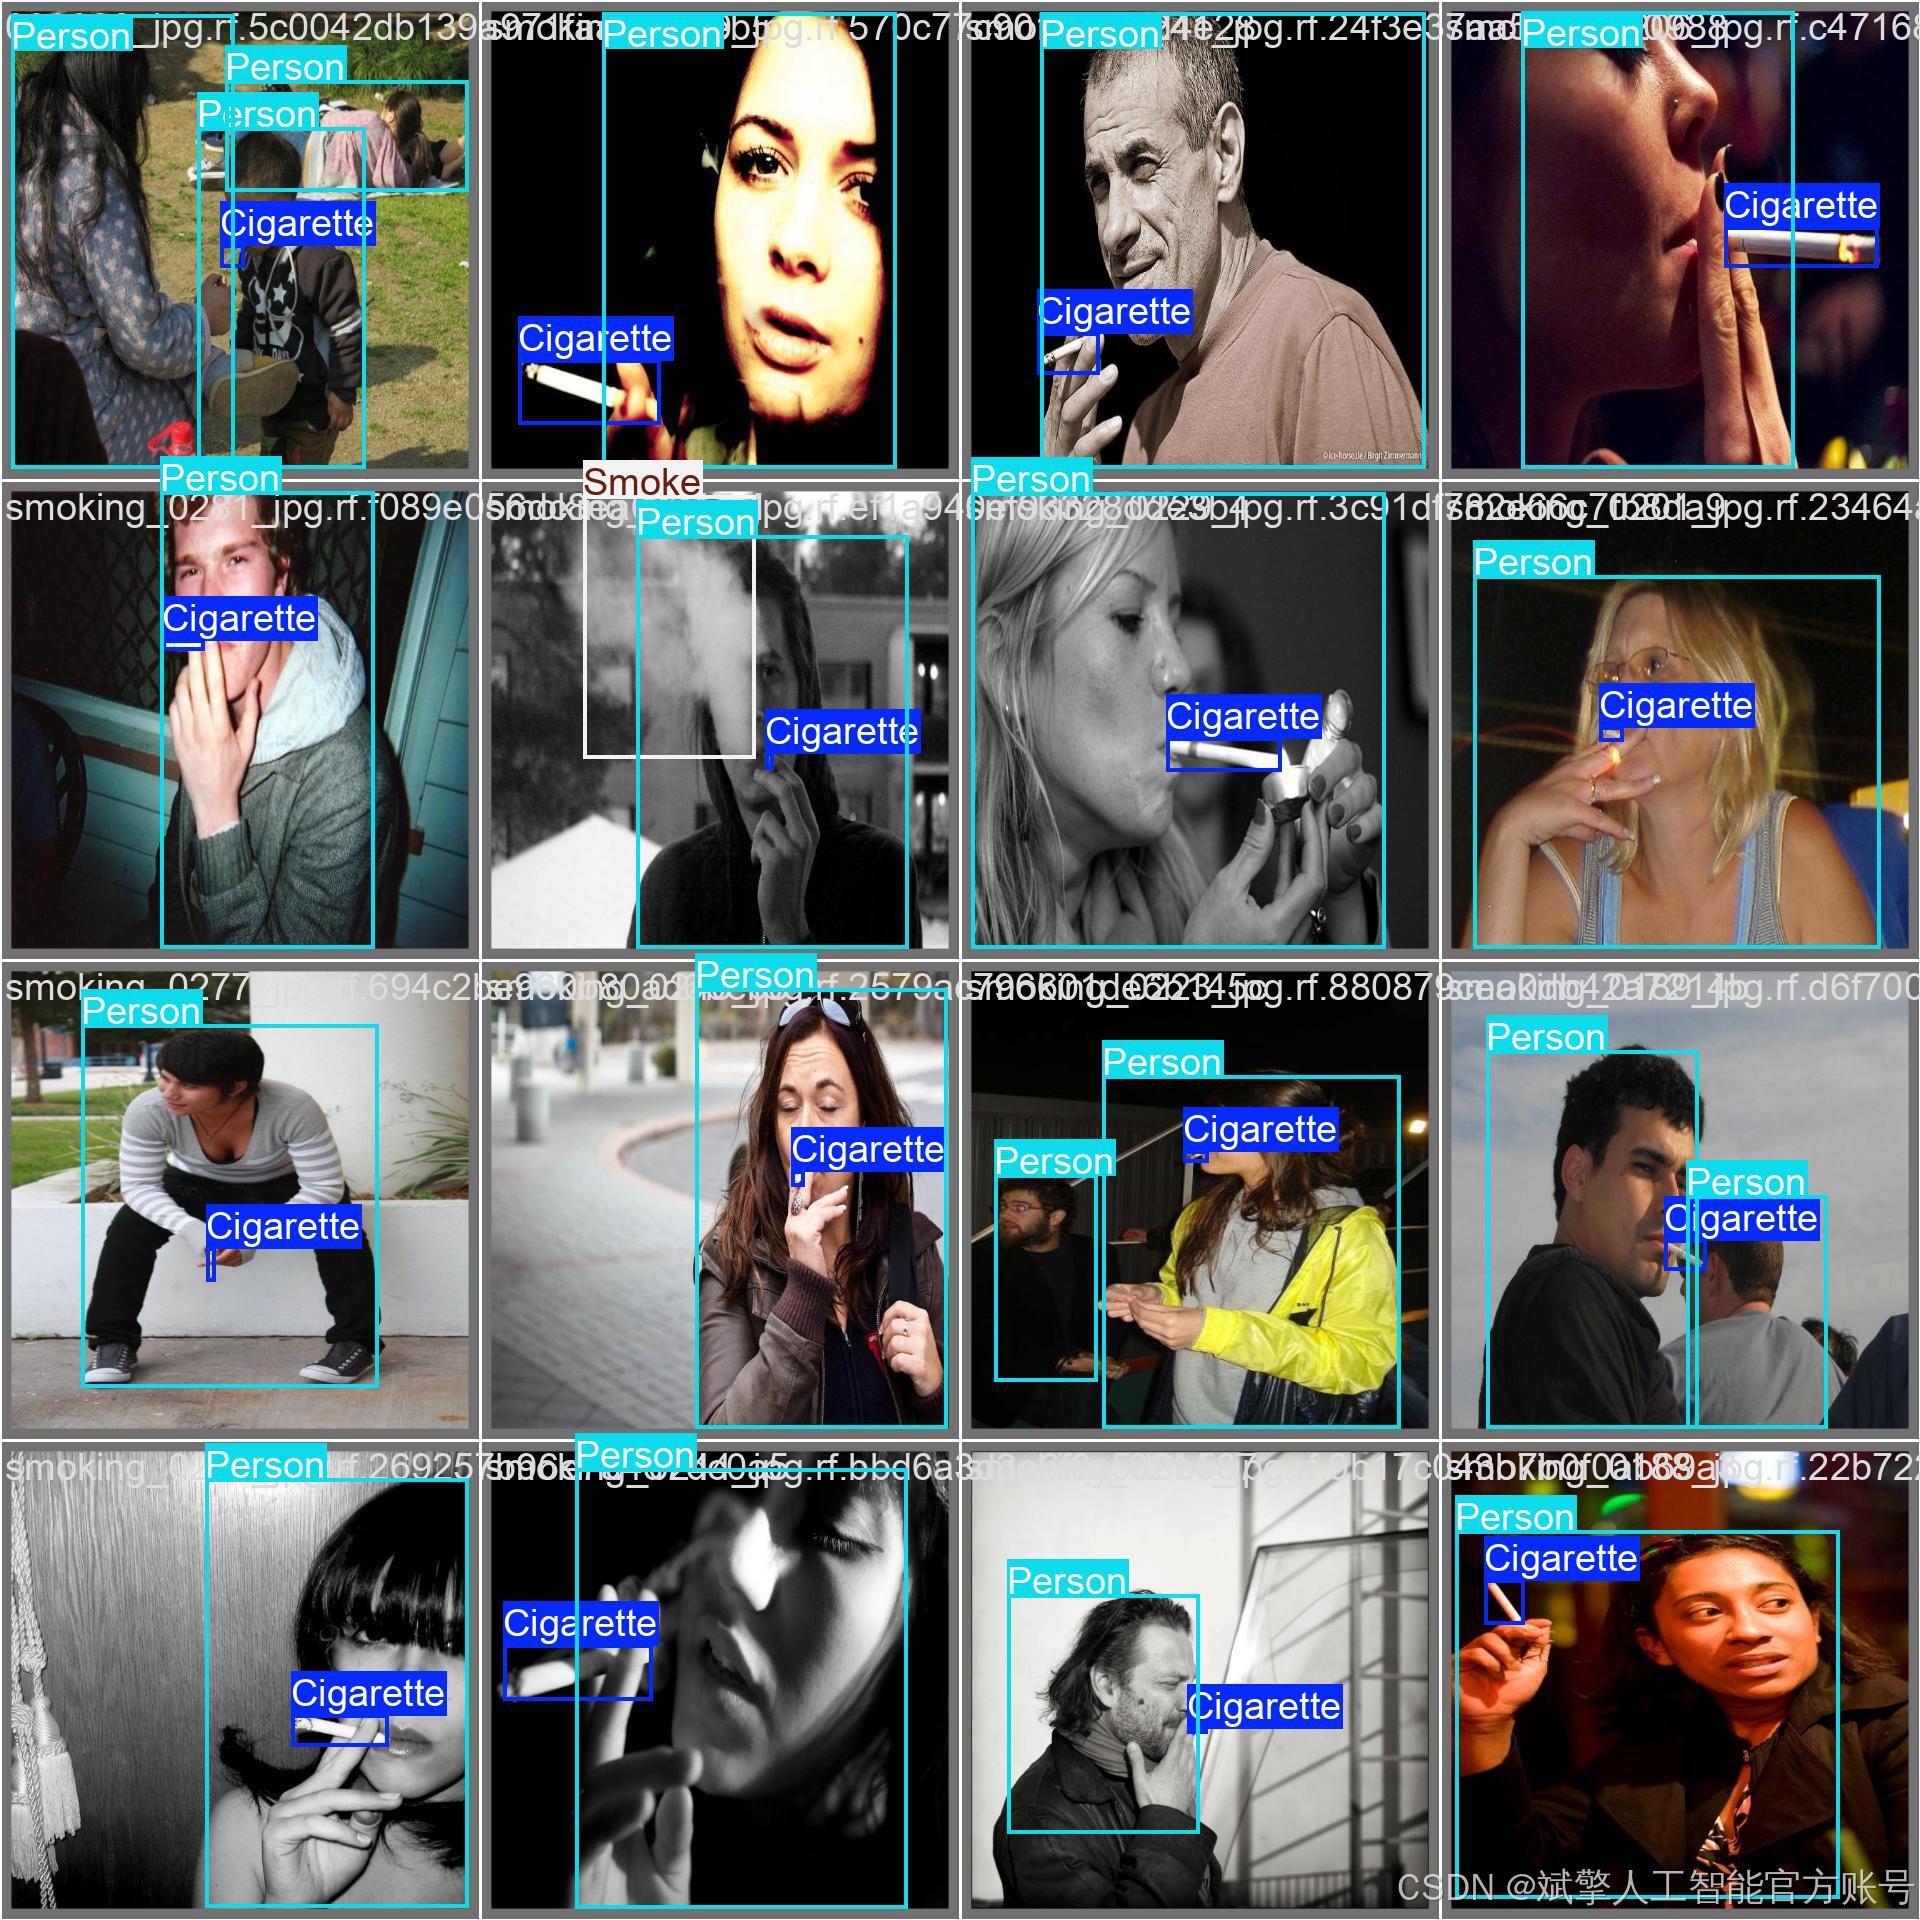
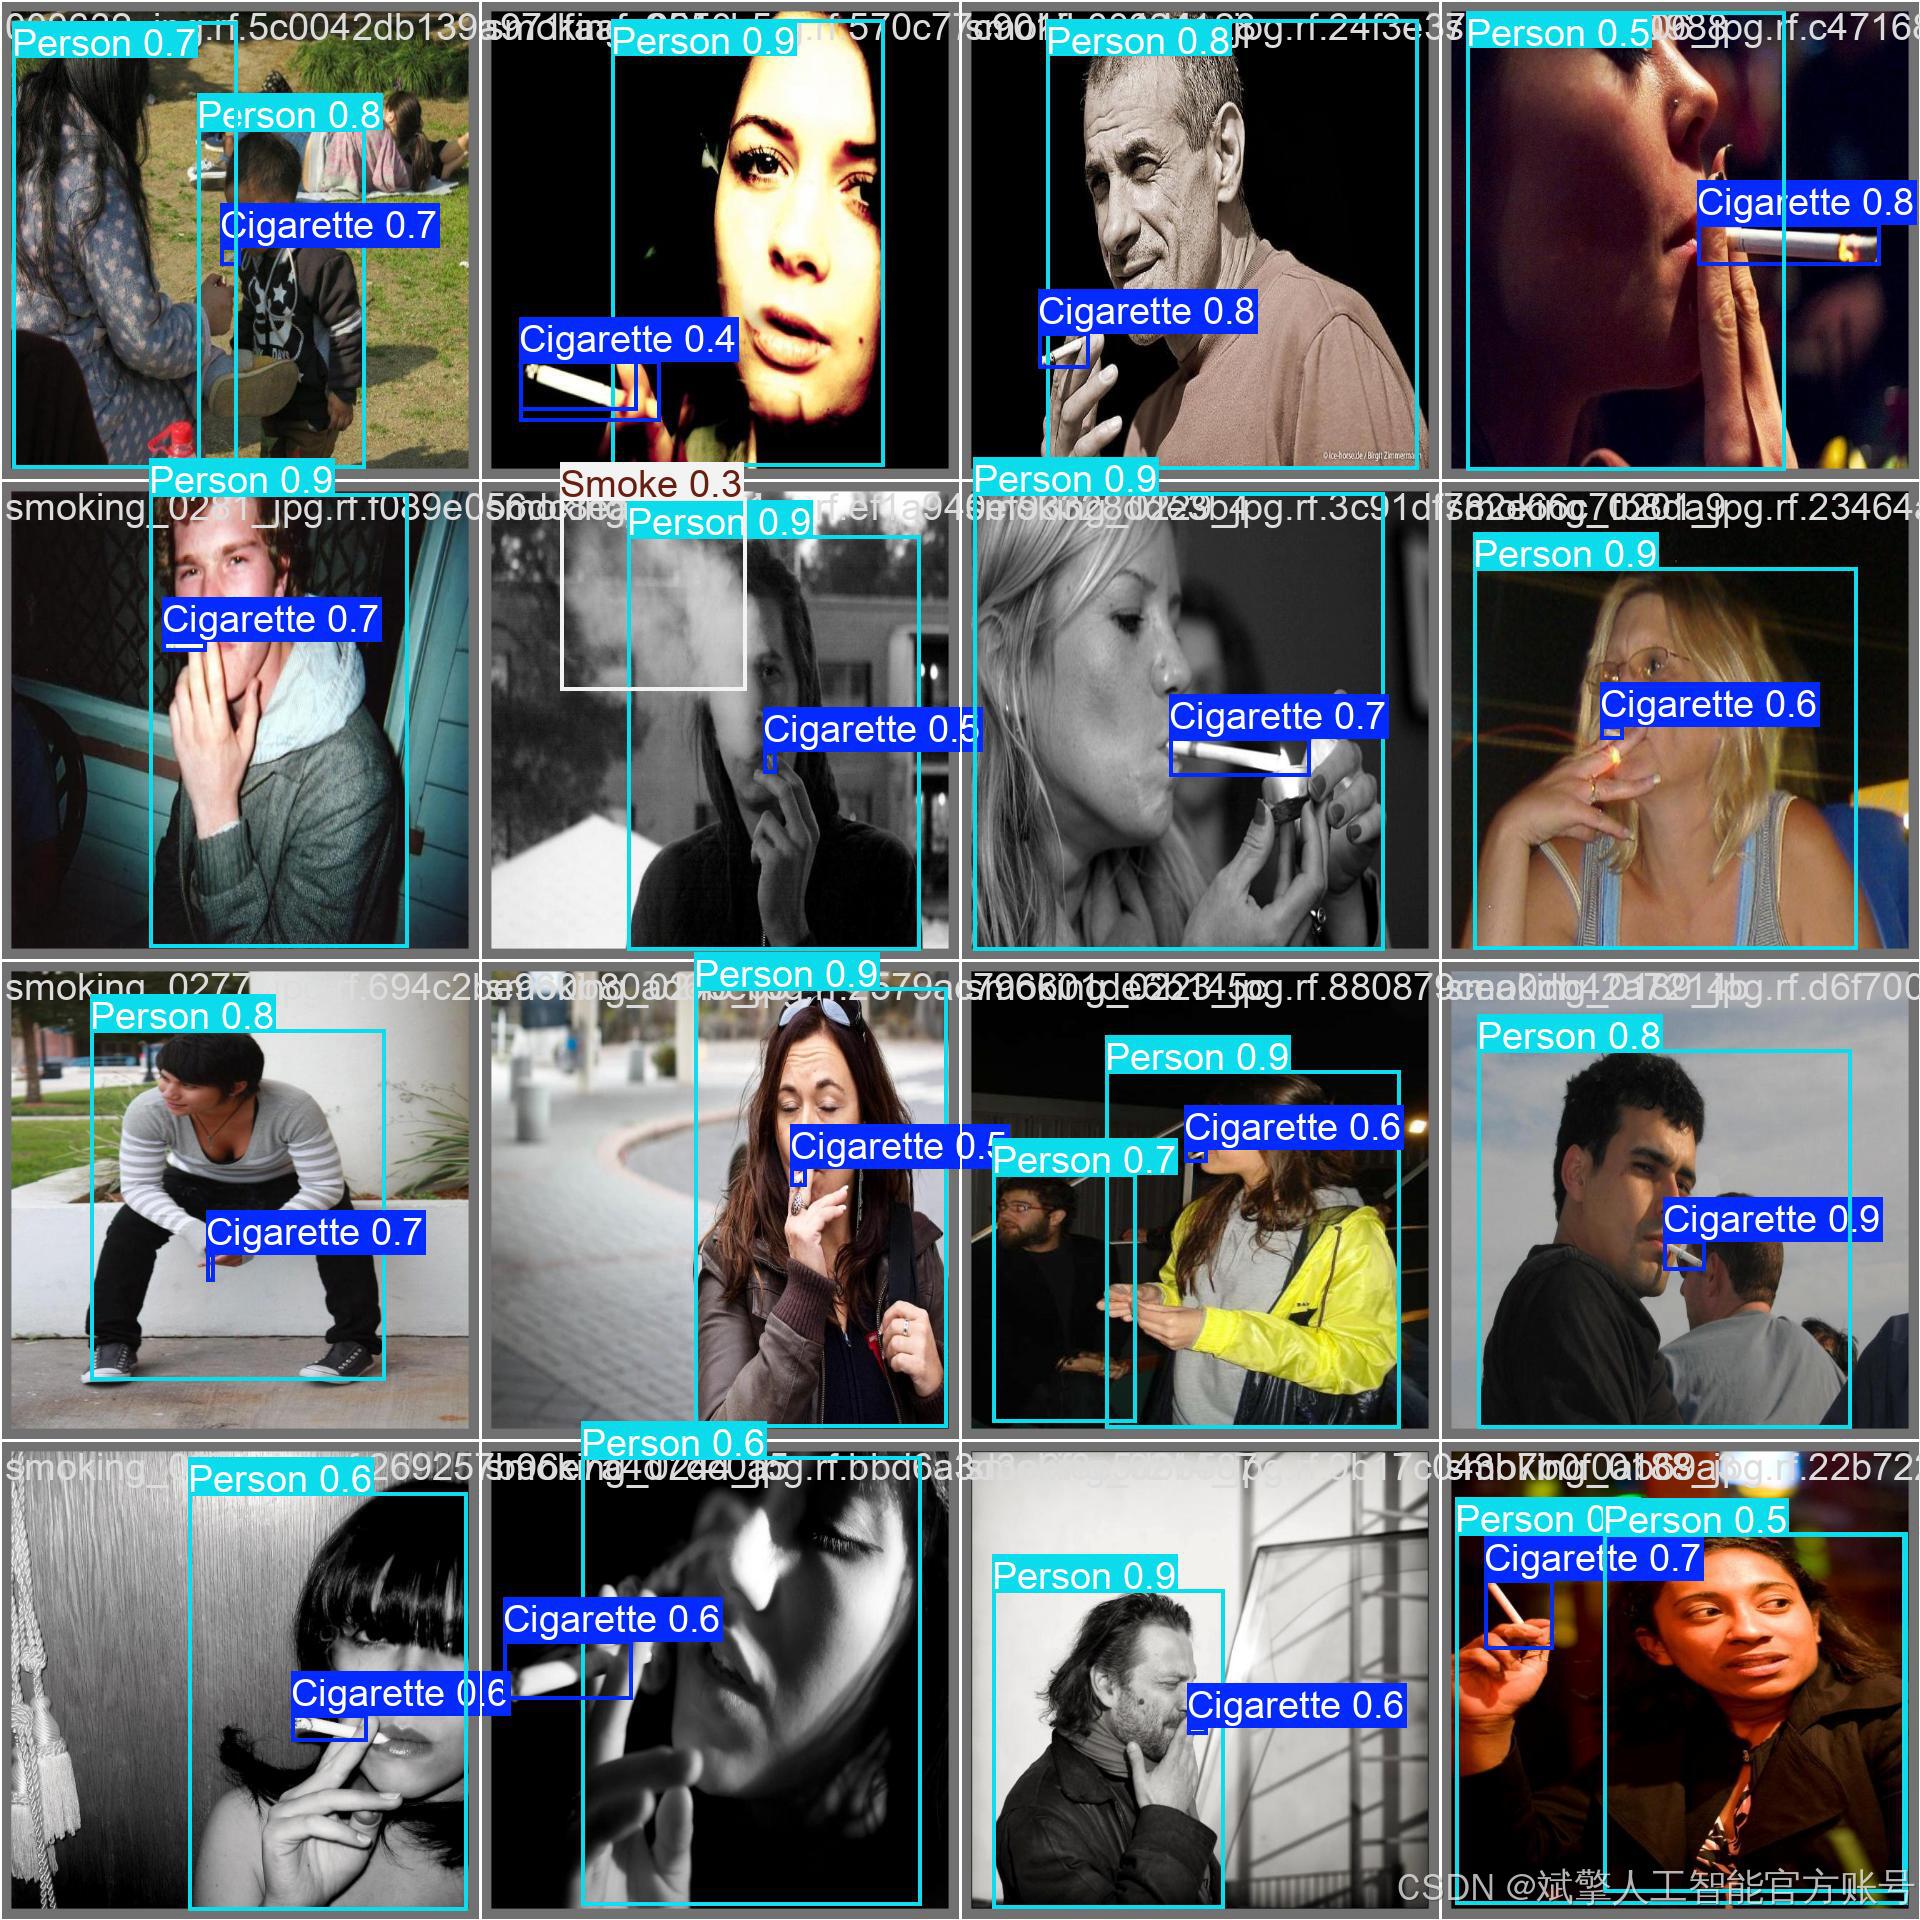
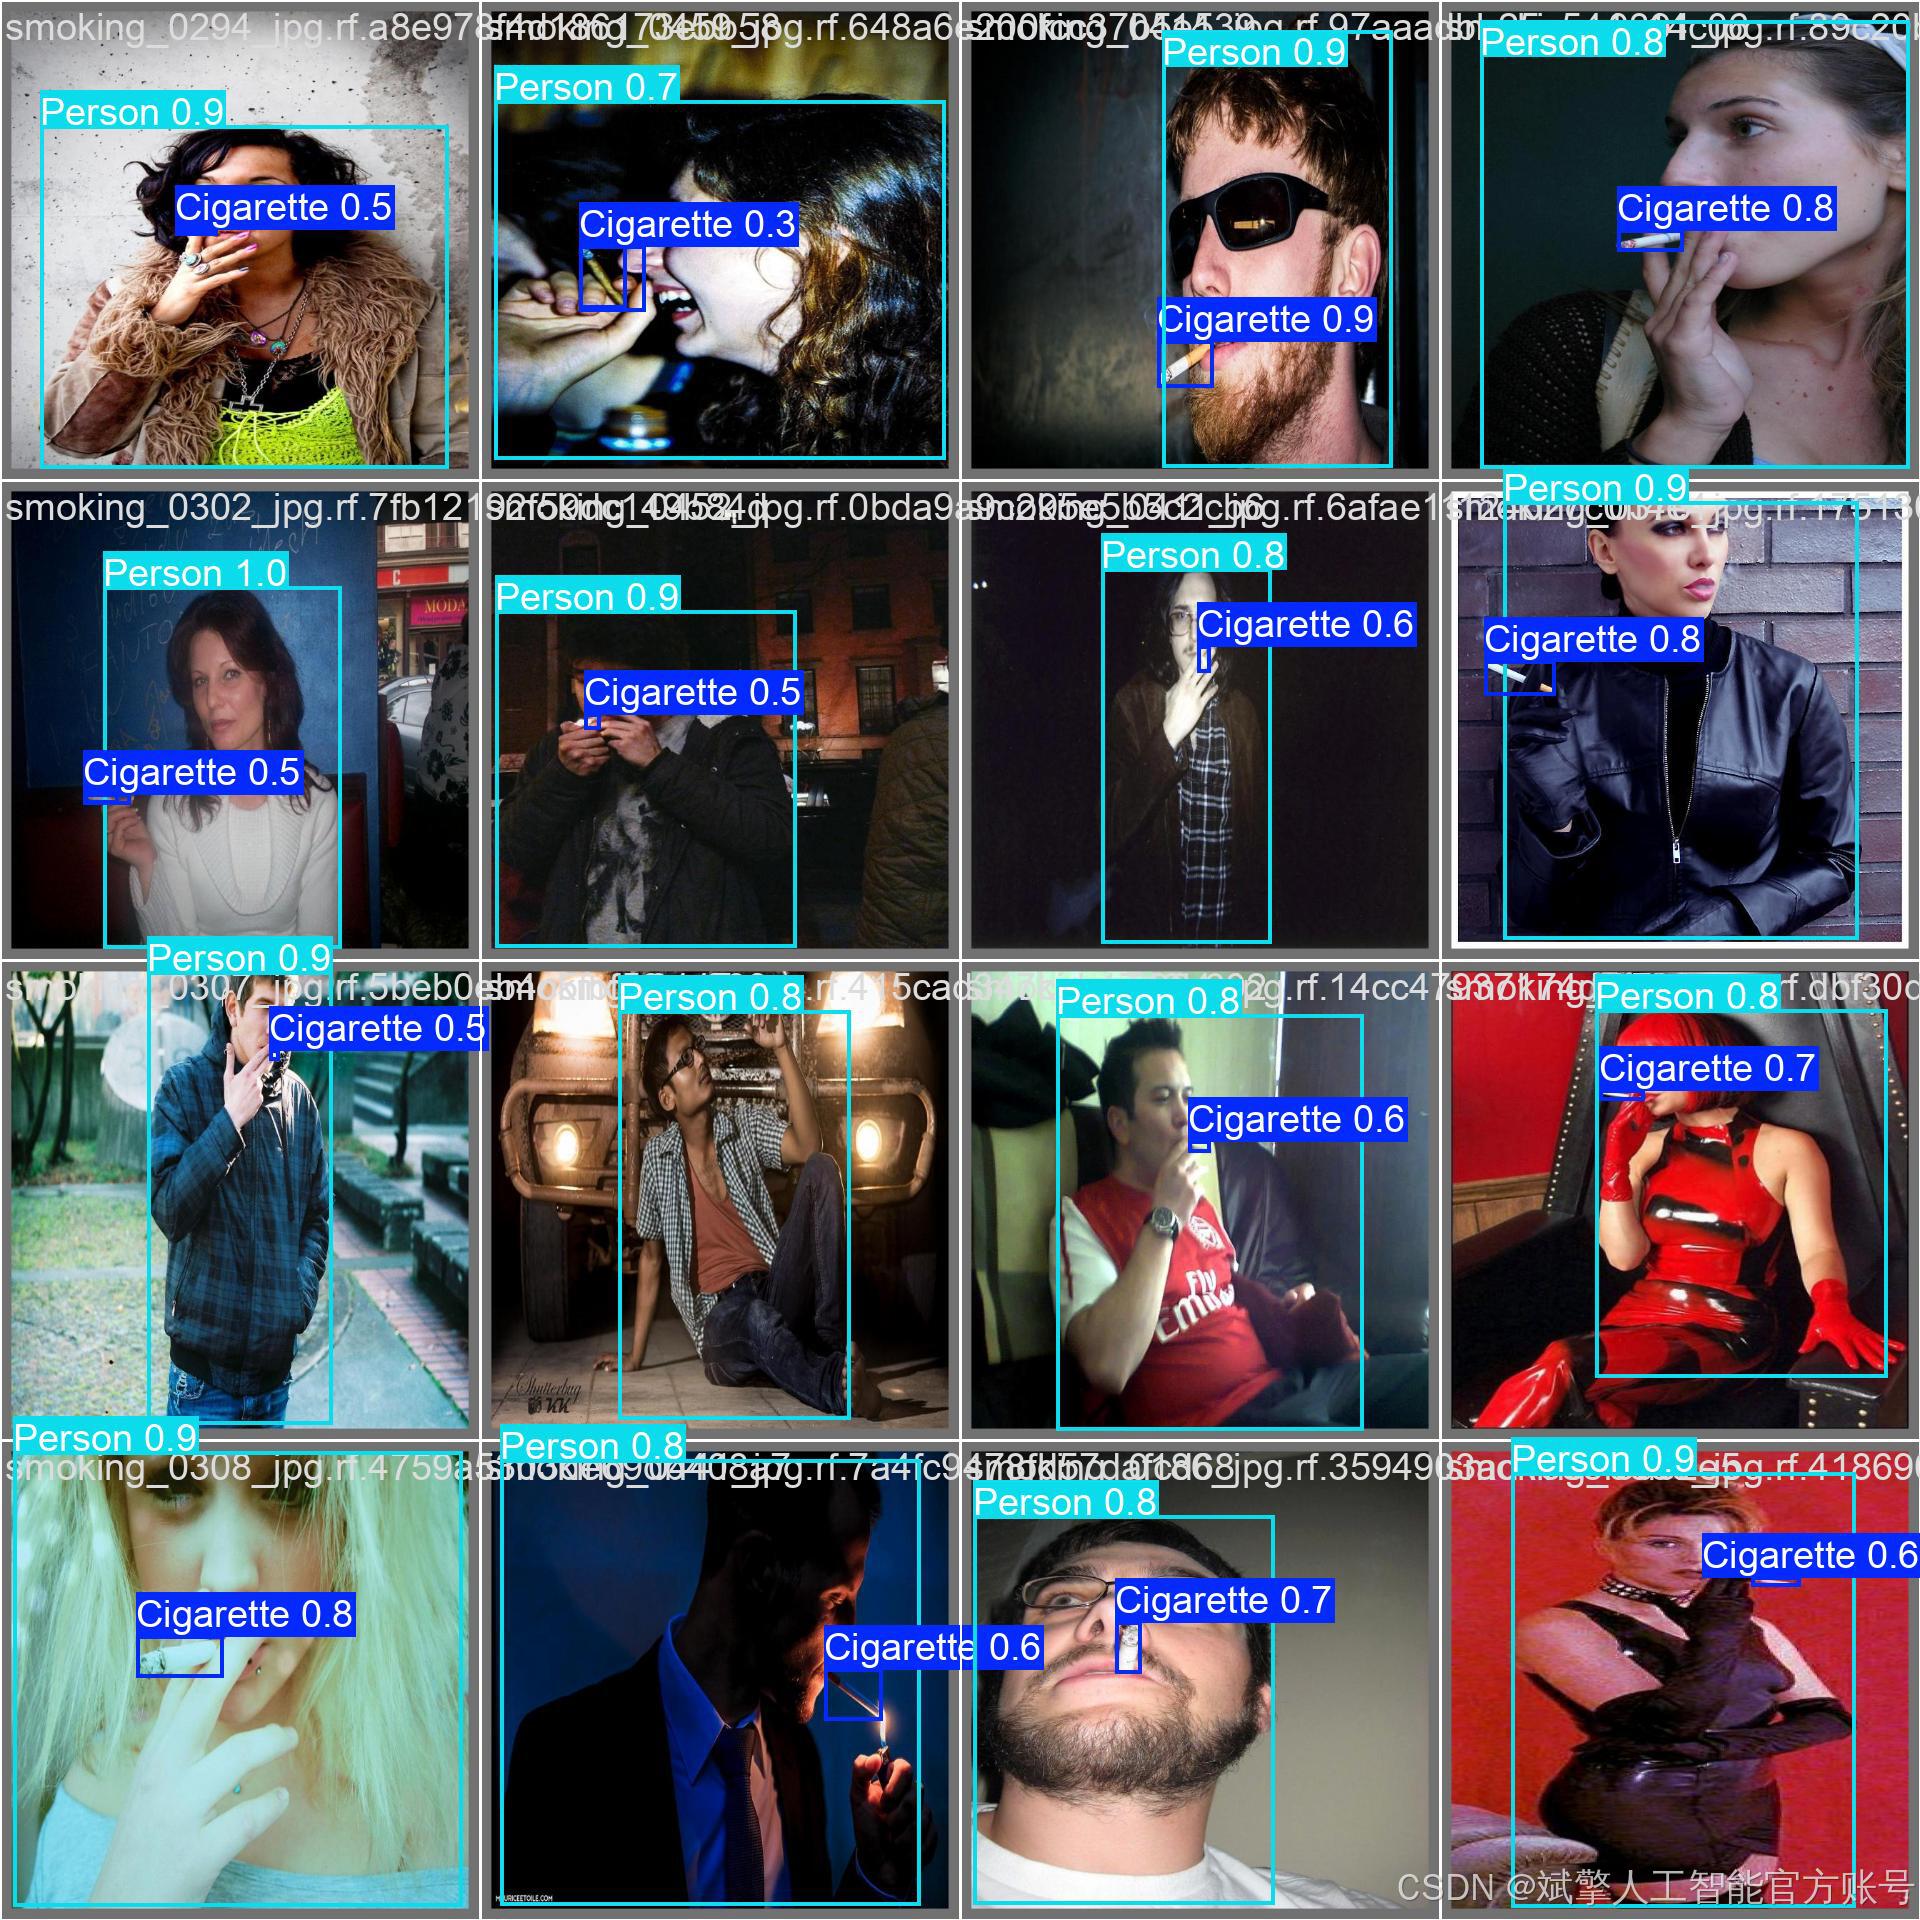
训练结果

六、核心代码

import sys

import cv2
import numpy as np
from PyQt5.QtWidgets import QApplication, QMessageBox, QFileDialog
from PyQt5.QtCore import QThread, pyqtSignal
from ultralytics import YOLO
from UiMain import UiMainWindow
import time
import os
from PyQt5.QtWidgets import QDialog
from LoginWindow import LoginWindow

class DetectionThread(QThread):
    frame_received = pyqtSignal(np.ndarray, np.ndarray, list)  # 原始帧, 检测帧, 检测结果
    finished_signal = pyqtSignal()  # 线程完成信号

    def __init__(self, model, source, conf, iou, parent=None):
        super().__init__(parent)
        self.model = model
        self.source = source
        self.conf = conf
        self.iou = iou
        self.running = True

    def run(self):
        try:
            if isinstance(self.source, int) or self.source.endswith(('.mp4', '.avi', '.mov')):  # 视频或摄像头
                cap = cv2.VideoCapture(self.source)
                while self.running and cap.isOpened():
                    ret, frame = cap.read()
                    if not ret:
                        break

                    # 保存原始帧
                    original_frame = frame.copy()

                    # 检测
                    results = self.model(frame, conf=self.conf, iou=self.iou)
                    annotated_frame = results[0].plot()

                    # 提取检测结果
                    detections = []
                    for result in results:
                        for box in result.boxes:
                            class_id = int(box.cls)
                            class_name = self.model.names[class_id]
                            confidence = float(box.conf)
                            x, y, w, h = box.xywh[0].tolist()
                            detections.append((class_name, confidence, x, y))

                    # 发送信号
                    self.frame_received.emit(
                        cv2.cvtColor(original_frame, cv2.COLOR_BGR2RGB),
                        cv2.cvtColor(annotated_frame, cv2.COLOR_BGR2RGB),
                        detections
                    )

                    # 控制帧率
                    time.sleep(0.03)  # 约30fps

                cap.release()
            else:  # 图片
                frame = cv2.imread(self.source)
                if frame is not None:
                    original_frame = frame.copy()
                    results = self.model(frame, conf=self.conf, iou=self.iou)
                    annotated_frame = results[0].plot()

                    # 提取检测结果
                    detections = []
                    for result in results:
                        for box in result.boxes:
                            class_id = int(box.cls)
                            class_name = self.model.names[class_id]
                            confidence = float(box.conf)
                            x, y, w, h = box.xywh[0].tolist()
                            detections.append((class_name, confidence, x, y))

                    self.frame_received.emit(
                        cv2.cvtColor(original_frame, cv2.COLOR_BGR2RGB),
                        cv2.cvtColor(annotated_frame, cv2.COLOR_BGR2RGB),
                        detections
                    )

        except Exception as e:
            print(f"Detection error: {e}")
        finally:
            self.finished_signal.emit()

    def stop(self):
        self.running = False


class MainWindow(UiMainWindow):
    def __init__(self):
        super().__init__()

        # 初始化模型
        self.model = None
        self.detection_thread = None
        self.current_image = None
        self.current_result = None
        self.video_writer = None
        self.is_camera_running = False
        self.is_video_running = False
        self.last_detection_result = None  # 新增:保存最后一次检测结果

        # 连接按钮信号
        self.image_btn.clicked.connect(self.detect_image)
        self.video_btn.clicked.connect(self.detect_video)
        self.camera_btn.clicked.connect(self.detect_camera)
        self.stop_btn.clicked.connect(self.stop_detection)
        self.save_btn.clicked.connect(self.save_result)

        # 初始化模型
        self.load_model()

    def load_model(self):
        try:
            model_name = self.model_combo.currentText()
            self.model = YOLO(f"{model_name}.pt")  # 自动下载或加载本地模型
            self.update_status(f"模型 {model_name} 加载成功")
        except Exception as e:
            QMessageBox.critical(self, "错误", f"模型加载失败: {str(e)}")
            self.update_status("模型加载失败")

    def detect_image(self):
        if self.detection_thread and self.detection_thread.isRunning():
            QMessageBox.warning(self, "警告", "请先停止当前检测任务")
            return

        file_path, _ = QFileDialog.getOpenFileName(
            self, "选择图片", "", "图片文件 (*.jpg *.jpeg *.png *.bmp)")

        if file_path:
            self.clear_results()
            self.current_image = cv2.imread(file_path)
            self.current_image = cv2.cvtColor(self.current_image, cv2.COLOR_BGR2RGB)
            self.display_image(self.original_image_label, self.current_image)

            # 创建检测线程
            conf = self.confidence_spinbox.value()
            iou = self.iou_spinbox.value()
            self.detection_thread = DetectionThread(self.model, file_path, conf, iou)
            self.detection_thread.frame_received.connect(self.on_frame_received)
            self.detection_thread.finished_signal.connect(self.on_detection_finished)
            self.detection_thread.start()

            self.update_status(f"正在检测图片: {os.path.basename(file_path)}")

    def detect_video(self):
        if self.detection_thread and self.detection_thread.isRunning():
            QMessageBox.warning(self, "警告", "请先停止当前检测任务")
            return

        file_path, _ = QFileDialog.getOpenFileName(
            self, "选择视频", "", "视频文件 (*.mp4 *.avi *.mov)")

        if file_path:
            self.clear_results()
            self.is_video_running = True

            # 初始化视频写入器
            cap = cv2.VideoCapture(file_path)
            frame_width = int(cap.get(cv2.CAP_PROP_FRAME_WIDTH))
            frame_height = int(cap.get(cv2.CAP_PROP_FRAME_HEIGHT))
            fps = cap.get(cv2.CAP_PROP_FPS)
            cap.release()

            # 创建保存路径
            save_dir = "results"
            os.makedirs(save_dir, exist_ok=True)
            timestamp = time.strftime("%Y%m%d_%H%M%S")
            save_path = os.path.join(save_dir, f"result_{timestamp}.mp4")

            fourcc = cv2.VideoWriter_fourcc(*'mp4v')
            self.video_writer = cv2.VideoWriter(save_path, fourcc, fps, (frame_width, frame_height))

            # 创建检测线程
            conf = self.confidence_spinbox.value()
            iou = self.iou_spinbox.value()
            self.detection_thread = DetectionThread(self.model, file_path, conf, iou)
            self.detection_thread.frame_received.connect(self.on_frame_received)
            self.detection_thread.finished_signal.connect(self.on_detection_finished)
            self.detection_thread.start()

            self.update_status(f"正在检测视频: {os.path.basename(file_path)}")

    def detect_camera(self):
        if self.detection_thread and self.detection_thread.isRunning():
            QMessageBox.warning(self, "警告", "请先停止当前检测任务")
            return

        self.clear_results()
        self.is_camera_running = True

        # 创建检测线程 (默认使用摄像头0)
        conf = self.confidence_spinbox.value()
        iou = self.iou_spinbox.value()
        self.detection_thread = DetectionThread(self.model, 0, conf, iou)
        self.detection_thread.frame_received.connect(self.on_frame_received)
        self.detection_thread.finished_signal.connect(self.on_detection_finished)
        self.detection_thread.start()

        self.update_status("正在从摄像头检测...")
🔐登录注册验证
对应文件:LoginWindow.py
# 账户验证核心逻辑
def handle_login(self):
    username = self.username_input.text().strip()
    password = self.password_input.text().strip()

    if not username or not password:
        QMessageBox.warning(self, "警告", "用户名和密码不能为空!")
        return

    if username in self.accounts and self.accounts[username] == password:
        self.accept()  # 验证通过
    else:
        QMessageBox.warning(self, "错误", "用户名或密码错误!")

# 密码强度检查(注册时)
def handle_register(self):
    if len(password) < 6:  # 密码长度≥6位
        QMessageBox.warning(self, "警告", "密码长度至少为6位!")
🎯 多重检测模式
对应文件:main.py
图片检测
def detect_image(self):
    file_path, _ = QFileDialog.getOpenFileName(
        self, "选择图片", "", "图片文件 (*.jpg *.jpeg *.png *.bmp)")
    if file_path:
        self.detection_thread = DetectionThread(self.model, file_path, conf, iou)
        self.detection_thread.start()  # 启动检测线程
视频检测
def detect_video(self):
    file_path, _ = QFileDialog.getOpenFileName(
        self, "选择视频", "", "视频文件 (*.mp4 *.avi *.mov)")
    if file_path:
        self.video_writer = cv2.VideoWriter()  # 初始化视频写入器
        self.detection_thread = DetectionThread(self.model, file_path, conf, iou)
实时摄像头
def detect_camera(self):
    self.detection_thread = DetectionThread(self.model, 0, conf, iou)  # 摄像头设备号0
    self.detection_thread.start()
🖼️ 沉浸式可视化
对应文件:UiMain.py
双画面显示
def display_image(self, label, image):
    q_img = QImage(image.data, w, h, bytes_per_line, QImage.Format_RGB888)
    pixmap = QPixmap.fromImage(q_img)
    label.setPixmap(pixmap.scaled(label.size(), Qt.KeepAspectRatio))  # 自适应缩放
结果表格
def add_detection_result(self, class_name, confidence, x, y):
    self.results_table.insertRow(row)
    items = [
        QTableWidgetItem(class_name),  # 类别列
        QTableWidgetItem(f"{confidence:.2f}"),  # 置信度
        QTableWidgetItem(f"{x:.1f}"),  # X坐标
        QTableWidgetItem(f"{y:.1f}")   # Y坐标
    ]
⚙️ 参数配置系统
对应文件:UiMain.py
双阈值联动控制
# 置信度阈值同步
def update_confidence(self, value):
    confidence = value / 100.0
    self.confidence_spinbox.setValue(confidence)  # 滑块→数值框
    self.confidence_label.setText(f"置信度阈值: {confidence:.2f}")

# IoU阈值同步
def update_iou(self, value):
    iou = value / 100.0
    self.iou_spinbox.setValue(iou)
✨ UI美学设计
对应文件:UiMain.py
科幻风格按钮
def create_button(self, text, color):
    return f"""
    QPushButton {{
        border: 1px solid {color};
        color: {color};
        border-radius: 6px;
    }}
    QPushButton:hover {{
        background-color: {self.lighten_color(color, 10)};
        box-shadow: 0 0 10px {color};  # 悬停发光效果
    }}
    """
动态状态栏
def update_status(self, message):
    self.status_bar.showMessage(
        f"状态: {message} | 最后更新: {time.strftime('%H:%M:%S')}"  # 实时时间戳
    )
🔄 智能工作流
对应文件:main.py
线程管理
class DetectionThread(QThread):
    frame_received = pyqtSignal(np.ndarray, np.ndarray, list)  # 信号量通信

    def run(self):
        while self.running:  # 多线程检测循环
            results = self.model(frame, conf=self.conf, iou=self.iou)
            self.frame_received.emit(original_frame, result_frame, detections)
七、项目源码(视频简介)

基于深度学习YOLOv11的吸烟识别检测系统(YOLOv11+YOLO数据集+UI界面+登录注册界面+Python项目源码+模型)_哔哩哔哩_bilibili
基于深度学习YOLOv11的吸烟识别检测系统(YOLOv11+YOLO数据集+UI界面+登录注册界面+Python项目源码+模型)


 444
444

 被折叠的 条评论
为什么被折叠?
被折叠的 条评论
为什么被折叠?
 到【灌水乐园】发言


