 使用Flask构建个人网站并部署到Heroku


 本文档详细介绍了如何使用Python的Flask框架来开发个人网站,包括本地网页的制作、调试和CSS样式设置。接着,讲述了如何将网站部署到Heroku服务器,涉及虚拟环境创建、依赖安装、文件结构配置、Procfile和requirements.txt的编写等步骤。最后,提到了Git的使用以及Heroku上的应用管理。
Project 3:Personal website
基于python中flask包(library)的personal website开发;
本地网页制作
准备工作
pip install flask
在本地(localhost)编辑网页的方法
from flask import Flask

app = Flask(__name__)

@app.route('/home/')

def home():
    return "Website content goes here!"

if __name__=="__main__":
    app.run(port=5001,debug=False)
debug=True则可以随时更改;
if __name__=="__main__"代表运行此程序时——即调试状态;
HTML的初始代码
homepage
#HTML加入网站
<!DOCTYPE html>
<html>
<body>
    <h1>My homepage</h1>
    <p>This is a test website</p>
</body>
</html>
创建layoutHTML文件,酱homepage和aboutpage作为子网站加入
layeout.HTML
#上述代码将被放到下列layout代码的blockcontent位置上
<!DOCTYPE html>
<html>
  <head>

  </head>
  <body>
    <header>
      <div class="container">
        <h1 class="logo">Qi's web app</h1>
        <strong><nav>
          <ul class="menu">
            <li><a href="{{ url_for('home') }}">Home</a></li>
            <li><a href="{{ url_for('about') }}">About</a></li>
          </ul>
        </nav></strong>
      </div>
    </header>
    <div class="container">
        {%block content%}
        {%endblock%}
    </div>
  </body>
</html>
home.HTML
#子网站无需声明头文件
{%extends "layout.html"%}
{%block content%}
<div class="home">
    <h1> My home</h1>
    <p> This is a website </p>
</div>
{%endblock%}
about.HTML
{%extends "layout.html"%}
{%block content%}
<div class="about">
    <h1>My aboutpage</h1>
    <p>This is a test website again</p>
</div>
{%endblock%}
此时的script1.py文件如下
#使用render_template
from flask import Flask,render_template

app = Flask(__name__)

@app.route('/')
def home():
    return render_template("home.html")
@app.route('/about')
def about():
    return render_template("about.html")

if __name__=="__main__":
    app.run(port=5001,debug=False)
可得到网站,并按照上面的HTML文件显示;
为HTML文件设置CSS代码
(1)CSS代码
#CSS代码
body {
  margin: 0;
  padding: 0;
  font-family: "Helvetica Neue", Helvetica, Arial, sans-serif;
  color: #060;
}

/*
 * Formatting the header area
 */

header {
  background-color: #DFB887;
  height: 35px;
  width: 100%;
  opacity: .9;
  margin-bottom: 10px;
}

header h1.logo {
  margin: 0;
  font-size: 1.7em;
  color: #fff;
  text-transform: uppercase;
  float: left;
}

header h1.logo:hover {
  color: #fff;
  text-decoration: none;
}

/*
 * Center the body content
 */

.container {
  width: 1200px;
  margin: 0 auto;
}

div.home {
  padding: 10px 0 30px 0;
  background-color: #E6E6FA;
  -webkit-border-radius: 6px;
     -moz-border-radius: 6px;
          border-radius: 6px;
}

div.about {
  padding: 10px 0 30px 0;
  background-color: #E6E6FA;
  -webkit-border-radius: 6px;
     -moz-border-radius: 6px;
          border-radius: 6px;
}

h2 {
  font-size: 3em;
  margin-top: 40px;
  text-align: center;
  letter-spacing: -2px;
}

h3 {
  font-size: 1.7em;
  font-weight: 100;
  margin-top: 30px;
  text-align: center;
  letter-spacing: -1px;
  color: #999;
}

.menu {
  float: right;
  margin-top: 8px;
}

.menu li {
  display: inline;
}

.menu li + li {
  margin-left: 35px;
}

.menu li a {
  color: #444;
  text-decoration: none;
}
(2)在layout.HTML的head中加入此css代码
  <head>
        <title>Flask app</title>
        <link rel="stylesheet" href="{{url_for('static',filename='css/main.css')}}"
  </head>
此时,本地localhost中已经可显示由CSS优化的静态网页;
在线网页
将网页放置服务器,使得可以在网络上访问
准备工作
(1)需要创建virtualpython
pip install virtualenv
(2)在cmd中建立虚拟python
#建立虚拟python
python -m venv virtual
#或者
py -3 -m venv virtual
#进入虚拟python,并下载flask
注意:
virtualpython中需要安装gunicorn包(用于显示网页);
virtualpython中需要安装flask包(用于运行程序);
安装方法:
cmd进入到virtualpython的Scripts页面,进行pip安装;
(3)下载git https://git-scm.com/download,并在Heroku中注册账号,使用该网站的服务器存放personal website,下载Heroku toolbelt;
注意点:pip freeze #查看当前路径的python下载了哪些lib
文件夹的存放顺序
(1)mysite目录下存放app4和venv virtual建立的virtual目录;
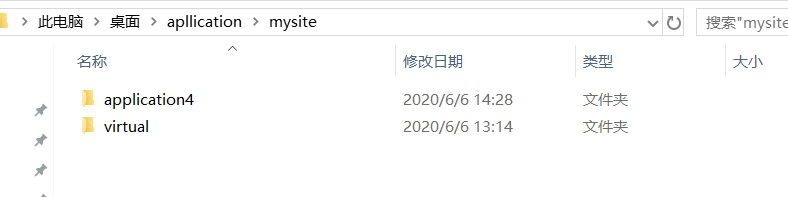
(2)application4目录下存放下面三个文件
分别为.py文件scripts1.py,为上面的python代码;
templates中存放layout.HTML, home.HTML, about.HTML文件;
static中存放css文件夹,其中存放main.css文件;

准备文件
在application中添加三个文件;

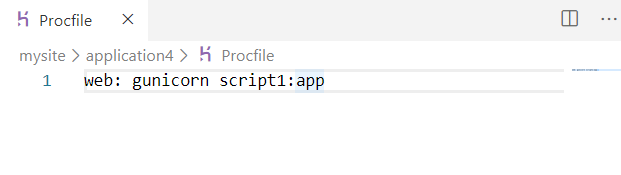
(1)Procfile——无格式文件
存放内容如下,用于告诉Heroku 通过gunicorn包显示网站;
app为script1中网站的变量名;
(2)requirement.txt
用于保存virtual python所下载的lib;
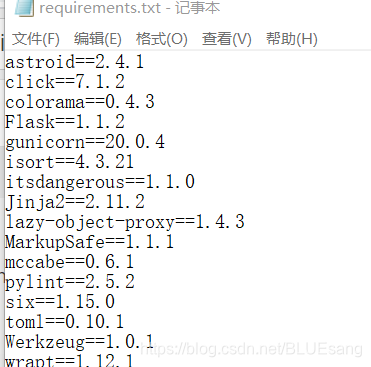
在保存该txt的目录下,使用cmd:
../virtual/Scripts/pip freeze > requirements.txt
将pip freeze的内容存入requirements.txt中;
(3)runtime文件:
python-3.8.3
用于告诉Heroku使用哪个版本的python运行该程序;
使用Git将mysite打包,并上传到Heroku运行
登录
cmd中登录Heroku账号密码
heroku login
查看账号下有哪些app
heroku apps
创建app
app名称不允许他人重名,所以不一定创建成功
heroku create app名称
或者在heroku官网登陆创建app;
Git打包
在application4目录下
(1)
git init
此时application4中出现git文件夹
(2)
git add .
此时已将application4中的文件传入git
(3)在此之前需要创建username和useremail,见后面的帮助手册;
git commit -m "first commit"
first commit为此次改动的名称,可随意取;
(4)若为第一次创建app,需要使用(修改则不用)
heroku git:remote --app app的名称
若为修改输入heroku info 会有app状态信息出现,则无需remote
(5)将改动传给heruko
git push heruko master
完成上传
可使用heroku open打开已完成的网站!
帮助手册
Steps to deploy a static Flask website to Heroku

1. Create an account on www.heroku.com if you don't have one already.
2. Download and install Heroku Toolbelt from https://devcenter.heroku.com/articles/heroku-cli
3. Install gunicorn with "pip install gunicorn". Make sure you're using pip from your virtual environment if you have one.
4. Create a requirement.txt file in the main app directory where the main Python app file is located. You can create that file by running "pip freeze > requirements.txt" in the command line. Make sure you're using pip from your virtual environment if you have one. The requirement.txt file should now contain a list of Python packages.
5. Create a file named "Procfile" in the main app directory. The file should not contain any extension. Then type in this line inside: "web: gunicorn script1:app" where "script1" should be replaced with the name of your Python script and "app" with the name of the variable holding your Flask app.
6. Create a runtime.txt file in the main app directory and type "python-3.5.1" inside.
If you're using Python 2, you may want to type in "python-2.7.11" instead.
7. Open your computer terminal/command line to point to the directory where the Python file containing your app code is located.
8. Using the terminal, log in to Heroku with "heroku login"
9. Enter your Heroku email address
10. Enter your Heroku password
11. Create a new Heroku app with "heroku create myawesomeappname"
17. Initialize a local git repository with "git init"
18. Add your local application files to git with "git add ."
19. Tell git your email address with "git config --global user.email "myemail@hotmail.com"". Make sure the email address is inside quotes here.
20. Tell git your username (just pick whatever username) with "git config --global user.name "whateverusername"". The username should be in quotes.
21. Commit the changes with "git commit -m "first commit"". Make sure "first commit" is inside quotes.
22. Before pushing the changes to Heroku, tell heroku the name of the app you want to use with "heroku git:remote --app myawesomeappname"
23. Push the changes to Heroku with "git push heroku master"
26. That should do it. Go ahead and open your app with "heroku open".


 745
745

 被折叠的 条评论
为什么被折叠?
被折叠的 条评论
为什么被折叠?
 到【灌水乐园】发言


