


 本文通过构建Spring AMQP RabbitMQ Messaging应用实例,详细介绍了如何使用Maven、Eclipse IDE和RabbitMQ Server进行消息发布与消费。涵盖Spring AMQP Publisher与Consumer的开发流程,包括配置XML上下文、实现消息监听、初始化Spring IOC容器等内容。
Spring AMQP RabbitMQ示例
今天我们将研究Spring AMQP RabbitMQ示例应用程序。我们之前的帖子中已经讨论了一些“Spring AMQP基础知识理论”和“如何安装和设置RabbitMQ服务器”。请参考以下内容:
在这篇文章中,我们将开发一个Spring AMQP RabbitMQ Messaging应用程序。我们现在就开始吧。
Spring AMQP RabbitMQ示例
让我们开始使用Maven,Eclipse IDE和RabbitMQ Server开发Spring AMQP RabbitMQ Messaging应用程序。对于所有其他Java IDE,它都是相同的。
请逐一执行以下步骤:
package com.tp.spring.amqp.rabbit;

import org.springframework.amqp.core.AmqpTemplate;
import org.springframework.context.support.ClassPathXmlApplicationContext;

public class SpringAMQPRabbitSender {
    private final String SENDER_XML = "springamqp-rabbit-sender-context.xml";
    public static void main(String[] args) throws Exception {
      AmqpTemplate amqpTemplate = (AmqpTemplate)(new ClassPathXmlApplicationContext(SENDER_XML)).getBean("amqpTemplate");
      int messagCount = 0;
	  while (messagCount < 10){
	    amqpTemplate.convertAndSend("tp.routingkey.1", "Message # " + messagCount++);
	  }
	  System.out.println( messagCount + " message(s) sent successfully.");
	}
}
<?xml version="1.0"encoding="UTF-8"?>
<beans xmlns="http://www.springframework.org/schema/beans"
	  xmlns:xsi="http://www.w3.org/2001/XMLSchema-instance"
	  xmlns:rabbit="http://www.springframework.org/schema/rabbit"
	  xsi:schemaLocation="http://www.springframework.org/schema/beans
	  http://www.springframework.org/schema/beans/spring-beans-3.1.xsd
	  http://www.springframework.org/schema/rabbit
	  http://www.springframework.org/schema/rabbit/spring-rabbit-1.0.xsd">

	<rabbit:connection-factory id="connectionFactory"
	host="localhost" username="tpuser" password="tpuser"/>

	<rabbit:admin connection-factory="connectionFactory"/>

	<rabbit:template id="amqpTemplate" connection-factory="connectionFactory"
	exchange="tpExchange"/>
</beans>
package com.tp.spring.amqp.rabbit;

import org.springframework.amqp.core.Message;
import org.springframework.amqp.core.MessageListener;
// Spirng MDP(Message Driven POJO)
public class SpringAMQPRabbitAyncListener implements MessageListener {
	@Override
	public void onMessage(Message message) {
		System.out.println("Listener received message = " + new String(message.getBody()));
	}
}
<?xmlversion="1.0"encoding="UTF-8"?>
<beans xmlns="http://www.springframework.org/schema/beans"
	  xmlns:xsi="http://www.w3.org/2001/XMLSchema-instance"
          xmlns:rabbit="http://www.springframework.org/schema/rabbit"
	  xsi:schemaLocation="http://www.springframework.org/schema/beans
	  http://www.springframework.org/schema/beans/spring-beans-3.1.xsd
	  http://www.springframework.org/schema/rabbit
	  http://www.springframework.org/schema/rabbit/spring-rabbit-1.0.xsd">

	<rabbit:connection-factory id="connectionFactory" host="localhost"
              username="tpuser" password="tpuser"/>

	<rabbit:admin connection-factory="connectionFactory"/>
	<rabbit:queue id="tpQueue"/>

	<rabbit:topic-exchange id="tpExchange" name="tpExchange">
		<rabbit:bindings>
			<rabbit:binding queue="tpQueue" pattern="tp.routingkey.1">
			</rabbit:binding>
		</rabbit:bindings>
	</rabbit:topic-exchange>

	<bean id="asyncListener" class="com.tp.spring.amqp.rabbit.SpringAMQPRabbitAyncListener"/>
	<rabbit:listener-container id="myListenerContainer" connection-factory="connectionFactory">
		<rabbit:listener ref="asyncListener" queue-names="tpQueue"/>
	</rabbit:listener-container>

</beans>
package com.tp.spring.amqp.rabbit;

import org.springframework.context.support.ClassPathXmlApplicationContext;

public class SpringAMQPRabbitlListenerContainer {
	public static void main(String[] args) {
        // Initialize Spring IOC Container
        new ClassPathXmlApplicationContext("springamqp-rabbt-listener-context.xml");
	}
}
<?xml version="1.0" encoding="UTF-8"?>
<project xmlns="http://maven.apache.org/POM/4.0.0" xmlns:xsi="http://www.w3.org/2001/XMLSchema-instance"
	xsi:schemaLocation="http://maven.apache.org/POM/4.0.0 http://maven.apache.org/maven-v4_0_0.xsd">
	<modelVersion>4.0.0</modelVersion>
	<groupId>com.tp</groupId>
	<artifactId>spring-amqp-rabbitmq</artifactId>
	<name>spring-amqp-rabbitmq</name>
	<packaging>jar</packaging>
	<version>1.0.0</version>
	<properties>
		<java-version>1.6</java-version>
		<org.springframework-version>3.1.1.RELEASE</org.springframework-version>
		<org.aspectj-version>1.6.10</org.aspectj-version>
		<org.slf4j-version>1.6.6</org.slf4j-version>
	</properties>
	<dependencies>
		<!-- Spring -->
		<dependency>
		  <groupId>org.springframework</groupId>
		  <artifactId>spring-context</artifactId>
		  <version>${org.springframework-version}</version>
		  <exclusions>
			<!-- Exclude Commons Logging in favor of SLF4j -->
			<exclusion>
				<groupId>commons-logging</groupId>
				<artifactId>commons-logging</artifactId>
			 </exclusion>
		  </exclusions>
		</dependency>
		<dependency>
			<groupId>org.springframework</groupId>
			<artifactId>spring-webmvc</artifactId>
			<version>${org.springframework-version}</version>
		</dependency>

		<!-- AspectJ -->
		<dependency>
			<groupId>org.aspectj</groupId>
			<artifactId>aspectjrt</artifactId>
			<version>${org.aspectj-version}</version>
		</dependency>
		<!-- Logging -->
		<dependency>
			<groupId>org.slf4j</groupId>
			<artifactId>slf4j-api</artifactId>
			<version>${org.slf4j-version}</version>
		</dependency>
		<dependency>
			<groupId>org.slf4j</groupId>
			<artifactId>jcl-over-slf4j</artifactId>
			<version>${org.slf4j-version}</version>
			<scope>runtime</scope>
		</dependency>
		<dependency>
			<groupId>org.slf4j</groupId>
			<artifactId>slf4j-log4j12</artifactId>
			<version>${org.slf4j-version}</version>
			<scope>runtime</scope>
		</dependency>
		<dependency>
			<groupId>log4j</groupId>
			<artifactId>log4j</artifactId>
			<version>1.2.15</version>
			<exclusions>
				<exclusion>
					<groupId>javax.mail</groupId>
					<artifactId>mail</artifactId>
				</exclusion>
				<exclusion>
					<groupId>javax.jms</groupId>
					<artifactId>jms</artifactId>
				</exclusion>
				<exclusion>
					<groupId>com.sun.jdmk</groupId>
					<artifactId>jmxtools</artifactId>
				</exclusion>
				<exclusion>
					<groupId>com.sun.jmx</groupId>
					<artifactId>jmxri</artifactId>
				</exclusion>
			</exclusions>
			<scope>runtime</scope>
		</dependency>

		<!-- @Inject -->
		<dependency>
			<groupId>javax.inject</groupId>
			<artifactId>javax.inject</artifactId>
			<version>1</version>
		</dependency>

		<!-- Servlet -->
		<dependency>
			<groupId>javax.servlet</groupId>
			<artifactId>servlet-api</artifactId>
			<version>2.5</version>
			<scope>provided</scope>
		</dependency>
		<dependency>
			<groupId>javax.servlet.jsp</groupId>
			<artifactId>jsp-api</artifactId>
			<version>2.1</version>
			<scope>provided</scope>
		</dependency>
		<dependency>
			<groupId>javax.servlet</groupId>
			<artifactId>jstl</artifactId>
			<version>1.2</version>
		</dependency>

		<!-- Test -->
		<dependency>
			<groupId>junit</groupId>
			<artifactId>junit</artifactId>
			<version>4.7</version>
			<scope>test</scope>
		</dependency>
		<dependency>
			<groupId>org.springframework.amqp</groupId>
			<artifactId>spring-rabbit</artifactId>
			<version>1.1.1.RELEASE</version>
		</dependency>
		<dependency>
			<groupId>org.springframework.amqp</groupId>
			<artifactId>spring-amqp</artifactId>
			<version>1.1.4.RELEASE</version>
		</dependency>
	</dependencies>
    <build>
        <plugins>
            <plugin>
                <artifactId>maven-eclipse-plugin</artifactId>
                <version>2.9</version>
                <configuration>
                    <additionalProjectnatures>
                        <projectnature>org.springframework.ide.eclipse.core.springnature</projectnature>
                    </additionalProjectnatures>
                    <additionalBuildcommands>
                        <buildcommand>org.springframework.ide.eclipse.core.springbuilder</buildcommand>
                    </additionalBuildcommands>
                    <downloadSources>true</downloadSources>
                    <downloadJavadocs>true</downloadJavadocs>
                </configuration>
            </plugin>
            <plugin>
                <groupId>org.apache.maven.plugins</groupId>
                <artifactId>maven-compiler-plugin</artifactId>
                <version>2.5.1</version>
                <configuration>
                    <source>1.6</source>
                    <target>1.6</target>
                    <compilerArgument>-Xlint:all</compilerArgument>
                    <showWarnings>true</showWarnings>
                    <showDeprecation>true</showDeprecation>
                </configuration>
            </plugin>
            <plugin>
                <groupId>org.codehaus.mojo</groupId>
                <artifactId>exec-maven-plugin</artifactId>
                <version>1.2.1</version>
                <configuration>
                    <mainClass>org.test.int1.Main</mainClass>
                </configuration>
            </plugin>
        </plugins>
    </build>
</project>

- 在Eclipse IDE中创建Maven Java项目
- 开发Spring AMQP Publisher程序
- 配置Spring AMQP Publisher所需的bean:springamqp-rabbit-sender-context.xml
- 开发Spring AMQP Consumer(Spring MDP)计划
- 配置Spring AMQP Consumer所需的bean:springamqp-rabbt-listener-context.xml
- 开发Spring AMQP Rabbit Container程序来初始化Spring IOC Container
- 最终的pom.xml文件
- 我们的最终Maven项目结构
使用RabbitMQ Server测试Spring AMQP RabbitMQ示例
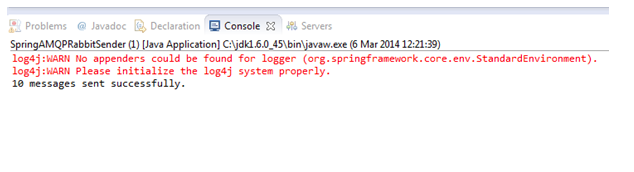
在这里我们可以看到AMQP Publisher成功发送了10条消息。
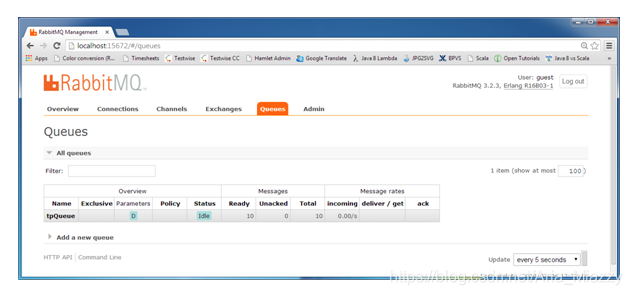
在这里,我们可以看到我们的RabbitMQ队列已成功从AMQP Publisher收到10条消息。
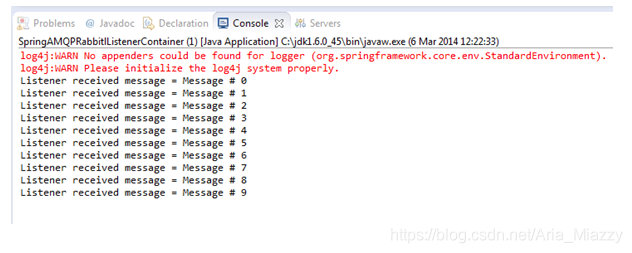
在这里我们可以看到AMQP Consumer从RabbitMQ队列中逐个接收每条消息。
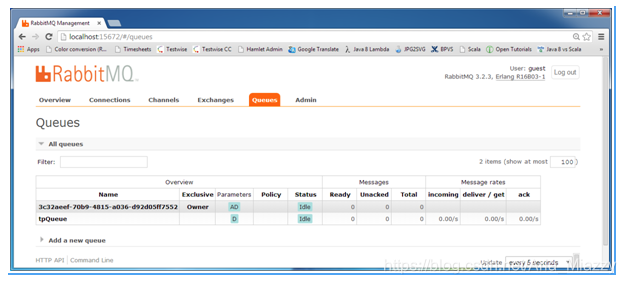
在这里我们可以观察到RabbitMQ队列有0条消息,这意味着AMQP Consumer已成功接收到所有消息。
- 运行AMQP Publisher并观察RabbitMQ队列中的消息
- RabbitMQ控制台在队列中显示10条消息
- 运行AMQP Consumer并在Eclipse IDE中观察消息
- RabbitMQ控制台在队列中显示0条消息
注意:有了Spring AMQP RabbitMQ Messaging的知识,您可以阅读有关Spring AMQP API的更多信息并学习新知识。并通过RabbitMQ Server文档获取有关Exchange,队列等的更多详细信息。
注意:正如我在之前的帖子中告诉你的那样,Spring AMQP API和RabbitMQ Server都来自The Pivotal Team。
这就是开发Spring AMQP RabbitMQ Messaging示例。我将在以后的帖子中讨论和开发Spring AMQP ActiveMQ Messaging示例。
进一步阅读:Apache ActiveMQ。


 被折叠的 条评论
为什么被折叠?
被折叠的 条评论
为什么被折叠?
 到【灌水乐园】发言


