鸿蒙5.0开发进阶:UI框架-ArkTS组件(Rating)

HarmonyOS Next开发学习手册——旋转屏动画增强 在原旋转屏动画基础上,可配置渐隐和渐现的转场效果。完整的代码示例和效果如下。需要在EntryAbility.ets文件的onWindowStageCreate方法中添加处理逻辑以获取屏幕的显示方向需要在项目的 module.json5 文件中的 abilities 列表里添加 “orientation”,指定为 “auto_rotation” 阅读详情

往期鸿蒙全套实战文章必看:(文中附带全栈鸿蒙学习资料)


Rating

提供在给定范围内选择评分的组件。

说明

该组件从API Version 7开始支持。后续版本如有新增内容,则采用上角标单独标记该内容的起始版本。

子组件

无

接口

Rating(options?: { rating: number, indicator?: boolean })

卡片能力: 从API version 9开始,该接口支持在ArkTS卡片中使用。

元服务API: 从API version 11开始,该接口支持在元服务中使用。

系统能力: SystemCapability.ArkUI.ArkUI.Full

参数:

参数名类型必填说明
ratingnumber是

设置并接收评分值。

默认值:0

取值范围: [0, stars]

小于0取0,大于stars取最大值stars。

从API version 10开始,该参数支持$$双向绑定变量。

indicatorboolean否

设置评分组件作为指示器使用,不可改变评分。

默认值:false, 可进行评分

说明:

indicator=true时,默认组件高度height=12.0vp,组件width=height * stars。

indicator=false时,默认组件高度height=28.0vp,组件width=height * stars。

属性

stars

stars(value: number)

设置评分总数。设置为小于等于0的值时,按默认值显示。

卡片能力: 从API version 9开始,该接口支持在ArkTS卡片中使用。

元服务API: 从API version 11开始,该接口支持在元服务中使用。

系统能力: SystemCapability.ArkUI.ArkUI.Full

参数:

参数名类型必填说明
valuenumber是

设置评分总数。

默认值:5

stepSize

stepSize(value: number)

设置操作评级的步长。设置为小于0.1的值时,按默认值显示。

卡片能力: 从API version 9开始,该接口支持在ArkTS卡片中使用。

元服务API: 从API version 11开始,该接口支持在元服务中使用。

系统能力: SystemCapability.ArkUI.ArkUI.Full

参数:

参数名类型必填说明
valuenumber是

操作评级的步长。

默认值:0.5

取值范围:[0.1, stars]

starStyle

starStyle(value: { backgroundUri: string, foregroundUri: string, secondaryUri?: string })

设置评分的样式。该属性所支持的图片类型能力参考Image组件。

支持加载本地图片和网络图片,暂不支持PixelMap类型和Resource资源。

默认图片加载方式为异步,暂不支持同步加载。

卡片能力: 从API version 9开始,该接口支持在ArkTS卡片中使用。

元服务API: 从API version 11开始,该接口支持在元服务中使用。

系统能力: SystemCapability.ArkUI.ArkUI.Full

参数:

参数名类型必填说明
value

{

backgroundUri: string,

foregroundUri: string,

secondaryUri?: string

}

是

backgroundUri:未选中的星级的图片链接,可由用户自定义或使用系统默认图片。

foregroundUri:选中的星级的图片路径,可由用户自定义或使用系统默认图片。

secondaryUri:部分选中的星级的图片路径,可由用户自定义或使用系统默认图片。

说明:

backgroundUri或者foregroundUri或者secondaryUri设置的图片路径错误时,图片不显示。

backgroundUri或者foregroundUri设置为undefined或者空字符串时,rating会选择加载系统默认星型图源。

secondaryUri不设置或者设置的值为undefined或者空字符串时,优先设置为backgroundUri,效果上等同于只设置了foregroundUri、backgroundUri。

说明

rating宽高为[width, height]时,单个图片的绘制区域为[width / stars, height]。

为了指定绘制区域为方形,建议自定义宽高时采取[height * stars, height], width = height * stars的方式。

contentModifier12+

contentModifier(modifier: ContentModifier<RatingConfiguration>)

定制Rating内容区的方法。

元服务API: 从API version 12开始,该接口支持在元服务中使用。

系统能力: SystemCapability.ArkUI.ArkUI.Full

参数:

参数名类型必填说明
modifierContentModifier<RatingConfiguration>是

在Rating组件上,定制内容区的方法。

modifier: 内容修改器,开发者需要自定义class实现ContentModifier接口。

事件

onChange

onChange(callback:(value: number) => void)

操作评分条的评星发生改变时触发该回调。

卡片能力: 从API version 9开始,该接口支持在ArkTS卡片中使用。

元服务API: 从API version 11开始,该接口支持在元服务中使用。

系统能力: SystemCapability.ArkUI.ArkUI.Full

参数:

参数名类型必填说明
valuenumber是评分条的评分。

键盘走焦规格

按键功能描述
Tab组件间切换焦点。
左右方向键评分预览增加/减少(步长为step),不改变实际分值。
Home移动到第一个星星, 不改变实际分值。
End移动到最后一个星星, 不改变实际分值。
Space/Enter根据当前评分提交评分结果。

RatingConfiguration12+对象说明

开发者需要自定义class实现ContentModifier接口。

元服务API: 从API version 12开始,该接口支持在元服务中使用。

系统能力: SystemCapability.ArkUI.ArkUI.Full

名称类型只读可选说明
ratingnumber否否

评分条当前评分数。

默认值:0

indicatorboolean否否

评分条是否作为一个指示器。

默认值:false

starsnumber否否

评分条的星级总数。

默认值:5

stepSizenumber否否

评分条的评分步长。

默认值:0.5

triggerChangeCallback<number>否否触发评分数量变化。

示例

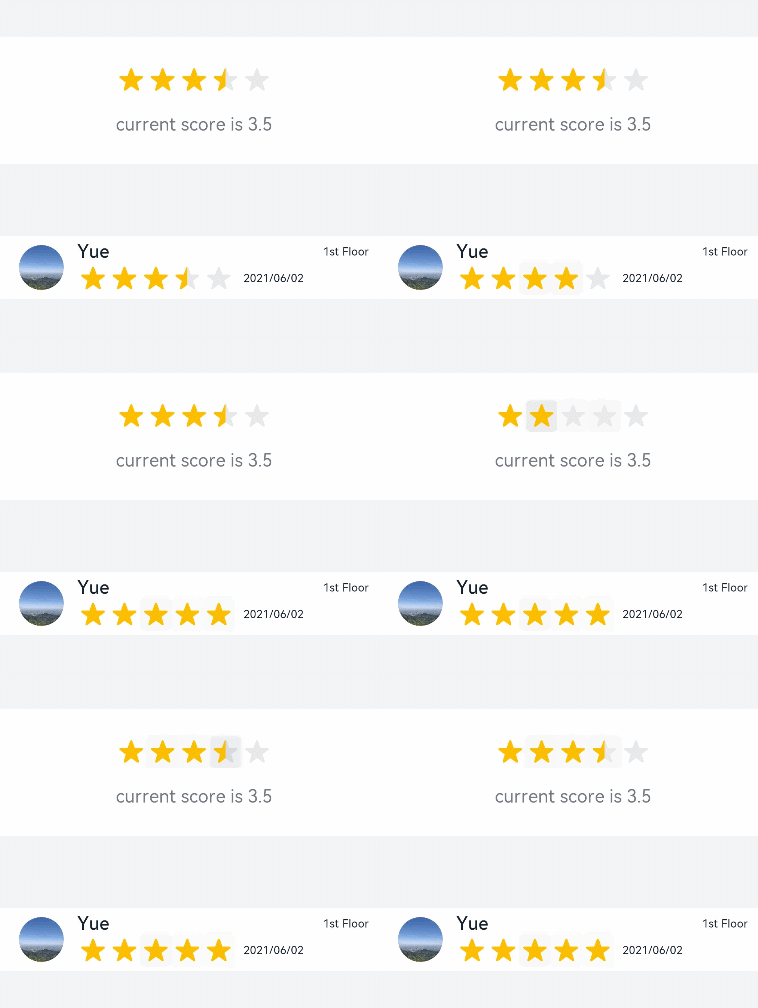
示例1(设置默认评分样式)

该示例为创建默认星型评分样式。

// xxx.ets
@Entry
@Component
struct RatingExample {
  @State rating: number = 3.5

  build() {
    Column() {
      Column() {
        Rating({ rating: this.rating, indicator: false })
          .stars(5)
          .stepSize(0.5)
          .margin({ top: 24 })
          .onChange((value: number) => {
            this.rating = value
          })
        Text('current score is ' + this.rating)
          .fontSize(16)
          .fontColor('rgba(24,36,49,0.60)')
          .margin({ top: 16 })
      }.width(360).height(113).backgroundColor('#FFFFFF').margin({ top: 68 })

      Row() {
        Image('common/testImage.jpg')
          .width(40)
          .height(40)
          .borderRadius(20)
          .margin({ left: 24 })
        Column() {
          Text('Yue')
            .fontSize(16)
            .fontColor('#182431')
            .fontWeight(500)
          Row() {
            Rating({ rating: 3.5, indicator: false }).margin({ top: 1, right: 8 })
            Text('2021/06/02')
              .fontSize(10)
              .fontColor('#182431')
          }
        }.margin({ left: 12 }).alignItems(HorizontalAlign.Start)

        Text('1st Floor')
          .fontSize(10)
          .fontColor('#182431')
          .position({ x: 295, y: 8 })
      }.width(360).height(56).backgroundColor('#FFFFFF').margin({ top: 64 })
    }.width('100%').height('100%').backgroundColor('#F1F3F5')
  }
}
示例2(设置评分的样式)

该示例通过配置starStyle实现自定义星级的图片链接。

// xxx.ets
@Entry
@Component
struct RatingExample {
  @State rating: number = 3.5

  build() {
    Column() {
      Rating({ rating: this.rating, indicator: false })
        .stars(5)
        .stepSize(0.5)
        .starStyle({
          backgroundUri: '/common/imag1.png', // common目录与pages同级
          foregroundUri: '/common/imag2.png',
          secondaryUri: '/common/imag3.png'
        })
        .margin({ top: 24 })
        .onChange((value: number) => {
          this.rating = value
        })
      Text('current score is ' + this.rating)
        .fontSize(16)
        .fontColor('rgba(24,36,49,0.60)')
        .margin({ top: 16 })
    }.width('100%').height('100%').backgroundColor('#F1F3F5')
  }
}

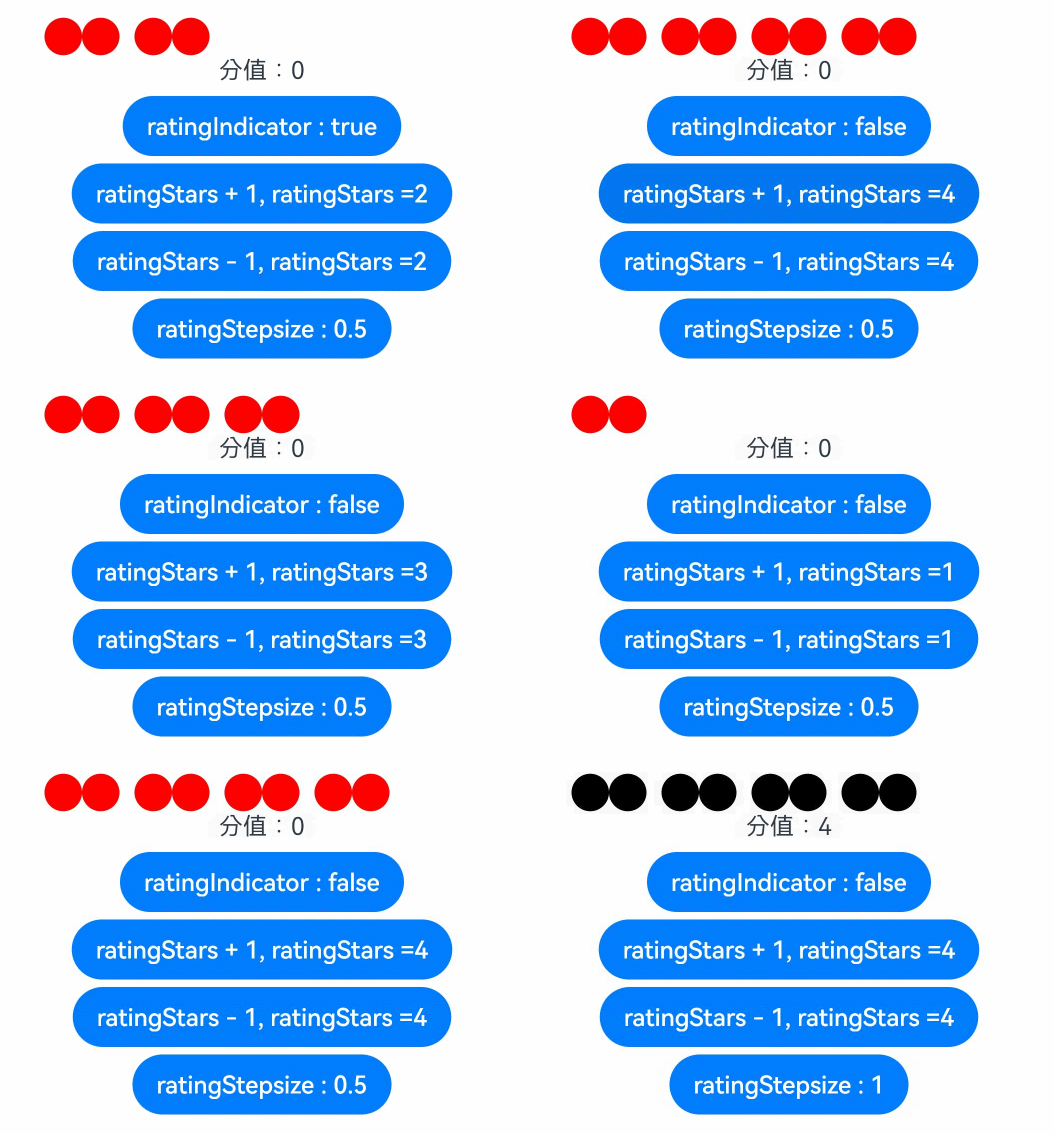
示例3(自定义评分条)

该示例实现了自定义评分条的功能,每个圆圈表示0.5分。ratingIndicator为true时表示评分条作为一个指示器不可改变评分;

为false时可以进行评分。ratingStars可改变评分总数。ratingStepsize可改变评分步长。

// xxx.ets
class MyRatingStyle implements ContentModifier<RatingConfiguration> {
  name: string = ""
  style: number = 0
  constructor(value1: string, value2: number) {
    this.name = value1
    this.style = value2
  }
  applyContent() : WrappedBuilder<[RatingConfiguration]> {
    return wrapBuilder(buildRating)
  }
}

@Builder function buildRating(config: RatingConfiguration) {
  Column() {
    Row() {
      Circle({ width: 25, height: 25 })
        .fill(config.rating >= 0.4 ? Color.Black : Color.Red)
        .onClick((event: ClickEvent) => {
          if (!config.indicator) {
            if (config.stepSize = 0.5) {
              config.triggerChange(0.5);
              return
            }
            if (config.stepSize = 1) {
              config.triggerChange(1);
              return
            }
          }
        }).visibility(config.stars >= 1 ? Visibility.Visible : Visibility.Hidden)
      Circle({ width: 25, height: 25 })
        .fill(config.rating >= 0.9 ? Color.Black : Color.Red)
        .onClick((event: ClickEvent) => {
          if (!config.indicator) {
            config.triggerChange(1);
          }
        }).visibility(config.stars >= 1 ? Visibility.Visible : Visibility.Hidden)
      Circle({ width: 25, height: 25 })
        .fill(config.rating >= 1.4 ? Color.Black : Color.Red)
        .onClick((event: ClickEvent) => {
          if (!config.indicator) {
            if (config.stepSize = 0.5) {
              config.triggerChange(1.5);
              return
            }
            if (config.stepSize = 1) {
              config.triggerChange(2);
              return
            }
          }
        }).visibility(config.stars >= 2 ? Visibility.Visible : Visibility.Hidden).margin({left:10})
      Circle({ width: 25, height: 25 })
        .fill(config.rating >= 1.9 ? Color.Black : Color.Red)
        .onClick((event: ClickEvent) => {
          if (!config.indicator) {
            config.triggerChange(2);
          }
        }).visibility(config.stars >= 2 ? Visibility.Visible : Visibility.Hidden)
      Circle({ width: 25, height: 25 })
        .fill(config.rating >= 2.4 ? Color.Black : Color.Red)
        .onClick((event: ClickEvent) => {
          if (!config.indicator) {
            if (config.stepSize = 0.5) {
              config.triggerChange(2.5);
              return
            }
            if (config.stepSize = 1) {
              config.triggerChange(3);
              return
            }
          }
        }).visibility(config.stars >= 3 ? Visibility.Visible : Visibility.Hidden).margin({left:10})
      Circle({ width: 25, height: 25 })
        .fill(config.rating >= 2.9 ? Color.Black : Color.Red)
        .onClick((event: ClickEvent) => {
          if (!config.indicator) {
            config.triggerChange(3);
          }
        }).visibility(config.stars >= 3 ? Visibility.Visible : Visibility.Hidden)
      Circle({ width: 25, height: 25 })
        .fill(config.rating >= 3.4 ? Color.Black : Color.Red)
        .onClick((event: ClickEvent) => {
          if (!config.indicator) {
            if (config.stepSize = 0.5) {
              config.triggerChange(3.5);
              return
            }
            if (config.stepSize = 1) {
              config.triggerChange(4);
              return
            }
          }
        }).visibility(config.stars >= 4 ? Visibility.Visible : Visibility.Hidden).margin({left:10})
      Circle({ width: 25, height: 25 })
        .fill(config.rating >= 3.9 ? Color.Black : Color.Red)
        .onClick((event: ClickEvent) => {
          if (!config.indicator) {
            config.triggerChange(4);
          }
        }).visibility(config.stars >= 4 ? Visibility.Visible : Visibility.Hidden)
      Circle({ width: 25, height: 25 })
        .fill(config.rating >= 4.4 ? Color.Black : Color.Red)
        .onClick((event: ClickEvent) => {
          if (!config.indicator) {
            if (config.stepSize = 0.5) {
              config.triggerChange(4.5);
              return
            }
            if (config.stepSize = 1) {
              config.triggerChange(5);
              return
            }
          }
        }).visibility(config.stars >= 5 ? Visibility.Visible : Visibility.Hidden).margin({left:10})
      Circle({ width: 25, height: 25 })
        .fill(config.rating >= 4.9 ? Color.Black : Color.Red)
        .onClick((event: ClickEvent) => {
          if (!config.indicator) {
            config.triggerChange(5);
          }
        }).visibility(config.stars >= 5 ? Visibility.Visible : Visibility.Hidden)
    }
    Text("分值:" + config.rating)
  }
}

@Entry
@Component
struct ratingExample {
  @State rating: number = 0;
  @State ratingIndicator: boolean = true;
  @State ratingStars: number = 0;
  @State ratingStepsize: number = 0.5;
  @State ratingEnabled: boolean = true;
  build() {
    Row() {
      Column() {
        Rating({
          rating: 0,
          indicator: this.ratingIndicator
        })
          .stepSize(this.ratingStepsize)
          .stars(this.ratingStars)
          .backgroundColor(Color.Transparent)
          .width('100%')
          .height(50)
          .onChange((value: number) => {
            console.info('Rating change is'+ value);
            this.rating = value
          })
          .contentModifier(new MyRatingStyle("hello", 3))
        Button(this.ratingIndicator ? "ratingIndicator : true" : "ratingIndicator : false")
          .onClick((event) => {
            if (this.ratingIndicator) {
              this.ratingIndicator = false
            } else {
              this.ratingIndicator = true
            }
          }).margin({top : 5})

        Button(this.ratingStars < 5 ? "ratingStars + 1, ratingStars =" + this.ratingStars : "ratingStars最大值为5")
          .onClick((event) => {
            if (this.ratingStars < 5) {
              this.ratingStars += 1
            }
          }).margin({top : 5})

        Button(this.ratingStars > 0 ? "ratingStars - 1, ratingStars =" + this.ratingStars : "ratingStars小于等于0时默认等于5")
          .onClick((event) => {
            if (this.ratingStars > 0) {
              this.ratingStars -= 1
            }
          }).margin({top : 5})

        Button(this.ratingStepsize == 0.5 ? "ratingStepsize : 0.5" : "ratingStepsize : 1")
          .onClick((event) => {
            if (this.ratingStepsize == 0.5) {
              this.ratingStepsize = 1
            } else {
              this.ratingStepsize = 0.5
            }
          }).margin({top : 5})
      }
      .width('100%')
      .height('100%')
      .justifyContent(FlexAlign.Center)
    }
    .height('100%')
  }
}

鸿蒙5.0版开发:ArkTS组件-Rating 提供在给定范围内选择评分的组件。 阅读详情

相关推荐

鸿蒙5.0版开发:UI框架JS组件-基础组件(rating)

评分条,表示用户使用感受的衡量标准条。

m0_69424697的博客 751

【鸿蒙软件开发】ArkTS基础组件之Rating(评分组件)、RichText(富文本显示)

Rating组件:提供在给定范围内选择评分的组件。 RichText组件:富文本组件,解析并显示HTML格式文本。提供在给定范围内选择评分的组件。说明 该组件从API Version 7开始支持。后续版本如有新增内容,则采用上角标单独标记该内容的起始版本。无 从API version 9开始,该接口支持在ArkTS卡片中使用。参数名:rating,参数类型:number,参数是否必填:是,参数作用:设置并接收评分值。默认值:0 取值范围: [0, stars],规定:小于0取0,大于stars取最大值sta

m0_62599305的博客 2246

【鸿蒙实战开发】HarmonyOS语法以及各种基础组件

这份鸿蒙(HarmonyOS NEXT)资料包含了鸿蒙开发必掌握的核心知识要点,内容包含了(ArkTS、ArkUI开发组件、Stage模型、多端部署、分布式应用开发、音频、视频、WebGL、OpenHarmony多媒体技术、Napi组件、OpenHarmony内核、OpenHarmony南向开发、鸿蒙项目实战等等)鸿蒙(HarmonyOS NEXT)技术知识点。

HarmonyOS_666的博客 2053

鸿蒙API14开发【Rating】ArkTS组件

本文介绍了Rating评分组件的使用说明,主要包括以下内容: 组件说明:Rating组件从API7开始支持,用于在给定范围内选择评分值,支持双向绑定变量。 接口参数: rating:设置评分值(必填) indicator:控制是否可交互(选填) 主要属性: stars:设置总星数 stepSize:设置评分步长 starStyle:自定义星级图标样式 contentModifier:定制内容区(API12+) 事件: onChange:评分变化时触发回调 支持能力: 支持ArkTS卡片(API9+) 支持原

bbq的博客 1073

HarmonyOS Next开发学习手册——基础组件(rating开发)

rating为评分条组件,表示用户使用感受的衡量标准条。

maniuT的博客 883

鸿蒙开发基础 —— ArkUI基础组件之rating开发

rating组件通过star-background、star-foreground和star-secondary属性设置单个星级未选择、选中和选中的次级背景图片。rating组件通过设置numstars和rating属性设置评分条的星级总数和当前评星数。开发者可以通过改变开关状态切换星级背景图,通过改变滑动条的值调整星级总数。在pages/index目录下的hml文件中创建一个rating组件。rating为评分条组件,表示用户使用感受的衡量标准条。向rating组件添加change事件,打印当前评分。

guangxishaoji的博客 338

HarmonyOS6 ArkTS Rating组件使用文档

说明:配置星级图标资源,属性为空时使用系统默认图标| 属性名 | 说明 || backgroundUri | 未选中星级图标路径 || foregroundUri | 选中星级图标路径 || secondaryUri | 半星图标路径(可选) |示例:})用户评价、商品评分、服务打分等可交互评分场景;个人等级、商家评分、作品评分等只读展示场景;配置类页面、个性化设置中的星级选择场景。

qq_37048082的博客 3114

鸿蒙开发入门:ArkUI框架与ArkTS语言实战指南

分布式操作系统通过解耦硬件与软件实现跨设备协同,鸿蒙OS采用微内核架构和声明式编程范式是其核心技术特点。在移动开发领域,ArkUI作为鸿蒙的UI框架,支持基于ArkTS的声明式开发,这种模式通过状态驱动UI更新,能显著提升代码可维护性和开发效率。对于需要适配手机、平板等多终端的应用场景,鸿蒙的'一次开发多端部署'特性展现出独特优势。实际开发中,DevEco Studio提供的ArkTS语言支持与可视化工具链,配合Resource资源管理系统,使开发者能快速构建高性能应用。本文以天气应用为例,详解了从环境搭建

aofan9566的博客 450

鸿蒙5.0进阶开发:UI开发-容器组件(rating开发)

rating为评分条组件,表示用户使用感受的衡量标准条。

AyomQAQ的博客 444

鸿蒙next 评分组件来了 我不允许你不会

各位同学大家,有段时间没有跟大家见面了,因为最近一直在更新鸿蒙的那个实战课程所以就没有去更新文章实在是不好意思, 所以今天就给大家更新一期实战案例 评分组件 希望帮助到各位同学工作和学习鸿蒙next 里面有自带评分组件 其实安卓原始和ios里面也有不过安卓ios更多是直接调用了系统评分库。这样弹出·位置样式都不能自定义更多时候还是要自己去实现 但是鸿蒙就提供了这个组件我们就可以跟进官方组件的属性来自定义我们更多的效果。

xq610928的博客 235

HarmonyOS鸿蒙开发指南:基础组件 rating开发指导

场景示例 开发者可以通过改变开关状态切换星级背景图,通过改变滑动条的值调整星级总数。

斌擎科技 1046

鸿蒙next开发:UI开发-rating开发指南

本文介绍了鸿蒙开发中Rating组件的使用指南

qq_39652397的博客 349

虚拟机安装Centos8.5

Centos8.5

weixin_63604047的博客 961

React Native鸿蒙 基于HarmonyOS API 24 find/join等方法是ES6通用API,在鸿蒙系统中会被React Native框架转换为ArkTS的数组操作逻辑

元类并不是新的 Python 特性,从 Python 2.2 版开始就一直都有。不过它的语法发生了重大变化,这种变化既不向后兼容也不向前兼容。新的语法如下所示:pass在 Python 2 中,其写法必须是这样的:= typePython 2 的 class 语句不接受关键字参数,所以 Python 3 定义元类的语法会在导入时引发 SyntaxError 异常。仍然可以编写在两个 Python 版本中都能运行的元类代码,但需要做一些额外工作。

2401_86113894的博客 702

sdc时钟约束2——多驱动时钟

sdc 多驱动时钟 master_clock

qq_40411444的博客 5529

数学建模常用模型10 :数据包络(DEA)分析法(投入产出法)

数据包络分析是评价多输入指标和多输出指标的较为有效的方法,将投入与产出进行比较。它的结果包含的意思有: ①θ=1,DEA有效,表示投入与产出比达到最优 ②θ&lt;1,非DEA有效,表示投入与产出比没有达到最优,一般来说,θ越大说明效果越好。 数据包络分析是通过对投入的指标和产出的指标做了一个线性规划,并且进行变换后,然后根据其线性规划的对偶问题(线性规划对偶问题具有经济学意义),求解这个对...

HaLosec_Wei 9万+

React Native鸿蒙跨平台 HarmonyOS ArkTS API 24 完成Modal组件则通过animationType=“slide“实现滑动弹窗效果

在健康管理类跨端应用开发领域,React Native 凭借其“一次开发、多端部署”的核心优势,成为打通iOS、Android与鸿蒙系统的关键技术载体。本文将深度拆解基于React Native开发的减重小组应用代码,从数据模型设计、状态管理、UI组件适配到鸿蒙跨端兼容的核心技术要点,全方位剖析健康管理类跨端应用的开发范式与最佳实践。这款减重小组应用聚焦于健康管理场景下的核心需求,涵盖用户体重管理、减重小组协作、饮食/运动数据记录、专业营养师指导等全流程功能。从架构层面来看,整个应用严格遵循React Na

2401_86113894的博客 611

[网络安全提高篇] 一二〇.恶意软件动态分析经典沙箱Cape批量提取动态API特征

这是作者网络安全自学教程系列,主要是关于安全工具和实践操作的在线笔记,特分享出来与博友们学习,希望您喜欢,一起进步。前文详细介绍动态分析沙箱Cape的安装过程,其是一个开源的自动恶意软件分析系统,通过自动运行和分析恶意软件,全面分析和提取恶意软件的关键特征。然而,当样本数量增加时,单个样本分析会降低效率。这篇文章将讲解如何实现Cape沙箱的批量分析,通过调用Python脚本文件来实施批量处理,并将分析结果存储在指定位置,最后补充submit.py的参数及Python调用方式。基础性文章,希望对您有帮助!

杨秀璋的专栏 4125

【共创季稿事节】鸿蒙原生 ArkTS 布局方式之 Rating 评分布局:从入门到实战

鸿蒙 ArkTS 评分布局开发指南 文章摘要 本文详细介绍了鸿蒙原生 ArkTS 框架中的 Rating 评分布局组件。Rating 是 HarmonyOS NEXT 提供的原生星级评分控件,支持多种配置参数和交互方式。文章从组件概述开始,重点讲解了核心 API 包括 stars(星数设置)、stepSize(评分步长)、indicator(只读模式)和 onChange(评分变化回调)。通过 5 个实战示例展示了不同场景下的应用,包括基础整星评分、半星评分、自定义星数评分、只读展示评分等。开发者可以快速掌

zjxcq520的博客 541

YOLO26 从零到工业落地全实战:自定义训练+多场景测试+边缘部署预备,踩坑实测100%可复现

很多人觉得训练是核心,其实不是——数据集的质量,直接决定了你模型的上限。我见过太多人,标注不规范、格式错误、数据集划分混乱,然后疯狂调参,训了几百轮还是不收敛,纯属白费功夫。我这次用的是工业零件缺陷检测自定义数据集,共3个类别:划痕、毛刺、变形,总计1200张图片,给大家讲一套标准的、可复现的数据集制作流程,不管你是做工业检测、安防、交通,都能直接套用。很多人拿到数据集,直接用默认命令训练,然后抱怨精度上不去。默认参数是给COCO数据集用的,你的自定义数据集,必须针对性调参,不然根本达不到最优效果。

专注于Python爬虫开发,分享爬虫技巧、项目实战与反爬经验,使用Scrapy、BeautifulSoup等工具,解决数据抓取难题。 574

【云原生】Docker可视化工具Portainer使用详解

Docker可视化工具Portainer使用详解

congge 1万+

React Native鸿蒙数组map/find/join等方法是ES6通用API,HarmonyOS API 24 在鸿蒙系统中会被React Native框架转换为ArkTS的数组操作逻辑

受欢迎的 Python WSGI 兼容的网络服务器:Gunicorn(参考 http://gunicorn.org/)和 uWSGI(参考 https://uwsgi-docs.readthedocs.org),它们使用工作线程处理 HTTP 请求,这些工作线。进程,例如使用 subprocess 模块中的 run()函数,实际上这是在多个进程中进行工作,幸运的是,许多兼容 WSGI 的 Web 服务器允许这样的设置。如果在多线程中毫无顾忌的使用它,中可能会导致串行化,这将撤消多线程的所有好处。

2401_86113894的博客 536

【异常】Claude Code 400错误(Extra inputs are not permitted)解决方案

摘要:Claude Code 2.0.37+版本因API请求包含未支持的custom.input_examples参数导致400错误,使核心功能失效。解决方案是降级至稳定版v2.0.32:先卸载当前版本(npm uninstall -g @anthropic-ai/claude-code),再安装指定版本(npm install -g @anthropic-ai/claude-code@2.0.32),最后验证请求是否恢复正常。该问题确认在v2.0.32版本不存在。(148字)

奶爸的编程之路,也就一周冷个三天 2043

HarmonyOS ArkTS 的新手练手样例:Rating 星级评分交互

这一篇只讲一个主角:Rating。做一个课程评分控件,点击星星后显示评分结果。对新手来说,学习控件最有效的方法不是把官方属性一次背完,而是先把一个完整页面跑起来,然后围绕这个页面改尺寸、改状态、改事件。下面的代码就是配套截图 App 中已经编译通过的完整页面。

xiaoqi922的博客 221

如何通过插值法计算cell delay?

插值法的公式:Z = A + B * X + C * Y + D * X * Y,其中X为input transition,Y为output load,A、B、C、D为四个参数,Z为delay值。从而得到Z=-0.086176 + 11.5493 * x + 0.65917 * y - 24.859 * x * y,当X=0.014930、Y=0.296311时,得到Z=0.1716ns。从而得到A = 0.08075,B = 3.47539,C = 0.04008,D = 0.01648。

芯冰乐 1077

Devexpress16.2.6破解工具

Devexpress16.2.6破解工具Devexpress16.2.6破解工具Devexpress16.2.6破解工具Devexpress16.2.6破解工具

HarmonyOS ArkTS API 24,React Native鸿蒙采用ScrollView的horizontal属性实现横向滚动实现特色游戏轮播和分类导航

它们的高级版本,称为元启发式(metaheuristics),提供解决数学优化问题的策略,这些问。然而,你可以从具有 O(1)平均复杂度的 get/set 操作的字典中获得相同的好处。优化的,以确保良好的性能与集合大小无关,但所提到的 O(1)复杂度实际上只是平均复杂性。实际上,namedtuple 是基于元组的,这可能也有益于它的性能。在这种情况下,namedtuple 是一个很好的类型,它结合了字典和元组的优点。例如,有已知良好的启发式和近似问题可以在合理的时间内解决非常大的 TSP 问题。

2301_77888392的博客 439

深度学习工具包 DeepLearningToolbox

深度学习工具包Deprecation notice.-----This toolbox is outdated and no longer maintained.There are much better tools available for deep learning than this toolbox, e.g. [Theano](http://deeplearning.net/software/theano/), [torch](http://torch.ch/) or [tensorflow](http://www.tensorflow.org/)I would suggest you use one of the tools mentioned above rather than use this toolbox.Best, Rasmus.DeepLearnToolbox================A Matlab toolbox for Deep Learning.Deep Learning is a new subfield of machine learning that focuses on learning deep hierarchical models of data.It is inspired by the human brain's apparent deep (layered, hierarchical) architecture.A good overview of the theory of Deep Learning theory is[Learning Deep Architectures for AI](http://www.iro.umontreal.ca/~bengioy/papers/ftml_book.pdf)For a more informal introduction, see the following videos by Geoffrey Hinton and Andrew Ng.* [The Next Generation of Neural Networks](http://www.youtube.com/watch?v=AyzOUbkUf3M) (Hinton, 2007)* [Recent Developments in Deep Learning](http://www.youtube.com/watch?v=VdIURAu1-aU) (Hinton, 2010)* [Unsupervised Feature Learning and Deep Learning](http://www.youtube.com/watch?v=ZmNOAtZIgIk) (Ng, 2011)If you use this toolbox in your research please cite [Prediction as a candidate for learning deep hierarchical models of data](http://www2.imm.dtu.dk/pubdb/views/publication_details.php?id=6284)```@MASTERSTHESIS\{IMM2012-06284, author = "R. B. Palm", title = "Prediction as a candidate for learning deep hierarchical models of data", year = "2012",}```Contact: rasmusbergpalm at gmail dot comDirectories included in the toolbox-----------------------------------`NN/` - A library for Feedforward Backpropagation Neural Networks`CNN/` - A library for Convolutional Neural Networks`DBN/` - A library for Deep Belief Networks`SAE/` - A library for Stacked Auto-Encoders`CAE/` - A library for Convolutional Auto-Encoders`util/` - Utility functions used by the libraries`data/` - Data used by the examples`tests/` - unit tests to verify toolbox is workingFor references on each library check REFS.mdSetup-----1. Download.2. addpath(genpath('DeepLearnToolbox'));Example: Deep Belief Network---------------------```matlabfunction test_example_DBNload mnist_uint8;train_x = double(train_x) / 255;test_x = double(test_x) / 255;train_y = double(train_y);test_y = double(test_y);%% ex1 train a 100 hidden unit RBM and visualize its weightsrand('state',0)dbn.sizes = [100];opts.numepochs = 1;opts.batchsize = 100;opts.momentum = 0;opts.alpha = 1;dbn = dbnsetup(dbn, train_x, opts);dbn = dbntrain(dbn, train_x, opts);figure; visualize(dbn.rbm{1}.W'); % Visualize the RBM weights%% ex2 train a 100-100 hidden unit DBN and use its weights to initialize a NNrand('state',0)%train dbndbn.sizes = [100 100];opts.numepochs = 1;opts.batchsize = 100;opts.momentum = 0;opts.alpha = 1;dbn = dbnsetup(dbn, train_x, opts);dbn = dbntrain(dbn, train_x, opts);%unfold dbn to nnnn = dbnunfoldtonn(dbn, 10);nn.activation_function = 'sigm';%train nnopts.numepochs = 1;opts.batchsize = 100;nn = nntrain(nn, train_x, train_y, opts);[er, bad] = nntest(nn, test_x, test_y);assert(er < 0.10, 'Too big error');```Example: Stacked Auto-Encoders---------------------```matlabfunction test_example_SAEload mnist_uint8;train_x = double(train_x)/255;test_x = double(test_x)/255;train_y = double(train_y);test_y = double(test_y);%% ex1 train a 100 hidden unit SDAE and use it to initialize a FFNN% Setup and train a stacked denoising autoencoder (SDAE)rand('state',0)sae = saesetup([784 100]);sae.ae{1}.activation_function = 'sigm';sae.ae{1}.learningRate = 1;sae.ae{1}.inputZeroMaskedFraction = 0.5;opts.numepochs = 1;opts.batchsize = 100;sae = saetrain(sae, train_x, opts);visualize(sae.ae{1}.W{1}(:,2:end)')% Use the SDAE to initialize a FFNNnn = nnsetup([784 100 10]);nn.activation_function = 'sigm';nn.learningRate = 1;nn.W{1} = sae.ae{1}.W{1};% Train the FFNNopts.numepochs = 1;opts.batchsize = 100;nn = nntrain(nn, train_x, train_y, opts);[er, bad] = nntest(nn, test_x, test_y);assert(er < 0.16, 'Too big error');```Example: Convolutional Neural Nets---------------------```matlabfunction test_example_CNNload mnist_uint8;train_x = double(reshape(train_x',28,28,60000))/255;test_x = double(reshape(test_x',28,28,10000))/255;train_y = double(train_y');test_y = double(test_y');%% ex1 Train a 6c-2s-12c-2s Convolutional neural network %will run 1 epoch in about 200 second and get around 11% error. %With 100 epochs you'll get around 1.2% errorrand('state',0)cnn.layers = { struct('type', 'i') %input layer struct('type', 'c', 'outputmaps', 6, 'kernelsize', 5) %convolution layer struct('type', 's', 'scale', 2) %sub sampling layer struct('type', 'c', 'outputmaps', 12, 'kernelsize', 5) %convolution layer struct('type', 's', 'scale', 2) %subsampling layer};cnn = cnnsetup(cnn, train_x, train_y);opts.alpha = 1;opts.batchsize = 50;opts.numepochs = 1;cnn = cnntrain(cnn, train_x, train_y, opts);[er, bad] = cnntest(cnn, test_x, test_y);%plot mean squared errorfigure; plot(cnn.rL);assert(er<0.12, 'Too big error');```Example: Neural Networks---------------------```matlabfunction test_example_NNload mnist_uint8;train_x = double(train_x) / 255;test_x = double(test_x) / 255;train_y = double(train_y);test_y = double(test_y);% normalize[train_x, mu, sigma] = zscore(train_x);test_x = normalize(test_x, mu, sigma);%% ex1 vanilla neural netrand('state',0)nn = nnsetup([784 100 10]);opts.numepochs = 1; % Number of full sweeps through dataopts.batchsize = 100; % Take a mean gradient step over this many samples[nn, L] = nntrain(nn, train_x, train_y, opts);[er, bad] = nntest(nn, test_x, test_y);assert(er < 0.08, 'Too big error');%% ex2 neural net with L2 weight decayrand('state',0)nn = nnsetup([784 100 10]);nn.weightPenaltyL2 = 1e-4; % L2 weight decayopts.numepochs = 1; % Number of full sweeps through dataopts.batchsize = 100; % Take a mean gradient step over this many samplesnn = nntrain(nn, train_x, train_y, opts);[er, bad] = nntest(nn, test_x, test_y);assert(er < 0.1, 'Too big error');%% ex3 neural net with dropoutrand('state',0)nn = nnsetup([784 100 10]);nn.dropoutFraction = 0.5; % Dropout fraction opts.numepochs = 1; % Number of full sweeps through dataopts.batchsize = 100; % Take a mean gradient step over this many samplesnn = nntrain(nn, train_x, train_y, opts);[er, bad] = nntest(nn, test_x, test_y);assert(er < 0.1, 'Too big error');%% ex4 neural net with sigmoid activation functionrand('state',0)nn = nnsetup([784 100 10]);nn.activation_function = 'sigm'; % Sigmoid activation functionnn.learningRate = 1; % Sigm require a lower learning rateopts.numepochs = 1; % Number of full sweeps through dataopts.batchsize = 100; % Take a mean gradient step over this many samplesnn = nntrain(nn, train_x, train_y, opts);[er, bad] = nntest(nn, test_x, test_y);assert(er < 0.1, 'Too big error');%% ex5 plotting functionalityrand('state',0)nn = nnsetup([784 20 10]);opts.numepochs = 5; % Number of full sweeps through datann.output = 'softmax'; % use softmax outputopts.batchsize = 1000; % Take a mean gradient step over this many samplesopts.plot = 1; % enable plottingnn = nntrain(nn, train_x, train_y, opts);[er, bad] = nntest(nn, test_x, test_y);assert(er < 0.1, 'Too big error');%% ex6 neural net with sigmoid activation and plotting of validation and training error% split training data into training and validation datavx = train_x(1:10000,:);tx = train_x(10001:end,:);vy = train_y(1:10000,:);ty = train_y(10001:end,:);rand('state',0)nn = nnsetup([784 20 10]); nn.output = 'softmax'; % use softmax outputopts.numepochs = 5; % Number of full sweeps through dataopts.batchsize = 1000; % Take a mean gradient step over this many samplesopts.plot = 1; % enable plottingnn = nntrain(nn, tx, ty, opts, vx, vy); % nntrain takes validation set as last two arguments (optionally)[er, bad] = nntest(nn, test_x, test_y);assert(er < 0.1, 'Too big error');```[![Bitdeli Badge](https://d2weczhvl823v0.cloudfront.net/rasmusbergpalm/deeplearntoolbox/trend.png)](https://bitdeli.com/free "Bitdeli Badge")

上一篇: 鸿蒙5.0开发进阶:UI框架-ArkTS组件(Radio)
下一篇: 鸿蒙5.0开发进阶:UI框架-ArkTS组件(Select)
懂你的大海
博客等级 码龄6年 9049粉丝 1381原创
评论
成就一亿技术人!
拼手气红包6.0元
还能输入1000个字符
 
 条评论被折叠 查看
添加红包

请填写红包祝福语或标题

个

红包个数最小为10个

元

红包金额最低5元

当前余额3.43元 前往充值 >
需支付:10.00元
成就一亿技术人!
领取后你会自动成为博主和红包主的粉丝 规则
hope_wisdom
发出的红包
实付元
使用余额支付
点击重新获取
扫码支付
钱包余额 0

抵扣说明:

1.余额是钱包充值的虚拟货币,按照1:1的比例进行支付金额的抵扣。
2.余额无法直接购买下载,可以购买VIP、付费专栏及课程。

余额充值