


 本文详细解析Vue Router的初始化过程,包括Matcher和History实例的创建,以及路由更新的起点。重点介绍了VueRouter、HashHistory、HTML5History和AbstractHistory的实现。同时,探讨了路由数据结构,如pathList、nameMap和pathMap,以及如何在不同场景下使用。
Router的从初始化到触发更新时候的流程
如果没有相应的Router源码阅读经历(如React Router的阅读经历),那么可能不需要通过了解整个流程就可以知道大致的实现方式,但是对于没有类似的经历的,那么很难做到窥一斑而知全豹。如果一开始就直接按点来进行讲解的话,那么很多时候都会很懵,因为不知道作用。所以在进行讲解之前,先看一下Vue Router的工作流程。
初始化
在项目初始化的时候,会先进行VueRouter的安装,只需要记住安装的时候会在Vue中混入了一个生命周期钩子函数,将根组件的_route响应式化(后面会用到)。
接下来就是路由的初始化,通过将配置项进行解析,执行以下流程。
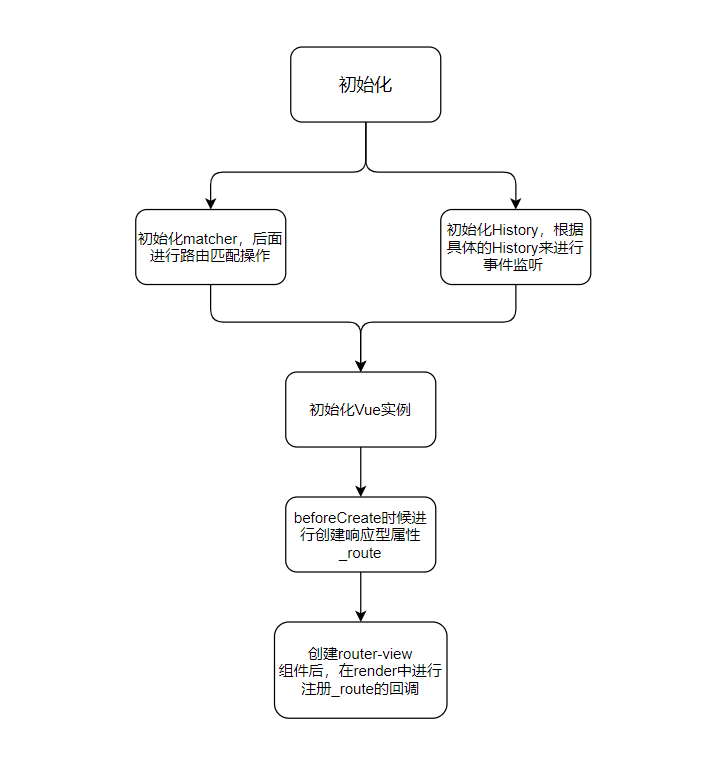
上面的流程中,要注意以下几点:
- Matcher进行初始化的时候,会将路由表制作成路由映射,后面调用
router的切换路由的方法的时候,会从这里拿到相应的路由配置。 - History进行初始化的时候,会进行根据不同的类型路由来进行不同的事件的注册,如果是hash或者h5类型的话,会在浏览器上注册事件。回调事件也是进行更新路由视图的起点。
- 在
beforeCreate的生命周期钩子函数中,只在路由对应的根组件中提添加_route响应式属性,在其他的组件没有,只能进行代理访问。 - 在
router-view组件中进行注册_route回调的前提是在render函数中引用到,这个要得了解什么响应数据的依赖的添加的时机才能够明白。
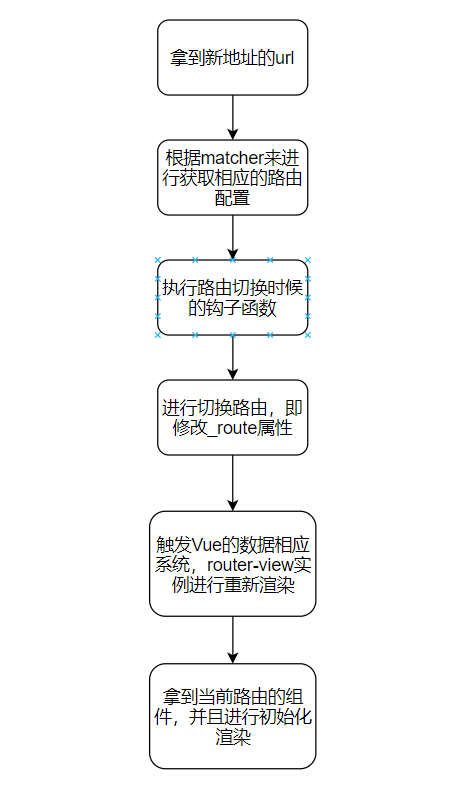
更新路由
首先要明白路由更新的起点在哪?根据不同类型的路由分类如下:
| 路由类型 | 更新起点 |
|---|---|
| Hash | popState、pushState、hashChange、replaceState、go、push、replace |
| H5 | popState、pushState、replaceState、go、push、replace |
| Abstract | go、push、replace |
具体的流程图如下:
Vuex和Vue Router很骚的一点就是它会去适当使用Vue的数据响应系统来进行事件通知功能,这是很巧妙的设计(不用关心Vue的版本,是使用Object.defineProperty还是代理来实现的),同时也是其强耦合度的体现。
入口
在install.js文件中,对路由、路由组件、路由混入事件、路由响应式对象创建的操作等进行了执行。下面会进行解释作用。
function install (Vue) {
  if (install.installed && _Vue === Vue) return
  install.installed = true

  _Vue = Vue

  const isDef = v => v !== undefined

  // 进行注册router实例
  const registerInstance = (vm, callVal) => {
    let i = vm.$options._parentVnode
    // 在data之后进行初始化
    if (isDef(i) && isDef(i = i.data) && isDef(i = i.registerRouteInstance)) {
      i(vm, callVal)
    }
  }

  Vue.mixin({
    beforeCreate () {
      // 在beforeCreate执行环境的时候,this指向的是新创建出来的vm实例
      if (isDef(this.$options.router)) {
        // 如果配置项有router选项的时候,那么这个vm实例就是router的根组件
        this._routerRoot = this
        this._router = this.$options.router
        this._router.init(this)
        // 定义响应数据。在router-view组件(后面会说)中的渲染函数中会访问到这个属性,同时会添加上依赖。当修改到本数据的时候,会触发数据相应系统,重新渲染对应的router-view。更改视图层
        Vue.util.defineReactive(this, '_route', this._router.history.current)
      } else {
        // 如果不是路由根目录组件的时候,那么就会将_routerRoot属性赋值为根目录组件
        this._routerRoot = (this.$parent && this.$parent._routerRoot) || this
      }
      // 进行注册路由操作
      registerInstance(this, this)
    },
    destroyed () {
      // 进行移除操作
      registerInstance(this)
    }
  })

  // 下面两个方法都是代理操作
  Object.defineProperty(Vue.prototype, '$router', {
    get () { return this._routerRoot._router }
  })

  Object.defineProperty(Vue.prototype, '$route', {
    get () { return this._routerRoot._route }
  })

  Vue.component('RouterView', View)
  Vue.component('RouterLink', Link)

  const strats = Vue.config.optionMergeStrategies
  // use the same hook merging strategy for route hooks
  strats.beforeRouteEnter = strats.beforeRouteLeave = strats.beforeRouteUpdate = strats.created
}
在安装文件干了三件事:
-
混入钩子函数,进行路由注册,并且进行定义响应式数据,方便后面路由改变的时候通知视图层进行更新
-
进行代理操作,实例访问
$router或者$route属性的时候会代理到跟组件的_route属性中(所以其实在对$route进行观察的时候,实际上是对根目录的_route属性进行观察,而这个属性已经变成了响应型数据,所以路由改变的时候能够实现回调观察的作用)一张图来说明引用的整个流程: -
注册全局组件。
Router的组成
1.VueRouter实例
VueRouter类是对外的接口,用户通过创建实例来进行路由控制,VueRouter类是对路由配置以及钩子函数进行管理、对内部功能进行代理的类,并不直接参与路由跳转时候的具体实现(仅仅是代理),而是交给其内部工具来完成:内部有Matcher、History实例承担实现路由功能的不同的模块。
将一类操作交个某个实例去完成,从而实现复杂功能的拆分,这是面向对象设计思想常用的方式。
先看一下属性:
static install: () => void;							    // install函数,即前面install.js文件的函数
static version: string;								   // 版本

app: any;                                                 // 当前运行的根目录组件的app
apps: Array<any>;                                         // 一个router 可以让多个app运行
ready: boolean;                                           // 是否已经更新路由完毕
readyCbs: Array<Function>;                                // 更新路由完毕时候的回调函 数
options: RouterOptions;						            // 选项
mode: string;                                             // 模式
history: HashHistory | HTML5History | AbstractHistory;    // 路由模式
matcher: Matcher;                                         // 路由匹配器
fallback: boolean;                                        // 是否向后兼容
beforeHooks: Array<?NavigationGuard>;                     // 下面都是钩子函数
resolveHooks: Array<?NavigationGuard>;
afterHooks: Array<?AfterNavigationHook>;
这个类关注的函数是初始化函数:
init (app: any /* Vue component instance */) {
    process.env.NODE_ENV !== 'production' && assert(
      install.installed,
      `not installed. Make sure to call \`Vue.use(VueRouter)\` ` +
      `before creating root instance.`
    )

    this.apps.push(app)

    // set up app destroyed handler
    // https://github.com/vuejs/vue-router/issues/2639
    app.$once('hook:destroyed', () => {
      // clean out app from this.apps array once destroyed
      const index = this.apps.indexOf(app)
      if (index > -1) this.apps.splice(index, 1)
      // ensure we still have a main app or null if no apps
      // we do not release the router so it can be reused
      if (this.app === app) this.app = this.apps[0] || null

      if (!this.app) {
        // clean up event listeners
        // https://github.com/vuejs/vue-router/issues/2341
        this.history.teardownListeners()
      }
    })

    // main app previously initialized
    // return as we don't need to set up new history listener
    if (this.app) {
      return
    }

    this.app = app

    const history = this.history

    if (history instanceof HTML5History || history instanceof HashHistory) {
      const setupListeners = () => {
        history.setupListeners()
      }
      history.transitionTo(history.getCurrentLocation(), setupListeners, setupListeners)
    }
    history.listen(route => {
      // 一个路由可以让多个vue实例来进行使用,通知所有的vm实例进行重新渲染rouer
      this.apps.forEach((app) => {
        // 还记得上面说过_route是一个响应型数据,在router-view组件的渲染函数中引用到,所以最后会重新渲染router-view
        app._route = route
      })
    })
  }
2.History实例
Vue Router中有三种类型的History,也就是我们平时所说的路由类型。他们是根据宿主所支持的特性来进行区分的。其中有两类,一类是基于Web环境的(hash和history模式),一类是适用于任何环境(abstract模式)。三种路由模式都是继承于History对象,根据不同的宿主类型进行实现不同的方法。
0)History
是路由的基础类,负责三种路由的公共逻辑,即对路由内部的状态进行处理,如路由的切换等等。并且用户在对路由设置的路由切换时候的钩子函数也会在这里一并进行执行,下面是History中的代码结构树。
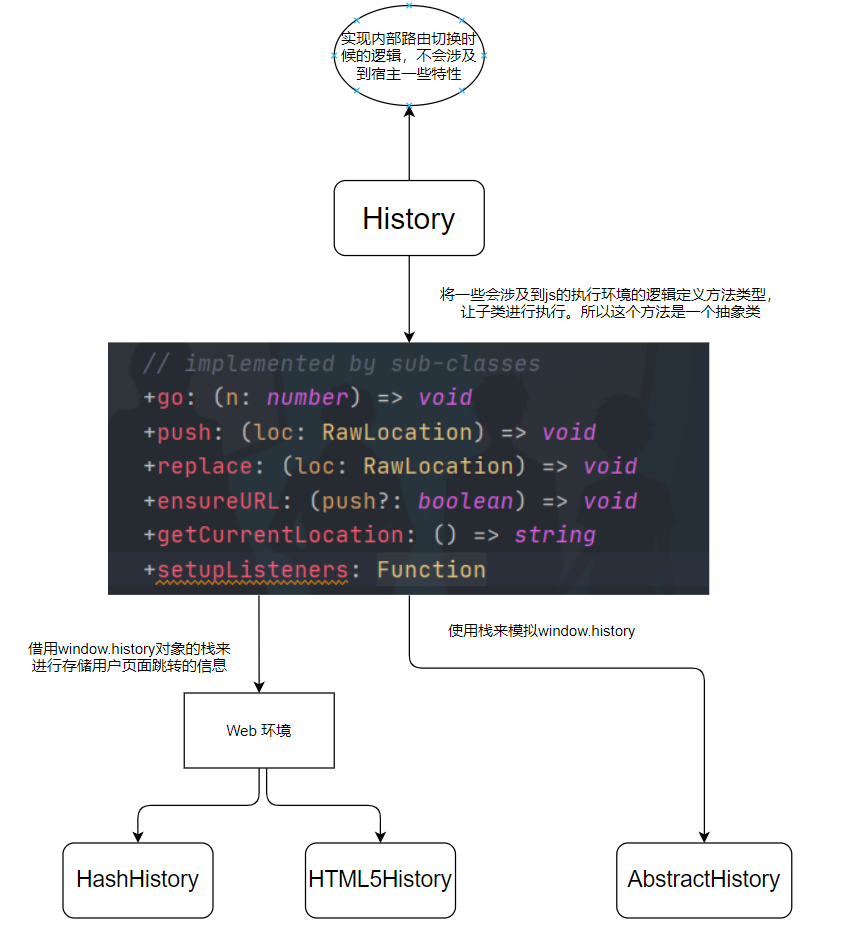
1)HashHistory
实现基础:实现的基础是因为浏览器的url有hash,修改hash值不会发生页面的重定向(但是会创建一个浏览器的访问项并且push到window.history对象中);浏览器还有能够监听hashchange事件
实现:对于抽象父类给出的抽象方法进行实现,主要的操作是对浏览器url进行提取修改。对url中的hash进行访问或者修改,并且利用window.history对象进行存储用户的访问路径,从而模拟路由的功能。
2)HTML5History
实现基础:HTML5中浏览器具有原生的history对象,并且提供了api对history这个栈进行操作:pushState、popState、replaceState三个方法来进行操作用户访问页面的栈。
实现:使用了HTML5中的window.history的对象,与hash实现的基础差不多。但是与hash不同的是,每次进行切换路径的时候,其实是访问一个新的路径,会向后台发起访问新路径的请求,此时后台需要对请求马上进行处理,即进行重定向,保证页面不会刷新。
3)AbstractHistory
实现基础:抽象路由能够在所有的js环境下运行,所以不会依靠宿主所提供的API,而是内部使用了stack和一些操作来进行模拟window.history对象。
实现:借助栈操作来模拟页面的切换操作。
3.Matcher实例
Matcher实例是Vue Router进行处理参数选项中的routes所配置的路由选项的实例,并且暴露出两个接口:
addRoutes:用来动态添加路由表match:用来匹配路由
Matcher实例是一个路由匹配规则库,用来存储设置的Routes配置,并且可以根据当前的路径来进行匹配相应的路由,并且返回匹配路径的信息,用于下一步的操作。在这里讲解一下关键函数:
-
createRouteMap:根据传进来的路由选项构建三个存储的数据:
pathList(将routes配置处理后扁平化)、nameMap(由路径的name来映射route)、pathMap(由path来映射route)。我将解析都放到代码上去export function createRouteMap ( routes: Array<RouteConfig>, oldPathList?: Array<string>, // 使用addRoutes函数的时候,会传进来之前的闭包存储结构,用于添加路由映射 oldPathMap?: Dictionary<RouteRecord>, oldNameMap?: Dictionary<RouteRecord> ): { pathList: Array<string>, pathMap: Dictionary<RouteRecord>, nameMap: Dictionary<RouteRecord> } { // the path list is used to control path matching priority const pathList: Array<string> = oldPathList || [] // $flow-disable-line const pathMap: Dictionary<RouteRecord> = oldPathMap || Object.create(null) // $flow-disable-line const nameMap: Dictionary<RouteRecord> = oldNameMap || Object.create(null) // 构建nameMap、pathMap、pathList路由表,因为路由配置是一个树状结构,所以这个addRouteRecord是一个递归函数,使用深度优先遍历来进行构建路由表 routes.forEach(route => { addRouteRecord(pathList, pathMap, nameMap, route) }); // ensure wildcard routes are always at the end // 因为只有所有的配置都不能够进行匹配的时候,才匹配通配符,这个操作是将通配符的路由配置项放到最后 for (let i = 0, l = pathList.length; i < l; i++) { if (pathList[i] === '*') { pathList.push(pathList.splice(i, 1)[0]) l-- i-- } } if (process.env.NODE_ENV === 'development') { // warn if routes do not include leading slashes const found = pathList // check for missing leading slash // 不是通配符,并且不是以斜杠开头的,那么会报错,因为需要使用的是相对路径 .filter(path => path && path.charAt(0) !== '*' && path.charAt(0) !== '/') if (found.length > 0) { const pathNames = found.map(path => `- ${path}`).join('\n') warn(false, `Non-nested routes must include a leading slash character. Fix the following routes: \n${pathNames}`) } } return { pathList, pathMap, nameMap } }接下来是
addRouteRecord函数function addRouteRecord ( pathList: Array<string>, pathMap: Dictionary<RouteRecord>, nameMap: Dictionary<RouteRecord>, route: RouteConfig, parent?: RouteRecord, matchAs?: string ) { const { path, name } = route const pathToRegexpOptions: PathToRegexpOptions = route.pathToRegexpOptions || {} // 进行归一化处理路径,即根据树状结构的上下级别关系来进行配置路径,如树状结构的访问路径是index.abc,那么path就会处理成为/index/abc const normalizedPath = normalizePath(path, parent, pathToRegexpOptions.strict) // ...codes const record: RouteRecord = { path: normalizedPath, regex: compileRouteRegex(normalizedPath, pathToRegexpOptions), components: route.components || { default: route.component }, instances: {}, name, parent, matchAs, redirect: route.redirect, beforeEnter: route.beforeEnter, meta: route.meta || {}, props: route.props == null ? {} : route.components ? route.props : { default: route.props } } if (route.children) { // route配置通常有children的嵌套子结构,这个函数是进行处理这种子结构关系 route.children.forEach(child => { const childMatchAs = matchAs ? cleanPath(`${matchAs}/${child.path}`) : undefined addRouteRecord(pathList, pathMap, nameMap, child, record, childMatchAs) }) } // 构建pathMap映射表 if (!pathMap[record.path]) { pathList.push(record.path) pathMap[record.path] = record } // 构建别名映射 if (route.alias !== undefined) { const aliases = Array.isArray(route.alias) ? route.alias : [route.alias] for (let i = 0; i < aliases.length; ++i) { const alias = aliases[i] const aliasRoute = { path: alias, children: route.children } addRouteRecord( pathList, pathMap, nameMap, aliasRoute, parent, record.path || '/' // matchAs ) } } // 构建nameMap映射表 if (name) { if (!nameMap[name]) { nameMap[name] = record } } }总的来说,createRouteMap函数会对
routes配置进行深度优先遍历,从而构建出映射表以及路径数组。这是matcher实例中存储路由配置的基础。 -
match函数:上面的函数是进行存储作用,本函数是进行匹配获取路径的作用。
  function match (
    raw: RawLocation,
    currentRoute?: Route,
    redirectedFrom?: Location
  ): Route {
    // 根据当前的route、router、location对象拿到序列化的数据,如query、params等等
    const location = normalizeLocation(raw, currentRoute, false, router)
    const { name } = location

    // 我们可以知道上面构建的时候存在两个map结构:一个是nameMap、另外一个是pathMap,它们的作用是来快速查找映射的,如果直接使用pathList来进行匹配的话,那么时间复杂度是O(n),如果用pathMap或者nameMap来进行匹配的话,时间复杂度是O(1)
    if (name) {
      // 直接获取
      const record = nameMap[name]
      if (process.env.NODE_ENV !== 'production') {
        warn(record, `Route with name '${name}' does not exist`)
      }
      if (!record) return _createRoute(null, location)
      const paramNames = record.regex.keys
        .filter(key => !key.optional)
        .map(key => key.name)

      if (typeof location.params !== 'object') {
        location.params = {}
      }

      if (currentRoute && typeof currentRoute.params === 'object') {
        for (const key in currentRoute.params) {
          if (!(key in location.params) && paramNames.indexOf(key) > -1) {
            location.params[key] = currentRoute.params[key]
          }
        }
      }

      location.path = fillParams(record.path, location.params, `named route "${name}"`)
      // 根据数据创建是当前的route对象,这样方便后面进行获取相应的组件并且渲染
      return _createRoute(record, location, redirectedFrom)
    } else if (location.path) {
      // 如果是pathMap来获取的话,是需要进行匹配路径操作的,因为vue router路径还支持了params这个功能,将参数都写到路径上,如配置路径是 /user:id  那么会匹配到所有的 /user1231231 /user32ss 的路由,原理是在初始化的时候会进行正则表达式的生成。
      location.params = {}
      for (let i = 0; i < pathList.length; i++) {
        const path = pathList[i]
        const record = pathMap[path]
        if (matchRoute(record.regex, location.path, location.params)) {
          return _createRoute(record, location, redirectedFrom)
        }
      }
    }
    // no match
    return _createRoute(null, location)
  }

function matchRoute (
  regex: RouteRegExp,
  path: string,
  params: Object
): boolean {
  const m = path.match(regex)

  if (!m) {
    return false
  } else if (!params) {
    return true
  }

  for (let i = 1, len = m.length; i < len; ++i) {
    const key = regex.keys[i - 1]
    const val = typeof m[i] === 'string' ? decodeURIComponent(m[i]) : m[i]
    if (key) {
      // Fix #1994: using * with props: true generates a param named 0
      params[key.name || 'pathMatch'] = val
    }
  }

  return true
}
上面就是
matcher实例大概的功能所在。
Router所包含的数据结构
1.存储访问记录的数据结构
无论是window.history还是抽象路由中,都是使用栈来进行处理的,因为栈具有后进先出的特性,所以能够根据访问的历史进行倒序访问。
2.路由映射表
1)pathList
router将VueRouter实例所传进来的options的routes进行处理,routes具有树状结构,其树状访问路径代表着路由匹配url的路径。而pathList是将这颗树进行解析出来,制作成一个数组进行存储。
2)nameMap
是一个Map结构,Key是String,是路由配置项的name属性,Value是route配置项,可以直接通过name来寻找route,这就要求路由配置中的name具有唯一性。
3)pathMap
是一个Map结构,与nameMap一致,不过它是能够找出在路径中的params(使用正则表达式进行匹配)。


 1047
1047

 被折叠的 条评论
为什么被折叠?
被折叠的 条评论
为什么被折叠?
 到【灌水乐园】发言


