


 本文详细介绍了如何在Spring Boot应用中快速集成Mybatis,包括依赖导入、配置数据源、Mapper接口注册、XML映射文件管理,以及在Spring框架下的Service实现和测试。重点讲解了两者整合的简化步骤和注意事项。
Spring整合Mybatis
-
导入依赖
<dependency> <groupId>org.mybatis</groupId> <artifactId>mybatis-spring</artifactId> <version>2.0.6</version> </dependency> <dependency> <groupId>mysql</groupId> <artifactId>mysql-connector-java</artifactId> <version>8.0.16</version> </dependency> <dependency> <groupId>org.springframework</groupId> <artifactId>spring-webmvc</artifactId> <version>5.3.8</version> </dependency> <dependency> <groupId>org.mybatis</groupId> <artifactId>mybatis</artifactId> <version>3.5.2</version> </dependency> -
编写Mapper和Mapper.xml
-
将Mybatis中的数据源配置写入Spring文件中
-
创建SQL session factory
-
绑定数据源
-
绑定Mybatis.config
-
扫描Mapper包注解
<?xml version="1.0" encoding="UTF-8"?>
<beans xmlns="http://www.springframework.org/schema/beans"
xmlns:xsi="http://www.w3.org/2001/XMLSchema-instance"
xsi:schemaLocation="http://www.springframework.org/schema/beans
http://www.springframework.org/schema/beans/spring-beans.xsd">
<bean id="DataSources" class="org.springframework.jdbc.datasource.DriverManagerDataSource">
<property name="driverClassName" value="com.mysql.cj.jdbc.Driver"></property>
<property name="url" value="jdbc:mysql://localhost:3306/mydb1?serverTimezone=UTC
&useSSl=true&useUnicode=true&characterEncoding=UTF-8"/>
<property name="username" value="root"></property>
<property name="password" value="123456"></property>
</bean>
<bean id="sqlsessionFatory" class="org.mybatis.spring.SqlSessionFactoryBean">
<property name="dataSource" ref="DataSources"/>
<property name="configLocation" value="classpath:Mybatis-config.xml"/>
</bean>
<bean class="org.mybatis.spring.mapper.MapperScannerConfigurer">
<property name="basePackage" value="com.llf.Mapper"></property>
<property name="sqlSessionFactoryBeanName" value="sqlsessionFatory"/>
</bean>
</beans>
-
Mapper.xml的注册和类别名等其他设置留在了mybatis-config中
注意:注册的是Mapper.xml而不是Mapper这个接口 不要因为是class方式注册的 误以为注册的是接口 其实是Mapper.xml
-
编写Service接口和实现类
-
在实现类上添加@Service注解 表明这个实现类由Spring托管
-
在实现类中引入Mapper 并添加@Autowired注解
@Autowired private StudentMapper studentMapper; public void setStudentMapper(StudentMapper studentMapper) { this.studentMapper = studentMapper; } -
测试
    @Test
    public void test(){
      ApplicationContext context = new ClassPathXmlApplicationContext("ApplicationContext.xml");
        StudentService serviceImpl = context.getBean("studentServiceImpl", StudentService.class);

        ArrayList<Student> students = serviceImpl.getStudent();

        for (Student student : students) {
            System.out.println(student);
        }}
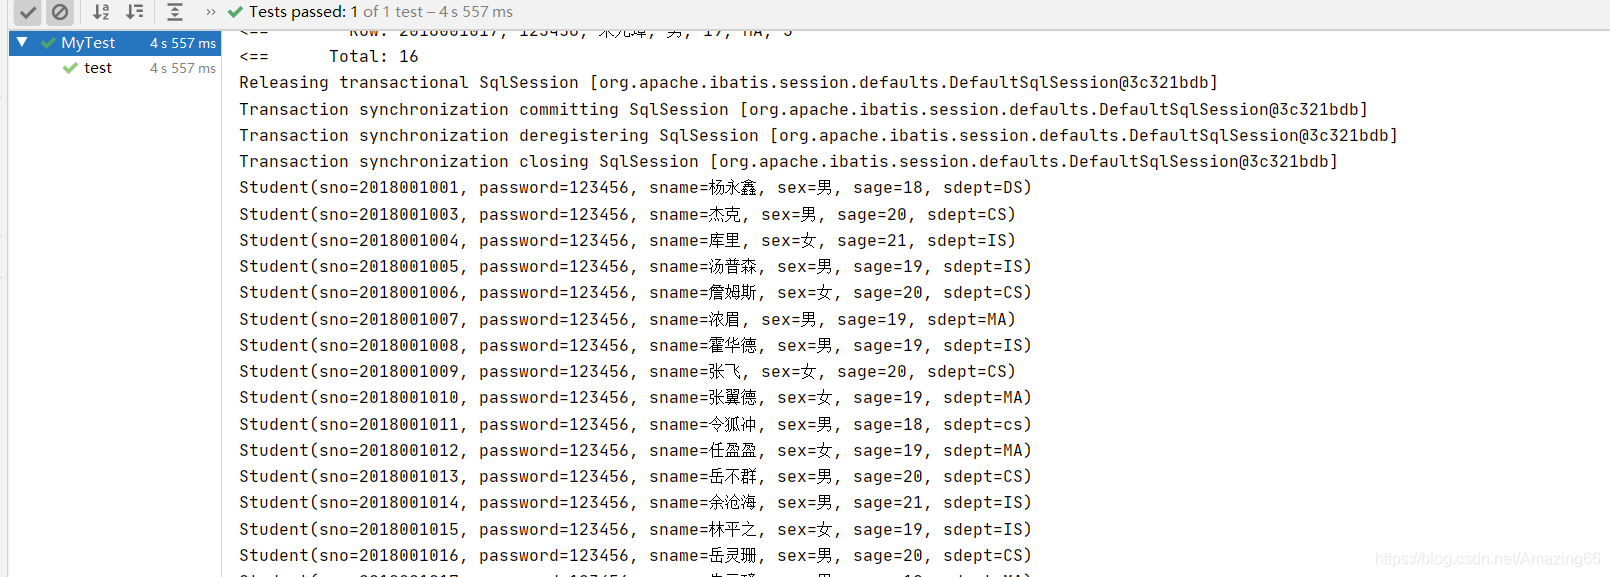
成功
SpringBoot整合Mybatis
- 导入依赖
<!-- https://mvnrepository.com/artifact/org.mybatis.spring.boot/mybatis-spring-boot-starter -->
<dependency>
    <groupId>org.mybatis.spring.boot</groupId>
    <artifactId>mybatis-spring-boot-starter</artifactId>
    <version>2.2.0</version>
</dependency>
-
编写实体类
-
编写Mapper接口
-
注册Mapper
在接口类上添加@Repository注解 表明这个接口被Spring接管
@Mapper
@Repository
public interface UserMapper {
    ArrayList<User> getall();
}
在Mapper接口的上面添加@Mapper注解来注册mapper
也可以在启动类上面添加@MapperScan()注解 括号里填mapper的路径 com.llf.Mapper
@SpringBootApplication @MapperScan("com.llf.Mapper") public class SpringbootDataApplication { public static void main(String[] args) { SpringApplication.run(SpringbootDataApplication.class, args); } } -
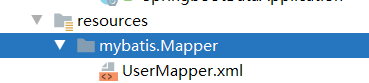
编写Mapper.xml
与以前不同,Mapper.xml要放在resource目录下 为了区分 在resource目录下创建 mybatis/Mapper/**.xml
-
配置xml文件 在yaml配置文件中
#注册xml文件 起别名 mybatis: mapper-locations: classpath:mybatis/Mapper/*.xml type-aliases-package: com.llf.pojo -
编写service接口
-
编写Service实现类
@Service public class UserServiceImpl implements UserService{ @Autowired private UserMapper userMapper; @Override public ArrayList<User> getall() { return userMapper.getall(); } } -
测试
    @Autowired
    private UserServiceImpl userService;
    @Test
public void all(){
        ArrayList<User> getall = userService.getall();
        for (User user : getall) {
            System.out.println(user);
        }
    }

说明mybatis整合完成
总结
相同点
- 都需要编写Mapper和Mapper.xml
- 都需要将数据源放到spring配置中
不同点
-
与spring整合时,mybatis的Mapper.xml文件可以与Mapper在同一个包下 而与springBoot整合时 必须放在resourcse目录下
-
与spring整合时,需要将mybatis的config文件与spring绑定 与springBoot整合时 什么也不需要
-
- 与spring整合时,Mapper.xml注册可以在spring配置中,也可以在mybatis配置中 与springBoot整合时 只能放在yaml配置文件中
#注册xml文件 起别名 mybatis: mapper-locations: classpath:mybatis/Mapper/*.xml type-aliases-package: com.llf.pojo -
与spring整合时,Mapper.xml可以有类路径、资源路径、包路径三种注册方式 在springBoot中 只能时类路径
-
与spring整合时,需要配置扫描Mapper的Bean,与Springboot整合时只需要在Mapper接口上添加@Mapper注解即可
@Repository、@Service、@Controller与@Componment功能一样 只是为了区分不同层而做出的注解
他们都是放在接口实现类上面的 而不是接口上


 291
291

 被折叠的 条评论
为什么被折叠?
被折叠的 条评论
为什么被折叠?
 到【灌水乐园】发言


