


 本文详细介绍了如何通过Docker镜像拉取并部署FastDFS的Tracker和Storage服务,包括创建相关文件夹、设置网络模式、配置端口以及调整Nginx配置,最后演示了图片上传和访问过程。
使用Docker搭建FastDFS的开发环境
-
拉取镜像
docker search fastdfs docker pull delron/fastdfs -
.通过Docker命令来创建Tracker服务
# 先创建文件夹 mkdir /mydata cd /mydata mkdir /tracker ll # 执行docker命令 docker run -d --name tracker --network=host -v /mydata/fastdfs/tracker:/var/fdfs delron/fastdfs tracker # 注意:tracker服务默认的端口为22122 -
通过Docker命令构建构建Storage服务
# 创建文件夹
cd /mydata
mkdir /storage
ll
# 执行命令
docker run -d --name storage --network=host  -e TRACKER_SERVER=x.x.x.x:22122 -v /mydata/fastdfs/storage:/var/fdfs -e GROUP_NAME=group1 delron/fastdfs storage
# 注意:其中TRACKER_SERVER中的ip要修改为你的Tracker服务所在的服务IP地址
默认情况下在Storage服务中是帮我们安装了Nginx服务的,相关的端口为:
服务 默认端口
tracker 22122
storage 23000
Nginx 8888 -
配置文件的查看&根据要求自行修改(比如端口冲突)
[root@VM-4-9-centos ~]# docker exec -it storage /bin/bash
[root@VM-4-9-centos nginx-1.12.2]# ls
CHANGES  CHANGES.ru  LICENSE  Makefile  README  auto  conf  configure  contrib  html  man  objs  src
[root@VM-4-9-centos nginx-1.12.2]# cd /
[root@VM-4-9-centos /]# ls
anaconda-post.log  bin  dev  etc  home  lib  lib64  media  mnt  opt  proc  root  run  sbin  srv  sys  tmp  usr  var
[root@VM-4-9-centos /]# cd etc/fdfs/
[root@VM-4-9-centos fdfs]# ls
client.conf         http.conf   mod_fastdfs.conf  storage.conf.sample  storage_ids.conf.sample  tracker.conf.sample
client.conf.sample  mime.types  storage.conf      storage_ids.conf     tracker.conf
[root@VM-4-9-centos fdfs]# cat storage.conf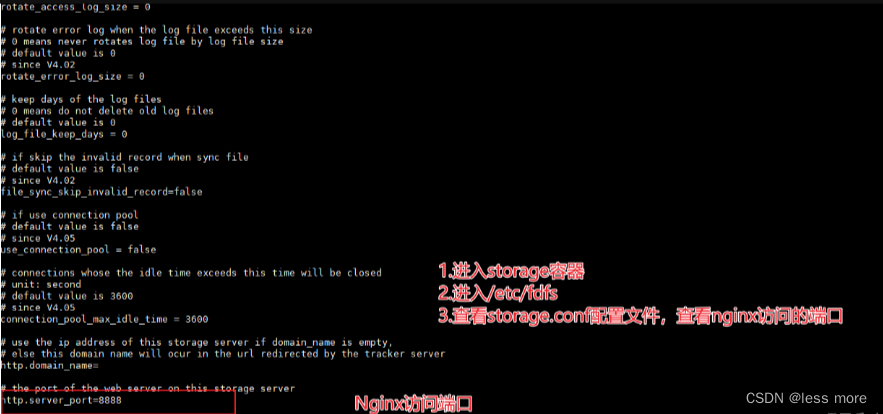
#重启storage容器 docker restart storage[root@VM-4-9-centos fdfs]# cd /usr/local/nginx [root@VM-4-9-centos nginx]# ll total 36 drwx------ 2 nobody root 4096 Oct 25 14:47 client_body_temp drwxr-xr-x 1 root root 4096 Apr 29 2018 conf drwx------ 2 nobody root 4096 Oct 25 14:47 fastcgi_temp drwxr-xr-x 2 root root 4096 Apr 29 2018 html drwxr-xr-x 1 root root 4096 Oct 25 14:47 logs drwx------ 2 nobody root 4096 Oct 25 14:47 proxy_temp drwxr-xr-x 2 root root 4096 Apr 29 2018 sbin drwx------ 2 nobody root 4096 Oct 25 14:47 scgi_temp drwx------ 2 nobody root 4096 Oct 25 14:47 uwsgi_temp [root@VM-4-9-centos nginx]# cd conf/ [root@VM-4-9-centos conf]# ls fastcgi.conf fastcgi_params koi-utf mime.types nginx.conf scgi_params uwsgi_params win-utf fastcgi.conf.default fastcgi_params.default koi-win mime.types.default nginx.conf.default scgi_params.default uwsgi_params.default [root@VM-4-9-centos conf]# cat nginx.conf
-
测试图片上传
先在虚拟机的 /mydata/fastdfs/storage 目录下上传一张图片
进入storage 容器,执行上传文件的命令[root@VM-4-9-centos storage]# docker exec -it storage bash [root@VM-4-9-centos nginx-1.12.2]# cd /var/fdfs/ [root@VM-4-9-centos fdfs]# ls 1.jpg logs data [root@VM-4-9-centos fdfs]# /usr/bin/fdfs_upload_file /etc/fdfs/client.conf 1.jpg group1/M00/00/00/xxx.jpg [root@VM-4-9-centos fdfs]#浏览器地址栏中输入地址,直接访问
http://ip地址:8888/group1/M00/00/00/xxx.jpg


 5576
5576

 被折叠的 条评论
为什么被折叠?
被折叠的 条评论
为什么被折叠?
 到【灌水乐园】发言


