


一、SpringMVC 框架介绍
1、概述
Spring MVC属于SpringFrameWork的后续产品,已经融合在Spring Web Flow里面。Spring 框架提供了构建 Web 应用程序的全功能 MVC 模块。使用 Spring 可插入的 MVC 架构,从而在使用Spring进行WEB开发时,可以选择使用Spring的SpringMVC框架或集成其他MVC开发框架,如Struts1(现在一 般不用),Struts2(一般老项目使用)等。
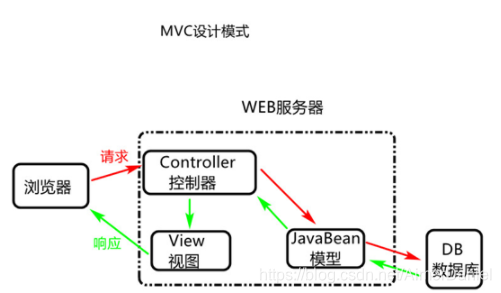
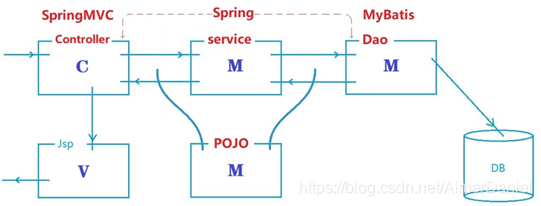
SpringMVC就是基于MVC设计模式来实现的。
我们的POJO就是Model层,我们的JSP就是视图层,我们的Controller就是控制层。
现在主流基于SSM三大框架开发都是在MVC上继续演化,又分为持久层DAO,业务层Service,控制层Controller。持久层用来和数据库读写ORM,业务层用来处理复杂的业务逻辑,控制层用来处理MVC的控制。
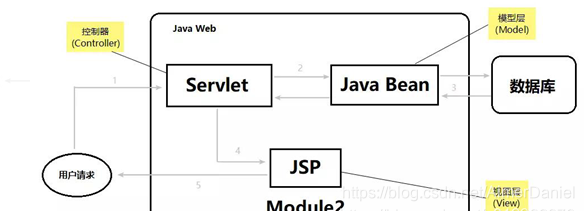
2、MVC模型
用来进行分层的结构,这样代码分离结构清晰,各层代码,各司其职,易于开发大型项目。
好处:实现分层的思想,达到松耦合的目的。提高代码的复用性,扩展性,容错性
M:Model模型,用来封装数据
V:View视图,用来展示数据
C:Controller控制器,用来接受请求和处理响应
通用的软件编程思想, 在MVC设计模式中认为, 任何软件都可以分三层:控制层(Controller)、数据处理模型(Model)、负责展示数据的视图(View)。
在MVC设计思想中要求一个符合MVC设计思想的软件应该保证上面这三部分相互独立,互不干扰,每一个部分只负责自己擅长的部分。如果某一个模块发生变化,应该尽量做到不影响其他两个模块。提高代码的可读性,实现程序间的松耦合、提高代码复用性。
3、性能超群
简单易用性能佳
4、工作原理
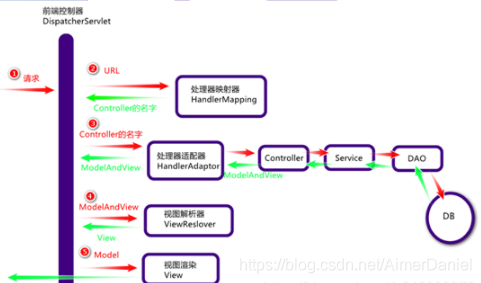
前端控制器:DispatcherServlet,用来接受请求分发请求
处理器映射器:HandlerMapping,用来根据url找具体的类里的具体方法
http://localhost:8080/abc/hi
@RequestMapping(“abc”)public class HelloBoot {@RequestMapping(“hi”) public String hello(){ } }
处理器适配器:HandlerAdaptor,用来执行方法里的代码
视图解析器:ViewResolver,定位页面的路径
视图:View,用来展示数据
4.1)过程简单描述
客户端发送请求-> 前端控制器 DispatcherServlet 接受客户端请求 -> 找到处理器映射 HandlerMapping 解析请求对应的 Handler-> HandlerAdapter 会根据 Handler 来调用真正的处理器开处理请求,并处理相应的业务逻辑 -> 处理器返回一个模型视图 ModelAndView -> 视图解析器进行解析 -> 返回一个视图对象->前端控制器 DispatcherServlet 渲染数据(Moder)->将得到视图对象返回给用户.
4.2)更具体一些的描述
1、用户发送请求至前端控制器DispatcherServlet。
2、DispatcherServlet收到请求调用HandlerMapping处理器映射器。
3、处理器映射器找到具体的处理器(可以根据xml配置、注解进行查找),生成处理器对象及处理器拦截器(如果有则生成)一并返回给DispatcherServlet。
4、DispatcherServlet调用HandlerAdapter处理器适配器。
5、HandlerAdapter经过适配调用具体的处理器(Controller,也叫后端控制器)。
6、Controller执行完成返回ModelAndView。
7、andlerAdapter将controller执行结果ModelAndView返回给DispatcherServlet。
8、DispatcherServlet将ModelAndView传给ViewReslover视图解析器。
9、ViewReslover解析后返回具体View。
10、DispatcherServlet根据View进行渲染视图(即将模型数据填充至视图中)。
11、DispatcherServlet响应用户。
二、入门案例
1、需求
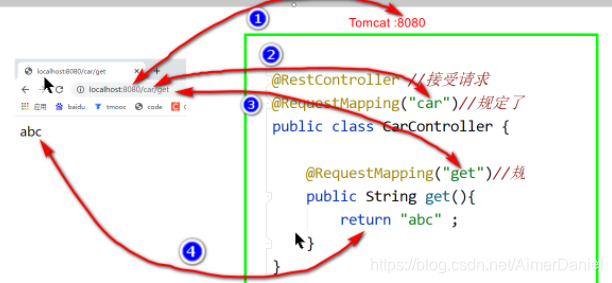
访问链接: http://localhost:8080/car/get
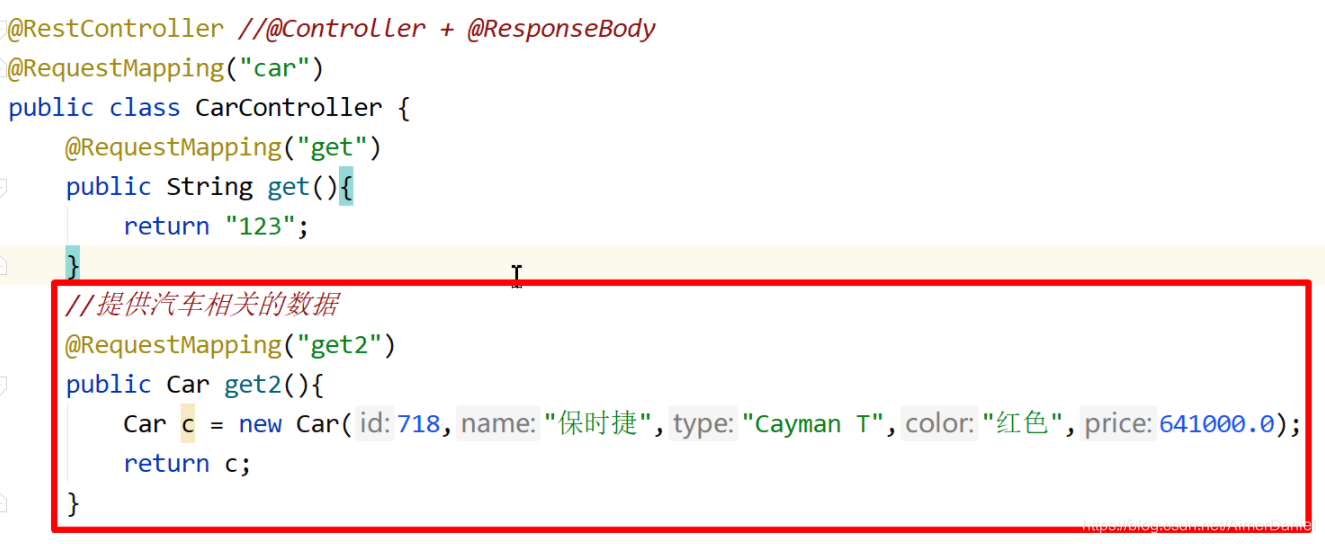
得到JSON数据: {“id”:718,“name”:“保时捷”,“type”:“Cayman T”,“color”:“红色”,“price”:641000.0}
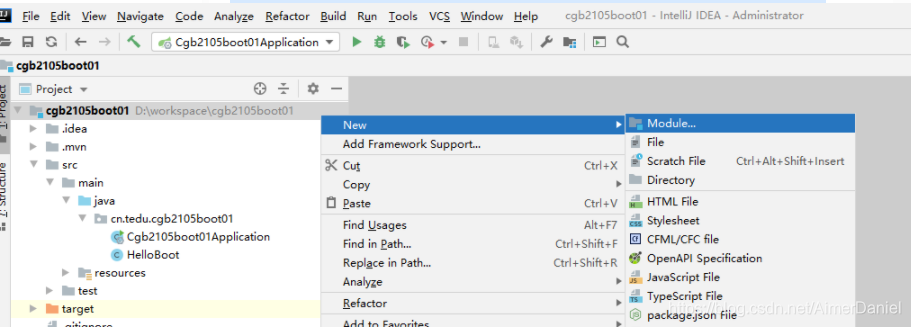
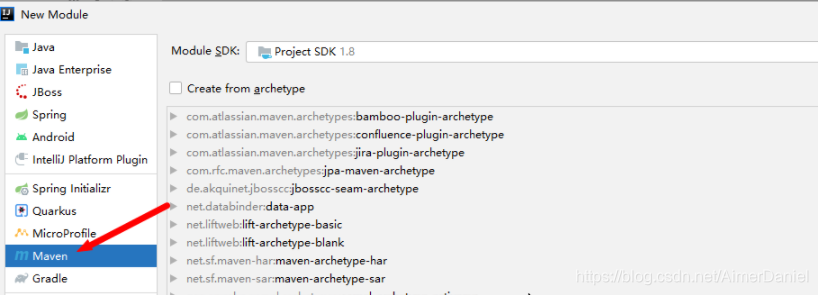
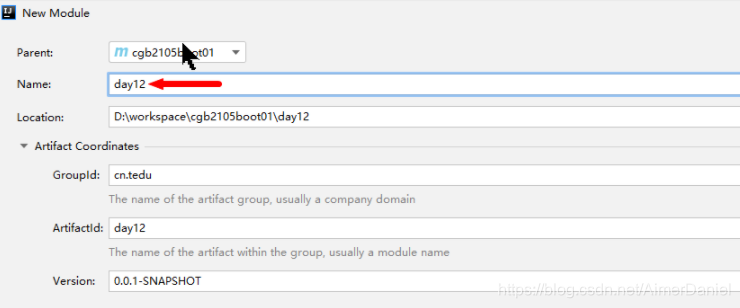
2、创建Maven module
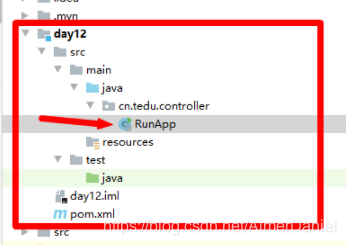
3、创建启动类
package cn.tedu.controller;
import org.springframework.boot.SpringApplication;
import org.springframework.boot.autoconfigure.SpringBootApplication;
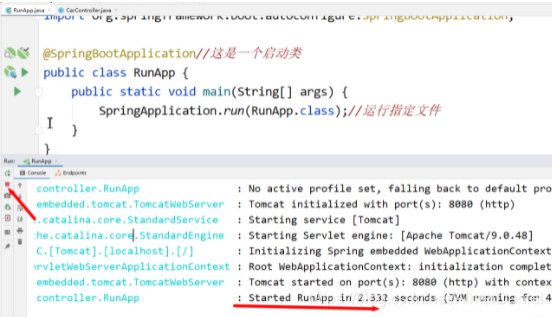
@SpringBootApplication//这是一个启动类
public class RunApp {
public static void main(String[] args) {
SpringApplication.run(RunApp.class);//运行指定文件
}
}
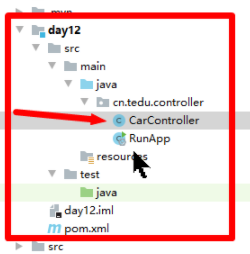
4、创建资源
package cn.tedu.controller;
import org.springframework.web.bind.annotation.RequestMapping;
import org.springframework.web.bind.annotation.RestController;
@RestController //接受请求
@RequestMapping("car")//规定了浏览器访问这个类的方式
public class CarController {
@RequestMapping("get")//规定了浏览器访问这个方法的方式
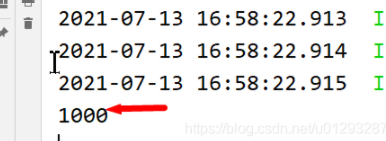
public void get(){
System.out.println(1000);
}
}
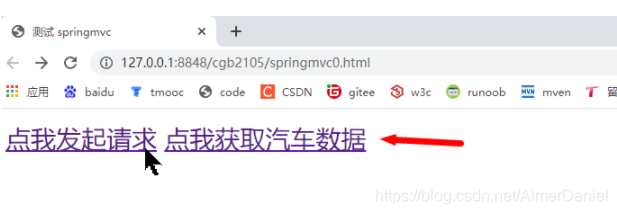
5、测试一

6、测试二,改造,前端后端结合使用
6.1、改造CarController(后端java)
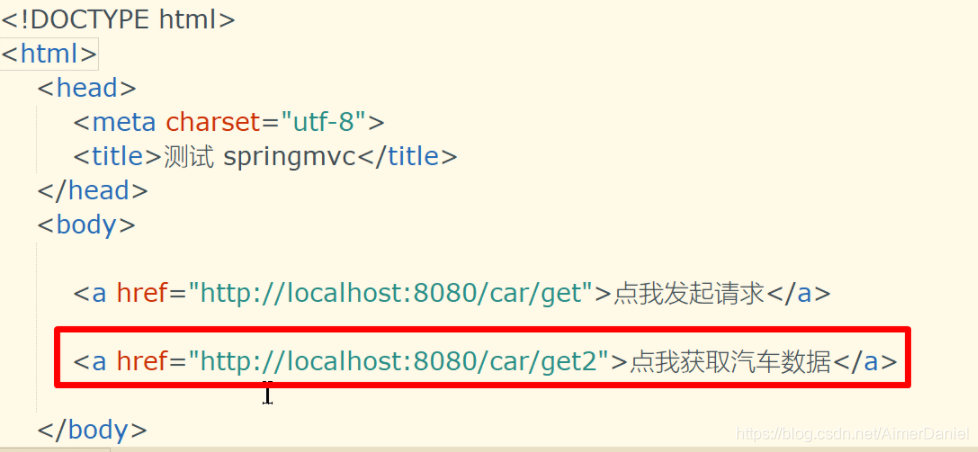
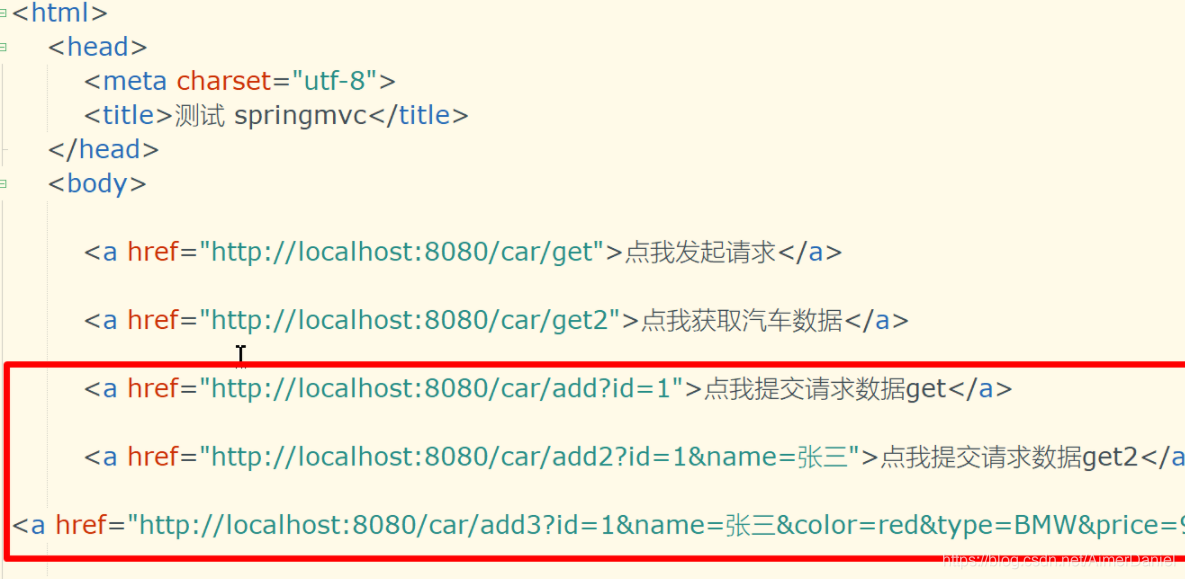
6.2、改造网页(前端html)
6.3、测试

三、处理请求参数
1、概述
当客户端打开浏览器要访问服务器时,可能会带着一些http请求参数过来。
这时,服务器需要获取http参数进行业务处理,如何处理http请求并获取参数呢?
总共有8种,重点时两种方式:GET方式和POST方式。
get:把请求参数 在地址栏拼接http://localhost:8080/car/insert?id=1&name=张三&age=18
post:安全,数据不在地址栏展示
2、GET方式
向特定的资源发出请求,并返回实体,有固定的写法,而且数据有最大长度,超出就不行
例如:
http://localhost:8080/car/insert?id=1&name=张三&age=18
3、POST方式
向指定资源提交数据进行处理请求(例如提交表单或者上传文件)。数据被包含在请求体中。POST请求可能会导致新的资源的建立和/或已有资源的修改。
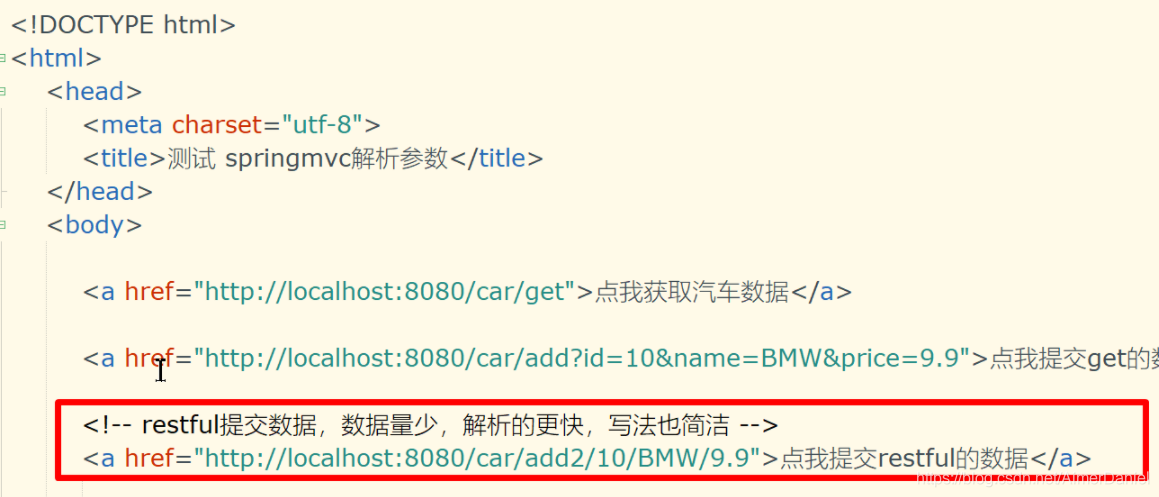
4、RESTFul方式(推荐)
为了简化GET请求的写法,可以使用RESTFul方式,用法:
1、需要使用注解@PathVariable来获取请求路径中的参数值,@PathVariable用来绑定值
2、通过{???}获取路径中传递来的值
3、以前GET的访问方式即将被简化成:
http://localhost:8080/car/insert/1/张三/18
5、测试
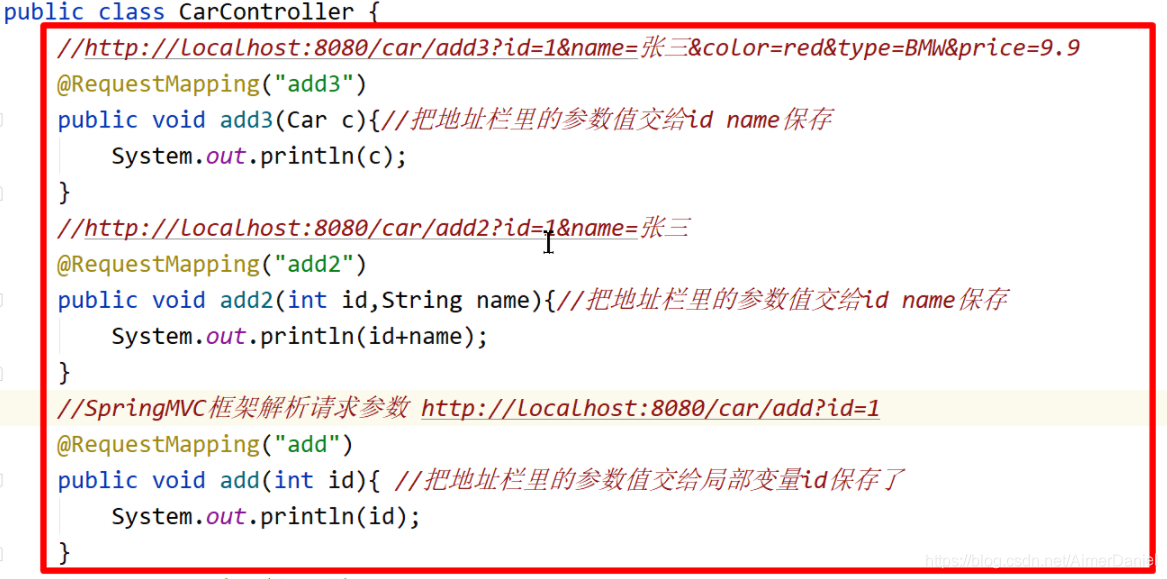
5.1、解析get参数
1)、修改网页
2)、修改CarController
5.2、解析restful风格的请求参数
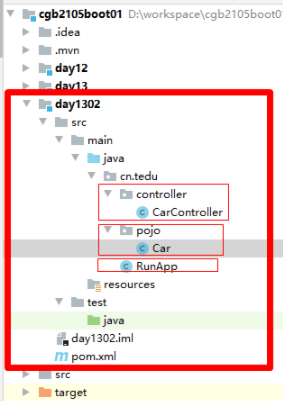
1)、项目结构
2)、修改网页
3)、修改Car
package cn.tedu.pojo;

public class Car {
    private int id;
    private String name;
    private String type;
    private String color;
    private double price;

    public Car() {
    }

    public Car(int id, String name, String type, String color, double price) {
        this.id = id;
        this.name = name;
        this.type = type;
        this.color = color;
        this.price = price;
    }

    public int getId() {
        return id;
    }

    public void setId(int id) {
        this.id = id;
    }

    public String getName() {
        return name;
    }

    public void setName(String name) {
        this.name = name;
    }

    public String getType() {
        return type;
    }

    public void setType(String type) {
        this.type = type;
    }

    public String getColor() {
        return color;
    }

    public void setColor(String color) {
        this.color = color;
    }

    public double getPrice() {
        return price;
    }

    public void setPrice(double price) {
        this.price = price;
    }
}
4)、修改CarController
package cn.tedu.controller;
import cn.tedu.pojo.Car;
import org.springframework.web.bind.annotation.CrossOrigin;
import org.springframework.web.bind.annotation.PathVariable;
import org.springframework.web.bind.annotation.RequestMapping;
import org.springframework.web.bind.annotation.RestController;
@RestController
@RequestMapping("car")
@CrossOrigin//解决跨域问题
public class controller {
@RequestMapping("get")
public Car get(){
Car c= new Car();
c.setId(11100);
return c;
}
//普通get方式提交的数据: http://Localhost:8080/car/add?id=10&name=BM&price=9.9
@RequestMapping("add")
public Car add(Car c){
return c;
}
/* 优化GET传参的restful方式 */
//GET方式访问: http://Localhost:8080/car/add?id=10&name=BM&price=9.9
//restful方式访问: http://localhost:8080/car/insert/10/BMW/9.9
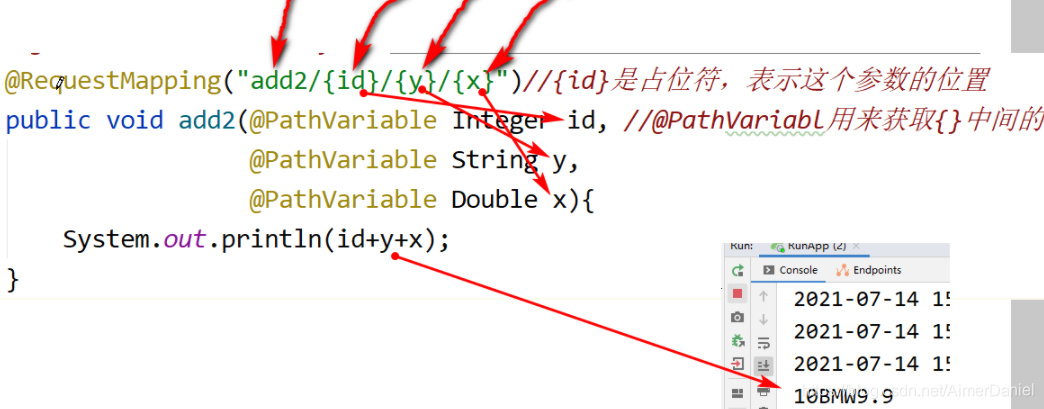
@RequestMapping("add1/{id}/{name}/{price}") //{id}是占位符,表示这个参数的位置
public String add1(@PathVariable Integer id, //@Pathvariabl用来获取中间的值
@PathVariable String name, //@Pathvariabl用来获取中间的值
@PathVariable Double price //@Pathvariabl用来获取中间的值
){
return "数据插入成功,id=" +id + ",name=" + name + ",age=" + price;
}
//普通get方式提交的数据: http://Localhost:8080/car/add?id=10&name=BM&price=9.9
@RequestMapping("add1")
public String add(Integer id,String name,Double price){
return "数据插入成功,id=" +id + ",name=" + name + ",age=" + price;
}
}
5)、 修改html
<!DOCTYPE html>
<html>
	<head>
		<meta charset="utf-8">
		<title></title>

	</head>
	<body>
		<a href="http://localhost:8080/car/get">点我提交get的数据</a></br>
		<a href="http://localhost:8080/car/add?id=10&name=BMW&price=9.9">点我,get提交add的数据</a></br>
		<a href="http://localhost:8080/car/add1/10/BMW/10.9">点我,restful提交add1的数据</a></br>
	</body>
</html>
6)、测试
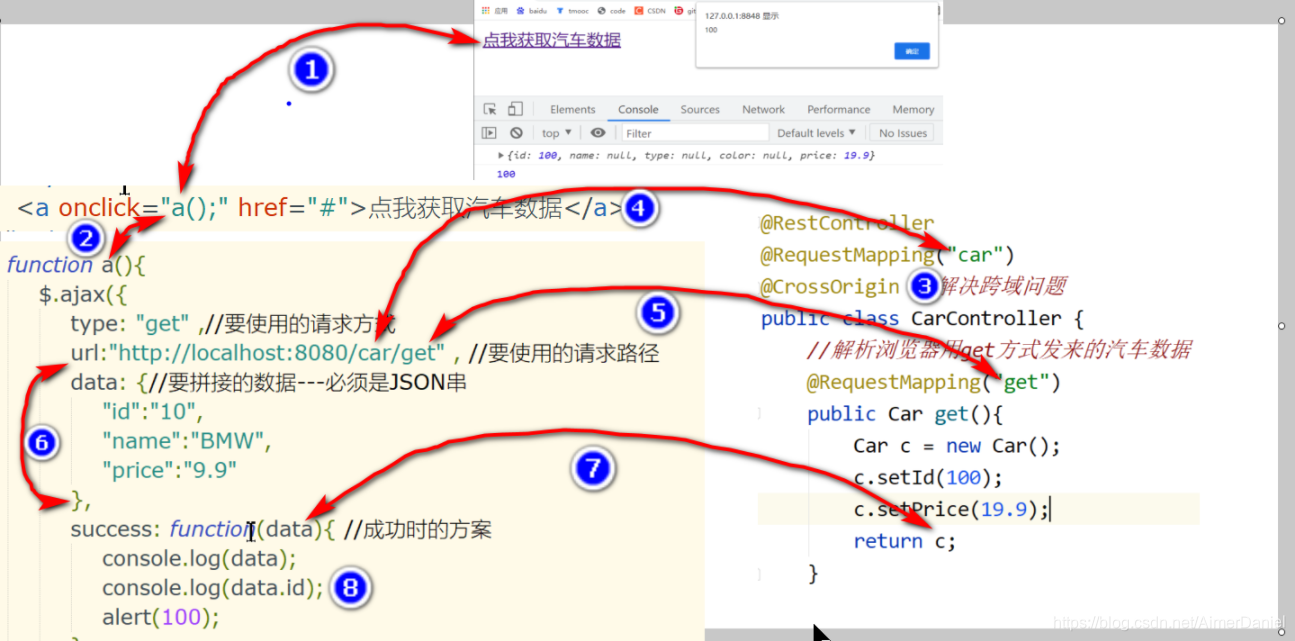
5.3)、改造成ajax提交请求数据
1)、创建新的网页文件,写ajax代码
<!DOCTYPE html>
<html>
	<head>
		<meta charset="utf-8">
		<title>测试数据</title>
		<script src="../jquery-1.8.3.min.js"></script>
		<script>
			function a(){
				$.ajax({ //发起Ajax请求数据
					type: "POST", //POST隐藏请求自带的数据,get显示请求自带的数据
					url: "http://localhost:8080/car/add1", //要使用的请求路径
					contentType: "application/json;charset=utf-8",
					data: { //拼接的参数
						"id": "10",
						"name": "bmw",
						"price": "11.0 0"
					},

					success: function(data) { //成功时的方案
						console.log(data); //查看js对象
						console.log(data.id);
						console.log(100);
					},
					error: function(data) {
						alert("提交失败" + JSON.stringify(data));
					}
				})
			}
		</script>
	</head>
	<body>
		<a onclick="a();" href="#">ajax,点我提交汽车的数据</a>
	</body>
</html>
2)、改造CarController类,加一个跨域的注解
package cn.tedu.controller;

import cn.tedu.pojo.Car;
import org.springframework.web.bind.annotation.CrossOrigin;
import org.springframework.web.bind.annotation.PathVariable;
import org.springframework.web.bind.annotation.RequestMapping;
import org.springframework.web.bind.annotation.RestController;

@RestController
@RequestMapping("car")
@CrossOrigin//解决跨域问题
public class controller {
    @RequestMapping("get")
    public Car get(){
        Car c= new Car();
        c.setId(11100);
        return c;
    }

    //普通get方式提交的数据: http://Localhost:8080/car/add?id=10&name=BM&price=9.9
    @RequestMapping("add")
    public Car add(Car c){
        return c;
    }
    /* 优化GET传参的restful方式 */
        //GET方式访问: http://Localhost:8080/car/add?id=10&name=BM&price=9.9
        //restful方式访问: http://localhost:8080/car/insert/10/BMW/9.9

    @RequestMapping("add1/{id}/{name}/{price}")    //{id}是占位符,表示这个参数的位置
    public String add1(@PathVariable Integer id,  //@Pathvariabl用来获取中间的值
                       @PathVariable String name,
                       @PathVariable Double price){
        return "数据插入成功,id=" +id + ",name=" + name + ",age=" + price;
    }

    //普通get方式提交的数据: http://Localhost:8080/car/add?id=10&name=BM&price=9.9
    @RequestMapping("add1")
    public String add(Integer id,String name,Double price){
        return "数据插入成功,id=" +id + ",name=" + name + ",age=" + price;
    }

}
3)、测试
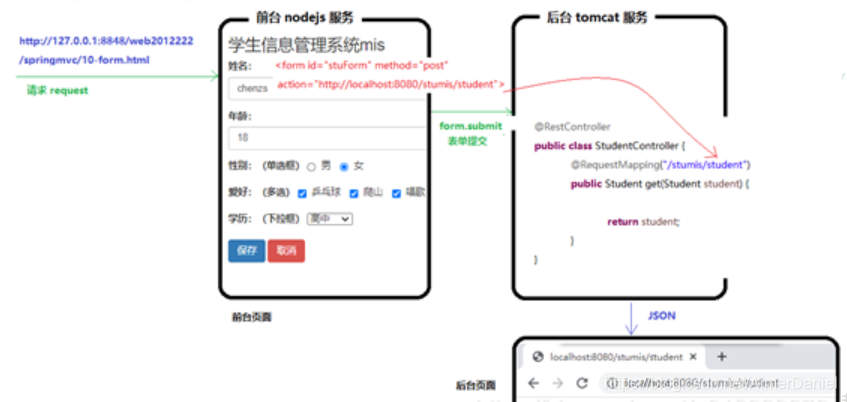
四、案例:学员信息表单
1、架构图
一种常规的方式和ajax不同,它是表单自身提供的一种方式,可以实现前台请求提交给后台系统,经过后台系统处理后,进行展现。
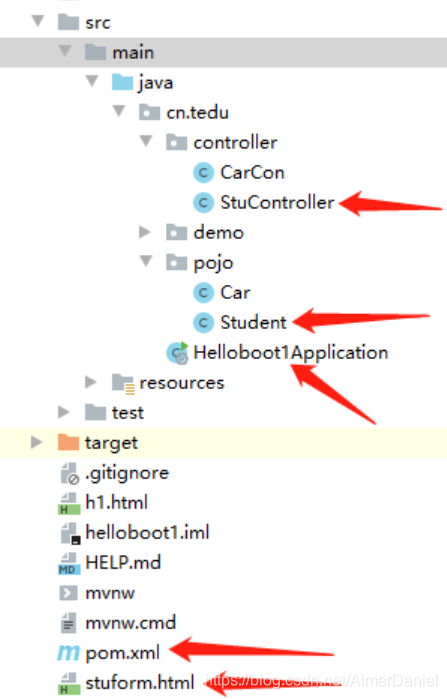
2、项目结构
3、接收参数
处理一个参数,比如:id
处理多个参数,比如:id,name,hobby
处理对象,比如:Student数据
url的RESTFul形式
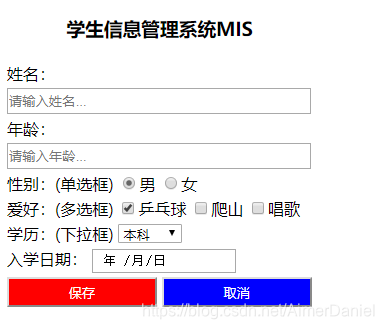
4、准备stuform.html
ajax提交
<!DOCTYPE html>
<html>
<head>
<meta charset="utf-8">
<title>学生信息管理系统</title>
<style>
input[type="text"]{
width: 300px;
height: 20px;
}
input[type="submit"]{
width: 150px;
height: 30px;
color: #FFFFFF;
background-color: #FF0000;
}
input[type="reset"]{
width: 150px;
height: 30px;
color: #FFFFFF;
background-color: #0000FF;
}
</style>
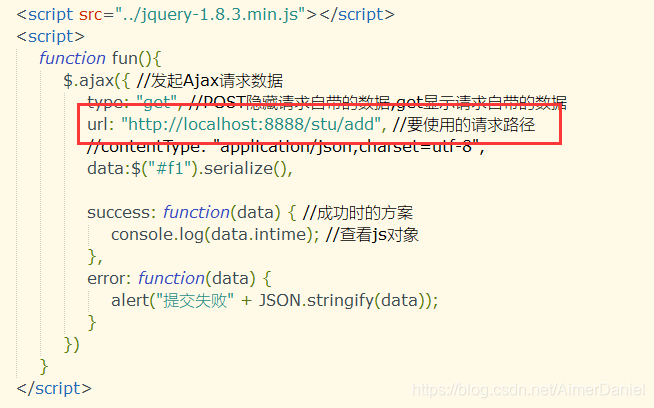
<script src="../jquery-1.8.3.min.js"></script>
<script>
function fun(){
$.ajax({ //发起Ajax请求数据
//type: "get", //POST隐藏请求自带的数据,get显示请求自带的数据
url: "http://localhost:8080/stu/add", //要使用的请求路径
//contentType: "application/json;charset=utf-8",
data:$("#f1").serialize(),
success: function(data) { //成功时的方案
console.log(data); //查看js对象
},
error: function(data) {
alert("提交失败" + JSON.stringify(data));
}
})
}
</script>
</head>
<body>
<form action="#" method="get" id="f1">
<table>
<tr>
<td align="center">
<h3>学生信息管理系统MIS</h3>
</td>
</tr>
<tr>
<td>姓名:</td>
</tr>
<tr>
<td>
<input type="text" name="name" placeholder="请输入姓名..." />
</td>
</tr>
<tr>
<td>年龄:</td>
</tr>
<tr>
<td>
<input type="text" name="age" placeholder="请输入年龄..." />
</td>
</tr>
<tr>
<td>
性别:(单选框)
<input type="radio" name="sex" checked="checked" value="0" />男
<input type="radio" name="sex" value="1" />女
</td>
</tr>
<tr>
<td>
爱好:(多选框)
<input type="checkbox" name="like" checked="checked" value="0" />乒乓球
<input type="checkbox" name="like" value="1" />爬山
<input type="checkbox" name="like" value="2" />唱歌
</td>
</tr>
<tr>
<td>
学历:(下拉框)
<select name="edu">
<option value="1">本科</option>
<option value="2">专科</option>
<option value="3">研究生</option>
</select>
</td>
</tr>
<tr>
<td>
入学日期:
<input type="date" name="intime" />
</td>
</tr>
<tr>
<td>
<input type="submit" value="保存" onclick="fun();" />
<input type="reset" value="取消" />
</td>
</tr>
</table>
</form>
</body>
</html>
注意:
1)submit方法把表单数据提交到 Web 服务器,表单的form里要写提交数据的地址,和提交方式,ajax里就不用写
<form action="#" method="get" id="f1">
<input type="submit" value="保存" onclick="fun();" />
	<script src="../jquery-1.8.3.min.js"></script>
		<script>
			function fun(){
				$.ajax({ //发起Ajax请求数据
					//type: "get", //POST隐藏请求自带的数据,get显示请求自带的数据
					url: "http://localhost:8080/stu/add", //要使用的请求路径
					//contentType: "application/json;charset=utf-8",
					data:$("#1").serialize(),

					success: function(data) { //成功时的方案
						console.log(data); //查看js对象
					},
					error: function(data) {
						alert("提交失败" + JSON.stringify(data));
					}
				})
			}
		</script>
2)button提交数据交给不同web服务器,form里要写提交数据的地址,和提交方式,ajax里就需要写
<form id="1">
<input type="button" value="保存" onclick="fun();" />
	<script src="../jquery-1.8.3.min.js"></script>
		<script>
			function fun(){
				$.ajax({ //发起Ajax请求数据
					type: "get", //POST隐藏请求自带的数据,get显示请求自带的数据
					url: "http://localhost:8080/stu/add", //要使用的请求路径
					//contentType: "application/json;charset=utf-8",
					data:$("#1").serialize(),

					success: function(data) { //成功时的方案
						console.log(data); //查看js对象
					},
					error: function(data) {
						alert("提交失败" + JSON.stringify(data));
					}
				})
			}
		</script>
5、准备Student.java
注意:日期属性要加注解,@DateTimeFormat(pattern=“yyyy-MM-dd”),否则400错误
package cn.tedu.pojo;

import org.springframework.format.annotation.DateTimeFormat;

import java.util.Arrays;
import java.util.Date;

public class Student {
    private String name;
    private Integer age;
    private String sex;
    private String[] hobby;
    private String edu;
    @DateTimeFormat(pattern="yyyy-MM-dd")
    //网页上的日期是string,注解用来转换格式,不然400错误
    private Date intime;

    public Student() {
    }

    public Student( String name, Integer age, String sex, String[] hobby, String edu, Date intime) {
        this.name = name;
        this.age = age;
        this.sex = sex;
        this.hobby = hobby;
        this.edu = edu;
        this.intime = intime;
    }

    public String getName() {
        return name;
    }

    public void setName(String name) {
        this.name = name;
    }

    public Integer getAge() {
        return age;
    }

    public void setAge(Integer age) {
        this.age = age;
    }

    public String getSex() {
        return sex;
    }

    public void setSex(String sex) {
        this.sex = sex;
    }

    public String[] getHobby() {
        return hobby;
    }

    public void setHobby(String[] hobby) {
        this.hobby = hobby;
    }

    public String getEdu() {
        return edu;
    }

    public void setEdu(String edu) {
        this.edu = edu;
    }


    @Override
    public String toString() {
        return "Student{" +
                ", name='" + name + '\'' +
                ", age=" + age +
                ", sex='" + sex + '\'' +
                ", hobby=" + Arrays.toString(hobby) +
                ", edu='" + edu + '\'' +
                ", intime=" + intime +
                '}';
    }

    //页面报400 IllegalArgumentException: String->Date
    public Date getIntime() {
        return intime;
    }

    public void setIntime(Date intime) {
        this.intime= intime;
    }
}
6、准备StuController.java
package cn.tedu.controller;

import cn.tedu.pojo.Student;
import org.springframework.web.bind.annotation.CrossOrigin;
import org.springframework.web.bind.annotation.RequestMapping;
import org.springframework.web.bind.annotation.RestController;

@RestController
@RequestMapping("/stu/")
@CrossOrigin//解决跨域问题
public class Controller {
    @RequestMapping("add")
    public Student add(Student s){
        return s;
    }
}
7、日期数据的处理
把页面上的intime日期数据,交给后台处理。由于页面的数据都当做String类型处理,所以交给后台处理时,会抛出400错误,需要使用注解进行类型转换,并指定日期格式:
//页面报400 IllegalArgumentException: String->Date

@DateTimeFormat(pattern="yyyy-MM-dd";)

private java.util.Date intime;

public Date getIntime() {

	return intime;

}

public void setIntime(Date intime) {

	this.intime= intime;

}
8、改造成Ajax访问
1)把form标签的内容改成:==<form action="#" method="post" id="f1">==
2)把提交按钮的内容改成:<input type="button" value="保存" onclick="fun();"/>
3)添加ajax代码:
4)修改Controller代码并添加@CrossOrigin注解,解决跨域问题
<script src="jquery-1.8.3.min.js"></script>
<script>
	function fun(){
		$.ajax({
			url:"http://localhost:8080/stu/add",
			data:$("#f1").serialize(),
			success:function(data){
				console.log(data);
			}
		})
	}
</script>
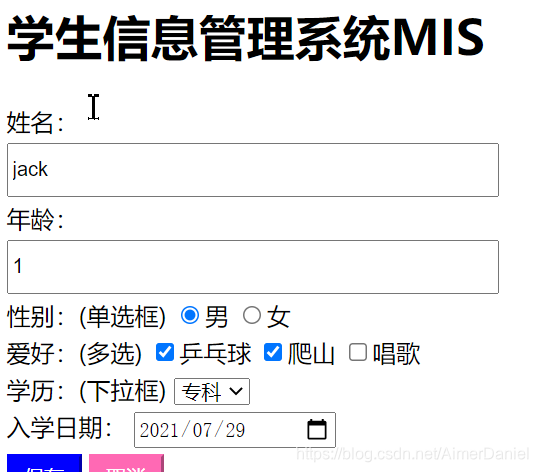
9 、form表单直接提交
9.1、网页
<!DOCTYPE html>
<html>
<head>
<meta charset="utf-8">
<title>测试 springmvc解析post数据</title>
<style>
/* 修饰 输入框的宽度高度 */
.a{ /* 选中网页中class=a的元素*/
width: 320px;
height: 30px;
}
/* 修饰保存按钮 */
input[type="submit"]{
background-color: blue; /* 背景色 */
border-color: blue;/* 边框的颜色 */
color:white; /* 字的颜色 */
height: 30px;
width: 50px;
}
/* 修饰取消按钮 */
input[type="button"]{
background-color: hotpink; /* 背景色 */
border-color: hotpink; /* 边框的颜色 */
color:white; /* 字的颜色 */
height: 30px;
width: 50px;
}
</style>
</head>
<body>
<!-- form表单,可以把数据提交给服务器
method指定提交数据的方式
action指定数据要提价给谁处理
-->
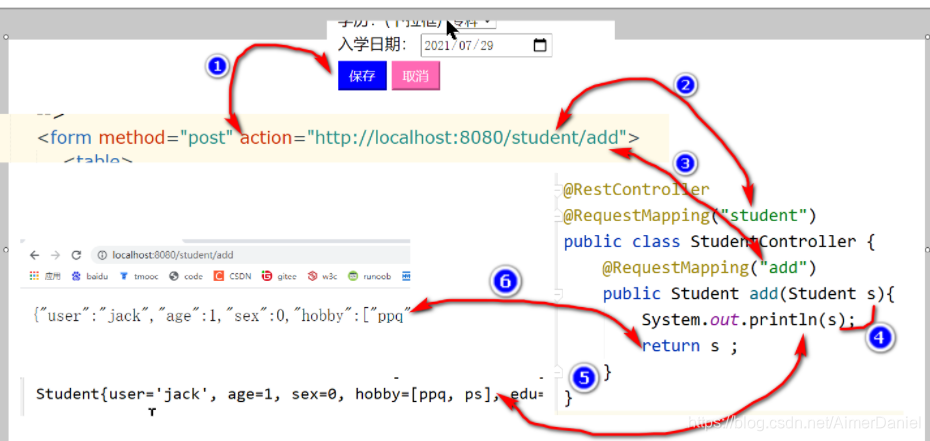
<form method="post" action="http://localhost:8080/student/add">
<table>
<tr>
<td>
<h1>学生信息管理系统MIS</h1>
</td>
</tr>
<tr>
<td> 姓名:</td>
</tr>
<tr>
<td>
<input class="a" type="text" placeholder="请输入姓名..." name="user" />
</td>
</tr>
<tr>
<td> 年龄:</td>
</tr>
<tr>
<td>
<input class="a" type="number" placeholder="请输入年龄..." name="age" />
</td>
</tr>
<tr>
<td>
性别:(单选框)
<input type="radio" name="sex" value="0" />男
<input type="radio" name="sex" value="1" />女
</td>
</tr>
<tr>
<td>
爱好:(多选)
<input type="checkbox" name="hobby" value="ppq"/>乒乓球
<input type="checkbox" name="hobby" value="ps" />爬山
<input type="checkbox" name="hobby" value="cg" />唱歌
</td>
</tr>
<tr>
<td>
学历:(下拉框)
<select name="edu">
<option value="1">本科</option>
<option value="2">专科</option>
<option value="3">高中</option>
</select>
</td>
</tr>
<tr>
<td>
入学日期:
<input type="date" name="intime" />
</td>
</tr>
<tr>
<td>
<input type="submit" value="保存"/>
<input type="button" value="取消"/>
</td>
</tr>
</table>
</form>
</body>
</html>
9.2、测试

9.3、总结

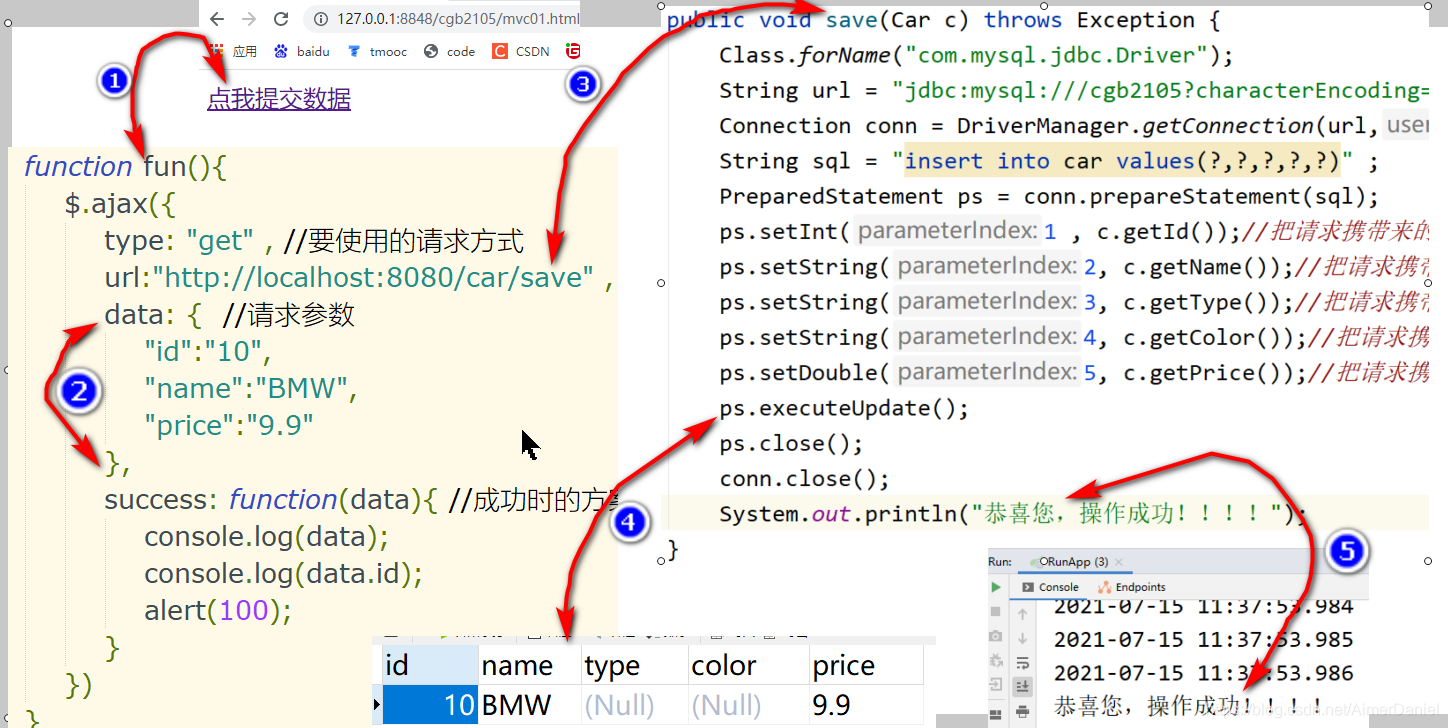
五、案例:提交汽车数据,到数据库
1、需求
接受浏览器发来的请求数据,解析,利用jdbc入库
2、步骤
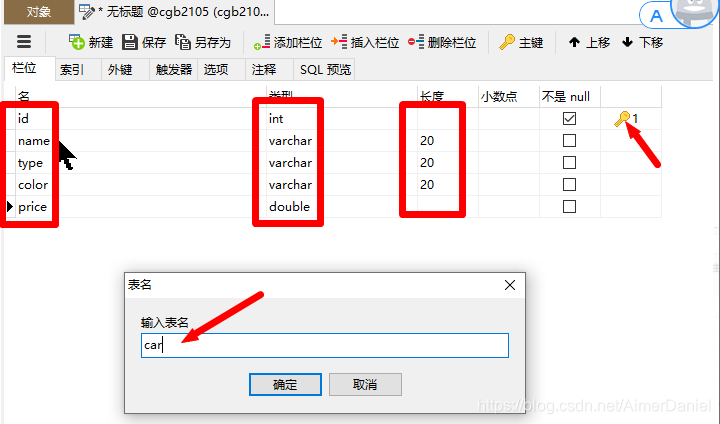
1)利用jdbc入库,设计表设计表的字段
2)编写前端的代码,利用ajax把请求参数携带着访问服务器
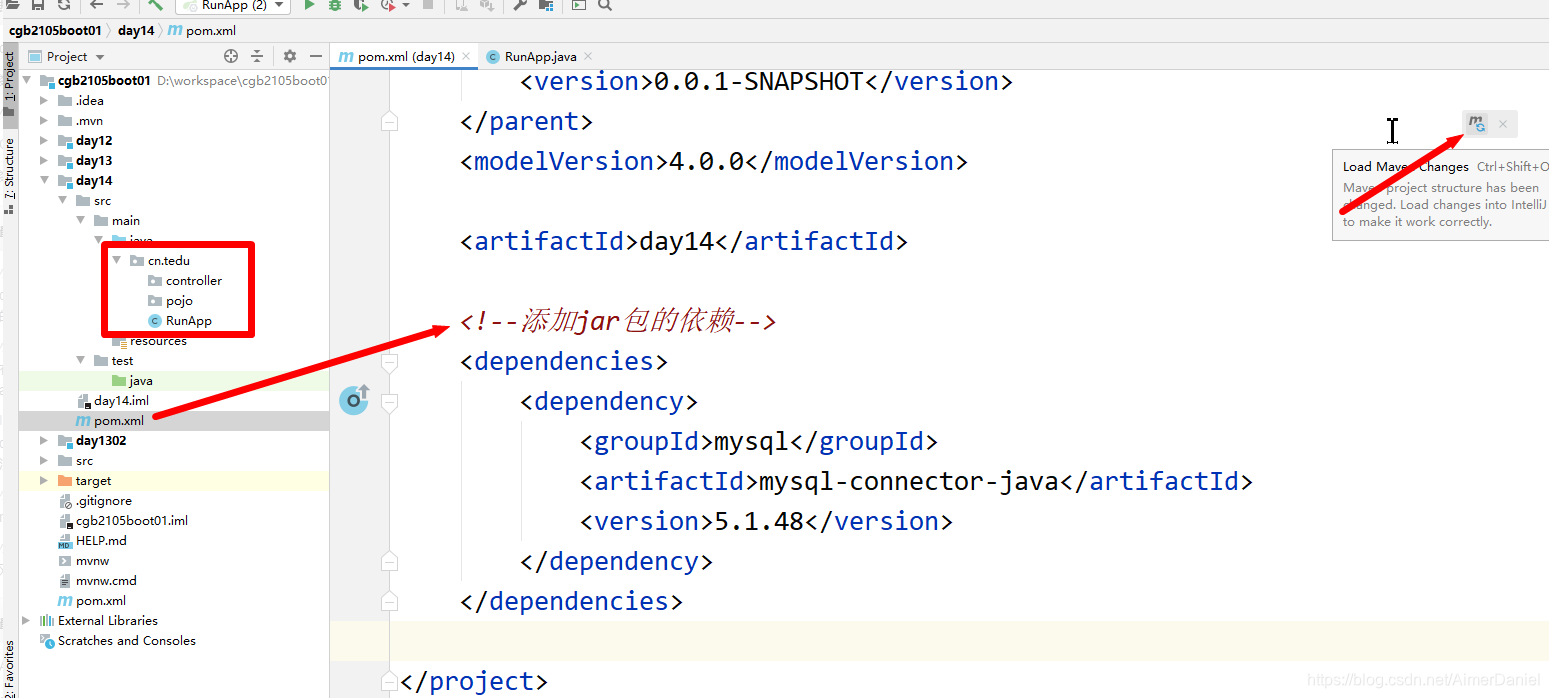
3)编写后端的代码,先加jar包的依赖,再利用jdbc发起insert的语句
3、创建表
4、创建前端网页,写ajax代码
<!DOCTYPE html>
<html>
	<head>
		<meta charset="utf-8">
		<title></title>
		<script src="../jquery-1.8.3.min.js"></script>
		<script>
			function fun(){
				$.ajax({
					type:"get",
					url:"http://localhost:8080/car/save",
					data:{
						"id":"10",
						"name":"BMW",
						"price":"10.9"
					},
					success: function(data){
						console.log(data);
						console.log(data.id);
						alert(100);
					}
				})
			}

		</script>
	</head>
	<body>
		<a onclick="fun()"  href="#">点我提交数据</a>
	</body>
</html>
5、创建后端程序,接受请求入库
5.1)项目结构
5.2)编写启动类RunApp.java
package cn.tedu;

import org.springframework.boot.SpringApplication;
import org.springframework.boot.autoconfigure.SpringBootApplication;
import org.springframework.stereotype.Controller;
import sun.nio.cs.ext.MacArabic;

//启动类
@SpringBootApplication //会进行资源的自动扫描
@Controller
public class RunApp {
    public static void main(String[] args) {
        SpringApplication.run(RunApp.class);
    }
}
5.3)编写Car类Car.java
package cn.tedu.pojo;

//充当MVC的M层,model,用来封装数据(最好和表里的数据一致)
public class Car {
    private Integer id;
    private String name;
    private String type;
    private String color;
    private Double price;

    public Integer getId() {
        return id;
    }

    public void setId(Integer id) {
        this.id = id;
    }

    public String getName() {
        return name;
    }

    public void setName(String name) {
        this.name = name;
    }

    public String getType() {
        return type;
    }

    public void setType(String type) {
        this.type = type;
    }

    public String getColor() {
        return color;
    }

    public void setColor(String color) {
        this.color = color;
    }

    public Double getPrice() {
        return price;
    }

    public void setPrice(Double price) {
        this.price = price;
    }

    @Override
    public String toString() {
        return "Car{" +
                "id=" + id +
                ", name='" + name + '\'' +
                ", type='" + type + '\'' +
                ", color='" + color + '\'' +
                ", price=" + price +
                '}';
    }
}
5.4)编写CarController类CarController.java
package cn.tedu.controller;
import cn.tedu.pojo.Car;
import org.springframework.web.bind.annotation.CrossOrigin;
import org.springframework.web.bind.annotation.RequestMapping;
import org.springframework.web.bind.annotation.RestController;
import java.sql.Connection;
import java.sql.DriverManager;
import java.sql.PreparedStatement;
//充当MVC里的C,Controller控制器,用来接受请求和给出响应
@RestController
@RequestMapping("car")
@CrossOrigin
public class CarController {
@RequestMapping("save")
public void save(Car c) throws Exception {
//1、 通过框架已经成功的解析了参数
Class.forName("com.mysql.cj.jdbc.Driver");
//2、利用jdbc入库,入库的数据从c获取
String url = "jdbc:mysql:///cgb2105?characterEncoding=utf8" ;
Connection conn = DriverManager.getConnection(url, "root", "root");
//3、获取传输器
String sql = "insert into car values(?,?,?,?,?)";
//?占位符,个数和表里的字段个数匹配,顺序和字序一致
PreparedStatement ps = conn.prepareStatement(sql);
//4、执行sql
ps.setInt(1 , c.getId());//把请求携带来的参数,拿到,给第1个?设置值
ps.setString(2, c.getName());//把请求携带来的参数,拿到,给第2个?设置值
ps.setString(3, c.getType());//把请求携带来的参数,拿到,给第3个?设置值
ps.setString(4, c.getColor());//把请求携带来的参数,拿到,给第4个?设置值
ps.setDouble(5, c.getPrice());//把请求携带来的参数,拿到,给第5个?设置值
ps.executeUpdate();//执行语句
//5、释放资源
ps.close();
conn.close();
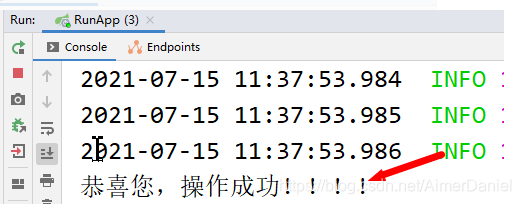
System.out.println("恭喜您操作成功!!!");
}
}
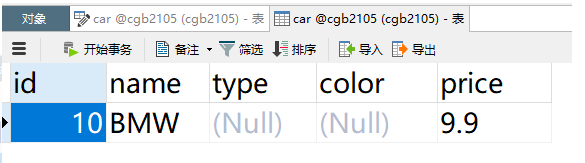
5.5)测试
先启动服务器,用前端网页,发起请求,访问服务器
6、总结
六、修改端口
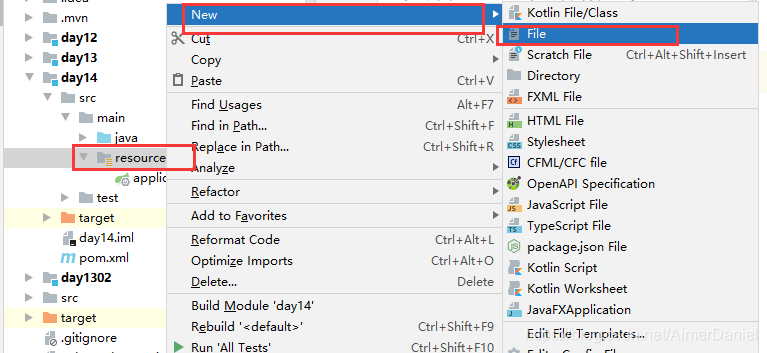
1、创建application.yml文件
resources—new file—application.yml
2、创建数据
server:
  port: 8888

3、修改前端.html文件
七:总结
1、springmvc和struts2比较

2、MVC和SSM的关系
3、SpringMVC常用的注解
@Controller 标识是一个Controller,Spring包扫描创建实例
@RequestMapping 请求后的映射路径
@PathVariable 标识接收单个参数
@ResponseBody 返回对象利用jackson工具类转换为json字符串
@RequestParam 参数名和请求参数名称不同时使用,可以设置默认值


 被折叠的 条评论
为什么被折叠?
被折叠的 条评论
为什么被折叠?
 到【灌水乐园】发言


