


1. Netty启动流程
Netty的启动流程可以简化为以下的代码:
// netty中使用NioEventLoopGroup(简称nio boss线程)来封装线程以及选择器selector
Selector selector = Selector.open();

// 在创建 NioServerSocketChannel的时候会同时会初始化与它关联的 handler;
// 并为原生的 ssc 存储 config
NioServerSocketChannel attachment = new NioServerSocketChannel();

// Netty在创建 NioServerSocketChannel 时,同时也创建了 java 原生的 ServerSocketChannel
// 1.
ServerSocketChannel serverSocketChannel = ServerSocketChannel.open();
serverSocketChannel.configureBlocking(false);

// 启动 nio boss 线程执行接下来的操作

// 注册(仅关联 selector 和 NioServerSocketChannel),未关注事件
// Netty中的SSC(在这里是NioServerSocketChannel,也就是参数中的attachment)通过附件的形式和原生的SSC关联在一起
// 2.
SelectionKey selectionKey = serverSocketChannel.register(selector, 0, attachment);

// 建立如下所示的流水线:head -> 初始化器 -> ServerBootstrapAcceptor -> tail,由于初始化器的执行是一次性的,只为添加 acceptor

// 绑定端口
// 3.
serverSocketChannel.bind(new InetSocketAddress(8080));

// 触发 channel active 事件,在流水线的 head 中关注 op_accept 事件
// 4.
selectionKey.interestOps(SelectionKey.OP_ACCEPT);
- 首先获取选择器Selector,Netty中使用了NioEventLoopGroup中的NioEventLoop对线程以及选择器进行了封装,每一个eventLoop中只包含有一个线程,同时也包含了一个选择器;
- 创建
NioServerSocketChannel,该Channel会作为附件添加到Java原生的ServerSocketChannel中去; - 创建Java原生的ServerSocketChannel,将其设置为非阻塞模式,并注册到选择器Selector之中,此时还没有关注事件,但是添加了附件NioServerSocketChannel;
- 绑定端口;
- 通过interestOps设置感兴趣的事件;
我们会使用以下的调试代码来对Netty中的部分源码进行分析,主要针对于以上代码中编号为1,2,3,4的部分:
package cn.itcast.source;

import io.netty.bootstrap.ServerBootstrap;
import io.netty.channel.ChannelInitializer;
import io.netty.channel.nio.NioEventLoopGroup;
import io.netty.channel.socket.nio.NioServerSocketChannel;
import io.netty.channel.socket.nio.NioSocketChannel;
import io.netty.handler.logging.LoggingHandler;

public class TestSourceServer {
    public static void main(String[] args) {
        new ServerBootstrap()
                .group(new NioEventLoopGroup())
                .channel(NioServerSocketChannel.class)
                .childHandler(new ChannelInitializer<NioSocketChannel>() {
                    @Override
                    protected void initChannel(NioSocketChannel ch) {
                        ch.pipeline().addLast(new LoggingHandler());
                    }
                }).bind(8080);
    }
}
package cn.itcast.source;

import io.netty.bootstrap.Bootstrap;
import io.netty.channel.ChannelFuture;
import io.netty.channel.ChannelHandlerContext;
import io.netty.channel.ChannelInboundHandlerAdapter;
import io.netty.channel.ChannelInitializer;
import io.netty.channel.nio.NioEventLoopGroup;
import io.netty.channel.socket.SocketChannel;
import io.netty.channel.socket.nio.NioSocketChannel;
import io.netty.handler.logging.LoggingHandler;
import lombok.extern.slf4j.Slf4j;

import java.net.InetSocketAddress;

@Slf4j
public class TestBacklogClient {
    public static void main(String[] args) {
        NioEventLoopGroup worker = new NioEventLoopGroup();
        try {
            Bootstrap bootstrap = new Bootstrap();
            bootstrap.channel(NioSocketChannel.class);
            bootstrap.group(worker);
            bootstrap.handler(new ChannelInitializer<SocketChannel>() {

                @Override
                protected void initChannel(SocketChannel ch) throws Exception {
                    ch.pipeline().addLast(new LoggingHandler());
                    ch.pipeline().addLast(new ChannelInboundHandlerAdapter(){
                        @Override
                        public void channelActive(ChannelHandlerContext ctx) throws Exception {
                            ctx.writeAndFlush(ctx.alloc().buffer().writeBytes("hello!".getBytes()));
                        }
                    });
                }
            });
            ChannelFuture channelFuture = bootstrap.connect(new InetSocketAddress(8080)).sync();
            channelFuture.channel().closeFuture().sync();
        } catch (InterruptedException e) {
            log.error("client error", e);
        } finally {
            worker.shutdownGracefully();
        }
    }
}
-
bind():我们可以在服务器的bind()处打一个断点;因为选择器Selector的创建是在NioEventLoopGroup中完成的,并且NioServerSocketChannel与ServerSocketChannel的创建以及ServerSocketChannel注册到Selector中以及绑定操作都是由bind方法完成的,所以服务器启动的入口便是bind()方法;
-
进入断点之后我们就可以来到
io.netty.bootstrap.ServerBootstrap#bind方法:在bind方法之中的关键方法是io.netty.bootstrap.AbstractBootstrap#doBind方法
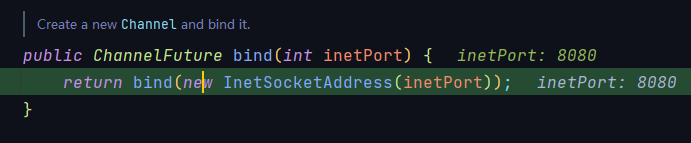
/** * Create a new {@link Channel} and bind it. */ public ChannelFuture bind(int inetPort) { return bind(new InetSocketAddress(inetPort)); } -
这之后便会来到doBind()方法
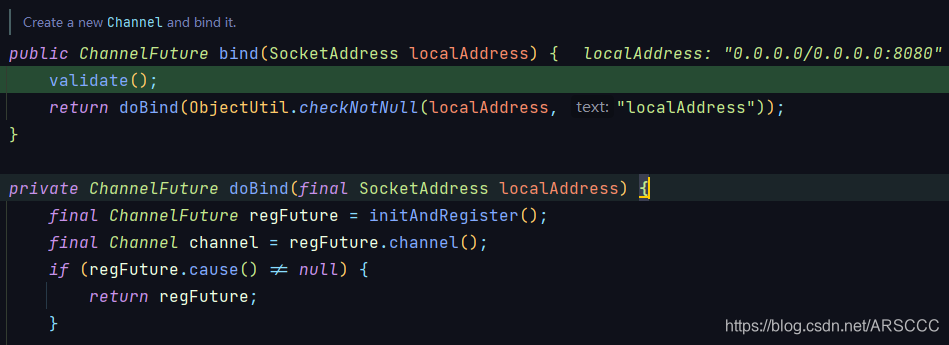
-
doBind()中有两个重要方法,分别是initAndRegister()和doBind0(regFuture, channel, localAddress, promise);
-
initAndRegister主要负责NioServerSocketChannel和ServerSocketChannel的创建(主线程中完成)以及ServerSocketChannel的注册(NIO线程中完成)工作
-
doBind0则负责连接的创建工作
以下为doBind(SocketAddress address)方法源代码以及相关解释
private ChannelFuture doBind(final SocketAddress localAddress) {
		// 1. 执行初始化操作以及注册操作,regFuture会由initAndRegister()进行设置,从而回调3.2处的代码
		// doBind0方法负责将SSC绑定到响应端口号(8080)上
		// init部分负责创建SSC,register部分负责将SSC绑定到selector上面
		// register操作已经不是在主线程中被执行了而是在一个NIO线程中执行的
		// initAndRegister()方法在执行注册部分的时候就已经新开启了一个NIO线程,而在执行注册部分之前的线程是主线程
		// 所以说该方法是一个异步的方法,异步的结果由一个promise(regFuture)对象接收
		// regFuture是由ChannelFuture regFuture = config().group().register(channel)产生的
        final ChannelFuture regFuture = initAndRegister();
        final Channel channel = regFuture.channel();
        if (regFuture.cause() != null) {
            return regFuture;
        }

		// 2. 因为initAndRegister方法异步执行,所以需要分两种情况来看,调试时也需要通过suspend断点类型加以区分
		// 2.1 主线程这边需要以回调的方式进行处理,如果initAndRegister做的比较快,到达if的时候已经完成了
		// 那么主线程就会直接调用bind0方法,但是比较大的几率是进入到else分支,因为绑定selector的操作是比较耗时的
        if (regFuture.isDone()) {
            // At this point we know that the registration was complete and successful.
            ChannelPromise promise = channel.newPromise();
            // 3.1 立刻调用 doBind0
            doBind0(regFuture, channel, localAddress, promise);
            return promise;
        // 2.2 初始化和注册方法并没有很快的完成,此时调用doBind0方法的线程就不会是主线程而是NIO线程
        } else {
            // Registration future is almost always fulfilled already, but just in case it's not.
            final PendingRegistrationPromise promise = new PendingRegistrationPromise(channel);
            // addListener方法是以异步的方式执行的
            // 3.2 回调 doBind0;由主线程为promise注册一个回调对象,当promise之中有结果的时候就会调用回调对象之中的operationComplete方法,进而调用doBind0方法;
            // 将结果放入promise的操作是由register0()方法完成的,如果register0方法调用的是safeSetSuccess(promise),就说明是设置了一个成功的结果;
            // 其实regFuture和这里的promise就是同一个对象
            // 所以说给结果到promise就是给结果到regFuture,进而触发回调事件中的方法,并调用回调方法之中的deBind0()方法
            regFuture.addListener(new ChannelFutureListener() {
                @Override
                public void operationComplete(ChannelFuture future) throws Exception {
                    Throwable cause = future.cause();
                    if (cause != null) {
                        // Registration on the EventLoop failed so fail the ChannelPromise directly to not cause an
                        // IllegalStateException once we try to access the EventLoop of the Channel.
                        // 处理异常...
                        promise.setFailure(cause);
                    } else {
                        // Registration was successful, so set the correct executor to use.
                        // See https://github.com/netty/netty/issues/2586
                        // 3. 由注册线程(也就是NIO线程)去执行doBind0
                        promise.registered();

                        doBind0(regFuture, channel, localAddress, promise);
                    }
                }
            });
            return promise;
        }
    }
以下为io.netty.bootstrap.AbstractBootstrap#initAndRegister的代码以及相应的解释
final ChannelFuture initAndRegister() {
    Channel channel = null;
    try {
        // newChannel()方法利用反射技术调用要构造的Channel的构造方法
        // 在本调试代码中就是反射调用NioServerSocketChannel的构造方法
        // 该默认构造器会构造一个原生的ServerSocketChannel并调用有参的构造方法
        // 也就是在创建NioServerSocketChannel的时候同时也创建出了Java原生的ServerSocketChannel
        channel = channelFactory.newChannel();
        // 1.1 初始化 - 做的事就是添加一个初始化器 ChannelInitializer
        init(channel);
    } catch (Throwable t) {
        // 处理异常...
        return new DefaultChannelPromise(new FailedChannel(), GlobalEventExecutor.INSTANCE).setFailure(t);
    }

    // 1.2 注册 - 做的事就是将 channel 注册到 selector 上
    ChannelFuture regFuture = config().group().register(channel);
    if (regFuture.cause() != null) {
        // 处理异常...
    }
    return regFuture;
}
以下为newChannel的源码以及对应的解释
@Override
public T newChannel() {
    try {
        // 通过反射调用NioServerSocketChannel的构造方法
        return constructor.newInstance();
    } catch (Throwable t) {
        throw new ChannelException("Unable to create Channel from class " + constructor.getDeclaringClass(), t);
    }
}
NioServerSocketChannel的构造方法
public NioServerSocketChannel() {
    // 创建了ServerSocketChannel实例,以调用有参的构造方法
    // DEFAULT_SELECTOR_PROVIDER就是SelectorProvider.provider()
    this(newSocket(DEFAULT_SELECTOR_PROVIDER));
}
有参的NioServerSocketChannel构造方法
public NioServerSocketChannel(ServerSocketChannel channel) {
    super(null, channel, SelectionKey.OP_ACCEPT);
    config = new NioServerSocketChannelConfig(this, javaChannel().socket());
}
newSocket方法,在此处创建出原生的Java ServerSocketChannel;所以在Netty中创建NioServerSocketChannel的时候同时也创建了Java原生的ServerSocketChannel;
private static ServerSocketChannel newSocket(SelectorProvider provider) {
    try {
        // 由于ServerSocketChannel.open方法底层调用的也是如下的代码(provider == DEFAULT_SELECTOR_PROVIDER == SelectorProvider.provider()):
        // SelectorProvider.provider().openServerSocketChannel()
	    // 所以此处相当于使用ServerSocketChannel.open()创建了ServerSocketChannel实例
    	return provider.openServerSocketChannel();
	} catch (IOException e) {
  	  	throw new ChannelException("Failed to open a server socket.", e);
	}
}
init(channel)方法的源码以及解释
// 这里 channel 实际上是 NioServerSocketChannel
void init(Channel channel) throws Exception {
    final Map<ChannelOption<?>, Object> options = options0();
    synchronized (options) {
        setChannelOptions(channel, options, logger);
    }

    final Map<AttributeKey<?>, Object> attrs = attrs0();
    synchronized (attrs) {
        for (Entry<AttributeKey<?>, Object> e: attrs.entrySet()) {
            @SuppressWarnings("unchecked")
            AttributeKey<Object> key = (AttributeKey<Object>) e.getKey();
            channel.attr(key).set(e.getValue());
        }
    }

    ChannelPipeline p = channel.pipeline();

    final EventLoopGroup currentChildGroup = childGroup;
    final ChannelHandler currentChildHandler = childHandler;
    final Entry<ChannelOption<?>, Object>[] currentChildOptions;
    final Entry<AttributeKey<?>, Object>[] currentChildAttrs;
    synchronized (childOptions) {
        currentChildOptions = childOptions.entrySet().toArray(newOptionArray(0));
    }
    synchronized (childAttrs) {
        currentChildAttrs = childAttrs.entrySet().toArray(newAttrArray(0));
    }


    // 为 NioServerSocketChannel 添加初始化器至流水线上(添加了一个acceptor handler,在accept事件被触发之后建立连接)
    // 但是该初始化器中的代码还没有被执行,该方法会在注册完毕之后被调用,由NIO线程执行
    // 而且ChannelInitializer中的initChannel()方法在被执行的时候也只会被执行一次
    p.addLast(new ChannelInitializer<Channel>() {
        @Override
        // 该方法会在注册之后被执行,注册之后的线程就已经不是主线程了,而是NIO线程,所以说该方法由NIO线程执行
        public void initChannel(final Channel ch) throws Exception {
            final ChannelPipeline pipeline = ch.pipeline();
            ChannelHandler handler = config.handler();
            if (handler != null) {
                pipeline.addLast(handler);
            }

            // 初始化器的职责是将 ServerBootstrapAcceptor 加入至 NioServerSocketChannel
            // 作用是在accept事件发生后建立连接
            // 以下的代码在Netty的源码之中非常的常见,它保证代码块中的run()等方法在某一个特定的线程之中被执行
            // 此处是保证run()方法在eventLoop的线程之中也即是NIO线程执行
            ch.eventLoop().execute(new Runnable() {
                @Override
                public void run() {
                    pipeline.addLast(new ServerBootstrapAcceptor(
                            ch, currentChildGroup, currentChildHandler, currentChildOptions, currentChildAttrs));
                }
            });
        }
    });
}
init方法主要完成了以下三个操作
- 创建NioServerSocketChannel,同时也创建出了Java原生的ServerSocketChannel;
- 由initChannel方法向NioServerSocketChannel中添加了两个handler,添加操作在register之后被执行,一个handler负责设置配置,一个handler负责发生Accepet事件后建立连接;
执行ChannelFuture regFuture = config().group().register(channel);操作
- init执行完毕后,便执行
ChannelFuture regFuture = config().group().register(channel);操作,该方法经过调用链之后最终调用的是promise.channel().unsafe().register(this, promise)方法;
以下是promise.channel().unsafe().register(this, promise)的源码以及解释
// register会进行线程切换,从主线程切换至NIO线程
public final void register(EventLoop eventLoop, final ChannelPromise promise) {
    // 一些检查,略...
	// 获取eventLoop
    AbstractChannel.this.eventLoop = eventLoop;

    // eventLoop.inEventLoop(): 检查eventLoop中的线程是否就是当前正在执行的线程
    // 当前线程是主线程,但是eventLoop中包含的线程是NIO线程,所以说if条件不成立
    if (eventLoop.inEventLoop()) {
        register0(promise);
    } else {
        try {
            // 将register0封装到一个任务对象之中,然后将任务对象交给eventLoop去执行
            // 这样就保证了register0就是在eventLoop的线程中执行的
            // 需要注意的是首次执行 execute 方法时,才会将与eventLoop所关联的nio线程创建出来,也就是懒加载,之后注册等操作都是在 nio 线程上执行
            // 因为只有一个 NioServerSocketChannel 因此,也只会有一个 boss nio 线程
            // 这行代码完成的是 main -> nio boss 线程的切换,并在execute被调用的时候执行register0方法
            eventLoop.execute(new Runnable() {
                @Override
                public void run() {
                	// 该方法会调用doRegister()方法,doRegister()方法是真正执行注册操作的方法
                    register0(promise);
                }
            });
        } catch (Throwable t) {
            // 日志记录...
            closeForcibly();
            closeFuture.setClosed();
            safeSetFailure(promise, t);
        }
    }
}
register0方法
private void register0(ChannelPromise promise) {
    try {
        if (!promise.setUncancellable() || !ensureOpen(promise)) {
            return;
        }
        boolean firstRegistration = neverRegistered;
        // 真正去干活的代码
        // 将原生的Java channel注册到selector上面,由于selector已经在eventLoop中被管理了
        // 所以通过eventLoop中的方法获得selector
        // 1.2.1 也就是将原生的 nio channel 绑定到 selector 上,并且在注册的时候并没有关注事件,而且附件为 NioServerSocketChannel,当selector上面发生事件的时候由附件对事件进行处理
        // 执行到这里的时候原生的SSC就已经注册到selector上面了
        doRegister();
        neverRegistered = false;
        registered = true;

        // 1.2.2 执行NioServerSocketChannel的初始化器(ChannelInitializer)中的initChannel()方法,也就是回调initChannel()方法
        pipeline.invokeHandlerAddedIfNeeded();

        // 回调 3.2 io.netty.bootstrap.AbstractBootstrap#doBind0
        safeSetSuccess(promise);
        pipeline.fireChannelRegistered();

        // 对应 server socket channel 还未绑定,isActive 为 false
        if (isActive()) {
            if (firstRegistration) {
                pipeline.fireChannelActive();
            } else if (config().isAutoRead()) {
                beginRead();
            }
        }
    } catch (Throwable t) {
        // Close the channel directly to avoid FD leak.
        closeForcibly();
        closeFuture.setClosed();
        safeSetFailure(promise, t);
    }
}
doRegister方法
@Override
protected void doRegister() throws Exception {
    boolean selected = false;
    for (;;) {
        try {
            // javaChannel()即为ServerSocketChannel
            // eventLoop().unwrappedSelector()获取eventLoop中的Selector
            // this为NioServerSocketChannel,作为附件
            selectionKey = javaChannel().register(eventLoop().unwrappedSelector(), 0, this);
            return;
        } catch (CancelledKeyException e) {
            ...
        }
    }
}
register主要完成了以下三个操作
- 完成了主线程到NIO的线程切换,通过eventLoop.inEventLoop()进行线程判断,切换的方式为让eventLoop执行register的操作,因为eventLoop中包含的线程是NIO线程;
- 调用doRegister方法
// javaChannel()即为ServerSocketChannel
// eventLoop().unwrappedSelector()获取eventLoop中的Selector
// this为NioServerSocketChannel,作为附件
// 在执行以下的操作之后ServerSocketChannel还是没有关注事件
selectionKey = javaChannel().register(eventLoop().unwrappedSelector(), 0, this);
- 通过invokeHandlerAddedIfNeeded调用init中的initChannel方法;initChannel方法主要创建了两个handler,一个handler负责设置配置,一个handler负责在发生Accept事件后建立连接;
doBind0
综上所述:当register0将doRegister执行完之后便会执行invokeHandlerAddedIfNeeded操作,之后会调用safeSetSuccess(promise)方法,向promise中设置执行成功的结果。此时AbstractBootstrap#doBind方法中由initAndRegister返回的ChannelFuture对象regFuture便会由NIO线程异步地去执行doBind0绑定操作;
private static void doBind0(
        final ChannelFuture regFuture, final Channel channel,
        final SocketAddress localAddress, final ChannelPromise promise) {

    // This method is invoked before channelRegistered() is triggered.  Give user handlers a chance to set up
    // the pipeline in its channelRegistered() implementation.
    channel.eventLoop().execute(new Runnable() {
        @Override
        public void run() {
            if (regFuture.isSuccess()) {
                channel.bind(localAddress, promise).addListener(ChannelFutureListener.CLOSE_ON_FAILURE);
            } else {
                promise.setFailure(regFuture.cause());
            }
        }
    });
}
经过调用链之后doBind0会来到关键代码 io.netty.channel.AbstractChannel.AbstractUnsafe#bind
public final void bind(final SocketAddress localAddress, final ChannelPromise promise) {
    assertEventLoop();

    if (!promise.setUncancellable() || !ensureOpen(promise)) {
        return;
    }

    if (Boolean.TRUE.equals(config().getOption(ChannelOption.SO_BROADCAST)) &&
        localAddress instanceof InetSocketAddress &&
        !((InetSocketAddress) localAddress).getAddress().isAnyLocalAddress() &&
        !PlatformDependent.isWindows() && !PlatformDependent.maybeSuperUser()) {
        // 记录日志...
    }

    boolean wasActive = isActive();
    try {
        // 3.3 执行端口绑定
        doBind(localAddress);
    } catch (Throwable t) {
        safeSetFailure(promise, t);
        closeIfClosed();
        return;
    }
	// channel经过前面一系列的初始化之后已经可用的时候,就表示channel处于active状态
    if (!wasActive && isActive()) {
        invokeLater(new Runnable() {
            @Override
            public void run() {
                // 3.4 active之后触发channel对应的所有pipeline上面handler的active事件
                // 此时的流水线为head -> acceptor -> tail
                // 后面两个即使调用了channelActive方法也没有做什么实质性的工作
                // 主要的工作还是由head执行的
                // 因为channel并不具备业务功能,真正干活的还是流水线上面的处理器
                pipeline.fireChannelActive();
            }
        });
    }

    safeSetSuccess(promise);
}
关键代码 io.netty.channel.socket.nio.NioServerSocketChannel#doBind
@SuppressJava6Requirement(reason = "Usage guarded by java version check")
@Override
protected void doBind(SocketAddress localAddress) throws Exception {
    if (PlatformDependent.javaVersion() >= 7) {
        // 调用ServerSocketChannel的bind方法,绑定端口
        javaChannel().bind(localAddress, config.getBacklog());
    } else {
        javaChannel().socket().bind(localAddress, config.getBacklog());
    }
}
关注事件:在绑定端口操作完成后,会判断各种初始化操作是否已经完成,若完成,则会添加ServerSocketChannel感兴趣的事件;
public void channelActive(ChannelHandlerContext ctx) {
    ctx.fireChannelActive();
	// 触发 read (NioServerSocketChannel 上的 read 不是读取数据,只是为了触发 channel 的事件注册)
    // 将ACCEPT事件绑定到selectionKey上
    readIfIsAutoRead();
}
该代码最终会调用io.netty.channel.nio.AbstractNioChannel#doBeginRead
protected void doBeginRead() throws Exception {
    // Channel.read() or ChannelHandlerContext.read() was called
    final SelectionKey selectionKey = this.selectionKey;
    if (!selectionKey.isValid()) {
        return;
    }

    readPending = true;

    final int interestOps = selectionKey.interestOps();
    // readInterestOp 取值是 16,在 NioServerSocketChannel 创建时初始化好,代表关注 accept 事件
    // 判断是否关注了accept事件,如果ServerSocketChannel没有关注Accept事件则让其关注Accepet事件
    if ((interestOps & readInterestOp) == 0) {
    	// 此处设置interestOps时使用的方法避免了覆盖ServerSocketChannel关注的其他事件
        selectionKey.interestOps(interestOps | readInterestOp);
    }
}


// 至此,服务器启动完毕
通过上述步骤,完成了以下的操作:
- NioServerSocketChannel与ServerSocketChannel的创建;
- ServerSocketChannel绑定到EventLoop的Selecot中,并添加NioServerSocketChannel附件;
- 绑定了对应的端口;
- 关注了Accept事件;
2. NioEventLoop剖析
NioEventLoop的重要组成一共有三个,分别是选择器Selector,线程Thread以及任务队列taskQueue;除此之外,NioEventLoop还能够同时执行IO任务,普通任务以及定时任务;
-
Selector
public final class NioEventLoop extends SingleThreadEventLoop { ... private Selector selector; private Selector unwrappedSelector; ... } -
Selector的创建
// NioEventLoop的构造方法:
NioEventLoop(NioEventLoopGroup parent, Executor executor, SelectorProvider selectorProvider,
                 SelectStrategy strategy, RejectedExecutionHandler rejectedExecutionHandler,
                 EventLoopTaskQueueFactory queueFactory) {
    super(parent, executor, false, newTaskQueue(queueFactory), newTaskQueue(queueFactory),
            rejectedExecutionHandler);
    if (selectorProvider == null) {
        throw new NullPointerException("selectorProvider");
    }
    if (strategy == null) {
        throw new NullPointerException("selectStrategy");
    }
    provider = selectorProvider;
    // 通过openSelector()我们可以得到一个selectorTuple
    final SelectorTuple selectorTuple = openSelector();
    // 在selectorTuple之中我们可以得到selector以及unwrappedSelector
    selector = selectorTuple.selector;
    unwrappedSelector = selectorTuple.unwrappedSelector;
    selectStrategy = strategy;
}
private SelectorTuple openSelector() { final Selector unwrappedSelector; try { // 使用NIO底层的provider来真正的创建了Selector对象 // 所以说unwrappedSelector才是NIO底层的Selector unwrappedSelector = provider.openSelector(); } catch (IOException e) { throw new ChannelException("failed to open a new selector", e); } ... // 获得基于数组的selectedKeySet实现 final SelectedSelectionKeySet selectedKeySet = new SelectedSelectionKeySet(); Object maybeException = AccessController.doPrivileged(new PrivilegedAction<Object>() { @Override public Object run() { try { // 通过反射拿到unwrappedSelector中的selectedKeys属性 Field selectedKeysField = selectorImplClass.getDeclaredField("selectedKeys"); Field publicSelectedKeysField = selectorImplClass.getDeclaredField("publicSelectedKeys"); if (PlatformDependent.javaVersion() >= 9 && PlatformDependent.hasUnsafe()) { ... } // 利用反射工具类暴力反射以修改私有属性 Throwable cause = ReflectionUtil.trySetAccessible(selectedKeysField, true); if (cause != null) { return cause; } cause = ReflectionUtil.trySetAccessible(publicSelectedKeysField, true); if (cause != null) { return cause; } // 调用上面通过反射得到的Field成员变量,替换为基于数组的selectedKeys实现 selectedKeysField.set(unwrappedSelector, selectedKeySet); publicSelectedKeysField.set(unwrappedSelector, selectedKeySet); return null; } catch (NoSuchFieldException e) { return e; } catch (IllegalAccessException e) { return e; } } }); if (maybeException instanceof Exception) { selectedKeys = null; Exception e = (Exception) maybeException; logger.trace("failed to instrument a special java.util.Set into: {}", unwrappedSelector, e); return new SelectorTuple(unwrappedSelector); } selectedKeys = selectedKeySet; logger.trace("instrumented a special java.util.Set into: {}", unwrappedSelector); // 调用构造函数,创建同时包含unwrappedSelector与selector的SelectorTuple对象 // 这样在NioEventLoop的构造函数中我们就可以通过SelectorTuple对象同时得到unwrappedSelector以及selector return new SelectorTuple(unwrappedSelector, new SelectedSelectionKeySetSelector(unwrappedSelector, selectedKeySet)); } -
为什么NioEventLoop有两个不同的Selector对象:NIO原生的unwrappedSelector有一个selectionKey集合,里面保存了事件的相应信息,它的底层默认为HashSet实现的,所用到的数据结构就是一个哈希桶数组,它的遍历效率要低于普通的数组,所以Netty就对unwrappedSelector进行了改进,将selectionKey集合的底层实现改为普通的数组,并封装至selector,但是一些功能还是需要原始的unwrappedSelector来实现,所以说这两个Selector都要保留;只不过在遍历key的时候使用的是selector;
-
Thread和TaskQueue
public abstract class SingleThreadEventExecutor extends AbstractScheduledEventExecutor implements OrderedEventExecutor { private final Queue<Runnable> taskQueue; private volatile Thread thread; ... private final Executor executor; ... } -
由于我们的EventLoop中只有一个线程,所以说当我们提交多个任务的时候这仅有的一个线程是处理不过来的,所以说我们需要一个任务队列,用于将暂时无法处理的任务放置于任务队列中;
-
executor可以理解为只有一个线程的线程池,其中的线程使用的也是SingleThreadEventExecutor.thread,不过它有更多的功能,比如说调用方法提交任务,添加定时任务等;
NIO线程的启动时机
-
NioEventLoop中的线程在首次执行任务时才会被创建且只会被创建一次;
-
测试代码
public class TestNioEventLoop {
    public static void main(String[] args) {
        EventLoop eventLoop = new NioEventLoopGroup().next();
        // 使用NioEventLoop执行任务
        eventLoop.execute(()->{
            System.out.println("hello");
        });
    }
}
进入
execute方法@Override public void execute(Runnable task) { // 对task任务做有效性检查 if (task == null) { throw new NullPointerException("task"); } // inEventLoop()方法实现为 return thread == this.thread; // 就是判断当前线程和eventLoop线程是不是同一个线程,在这里当前线程是主线程 // this.thread为NIO线程,首次执行任务时,其为null // 所以此时inEventLoop == false boolean inEventLoop = inEventLoop(); // 将任务加入到任务队列之中 addTask(task); // 由于inEventLoop == false,所以if条件成立 if (!inEventLoop) { // 首次开启线程 startThread(); if (isShutdown()) { boolean reject = false; try { if (removeTask(task)) { reject = true; } } catch (UnsupportedOperationException e) { // The task queue does not support removal so the best thing we can do is to just move on and // hope we will be able to pick-up the task before its completely terminated. // In worst case we will log on termination. } if (reject) { reject(); } } } if (!addTaskWakesUp && wakesUpForTask(task)) { wakeup(inEventLoop); } }进入
startThread()方法
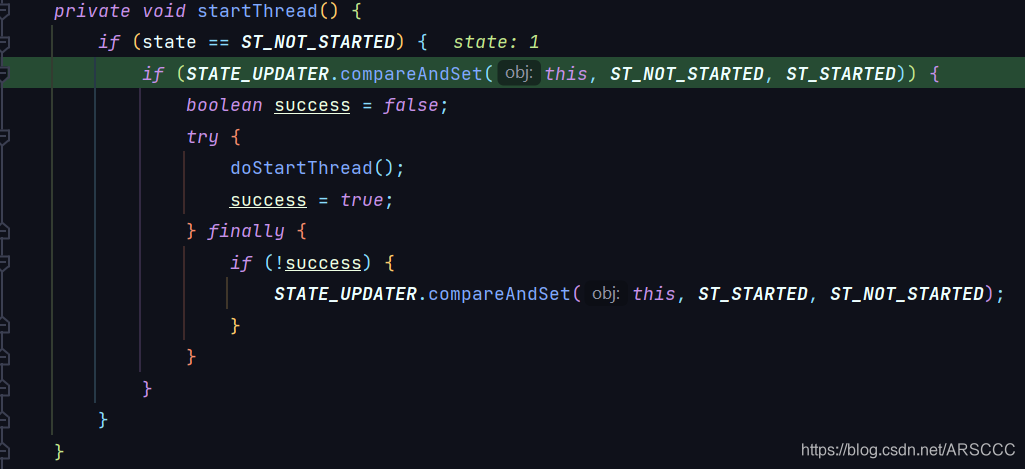
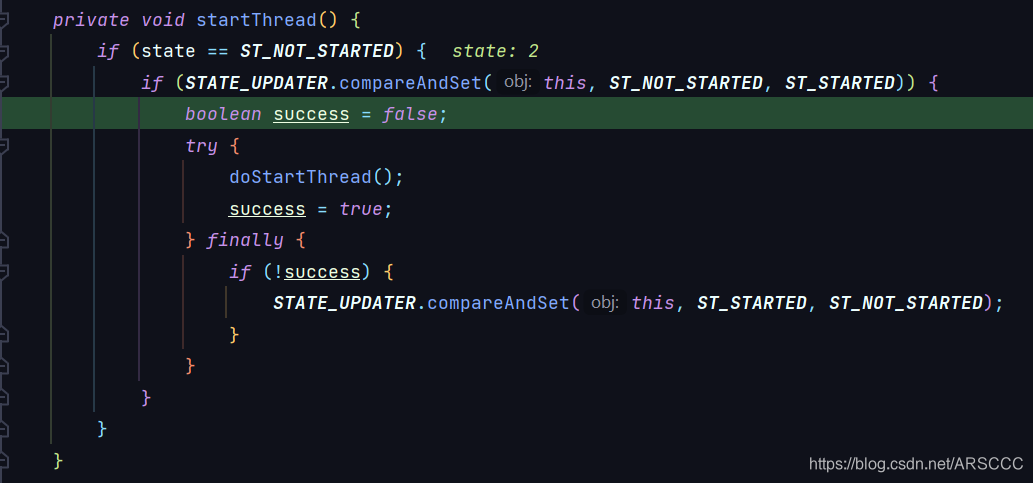
private void startThread() {
	// 如果状态是线程未启动的时候就执行以下的代码
    if (state == ST_NOT_STARTED) {
    	// 如上图所示经过更改之后state由1变为了2,所以说真正启动线程的代码只会被执行一次
    	// 因为之后if条件就不成立了
        if (STATE_UPDATER.compareAndSet(this, ST_NOT_STARTED, ST_STARTED)) {
            boolean success = false;
            try {
                doStartThread();
                success = true;
            } finally {
                if (!success) {
                    STATE_UPDATER.compareAndSet(this, ST_STARTED, ST_NOT_STARTED);
                }
            }
        }
    }
}
进入
doStartThread方法private void doStartThread() { assert thread == null; executor.execute(new Runnable() { @Override public void run() { // 将executor中的线程赋值给thread,其实就是NIO线程 thread = Thread.currentThread(); if (interrupted) { thread.interrupt(); } boolean success = false; updateLastExecutionTime(); try { // 该方法就是NioEventLoop中的一个run方法 SingleThreadEventExecutor.this.run(); success = true; } catch (Throwable t) { logger.warn("Unexpected exception from an event executor: ", t); } finally { for (;;) { int oldState = state; if (oldState >= ST_SHUTTING_DOWN || STATE_UPDATER.compareAndSet( SingleThreadEventExecutor.this, oldState, ST_SHUTTING_DOWN)) { break; } } // Check if confirmShutdown() was called at the end of the loop. if (success && gracefulShutdownStartTime == 0) { if (logger.isErrorEnabled()) { logger.error("Buggy " + EventExecutor.class.getSimpleName() + " implementation; " + SingleThreadEventExecutor.class.getSimpleName() + ".confirmShutdown() must " + "be called before run() implementation terminates."); } } try { // Run all remaining tasks and shutdown hooks. for (;;) { if (confirmShutdown()) { break; } } } finally { try { cleanup(); } finally { // Lets remove all FastThreadLocals for the Thread as we are about to terminate and notify // the future. The user may block on the future and once it unblocks the JVM may terminate // and start unloading classes. // See https://github.com/netty/netty/issues/6596. FastThreadLocal.removeAll(); STATE_UPDATER.set(SingleThreadEventExecutor.this, ST_TERMINATED); threadLock.countDown(); if (logger.isWarnEnabled() && !taskQueue.isEmpty()) { logger.warn("An event executor terminated with " + "non-empty task queue (" + taskQueue.size() + ')'); } terminationFuture.setSuccess(null); } } } } }); }进入到
run方法@Override protected void run() { // 死循环,不断地从任务队列中获取各种任务来执行 for (;;) { try { try { switch (selectStrategy.calculateStrategy(selectNowSupplier, hasTasks())) { case SelectStrategy.CONTINUE: continue; case SelectStrategy.BUSY_WAIT: // fall-through to SELECT since the busy-wait is not supported with NIO case SelectStrategy.SELECT: select(wakenUp.getAndSet(false)); if (wakenUp.get()) { selector.wakeup(); } // fall through default: } } catch (IOException e) { // If we receive an IOException here its because the Selector is messed up. Let's rebuild // the selector and retry. https://github.com/netty/netty/issues/8566 rebuildSelector0(); handleLoopException(e); continue; } cancelledKeys = 0; needsToSelectAgain = false; final int ioRatio = this.ioRatio; if (ioRatio == 100) { try { processSelectedKeys(); } finally { // Ensure we always run tasks. runAllTasks(); } } else { final long ioStartTime = System.nanoTime(); try { processSelectedKeys(); } finally { // Ensure we always run tasks. final long ioTime = System.nanoTime() - ioStartTime; runAllTasks(ioTime * (100 - ioRatio) / ioRatio); } } } catch (Throwable t) { handleLoopException(t); } // Always handle shutdown even if the loop processing threw an exception. try { if (isShuttingDown()) { closeAll(); if (confirmShutdown()) { return; } } } catch (Throwable t) { handleLoopException(t); } } }进入
select方法// 为什么NIO的select方法是无参的但是Netty的select方法是有参的 // 因为Netty不仅要处理IO事件,还要处理其他的事件任务,不能一直阻塞 // 一方面当有新任务的时候会唤醒Netty的select方法 // 另一方面,在超时的时候也会唤醒select方法继续向下执行 // 以便及时地处理IO事件以外的普通任务 // 通过调wakeUp()方法实现,不管有几个普通的任务,wakeUp()方法都只会被执行一次 private void select(boolean oldWakenUp) throws IOException { Selector selector = this.selector; try { int selectCnt = 0; long currentTimeNanos = System.nanoTime(); long selectDeadLineNanos = currentTimeNanos + delayNanos(currentTimeNanos); for (;;) { long timeoutMillis = (selectDeadLineNanos - currentTimeNanos + 500000L) / 1000000L; if (timeoutMillis <= 0) { if (selectCnt == 0) { selector.selectNow(); selectCnt = 1; } break; } if (hasTasks() && wakenUp.compareAndSet(false, true)) { selector.selectNow(); selectCnt = 1; break; } int selectedKeys = selector.select(timeoutMillis); selectCnt ++; if (selectedKeys != 0 || oldWakenUp || wakenUp.get() || hasTasks() || hasScheduledTasks()) { break; } if (Thread.interrupted()) { if (logger.isDebugEnabled()) { logger.debug("Selector.select() returned prematurely because " + "Thread.currentThread().interrupt() was called. Use " + "NioEventLoop.shutdownGracefully() to shutdown the NioEventLoop."); } selectCnt = 1; break; } long time = System.nanoTime(); if (time - TimeUnit.MILLISECONDS.toNanos(timeoutMillis) >= currentTimeNanos) { selectCnt = 1; } else if (SELECTOR_AUTO_REBUILD_THRESHOLD > 0 && selectCnt >= SELECTOR_AUTO_REBUILD_THRESHOLD) { selector = selectRebuildSelector(selectCnt); selectCnt = 1; break; } currentTimeNanos = time; } if (selectCnt > MIN_PREMATURE_SELECTOR_RETURNS) { if (logger.isDebugEnabled()) { logger.debug("Selector.select() returned prematurely {} times in a row for Selector {}.", selectCnt - 1, selector); } } } catch (CancelledKeyException e) { if (logger.isDebugEnabled()) { logger.debug(CancelledKeyException.class.getSimpleName() + " raised by a Selector {} - JDK bug?", selector, e); } } }NioEventLoop的wakeup方法
@Override
    protected void wakeup(boolean inEventLoop) {
    	// 当不是eventLoop中的NIO线程的时候,才会进入if块
    	// NIO线程自己提交任务的时候并不会执行selector.wakeup()
    	// NIO线程内部在NioEventLoop中有自己的唤醒机制
    	// wakenUp由多个线程通过CAS方法进行修改,只有一个线程可以成功
    	// selector.wakeup()是一个重量级的操作,不能被频繁的调用
    	// 如果有多个其它的线程提交任务,只需要唤醒一次就行
    	// wakenUp为一个原子的boolean变量,有一个线程将其置为true的时候
    	// 之后线程的CAS便不会成功,compareAndSet会返回false,自然也不会进入if块
    	// 保证了唤醒之后其他的线程不会再调用selector.wakeup()
        if (!inEventLoop && wakenUp.compareAndSet(false, true)) {
            selector.wakeup();
        }
    }
SELECT分支:run方法的switch语句有多条分支,具体执行分支的代码由strategy变量控制;
int strategy = selectStrategy.calculateStrategy(selectNowSupplier, hasTasks());
switch (strategy) {
	...
}
strategy的值由calculateStrategy方法确定
@Override
public int calculateStrategy(IntSupplier selectSupplier, boolean hasTasks) throws Exception {
    // selectSupplier.get() 底层是 selector.selectNow();
    return hasTasks ? selectSupplier.get() : SelectStrategy.SELECT;
}
该方法会根据hasTaks变量判断任务队列中是否有任务
-
若有任务,则通过selectSupplier获得strategy的值,get方法会调用selectNow方法,顺便拿到IO事件;若没有任务,就会进入SELECT分支;
private final IntSupplier selectNowSupplier = new IntSupplier() {
    public int get() throws Exception {
        return NioEventLoop.this.selectNow();
    }
};

int selectNow() throws IOException {
    return this.selector.selectNow();
}
也就说,当任务队列中没有任务时,才会进入SELECT分支,让NIO线程阻塞,而不是空转。若有任务,则会通过get方法调用selector.selectNow方法,顺便拿到IO事件
Java NIO空轮询BUG:Java NIO空轮询BUG也就是JavaNIO在Linux系统下的epoll空轮询问题;在NioEventLoop中,因为run方法中存在一个死循环,需要通过selector.select方法来阻塞线程。但是select方法因为BUG,可能无法阻塞线程,导致循环一直执行,使得CPU负载升高;
@Override
protected void run() {
    ...
    for(;;){
        ...
        // 可能发生空轮询,无法阻塞NIO线程
        strategy = select(curDeadlineNanos);
        ...

     	if(...) {
			...
     	} else if (unexpectedSelectorWakeup(selectCnt) ){
            // 通过unexpectedSelectorWakeup方法中的rebuildSelector重建selector
            // 并将selectCnt重置为0
            selectCnt = 0;
        }
	}
}
Netty中通过selectCnt变量来检测select方法是否发生空轮询BUG,若发生空轮询BUG,那么selectCnt的值会增长是十分迅速。当selectCnt的值大于等于SELECTOR_AUTO_REBUILD_THRESHOLD(默认512)时,Netty则判断其出现了空轮询BUG,进行如下处理;
if (SELECTOR_AUTO_REBUILD_THRESHOLD > 0 && selectCnt >= SELECTOR_AUTO_REBUILD_THRESHOLD) {
    // The selector returned prematurely many times in a row.
    // Rebuild the selector to work around the problem.
    logger.warn("Selector.select() returned prematurely {} times in a row; rebuilding Selector {}.",selectCnt, selector);
    // 重建selector,将原selector的配置信息传给新selector
    // 再用新selector覆盖旧selector
    rebuildSelector();
    return true;
}
通过rebuildSelector方法重建selector,将原selector的配置信息传给新selector,再用新selector覆盖旧selector。同时将selectCnt的值设置为0;
ioRatio:NioEventLoop可以处理IO事件和其他任务。不同的操作所耗费的时间是不同的,想要控制NioEventLoop处理IO事件花费时间占执行所有操作的总时间的比例,需要通过ioRatio来控制;
NioEventLoop.run方法:
// 处理IO事件时间比例,默认为50%
final int ioRatio = this.ioRatio;

// 如果IO事件时间比例设置为100%
if (ioRatio == 100) {
    try {
        // 如果需要去处理IO事件
        if (strategy > 0) {
            // 先处理IO事件
            processSelectedKeys();
        }
    } finally {
        // Ensure we always run tasks.
        // 剩下的时间都去处理普通任务和定时任务
        ranTasks = runAllTasks();
    }
} else if (strategy > 0) { // 如果需要去处理IO事件
    // 记录处理IO事件前的时间
    final long ioStartTime = System.nanoTime();
    try {
        // 去处理IO事件
        processSelectedKeys();
    } finally {
        // Ensure we always run tasks.
        // ioTime为处理IO事件耗费的事件
        final long ioTime = System.nanoTime() - ioStartTime;
        // 计算出处理其他任务的事件
        // 超过设定的时间后,将会停止任务的执行,会在下一次循环中再继续执行
        ranTasks = runAllTasks(ioTime * (100 - ioRatio) / ioRatio);
    }
} else { // 没有IO事件需要处理
    // This will run the minimum number of tasks
    // 直接处理普通和定时任务
    ranTasks = runAllTasks(0);
}
通过ioRatio控制各个任务执行的过程如下:判断ioRatio是否为100,若是,判断是否需要处IO事件(strategy>0),若需要处理IO事件,则先处理IO事件,若否(或IO事件已经处理完毕),接下来去执行所有的普通任务和定时任务,直到所有任务都被处理完;
// 没有指定执行任务的时间
ranTasks = runAllTasks();
若ioRatio不为100,先去处理IO事件,记录处理IO事件所花费的事件保存在ioTime中,接下来去处理其他任务,根据ioTime与ioRatio计算执行其他任务可用的时间;执行其他任务一旦超过可用时间,则会停止执行,在下一次循环中再继续执行;
// 比如ioTime为10s,ioRatio为50
// 那么通过 10 * (100 - 50) / 50 = 10 计算出其他任务可用的时间为 10s
// 处理IO事件占用的事件总比例为50%
ranTasks = runAllTasks(ioTime * (100 - ioRatio) / ioRatio);
若没有IO事件需要处理,则去执行最少数量的普通任务和定时任务
// 运行最少数量的任务 ranTasks = runAllTasks(0);处理事件:IO事件是通过NioEventLoop.processSelectedKeys()方法处理的;
private void processSelectedKeys() {
    // 如果selectedKeys是基于数组的
    // 一般情况下都走这个分支
    if (selectedKeys != null) {
        // 处理各种IO事件
        processSelectedKeysOptimized();
    } else {
        processSelectedKeysPlain(selector.selectedKeys());
    }
}
processSelectedKeysOptimized方法
private void processSelectedKeysOptimized() {
    for (int i = 0; i < selectedKeys.size; ++i) {
        // 拿到SelectionKeyec
        final SelectionKey k = selectedKeys.keys[i];
        // null out entry in the array to allow to have it GC'ed once the Channel close
        // See https://github.com/netty/netty/issues/2363
        selectedKeys.keys[i] = null;

        // 获取SelectionKey上的附件,即NioServerSocketChannel
        final Object a = k.attachment();

        if (a instanceof AbstractNioChannel) {
            // 处理事件,传入附件NioServerSocketChannel
            processSelectedKey(k, (AbstractNioChannel) a);
        } else {
            @SuppressWarnings("unchecked")
            NioTask<SelectableChannel> task = (NioTask<SelectableChannel>) a;
            processSelectedKey(k, task);
        }

        if (needsToSelectAgain) {
            // null out entries in the array to allow to have it GC'ed once the Channel close
            // See https://github.com/netty/netty/issues/2363
            selectedKeys.reset(i + 1);

            selectAgain();
            i = -1;
        }
    }
}
该方法中通过fori的方法,遍历基于数组的SelectedKey
final SelectionKey k = selectedKeys.keys[i];获取到SelectionKey,然后获取其在Register时添加的附件NioServerSocketChannel
// 获取SelectionKey上的附件,即NioServerSocketChannel
final Object a = k.attachment();
如果附件继承自AbstractNioChannel,则会调用以下代码去处理各个事件
// 处理事件,传入附件NioServerSocketChannel
processSelectedKey(k, (AbstractNioChannel) a);
真正处理各种事件的方法processSelectedKey会获取SelectionKey的事件,判断;
private void processSelectedKey(SelectionKey k, AbstractNioChannel ch) { final AbstractNioChannel.NioUnsafe unsafe = ch.unsafe(); if (!k.isValid()) { final EventLoop eventLoop; try { eventLoop = ch.eventLoop(); } catch (Throwable ignored) { // 如果channel因为没有eventLoop而抛出了一个异常,我们就忽略此项 // 因为我们只是想确认是否已经将channel注册到相应的事件循环上面 return; } // Only close ch if ch is still registered to this EventLoop. ch could have deregistered from the event loop // and thus the SelectionKey could be cancelled as part of the deregistration process, but the channel is // still healthy and should not be closed. // See https://github.com/netty/netty/issues/5125 if (eventLoop == this) { // close the channel if the key is not valid anymore unsafe.close(unsafe.voidPromise()); } return; } try { int readyOps = k.readyOps(); // We first need to call finishConnect() before try to trigger a read(...) or write(...) as otherwise // the NIO JDK channel implementation may throw a NotYetConnectedException. // 在尝试读取或者是写入操作之前,我们需要先调用finishConnect()方法,否则JDK的NIO通道可能会抛出NotYetConnectedException if ((readyOps & SelectionKey.OP_CONNECT) != 0) { // remove OP_CONNECT as otherwise Selector.select(..) will always return without blocking // See https://github.com/netty/netty/issues/924 int ops = k.interestOps(); ops &= ~SelectionKey.OP_CONNECT; k.interestOps(ops); unsafe.finishConnect(); } // 首先处理写事件,因为这样我们就可以将队列中等待的任务一一释放掉,从而释放内存; if ((readyOps & SelectionKey.OP_WRITE) != 0) { // Call forceFlush which will also take care of clear the OP_WRITE once there is nothing left to write ch.unsafe().forceFlush(); } // Also check for readOps of 0 to workaround possible JDK bug which may otherwise lead to a spin loop if ((readyOps & (SelectionKey.OP_READ | SelectionKey.OP_ACCEPT)) != 0 || readyOps == 0) { unsafe.read(); } } catch (CancelledKeyException ignored) { unsafe.close(unsafe.voidPromise()); } } -
3. Accept剖析
NIO中处理Accept事件主要有以下六步
- selector.select()阻塞线程,直到事件发生;
- 遍历selectionKeys;
- 获取一个key,判断事件类型是否为Accept;
- 创建SocketChannel,设置为非阻塞;
- 将SocketChannel注册到selector中;
- 关注selectionKeys的read事件;
相应的代码如下所示:
// 阻塞直到事件发生
selector.select();

Iterator<SelectionKey> iter = selector.selectionKeys().iterator();
// 遍历selectionKeys
while (iter.hasNext()) {
    // 拿到一个事件
    SelectionKey key = iter.next();

    // 判断事件类型是否为Accept
    if (key.isAcceptable()) {

        // 执行accept,获得SocketChannel并设置为非阻塞
        SocketChannel channel = serverSocketChannel.accept();
        channel.configureBlocking(false);

        // 将SocketChannel注册到selector中,并关注read事件
        channel.register(selector, SelectionKey.OP_READ);
    }
    // ...
}
其中前三步,在NioEventLoop剖析中已经分析过了,所以接下来主要分析后三步;
SocketChannel的创建与注册
发生Accept事件后,会执行NioEventLoop.run方法的如下if分支
// readyOps就是我们当前的selectedKeys的事件类型
// 它的取值如果是16的话就代表它是一个accept事件
// 它的取值是1的话,那就是一个read事件
if ((readyOps & (SelectionKey.OP_READ | SelectionKey.OP_ACCEPT)) != 0 || readyOps == 0) {
	// 该方法会把后面的三件事都做完,进入该方法后将会有一个重要方法:doReadMessages(readBuf)
	unsafe.read();
}
进入AbstractNioMessageChannel.NioMessageUnsafe#read方法
public void read() {

    ...

    try {
        try {
            do {
            	// 该方法会执行第4步的操作,也就是调用SocketUtils.accept(javaChannel())来创建SocketChannel
				// 之后会进行至buf.add(new NioSocketChannel(this, ch));
				// 到了这一步之后就已经把SocketChannel设置好了,并且在构造方法中将其设置为非阻塞
				// 同时也创建了NioSocketChannel,将NioSocketChannel当做一个消息放到readBuf里面供将来的pipeline去处理
                // readBuf是一个ArrayList,它用来缓存消息
                // private final List<Object> readBuf = new ArrayList<Object>();
                int localRead = doReadMessages(readBuf);

                ...

				// localRead值为1,就一条消息,即接收一个客户端连接
                allocHandle.incMessagesRead(localRead);
            } while (allocHandle.continueReading());
        } catch (Throwable t) {
            exception = t;
        }

        int size = readBuf.size();
        for (int i = 0; i < size; i ++) {
            readPending = false;
            // 触发read事件,让pipeline上的handler处理
            // ServerBootstrapAcceptor.channelRead
            pipeline.fireChannelRead(readBuf.get(i));
        }

        ...

    } finally {
        if (!readPending && !config.isAutoRead()) {
            removeReadOp();
        }
    }
}
NioSocketChannel.doReadMessages方法:该方法中处理accpet事件,获得SocketChannel,同时创建了NioSocketChannel,作为消息放在了readBuf中
@Override
protected int doReadMessages(List<Object> buf) throws Exception {
    // 处理accpet事件,获得SocketChannel
    SocketChannel ch = SocketUtils.accept(javaChannel());

    try {
        if (ch != null) {
            // 创建了NioSocketChannel,作为消息放在了readBuf中
            buf.add(new NioSocketChannel(this, ch));
            return 1;
        }
    } catch (Throwable t) {
       ...
    }

    return 0;

	// 现在readBuf中放置的就是NioSocketChannel,代表了服务器和客户端之间的连接;
	// readBuf既然是一个消息,那么就应该放到NioServerSocketChannel的pipeline(head -> acceptor -> tail)之中进行处理
	// 具体执行处理的代码就是以上read()方法中的pipeline.fireChannelRead(readBuf.get(i))
	// 该流水线中有一系列的handler,把我们刚刚建立的连接当做消息进行处理
	// 处理工作由acceptor进行,建立连接之后acceptor还要进行注册等后续处理,也就是连接建立之后剩下的工作几乎都是由它完成的
}
ServerBootstrapAcceptor.channelRead方法
public void channelRead(ChannelHandlerContext ctx, Object msg) {
    // 这时的msg是NioSocketChannel
    final Channel child = (Channel) msg;

    // 向流水线中添加childHandler,即初始化器
    child.pipeline().addLast(childHandler);

    // 设置选项
    setChannelOptions(child, childOptions, logger);

    for (Entry<AttributeKey<?>, Object> e: childAttrs) {
        child.attr((AttributeKey<Object>) e.getKey()).set(e.getValue());
    }

    try {
        // 注册 NioSocketChannel 到nio worker线程,接下来的处理也移交至nio worker线程
        childGroup.register(child).addListener(new ChannelFutureListener() {
            @Override
            public void operationComplete(ChannelFuture future) throws Exception {
                if (!future.isSuccess()) {
                    forceClose(child, future.cause());
                }
            }
        });
    } catch (Throwable t) {
        forceClose(child, t);
    }
}
进入AbstractChannel.AbstractUnsafe#register 方法,该方法将SocketChannel注册到了Selector中,过程与启动流程中的Register过程类似;
@Override
public final void register(EventLoop eventLoop, final ChannelPromise promise) {
    if (eventLoop == null) {
        throw new NullPointerException("eventLoop");
    }
    if (isRegistered()) {
        promise.setFailure(new IllegalStateException("registered to an event loop already"));
        return;
    }
    if (!isCompatible(eventLoop)) {
        promise.setFailure(
                new IllegalStateException("incompatible event loop type: " + eventLoop.getClass().getName()));
        return;
    }

    AbstractChannel.this.eventLoop = eventLoop;

	// eventLoop.inEventLoop()判断的是eventLoop中的线程和当前的线程是不是同一个线程
	// 当前的线程是nioEventLoopGroup中的一个NioServerSocketChannel线程
	// 但是eventLoop中的线程是我们新建的SocketChannel对应的NioEventLoop线程
	// NioServerSocketChannel线程和SocketChannel线程所使用的肯定不是同一个线程
	// 所以if条件不成立,会进入到else
	// 保证register0是在一个新的eventLoop中执行的,也就是在SocketChannel对应的eventLoop上执行
    if (eventLoop.inEventLoop()) {
        register0(promise);
    } else {
        try {
            eventLoop.execute(new Runnable() {
                @Override
                public void run() {
                	// 真正的注册操作
                    register0(promise);
                }
            });
        } catch (Throwable t) {
            logger.warn(
                    "Force-closing a channel whose registration task was not accepted by an event loop: {}",
                    AbstractChannel.this, t);
            closeForcibly();
            closeFuture.setClosed();
            safeSetFailure(promise, t);
        }
    }
}
进入到AbstractChannel.AbstractUnsafe.register0方法
private void register0(ChannelPromise promise) {
    try {

        ...

        // 该方法将SocketChannel注册到Selector中
        doRegister();

        // 触发SocketChannel上面的初始化事件,调用SocketChannel上的初始化器,在channel上面添加一些handler
        // 执行前 pipeline 中只有 head -> 初始化器 -> tail
        pipeline.invokeHandlerAddedIfNeeded();
        // 执行后就是 head -> logging handler -> ...(我们添加的其它的handler) -> tail(初始化器只执行一次)

        safeSetSuccess(promise);
        pipeline.fireChannelRegistered();

        if (isActive()) {
            if (firstRegistration) {
            	// 触发pipeline上的ChannelActive事件,最后在selectionKey上关注read事件
                pipeline.fireChannelActive();
            } else if (config().isAutoRead()) {
                beginRead();
            }
        }
    } catch (Throwable t) {
        closeForcibly();
        closeFuture.setClosed();
        safeSetFailure(promise, t);
    }
}
AbstractNioChannel.doRegister将SocketChannel注册到Selector中
@Override
protected void doRegister() throws Exception {
    boolean selected = false;
    for (;;) {
        try {
        	// 拿到SocketChannel并注册到当前eventLoop的Selector上面,没有关注任何事件;
        	// 并将NioSocketChannel作为附件绑定在SocketChannel上;
            selectionKey = javaChannel().register(eventLoop().unwrappedSelector(), 0, this);
            return;
        } catch (CancelledKeyException e) {
            if (!selected) {
                // Force the Selector to select now as the "canceled" SelectionKey may still be
                // cached and not removed because no Select.select(..) operation was called yet.
                eventLoop().selectNow();
                selected = true;
            } else {
                // We forced a select operation on the selector before but the SelectionKey is still cached
                // for whatever reason. JDK bug ?
                throw e;
            }
        }
    }
}
HeadContext.channelActive方法
public void channelActive(ChannelHandlerContext ctx) {
    ctx.fireChannelActive();
	// 触发read(NioSocketChannel这里read只是为了触发channel的事件注册,还未涉及数据读取)
    readIfIsAutoRead();
}
AbstractNioChannel.doBeginRead,最后通过该方法,SocketChannel关注了read事件
protected void doBeginRead() throws Exception {
    // Channel.read() or ChannelHandlerContext.read() was called
    final SelectionKey selectionKey = this.selectionKey;
    if (!selectionKey.isValid()) {
        return;
    }

    readPending = true;
	// 这时候 interestOps 是 0,if判断成立
    final int interestOps = selectionKey.interestOps();
    if ((interestOps & readInterestOp) == 0) {
        // 关注read事件
        selectionKey.interestOps(interestOps | readInterestOp);
    }
}
4. Read剖析
Read事件的处理也是在以下的代码中,第一次出发的是accept事件,之后触发的便是read事件
if ((readyOps & (SelectionKey.OP_READ | SelectionKey.OP_ACCEPT)) != 0 || readyOps == 0) {
	unsafe.read();
}
分支中,通过unsafe.read()方法处理的,不过此处调用的方法在AbstractNioByteChannel.NioByteUnsafe类中
public final void read() {
    final ChannelConfig config = config();
    if (shouldBreakReadReady(config)) {
        clearReadPending();
        return;
    }
    final ChannelPipeline pipeline = pipeline();
    // io.netty.allocator.type 决定 allocator 的实现
    // 获得ByteBuf的分配器,它决定了我们的ByteBuf是池化的还是非池化的
    final ByteBufAllocator allocator = config.getAllocator();
    // 用来分配 byteBuf,确定单次读取大小
    // 它可以动态地调整ByteBuf的大小,而且会强制使用直接内存而不是堆内存,因为IO事件使用直接内存的话效率会更高一些
    final RecvByteBufAllocator.Handle allocHandle = recvBufAllocHandle();
    allocHandle.reset(config);

    ByteBuf byteBuf = null;
    boolean close = false;
    try {
        do {
            byteBuf = allocHandle.allocate(allocator);
            // 读取
            // 执行doReadBytes(byteBuf)之后,byteBuf之中就会被填充内容
            allocHandle.lastBytesRead(doReadBytes(byteBuf));
            if (allocHandle.lastBytesRead() <= 0) {
                byteBuf.release();
                byteBuf = null;
                close = allocHandle.lastBytesRead() < 0;
                if (close) {
                    readPending = false;
                }
                break;
            }

            allocHandle.incMessagesRead(1);
            readPending = false;
            // 先找到 NioSocketChannel 上的 pipeline流水线
            // 然后触发 read 事件,让 pipeline 上的 handler 处理,也就是把读到的byteBuf中的"hello"的数据依次交给以下的三个handler
            // header -> LoggingHandler -> tail
            pipeline.fireChannelRead(byteBuf);
            byteBuf = null;
        }
        // 是否要继续循环
        while (allocHandle.continueReading());

        allocHandle.readComplete();
        // 触发 read complete 事件
        pipeline.fireChannelReadComplete();

        if (close) {
            closeOnRead(pipeline);
        }
    } catch (Throwable t) {
        handleReadException(pipeline, byteBuf, t, close, allocHandle);
    } finally {
        if (!readPending && !config.isAutoRead()) {
            removeReadOp();
        }
    }
}
io.netty.channel.DefaultMaxMessagesRecvByteBufAllocator.MaxMessageHandle#continueReading(io.netty.util.UncheckedBooleanSupplier)
public boolean continueReading(UncheckedBooleanSupplier maybeMoreDataSupplier) {
    return
           // 一般为 true
           config.isAutoRead() &&
           // respectMaybeMoreData 默认为 true
           // maybeMoreDataSupplier 的逻辑是如果预期读取字节与实际读取字节相等,返回 true
           (!respectMaybeMoreData || maybeMoreDataSupplier.get()) &&
           // 小于最大次数,maxMessagePerRead 默认 16
           totalMessages < maxMessagePerRead &&
           // 实际读到了数据
           totalBytesRead > 0;
}
至此,对Netty中部分重要的源码就解析完毕了。


 569
569

 被折叠的 条评论
为什么被折叠?
被折叠的 条评论
为什么被折叠?
 到【灌水乐园】发言


