


 该项目是一个集成门户,采用Vite+Vue+JS模板创建,实现了登录功能和不同前端微服务的展示。作者清理了组件文件,修改了配置,并创建了登录和主页组件。还封装了自己的基础组件,讨论了自定义组件名并在Vue3中使用setup语法糖的问题。此外,文章涵盖了路由模块的添加,打包编译,以及容器部署的初步步骤。
aiguibin-protal-gateway
前言
本项目为集成门户,意在把自己学到的东西通过实战的方式串联掌握,形成完整知识体系。整体思路:
- 整合多个前端微服务
- 实现登陆功能,配合后端微服务
- 根据登录人的权限,展示不同的前端微服务
具体实现
vite+vue+js模板创建项目
清空src/components下的文件,修改App.vue文件
- 修改App.vue文件删除不必要,结果如下:
/**
* @Author AIguibin
* @Datetime 2023/1/24 21:36
* @Description TODO
*/
<script setup>
</script>

<template>
  <!-- 路由出口 -->
  <!-- 路由匹配到的组件将渲染在这里 -->
  <div id="rootDiv">
    <router-view></router-view>
  </div>
</template>

<style scoped>
</style>
- style.css根据自己的需要修改,关键知识点可移步:
从零开始学习CSS,梳理企业开发中的CSS知识盲点
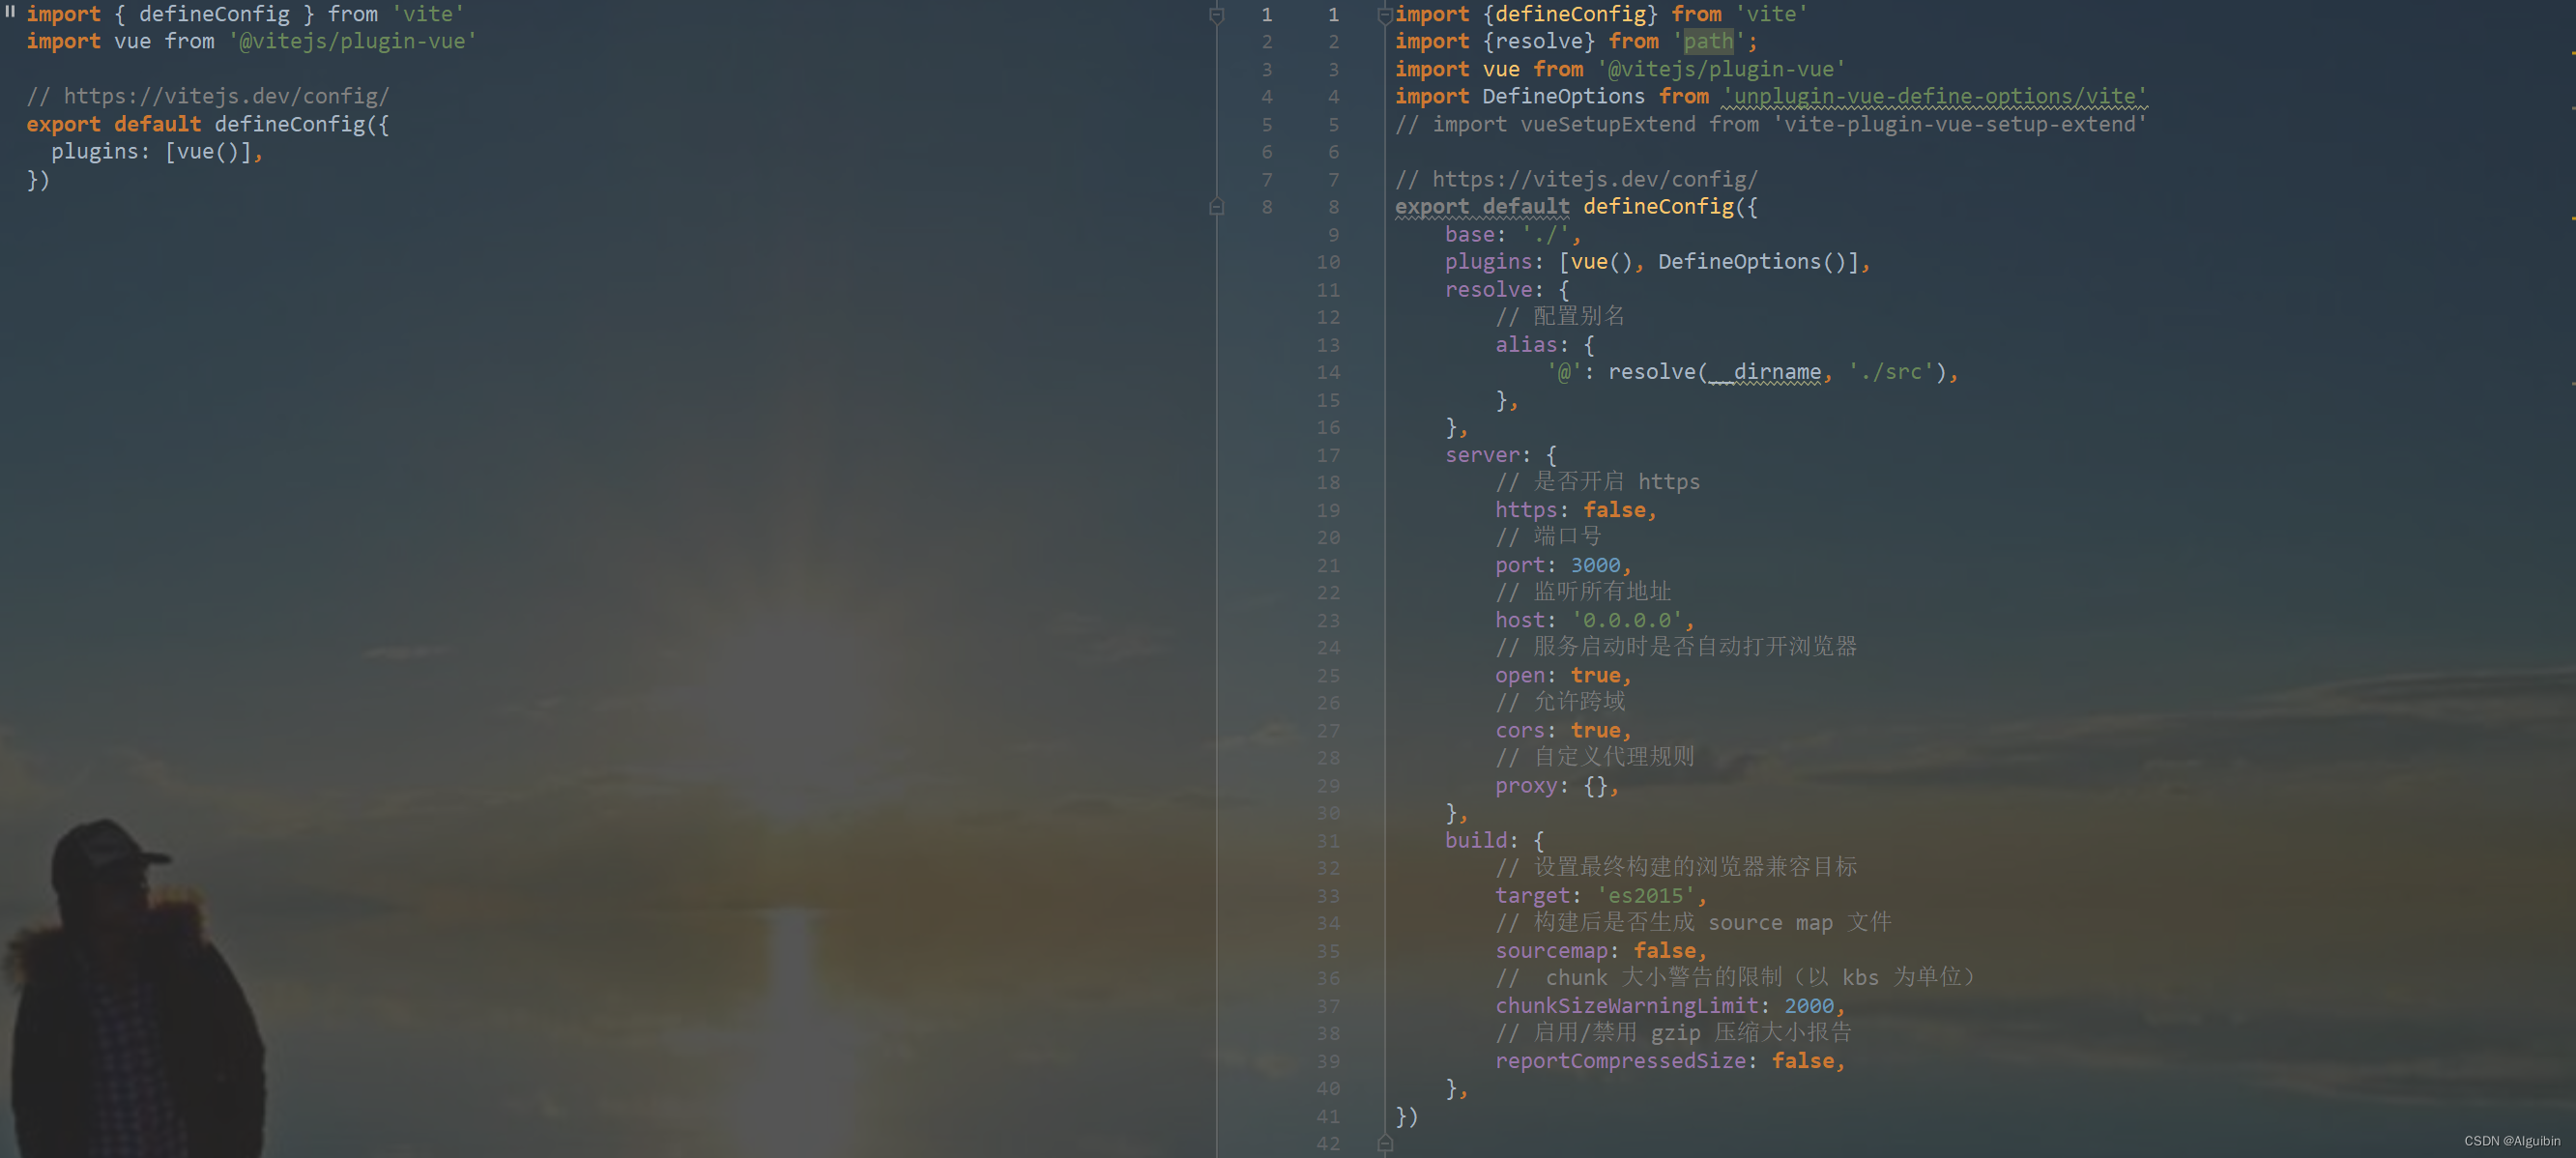
修改默认配置vite.config.js
- 修改vite.config.js,左边初始,右边为简单配置一些,具体参考——
创建src/pages/HomeView.vue
创建src/pages/LoginView.vue登录页面
页面设计
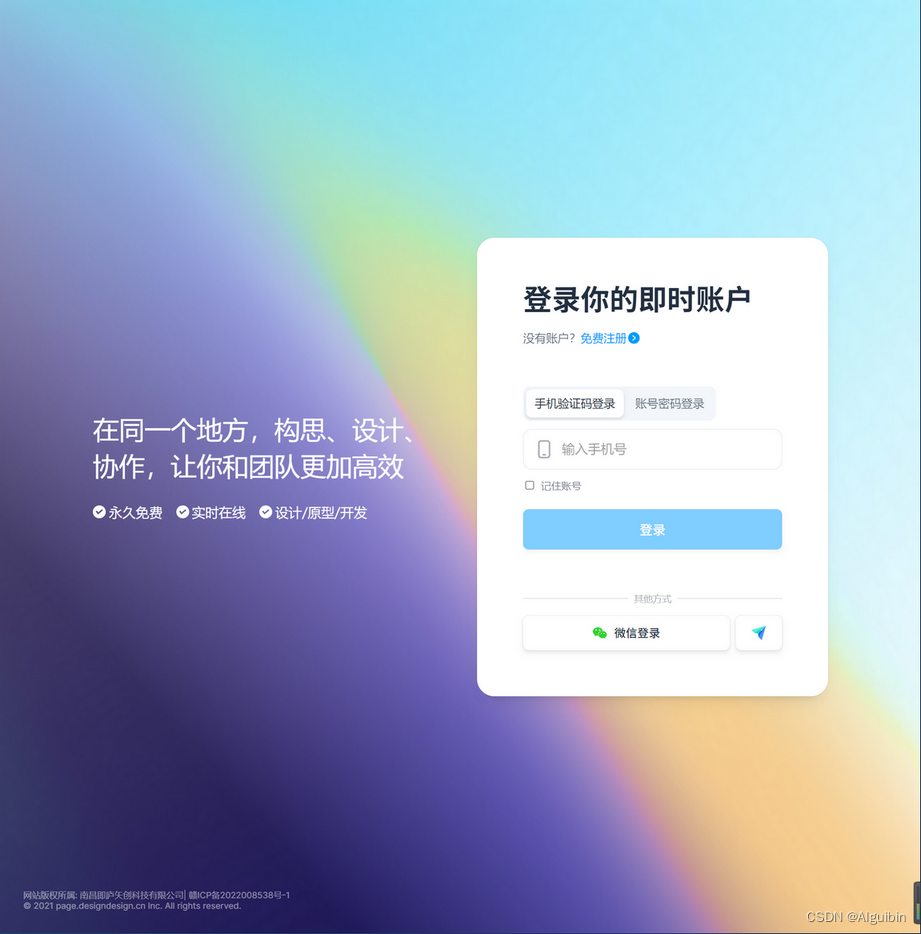
- 抄一个比较欣赏的设计,如即时设计登录页面
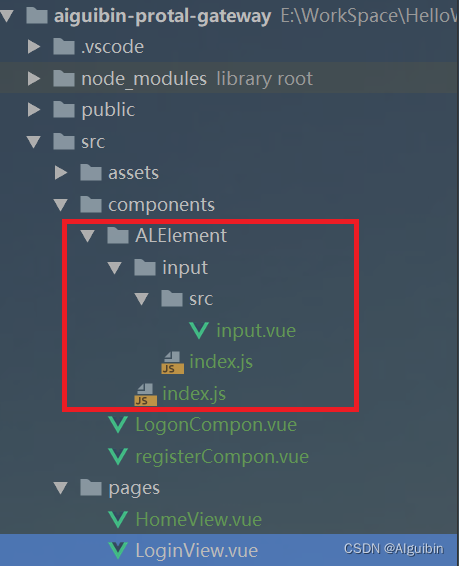
页面拆分
- 由于功能包含各种切换与验证,需要进行WBS功能拆解成小组件,未使用UI组件,模仿ElementUI先做个mini版的input,创建
组件编写
代码实现
- 创建src/components/ALElement/input/src/input.vue
<script setup>
    import {ref} from 'vue'
    defineOptions({
        name: 'AlInput',
        inheritAttrs: false,
    })
    const errorMsg = ref('')
</script>
<template>
    <div class="logon-input-item">
        <div class="input-item-wrap">
            <div class="error-card-input card-input">
                <div class="error-input input-all">
                    <div class="input-wrapper">
                        <img src="" alt="">
                        <input type="text">
                    </div>
                </div>
            </div>
            <div class="error-input-msg">{{errorMsg}}</div>
        </div>
    </div>
</template>
<style scoped>
</style>
- 创建src/components/ALElement/input/index.js
import AlInput from './src/input.vue';

/* istanbul ignore next */
AlInput.install = function(Application) {
  console.log(AlInput.name);
  Application.component(AlInput.name, AlInput);
};

export default AlInput;
- 创建src/components/ALElement/index.js
import Input from './input/index.js';

const components = [
    Input,
];
const install = function (Application) {

    components.forEach(component => {
        Application.component(component.name, component);
    });
};
/* istanbul ignore if */
if (typeof window !== 'undefined' && window.Vue) {
    install(window.Vue);
}
export default {
    version: '1.0.0',
    install,
    Input
};
- 创建src/components/LogonCompon.vue并使用ALElement->【al-input】
/**
* @Author AIguibin
* @Datetime 2023/1/24 21:36
* @Description TODO
*/

<script setup>
    import {ref} from 'vue'
    const errorMsg = ref('')
</script>

<template>
    <div class="logon-main-wrap">
        <div class="logon-btn-wrap">
            <button>手机验证码登录</button>
            <button>账号密码登录</button>
        </div>
        <div class="logon-input-wrap">
            <div class="logon-input-content">
                <!--这里可以参考ElementUI的input组件封装一个mini版-->
                <al-input></al-input>
            </div>
        </div>
    </div>
</template>
<style scoped>
    .logon-main-wrap {
        display: flex;
        flex-direction: column;
    }
</style>
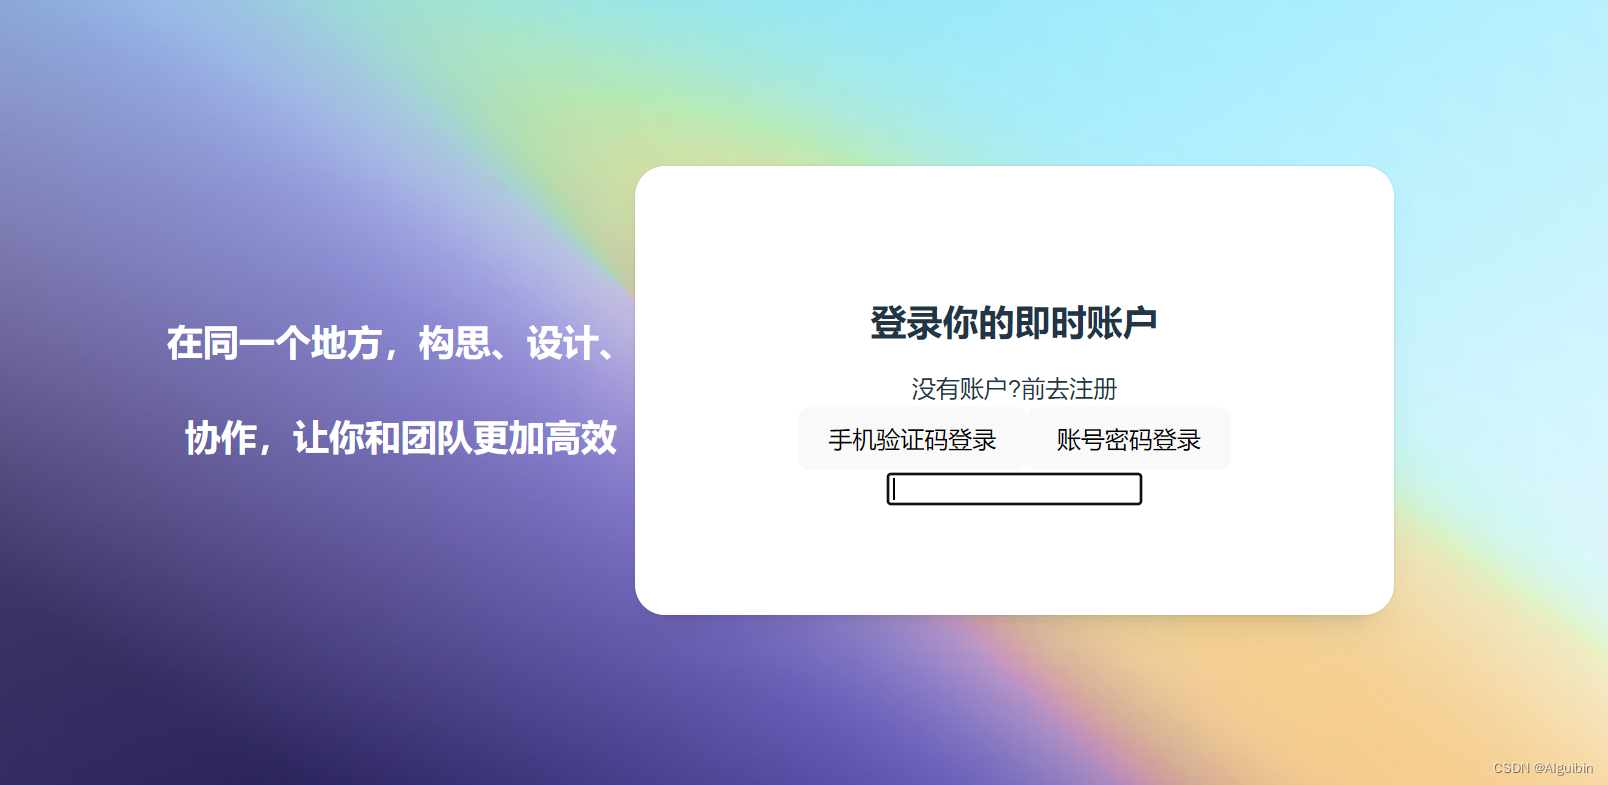
初步效果如下
挖坑填坑
封装基础组件原因与好处
虽然基础组件库如Element Plus,Ant Design,IView等组件库已经非常成熟而且好用,而且自己做这些需要时间、精力,更容易出现BUG,但是市场上的UI组件库并不能完全、直接满足项目产品的需求,针对某些特定的项目中较为普遍的需求要进行二次封装,所以通过学习UI开源框架的源码制作MINI版,可以提高自己的技术水平,代码质量以及抽象能力;
倾向于Vue 2.x中ElementUI的组件注册的方法,将组件的name属性注册为组件名,在main.js中全局注册
在Vue 3.x中使用setup语法糖无法指定组件名
代码主要增加:
defineOptions({ name: 'AlInput', inheritAttrs: false, })
解决方案参考:Vue3 在 setup 中如何定义组件的 name 属性
单个组件导出src/components/ALElement/index.js
代码主要提供install方法:
AlInput.install = function(Application) {
  Application.component(AlInput.name, AlInput);
  // 遵循链式调用
  return Application
};
如果按需导入的时候提供给Vue2或Vue3(Application)调用
整个组件库导出
// 引入组件,这里引的是组件的index.js出口文件;
import Input from './input/index.js';
// 把所有组件放在数组里
const components = [
    Input,
];
// 提供一个install方法
const install = function (Application) {
    components.forEach(component => {
        Application.component(component.name, component);
    });
    // 遵循链式调用
    return Application
};
// 默认导出版本、install方法、组件
export default {
    version: '1.0.0',
    install,
    Input
};
重点的重点的重点不要把install忘记导出,install方法是提供给Vue2或Vue3(Application)调用注册组件
另一个版本:
// 引入组件,这里引的是组件的index.js出口文件;
import Input from './input/index.js';
// 按需引入
export { Input };
// 把所有组件放在数组里
const components = [
    Input,
];
const AIElementUI= {
    install(Application) {
        components.forEach((component) => {
            Application.component(component.name, component);
        });
        // 遵循链式调用
        return Application
    },
};
export default AIElementUI;
全局注册使用,在src/main.js中注册
import { createApp } from 'vue'
import './style.css'
import App from './App.vue'
import router from './router';
import ALElement from '@/components/ALElement/index.js'


const application=createApp(App);
application.use(router);
application.use(ALElement);
application.mount('#app');
更灵活标准的方式推荐:vue3+vite+ts搭建组件库
推荐后两种:npm install unplugin-vue-define-options -D 或 npm install vite-plugin-vue-setup-extend -D
增加路由模块
- 创建src/router/modules/baseRouter.js,导出基本路由数组
export default [
    {
        path: '/',
        name: 'HomeView',
        component: () => import('@/pages/HomeView.vue')
    },
    {
        path: '/login',
        name: 'LoginView',
        component: () => import('@/pages/LoginView.vue')
    },
];
- 创建src/router/index.js,设置路由守卫,验证登陆录信息
/**
 * @Author AIguibin
 * @Datetime 2023/1/23 15:20
 * @Description TODO
 */
import {createRouter, createWebHistory} from 'vue-router';
import baseRouter from './modules/baseRouter'

const routeArray = [
    ...baseRouter
];
const router = createRouter({
    history: createWebHistory(),
    routes: routeArray,
});
// 全局导航守卫
// 验证是否登陆或登录过期
router.beforeEach((to, from, next) => {
    if (to.name !== 'LoginView' && 登录信息Token) next({ name: 'LoginView' });
    else next()
});
export default router;
打包编译
E:\WorkSpace\HelloWorldFrontend\aiguibin-protal-gateway -> origin (aiguibin-protal-gateway -> origin)
λ npm run build

> aiguibin-protal-gateway@0.0.0 build
> vite build

vite v4.0.4 building for production...
✓ 38 modules transformed.
dist/index.html                        0.47 kB
dist/assets/login-bg-5-72265adb.jpg  225.07 kB
dist/assets/LoginView-9baefae1.css     1.83 kB
dist/assets/index-c72bfea7.css         1.94 kB
dist/assets/HomeView-b07fbb30.js       0.15 kB
dist/assets/LoginView-bc25bcf2.js      1.77 kB
dist/assets/index-87b20e55.js         77.76 kB

E:\WorkSpace\HelloWorldFrontend\aiguibin-protal-gateway -> origin (aiguibin-protal-gateway -> origin)
λ
容器部署
ThinkPad物理机安装Linux系统实战企业级SpringCloud项目之Docker安装Nginx
ThinkPad物理机安装Linux系统实战企业级SpringCloud项目之Docker网络Network


 8005
8005

 被折叠的 条评论
为什么被折叠?
被折叠的 条评论
为什么被折叠?
 到【灌水乐园】发言


