


本文详细阐述了如何运用 Spring Boot 框架搭建一个多链资产统一管理系统中的区块链接口抽象与适配层,旨在解决不同区块链在底层差异上带来的管理难题,实现多链资产操作的统一化、标准化,提高系统的扩展性与稳定性。
一、引言
随着区块链技术的广泛应用,多链并存的场景日益普遍。在资产管理领域,实现对多种区块链资产的统一管理成为迫切需求。然而,不同区块链在共识机制、数据结构和 API 接口等方面存在显著差异,这给多链资产统一管理带来挑战。基于 Spring Boot 框架构建接口抽象与适配层,能够有效屏蔽底层差异,为上层业务逻辑提供统一操作接口,极大地简化多链资产统一管理的实现过程。
二、技术方案框架
(一)项目结构
项目采用经典的 MVC(Model - View - Controller)架构思想,结合 Spring Boot 的特性进行组织。
-
src/main/java/com/example/multichain
- config:存放区块链相关配置类
BlockchainConfig.java,用于集中管理区块链节点地址、端口等配置参数,增强系统的可配置性与灵活性。 - controller:
BlockchainController.java作为对外暴露的接口控制器,负责接收用户请求,并将其转发给服务层进行处理,同时将处理结果返回给用户,是系统与外部交互的桥梁。 - core:此包是适配层的核心,定义了
BlockchainAdaptor.java接口,规定了通用的区块链操作方法,如获取余额、发送交易等。同时包含针对不同区块链的具体实现类,如BitcoinAdaptor.java和EthereumAdaptor.java,它们分别实现了比特币和以太坊的适配逻辑,屏蔽了不同区块链的底层差异。 - service:
BlockchainService.java定义了业务逻辑服务接口,BlockchainServiceImpl.java则实现了该接口,根据不同的链类型调用相应的适配层方法,实现业务逻辑的编排与处理。 - MultichainApplication.java:Spring Boot 启动类,负责初始化整个应用程序,加载配置,启动服务。
- config:存放区块链相关配置类
-
src/main/resources:包含
application.properties配置文件,用于配置 Spring Boot 应用的各项参数,如数据库连接、日志级别等,同时也可用于存放自定义的区块链相关配置。 -
src/test/java/com/example/multichain:
MultichainApplicationTests.java测试类,用于对系统的关键功能进行单元测试,确保系统的正确性与稳定性。
(二)依赖引入
在pom.xml文件中,引入 Spring Boot 相关依赖以搭建基础框架,同时引入区块链客户端依赖,如比特币的bitcoinj和以太坊的web3j,为与不同区块链进行交互提供支持。这些依赖不仅丰富了项目的功能,还遵循了 Spring 生态系统的规范,便于开发与维护。
xml
xml
代码解读
复制代码
<dependencies> <dependency> <groupId>org.springframework.boot</groupId> <artifactId>spring-boot-starter-web</artifactId> </dependency> <!-- 比特币客户端依赖 --> <dependency> <groupId>org.bitcoinj</groupId> <artifactId>bitcoinj-core</artifactId> <version>0.16.3</version> </dependency> <!-- 以太坊客户端依赖 --> <dependency> <groupId>org.web3j</groupId> <artifactId>core</artifactId> <version>4.8.7</version> </dependency> </dependencies>
(三)配置类
BlockchainConfig.java配置类使用@Configuration和@ConfigurationProperties注解,将区块链相关配置参数绑定到类的属性上。通过在application.properties中配置blockchain.bitcoinNodeUrl、blockchain.bitcoinNodePort、blockchain.ethereumNodeUrl和blockchain.ethereumNodePort等参数,实现对不同区块链节点连接信息的灵活配置。
java
kotlin
代码解读
复制代码
package com.example.multichain.config; import org.springframework.boot.context.properties.ConfigurationProperties; import org.springframework.context.annotation.Configuration; @Configuration @ConfigurationProperties(prefix = "blockchain") public class BlockchainConfig { private String bitcoinNodeUrl; private int bitcoinNodePort; private String ethereumNodeUrl; private int ethereumNodePort; // 省略 getters 和 setters }
(四)适配层接口与实现
- 接口定义:
BlockchainAdaptor.java接口定义了通用的区块链操作方法,确保不同区块链适配层具有统一的对外接口,方便上层业务逻辑调用。
java
arduino
代码解读
复制代码
package com.example.multichain.core; public interface BlockchainAdaptor { String getBalance(String address); String sendTransaction(String fromAddress, String toAddress, String amount); // 其他通用操作方法 }
2. 比特币适配层实现:BitcoinAdaptor.java类实现了BlockchainAdaptor接口,针对比特币区块链进行适配。通过WalletAppKit连接比特币节点,实现获取余额和发送交易等功能。在实际应用中,需注意私钥管理、交易确认等安全与业务逻辑的完善。
java
ini
代码解读
复制代码
package com.example.multichain.core; import org.bitcoinj.core.Coin; import org.bitcoinj.core.NetworkParameters; import org.bitcoinj.core.Transaction; import org.bitcoinj.core.TransactionConfidence; import org.bitcoinj.kits.WalletAppKit; import org.bitcoinj.params.MainNetParams; import org.springframework.beans.factory.annotation.Autowired; import org.springframework.stereotype.Component; @Component public class BitcoinAdaptor implements BlockchainAdaptor { private final BlockchainConfig blockchainConfig; @Autowired public BitcoinAdaptor(BlockchainConfig blockchainConfig) { this.blockchainConfig = blockchainConfig; } @Override public String getBalance(String address) { // 初始化比特币网络参数 NetworkParameters params = MainNetParams.get(); WalletAppKit kit = new WalletAppKit(params, null, ""); kit.connectToHost(blockchainConfig.getBitcoinNodeUrl(), blockchainConfig.getBitcoinNodePort()); kit.startAsync(); kit.awaitRunning(); // 获取余额逻辑 // 此处省略实际实现 Coin balance = Coin.ZERO; kit.stopAsync(); return balance.toFriendlyString(); } @Override public String sendTransaction(String fromAddress, String toAddress, String amount) { // 发送交易逻辑 // 此处省略实际实现 NetworkParameters params = MainNetParams.get(); WalletAppKit kit = new WalletAppKit(params, null, ""); kit.connectToHost(blockchainConfig.getBitcoinNodeUrl(), blockchainConfig.getBitcoinNodePort()); kit.startAsync(); kit.awaitRunning(); Transaction transaction = null; // 构建交易等操作 TransactionConfidence confidence = transaction.getConfidence(); kit.stopAsync(); return confidence.getStatus().name(); } }
3. 以太坊适配层实现:EthereumAdaptor.java类同样实现了BlockchainAdaptor接口,利用Web3j库连接以太坊节点,完成以太坊相关的操作。在实际场景中,要关注 Gas 费用设置、智能合约交互等细节。
java
java
代码解读
复制代码
package com.example.multichain.core; import org.web3j.protocol.Web3j; import org.web3j.protocol.http.HttpService; import org.web3j.tx.Transfer; import org.web3j.utils.Convert; import org.springframework.beans.factory.annotation.Autowired; import org.springframework.stereotype.Component; import java.math.BigDecimal; import java.math.BigInteger; @Component public class EthereumAdaptor implements BlockchainAdaptor { private final BlockchainConfig blockchainConfig; @Autowired public EthereumAdaptor(BlockchainConfig blockchainConfig) { this.blockchainConfig = blockchainConfig; } @Override public String getBalance(String address) { Web3j web3j = Web3j.build(new HttpService(blockchainConfig.getEthereumNodeUrl() + ":" + blockchainConfig.getEthereumNodePort())); try { BigInteger balance = web3j.ethGetBalance(address, null).send().getBalance(); BigDecimal etherBalance = Convert.fromWei(balance.toString(), Convert.Unit.ETHER); return etherBalance.toString(); } catch (Exception e) { e.printStackTrace(); return "0"; } } @Override public String sendTransaction(String fromAddress, String toAddress, String amount) { Web3j web3j = Web3j.build(new HttpService(blockchainConfig.getEthereumNodeUrl() + ":" + blockchainConfig.getEthereumNodePort())); try { // 发送交易逻辑,此处省略私钥管理等实际操作 Transfer.sendFunds(web3j, fromAddress, toAddress, new BigDecimal(amount), Convert.Unit.ETHER).send(); return "Transaction sent successfully"; } catch (Exception e) { e.printStackTrace(); return "Transaction failed"; } } }
(五)业务逻辑服务
- 接口定义:
BlockchainService.java接口定义了业务层的方法,将获取余额和发送交易等操作抽象出来,方便业务逻辑的调用与扩展。
java
arduino
代码解读
复制代码
package com.example.multichain.service; public interface BlockchainService { String getBalance(String chainType, String address); String sendTransaction(String chainType, String fromAddress, String toAddress, String amount); }
2. 接口实现:BlockchainServiceImpl.java类实现了BlockchainService接口,根据传入的链类型,调用相应的区块链适配层方法,实现业务逻辑的处理。这种设计模式遵循了依赖倒置原则,提高了代码的可维护性与可扩展性。
java
kotlin
代码解读
复制代码
package com.example.multichain.service; import com.example.multichain.core.BlockchainAdaptor; import com.example.multichain.core.BitcoinAdaptor; import com.example.multichain.core.EthereumAdaptor; import org.springframework.beans.factory.annotation.Autowired; import org.springframework.stereotype.Service; @Service public class BlockchainServiceImpl implements BlockchainService { private final BitcoinAdaptor bitcoinAdaptor; private final EthereumAdaptor ethereumAdaptor; @Autowired public BlockchainServiceImpl(BitcoinAdaptor bitcoinAdaptor, EthereumAdaptor ethereumAdaptor) { this.bitcoinAdaptor = bitcoinAdaptor; this.ethereumAdaptor = ethereumAdaptor; } @Override public String getBalance(String chainType, String address) { if ("bitcoin".equalsIgnoreCase(chainType)) { return bitcoinAdaptor.getBalance(address); } else if ("ethereum".equalsIgnoreCase(chainType)) { return ethereumAdaptor.getBalance(address); } return "Unsupported chain type"; } @Override public String sendTransaction(String chainType, String fromAddress, String toAddress, String amount) { if ("bitcoin".equalsIgnoreCase(chainType)) { return bitcoinAdaptor.sendTransaction(fromAddress, toAddress, amount); } else if ("ethereum".equalsIgnoreCase(chainType)) { return ethereumAdaptor.sendTransaction(fromAddress, toAddress, amount); } return "Unsupported chain type"; } }
(六)控制器
BlockchainController.java作为 Spring Boot 的控制器,使用@RestController和@RequestMapping注解,定义了处理获取余额和发送交易请求的接口。它接收来自用户的 HTTP 请求,调用服务层方法进行处理,并将结果返回给用户,实现了前后端的数据交互。
java
less
代码解读
复制代码
package com.example.multichain.controller; import com.example.multichain.service.BlockchainService; import org.springframework.beans.factory.annotation.Autowired; import org.springframework.web.bind.annotation.*; @RestController @RequestMapping("/blockchain") public class BlockchainController { private final BlockchainService blockchainService; @Autowired public BlockchainController(BlockchainService blockchainService) { this.blockchainService = blockchainService; } @GetMapping("/balance") public String getBalance(@RequestParam String chainType, @RequestParam String address) { return blockchainService.getBalance(chainType, address); } @PostMapping("/sendTransaction") public String sendTransaction(@RequestParam String chainType, @RequestParam String fromAddress, @RequestParam String toAddress, @RequestParam String amount) { return blockchainService.sendTransaction(chainType, fromAddress, toAddress, amount); } }
(七)启动类
MultichainApplication.java是 Spring Boot 的启动入口,通过@SpringBootApplication注解启用 Spring Boot 的自动配置、组件扫描等功能,启动整个应用程序。
java
typescript
代码解读
复制代码
package com.example.multichain; import org.springframework.boot.SpringApplication; import org.springframework.boot.autoconfigure.SpringBootApplication; @SpringBootApplication public class MultichainApplication { public static void main(String[] args) { SpringApplication.run(MultichainApplication.class, args); } }
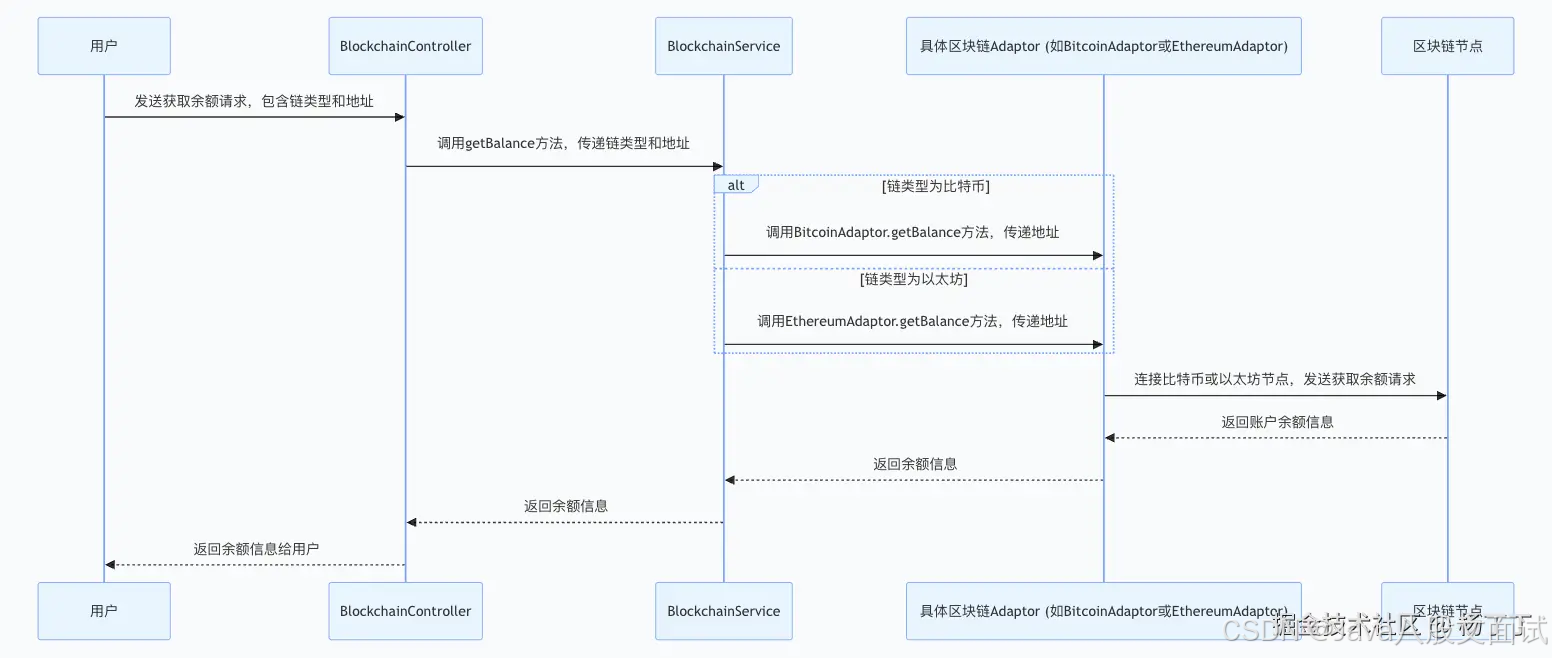
(八)交互流程图
- 获取账户余额交互流程图
2. 发送区块链交易交互流程图

。


 7010
7010

 被折叠的 条评论
为什么被折叠?
被折叠的 条评论
为什么被折叠?
 到【灌水乐园】发言


