


React
-
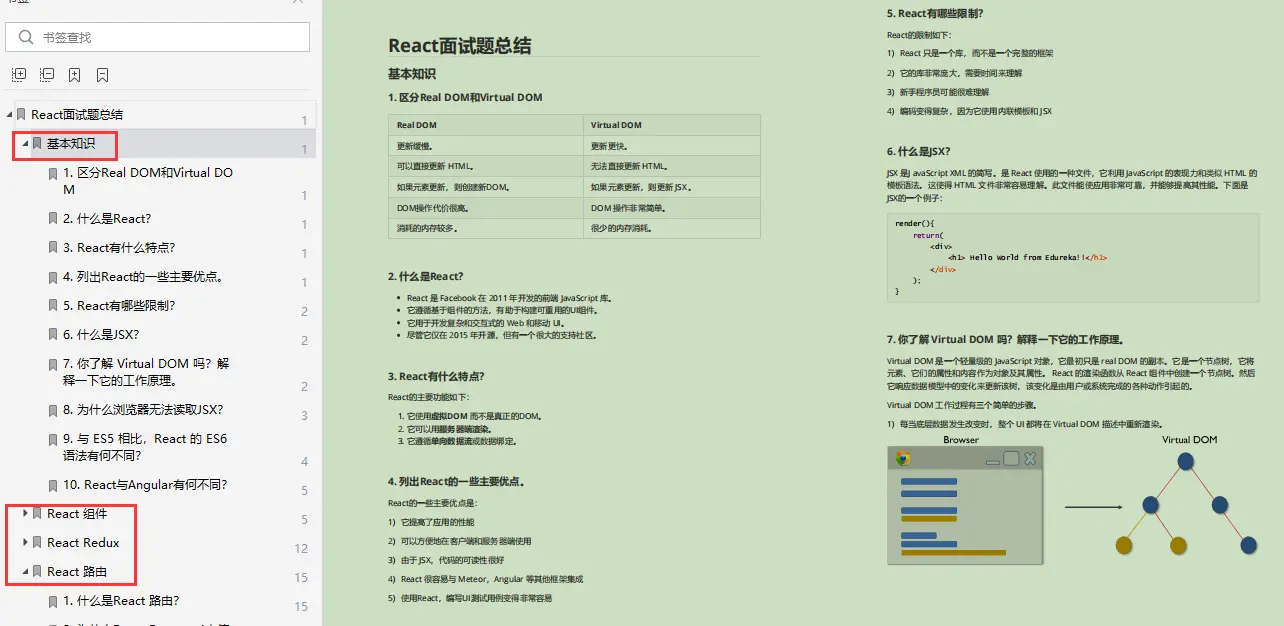
介绍一下react
-
React单项数据流
-
react生命周期函数和react组件的生命周期
-
react和Vue的原理,区别,亮点,作用
-
reactJs的组件交流
-
有了解过react的虚拟DOM吗,虚拟DOM是怎么对比的呢
-
项目里用到了react,为什么要选择react,react有哪些好处
-
怎么获取真正的dom
-
选择react的原因
-
react的生命周期函数
-
setState之后的流程
-
react高阶组件知道吗?
-
React的jsx,函数式编程
-
react的组件是通过什么去判断是否刷新的
-
如何配置React-Router
-
路由的动态加载模块
-
Redux中间件是什么东西,接受几个参数
-
redux请求中间件如何处理并发
开源分享:【大厂前端面试题解析+核心总结学习笔记+真实项目实战+最新讲解视频】

<RelativeLayout
android:id=“@+id/rl_head”
android:layout_width=“match_parent”
android:layout_height=“?android:actionBarSize”
android:background=“@color/colorAccent”>
<ImageView
android:id=“@+id/iv_back”
android:layout_width=“wrap_content”
android:layout_height=“wrap_content”
android:layout_centerVertical=“true”
android:padding=“10dp”
android:src=“@drawable/sel_back”/>
<TextView
android:id=“@+id/tv_title”
android:layout_width=“wrap_content”
android:layout_height=“wrap_content”
android:layout_centerInParent=“true”
android:ellipsize=“end”
android:maxLength=“200”
android:maxLines=“1”
android:text=“标题”/>
<ProgressBar
android:id=“@+id/progressBar”
style=“@style/Widget.AppCompat.ProgressBar.Horizontal”
android:layout_width=“match_parent”
android:layout_height=“wrap_content”
android:layout_below=“@id/rl_head”/>
<WebView android:id=“@+id/webView”
android:layout_width=“match_parent”
android:layout_height=“match_parent”
android:layout_below=“@id/progressBar”>
mWebView = bind.webView;
需要注意的是 这里我采用的是 databinding库,这个库可以很方便 地将我们减少findViewById 的代码,同时可以将数据与我们的View 绑定在一起,是Android支持MVVN的一个库,不了解这个库用法的用法的 请自行搜索,这里基本不涉及到这个库的 用法。
第三步,配置webView
如果想在当前客户端打开浏览器的话,可以给webView 设置 setWebViewClient,并重写 shouldOverrideUrlLoading这个方法
WebSettings settings = mWebView.getSettings();
// 设置是够支持js脚本
settings.setJavaScriptEnabled(true);
mWebView.setWebViewClient(new WebViewClient() {
//重写这个方法 返回true,在当前 webView 打开,否则在浏览器中打开
@Override
public boolean shouldOverrideUrlLoading(WebView view, WebResourceRequest request) {
view.loadUrl(mUrl);
return true;
}
});
如果想显示加载进度的话,可以给webView 设置setWebChromeClient,并重写onProgressChanged()方法,至于onReceivedTitle()这个方法是拿到网页加载中的 标题
mWebView.setWebChromeClient(new WebChromeClient() {
@Override
public void onProgressChanged(WebView view, int newProgress) {
super.onProgressChanged(view, newProgress);
// LUtils.i(“newProgress=” + newProgress);
if (newProgress != 100) {
mProgressBar.setProgress(newProgress);
} else {
mProgressBar.setVisibility(View.GONE);
}
}
@Override
public void onReceivedTitle(WebView view, String title) {
super.onReceivedTitle(view, title);
mTvTitle.setText(title);
}
});
}
想大多数APP的做法一样,如微信,按下返回键,只是想后退,并不是想销毁Activity,我们可以这样做,重写 Activity的 onKeyDown()方法 ,并监听按下的键,采取 相应的 操作。
public boolean onKeyDown(int keyCode, KeyEvent event) {
if ((keyCode == KEYCODE_BACK) && mWebView.canGoBack()) {
mWebView.goBack();
return true;
}
return super.onKeyDown(keyCode, event);
}
既然有后退操作,当然也有前进操作
//是够能够前进
mWebView.canGoForward();
//前进
mWebView.goForward();
第四步
调用该方法开始加载网页
mWebView.loadUrl(mUrl);
到此,webView的基本用法讲解到此。
webView 配置缓存
配置 缓存模式
缓存模式主要有一下几种:
- LOAD_CACHE_ELSE_NETWORK
Use cached resources when they are available, even if they have expired.(如果本地有缓存,优先使用 本地 缓存,即使已经过期了 )
- LOAD_CACHE_ONLY
Don’t use the network, load from the cache.(只使用本地 缓存)
- LOAD_DEFAULT
Default cache usage mode.(默认的缓存 模式)
- LOAD_NORMAL
This constant was deprecated in API level 17. This value is obsolete, as from API level HONEYCOMB and onwards it has the same effect as LOAD_DEFAULT.
- LOAD_NO_CACHE
Don’t use the cache, load from the network.(不使用 本地缓存 )
我们可以通过以下方法设置缓存模式
WebSettings settings = mWebView.getSettings();
settings.setCacheMode(WebSettings.LOAD_DEFAULT);
webView请求错误时候的处理
因为系统自带的 错误页面太丑了,所以我们经常会对其 进行处理,目前本人了解到的主要有两种方法
- 加载本地的控件,显示 错误信息
- 加载自己 定义的 html页面
加载本地的控件
@SuppressWarnings(“deprecation”)
@Override
public void onReceivedError(WebView view, int errorCode, String description, String
failingUrl) {
super.onReceivedError(view, errorCode, description, failingUrl);
if (errorCode == 404) {
//用javascript隐藏系统定义的404页面信息
//String data = “Page NO FOUND!”;
// view.loadUrl(“javascript:document.body.innerHTML=”" + data + “”");
mWebView.setVisibility(View.INVISIBLE);
mErrorView.setVisibility(View.VISIBLE);
}
}
加载 定义的 html页面
@SuppressWarnings(“deprecation”)
@Override
public void onReceivedError(WebView view, int errorCode, String description, String
failingUrl) {
super.onReceivedError(view, errorCode, description, failingUrl);
if (errorCode == 404) {
//用javascript隐藏系统定义的404页面信息
String data = “Page NO FOUND!”;
view.loadUrl(“javascript:document.body.innerHTML=”" + data + “”");
}
}
当然实际开发中为了给用户比较还要的体验,会做非常多的处理,包括有网络情况和没有网络情况的处理,对于没有网络情况的处理,这里我们跳转到打开WiFi界面,详情可以参照我的 上一篇博客android 监听网络状态的变化及实战,而对于有网络情况的处理,这里我们只处理404错误,其他错误请根据项目的需求自行处理。
@SuppressWarnings(“deprecation”)
@Override
public void onReceivedError(WebView view, int errorCode, String description, String
failingUrl) {
super.onReceivedError(view, errorCode, description, failingUrl);
// 没有网络连接
if (false == APP.getInstance().isConnected()) {
APP.getInstance().showWifiDlg(NewsDetailActivity.this);
} else {
if (errorCode == 404) {
//用javascript隐藏系统定义的404页面信息
String data = “Page NO FOUND!”;
view.loadUrl(“javascript:document.body.innerHTML=”" + data + “”");
mWebView.setVisibility(View.INVISIBLE);
} else {//其他状态码错误的处理,这里就不罗列出来了
}
}
}
webView cookie的同步与清除
关于这个问题,我们主要分为两步,
- 怎样获取cookie
- 怎样将cookie与webView进行 同步
对于怎样获取 cookie,主要有以下方法
下面只给出核心代码
第一,使用DefaultHttpClient
DefaultHttpClient client = new DefaultHttpClient();
CookieStore store = client.getCookieStore();
List list = store.getCookies();
第二,使用HttpURLConnection
URLConnection con= (HttpURLConnection) url.openConnection();
// 取得sessionid.
String cookieval = con.getHeaderField(“set-cookie”);
String sessionid;
if(cookieval != null) {
sessionid = cookieval.substring(0, cookieval.indexOf(“;”));
}
发送设置cookie:
URL url = new URL(requrl);
HttpURLConnectioncon= (HttpURLConnection) url.openConnection();
if(sessionid != null) {
con.setRequestProperty(“cookie”, sessionid);
}
第三,使用Retrofit
Call call = tnGouAPi.getTest(test);
call.enqueue(new Callback() {
@Override
public void onResponse(Call call, Response response) {
ResponseBody body = response.body();
Headers headers = response.headers();
Set names = headers.names();
for(String key:names){
String value = headers.get(key);
}
try {
Logger.i(“onResponse: body=” + body.string());
} catch (IOException e) {
e.printStackTrace();
}
}
@Override
public void onFailure(Call call, Throwable t) {
Logger.i(“onResponse: t=” + t.getMessage());
}
});
cookie 同步
/**
- cookie同步
*/
最后
资料过多,篇幅有限
开源分享:【大厂前端面试题解析+核心总结学习笔记+真实项目实战+最新讲解视频】
自古成功在尝试。不尝试永远都不会成功。勇敢的尝试是成功的一半。
names = headers.names();
for(String key:names){
String value = headers.get(key);
}
try {
Logger.i(“onResponse: body=” + body.string());
} catch (IOException e) {
e.printStackTrace();
}
}
@Override
public void onFailure(Call call, Throwable t) {
Logger.i(“onResponse: t=” + t.getMessage());
}
});
cookie 同步
/**
- cookie同步
*/
最后
[外链图片转存中…(img-i2vEyQev-1715663188172)]
[外链图片转存中…(img-2t1x8mww-1715663188173)]
资料过多,篇幅有限
开源分享:【大厂前端面试题解析+核心总结学习笔记+真实项目实战+最新讲解视频】
自古成功在尝试。不尝试永远都不会成功。勇敢的尝试是成功的一半。


 被折叠的 条评论
为什么被折叠?
被折叠的 条评论
为什么被折叠?
 到【灌水乐园】发言


