


1Springboot数据层开发
1.1数据源自动管理
引入jdbc的依赖和springboot的应用场景
Mybatis和JDBCTemplate都是用JDBC做封装,因此需要导入JDBC的依赖
dbcp2是连接池的依赖
还需要导入mysql依赖
<!--JDBC依赖SpringBoot的JDBC启动器-->
<dependency>
    <groupId>org.springframework.boot</groupId>
    <artifactId>spring-boot-starter-jdbc</artifactId>
</dependency>
<!--dbcp2连接池-->
<dependency>
    <groupId>org.apache.commons</groupId>
    <artifactId>commons-dbcp2</artifactId>
</dependency>
<!-- MySQL的JDBC驱动程序,它允许你的应用程序连接到MySQL数据库-->
<dependency>
    <groupId>mysql</groupId>
    <artifactId>mysql-connector-java</artifactId>
    <scope>runtime</scope>
</dependency>
让我们使用yml方式配置,创建application.yml
将数据连接池配置到yml文件当中
在默认情况下, 数据库连接可以使用DataSource池进行自动配置
- 如果Hikari可用, Springboot将使用它。SpringBoot自带的连接池
- 如果Commons DBCP2可用, 我们将使用它。
- Druid连接池
我们可以自己指定数据源配置,通过type来选取使用哪种数据源
spring:
  datasource:
    username: root
    password: 2020
    #数据库的连接URL。
    url: jdbc:mysql://localhost:3306/boot_demo?serverTimezone=GMT%2B8
    #数据库驱动程序
    driver-class-name: com.mysql.jdbc.Driver
    #数据库连接池的类型
    type: com.zaxxer.hikari.HikariDataSource
   # type: org.apache.commons.dbcp2.BasicDataSource
   # type: com.alibaba.druid.pool.DruidDataSource
1.2 配置druid数据源
引入druid的依赖
<dependency>
    <groupId>org.mybatis.spring.boot</groupId>
    <artifactId>mybatis-spring-boot-starter</artifactId>
    <version>1.3.1</version>
</dependency>
完整的pom文件
<?xml version="1.0" encoding="UTF-8"?>
<project xmlns="http://maven.apache.org/POM/4.0.0"
         xmlns:xsi="http://www.w3.org/2001/XMLSchema-instance"
         xsi:schemaLocation="http://maven.apache.org/POM/4.0.0 http://maven.apache.org/xsd/maven-4.0.0.xsd">
    <modelVersion>4.0.0</modelVersion>


    <parent>
        <groupId>org.springframework.boot</groupId>
        <artifactId>spring-boot-starter-parent</artifactId>
        <version>2.5.6</version>
        <relativePath/> <!-- lookup parent from repository -->
    </parent>

    <groupId>com.qcby</groupId>
    <artifactId>SpringBootMybatis</artifactId>
    <version>1.0-SNAPSHOT</version>
    <dependencies>
        <dependency>
            <groupId>org.springframework.boot</groupId>
            <artifactId>spring-boot-starter-web</artifactId>
        </dependency>

        <dependency>
            <groupId>org.springframework.boot</groupId>
            <artifactId>spring-boot-starter-test</artifactId>
            <scope>test</scope>
        </dependency>
        <!--JDBC依赖-->
        <dependency>
            <groupId>org.springframework.boot</groupId>
            <artifactId>spring-boot-starter-jdbc</artifactId>
        </dependency>
        <!--dbcp2连接池-->
        <dependency>
            <groupId>org.apache.commons</groupId>
            <artifactId>commons-dbcp2</artifactId>
        </dependency>
        <!--mysql-->
        <dependency>
            <groupId>mysql</groupId>
            <artifactId>mysql-connector-java</artifactId>
            <scope>runtime</scope>
        </dependency>
        <!--druid连接池-->
        <dependency>
            <groupId>com.alibaba</groupId>
            <artifactId>druid</artifactId>
            <version>1.0.9</version>
        </dependency>
        <dependency>
            <groupId>log4j</groupId>
            <artifactId>log4j</artifactId>
            <version>1.2.16</version>
        </dependency>
        <dependency>
            <groupId>org.mybatis.spring.boot</groupId>
            <artifactId>mybatis-spring-boot-starter</artifactId>
            <version>1.3.1</version>
        </dependency>
    </dependencies>

</project>
spring-boot-starter-web
是 Spring Boot 的 Web 应用程序启动器
包含了 Spring MVC 框架,用于构建基于 MVC 模式的 Web 应用程序,提供了控制器(Controller)、视图解析器、请求映射、模型和视图等组件,使你可以方便地开发 Web 服务和处理 HTTP 请求。
引入了嵌入式的 Servlet 容器,通常是 Tomcat。这意味着你不需要单独部署一个 Servlet 容器,Spring Boot 会将 Tomcat 嵌入到应用程序中,使部署变得更加简单和方便。
提供了对 JSON 数据的支持,通过集成 Jackson 库,你可以轻松地将 Java 对象转换为 JSON 数据进行传输,也可以将接收到的 JSON 数据转换为 Java 对象,方便前后端数据交互。
提供了对 HTTP 客户端和服务器端的支持,包括对 HTTP 请求的处理、响应的生成和处理等,支持各种 HTTP 方法(GET、POST、PUT、DELETE 等)和状态码。
spring-boot-starter-test
Spring Boot 的测试启动器,主要用于编写和运行单元测试、集成测试和端到端测试。
包含了多种测试框架和工具,如 JUnit 5,用于编写单元测试用例,你可以使用 JUnit 5 的注解(如 @Test、@BeforeEach、@AfterEach 等)来编写测试代码。
包含了 Spring Test 框架,它提供了一些工具和注解,如 @SpringBootTest,允许你在测试中加载 Spring 应用程序上下文,进行集成测试,测试 Spring 组件和服务的功能。
修改spring.datasource.type=com.alibaba.druid.pool.DruidDataSource,将连接池改为druid连接池
在application.yml中加入
spring:
  datasource:
    username: root
    password: 2020
    url: jdbc:mysql://localhost:3306/boot_demo?serverTimezone=GMT%2B8
    driver-class-name: com.mysql.jdbc.Driver
    type: com.alibaba.druid.pool.DruidDataSource
    #连接池的相关参数
    initialSize: 5
    minIdle: 5
    maxActive: 20
    maxWait: 60000
    timeBetweenEvictionRunsMillis: 60000
    minEvictableIdleTimeMillis: 300000
    validationQuery: SELECT 1 FROM DUAL
    testWhileIdle: true
    testOnBorrow: false
    testOnReturn: false
    poolPreparedStatements: true
    filters: stat,wall,log4j
    maxPoolPreparedStatementPerConnectionSize: 20
    useGlobalDataSourceStat: true
    connectionProperties: druid.stat.mergeSql=true;druid.stat.slowSqlMillis=500
创建数据源注册类
SpringBoot会自动生成的DataSource对象,DataSource对象的配置类应该放在启动类同级目录或者子目录下,确保能够扫描到
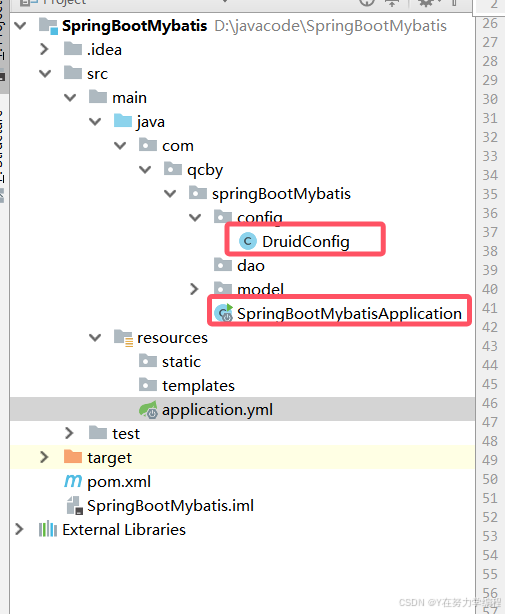
package com.qcby.springBootMybatis.config;
import com.alibaba.druid.pool.DruidDataSource;
import com.alibaba.druid.support.http.StatViewServlet;
import com.alibaba.druid.support.http.WebStatFilter;
import org.springframework.boot.context.properties.ConfigurationProperties;
import org.springframework.boot.web.servlet.FilterRegistrationBean;
import org.springframework.boot.web.servlet.ServletRegistrationBean;
import org.springframework.context.annotation.Bean;
import org.springframework.context.annotation.Configuration;
import javax.sql.DataSource;
import java.util.Arrays;
import java.util.HashMap;
import java.util.Map;
@Configuration
public class DruidConfig {
@ConfigurationProperties(prefix = "spring.datasource")
@Bean
public DataSource dataSource(){
return new DruidDataSource();
}
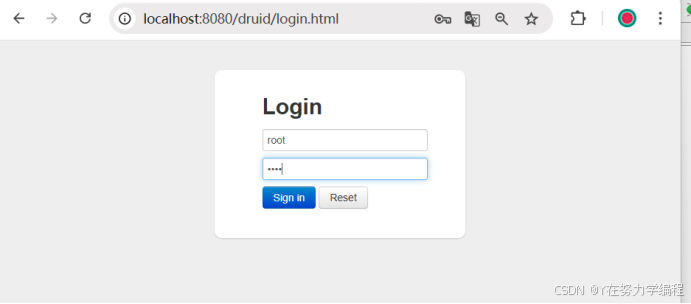
//配置druid运行期监控
//配置 Druid 监控页面的访问权限。
@Bean
public ServletRegistrationBean statViewServlet() {
// 创建一个 ServletRegistrationBean 对象,用于注册 StatViewServlet,并将其映射到 "/druid/*" 路径
ServletRegistrationBean bean = new ServletRegistrationBean(new StatViewServlet(), "/druid/*");
// 创建一个 Map 用于存储初始化参数
Map<String, String> initParams = new HashMap<>();
// 设置登录用户名
initParams.put("loginUsername", "root");
// 设置登录密码
initParams.put("loginPassword", "2020");
// 设置允许访问的 IP 地址列表,这里的空字符串表示允许所有 IP 访问
initParams.put("allow", "");
// 设置拒绝访问的 IP 地址,这里拒绝了 192.168.15.21 这个 IP 的访问
initParams.put("deny", "192.168.15.21");
// 将初始化参数设置到 ServletRegistrationBean 中
bean.setInitParameters(initParams);
// 将配置好的 ServletRegistrationBean 返回,Spring 会将其注册到容器中
return bean;
}
//2、配置一个web监控的filter
@Bean
public FilterRegistrationBean webStatFilter() {
// 创建一个 FilterRegistrationBean 对象,用于注册自定义过滤器
FilterRegistrationBean bean;
// 实例化 FilterRegistrationBean 对象
bean = new FilterRegistrationBean();
// 设置过滤器为 WebStatFilter 实例,WebStatFilter 是阿里巴巴 Druid 提供的一个用于统计 Web 请求信息的过滤器
bean.setFilter(new WebStatFilter());
// 创建一个 Map 用于存储过滤器的初始化参数
Map<String, String> initParams = new HashMap<>();
// 设置排除的请求路径,这里排除了所有的.js 和.css 文件以及 /druid/* 路径下的请求
initParams.put("exclusions", "*.js,*.css,/druid/*");
// 将初始化参数设置到 FilterRegistrationBean 中
bean.setInitParameters(initParams);
// 设置过滤器的 URL 模式,这里表示该过滤器将对所有请求(/*)生效
bean.setUrlPatterns(Arrays.asList("/*"));
// 返回 FilterRegistrationBean 对象,该对象将被 Spring 容器管理,Spring 会根据该对象注册相应的过滤器
return bean;
}
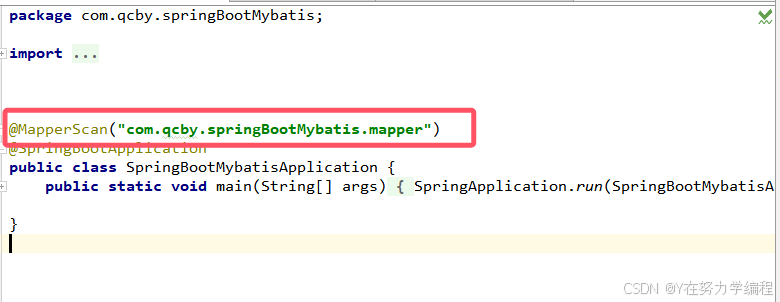
}启动类
package com.qcby.springBootMybatis;

import org.springframework.boot.SpringApplication;
import org.springframework.boot.autoconfigure.SpringBootApplication;

//@MapperScan
@SpringBootApplication
public class SpringBootMybatisApplication {
    public static void main(String[] args) {
        SpringApplication.run(SpringBootMybatisApplication.class, args);
    }

}
打开监控页面

1.3 springboot整合jdbcTemplate
新建一个数据库boot_demo并创建表
SET FOREIGN_KEY_CHECKS=0;

-- ----------------------------
-- Table structure for my_user
-- ----------------------------
DROP TABLE IF EXISTS `my_user`;
CREATE TABLE `my_user` (
  `pid` int(11) NOT NULL AUTO_INCREMENT,
  `username` varchar(255) DEFAULT NULL,
  `password` varchar(255) DEFAULT NULL,
  `p_addr` varchar(255) DEFAULT NULL,
  `gender` int(11) DEFAULT NULL,
  `birth` date DEFAULT NULL,
  PRIMARY KEY (`pid`)
) ENGINE=InnoDB AUTO_INCREMENT=5 DEFAULT CHARSET=utf8;

-- ----------------------------
-- Records of my_user
-- ----------------------------
INSERT INTO `my_user` VALUES ('1', 'zhangsan', '123', '北京', '1', '2020-06-14');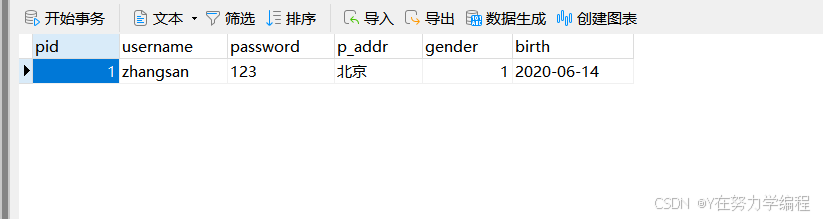
创建Controller
package com.qcby.springBootMybatis.controller;

import org.springframework.beans.factory.annotation.Autowired;
import org.springframework.jdbc.core.JdbcTemplate;
import org.springframework.stereotype.Controller;
import org.springframework.web.bind.annotation.RequestMapping;
import org.springframework.web.bind.annotation.ResponseBody;

import java.util.List;
import java.util.Map;

@Controller
public class TestController {

  @Autowired
    JdbcTemplate jdbcTemplate;
  @ResponseBody
  @RequestMapping("/query")
    public List<Map<String,Object>> query(){
      List<Map<String,Object>> maps=jdbcTemplate.queryForList("SELECT * FROM my_user");
      return maps;
  }
}
启动springboot访问

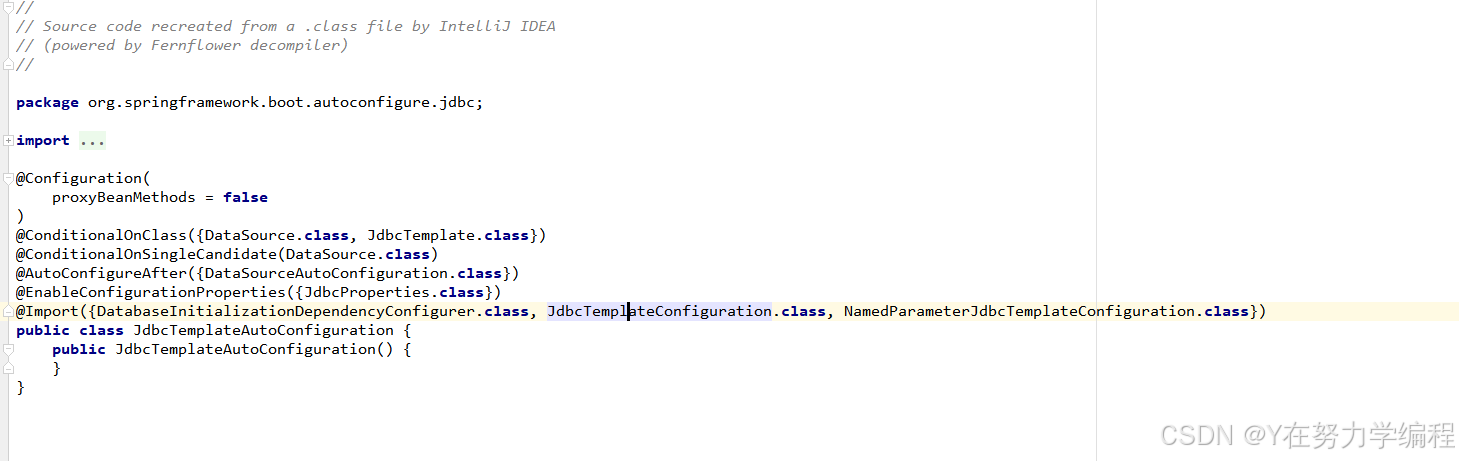
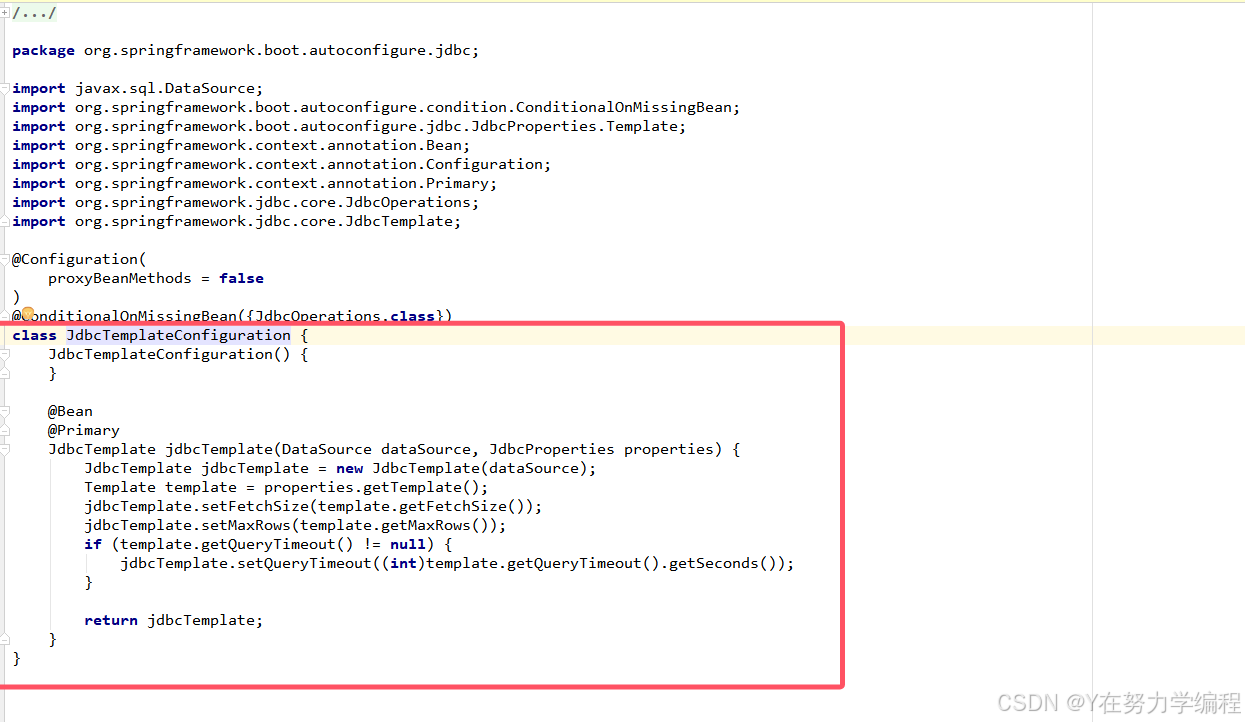
Springboot中提供了JdbcTemplateAutoConfiguration的自动配置
org.springframework.boot.autoconfigure.jdbc.JdbcTemplateAutoConfiguration,\
JdbcTemplateAutoConfiguration源码:
1.4 Springboot整合mybatis注解版
<dependency>
    <groupId>org.mybatis.spring.boot</groupId>
    <artifactId>mybatis-spring-boot-starter</artifactId>
    <version>1.3.1</version>
</dependency>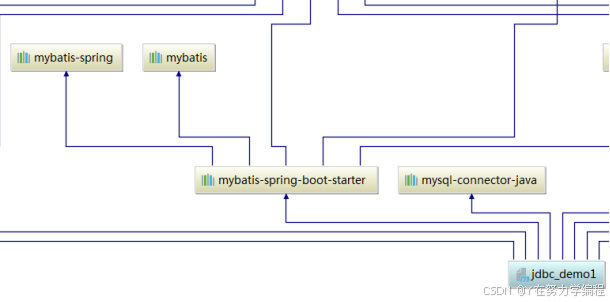
步骤:
1)、配置数据源相关属性
2)、给数据库建表
3)、创建JavaBean
package com.qcby.springBootMybatis.model;

import java.util.Date;

public class MyUser {
    private int pid;

    private String username;

    private String password;

    private String pAddr;

    private String pname;

    private int gender;

    private Date birth;

    public MyUser() {
    }

    public MyUser(int pid, String username, String password, String pAddr, String pname, int gender, Date birth) {
        this.pid = pid;
        this.username = username;
        this.password = password;
        this.pAddr = pAddr;
        this.pname = pname;
        this.gender = gender;
        this.birth = birth;
    }

    public int getPid() {
        return pid;
    }

    public void setPid(int pid) {
        this.pid = pid;
    }

    public String getUsername() {
        return username;
    }

    public void setUsername(String username) {
        this.username = username;
    }

    public String getPassword() {
        return password;
    }

    public void setPassword(String password) {
        this.password = password;
    }

    public String getpAddr() {
        return pAddr;
    }

    public void setpAddr(String pAddr) {
        this.pAddr = pAddr;
    }

    public String getPname() {
        return pname;
    }

    public void setPname(String pname) {
        this.pname = pname;
    }

    public int getGender() {
        return gender;
    }

    public void setGender(int gender) {
        this.gender = gender;
    }

    public Date getBirth() {
        return birth;
    }

    public void setBirth(Date birth) {
        this.birth = birth;
    }

    @Override
    public String toString() {
        return "MyUser{" +
                "pid=" + pid +
                ", username='" + username + '\'' +
                ", password='" + password + '\'' +
                ", pAddr='" + pAddr + '\'' +
                ", pname='" + pname + '\'' +
                ", gender=" + gender +
                ", birth=" + birth +
                '}';
    }
}
4)创建Mapper
package com.qcby.springBootMybatis.mapper;

import com.qcby.springBootMybatis.model.MyUser;
import org.apache.ibatis.annotations.*;

import java.util.List;
import java.util.Map;

@Mapper
public interface MyUseMapper {

    @Options(useGeneratedKeys = true, keyProperty = "pid")
    @Insert("insert into my_user(pid, username, password, p_addr, gender, birth)values(" +
            "#{pid}, #{username}, #{password}, #{pAddr}, #{gender}, #{birth})")
    public  void insert(MyUser user) ;

    @Select("select * from my_user")
    public List<MyUser> selectUsers();

    @Select("select * from my_user t where t.username = #{username} and t.password = #{password}")
    public MyUser selectUsersById(Map<String, String> map);


    @Select("select * from my_user t where t.pid = #{pid}")
    public MyUser selectUsersById1(int userId);

    @Update("update  my_user set " +
            "username = #{username}," +
            "password=#{password}, " +
            "p_addr= #{pAddr}, " +
            "gender=#{gender}, " +
            "birth=#{birth} " +
            "where pid = #{pid}")
    public  void update(MyUser user) ;

    @Delete("delete from my_user  where pid = #{pid}")
    public  void delete(int pid) ;
}
单元测试
package com.qcby.springBootMybatis;

import com.qcby.springBootMybatis.mapper.MyUseMapper;
import com.qcby.springBootMybatis.model.MyUser;
import org.junit.jupiter.api.Test;
import org.springframework.beans.factory.annotation.Autowired;
import org.springframework.boot.test.context.SpringBootTest;
import org.springframework.context.ApplicationContext;
import org.springframework.jdbc.core.JdbcTemplate;

import javax.sql.DataSource;
import java.sql.SQLException;

@SpringBootTest
public class MybatisBootTest {

    @Autowired
    JdbcTemplate jdbcTemplate;

    @Autowired
    MyUseMapper myUseMapper;

    @Autowired
    ApplicationContext context;

    @Test
    public void contextLoads() throws SQLException{
        DataSource bean= (DataSource) context.getBean("dataSource");
        System.out.println(bean);
    }

    @Test
    public void testMybatis() throws SQLException{
        MyUser u=myUseMapper.selectUsersById1(1);
    }
}
解决驼峰模式和数据库中下划线不能映射的问题。
package com.qcby.springBootMybatis.config;
import org.apache.ibatis.logging.stdout.StdOutImpl;
import org.mybatis.spring.boot.autoconfigure.ConfigurationCustomizer;
import org.springframework.context.annotation.Bean;
import org.springframework.context.annotation.Configuration;
@Configuration
public class MybatisConfig {
@Bean
public ConfigurationCustomizer getCustomizer(){
return new ConfigurationCustomizer() {
@Override
public void customize(org.apache.ibatis.session.Configuration configuration) {
//解决驼峰命名的问题
configuration.setMapUnderscoreToCamelCase(true);
//日志文件输出
configuration.setLogImpl(StdOutImpl.class);
}
};
}
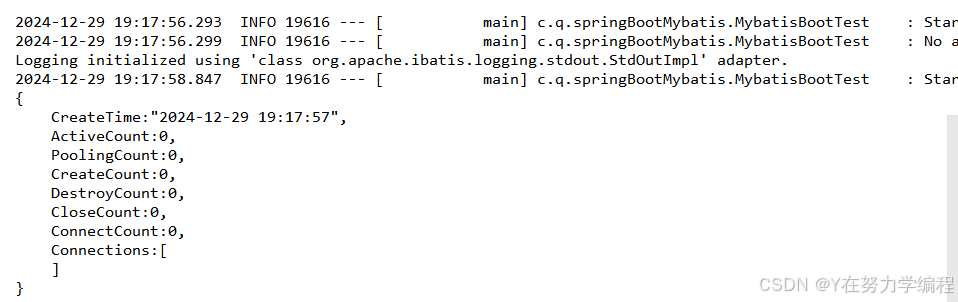
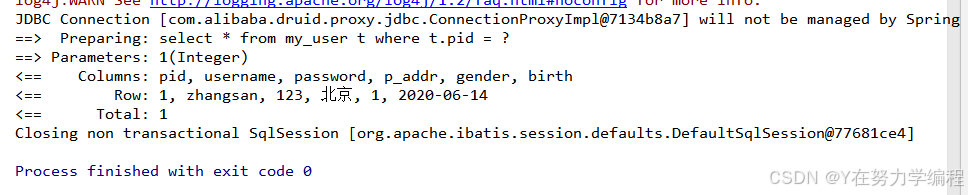
}执行结果
第一个测试方法的结果
第二个测试方法的结果
我们同样可以在mybatis的接口上不加@Mapper注解,通过扫描器注解来扫描,Mapper接口存放在com.qcby.springBootMybatis.mapper
1.5 Springboot整合mybatis配置文件
创建sqlMapConfig.xml配置文件
<?xml version="1.0" encoding="UTF-8"?>
<!DOCTYPE configuration
        PUBLIC "-//mybatis.org//DTD Config 3.0//EN"
        "http://mybatis.org/dtd/mybatis-3-config.dtd">
<configuration>
</configuration>
创建映射文件MyUserMapper.xml
<?xml version="1.0" encoding="UTF-8"?>
<!DOCTYPE mapper PUBLIC "-//mybatis.org//DTD Mapper 3.0//EN" "http://mybatis.org/dtd/mybatis-3-mapper.dtd">
<mapper namespace="cn.tx.mapper.TxPersonMapper">
    <select id="getPersons" resultType="TxPerson">
        select * from tx_person
    </select>
</mapper>
在application.yml中配置mybatis的信息
mybatis:
  config-location: classpath:mybatis/sqlMapConfig.xml
  mapper-locations: classpath:mybatis/mapper/*.xml
  type-aliases-package: cn.tx.springboot.jdbc_demo1
2 Springboot开发企业信息管理系统
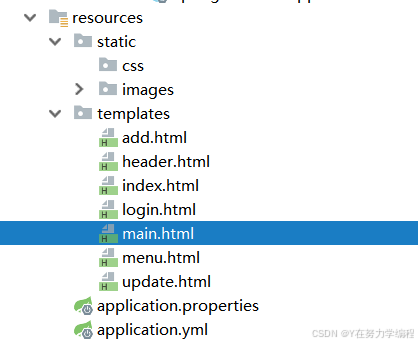
2.1 引入资源
1.创建项目引入页面原型
2.引入maven的依赖和starters
<?xml version="1.0" encoding="UTF-8"?>
<project xmlns="http://maven.apache.org/POM/4.0.0"
         xmlns:xsi="http://www.w3.org/2001/XMLSchema-instance"
         xsi:schemaLocation="http://maven.apache.org/POM/4.0.0 http://maven.apache.org/xsd/maven-4.0.0.xsd">
    <modelVersion>4.0.0</modelVersion>

    <!--添加父工程目录 为了更好的将子目录交给SpringBoot管理-->
    <parent>
        <groupId>org.springframework.boot</groupId>
        <artifactId>spring-boot-starter-parent</artifactId>
        <version>2.5.6</version>
        <relativePath/> <!-- lookup parent from repository -->
    </parent>

    <groupId>com.qcby</groupId>
    <artifactId>SpringBootTest</artifactId>
    <version>1.0-SNAPSHOT</version>

    <!--添加内容-->
    <dependencies>
        <dependency>
            <groupId>org.springframework.boot</groupId>
            <artifactId>spring-boot-starter-web</artifactId>
        </dependency>
        <dependency>
            <groupId>org.springframework.boot</groupId>
            <artifactId>spring-boot-starter-test</artifactId>
            <scope>test</scope>
        </dependency>
        <dependency>
            <groupId>org.springframework.boot</groupId>
            <artifactId>spring-boot-devtools</artifactId>
            <optional>true</optional>
        </dependency>
        <dependency>
            <groupId>org.springframework.boot</groupId>
            <artifactId>spring-boot-starter-thymeleaf</artifactId>
        </dependency>
        <dependency>
            <groupId>org.webjars</groupId>
            <artifactId>jquery</artifactId>
            <version>3.3.1</version>
        </dependency>
        <dependency>
            <groupId>org.mybatis.spring.boot</groupId>
            <artifactId>mybatis-spring-boot-starter</artifactId>
            <version>1.3.1</version>
        </dependency>
        <dependency>
            <groupId>com.alibaba</groupId>
            <artifactId>druid</artifactId>
            <version>1.0.9</version>
        </dependency>
        <dependency>
            <groupId>log4j</groupId>
            <artifactId>log4j</artifactId>
            <version>1.2.15</version>
        </dependency>
        <dependency>
            <groupId>mysql</groupId>
            <artifactId>mysql-connector-java</artifactId>
            <scope>runtime</scope>
        </dependency>
    </dependencies>

</project>
2.2 thymeleaf模板处理
创建mvc的配置类
package com.qcby.springBootTest.config;

import org.mybatis.spring.annotation.MapperScan;
import org.springframework.context.annotation.Configuration;
import org.springframework.web.servlet.config.annotation.InterceptorRegistry;
import org.springframework.web.servlet.config.annotation.ViewControllerRegistry;
import org.springframework.web.servlet.config.annotation.WebMvcConfigurer;

import java.util.ArrayList;
import java.util.List;

@Configuration
@MapperScan("com.qcby.springBootTest.mapper")
public class MyMvcConfig implements WebMvcConfigurer {

    @Override
    public void addViewControllers(ViewControllerRegistry registry) {
        registry.addViewController("/toLogin").setViewName("login");
        registry.addViewController("/header").setViewName("header");
        registry.addViewController("/index").setViewName("index");
        registry.addViewController("/menu").setViewName("menu");
        registry.addViewController("/add").setViewName("add");
//        registry.addViewController("/main").setViewName("main");
    }


    @Override
    public void addInterceptors(InterceptorRegistry registry) {

        List<String> excludePatterns = new ArrayList<String>();
        excludePatterns.add("/css/**");
        excludePatterns.add("/images/**");
        excludePatterns.add("/toLogin");
        excludePatterns.add("/login");
        registry.addInterceptor(new LoginInterceptor())
                .addPathPatterns("/**")
                .excludePathPatterns(excludePatterns);
    }
}
2.3 创建数据库环境
1.创建数据库执行脚本
SET FOREIGN_KEY_CHECKS=0;

-- ----------------------------
-- Table structure for my_user
-- ----------------------------
DROP TABLE IF EXISTS `my_user`;
CREATE TABLE `my_user` (
  `pid` int(11) NOT NULL AUTO_INCREMENT,
  `username` varchar(255) DEFAULT NULL,
  `password` varchar(255) DEFAULT NULL,
  `p_addr` varchar(255) DEFAULT NULL,
  `gender` int(11) DEFAULT NULL,
  `birth` date DEFAULT NULL,
  PRIMARY KEY (`pid`)
) ENGINE=InnoDB AUTO_INCREMENT=5 DEFAULT CHARSET=utf8;

-- ----------------------------
-- Records of my_user
-- ----------------------------
INSERT INTO `my_user` VALUES ('1', 'zhangsan', '123', '北京', '1', '2020-06-14');
2..配置druid数据源
spring:
  datasource:
    username: root
    password: 2020
    url: jdbc:mysql://localhost:3306/boot_demo
    driver-class-name: com.mysql.jdbc.Driver
    type: com.alibaba.druid.pool.DruidDataSource
    initialSize: 5
    minIdle: 5
    maxActive: 20
    maxWait: 60000
    timeBetweenEvictionRunsMillis: 60000
    minEvictableIdleTimeMillis: 300000
    validationQuery: SELECT 1 FROM DUAL
    testWhileIdle: true
    testOnBorrow: false
    testOnReturn: false
    poolPreparedStatements: true
    filters: stat,wall,log4j
    maxPoolPreparedStatementPerConnectionSize: 20
    useGlobalDataSourceStat: true
    connectionProperties: druid.stat.mergeSql=true;druid.stat.slowSqlMillis=500
server:
  port: 8084
3.创建数据源的配置类
package com.qcby.springBootTest.config;

import com.alibaba.druid.pool.DruidDataSource;
import org.springframework.boot.context.properties.ConfigurationProperties;
import org.springframework.context.annotation.Bean;
import org.springframework.context.annotation.Configuration;

import javax.sql.DataSource;

@Configuration
public class DruidConfig {
    @ConfigurationProperties(prefix = "spring.datasource")
    @Bean
    public DataSource dataSource(){
        return new DruidDataSource();
    }

}
2.4 编写数据层
1.创建mybatis的配置类MybatisConfig
package com.qcby.springBootTest.config;

import org.mybatis.spring.boot.autoconfigure.ConfigurationCustomizer;
import org.springframework.context.annotation.Bean;
import org.springframework.context.annotation.Configuration;

@Configuration
public class MybatisConfig {


    @Bean
    public ConfigurationCustomizer getCustomizer(){
        return new ConfigurationCustomizer() {
            @Override
            public void customize(org.apache.ibatis.session.Configuration configuration) {
                configuration.setMapUnderscoreToCamelCase(true);
            }
        };
    }

}
2.创建数据层 MyUserMapper
package com.qcby.springBootTest.mapper;


import com.qcby.springBootTest.model.MyUser;
import org.apache.ibatis.annotations.*;

import java.util.List;
import java.util.Map;
@Mapper
public interface MyUserMapper {


    @Options(useGeneratedKeys = true, keyProperty = "pid")
    @Insert("insert into my_user(username, password, p_addr, gender, birth)values(" +
            "#{username}, #{password}, #{pAddr}, #{gender}, #{birth})")
    public  void insert(MyUser user) ;

    @Select("select * from my_user")
    public List<MyUser> selectUsers();

    @Select("select * from my_user t where t.username = #{username} and t.password = #{password}")
    public MyUser selectUsersById(Map<String, String> map);


    @Select("select * from my_user t where t.pid = #{pid}")
    public MyUser selectUsersById1(int userId);

    @Update("update  my_user set " +
            "username = #{username}," +
            "password=#{password}, " +
            "p_addr= #{pAddr}, " +
            "gender=#{gender}, " +
            "birth=#{birth} " +
            "where pid = #{pid}")
    public  void update(MyUser user) ;

    @Delete("delete from my_user  where pid = #{pid}")
    public  void delete(int pid) ;

}
2.5 编写Service
package com.qcby.springBootTest.service;


import com.qcby.springBootTest.model.MyUser;

import java.util.List;
import java.util.Map;

public interface MyUserService {

    public  void insert(MyUser user) ;

    public  void update(MyUser user) ;

    public List<MyUser> selectUsers();

    public MyUser selectUsersById(Map<String, String> map);

    public MyUser selectUsersById1(int userId);

    public  void delete(int pid) ;


}
实现类
package com.qcby.springBootTest.service.impl;

import com.qcby.springBootTest.mapper.MyUserMapper;
import com.qcby.springBootTest.model.MyUser;
import com.qcby.springBootTest.service.MyUserService;
import org.springframework.beans.factory.annotation.Autowired;
import org.springframework.stereotype.Service;

import java.util.List;
import java.util.Map;

@Service
public class MyUserServiceImpl implements MyUserService {
    @Autowired
    private MyUserMapper myUserMapper;

    @Override
    public void insert(MyUser user) {
        myUserMapper.insert(user);
    }

    @Override
    public void update(MyUser user) {
       myUserMapper.update(user);
    }

    @Override
    public List<MyUser> selectUsers() {
        return myUserMapper.selectUsers();
    }

    @Override
    public MyUser selectUsersById(Map<String, String> map) {
        return myUserMapper.selectUsersById(map);
    }

    @Override
    public MyUser selectUsersById1(int userId) {
        return myUserMapper.selectUsersById1(userId);
    }

    @Override
    public void delete(int pid) {
       myUserMapper.delete(pid);
    }
}
2.6 页面处理
header页面
<!DOCTYPE html>
<html lang="en" xmlns:th="http://www.thymeleaf.org">
<head>
    <meta charset="UTF-8">
    <title>登录页面</title>
</head>
<body>
<div id="main">
    <div id="welcome">欢迎你回来
        <span th:text="${session.user.username}" th:if="${not #strings.isEmpty(session.user)}"></span>
        <a target="_top" th:text="请登录" th:href="@{/toLogin}" th:if="${#strings.isEmpty(session.user)}"></a>
        <img src="images/header.gif" /> 学习是最好的投资</div>
    <div id="adminop">
        <ul>
            <li><a href="#">站点首页</a></li>
            <li><a href="javascript:parent.location.reload();">管理首页</a></li>
            <li><a href="javascript:parent.location.reload();">退出管理</a></li>
            <li><a href="#">站点首页</a></li>
        </ul>
    </div>
</div>
</body>
</html>
login页面
<!DOCTYPE html PUBLIC "-//W3C//DTD XHTML 1.0 Transitional//EN" "http://www.w3.org/TR/xhtml1/DTD/xhtml1-transitional.dtd">
<html lang="en" xmlns:th="http://www.thymeleaf.org">
<head>
    <meta http-equiv="Content-Type" content="text/html; charset=utf-8" />
    <title>用户登录</title>
    <!--<link href="css/login.css" rel="stylesheet" type="text/css" />-->
    <link th:href="@{/css/login.css}" rel="stylesheet" type="text/css" />
    <script th:src="@{/webjars/jquery/3.3.1/jquery.js}"></script>
    <script>
        function login1() {
            $("form").submit();
        }

    </script>
</head>
<body>

<div id="login">

    <div id="top">
        <div id="top_left"><img src="images/header.gif" /></div>
        <div id="top_center"></div>
    </div>
    <form th:action="@{/login}" method="post">
        <div id="center">
            <div id="center_left"></div>
            <div id="center_middle">
                <div style="text-align: center; color: red" th:text="${tip}"></div>
                <div id="user">用 户
                    <input type="text" name="username" />
                </div>
                <div id="password">密   码
                    <input type="password" name="password" />
                </div>
                <div id="btn">
                    <a href="#" onclick="login1()">登录</a>
                    <a href="#">清空</a>
                </div>
            </div>
            <div id="center_right"></div>
        </div>
    </form>
    <div id="down">
        <div id="down_left">
            <div id="inf">
                <span class="inf_text">版本信息</span>
                <span class="copyright">信息管理系统 v2.0</span>
            </div>
        </div>
        <div id="down_center"></div>
    </div>
</div>
</body>
</html>
main页面
<!DOCTYPE html PUBLIC "-//W3C//DTD XHTML 1.0 Transitional//EN" "http://www.w3.org/TR/xhtml1/DTD/xhtml1-transitional.dtd">
<html lang="en" xmlns:th="http://www.thymeleaf.org">
<head>
    <meta charset="UTF-8">
    <title>Title</title>
</head>
<body>
<frameset cols="*" rows="136, *" id="frame_main"  border="0">
    <frame src="header" noresize="noresize" name="header">

    <frameset cols="240, *">
        <frame th:src="@{/menu}" name="menu" />
        <frame th:src="@{/main}" name="main">
    </frameset>
</frameset>
<a th:href="@{/add}">添加</a>
<table class="mt" align="center">
    <tr >
        <td >用户名</td>
        <td >密码</td>
        <td >地址</td>
        <td >生日</td>
        <td >操作</td>
    </tr>
    <tr th:each="user:${users}">
        <td th:text="${user.username}"></td>
        <td th:text="${user.password}"></td>
        <td th:text="${user.pAddr}"></td>
        <td th:text="${#calendars.format(user.birth,'yyyy-MM-dd')}"></td>
        <td>
            <a th:href="@{/getUser(pid=${user.pid})}" >修改</a>
            <a th:href="@{/delete(pid=${user.pid})}" >删除</a>
        </td>
    </tr>
</table>
</body>
</html>
add页面
<!DOCTYPE html>
<html lang="en" xmlns:th="http://www.thymeleaf.org">
<head>
    <meta charset="UTF-8">
    <title>Title</title>
</head>
<body>
<form th:action="@{/save}" method="post">
    <table class="mt" align="center">
        <tr >
            <td >用户名</td>
            <td><input name="username" type="text"/></td>
        </tr>
        <tr >
            <td >密码</td>
            <td><input name="password" type="password"/></td>

        </tr>
        <tr >
            <td >地址</td>
            <td><input name="pAddr" type="text"/></td>
        </tr>
        <tr >
            <td >生日</td>
            <td><input name="birth" type="date"/></td>

        </tr>
        <tr >
            <td >性别</td>
            <td>
                <select name="gender">
                    <option value="1">男</option>
                    <option value="2">女</option>
                </select>
            </td>
        </tr>
        <tr >
            <td ></td>
            <td><input  type="submit"/></td>
        </tr>
    </table>
</form>
</body>
</html>
update页面
<!DOCTYPE html>
<html lang="en" xmlns:th="http://www.thymeleaf.org">
<head>
    <meta charset="UTF-8">
    <title>Title</title>
</head>
<body>
<form th:action="@{/update}" method="post">
    <input type="hidden" name="pid" th:value="${user.pid}"/>
    <table class="mt" align="center">
        <tr >
            <td >用户名</td>
            <td><input name="username" type="text" th:value="${user.username}"/></td>
        </tr><tr >
        <td >密码</td>
        <td><input name="password" type="password" th:value="${user.password}"/></td>
    </tr><tr >
        <td >地址</td>
        <td><input name="pAddr" type="text" th:value="${user.pAddr}"/></td>
    </tr>
        <tr >
            <td >地址</td>
            <td><input name="gender" type="text" th:value="${user.gender}"/></td>
        </tr>
        <tr >
            <td >生日</td>
            <td><input name="birth" type="text" th:value="${#calendars.format(user.birth, 'yyyy-MM-dd')}"/></td>
        </tr><tr >
        <td ></td>
        <td><input  type="submit"/></td>
    </tr>
    </table>
</form>
</body>
</html>
2.7 表现层
package com.qcby.springBootTest.controller;


import com.qcby.springBootTest.model.MyUser;
import com.qcby.springBootTest.service.MyUserService;
import org.springframework.beans.factory.annotation.Autowired;
import org.springframework.stereotype.Controller;
import org.springframework.ui.Model;
import org.springframework.web.bind.annotation.PostMapping;
import org.springframework.web.bind.annotation.RequestMapping;

import javax.servlet.http.HttpSession;
import java.util.HashMap;
import java.util.List;
import java.util.Map;

@Controller
public class MyUserController {

    @Autowired
    private MyUserService userService;
    @PostMapping("/login")
    public String login(HttpSession session, String username, String password, Model model) {
        Map<String, String> map = new HashMap<String, String>();
        map.put("username", username);
        map.put("password", password);
        MyUser user = userService.selectUsersById(map);
        if (user != null){
            session.setAttribute("user", user);
            return "redirect:main";
        }else{
            model.addAttribute("tip","用户名或者密码错误");
            return "login";
        }
    }

    @RequestMapping("/main")
    public String main(Model model){
        List<MyUser> users= userService.selectUsers();
        model.addAttribute("users",users);
        return "main";
    }


    @PostMapping("/save")
    public String save(MyUser user) {
        // 在这里可以对用户输入的数据进行处理,例如将其保存到数据库
        // 假设 userService 已经正确注入
        userService.insert(user);
        return "redirect:/main";
    }

    @RequestMapping("/getUser")
    public String getUser(Integer pid,Model model){
        MyUser user=userService.selectUsersById1(pid);
        model.addAttribute("user",user);
        return "update";
    }

    @RequestMapping("/update")
    public String update(MyUser user){
        userService.update(user);
        return "redirect:/main";
    }

    @RequestMapping("/delete")
    public String delete(Integer pid){
        userService.delete(pid);
        return "redirect:/main";
    }

}


 760
760

 被折叠的 条评论
为什么被折叠?
被折叠的 条评论
为什么被折叠?
 到【灌水乐园】发言


