


原文链接:https://m4lwhere.medium.com/the-ultimate-guide-for-bloodhound-community-edition-bhce-80b574595acf
I’ve run into many interested hackers who want to learn how to use BloodHound, but struggle to get started. This results in many getting lost and getting frustrated. Beyond this, if we’re in a pentest engagement, we do a complete disservice to the customer by not enumerating as many risks as possible.
我遇到过许多感兴趣的黑客,他们想学习如何使用 BloodHound,但难以入门。这导致许多人迷路和沮丧。除此之外,如果我们正在进行渗透测试,我们没有列举尽可能多的风险,从而对客户造成了完全的伤害。
This article will cover setting up, collecting data, analyzing the data, and providing value with that data. This will use the GOADv2 forest as sample data for collection and analysis. I’ve already collected some sample data and placed it on a repository to ingest for analysis and practice.
本文将介绍如何设置、收集数据、分析数据以及提供数据的价值。这将使用 GOADv2 森林作为样本数据进行收集和分析。我已经收集了一些示例数据并将其放在存储库中,以便提取以进行分析和练习。
Huge thanks to the SpecterOps team for creating BloodHound and giving it to the community!
非常感谢 SpecterOps 团队创建 BloodHound 并将其提供给社区!
The Why 原因
Before we start, we need to understand the WHY. Active Directory is notoriously complex, and with anything that involves complexity, there is plenty of room for errors. AD is interesting in the fact that most environments don’t have traditional CVE-based exploits available — instead most escalation attacks rely on misconfigurations. Our job is to enumerate as many of these escalation scenarios as possible, define their risk, and present recommendations to reduce risk to lowest possible levels.
在开始之前,我们需要了解 WHY。众所周知,Active Directory 非常复杂,任何涉及复杂性的事情都存在很大的错误空间。AD 的有趣之处在于,大多数环境都没有可用的基于 CVE 的传统漏洞利用,相反,大多数升级攻击都依赖于错误的配置。我们的工作是尽可能多地列举这些升级情景,定义它们的风险,并提出建议以将风险降低到尽可能低的水平。
If you want to get paid to do this work, you must be able to effectively present these risks in writing!
如果您想通过做这项工作获得报酬 ,您必须能够有效地以书面形式呈现这些风险!
The Background 背景
BloodHound has been developed by SpecterOps as a way to visualize relationships between objects in AD. Because of the scale and complexity of most AD networks, manually auditing these relationships is a nightmare. Instead, the original BloodHound relied on Neo4j’s Graph Theory to visualize this information to escalate between objects.
BloodHound 由 SpecterOps 开发,用于可视化 AD 中对象之间的关系。由于大多数 AD 网络的规模和复杂性,手动审核这些关系是一场噩梦。相反,最初的 BloodHound 依靠 Neo4j 的图论来可视化这些信息,以便在对象之间升级。
There are currently three versions of BloodHound you need to know about:
目前您需要了解三个版本的 BloodHound:
BloodHound Legacy: The original BloodHound, no longer supported. Built on an Electron-based application, somewhat complicated to set up.
BloodHound Legacy:最初的 BloodHound,不再受支持。基于基于 Electron 的应用程序构建,设置起来有些复杂。
BloodHound Community Edition: Released in August 2023, actively supported. Leverages docker compose to manage a set of containers, exceptionally easy to deploy. Smooth web application interface.
BloodHound 社区版 :2023 年 8 月发布,积极支持。利用 docker compose 管理一组容器,非常易于部署。流畅的 Web 应用程序界面。
BloodHound Enterprise: Paid version of BloodHound for attack path management. The major difference is that this version is used for risk management and validation.
BloodHound Enterprise:用于攻击路径管理的 BloodHound 付费版本。主要区别在于此版本用于风险管理和验证。
The Basics 基础知识
There are a few different parts we need to be aware about. First, the BloodHound application itself is nothing more than a front-end to help visualize, present, and analyze data. We need to gather data about the environment with a collector to have it ingested into the application for analysis.
我们需要注意几个不同的部分。首先,BloodHound 应用程序本身只不过是一个前端,用于帮助可视化、呈现和分析数据。我们需要使用收集器收集有关环境的数据,以便将其摄取到应用程序中进行分析。
The Collector 收藏家
We need to gather the data from the AD environment in order to feed it into BloodHound for analysis. There are two major collectors you need to know about:
我们需要从 AD 环境中收集数据,以便将其馈送到 BloodHound 进行分析。您需要了解两个主要的收藏家:
SharpHound: This is the officially supported collector tool for BloodHound, written in C#. Must be run from a Windows-based PC connected to the domain in order to collect the information.
SharpHound: 这是 BloodHound 官方支持的收集器工具,用 C# 编写。必须从连接到域的基于 Windows 的 PC 上运行,以便收集信息。
BloodHound.py: A community driven python script used to collect AD data. Can be run from a Linux-based machine, such as a Raspberry Pi. Excellent use-case for a pentesting dropbox.
BloodHound.py:用于收集 AD 数据的社区驱动的 python 脚本。可以从基于 Linux 的计算机(如 Raspberry Pi)运行。渗透测试 Dropbox 的绝佳用例。
It’s important to realize that at the time of this writing, bloodhound.py does not natively support BloodHound-CE. You must use the bloodhound-ce branch of the bloodhound.pypython collector if you choose to use this. We cannot mix legacy collectors with Community Edition collectors — this will cause the ingest to fail (and it’s frustrating!).
请务必认识到,在撰写本文时,bloodhound.py 本身并不支持 BloodHound-CE。如果您选择使用它,则必须使用 bloodhound.pypython 收集器的 bloodhound-ce 分支 。我们不能将旧版收集器与 Community Edition 收集器混合使用 — 这将导致摄取失败(这很令人沮丧!
The Frontend 前端
BloodHound itself is the web application used to interpret the data from the collector. This is the GUI-based application we interact with to interpret the data for risks and escalation paths. The frontend is only as good as the data it’s ingested from the collector.
BloodHound 本身是用于解释来自收集器的数据的 Web 应用程序。这是我们与之交互的基于 GUI 的应用程序,用于解释风险和升级路径的数据。前端的好坏取决于它从收集器中提取的数据。
The Ingest 摄取
Within the GUI frontend is the File Ingest. This is what is used to place the data gathered from the collector to be interpreted into the Neo4j database. Once parsed, this data will be accessible to the GUI application for analysis.
GUI 前端中是 File Ingest。这是用来将从收集器收集的数据放入 Neo4j 数据库中的内容。解析后,GUI 应用程序将可以访问此数据以进行分析。
The API
One of the most exciting parts about BloodHound-CE is the HTTP API available to query data. This can help us automate and extract data quickly to prove value in a pentesting engagement.
BloodHound-CE 最令人兴奋的部分之一是可用于查询数据的 HTTP API。这可以帮助我们快速自动化和提取数据,以证明渗透测试活动的价值。
Legacy BloodHound 传承 BloodHound
We’ve touched on the original version of BloodHound legacy and why it’s important earlier, but this is critical to understand. The older collectors DO NOT WORK with the Community Edition of BloodHound. Anyone can still use the legacy version and it still works great — however, it will not be up to date on the latest threats. Since we’re proving value to customers, we need to use items which can evaluate the most applicable risk to them.
我们之前已经谈到了 BloodHound 遗产的原始版本以及为什么它很重要,但理解这一点至关重要。较旧的收藏家不适用于 BloodHound 社区版。任何人都可以使用旧版本,并且它仍然运行良好——但是,它不会了解最新的威胁。由于我们正在向客户证明价值,因此我们需要使用可以评估对他们最适用风险的项目。
Getting Started 开始
Great, now that we know all about each part of the puzzle, we can get started by installing BloodHound-CE and collecting data for our analysis.
太好了,既然我们已经了解了拼图的每个部分,我们可以从安装 BloodHound-CE 并收集数据进行分析开始。
Start the Containers 启动容器
Community Edition leverages docker compose through a set of containers. This significantly enhances the simplicity of starting up and managing infrastructure for BloodHound, as everything is containerized within a docker network.
Community Edition 通过一组容器利用 docker compose。这大大提高了 BloodHound 启动和管理基础设施的简单性,因为一切都在 Docker 网络中容器化。
To start, all we need to do is download the docker-compose.yml file and instruct docker to build the containers. There’s a simple one-liner provided by SpecterOps to begin:
首先,我们需要做的就是下载 docker-compose.yml 文件并指示 docker 构建容器。SpecterOps 提供了一个简单的单行代码来开始:
curl -L https://ghst.ly/getbhce | docker compose -f - up
Note: If you’re using Kali, there’s a chance the installed docker version does not have the compose command. If this is the case, you will receive an error similar to below:
注意 :如果您使用的是 Kali,则安装的 docker 版本可能没有 compose 命令。如果是这种情况,您将收到类似于以下内容的错误:
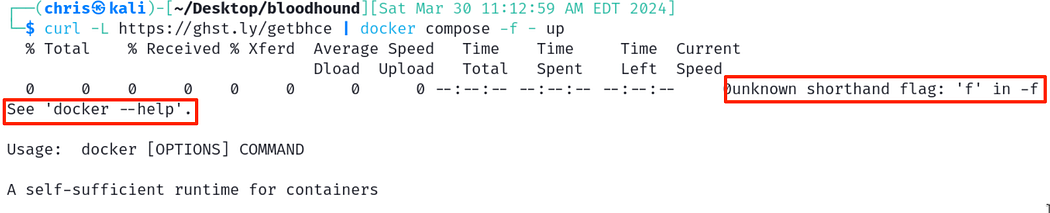
Error with docker compose command, don’t worry — we can fix it!
docker compose 命令出错,别担心 - 我们可以修复它!
NOTE: As of early December 2024, Debian has removed docker-compose from packages. What we need to do now is to install from pip (which I personally have not had luck) or download the precompiled binary from GitHub.
注意 :截至 2024 年 12 月初,Debian 已从软件包中删除了 docker-compose。我们现在需要做的是从 pip 安装(我个人没有运气)或从 GitHub 下载预编译的二进制文件。
These binaries are available: https://github.com/docker/compose/releases. Download the applicable one for your architecture and then place it into your $PATH.
这些二进制文件可用:https://github.com/docker/compose/releases。下载适用于您的架构的 Importance,然后将其放入您的 $PATH。
wget https://github.com/docker/compose/releases/download/v2.32.1/docker-compose-linux-aarch64chmod +x ./docker-compose-linux-aarch64cp ./docker-compose-linux-aarch64 /usr/bin/
Now you should be able to properly access the docker-compose command from your terminal 😃
现在,您应该能够从终端正确访问 docker-compose 命令:)
OUTDATED INFO: This is left in for posterity. To fix this, we can install the docker-compose package within Kali’s repositories. Then, we can modify the command to run the containers.
过时的信息 :这是留给后人看的。要解决此问题,我们可以在 Kali 的存储库中安装 docker-compose 包。然后,我们可以修改命令以运行容器。
sudo apt install docker-compose -ydocker-compose -vcurl -L https://ghst.ly/getbhce | docker-compose -f - up
Back to valid and usable info!
返回有效和可用的信息!
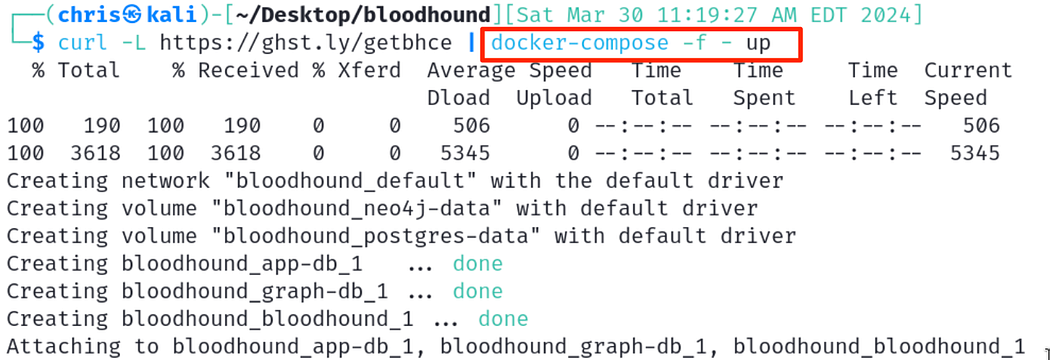
Much happier! 高兴多了!
To hold onto the docker-compose.yml file to use again later, we can use this command to download it to our current directory. When the file is saved with this name, we don’t need to specify it when starting docker-compose.
要保留 docker-compose.yml 文件以便以后再次使用,我们可以使用此命令将其下载到当前目录。当文件使用此名称保存时,我们无需在启动 docker-compose 时指定它。
wget https://ghst.ly/getbhce -O docker-compose.ymldocker-compose up
Great! Looks like the containers have been started with the docker-compose command, green is always a good color. Pay attention though, in the logs there will be an initial password we need to use to log into the system.
伟大!看起来容器已使用 docker-compose 命令启动,绿色始终是一个好的颜色。但请注意,在日志中,我们需要使用初始密码登录系统。

Identifying the initial password to log into the GUI
确定用于登录 GUI 的初始密码
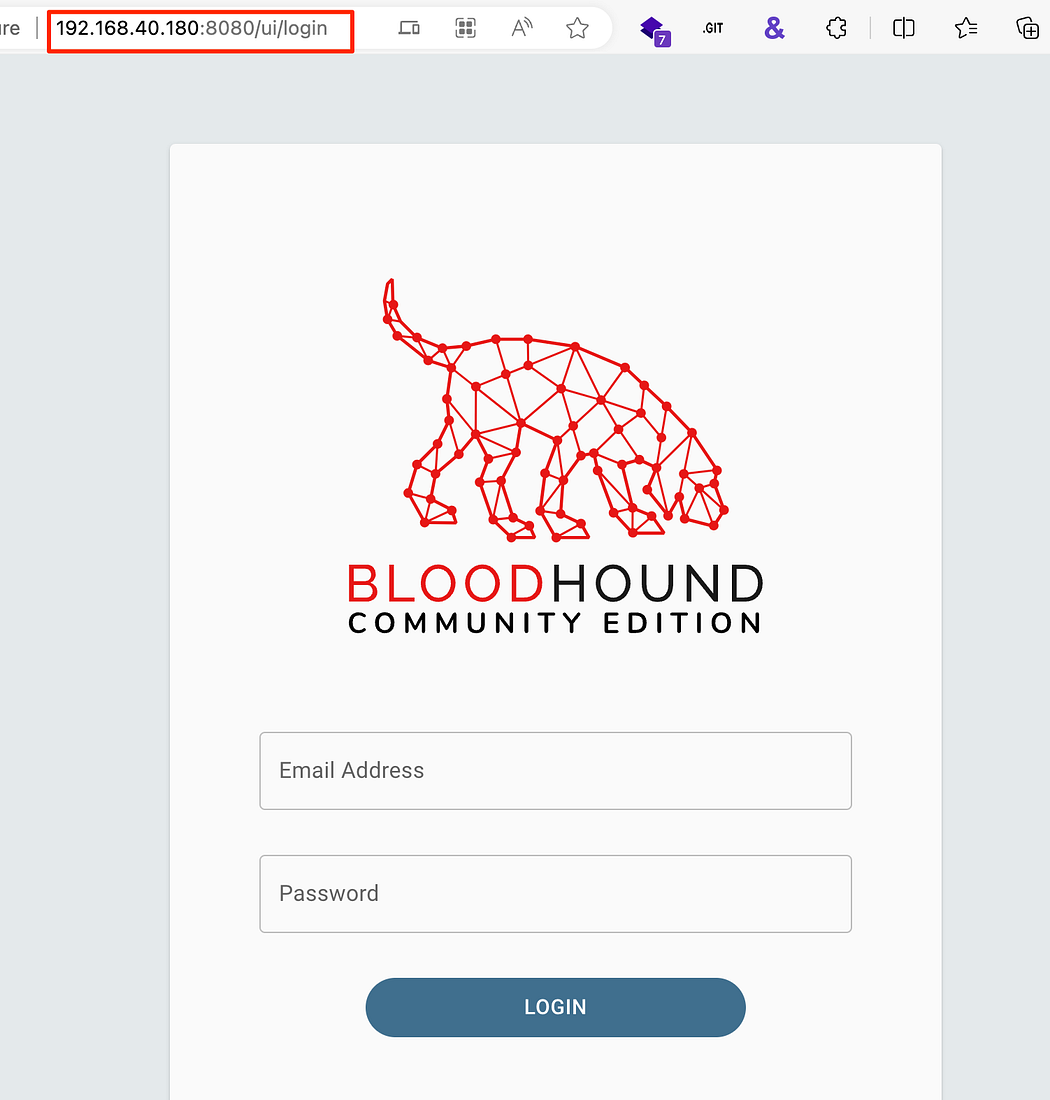
Copy this password and browse to http://localhost:8080 to log into the GUI. The user will be admin and the initial password from the logs.
复制此密码并浏览到 http://localhost:8080 以登录到 GUI。用户将是 admin 和日志中的初始密码。
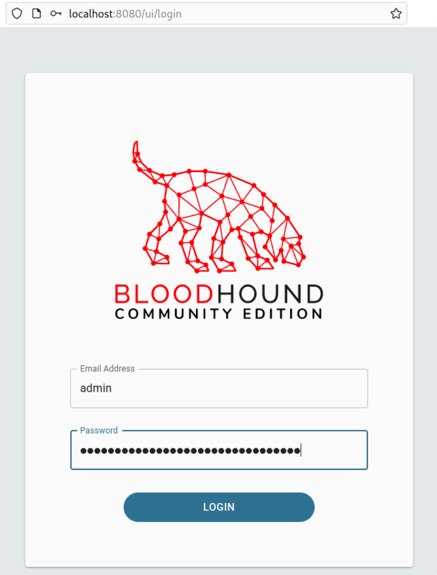
Initial login with the generated password.
使用生成的密码进行初始登录。
When you log in, you will be directed to update the password. Choose one you will remember.
登录时,系统将引导您更新密码。选择一个你会记住的。
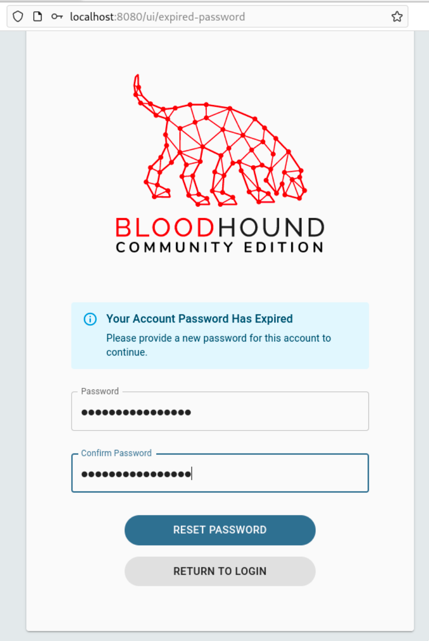
Updating the password for the admin account
更新 admin 帐户的密码
Now we’re in! But wait, there’s no data! So how do we actually get started with the analysis? Well, we need to download the collectors first!
现在我们进来了!但是等等,没有数据!那么我们如何真正开始分析呢?好吧,我们需要先下载收集器!
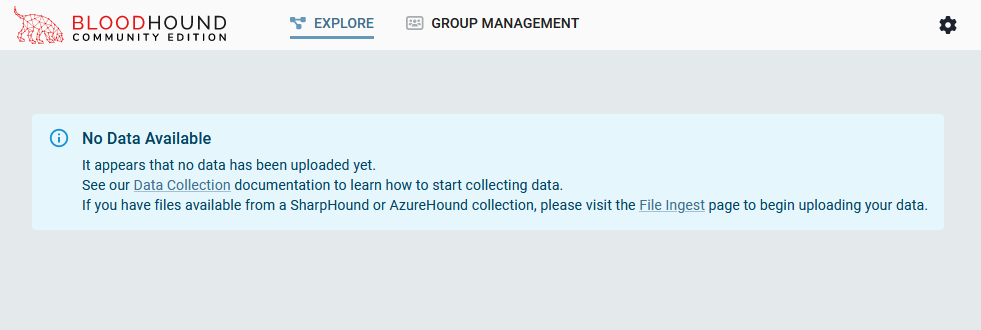
We’re in! But there’s nothing to analyze 😦
我们进来了!但没有什么可分析的:(
Data Collection 数据采集
We have a few ways for us to do this. We can use the SharpHound.exe C#, PowerShell, or Python collectors to gather this information.
我们有几种方法可以做到这一点。我们可以使用 SharpHound.exe C#、PowerShell 或 Python 收集器来收集此信息。
To get a copy of the supported collectors, we can download them straight from the BHCE GUI. Click on the cog and then “Download Collectors”. This will open a page where we can download the collector.
要获取受支持的收集器的副本,我们可以直接从 BHCE GUI 下载它们。单击齿轮,然后单击“Download Collectors”。这将打开一个页面,我们可以在其中下载收集器。
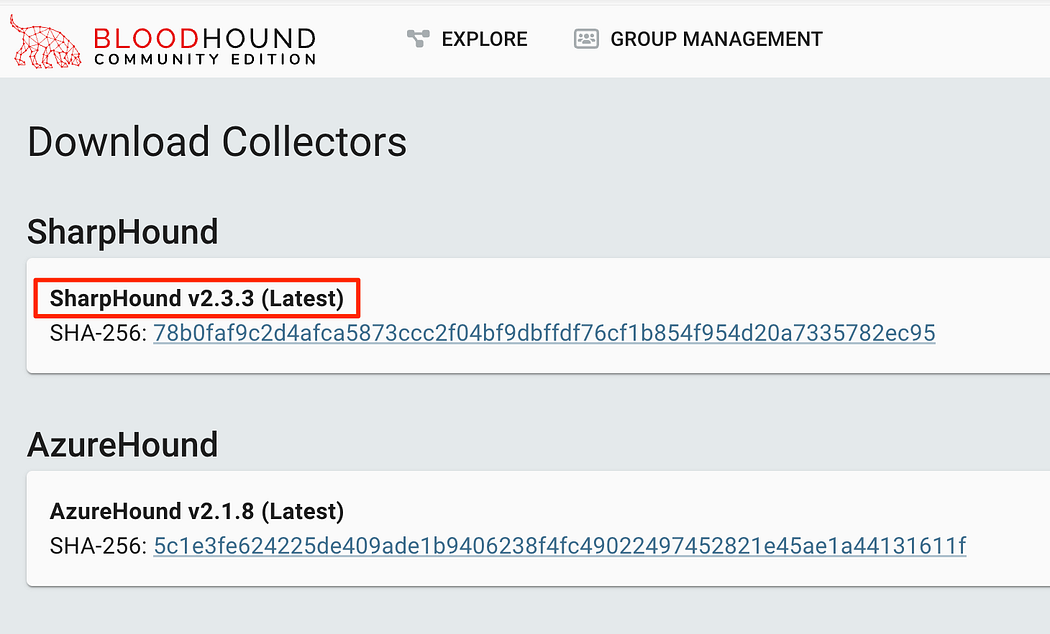
The collector available within the GUI is easily available.
GUI 中可用的收集器很容易获得。
We can always gather the latest versions of the collector which are available on the SharpHound Releases page:
我们始终可以在 SharpHound Releases 页面上收集最新版本的收集器:
Once unzipped, we can launch this collection tool on the remote host. Choose your favorite way to complete this, whether it’s within a beacon for inline-execute or an interactive RDP session.
解压后,我们可以在远程主机上启动这个采集工具。选择您最喜欢的方式来完成此作,无论是在内联执行的信标中还是在交互式 RDP 会话中。
C# Collector C# 收集器
Using SharpHound.exe is straightforward — we can simply execute it without any additional flags and it will happily gather the default information about the current domain with the current user.
使用 SharpHound.exe 很简单 — 我们可以简单地执行它,而无需任何其他标志,它会很高兴地与当前用户收集有关当前域的默认信息。
.\SharpHound.exe
To collect all available information, we can specify the flag -c All. This will provide information such as ADCS information, RDP, and DCOM. However, in large environments collecting everything could easily overwhelm our machine — keep this in mind!
要收集所有可用信息,我们可以指定标志 -c All。这将提供 ADCS 信息、RDP 和 DCOM 等信息。然而,在大型环境中,收集所有东西很容易使我们的机器不堪重负 - 请记住这一点!
Personally, I like to collect everything and then encrypt the ZIP with a password, while also giving the files a prefix. While this data is available to all users in the domain, in the wrong hands it could prove to be sensitive information.
就个人而言,我喜欢收集所有内容,然后使用密码加密 ZIP,同时也为文件提供前缀。虽然此数据可供域中的所有用户使用,但落入坏人之手可能会被证明是敏感信息。
.\SharpHound.exe -c All --zippassword 'p@ssw0rd' --outputprefix 'NORTH'

Running the collector to gather everything, encrypt the zip, and add a prefix.
运行收集器以收集所有内容、加密 zip 并添加前缀。
Once completed, we’ll see that the zip file was created with our intended prefix as well. Note the number of objects, this can be a useful number within a report to a customer.
完成后,我们将看到 zip 文件也使用我们预期的前缀创建。记下对象的数量,这可能是给客户的报告中的有用数字。
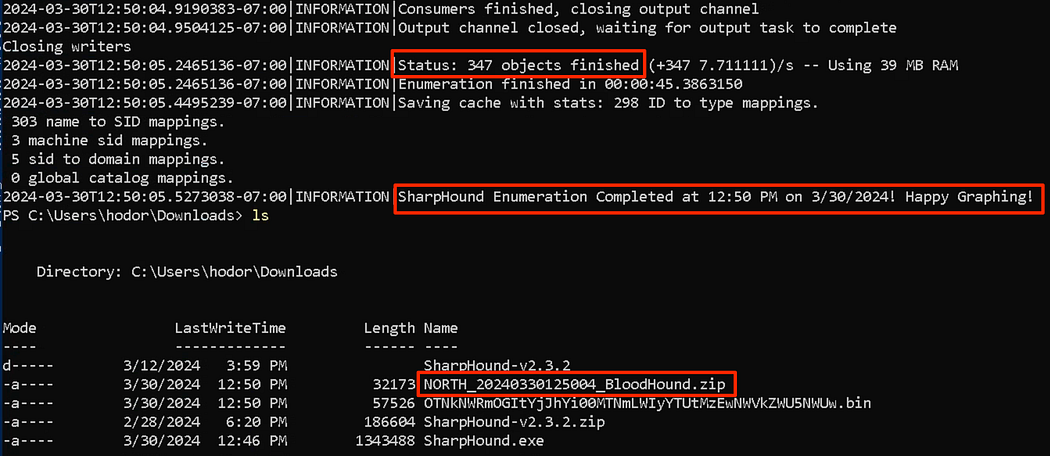
Collection completed for the north.sevenkingdoms.local domain.
已完成 north.sevenkingdoms.local 域的收集。
Cross-Domain Collection 跨域集合
To collect data from other domains in the same forest, we’ll need to add a few additional flags. For instance, we’ll need to direct to the correct domain with the --domain flag. We’ll pivot to the sevenkingdoms.local domain next, while running as the hodor@north.sevenkingdoms.local user. This machine must be able to resolve the domain within DNS to work.
要从同一林中的其他域收集数据,我们需要添加一些额外的标志。例如,我们需要使用 --domain 标志定向到正确的域。接下来,我们将转向 sevenkingdoms.local 域,同时以 hodor@north.sevenkingdoms.local 用户身份运行。此计算机必须能够解析 DNS 中的域才能正常工作。
.\SharpHound.exe -c All --domain sevenkingdoms.local --zippassword 'p@ssw0rd' --outputprefix 'SEVENKINGDOMS'
Collection as a Different User
作为其他用户收集
In the event we’re in a forest but don’t have access to an account trusted on a separate domain, we can always launch SharpHound.exe with the runas.exe command.
如果我们位于林中,但无权访问单独域上受信任的帐户,我们始终可以使用 runas.exe 命令启动 SharpHound.exe。
runas /netonly /user:khal.drogo@essos.local cmd.\SharpHound.exe -c All --domain essos.local --zippassword 'p@ssw0rd' --outputprefix 'ESSOS'
Alternatively, we can also specify the --ldapusername and --ldappassword flags to connect to the other domain. This does not require the runas.exe command to function.
或者,我们也可以指定 --ldapusername 和 --ldappassword 标志来连接到另一个域。这不需要 runas.exe 命令运行。
.\SharpHound.exe -c All --domain essos.local --ldapusername khal.drogo --ldappassword horse --zippassword 'p@ssw0rd' --outputprefix 'ESSOS'

Gathering cross-domain information via LDAP authentication. This gathered from a session as hodor@north.sevenkingdoms.local to use khal.drogo@essos.local for the essos.local domain.
通过 LDAP 身份验证收集跨域信息。这是从作为 hodor@north.sevenkingdoms.local 的会话中收集的,以将 khal.drogo@essos.local 用于 essos.local 域。
Reflectively Loading SharpHound
反射加载 SharpHound
Have you run into a scenario where the SharpHound.exe is flagged by detections as malicious? In some scenarios, we can bypass these controls by reflectively loading the C# executable into memory, then executing the entrypoint (ATT&CK ID T1620).
您是否遇到过 SharpHound.exe 被检测标记为恶意的情况?在某些情况下,我们可以通过反射性地将 C# 可执行文件加载到内存中,然后执行入口点 (ATT&CK ID T1620) 来绕过这些控件。
$sh = [System.Reflection.Assembly]::Load([byte[]]([IO.FIle]::ReadAllBytes("C:\Temp\SharpHound.exe")));$cmd = "-c All --zippassword 'p@ssw0rd' --outputprefix REFLECTED"[Sharphound.Program]::Main($cmd.Split())

Identifying the type and entry to execute the collector within memory.
标识在内存中执行收集器的类型和条目。
Note that you may need to add the --outputdirectory switch to ensure it is saved in your desired location.
请注意,您可能需要添加 --outputdirectory 开关以确保它保存在您想要的位置。
Python Collector Python 收集器
Next we can use the bloodhound.py tool to gather this information as well. As noted earlier, the current bloodhound.py package in Kali repositories is for Legacy BloodHound only. You will need to download the bloodhound-ce branch from their GitHub.
接下来,我们也可以使用 bloodhound.py 工具来收集此信息。如前所述,Kali 存储库中的当前 bloodhound.py 包仅适用于 Legacy BloodHound。您需要从他们的 GitHub 下载 bloodhound-ce 分支。
sudo apt install bloodhound.pybloodhound-python -d north.sevenkingdoms.local -u hodor -p hodor -c All -op default_kali_bloodhoundpy --zip -ns 192.168.56.10
Since we’re interested in data to support BHCE, let’s focus on installing that branch and using that one instead. We can clone that branch in particular directly from GitHub.
由于我们对支持 BHCE 的数据感兴趣,因此让我们专注于安装该分支并改用该分支。特别是,我们可以直接从 GitHub 克隆该分支。
git clone -b bloodhound-ce https://github.com/dirkjanm/BloodHound.py.git
If we don’t want to clobber any dependencies, we can always build a container to run this within. A Dockerfile is already present within the repo which we can use to build this.
如果我们不想破坏任何依赖项,我们总是可以构建一个容器来运行它。存储库中已经存在一个 Dockerfile,我们可以使用它来构建它。
cd BloodHound.pydocker build -t bloodhound .docker run -v ${PWD}:/bloodhound-data -it bloodhounda0140a0d356a:/bloodhound-data
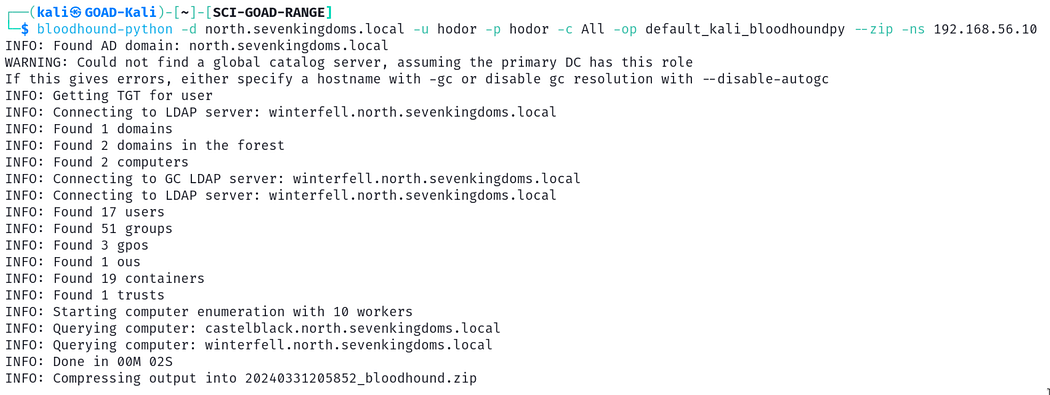
Default bloodhound-python collection from Kali repositories
来自 Kali 存储库的默认 bloodhound-python 集合
Data Ingest 数据摄取
Now that we’ve been able to collect data, we need to be able to use it. We need to upload it into the GUI, where it will be ingested into the Neo4j database. This is done by clicking on the cog button and then the Administration button.
现在我们已经能够收集数据,我们需要能够使用它。我们需要将其上传到 GUI 中,然后它将被摄取到 Neo4j 数据库中。这是通过单击齿轮按钮,然后单击 Administration 按钮来完成的。

Navigating to ingest data within the GUI.
导航到在 GUI 中摄取数据。
At this point, we can click the UPLOAD FILE(S) button to upload our data. We can drag and drop the ZIP file itself into the interface, no need to unzip for individual files anymore!
此时,我们可以单击 UPLOAD FILES(S) 按钮上传我们的数据。我们可以将 ZIP 文件本身拖放到界面中,无需再为单个文件解压缩!
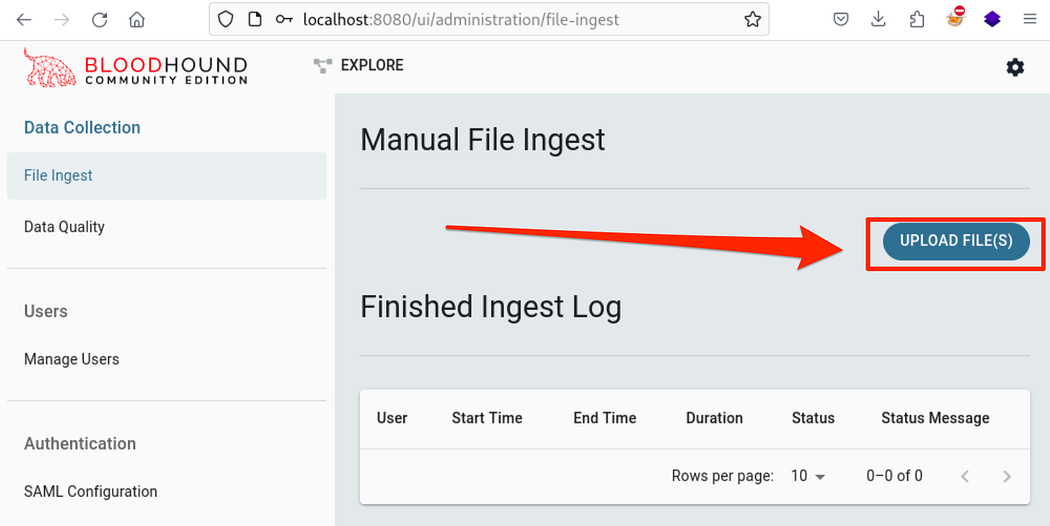
Clicking the UPLOAD FILE(S) button to add our data.
单击 UPLOAD FILE(S) 按钮添加我们的数据。
The popup window that appears will allow us to drag and drop files to be ingested.
出现的弹出窗口将允许我们拖放要摄取的文件。
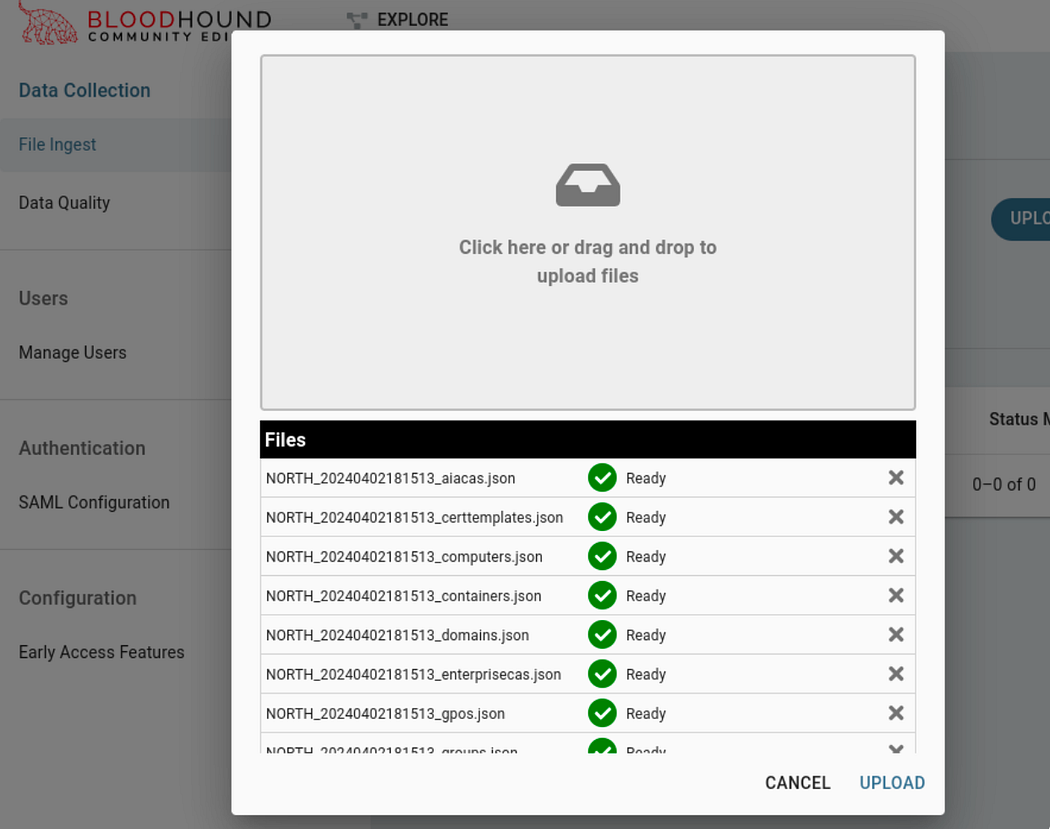
Uploading the JSON files extracted from the zip created by the collector
上传从收集器创建的 zip 中提取的 JSON 文件
After clicking the upload button twice, we’ll be brought back to the ingest page. We can see that the status states it’s completed ingesting! We can continue to upload additional data for other domains in the forest as well.
单击两次上传按钮后,我们将返回到 ingest 页面。我们可以看到状态显示 It’s completed ingesting!我们也可以继续为林中的其他域上传其他数据。
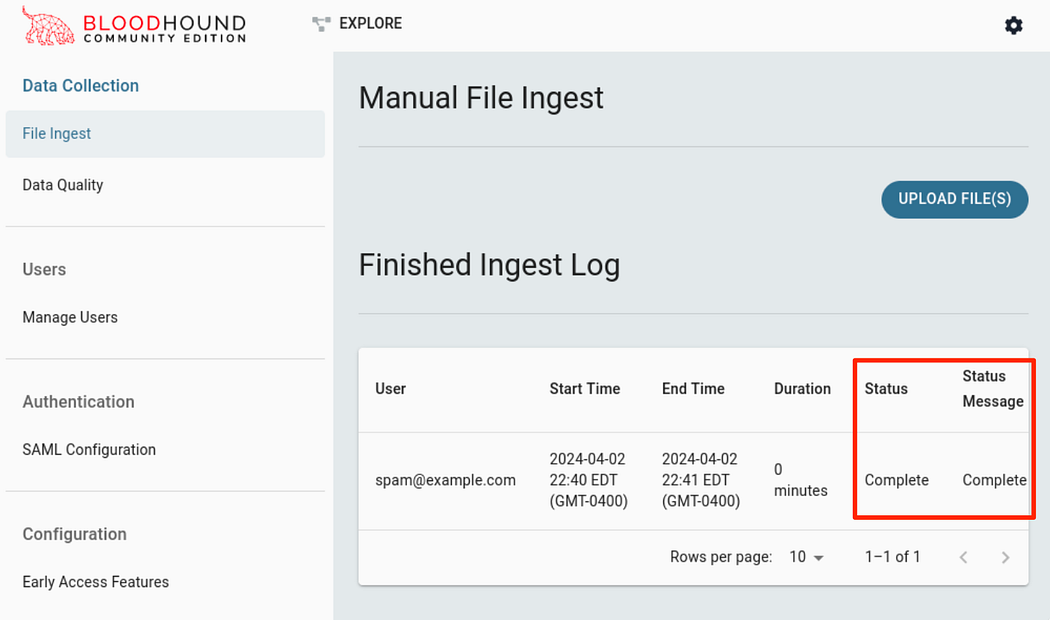
After uploading the files and they have completed ingest.
上传文件后,他们已完成摄取。
Ingest Failures 摄取失败
One of the more frustrating pieces about BHCE is that there doesn’t appear to be any feedback when outdated information is loaded in for ingest. This scenario in particular is why I believe so many hackers learning how to use this tool get frustrated and quit.
关于 BHCE 最令人沮丧的一点是,当加载过时的信息进行摄取时,似乎没有任何反馈。特别是这种情况,这就是为什么我相信这么多学习如何使用这个工具的黑客会感到沮丧并退出的原因。
For this scenario, if we gather information from a collector for Legacy Bloodhound and import it into BHCE, there’s a chance that the files will pass the initial upload check, be marked as complete, but won’t actually be ingested.
对于此方案,如果我们从 Legacy Bloodhound 的收集器收集信息并将其导入 BHCE,则文件有可能通过初始上传检查,标记为完成,但实际上不会被摄取。
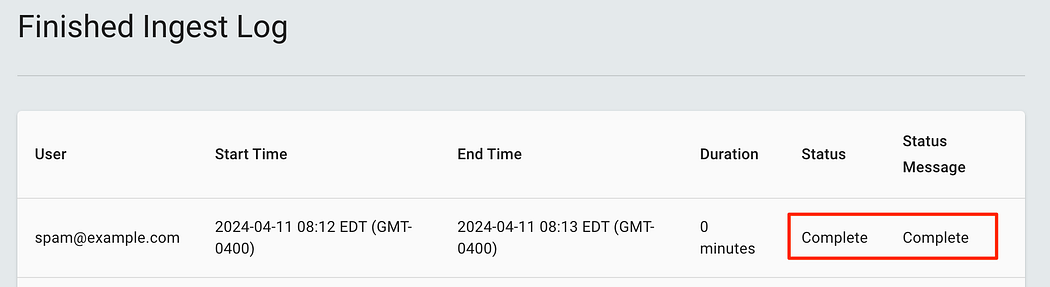
Ingested data marked as Complete — but wait where is it?
摄取的数据标记为 Complete — 但等等,它在哪里?
Browsing back to the Explore page we see that there’s still no data ingested. This is where it’s easy to get frustrated — after all we uploaded the data right?
浏览回 Explore (浏览) 页面,我们看到仍然没有提取任何数据。这就是很容易感到沮丧的地方——毕竟我们上传了数据,对吧?
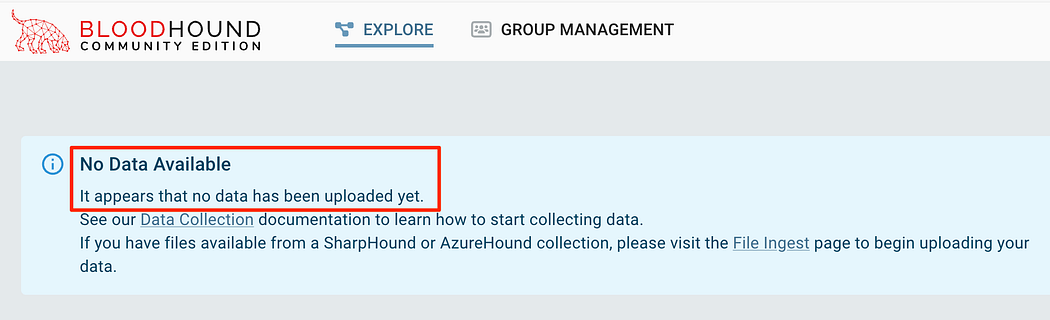
Data was not ingested properly, even though it was marked as Complete.
数据未正确摄取,即使数据被标记为 Complete。
To find this we needed to jump into the logs with docker compose logs to see the error. This shows that there was an unmarshalling error from the data uploaded. This was with data collected via the bloodhound-python from the Kali repos.
要找到这一点,我们需要使用 docker compose logs 跳转到日志中以查看错误。这表明上传的数据中存在解组错误。这是通过 Bloodhound-python 从 Kali 存储库收集的数据。
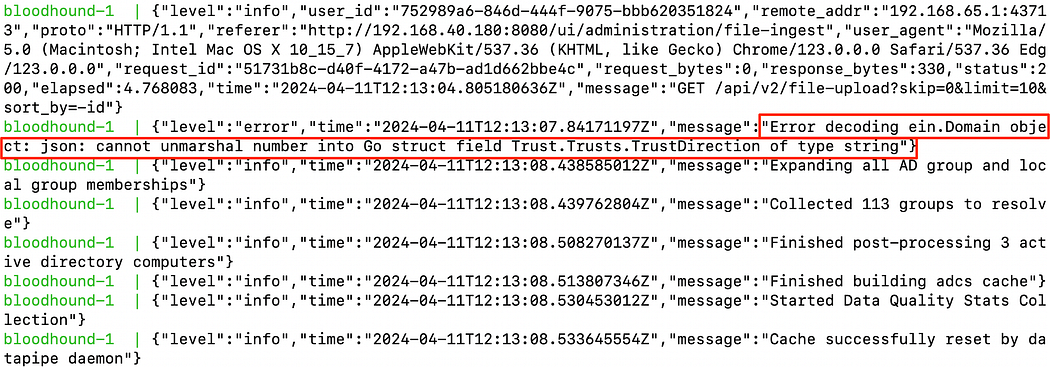
Unmarshalling errors from uploading data using the bloodhound-python from Kali repos.
使用 Kali 存储库中的 bloodhound-python 上传数据时出现的解组错误。
To help fix this, I would recommend using the latest collectors for the BHCE. I would also certainly wish that the BHCE GUI is updated to reflect these unmarshalling errors or at least provide an indication that the ingest did not work successfully.
为了帮助解决这个问题,我建议使用 BHCE 的最新收集器。我当然也希望 BHCE GUI 得到更新,以反映这些解组错误,或者至少提供一个指示,表明摄取没有成功工作。
Ingest via API 通过 API 引入
To ingest data through the API, we can read the docs. Personally, I do not do this since I upload data through the GUI, however, it is supported.
要通过 API 摄取数据,我们可以阅读 docs.就个人而言,我不这样做,因为我通过 GUI 上传数据,但是,它是支持的。
Browsing the Data 浏览数据
Since you’ve made it this far, we can actually start to explore the data that was gathered! This allows us to find and understand the relationships between the objects in the forest and how they could be exploited. To get started, we can use the built-in queries to explore the data. This is done by clicking the CYPHER button, then the folder icon to open the searches.
既然您已经走到了这一步,我们实际上可以开始探索收集到的数据了!这使我们能够找到并了解森林中对象之间的关系以及如何利用它们。首先,我们可以使用内置查询来浏览数据。这是通过单击 CYPHER 按钮,然后单击文件夹图标以打开搜索来完成的。
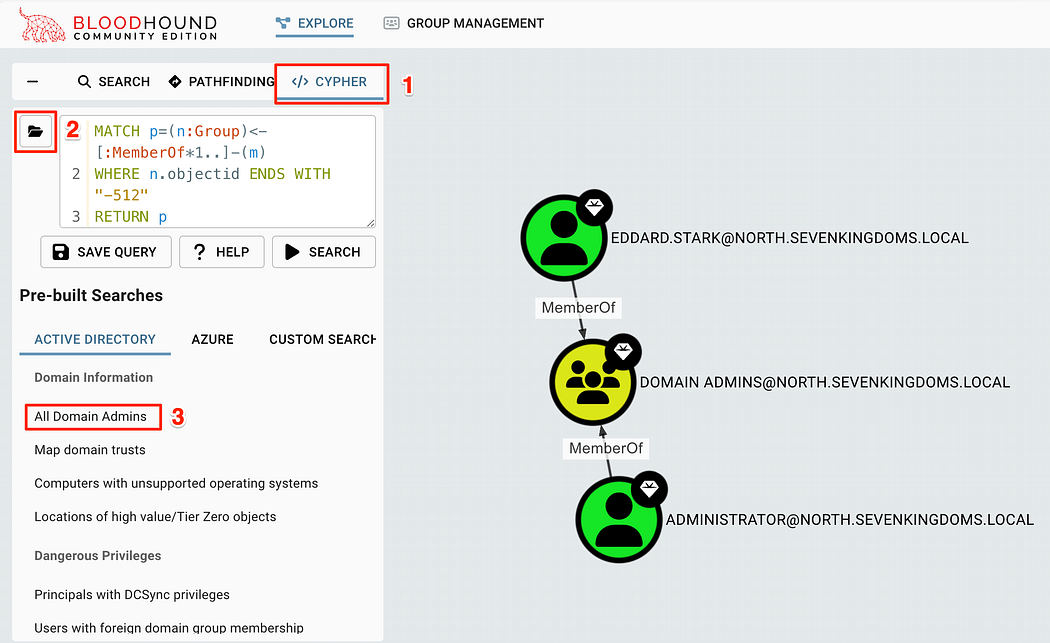
Navigating to the Pre-built searches to start exploring data
导航到预构建搜索以开始探索数据
Clicking on one of the searches, such as “All Domain Admins” will add a Cypher query to the search bar and look for matches in the database. The results will now be on the screen!
单击其中一个搜索,例如 “All Domain Admins” 将在搜索栏中添加 Cypher 查询并在数据库中查找匹配项。结果现在将在屏幕上显示!
To get detailed information about an object, we can click on it to see its properties. This can help reveal additional info we could use about the account or within the domain.
要获取有关对象的详细信息,我们可以单击它以查看其属性。这有助于揭示我们可以使用的有关帐户或域内的其他信息。
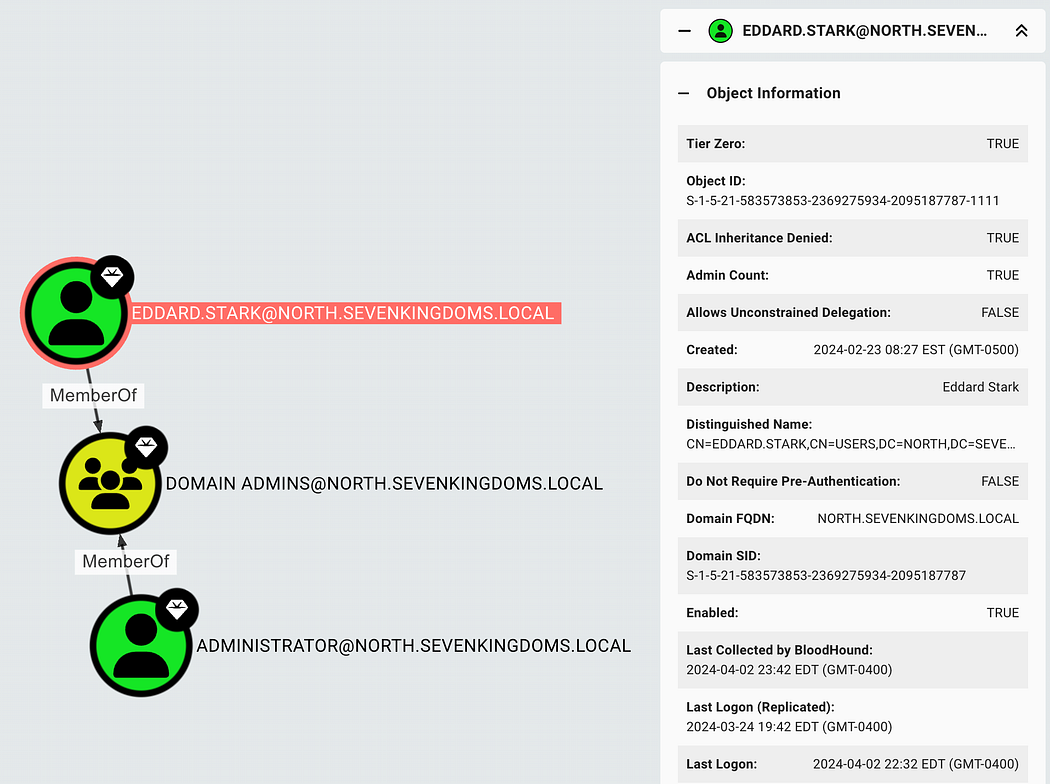
Reviewing the properties for the EDDARD.STARK account by clicking on it.
查看 EDDARD 的属性。STARK 帐户。
Pathfinding 寻路
To find specific paths from one object to another, we can use the PATHFINDING button. In this case, we can request how the user samwell.tarly can gain access to Domain Admins to identify how this user could exploit this path.
要查找从一个对象到另一个对象的特定路径,我们可以使用 PATHFINDING 按钮。在这种情况下,我们可以请求用户 samwell.tarly 如何获得对 Domain Admins 的访问权限,以确定该用户如何利用此路径。
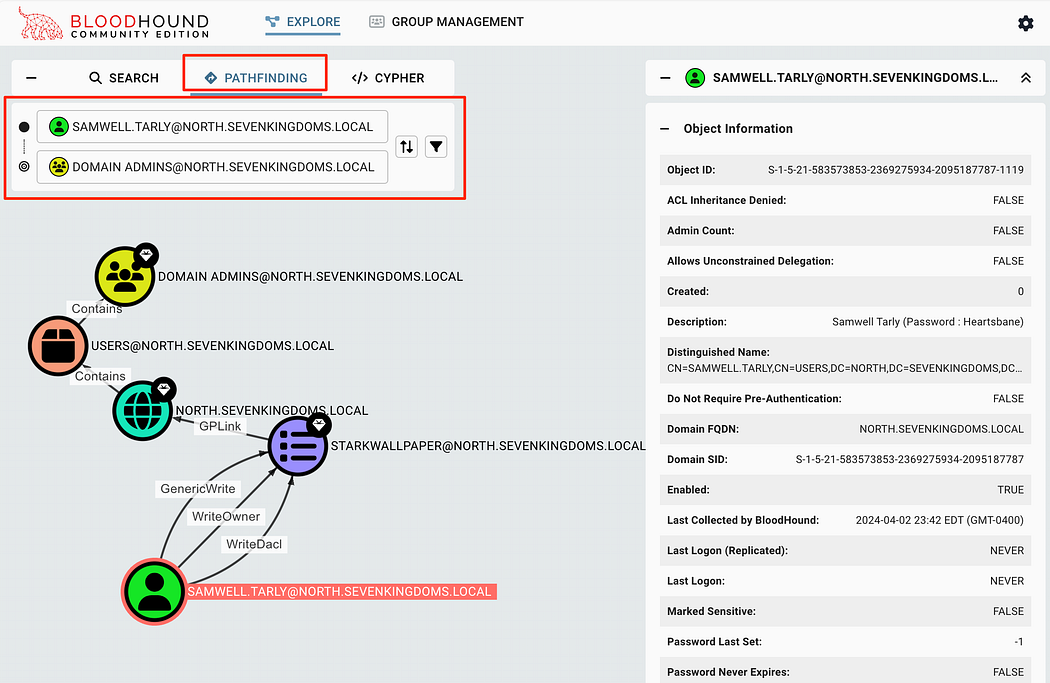
Finding paths between specific objects in AD. This scenario shows the samwell.tarly account’s ability to escalate to the Domain Admins group.
在 AD 中查找特定对象之间的路径。此场景显示了 samwell.tarly 帐户升级到 Domain Admins 组的能力。
Edges 边缘
In this scenario, we can see that samwell.tarly has the GenericWrite, WriteOwner, and WriteDacl permissions over the STARKWALLPAPER GPO. If we don’t know how this could be exploited, we can click on the edge itself to have the properites open in the right pane. This has information about the edge, to include how to abuse this permission on Windows or Linux based machines.
在此方案中,我们可以看到 samwell.tarly 对 STARKWALLPAPER GPO 具有 GenericWrite、WriteOwner 和 WriteDacl 权限。如果我们不知道如何利用这一点,我们可以单击 Edge 本身以在右侧窗格中打开 Properites。其中包含有关 Edge 的信息,包括如何在基于 Windows 或 Linux 的计算机上滥用此权限。
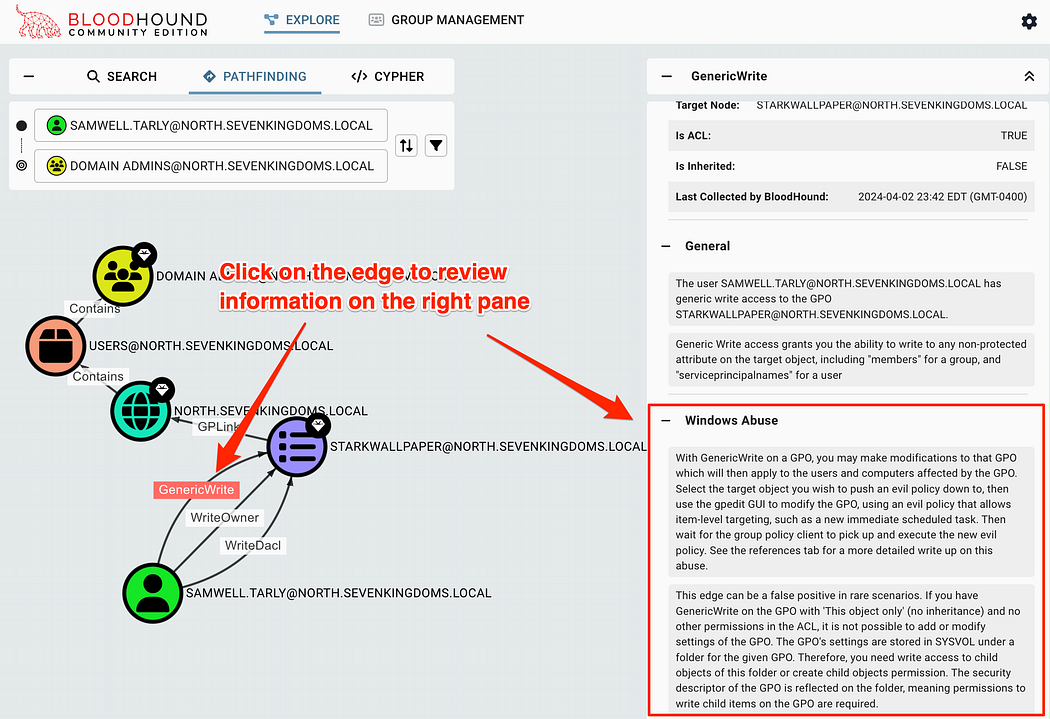
Identifying more information about the edge by clicking on it. This includes how to abuse this case on Windows or Linux based machines.
通过单击边缘来识别有关边缘的更多信息。这包括如何在基于 Windows 或 Linux 的机器上滥用这种情况。
How cool is that?? It tells us what and how we can use these edges to prove impact. These properties also include several excellent references, which are always worth reading to learn more about a specific abuse scenario.
那有多酷??它告诉我们可以利用什么以及如何利用这些优势来证明影响力。这些属性还包括几个优秀的参考资料,这些参考资料总是值得阅读以了解有关特定滥用场景的更多信息。
Marking Objects as Owned 将对象标记为已拥有
To mark an object as owned, we can right click on them in the GUI. This will place a skull icon on their object, allowing us to perform additional queries based on owned objects. This will help us keep track of how we can maneuver within the environment as we continue to gain access.
要将对象标记为拥有,我们可以在 GUI 中右键单击它们。这将在他们的对象上放置一个骷髅图标,允许我们根据拥有的对象执行其他查询。这将帮助我们在继续获得访问权限时跟踪如何在环境中进行机动。
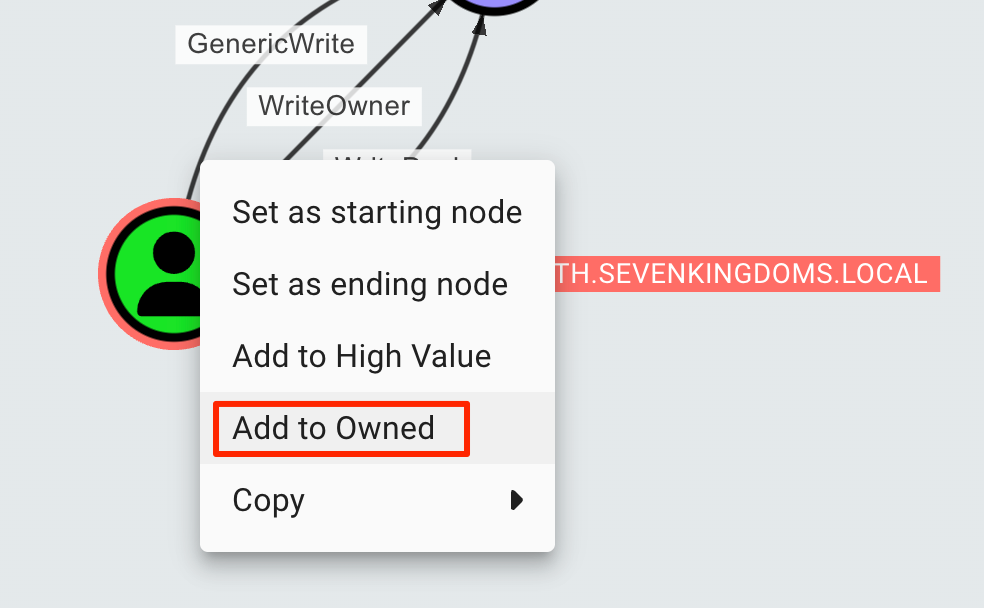
Marking an object as owned. This indicates that we know we can use that object at a later time.
将对象标记为拥有。这表明我们知道我们可以在以后使用该对象。
To review objects marked as owned, we can click on the “GROUP MANAGEMENT” button at the top of the page. You’ll notice the page is blank at first, we’ll need to click a few buttons to get the correct information.
要查看标记为 owned 的对象,我们可以单击页面顶部的 “GROUP MANAGEMENT” 按钮。您会注意到页面一开始是空白的,我们需要单击几个按钮来获取正确的信息。
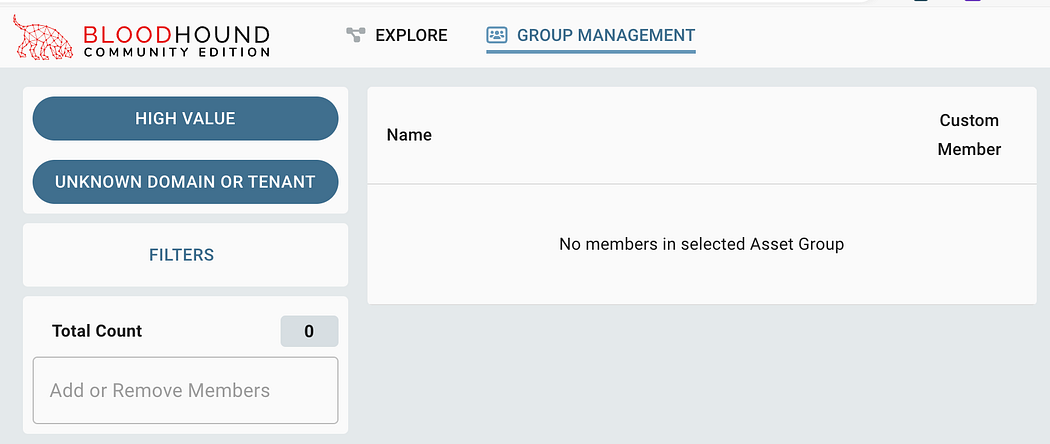
After clicking on GROUP MANAGEMENT, the page appears empty.
单击 GROUP MANAGEMENT 后,页面显示为空白。
Start by clicking the second button to select an entity to search through. In most cases, selecting “All Active Directory Domains” will be enough.
首先单击第二个按钮选择要搜索的实体。在大多数情况下,选择“所有 Active Directory 域”就足够了。
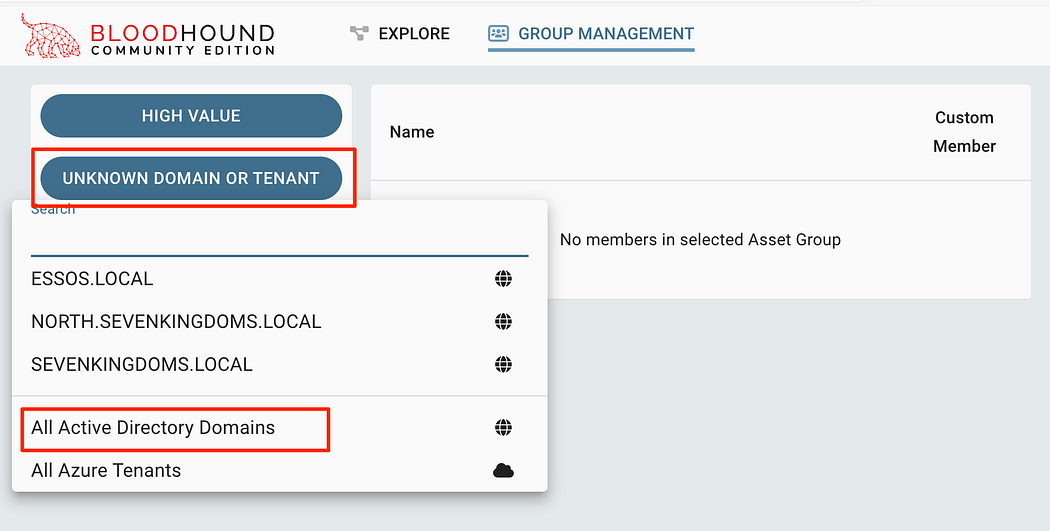
Selecting a domain to view within the Group Management
选择要在 Group Management 中查看的域
After, we can click on the top drop-down menu to select “OWNED”.
之后,我们可以单击顶部下拉菜单以选择“拥有”。
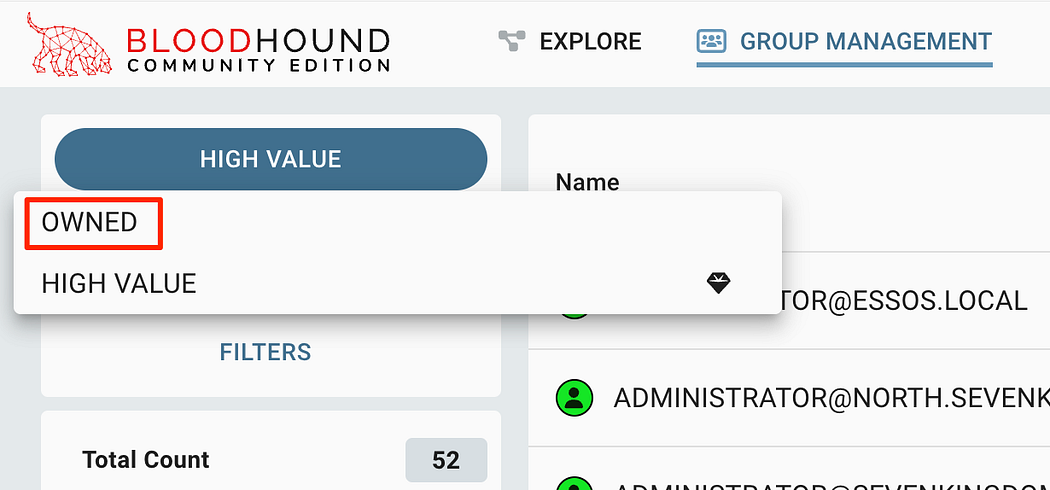
Selecting OWNED from the drop down to see all objects marked as owned.
从下拉列表中选择 OWNED 可查看标记为 owned 的所有对象。
At this point, we’ll be able to see the account we marked as owned. This can be useful to help us keep track of objects as we gain access, as well as use in reporting to a customer.
此时,我们将能够看到我们标记为 owned(已拥有)的账户。这有助于我们在获得访问权限时跟踪对象,以及用于向客户报告。
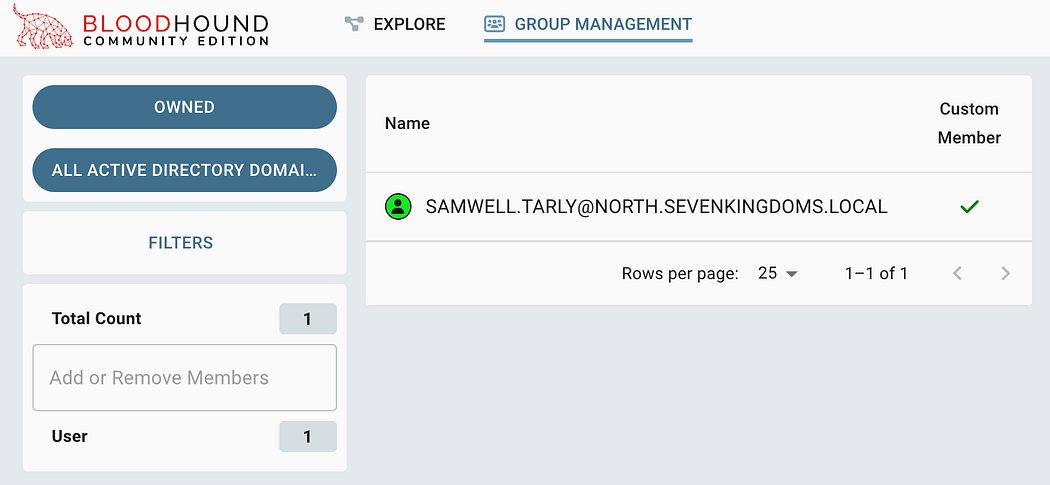
Reviewing all objects marked as owned within Group Management.
查看 Group Management 中标记为拥有的所有对象。
Cypher Queries Cypher 查询
While the pre-built searches will be able to help use see interesting items quickly, there are many times where we will need to find something which is not covered by those searches. To solve this, we can create our own queries sent to the Neo4j database. This is how we can validate a search operates in the way we intend it to, where we can save it to a custom search afterwards.
虽然预构建的搜索能够帮助用户快速查看感兴趣的项目,但很多时候我们需要找到这些搜索未涵盖的内容。为了解决这个问题,我们可以创建发送到 Neo4j 数据库的自己的查询。这就是我们验证搜索是否按预期方式运行的方法,我们可以在之后将其保存到自定义搜索中。
Personally, I feel that the BHCE pre-built queries are missing some critical searches to help match between owned objects and high-value targets. This is handled differently in BHCE vs Legacy and require specific queries in Cypher to achieve it. The way to list all owned Objects in BHCE is below:
就个人而言,我觉得 BHCE 预构建的查询缺少一些关键搜索来帮助匹配拥有的对象和高价值目标。这在 BHCE 和 Legacy 中的处理方式不同,并且需要在 Cypher 中进行特定查询来实现。在 BHCE 中列出所有拥有的对象的方法如下:
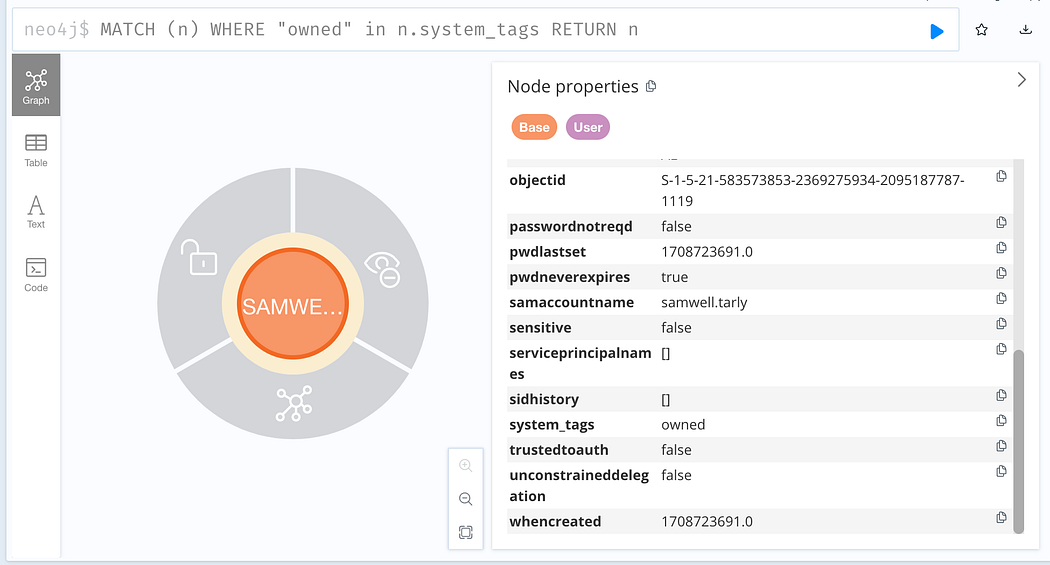
# List all owned objectsMATCH (n) WHERE "owned" in n.system_tags RETURN n
This can be placed into the Cypher query panel, click search, and see all owned objects. Note that in the image below, the User and Computer objects are both owned, but do not have a path to each other from this search.
这可以放入 Cypher 查询面板中,单击 search 并查看所有拥有的对象。请注意,在下图中,User 和 Computer 对象都是所有者,但在此搜索中没有指向彼此的路径。
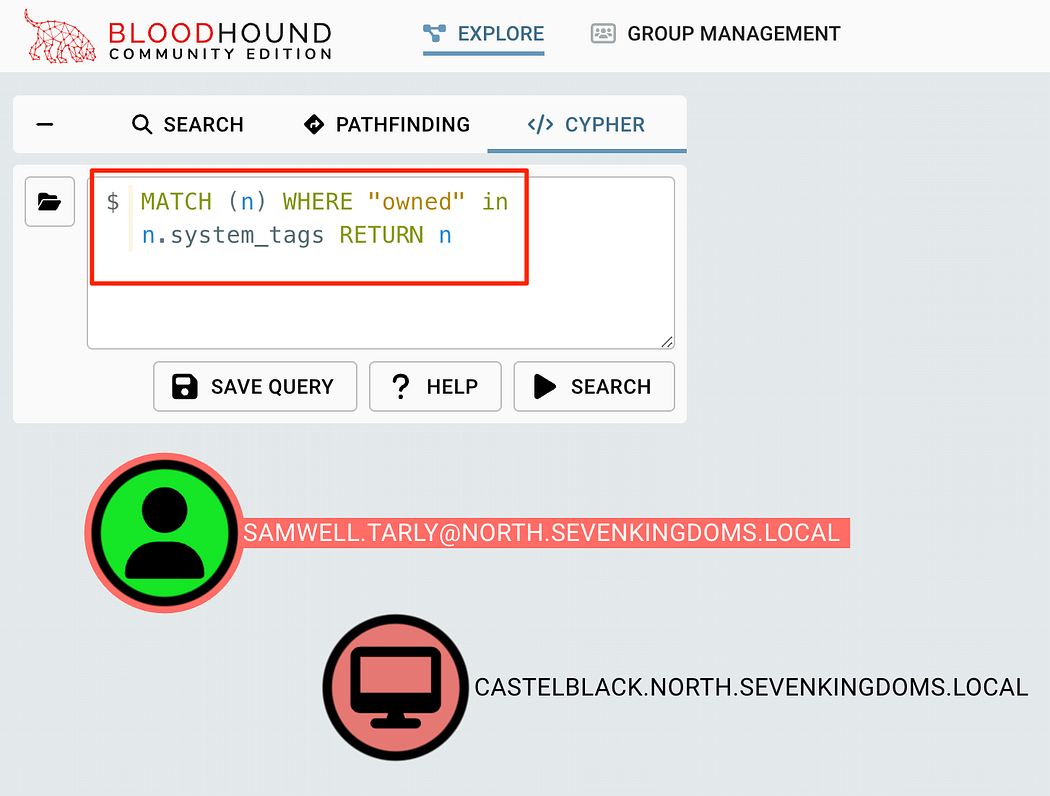
Listing all owned objects with a custom cypher query
使用自定义密码查询列出所有拥有的对象
Here’s a few useful queries I’ve been using in the past which have helped me find misconfigurations:
以下是我过去一直在使用的一些有用的查询,它们帮助我找到了错误的配置:
MATCH (c1:Computer)-[:MemberOf*1..]->(g:Group) WHERE g.objectid ENDS WITH '-516' WITH COLLECT(c1.name) AS domainControllers MATCH (c2 {unconstraineddelegation:true}) WHERE NOT c2.name IN domainControllers RETURN c2MATCH p = (d:Domain)-[r:Contains*1..]->(u:User) WHERE u.description =~ '(?i).*pass.*' RETURN pMATCH (n) WHERE "owned" in n.system_tags RETURN nMATCH p = allShortestPaths((o)-[*1..]->(h)) WHERE 'owned' in o.system_tags AND 'admin_tier_0' in h.system_tags RETURN p
There’s some fantastic resources on how to create and understand in-depth Cypher queries on the BloodHound docs if you’re interested in learning more:
如果您有兴趣了解更多信息,BloodHound 文档中提供了一些关于如何创建和理解深入 Cypher 查询的精彩资源:
Custom Searches 自定义搜索
When we’re happy with how a search operates and want to save it for later use, we can save it with the “Save Query” button. This will populate the “Custom Searches” category within the same folder icon for later use.
当我们对搜索的运行方式感到满意并希望保存它以备后用时,我们可以使用 “Save Query” 按钮保存它。这将填充同一文件夹图标内的 “Custom Searches” 类别,供以后使用。

Saving a custom search to continue to use again later.
保存自定义搜索以备后用。
However, at the moment there doesn’t appear to be a way to load the custom queries from disk similar to BloodHound Legacy. This was addressed in the BloodHound Slack a few times, suggesting to use the API instead.
但是,目前似乎没有办法从磁盘加载类似于 BloodHound Legacy 的自定义查询。这在 BloodHound Slack 中已经解决了几次,建议改用 API。
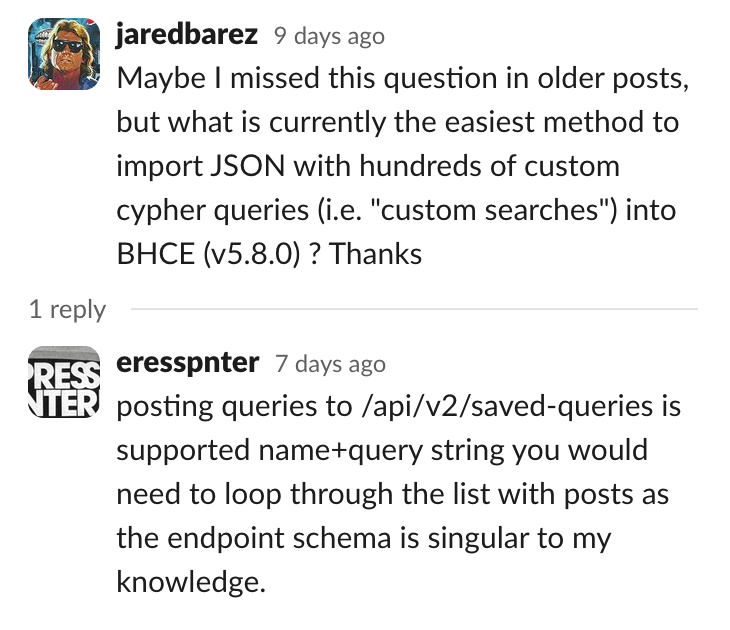
Glad to know I’m not the only one with this problem
很高兴知道我不是唯一一个有这个问题的人
Nevertheless, we can use the API docs to try and figure out what we need to do. It’s good to note that there are a few different things we can use to read and place new custom-saved queries into the system for us.
尽管如此,我们可以使用 API 文档来尝试弄清楚我们需要做什么。值得注意的是,我们可以使用一些不同的内容来读取新的自定义保存的查询并将其放入系统中。
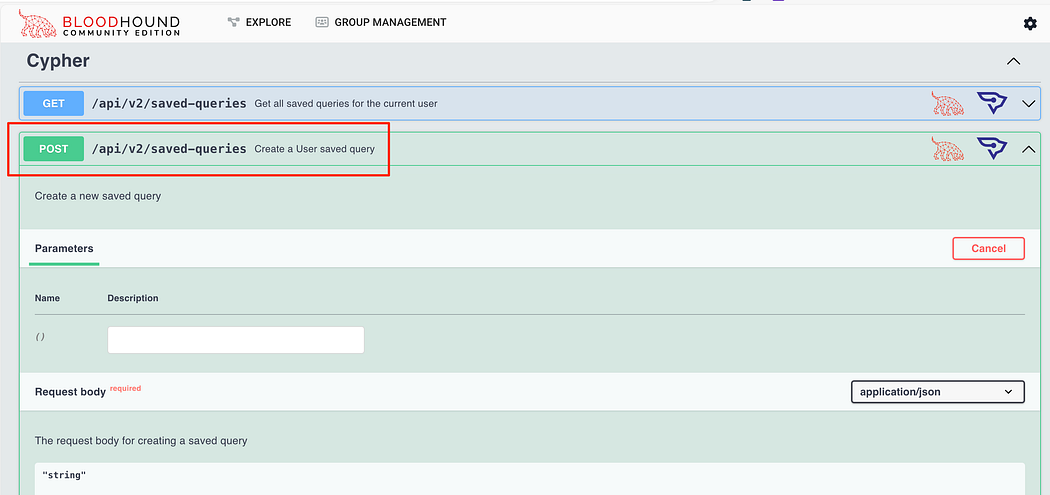
As far as actually uploading these, we can use the curl command below to create one uploaded to the GUI. Note that you will need your JWT.
就实际上传这些内容而言,我们可以使用下面的 curl 命令创建一个上传到 GUI 的文件。请注意,您将需要您的 JWT。
curl -X 'POST' \ 'http: -H 'accept: application/json' \ -H 'Content-Type: application/json' \ -H 'Authorization: Bearer {{token}}' \ -d '{"name":"New Query via API", "query":"CYPHER CODE HERE"}'
This is great to upload one or two queries, but would be terrible to do for hundreds of them. So instead, let’s use our python scripting skills. I’ll probably put this in a follow-up blog post 😁
上传一两个查询很好,但对于数百个查询来说就很糟糕了。因此,让我们使用我们的 python 脚本编写技能。我可能会把它放在后续的博客文章😁中
Neo4j Web Console Neo4j Web 控制台
In the event that we need to directly access the web console for Neo4j, we can do this by browsing to http://localhost:7474. For most scenarios, this is not necessary unless we need direct access to the database. This is the web interface for the Neo4j database and will allow us to run raw cypher queries and review the data. Log into this application with the default neo4j:bloodhoundcommunityedition creds in the docker-compose.yml file.
如果我们需要直接访问 Neo4j 的 Web 控制台,我们可以通过浏览 http://localhost:7474 来实现。在大多数情况下,除非我们需要直接访问数据库,否则这不是必需的。这是 Neo4j 数据库的 Web 界面,将允许我们运行原始密码查询并查看数据。使用 docker-compose.yml 文件中的默认 neo4j:bloodhoundcommunityedition creds 登录此应用程序。
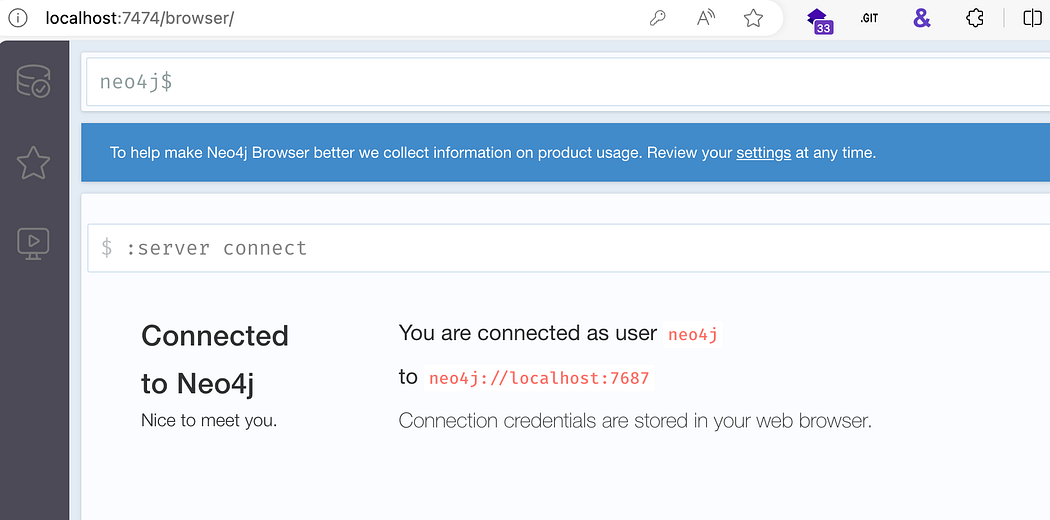
Connecting to the Neo4j web browser.
连接到 Neo4j Web 浏览器。
We can place the raw queries into the prompt and see the results, as well as all of the properties for each object returned.
我们可以将原始查询放入提示符中,并查看结果,以及返回的每个对象的所有属性。
Reviewing the properties for returned objects within the Neo4j web console.
在 Neo4j Web 控制台中查看返回对象的属性。
This can help us create and debug custom queries for BHCE. Again, access to the Neo4j web console is generally unnecessary in most scenarios, but it good to have as a backup if needed!
这可以帮助我们为 BHCE 创建和调试自定义查询。同样,在大多数情况下,访问 Neo4j Web 控制台通常是不必要的,但如果需要,最好将其作为备份!
Sample BHCE Data BHCE 数据示例
I’ve had a hard time locating sample data for BHCE online. There seems to be a significant amount of sample data for legacy BloodHound, but it’s harder to find for BHCE. To solve this, I’ve created a repo of sample data from the GOADv2 range.
我很难在网上找到 BHCE 的样本数据。旧版 BloodHound 似乎有大量样本数据,但更难找到 BHCE。为了解决这个问题,我创建了一个来自 GOADv2 范围的示例数据的存储库。
This data can be downloaded from the repository below:
这些数据可以从下面的存储库下载:
Clearing Data 清除数据
In most consulting environments, we’ll need to make sure we clear out the BloodHound data to keep data separated between customers. In the most recent release of BloodHound 5.8.0, this can now be accomplished entirely in the GUI.
在大多数咨询环境中,我们需要确保清除 BloodHound 数据,以保持客户之间的数据分离。在最新版本的 BloodHound 5.8.0 中,这现在可以完全在 GUI 中完成。
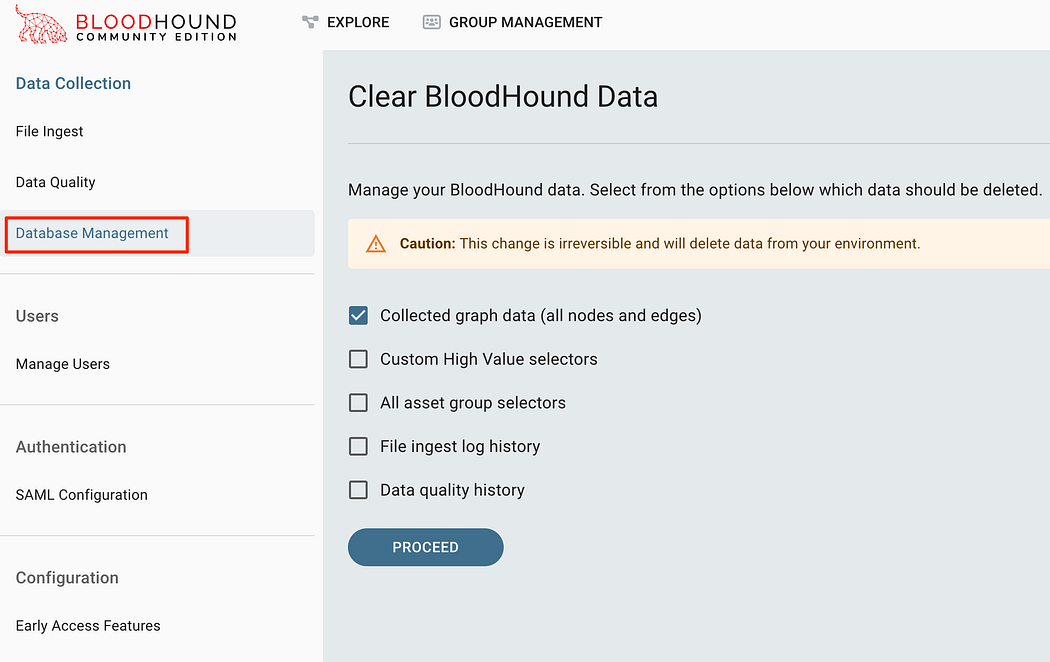
Ability to clear data directly from the GUI now exists as of 5.8.0
从 5.8.0 开始,现在可以直接从 GUI 清除数据
Prior to version 5.8.0, we needed to remove the volume used by BloodHound in order to clear this out. I’ve left these instructions in here in case someone else needs to know how to accomplish this, this is documented in issue #107 for BHCE as well.
在 5.8.0 版本之前,我们需要删除 BloodHound 使用的卷才能清除它。我把这些说明留在这里,以防其他人需要知道如何完成此作,这也记录在 BHCE 的 issue #107 中 。
Let’s start by listing the volumes in use by docker first:
让我们首先列出 docker 正在使用的卷:
docker volume ls
Within this data, we can see there are two volumes related to BloodHound.
在此数据中,我们可以看到有两个与 BloodHound 相关的卷。
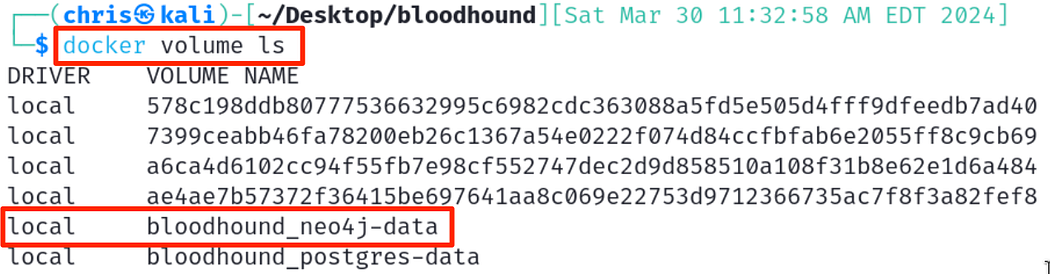
Identifying the Neo4j volume used by BloodHound
识别 BloodHound 使用的 Neo4j 卷
To remove this data and get a fresh instance of BloodHound data, we need to remove this volume. Note that the bloodhound_postgres-data volume is used for logging into the GUI and web application. We generally don’t want to remove this, unless you want everything reset.
要删除此数据并获取 BloodHound 数据的新实例,我们需要删除此卷。请注意,bloodhound_postgres 数据卷用于登录到 GUI 和 Web 应用程序。我们通常不想删除它,除非你想重置所有内容。
Let’s remove this volume to reset the data. We’ll use the command below to ask docker to remove this volume.
让我们删除此卷以重置数据。我们将使用以下命令要求 docker 删除此卷。
To simplify things, we can accomplish this all in a single one-liner.
为了简化事情,我们可以在一行代码中完成这一切。
docker volume rm $(docker volume ls -q | grep neo4j-data)
Nuke Everything Nuke 一切
If you want to nuke everything and pull a fresh copy of all containers, volumes, and configurations, follow these instructions. These assume that you have the docker-compose.yml file in the working directory.
如果您想 Nushell 所有内容并提取所有容器、卷和配置的新副本,请按照这些说明进行作。这些选项假定您在工作目录中有 docker-compose.yml 文件。
We need to first take the containers down and remove the volumes with the command below:
我们需要首先使用以下命令关闭容器并删除卷:
docker-compose down -v
After, we can pull a fresh copy of the containers with the pull command.
之后,我们可以使用 pull 命令拉取容器的新副本。
docker-compose pull
Then we can start the containers as usual, and we should have the latest version of the containers! Note that you will need to set the initial password again, since we removed those previous volumes.
然后我们可以像往常一样启动容器,我们应该拥有最新版本的容器!请注意,您需要再次设置初始密码,因为我们删除了以前的卷。
docker-compose up
Stopping Containers 停止容器
Stopping the containers is straight-forward, we can just ask docker to stop them. This will stop the containers from serving the application.
停止容器很简单,我们只需要求 docker 停止它们。这将阻止容器为应用程序提供服务。
docker compose stop
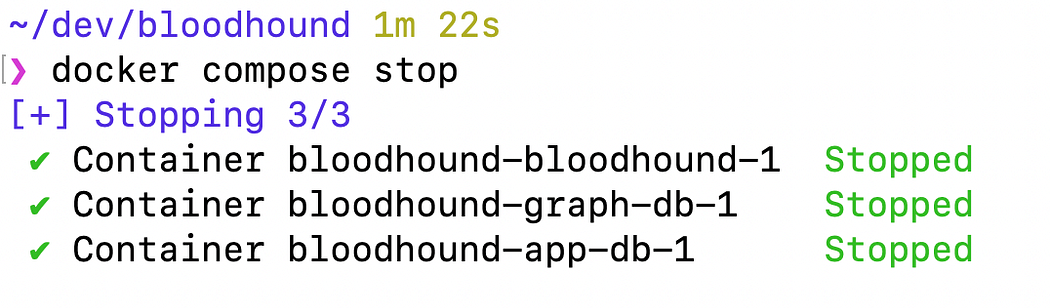
Stopping containers, nothing too fancy.
停止集装箱,没什么太花哨的。
Exposing to Others 向他人展示
In many consulting environments, we’ll want to share our instance of BHCE to others so they can all connect to one instance. By default, BHCE is only exposed to the localhost. To achieve this, we’ll need to modify the docker-compose.yml file to expose it to others.
在许多咨询环境中,我们希望将我们的 BHCE 实例共享给其他人,以便他们都可以连接到一个实例。默认情况下,BHCE 仅向 localhost 公开。为此,我们需要修改 docker-compose.yml 文件以将其公开给其他人。
By changing the line below within the bloodhound service, we can tell Docker Compose to expose the GUI to interfaces other than localhost. This is great if we’re planning on using a single server for many pentesters to use concurrently.
通过在 bloodhound 服务中更改以下行,我们可以告诉 Docker Compose 将 GUI 公开给 localhost 以外的接口。如果我们计划使用单个服务器供许多渗透测试人员同时使用,这非常有用。
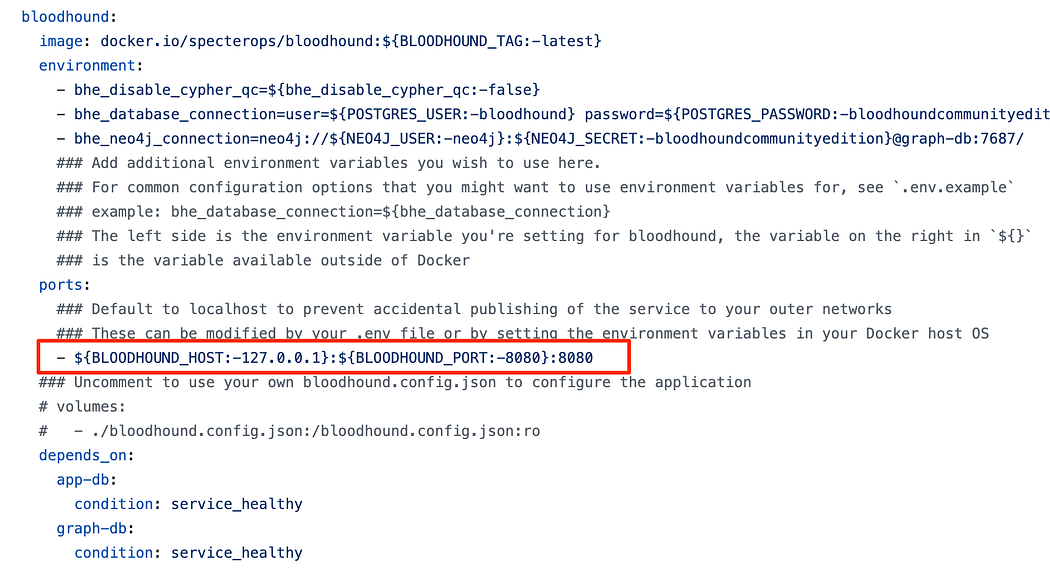
If we want to expose this to all interfaces, change the BLOODHOUND_HOST setting to 0.0.0.0. Note that this will expose it to the Internet if you have that server Internet accessible! Instead, it’s usually a better idea to bind it only to a VPN interface such as a WireGuard interface to limit exposure.
如果我们想将其公开给所有接口,请将 BLOODHOUND_HOST 设置更改为 0.0.0.0。 请注意,如果您可以访问该服务器 Internet,这会将其暴露给 Internet!相反,通常最好仅将其绑定到 VPN 接口(如 WireGuard 接口)以限制暴露。
Accessing the BHCE GUI across the network instead of only localhost
通过网络访问 BHCE GUI,而不仅仅是 localhost
Accelerating 加速
If you know me, you know that I live to accelerate processes and make things more gooder. So how do we leverage this to get things done faster?
如果你了解我,你就会知道我活着就是为了加速流程,让事情变得更美好。那么,我们如何利用这一点更快地完成工作呢?
AD-Miner AD-矿工
The AD-Miner toolset leverages the data within Neo4j to search for many known risks and escalation paths, then presents these findings within an HTML file with an overall score.
AD-Miner 工具集利用 Neo4j 中的数据来搜索许多已知的风险和升级路径,然后将这些发现显示在带有总分的 HTML 文件中。
We can run this by first installing the AD-Miner tool via pipx then providing the information to connect to the Neo4j database — these credentials are stored in the docker-compose.yml file. By default, they are neo4j:bloodhoundcommunityedition. Note that this is the password to the Neo4j database, no to the BHCE GUI!
我们可以通过首先通过 pipx 安装 AD-Miner 工具,然后提供信息以连接到 Neo4j 数据库来运行它——这些凭据存储在 docker-compose.yml 文件中。默认情况下,它们是 neo4j:bloodhoundcommunityedition .请注意,这是 Neo4j 数据库的密码,不是 BHCE GUI 的密码!
pipx install 'git+https://github.com/Mazars-Tech/AD_Miner.git'AD-miner -u neo4j -p bloodhoundcommunityedition -cf GOAD
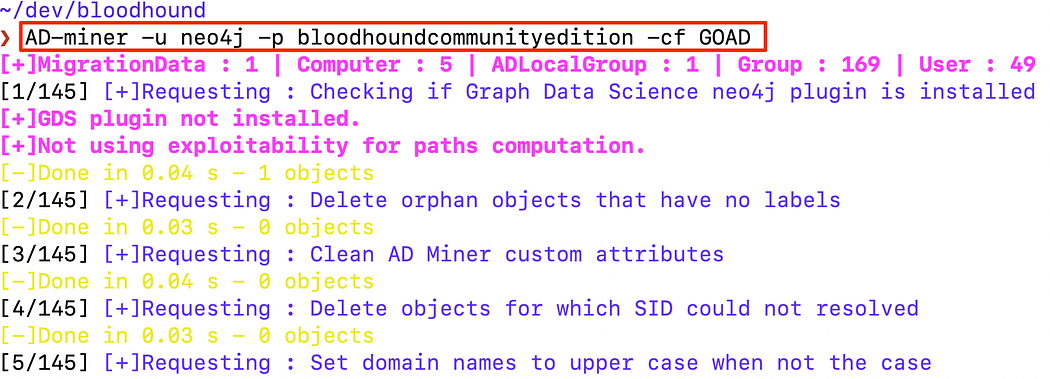
Running the AD-miner collection and analysis tool to generate the HTML file.
运行 AD-miner 采集和分析工具以生成 HTML 文件。
This can take a long time depending on the size of the environment — in some domains I’ve had to wait over 2 hours! Once this has completed, the files will be in a folder named render_GOAD using the label provided within the -cf switch. We can find this HTML file in the folder created.
这可能需要很长时间,具体取决于环境的大小 — 在某些域中,我不得不等待 2 个多小时!完成此作后,文件将使用 -cf 开关中提供的标签位于名为 render_GOAD 的文件夹中。我们可以在创建的文件夹中找到这个 HTML 文件。
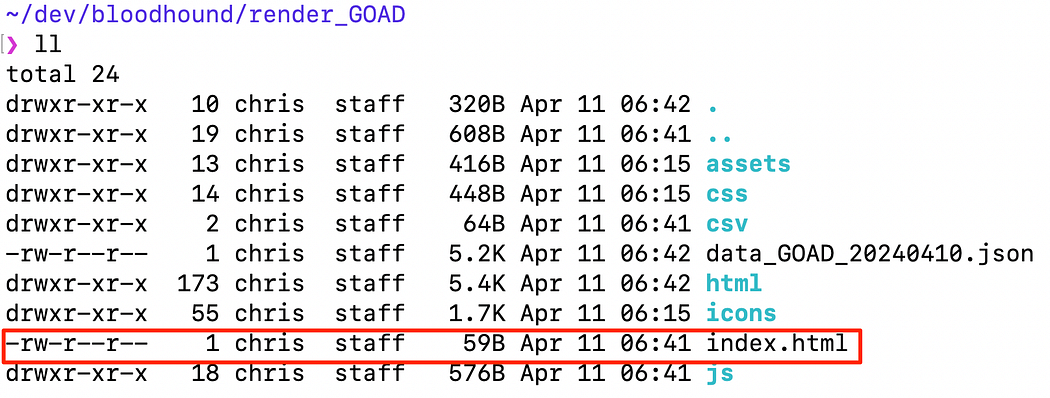
Finding the HTML file for the AD-Miner analysis
查找用于 AD-Miner 分析的 HTML 文件
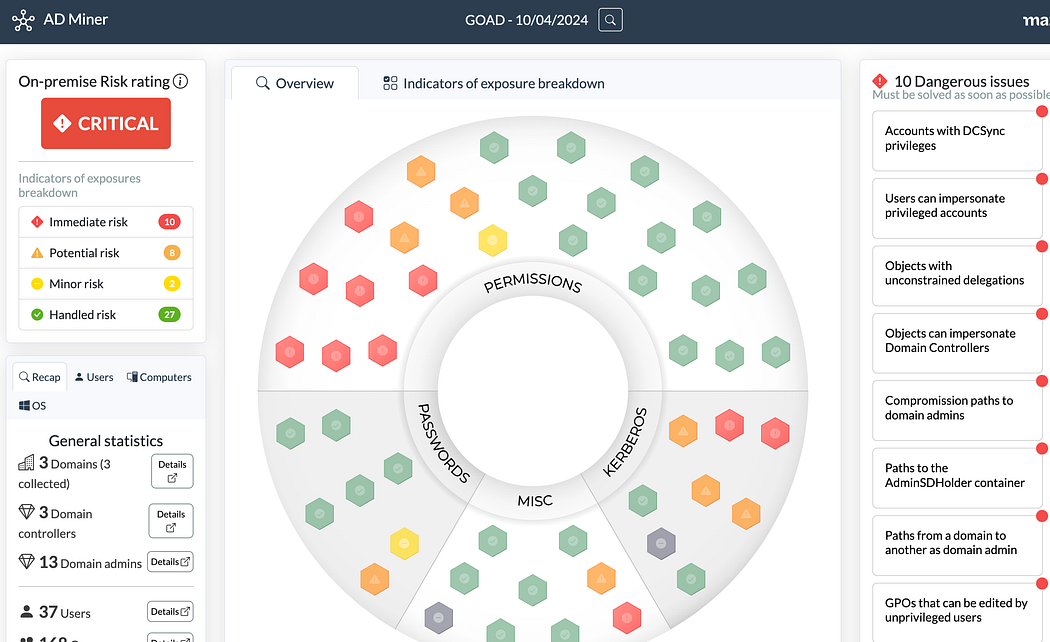
Analysis of GOAD based on Neo4j data
基于 Neo4j 数据的 GOAD 分析
How cool is that? We now have an interactive dashboard which brings the most critical misconfigurations to our attention. We can use all of this information to help customers and environments reduce risk and exposure.
那有多酷?我们现在有一个交互式仪表板,可以让我们注意到最关键的错误配置。我们可以使用所有这些信息来帮助客户和环境降低风险和暴露。
AD-Miner is a fantastic tool to help provided additional analysis and enrichment from the BloodHound data — definitely check it out!
AD-Miner 是一个很棒的工具,可以帮助从 BloodHound 数据中提供额外的分析和丰富 - 一定要检查一下!


 519
519

 被折叠的 条评论
为什么被折叠?
被折叠的 条评论
为什么被折叠?
 到【灌水乐园】发言


