


 本文详细介绍了一个基于Spring、Struts2和Hibernate(SSH)框架整合的实际案例。从项目的搭建开始,逐步介绍了如何配置web.xml和hibernate配置文件,实现数据库连接;如何编写实体bean并配置表映射关系;以及如何通过Spring进行Bean的注入,最终实现各层间的解耦合。
一,引入jar包
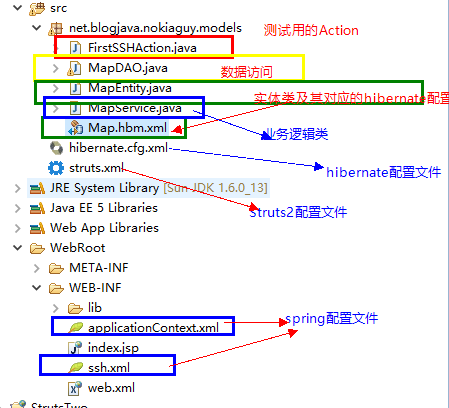
首先建立如下项目:
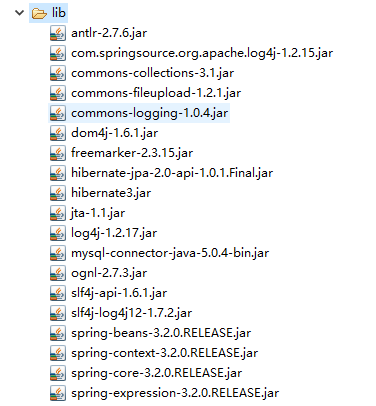
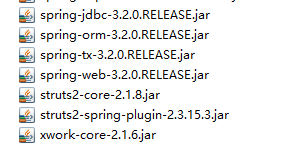
接着,在项目中引入如下jar包:
楼主本人属于比较笨的那种,总是引丢了。。
二,基本XML配置
1,首先是web.xml中,spring跟strut2的基本配置:
 <!-- spring 监听器的配置 -->
   <listener>
    <listener-class>
			org.springframework.web.context.ContextLoaderListener
		</listener-class>
  </listener>

  <!-- strut2配置 -->
  <filter>
    <filter-name>struts2</filter-name>
    <filter-class>org.apache.struts2.dispatcher.ng.filter.StrutsPrepareAndExecuteFilter</filter-class>
  </filter>
  <filter-mapping>
    <filter-name>struts2</filter-name>
    <url-pattern>*</url-pattern>
  </filter-mapping>
2,hibernate的连接配置
<?xml version="1.0" encoding="UTF-8"?>
<!--表明解析本XML文件的DTD文档位置,DTD是Document Type Definition 的缩写,即文档类型的定义,XML解析器使用DTD文档来检查XML文件的合法性。hibernate.sourceforge.net/hibernate-configuration-3.0dtd可以在Hibernate3.1.3软件包中的src\org\hibernate目录中找到此文件-->
<!DOCTYPE hibernate-configuration PUBLIC
          "-//Hibernate/Hibernate Configuration DTD 3.0//EN"
          "http://hibernate.sourceforge.net/hibernate-configuration-3.0.dtd">

<!--表明以下的配置是针对session-factory配置的,SessionFactory是Hibernate中的一个类,这个类主要负责保存HIbernate的配置信息,以及对Session的操作-->
<hibernate-configuration>
<!--配置数据库的驱动程序,Hibernate在连接数据库时,需要用到数据库的驱动程序-->
	<session-factory>
		 <!--设置数据库的连接url:jdbc:mysql://localhost/**,其中localhost表示mysql服务器名称,此处为本机,    **是数据库名-->
		<property name="connection.url">
			jdbc:mysql://localhost/testhibernate
		</property>

		<!--hibernate.dialect 只是Hibernate使用的数据库方言,就是要用Hibernate连接那种类型的数据库服务器。-->
		<property name="dialect">
			org.hibernate.dialect.MySQLDialect
		</property>

		<property name="connection.username">root</property>
		<property name="connection.password"></property>
		<!-- 显示hibernate生产的SQL语句 -->
		<property name="show_sql">true</property>
		<property name="connection.driver_class">
			com.mysql.jdbc.Driver
		</property>
		<!-- 指定Map.hbm.xml的位置 -->
		<mapping resource="net/blogjava/nokiaguy/models/Map.hbm.xml"/>
	</session-factory>
</hibernate-configuration>
3,编写实体bean,配置bean跟表的对应关系
  <hibernate-mapping>
    	<class name="net.blogjava.nokiaguy.models.MapEntity" table="t_map">
    		<!-- 将id属性应射成自增类型 -->
    		<id name="id" column="id" type="int">
    			<generator class="increment"/>
    		</id>
    		<property name="keyword" column="keyword"/>
    		<property name="value" column="value"/>
    	</class>
    </hibernate-mapping>
三,编写各层类
1,数据访问DAO
package net.blogjava.nokiaguy.models;

import java.util.List;

import org.springframework.orm.hibernate3.HibernateTemplate;

public class MapDAO {

	private HibernateTemplate template; //需要spring-orm.jar包
	public MapDAO(HibernateTemplate template){
		this.template=template;
	}
	public String getValue(String keyword)

	{
		//在Spring中,不直接对Hibernate的Session进行操作,而是提供一个HibernateTemplate类来对Hibernate的Session进行操作。
		List value=template.find("select a.value from MapEntity a where a.keyword=?",keyword); //注意引入spring-tx..这个开头的jar包
		if(value.size()>0){
			return String.valueOf(value.get(0));
		}
		return null;

	}
}
2,业务逻辑Bean
package net.blogjava.nokiaguy.models;

public class MapService {
	private MapDAO dao;
	public MapService(MapDAO dao){
		this.dao=dao;
	}
	//验证value是否等于lhc
	public boolean validate(String keyword){
		String value=dao.getValue(keyword);
		//业务逻辑。。。。
		if(value==null){
			return false;
		}else if("lhc".equalsIgnoreCase(keyword)){
			return true;
		}
		return true;
	}
}
3,控制层Bean
package net.blogjava.nokiaguy.models;
import javax.servlet.http.HttpServletRequest;
import org.apache.struts2.interceptor.ServletRequestAware;
import org.springframework.context.ApplicationContext;
import org.springframework.web.context.support.WebApplicationContextUtils;

public class FirstSSHAction implements ServletRequestAware {
	private HttpServletRequest request;

	public String execute(){
		//获得ApplicationContext对象
		ApplicationContext applicationContext=WebApplicationContextUtils.getWebApplicationContext(request.getSession().getServletContext());
		//获得MapService对象
		MapService mapService=(MapService)applicationContext.getBean("mapService");
		//调用MapService类的validate方法,并在console中输出返回值
		System.out.println(mapService.validate("lhc"));

		return "success";
	}
	public void setServletRequest(HttpServletRequest request) {
		// TODO Auto-generated method stub
		this.request = request;
	}
}
四,Spring注入Bean
如上代码,我们在获得ApplicationContext对象之后,通过这个对象的getBean方法,传入我们配置文件中配置的Bean的ID来注入Bean。
我们在ssh.xml文件中添加如下注入方式:
<?xml version="1.0" encoding="UTF-8"?>
<beans xmlns="http://www.springframework.org/schema/beans"
	xmlns:xsi="http://www.w3.org/2001/XMLSchema-instance"
	xmlns:context="http://www.springframework.org/schema/context"
	xmlns:aop="http://www.springframework.org/schema/aop"
	xmlns:tx="http://www.springframework.org/schema/tx"
	xsi:schemaLocation="http://www.springframework.org/schema/beans
	http://www.springframework.org/schema/beans/spring-beans.xsd
	http://www.springframework.org/schema/context
	http://www.springframework.org/schema/context/spring-context.xsd
	http://www.springframework.org/schema/aop
	http://www.springframework.org/schema/aop/spring-aop.xsd
	http://www.springframework.org/schema/tx
	http://www.springframework.org/schema/tx/spring-tx.xsd">


<!-- 装配Session工厂对象,用于创建Hibernate Session对象 -->
<bean id="sessionFactory" class="org.springframework.orm.hibernate3.LocalSessionFactoryBean">
	<property name="configLocation" value="classpath:hibernate.cfg.xml">
	</property>
</bean>

<!-- 装配HibernateTemplate对象,该对象需要装配一个sessionFactory属性 -->
<bean id="hibernateTemplate" class="org.springframework.orm.hibernate3.HibernateTemplate">
	<property name="sessionFactory" ref="sessionFactory"></property>
</bean>

<!-- 装配数据访问层组件 -->
<bean  id="mapDAO" class="net.blogjava.nokiaguy.models.MapDAO">
	<constructor-arg>
		<!-- 通过构造方法的参数将HibernateTemplate对象传入数据访问层组件 -->
		<ref bean="hibernateTemplate"/>
	</constructor-arg>
</bean>

<!-- 装配业务逻辑层组件 -->
<bean id="mapService" class="net.blogjava.nokiaguy.models.MapService">
	<constructor-arg>
		<!--将构造方法的参数MapDAO对象传入业务逻辑层 -->
		<ref bean="mapDAO"/>
	</constructor-arg>
</bean>

</beans>
当在action中调用业务逻辑层组件的时候,通过spring初始化了DAO层组件,而初始化DAO层Bean的时候,我们又需要之前spring初始化Hibernate组件的结果作为参数。
在这个XML文件中,我们将各层bean直接的依赖关系通过xml写在这里,一旦某曾出现变动,直接编写新的bean,更改这里的配置文件,完美实现各层的解耦合。
PS:为了完成这个Demo,还需将这个配置文件引入applicationContext.xml文件:
<import resource="ssh.xml"/><!-- 导入ssh.xml文件 -->
+在strut2.xml文件中配置action与jsp页面的对应关系。
待续。。。


 1183
1183


 到【灌水乐园】发言


