Gradle: SDK location not found, 问题与解决

本文介绍了解决Gradle项目中SDK位置未找到错误的方法。通过设置环境变量ANDROID_HOME及创建local.properties文件指定SDK路径,成功解决了跨平台项目配置问题。

摘要生成于 C知道 ,由 DeepSeek-R1 满血版支持, 前往体验 >

原文链接

https://xinyustudio.wordpress.com/2014/07/02/gradle-sdk-location-not-found-the-problem-and-solution/


我是在cocos3.10新建项目无法用android studio打开时遇到的。

原文中写的非常清楚和详细。非常感谢原作者!


In a recent project, I created a Gradle project in windows, but when I load the project in Ubuntu and Mac OSX, an error “SDK location not found. Define location with sdk.dir in the local.properties file or with an ANDROID_HOME environment variable”

问题图片

image

I then followed the instruction, and in the ~/.bashrc file, I added the environment variable ANDROID_HOME

我然后修改了 ~/.bashrc file来添加环境变量

(我是在终端中输入  open .bash_profile  后在里面加入了  export ANDROID_HOME=/user...你的sdk地址

image

And then I sourced this file in the terminal:

source ~/.bashrc

When rebuilding the gradle model, the same problem persists!

To troubleshoot this, I then followed the instruction as shown in the first snapshot:

  • Create a new file called local.properties in the root folder of the gradle project

image   image
  Before adding local.properties                     After adding local.properties 

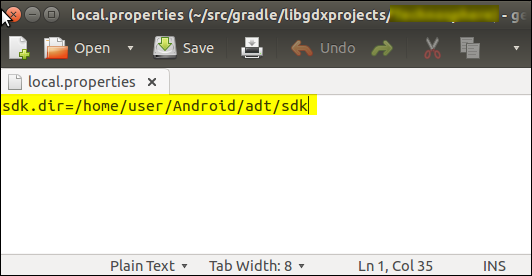
  • Edit the newly created local.properties file, add the single line as following:
  • 在新项目中新建一个  local.properties 文件,在里面添加一行代码

sdk.dir=/home/user/Android/adt/sdk

image

where “/home/user/Android/adt/sdk” is the path where installed the Android SDK.

/home/user/Android/adt/sdk是你的sdk路径

  • Rebuild the model, now it works!

This approach is also applicable to Mac OSX!

image

image

Happy coding!

大功告成
### 解决方案 当遇到 `com.android.tools.build:gradle:7.3.3` 找不到的问题时,通常是因为本地环境配置不匹配或者网络连接问题导致无法下载所需的依赖项。以下是详细的分析和解决办法: #### 1. 检查 Gradle 版本兼容性 确保所使用的 Gradle Wrapper 的版本 Android Gradle 插件 (AGP) 兼容。可以通过修改 `gradle-wrapper.properties` 文件来指定正确的 Gradle 版本。例如,在该文件中设置如下内容[^3]: ```properties distributionUrl=https\://services.gradle.org/distributions/gradle-7.5-bin.zip ``` 对于 AGP 7.3.x,推荐使用 Gradle 7.5 或更高版本。 --- #### 2. 修改 build.gradle 中的插件版本 确认项目根目录下的 `build.gradle` 文件中指定了正确的 AGP 版本。如果当前版本为 7.3.3,则应将其更新到稳定版(如 7.4.2)。示例代码如下[^2]: ```groovy plugins { id 'com.android.application' version '7.4.2' apply false id 'com.android.library' version '7.4.2' apply false } ``` 注意:如果确实需要使用 7.3.3,请先验证其是否存在官方 Maven 存储库中。可以访问 [Maven Central](https://search.maven.org/) 进行查询。 --- #### 3. 配置 JDK 版本一致性 有时错误可能是由于 JDK 版本不一致引起的。建议通过以下方式统一 JDK 设置[^4]: - **方法一**:在 Android Studio 中调整 JDK 路径。 - 点击菜单栏中的 `File -> Project Structure -> SDK Location`。 - 将 `JDK location` 和 `Gradle user home` 设定为相同版本的 JDK 目录。 - **方法二**:在 `local.properties` 文件中显式声明 JDK 路径。例如: ```properties sdk.dir=/path/to/android/sdk java.home=/path/to/jdk ``` --- #### 4. 清理缓存并重新同步 执行以下命令清理旧的构建缓存并强制刷新依赖项: ```bash ./gradlew clean --refresh-dependencies ``` 此操作会清除现有的依赖项缓存,并尝试从远程仓库重新拉取所需的内容。 --- #### 5. 替代存储库地址 某些情况下可能因网络原因无法正常访问默认的 Maven 中央仓库。可以在 `build.gradle` 文件中添加备用镜像源。例如: ```groovy repositories { mavenCentral() google() maven { url 'https://dl.bintray.com/kotlin/kotlin-eap/' } maven { url 'https://jitpack.io' } } ``` --- #### 6. 使用离线模式排查 如果始终无法解决问题,可切换至离线模式测试是否有其他潜在冲突。启用离线模式的方法包括: - 在终端运行命令时附加参数: ```bash ./gradlew assembleDebug --offline ``` - 或者在 Android Studio 中勾选 `Settings -> Build, Execution, Deployment -> Gradle -> Offline work`。 --- ### 总结 综合来看,`com.android.tools.build:gradle:7.3.3 not found` 的主要原因是版本不存在或未正确配置相关工具链。优先升级到最新稳定的 AGP 版本(如 7.4.2),同时确保 Gradle、JDK 和网络资源的一致性和可用性。 ---
评论
添加红包

请填写红包祝福语或标题

红包个数最小为10个

红包金额最低5元

当前余额3.43前往充值 >
需支付:10.00
成就一亿技术人!
领取后你会自动成为博主和红包主的粉丝 规则
hope_wisdom
发出的红包
实付
使用余额支付
点击重新获取
扫码支付
钱包余额 0

抵扣说明:

1.余额是钱包充值的虚拟货币,按照1:1的比例进行支付金额的抵扣。
2.余额无法直接购买下载,可以购买VIP、付费专栏及课程。

余额充值